CleanCraft SSM 281 User manual
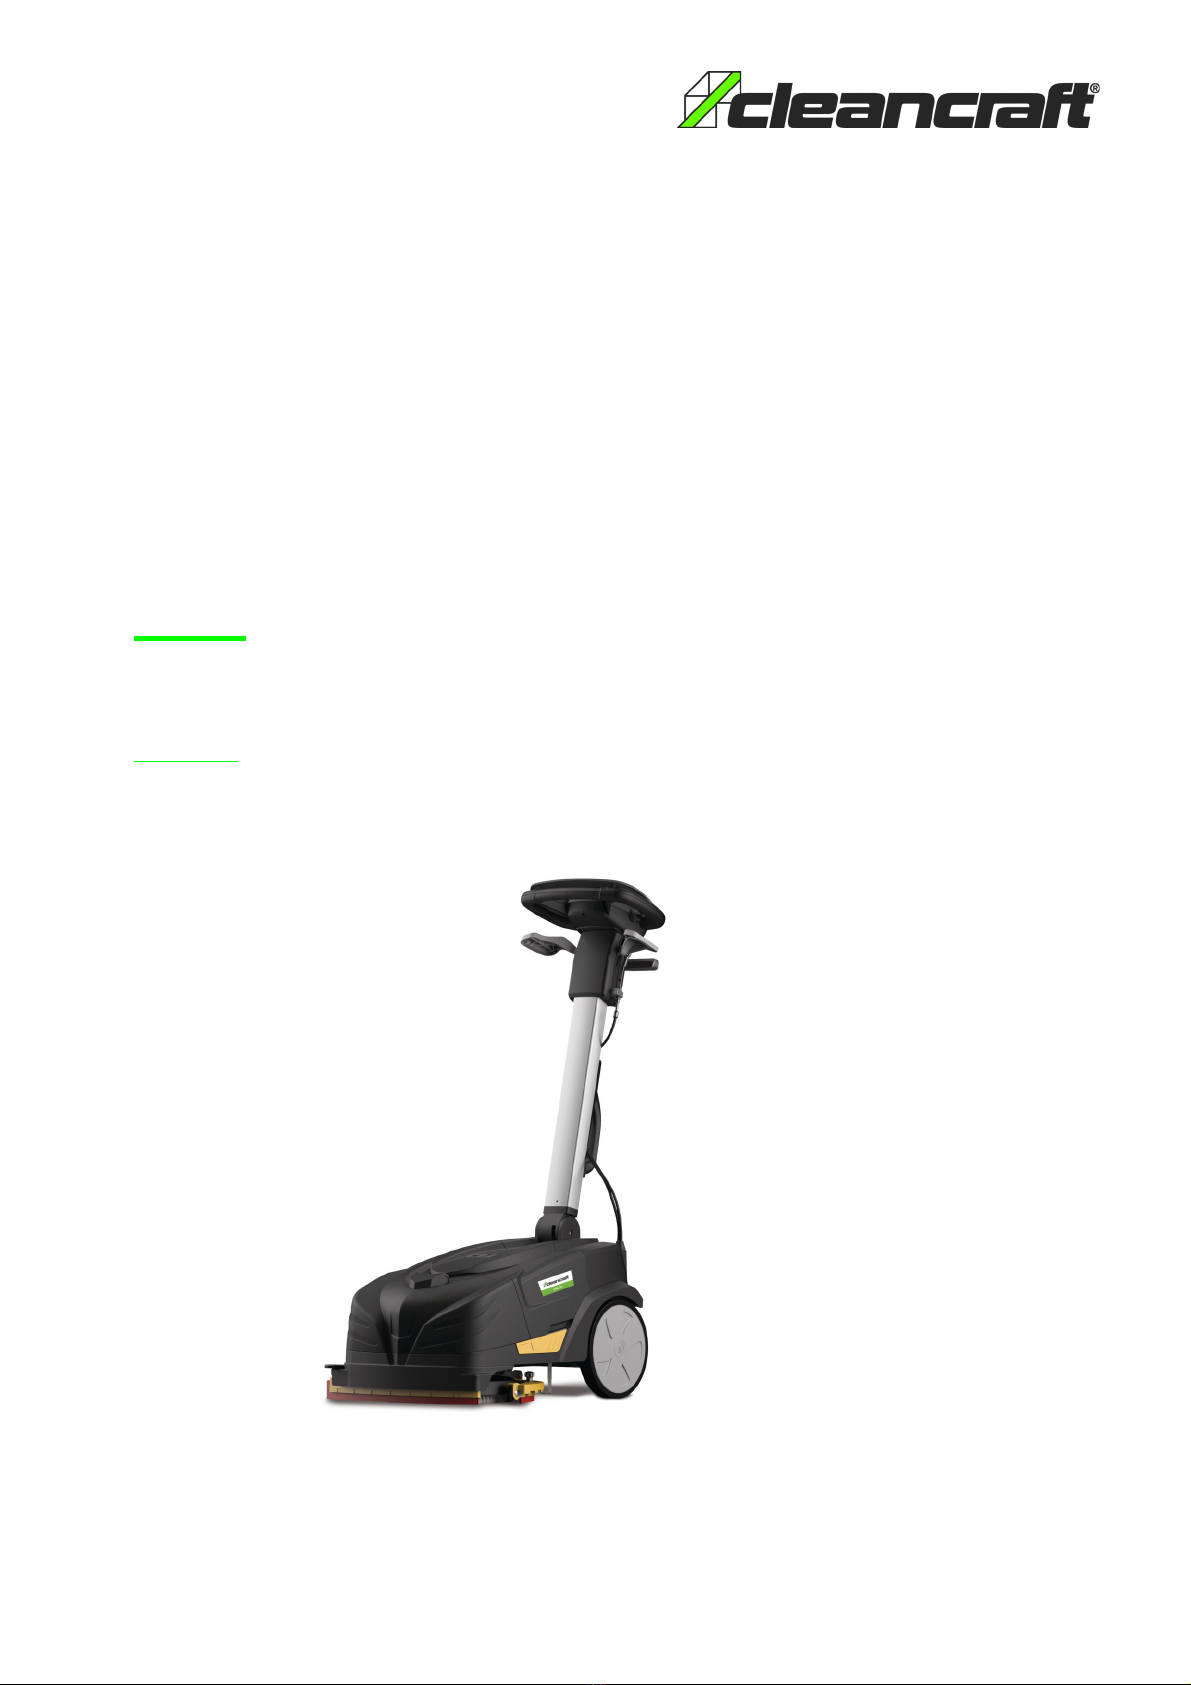
Scrubbing vacuum cleaning machine
SSM 281
Operating Instructions
SSM 281
SSM 281

2 SSM 281 | Version 1.02
Imprint
Product identification
Machine type Item number
SSM 281 7252128
Manufacturer
St rmer Maschinen GmbH
Dr.-Robert-Pfleger-Str. 26
D-96103 Hallstadt
Fax: 0049 (0) 951 96555 - 55
E-Mail: [email protected]
Internet: www.cleancraft.de
Indications regarding the operating instructions
Original instruction
Edition: 23.02.2021
Version: 1.02
Language: English
Author: RL
Indications regarding the copyright
Copyright © 2021 St rmer Maschinen GmbH, Hallstadt,
Germany.
The contents of these operating instructions is the sole
property of the company St rmer Maschinen GmbH.
Passing on as well as copying of this document, the use
and distribution of its content are prohibited if not expli-
citly permitted. Contraventions are liable to compensa-
tion.
Subject to technical modifications and error.
Content
1 Introduction..................................................................3
1.1 Copyright ............................................................ 3
1.2 Costumer service................................................ 3
1.3 Limitation of liability............................................. 3
2 Safety............................................................................3
2.1 Symbol explanation ............................................ 3
2.2 Obligations of the operating company ................ 4
2.3 Qualification of the staff ...................................... 5
2.4 Personal protective equipment ........................... 5
2.5 General safety instructions ................................. 5
2.6 Safety markings on the machine ........................ 6
2.7 Battery safety notes............................................ 6
2.8 Safety data sheets.............................................. 7
3 Intended Use ................................................................7
3.1 Misuse ................................................................ 7
3.2 Residual risks ..................................................... 7
4 Technical Data .............................................................8
4.1 Table................................................................... 8
4.2 Type plate........................................................... 8
Transport, Packaging, Storage...................................8
5.1 Transport ............................................................ 8
5.2 Packaging........................................................... 8
5.3 Storage ............................................................... 8
6 Description ...................................................................9
6.1 Scope of delivery .............................................. 10
6.2 Optional Accessoires........................................ 10
7 Before Commissioning .............................................10
7.1 Unpacking the machine .................................... 10
7.2 Assembling the machine................................... 10
7.3 Parking position of machine.............................. 11
7.4 Adjusting angle of the handle ........................... 11
7.5 Mounting the brush........................................... 12
7.6 Dirty water / Detergent tank.............................. 12
7.7 Adjusting the drive ............................................ 13
7.8 Battery charge indication (1, Fig. 3).................. 14
7.9 Care by cleaning............................................... 14
8 Operating....................................................................14
8.1 Description of the function keys........................ 14
8.2 Working with the machine................................. 14
8.3 Finishing work................................................... 15
9 Maintenance and Service/Repair..............................16
9.1 Cleaning the float.............................................. 16
9.2 Cleaning the water/cleaning agent tank filter.... 16
9.3 Cleaning the suction filter ................................. 16
9.4 Cleaning the suction hoses............................... 16
9.5 Cleaning the diverter valve ............................... 17
9.6 Cleaning the squeegee ledges ......................... 18
9.7 Adjusting the squeegee ledge .......................... 18
9.8 Replacing the suction lips................................. 18
9.9 Replace brush................................................... 19
10 Malfunctions, Possible Causes and Measures .....20
10.1 Troubleshooting.............................................. 20
11 Disposal, Recycling of old Equipment ..................22
11.1 Decommissioning ........................................... 22
11.2 Disposal of electrical equipment..................... 22
12 Spare Parts...............................................................22
12.1 Ordering spare parts....................................... 22
12.2 Spare parts drawings...................................... 23
13 Electrical circuit diagram ........................................34
14 EC - Declaration of Conformity ..............................3

Introduction
SSM 281 | Version 1.02 3
1 Introduction
You have made a good choice by purchasing the
CLEANCRAFT Scrubbing vacuum cleaning machine.
Read the operating manual thoroughly before com-
missioning the machine.
It gives you information about the proper commission-
ing, intended use and safe and efficient operation and
maintenance of your Scrubbing vacuum cleaning ma-
chine.
The operating manual is part of the Scrubbing vacuum
cleaning machine package. Always keep this operating
manual in the location where your Scrubbing vacuum
cleaning machine is being operated. All local accident
prevention regulations and general safety instructions for
the operating range of your Scrubbing vacuum cleaning
machine must also be complied with.
Illustrations in this operating manual serve the general
understanding and may deviate from the actual design.
1.1 Copyright
The contents of these instructions are copyright. They
may be used in conjunction with the operation of the
Scrubbing vacuum cleaning machine. Any application
beyond those described is not permitted without the writ-
ten approval of St rmer Maschinen GmbH. For the pro-
tection of our products, we shall register trademark, pa-
tent and design rights, as this is possible in individual
cases. We strongly oppose any infringement of our intel-
lectual property.
1.2 Costumer service
If you have questions about your machine or technical in-
formation, please contact your dealer. There you will be
happy to help with expert advice and information.
Germany:
St rmer Maschinen GmbH
Dr.-Robert-Pfleger-Str. 26
D-96103 Hallstadt
Repair-Service:
Fax: 0049 (0) 951 96555-111
Email: [email protected]
Internet: www.cleancraft.de
Spare parts orders:
Fax: 0049 (0) 951 96555-119
Email: ersatz[email protected]
We are always interested in valuable experience and
knowledge gained from using the application-which then
could be shared and be valuable to develop our products
even further.
1.3 Limitation of liability
All information and notes in these operating instructions
were summarised while taking applicable standards and
rules, the state-of-the-art technology and our longterm
knowledge and experiences into consideration.
In the following cases the manufacturer is not liable for
damages:
- Non-observance of the operating instructions,
- Inappropriate use
- Use of untrained staff,
- Unauthorised modifications
- Technical changes,
- Use of not allowed spare parts.
The actual scope of delivery may deviate from the ex-
planations and presentations described here in case of
special models, when using additional ordering options
or due to latest technical modifications.
The obligations agreed in the delivery contract, the gen-
eral terms and conditions as well as the delivery condi-ti-
ons of the manufacturer and the legal regulations at the
time of the conclusion of the contract are applicable.
2 Safety
This section provides an overview of all important safety
packages for the protection of operating personnel as
well as for safe and fault-free operation. Other task-ba-
sed safety notes are included in the paragraphs of the in-
dividual phases of life.
2.1 Symbol explanation
Safety instructions
The safety notes in these operating instructions are high-
lighted by symbols. The safety notes are introduced by
signal words which express the concern of the risk.
ANGER!
This combination of symbol and signal words indi-
cates an imminently dangerous situation which may
lead to death or severe injury if not avoided.

4 SSM 281 | Version 1.02
Safety
Tips and recommenations
To reduce the risk of personal injury and property da-
mage and to avoid dangerous situations, the safety inst-
ructions in this manual must be observed.
2.2 Obligations of the operating company
The operating company is the person who operates the
Scrubbing vacuum cleaning machine for business or
commercial reasons by herself, or leaves it to a third
party for use or application, and who bears the legal pro-
duct responsibility for the protection of the user, the staff
or for third parties.
Obligations of the operator:
If the machine is used in the commercial sector, the ope-
rator of the machine is subject to the legal obligations for
occupational safety.
For this reason, the safety instructions in this operating
manual as well as the safety, accident prevention and
environmental protection regulations applicable to the
area of application of the machine must be observed.
The following applies in particular:
- The operating company must be informed about
the applying industrial safety regulations and fur-
ther analyse hazards resulting from the special
working conditions at the place of use of the Scrub-
bing vacuum cleaning machine. She must imple-
ment these in form of operating manuals for the
operation of the Scrubbing vacuum cleaning ma-
chine.
- During the entire lifetime the Scrubbing vacuum
cleaning machine, the operating company must
verify whether the operating manuals prepared by
her correspond to the current status of the regulati-
ons, and must adapt these if necessary.
- The operating company must unambiguously regu-
late and determine the responsibilities for installa-
tion, operation, troubleshooting, maintenance and
cleaning.
- The operating company must ensure that all per-
sons who work with the Scrubbing vacuum clea-
ning machine, have read and understood this ma-
nual. Furthermore she must instruct the staff in re-
gular intervals and inform them about the hazards.
Furthermore the operating company is responsible to
keep the Scrubbing vacuum cleaning machine always in
a technically flawless state. Thus, the following applies:
- The operator must ensure that the maintenance in-
tervals described in this manual are kept.
- The operator must have all safety devices checked
regularly for their good working order and their in-
tegrity.
WARNING!
This combination of symbol and signal words indi-
cates a potentially dangerous situation which may
lead to death or severe injury if not avoided.
CAUTION!
This combination of symbol and signal words indi-
cates a potentially dangerous situation which may
lead to slight or minor injury if not avoided.
ATTENTION!
This combination of symbol and signal words indi-
cates a possibly dangerous situation which may lead
to property and environmental damages if they are
not avoided.
NOTE!
This combination of symbol and signal words indi-
cates a potentially dangerous situation which may
lead to material or environmental damage if not avoi-
ded.
Tips and recommendations
This symbol highlights useful tips and recommendati-
ons as well as information for efficient and trouble-
free operation.

Safety
SSM 281 | Version 1.02 5
2.3 Qualification of the staff
The different tasks described in this manual represent
different requirements to the qualification of the persons
entrusted with these tasks.
Only persons reliable working procedures can be ex-
pected from, are allowed to perform all works. Persons
the responsiveness of which is affected by e. g. drugs,
alcohol or medication, are not allowed to work with the
machine.
The qualifications of the personnel for the different tasks
are mentioned below:
Operator
The operator is instructed by the operating company ab-
out the assigned tasks and possible risks in case of im-
proper behaviour. Any tasks which need to be performed
beyond the operation in the standard mode must only be
performed by the operator if it is indicated in these inst-
ructions and if the operating company expressively com-
missioned the operator.
Electrically qualified person
Electrically qualified person is due to their professional
training, knowledge and experience as well as knowl-
edge of the relevant standards and regulations, in a po-
sition to carry out work on the electrical systems and to
independently recognize and avoid possible dangers.
Qualified personnel
Due to their professional training, knowledge and expe-
rience as well as their knowledge of relevant regulations
the specialist staff is able to perform the assigned tasks
and to recognise and avoid any possible dangers them-
selves.
Manufacturer
Certain works may only be performed by specialist per-
sonnel of the manufacturer. Other personnel is not au-
thorized to perform these works. Please contact our cus-
tomer service for the execution of all arising work.
2.4 Personal protective equipment
The personal protective equipment serves to protect per-
sons against impairments of safety and health while wor-
king. The staff member has to wear personal protective
equipment while performing different tasks on and with
the machine which are indicated in the individual para-
graphs of these instructions.
The personal protective equipment is explained in the
following paragraph:
2. General safety instructions
The following must be observed:
- Use the guards and fasten them securely. Never
work without guards and keep them in working or-
der.
- Always keep the machine an the work environment
clean. Always ensure that there is sufficient lighting.
- The scrubbing vacuum cleaning machine must not
be modified in its design and must not be used for
purposes other than those intended by the manu-
facturer.
- Never work under the influence of diseases that may
impair concentration, fatigue, drugs, alcohol or me-
dication.
- Keep children and persons unfamiliar with the scrub-
bing vacuum cleaning machine away from the work
area.
- Do not pull on the power cord to unplug it from the
wall socket. Protect the cord from heat, oil and sharp
edges.
- Immediately rectify any faults that affect safety.
- Make sure that the machine is operated in a suitable
power supply network.
- Protect the scrubbing vacuum cleaning machine
from moisture (risk of short circuit).
WARNING!
anger in case of insufficient quali-
fication of the staff!
Insufficiently qualified persons cannot estimate the
risks while using the single-disc machine and expose
themselves and others to the danger of severe or let-
hal injuries.
- Have all works only performed by qualified per-
sons.
- Keep insufficiently qualified persons out of the wor-
king area.
Protective gloves
The protective gloves serve to protect the hands
against sharp components as well as against fric-
tion, abrasions or deep injuries.
Safety boots
Safety boots protect the feet from being crushed, fal-
ling parts and slipping over on slippery ground.
Protective clothes
Protective clothes are made of a tightly fitted fabric
without the protruding parts of low tear strength.

6 SSM 281 | Version 1.02
Safety
- Do not use the machine in explosive atmospheres.
- Do not vacuum flammable liquids or hazardous pow-
der.
- To avoid the formation of harmful gases, do not mix
cleaning agents of different types.
- Do not bump against shelves or scaffolding where
there is a risk of objects falling.
- Do not use acidic or alkaline solutions that may da-
mage the machine and/or endanger people.
- Before each use, make sure that no parts of the
scrubbing vacuum cleaning machine are damaged.
Damaged parts must be replaced immediately to
prevent hazards.
- Do not overload the scrubbing vacuum cleaning ma-
chine! You will work better and safer in the specified
performance range.
- Use only original spare parts and accessories to
avoid possible hazards and risks of accidents.
- Always keep the ventilation slots of the machine
clean. Always remove dirt with the main switch tur-
ned off. Never operate the machine if the air flow is
blocked.
2.6 Safety markings on the scrubbing vacuum
cleaning machine
Safety labels and instructions are attached to the scrub-
bing vacuum cleaning machine (Fig. 1) that must be ob-
served and followed.
Fig. 1: Safety markings
2.7 Battery safety notes
- Take care when handling battery acid.
- Always keep the battery clean and dry to avoid leakage
currents on the surface.
- Protect the battery from contaminants such as metal
dust.
- Do not place tools on the battery. There is a risk of short
circuit and explosion.
- Only use the supplied charger to charge the battery.
- If the mains cable is damaged, do not use the charger.
To replace the cable, contact the Customer Service
Centre.
- Make sure that the battery charger sockets are properly
earthed and protected by a thermal magnetic switch.
ATTENTION!
Make sure that the brushes do not rotate when the
machine is at a standstill so that the floor is not
damaged!
Avoid any contact with moving parts of the machine
(brushes and drive).
Keep hair, loose clothing, fingers and all other body
parts away from slots and moving parts.
Set the speed according to the grip of the floor.
Do not use the machine on floors with a slope of
more than 2%.
ATTENTION!
This machine should be stored taking into account its
weight, i.e. on a stable, safe, level surface and only
in storage places without moisture.
ATTENTION!
Do not use or store the unit outdoors or in a humid
environment.
Storage temperature: -25° C ~ +55° C.
Operating temperature: 0° C and +40° C at relative
humidity of 30% to 95%.
ATTENTION!
Never leave the machine unattended. Always unplug
the machine from the mains when not in use and
keep it out of the reach of children or unauthorised
persons.
ATTENTION!
In case of liquid or foam leakage, switch off the
machine immediately.
ATTENTION!
The unit is not suitable for environments protected
against electrostatic discharge.

Intended Use
SSM 281 | Version 1.02 7
2.8 Safety data sheets
Safety data sheets for hazardous goods can be obtained
from your specialist dealer or by calling +49 (0)951 /
96555-0.
Specialist dealers can find safety data sheets in the
download area of the partner portal.
3 Intended Use
The scrubbing vacuum cleaning machine is suitable for
sweeping, washing and drying flat, horizontal, smooth or
moderately rough, evenly textured and obstacle-free
floors in private and industrial premises.
The machine may only be used for cleaning in indoor
areas or at least covered areas. The scrubbing vacuum
cleaning machine must not be operated in explosive en-
vironments.
Intended use also includes compliance with all the infor-
mation in these instructions.
St rmer Maschinen GmbH accepts no liability for design
and technical modifications to the scrubbing vacuum
cleaning machine.
Claims of any kind for damage due to improper use are
excluded.
3.1 Misuse
3.2 Residual risks
There are residual risks, which are listed below, even if
all safety instructions are observed and the machine is
used according to the instructions:
- Risk of injury to upper limbs (e.g. hands, fingers).
- Risk of short-circuit between the battery terminals du-
ring charging.
- Skin irritation when using cleaning agents.
- Never clean floors with a height gradient greater than
that indicated on the machine.
- Do not use at altitudes above 2000m.
ATTENTION!
Any modification of the appliance is prohibited. Modi-
fication may result in fire and injury, including death,
to the user, in addition to invalidating the warranty.
The manufacturer accepts no liability for damage
caused to property or persons as a result of failure to
comply with these instructions or in the event of
misuse of the appliance.
WARNING!
anger in case of misuse!
Misuse of the scrubbing vacuum cleaning machine
can lead to dangerous situations.
- Only operate the scrubbing vacuum cleaning ma-
chine in the power range specified in the technical
data.
- Never bypass or override the safety devices.
- Only operate the scrubbing vacuum cleaning ma-
chine when it is in perfect working order.
ATTENTION!
- The machine is not suitable for vacuuming hazar-
dous dust or other hazardous materials. Never va-
cuum incandescent, flammable, explosive or toxic
substances. The maximum permissible tempera-
ture for use is 40°C / 104°F.
- Do not vacuum aggressive cleaning agents, as
these could damage the appliance.
- Do not vacuum any materials that could damage
the filter elements (e.g. glass splinters, metal, etc.).
8 SSM 281 | Version 1.02
Technical ata
4 Technical Data
4.1 Table
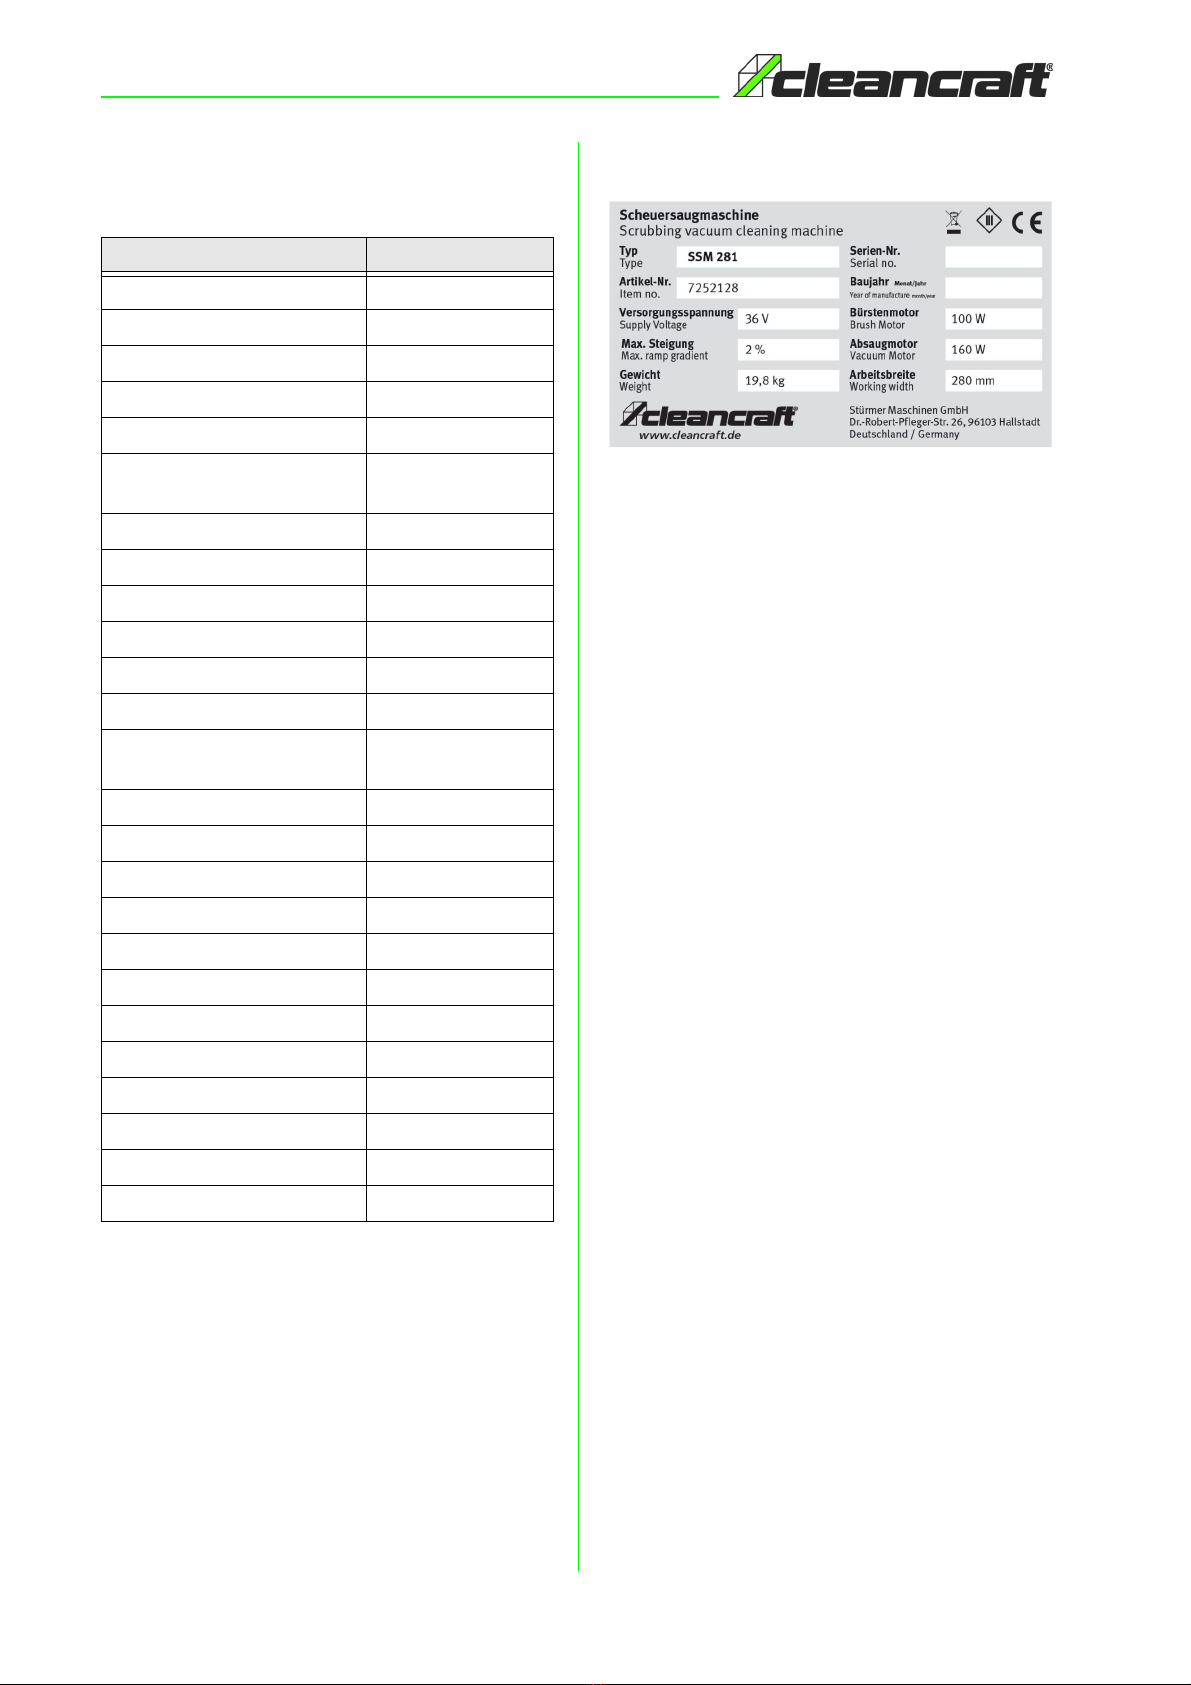
4.2 Type plate
Fig. 2: Type plate
Transport, Packaging, Storage
.1 Transport
Check the scrubbing vacuum cleaning machine for visible
transport damage after delivery. If you discover any da-
mage to the scrubbing vacuum cleaning machine, report
it immediately to the transport company or the dealer.
.2 Packaging
All packaging materials and packaging aids of the scrub-
bing vacuum cleaning machine are recyclable and must
always be recycled.
Shred cardboard packaging components and take them
to the waste paper collection.
The films are made of polyethylene (PE) and the padding
parts of polystyrene (PS). These materials should be ta-
ken to a collection point for recyclable materials or to
your local waste disposal company.
.3 Storage
Store the scrubbing vacuum cleaning machine in a dry,
clean and frost-free environment.
Model SSM 281
Length x Width/Depth x Height 758 x 376 x 392 mm
Net weight approx. 19,8 kg
Supply voltage 36 V
Cleaning surface 900 m
2
Working capacity 900 m²/h
Power supply Lithium-battery
(36V 5,5Ah)
Battery life max. 50 min
Battery recharge time 2 h
Power brushes motor 100 W
Vacuum power 160 W
Total output 220 W
Type of protection IPX3
Working width with central
brush
280 mm
Brush diameter 280 mm
Speed brushes 169 min
-1
Contact pressure brushes 10 kg
Contact pressure 30 g/cm
2
Squeegee width 380 mm
Vacuum 60 mbar
Speed max. 3,5 km/h
Maximum ramp gradient 2 %
Sound pressure level 63 dB(A)
Vibration level 1 m/s²
Solution tank 5 l
Greywater tank 5 l
escription
SSM 281 | Version 1.02 9
6 Description
The scrubbing vacuum cleaning machine sprays a solu-
tion of water and detergent in the correct concentration
onto the floor and finally removes the dirt by scrubbing.
Through careful selection of detergent and brushes (or
abrasive discs) from the range of accessories, the ma-
chine can be used on a variety of floor types and dirt.
The scrubbing vacuum cleaning machine has a wet sy-
stem that dries the floor immediately after washing. The
drying effect is generated by the suction motor, which
creates a partial vacuum in the dirty water tank. Suction
cups mounted below the tank are designed to pick up the
dirty water film as the machine moves forward and back-
ward.
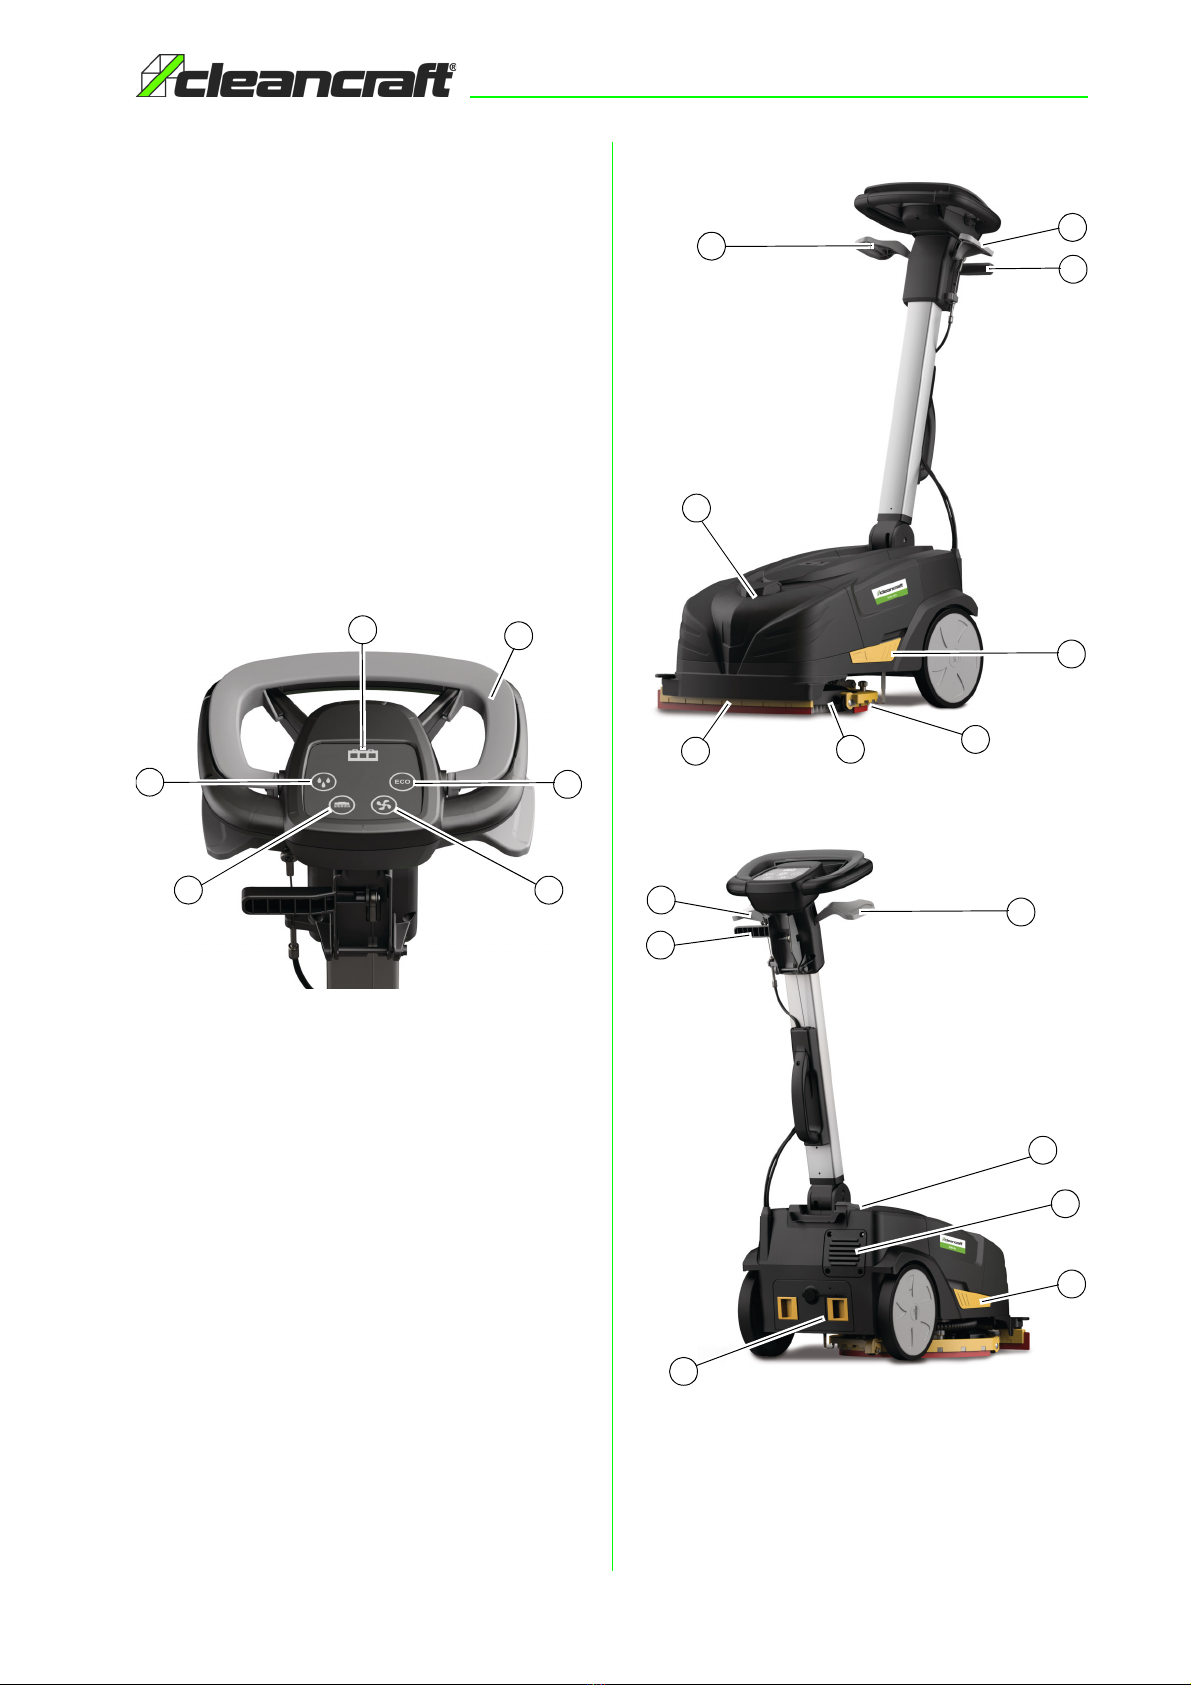
Control Panel
Fig. 3: Control panel
1 Battery indicator
2 Detergent flow ON/OFF / control
3 Brush control button
4 Suction control button
5 Operating mode "ECO"
6 Brush control lever
Front view and rear view of the machine
Fig. 4: Front view of the machine
Fig. 5: Rear view of the machine
1 Driving lever
2 Brake lever
3 Lift/lower suction lip lever
4 Front squeegee
2
3 4
5
16
1
2
3
7
8
46
5
10
11
1
2
12
3
9
10 SSM 281 | Version 1.02
Before Commissioning
5 Brush
6 Rear squeegee
7 Sliding cover
8 Housing cover
9 Air filter
10 Battery compartment
11 Sliding cover
12 Main switch
6.1 Scope of delivery
- 1 x SSM 281
- 1 x Battery 36V 5,5Ah Li-Ion (7260015)
- 1 x Charger with Euro plug (7260017)
- 1 x Disc brush PPL 0.4
6.2 Optional Accessoires
- Brush (
7260000
)
- Brush (
7260001
)
- Brush (
7260002
)
- Driving plate (
7260005
)
- Front suction lips latex (
7260010
)
- Rear suction lips latex (
7260011
)
- Set suction lips latex (
7260012
)
- PU suction lip set oil resistant (
7260013
)
- Suction lips set Linatex (
7260014
)
- Li-Ion battery 36V 5,5 Ah (scope of delivery) (
7260015
)
- Li-Ion battery 36V 8,2 Ah (optional) (
7260016
)
- Charger with plug (EU standard) (
7260017
)
- Cleaning pad black (
7212020
)
- Cleaning pad brown (
7212021
)
- Cleaning pad green (
7212022
)
- Cleaning pad red (
7212023
)
- Cleaning pad white (
7212024
)
7 Before Commissioning
7.1 Unpacking the machine
Step 1: Open the packaging of the machine. If neces-
sary, remove any attached plastic straps by
using shear or pliers.
Step 2: Remove (if necessary) any individual parts or do-
cuments lying in the carton.
Step 3: Carefully lift the scrubbing vacuum cleaning ma-
chine out of the box by the handle and place the
machine on the floor. Keep the packaging for
possible transport.
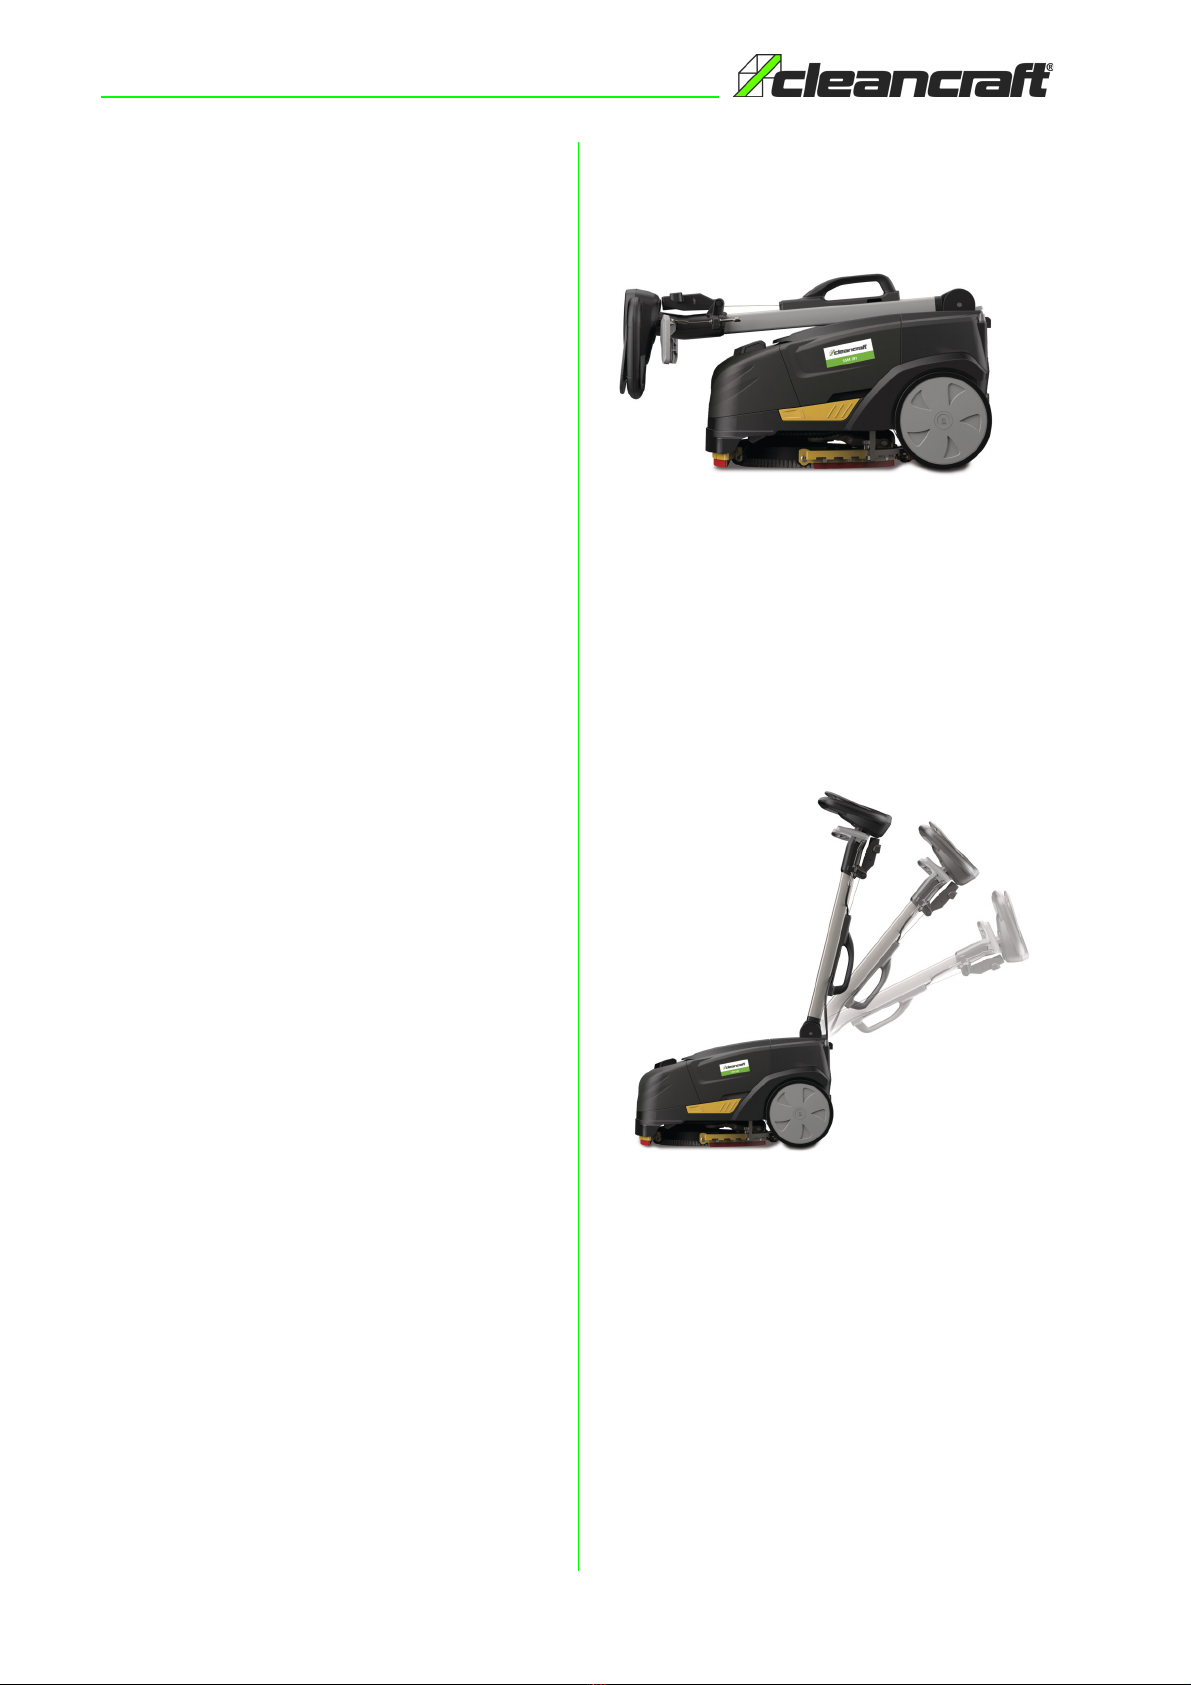
The scrubbing vacuum cleaning machine is delivered in
a folded state as follows (accessories may still need to
be assembled):
Fig. 6: Machine delivery state
7.2 Assembling the machine
Step 1: Fold the handle of the scrubbing vacuum clea-
ning machine upwards at a right angle so that the
handle is in the extended position.
The angle of handle is variable and can be adjusted as
desired:
Fig. 7: Adjustable handle
Step 2: Remove the two tanks and place them on the
ground.
Step 3: Tilt the machine over and place it so that the
handle is on the floor.
Step 4: Cut the transport straps attached to the rear
squeegee.
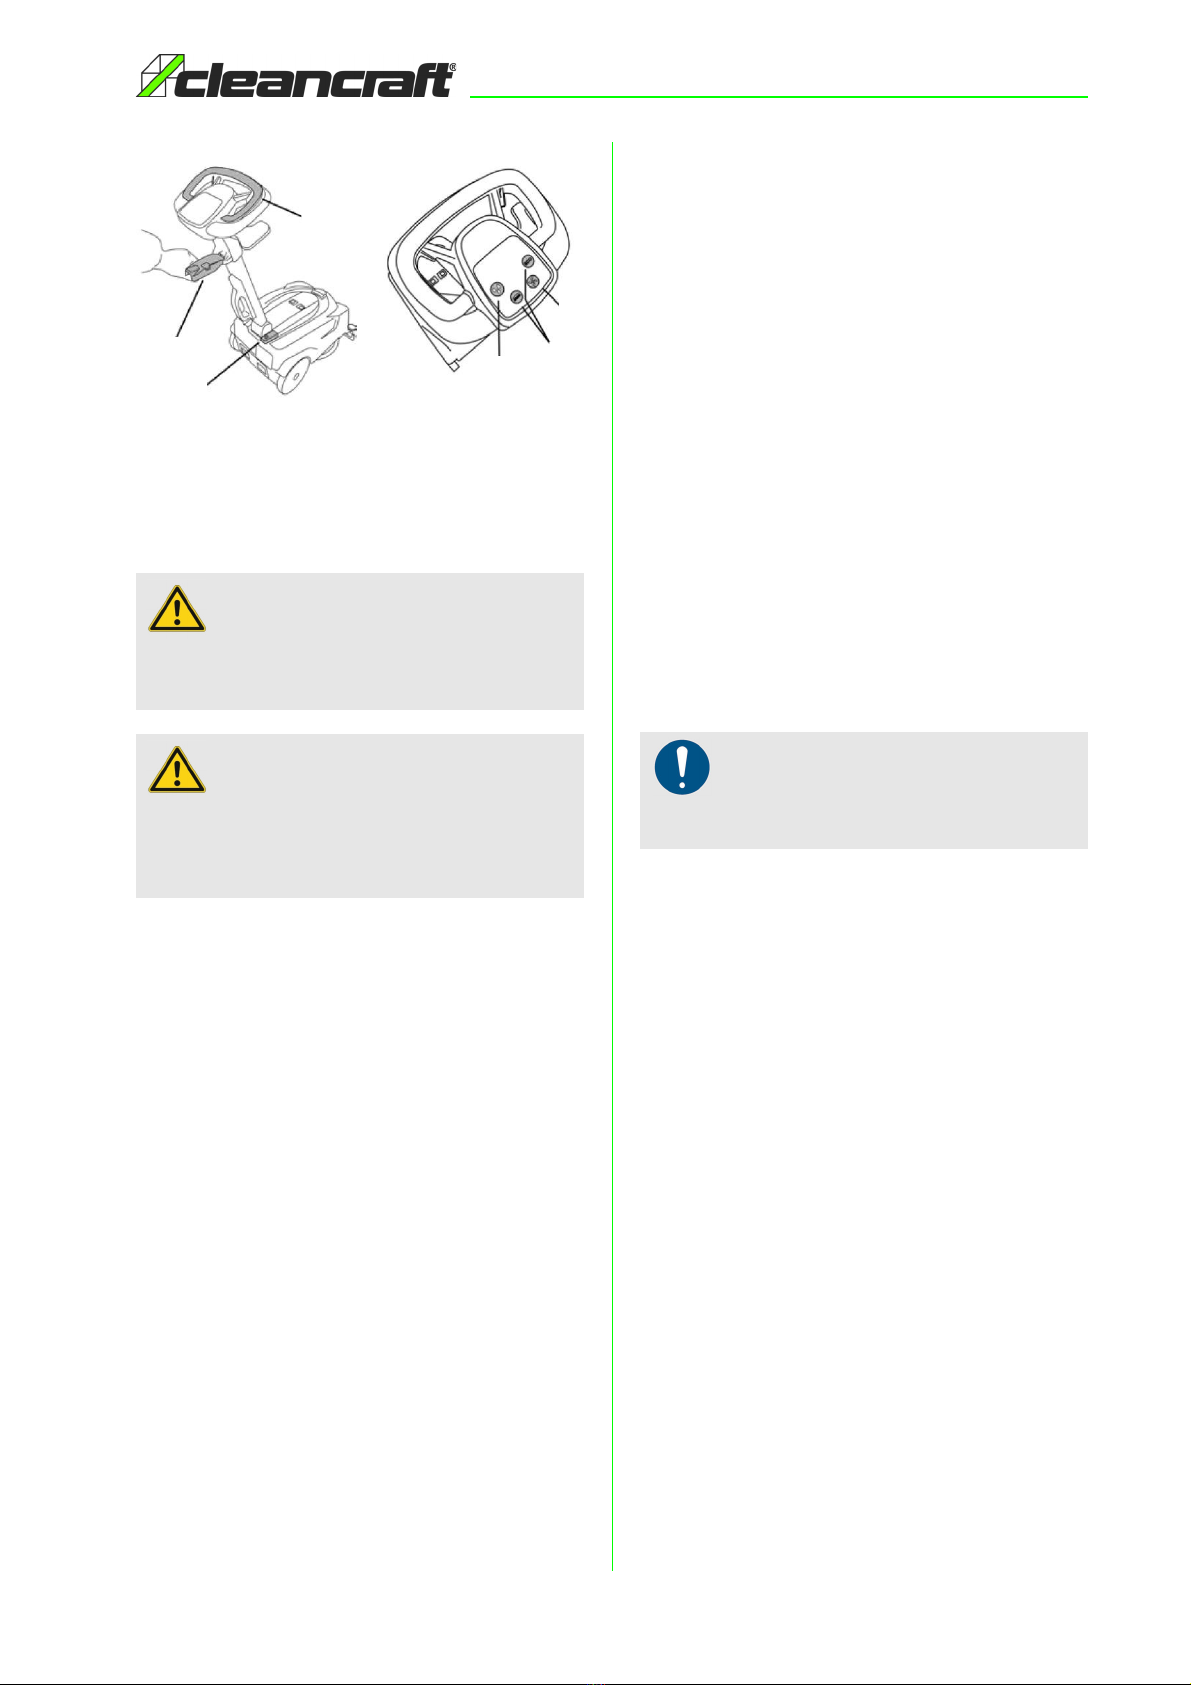
Step 5: Install the front squeegee (left, Fig 8).
Step 6: Install the rear bumper (buffer) (right, Fig 8).

Before Commissioning
SSM 281 | Version 1.02 11
Fig. 8: Assembling
7.3 Parking position of machine
Step 1: Make sure that the main switch of the machine is
turned off. (1, Fig. 9).
Fig. 9: Operating position
Step 2: Make sure that the suction lips of the machine
are not activated. To raise the suction lips, ope-
rate the lever (2, Fig. 9).
Step 3: Fold the handle and put the machine in parking
position (Fig. 10).
Fig. 10: Parking position
Step 4: Wipe the brush and suction lips on the underside
of the machine dry with a cloth.
7.4 Adjusting angle of the handle
Pull the lever (Fig. 11) to set the desired angle of the
handle. Release the lever to lock the handle in the
selected position.
Fig. 11: Adjust angle of handle
ATTENTION!
If the product is delivered packed in a carton, ensure
that the product is raised with suitable lifting equip-
ment that complies with the applicable legal and
safety regulations.
ATTENTION!
The machine must always be parked upright (verti-
cally), in the parking position. Non-observance may
result in damage to the brush or deformation of the
squeegee bars due to the machine's own weight.
ATTENTION!
Empty the fresh and dirty water tank after each use
of the machine.
12 SSM 281 | Version 1.02
Before Commissioning
7. Mounting the brush
Inserting the brush
Step 1: Press the main switch (1, Fig 9) to switch ON the
machine.
Step 2: Press the brush button on control panel (3, Fig. 5).
Step 3: Place the brush (with bristle hairs down) on the
floor.
Step 4: Pull back the handle to lift the front part of the ma-
chine as shown in Fig. 12. Position the brush hood
directly above the brush and lower the machine
again (Fig. 12).
Fig. 12: Lift the front of the machine
Step 5: Carefully move the brush control lever back and
forward (6, Fig. 5) until the brush clicks into
place.
Removing the brush
Step 1: Pull back the handle to lift the front part of the
machine.
Step 2: Press and hold the brush button on the control
panel for 3 seconds (3, Fig. 5) to release the
brush locking mechanism.
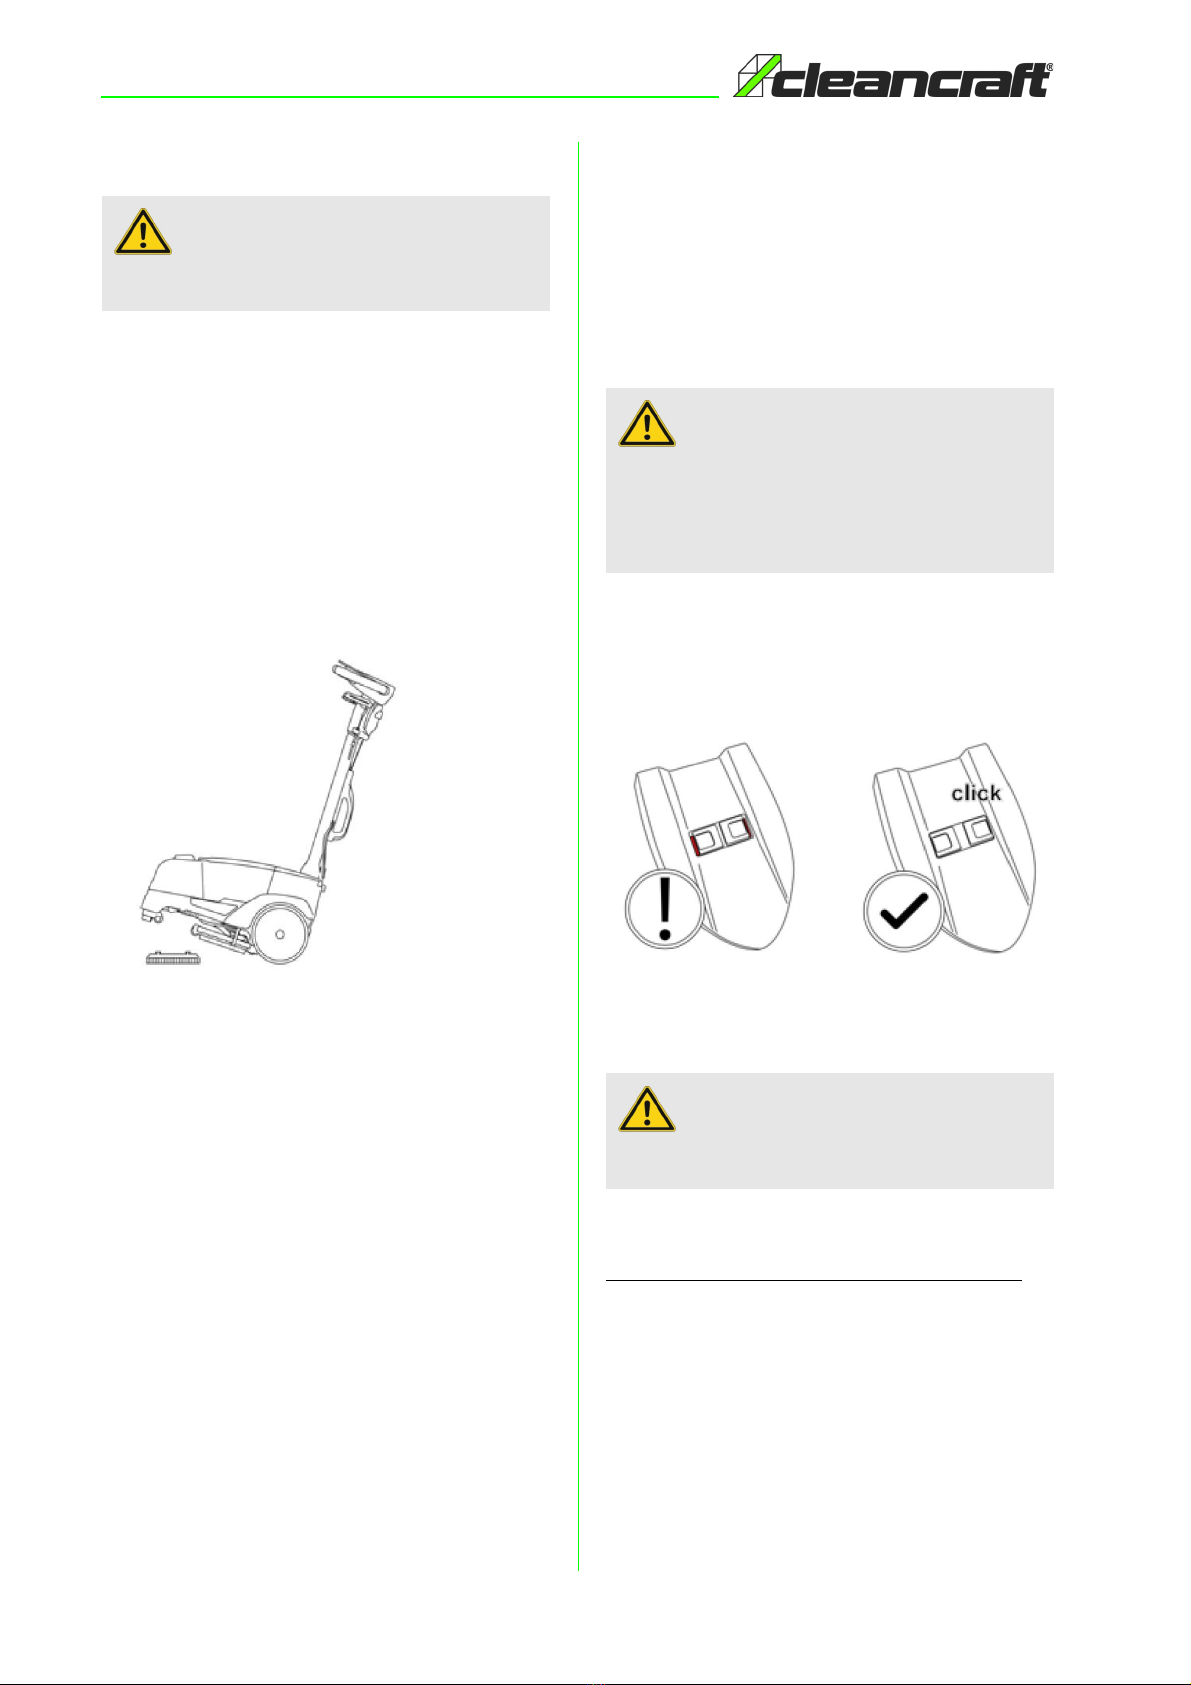
7.6 Dirty water / Detergent tank
Removing the cover of the dirty water tank
Simultaneously press the two sliding latches (7 and 11,
Fig. 5) towards each other to remove the cover of the
dirty water tank.
Mounting the dirty water tank
- Place the cover upon the tank
- Carefully press the cover down so that the release
springs outwards and thus the top of the dirty water
tank snaps into place (right, Fig. 13)
Fig. 13: Correct click-in of the cover
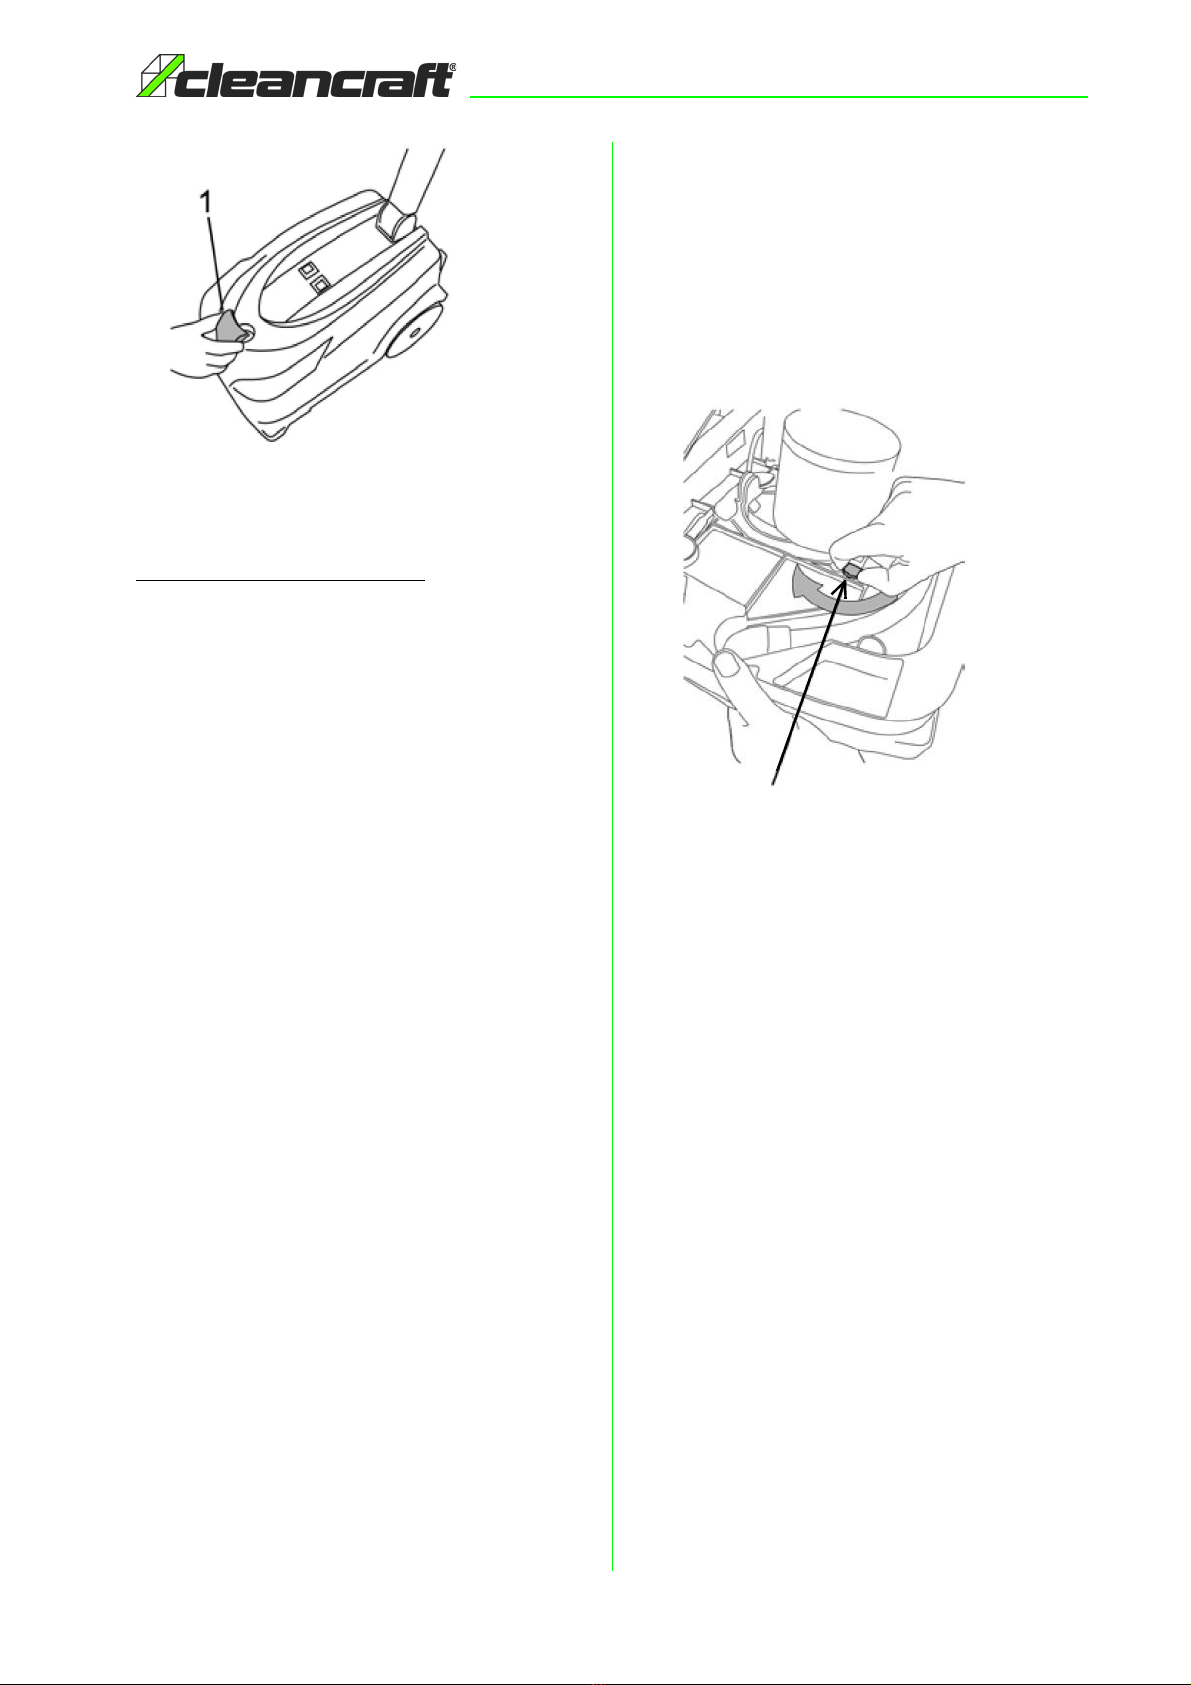
Filling the fresh water/cleaning agent tank
The tank can be filled in two different ways.
Option 1: Fill the tank while it is fitted in the machine.
- Always turn off the main switch (1, Fig. 9) of the ma-
chine to fill the water tank.
- Remove the cap of the detergent tank (Fig.12)
ATTENTION!
During this procedure, make sure that there are no
objects or people located near the brushes.
ATTENTION!
Incorrect positioning of the cover on the dirty water
tank will cause the machine to malfunction when
drying the floor.
The cover is correctly snapped in when the red mar-
king (left, Fig. 13) on the latch is no longer visible.
ATTENTION!
The dirty water tank must always be emptied before
filling the clean water and cleaning agent tank.
Before Commissioning
SSM 281 | Version 1.02 13
Fig. 14: Remove tank cap
- Fill the tank with clean water
Option 2: Remove the tank for filling:
- Always switch off the main switch (1, Fig. 9) of the ma-
chine before filling the water tank.
- Open the housing cover (8, Fig. 5) by simultaneously
pressing the two sliding latches (7 and 11, Fig. 5) to-
wards each other.
- Now take out the dirty water tank from inside the ma-
chine and place it aside. Empty the tank if necessary
- Remove the clean water/cleaning agent tank from the
machine
- Remove cap and fill the tank with clean water
Emptying the dirty water tank
An automatic float-controlled shutdown device located
inside the dirty water cover prevents further flow of dirty
water when the tank is full.
As soon as the suction motor becomes louder during
operation and the floor no longer dries as expected, the
operator must stop the machine to empty the dirty water
tank as follows:
- Switch off the main switch (1, Fig. 9) of the machine.
- Open the housing cover (8, Fig. 5) by simultaneously
pressing the two sliding catches (7 and 11, Fig. 5) to-
wards each other
- Take out the dirty water tank inside the machine.
- Remove cap and empty tank
7.7 Adjusting the drive
The machine is equipped with a mechanical drive that
uses the friction that occurs between the brush and the
floor to generate a forward movement.
By turning the knob (Fig. 15), the driving power that the
machine develops can be adjusted.
Fig. 15: Rotary knob for setting the drive
There are two adjustment options:
- In the green setting range, the drive force is increased
and the machine tends to deviate from a straight line as
a result.
- In the yellow setting range, the drive force is reduced
and the machine moves in a straight line.
Do the following to make the adjustments:
- Switch off the machine at the main switch (12, Fig. 5).
- Remove the dirty water tank located inside the machine
and place it aside. Empty the tank if necessary
- Remove the clean water/cleaning agent tank out of the
machine
- Lift the brush/motor with one hand and turn the rotary
knob to the desired position with the other hand (Fig. 15).

14 SSM 281 | Version 1.02
Operating
7.8 Battery charge indication (1, Fig. 3)
The battery charge indication has 3 LEDS (red, yellow
and green) and lights up as follows according to the
charge level:
Battery level 100% --> Red, green and yellow LED lights up
Battery level 30% --> Red and yellow LED lights up
Battery level 10% --> Red LED lights up constantly
Battery level 5% --> Red LED flashes; battery fully discharged
After a few seconds, the brush and suction motor are
switched off when the battery is discharged.
7.9 Care by cleaning
The scrubbing vacuum cleaning machine must always
be kept in a clean condition.
8 Operating
8.1 Description of the function keys
- Pressing the brush control button (3, Fig. 3) automati-
cally also activates the suction and detergent flow func-
tions, which can then be controlled and set via the indi-
vidual buttons on the control panel.
- The suction control key (4, Fig. 3) starts the vacuum
motor (LED lights up). A vacuum is then generated,
which is necessary for drying the floor after scrubbing.
The motor only comes into operation when the brush
control lever (6, Fig. 3) has been released.
- The detergent flow button (2, Fig. 3) enables the flow of
the detergent solution (LED lights up). There are 3 le-
vels of detergent delivery available. The flow is activa-
ted only when the brush is operating.
- If the ECO button (5, Fig. 3) is activated (LED lights up),
the machine operates in the economy mode. In this
operating mode, the power of the brush and suction
motor is automatically reduced and the detergent flow
is preset to feed flow level "1".
8.2 Working with the machine
- Press the main switch to switch ON the machine (1,
Fig. 11).
- Press the brush control button or the ECO button (5,
Fig. 11). The brushes as well as the vacuum function
and flow of the cleaning solution get activated.
- To lower the squeegee to the floor, operate the lever (2,
Fig. 11).
- Press the brush control lever (3, Fig. 11) to begin the
work.
Wear protective gloves
Wear suitable protective gloves for cleaning to protect
against injury.
ATTENTION!
Always clean all accessible parts of the machine
after use; empty the tanks and wipe the machine
parts dry with a cloth.
Maintenance and repairs must always be carried out
by qualified personnel; damaged parts must be
replaced only with original spare parts. Cleaning may
not be carried out by children.
ATTENTION!
Never use a high-pressure cleaner to clean the
machine. Water getting into the machine could
damage the electrical system or the motor of the
machine or cause a short circuit.
Do not use solvents or hydrocarbon-based products.
The casing and rubber parts could be damaged.
Avoid hot water and steam, the resulting heat could
permanently deform or damage the plastic parts.
NOTE!
The soil drying function can be operated not only in
the forward motion, but also in the reverse motion of
the machine. Pull the lever (2, Fig. 4) upwards to per-
form the soil drying function in the reverse direction.
Operating
SSM 281 | Version 1.02 15
Fig. 16: Working with the machine
- Check the thoroughness of the cleaning process during
operation. The flow rate of the cleaning agent can be re-
gulated by tapping the cleaning agent button (4, Fig. 11).
Stubborn soiling
For particularly stubbornly soiled floors, the scrubbing
and drying can be performed in two separate working
stages:
Pre-washing with brush/pad
- Operate lever (2, Fig. 11) to lift the squeegee ledge.
- Press the main switch to switch on the machine (1, Fig.
11).
- Press brush control button (5, Fig. 11)
- Deactivate the vacuum function by pressing the suction
control button (6, Fig. 11)
- Operate brush control lever (3, Fig. 11) to start the wor-
king process
Ensure that it is enough time for the cleaning agent to
take effekt when scrubbing particularly soiled areas. This
helps the detergent to exert its chemical effect to remove
the dirt. The brushes require a certain amount of time to
exert an effective mechanical effect.
rying
- Operate the lever (2, Fig. 11) again to lower the squee-
gee ledge.
- Activate the vacuuming function by pressing the suction
control button (6, Fig. 11) again and move the machine
over the pre-cleaned surface.
The process is similar to a thorough scrubbing process
of the floor. Subsequent routine maintenance work on
the floor is thus less time-consuming.
8.3 Finishing work
- Always switch off the machine via its main switch after
you have finished work.
- Empty the dirty water tank and rinse it out with clean
water
- Empty the water/cleaning agent tank as well.
- Place the machine in parking position.
ATTENTION!
Regularly check whether the detergent solution wets
the brush and make sure that the tank is sufficiently
filled.
ATTENTION!
The battery indication lights up red when the battery
is almost discharged. After a few seconds, the brush
and suction functions switch off automatically.
The battery must be recharged to resume work.
3
4
5
6
2
1
NOTE!
For notes on how to replace the brush, refer to chap-
ter "7.5 Mounting the brush".

16 SSM 281 | Version 1.02
Maintenance and Service/Repair
9 Maintenance and Service/Repair
If the scrubbing vacuum cleaning machine does not
function properly, contact a specialist dealer or our cus-
tomer service. The contact details can be found in chap-
ter 1.2 Customer service.
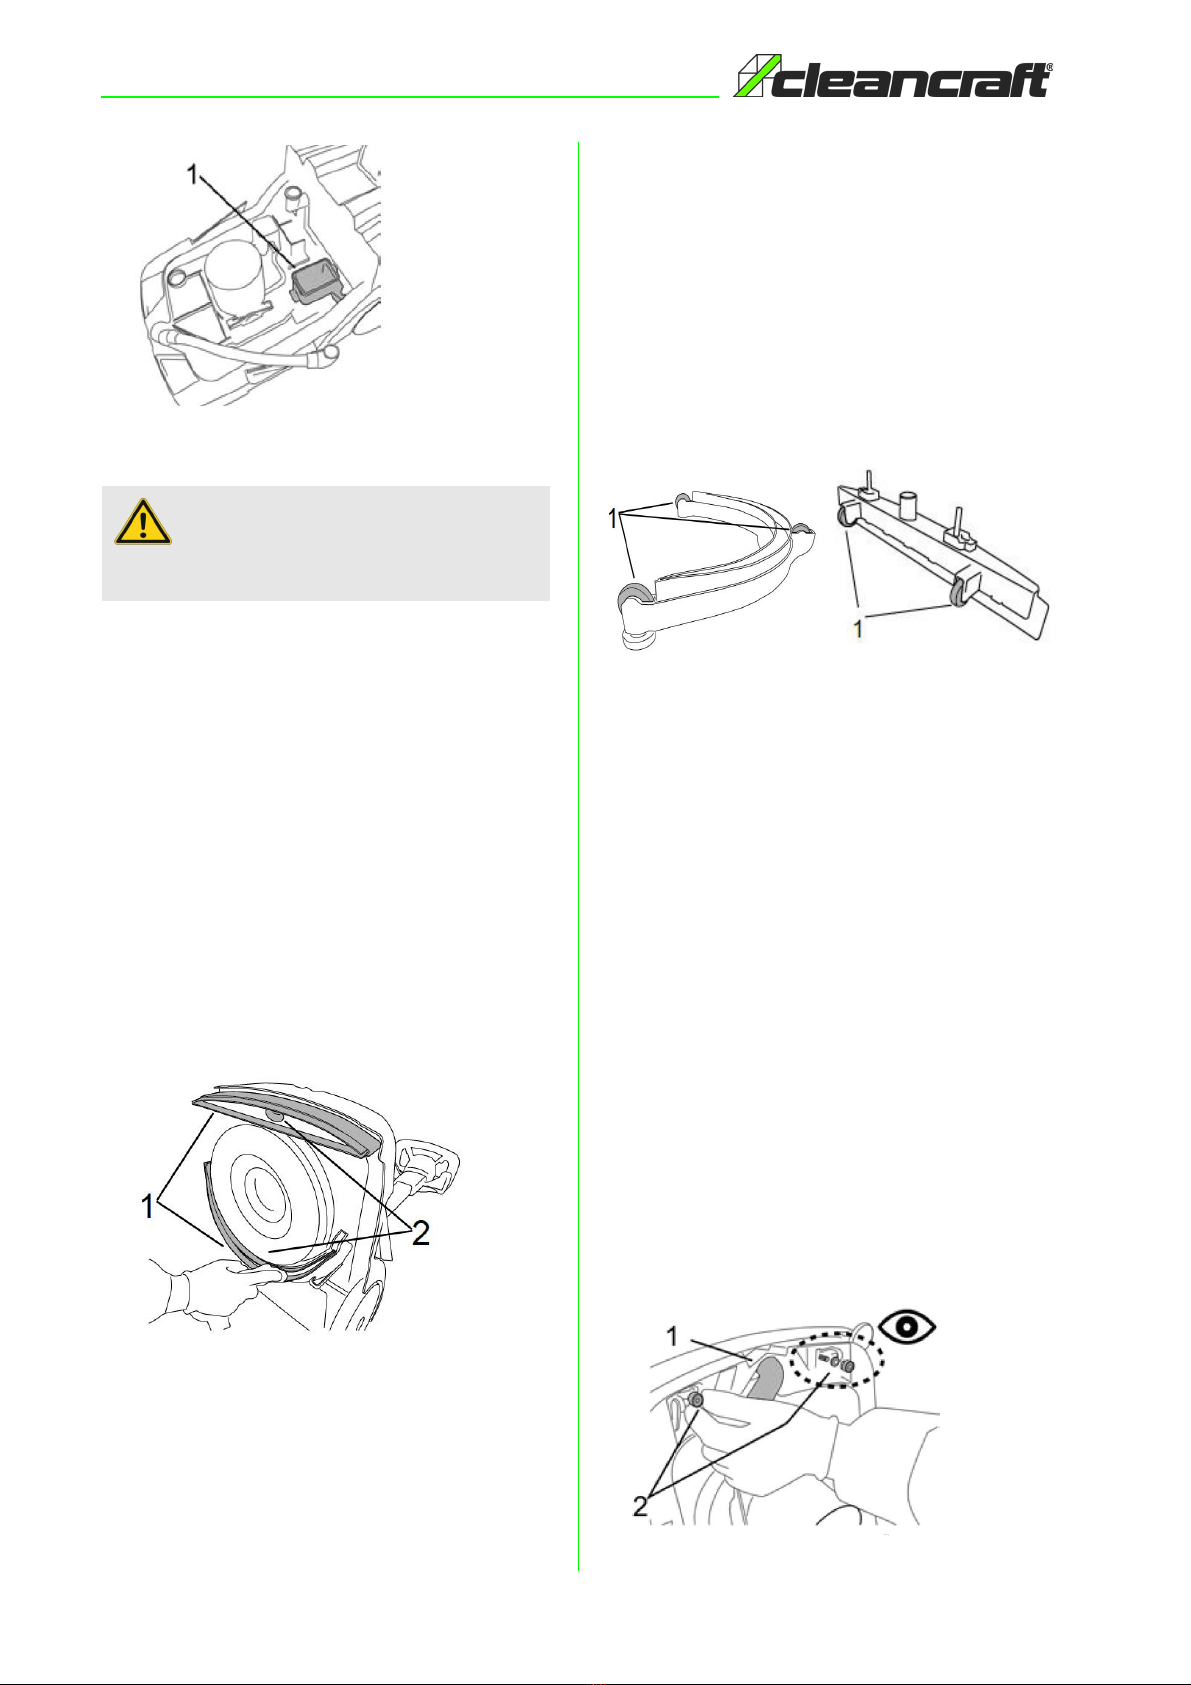
9.1 Cleaning the float
An automatic float-controlled shutdown system, located
at the cover of the dirty water tank, prevents further oper-
ation of the vacuum system when the tank is full. The
float can be cleaned as follows:
- Remove the cover of the dirty water tank
- Loosen the cap to check that the floats can freely move
(1, fig. 14)
- Clean the seals with a damp cloth (2, Fig. 17).
Fig. 17: Floats (pos. 1) and seals (pos. 2)
- Place the cover of the dirty water tank again on the ma-
chine.
9.2 Cleaning the water/cleaning agent tank filter
- Remove the dirty water tank and the cleaning agent
tank and place them on the floor (see chapter 7.6
"Dirty water/cleaning agent tank").
- Remove the filter and wash it with water (1, Fig. 18).
Fig. 18: Filter in the machine
9.3 Cleaning the suction filter
- Remove the dirty water tank and the cleaning agent
tank and place them on the floor (see chapter 7.6 "Dirty
water/cleaning agent tank").
- Take out the suction filter and wash it with water (2,
Fig. 18).
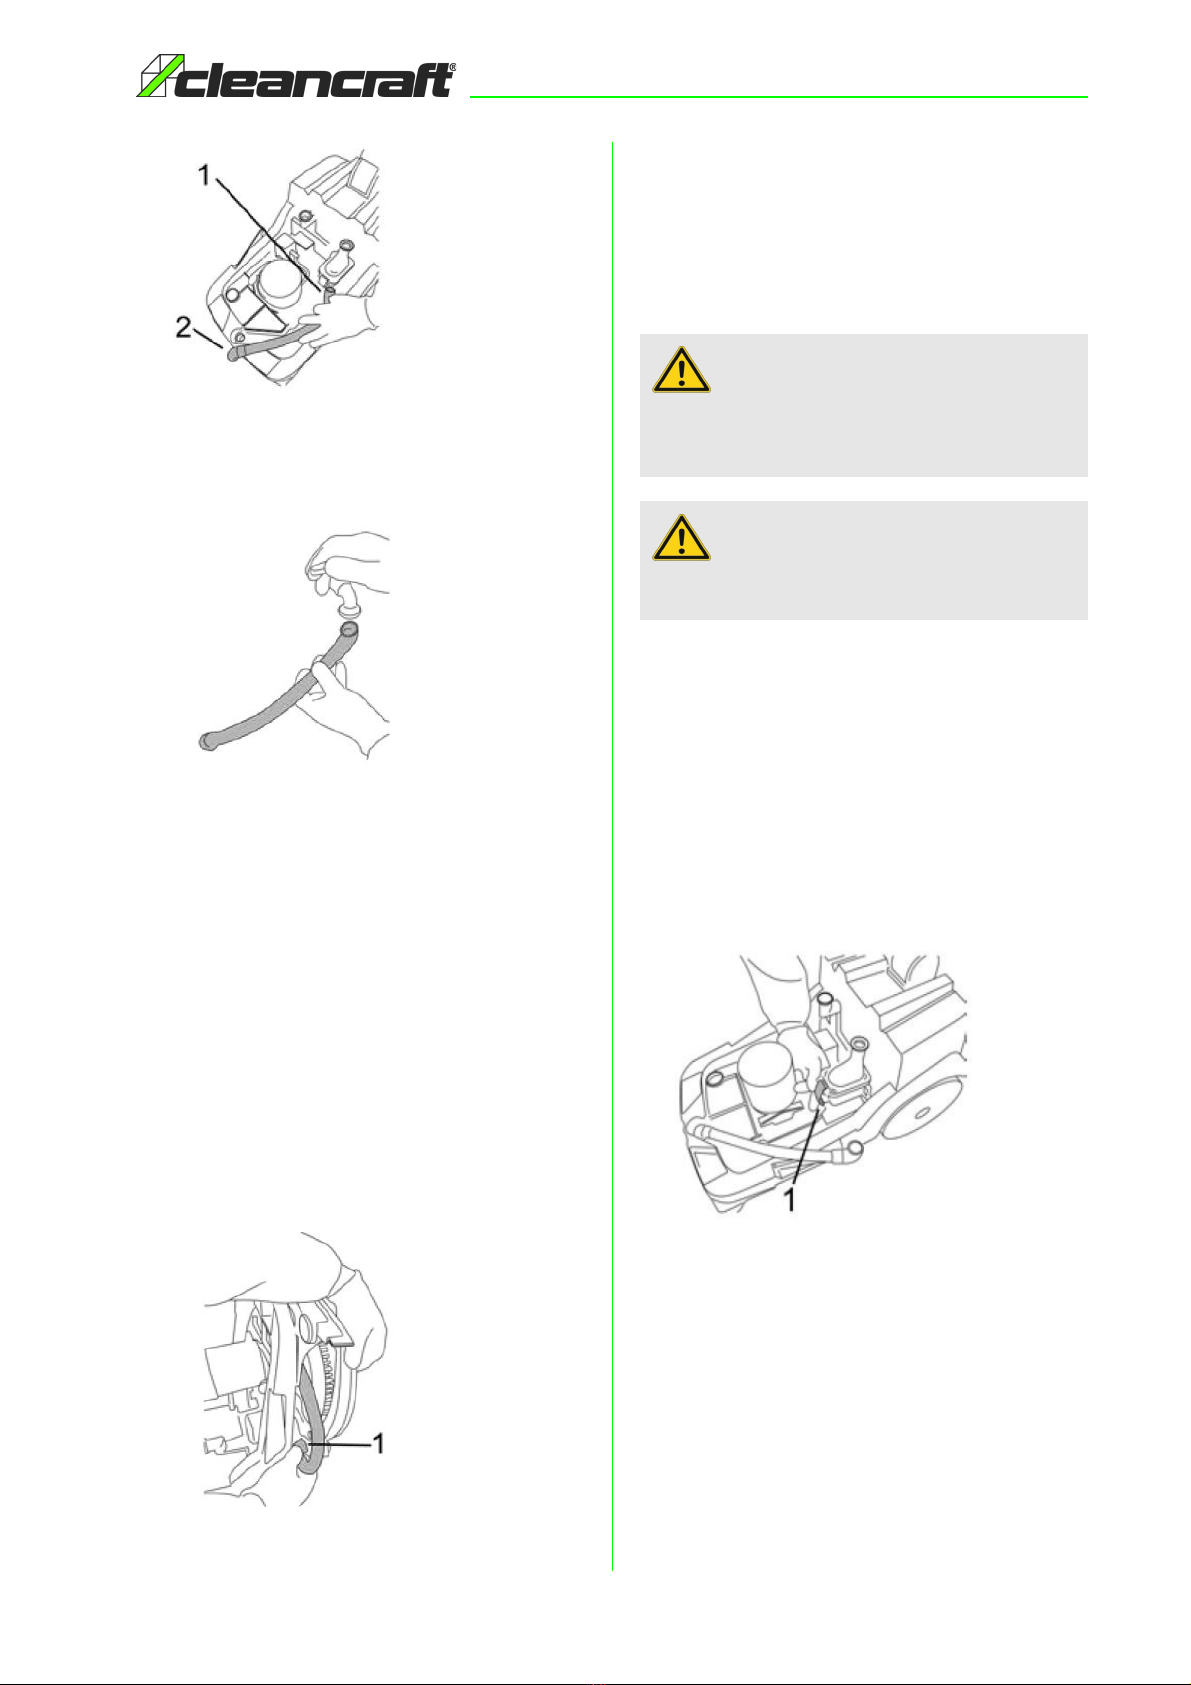
9.4 Cleaning the suction hoses
Clean the suction hose of the front squeegee
- Remove the dirty water tank and the cleaning agent
tank and place them on the floor (see chapter 7.6 "Dirty
water/cleaning agent tank").
- Pull off the hose from the diverter valve (1, Fig. 19) and
from the front suction foot (2, Fig. 19).
Protective gloves
Suitable protective gloves must be worn for cleaning
and maintenance to protect against injury.
ATTENTION!
Maintenance and repairs must always be carried out
by qualified personnel; any damaged parts must only
be replaced with original spare parts.
ATTENTION!
This work may only be carried out when the machi-
nes is switched off.
ATTENTION!
Before performing any repair work, take the battery
out of the machine to disconnect the power supply.
ATTENTION!
Never use aggressive cleaning agent solutions such
as ethyl alcohol to clean the seals.
Maintenance and Service/Repair
SSM 281 | Version 1.02 17
Fig. 19: Suction hose of the front squeegee
- Thoroughly rinse the hose with water by letting water
flow through the opening (Fig. 20).
Fig. 20: Cleaning the hose
- Reattach the hose after cleaning.
Clean the suction hose of the rear squeegee
- Remove the dirty water tank and the cleaning agent
tank and place them on the floor (see chapter 7.6 "Dirty
water/cleaning agent tank").
- Fold out the handle of the machine toward the top.
- Operate the lever (3, Fig. 5) to lower the suction lips.
- Tilt the machine backwards over the handle so that the
bottom side of the machine can be cleaned.
- Pull off the hose from the diverter valve and from the
rear squeegee ledge (Fig. 21).
Fig. 21: Suction hose of the rear squeegee
- Thoroughly rinse the hose with water by letting water
flow through the opening (Fig. 20).
- Reattach the hose after cleaning
9. Cleaning the diverter valve
- Remove the dirty water tank and the cleaning agent
tank and place them on the ground (see chapter 7.6
"Dirty water/cleaning agent tank").
- Detach the suction hose of the front squeegee from the
diverter valve.
- Detach the suction hose of the rear squeegee from the
diverter valve.
- Release the support lever (Fig. 22) and remove the
cover of the diverter valve.
Fig. 22: Release support lever
- The compartment of the valve can now be cleaned (Fig.
23). Remove any incrustations and rinse clean water.
Use a soft cloth to wipe off the seals.
ATTENTION!
Cleaning of the diverter valve should be performed in
an appropriate area for maintenance work, as the
floor could be wet and dirty.
ATTENTION!
Personal protective equipment must be worn during
all maintenance and cleaning work.
18 SSM 281 | Version 1.02
Maintenance and Service/Repair
Fig. 23: Clean valve compartment
9.6 Cleaning the squeegee ledges
- Remove the dirty water tank and the cleaning agent
tank and place them on the ground (see chapter 7.6
"Dirty water/cleaning agent tank").
- Unfold the handle of the machine upwards.
- Tilt the machine backwards over the handle so that the
floor side of the machine can be cleaned.
- Wipe the two suction bars (1, Fig. 24) with a damp
cloth.
- Clean the suction inlet connections of the two strips (2,
Fig. 24) also with a damp cloth.
Fig. 24: Cleaning the squeegee ledges
9.7 Adjusting the squeegee ledge
The squeegee is factory-adjusted to achieve an optimum
drying effect on various floor surfaces.
In the event that the drying results do not comply with
your expectations, the squeegee can be re-adjusted:
- The rubber lips of the squeegee blade should be an-
gled 45° from the floor surface along its entire length.
- The height of the squeegee blade can be adjusted by
increasing or decreasing the height of the wheels (1,
Fig. 25)
Fig. 25: Adjusting the squeegee ledge
9.8 Replacing the suction lips
The suction lips pull off the water/cleaning agent film so
that the residual water can then be sucked in.
Due to the regular wiping motion and the contact with the
floor, the rubber lips show signs of abrasion (cracks/
rounded edges). The rubber lips must be replaced as fol-
lows:
- Remove the dirty water tank and the cleaning agent
tank and place them on the floor (see chapter 7.6 "Dirty
water/cleaning agent tank").
- Fold out the handle of the machine upwards.
- Tilt the machine backwards and support the handle on
the ground
Front suction ledge
- Detach the suction hose from the front squeegee (1,
Fig. 26)
- Unscrew the knobs (2, Fig. 26)
Fig. 26: Detach suction hose
ATTENTION!
Never use aggressive cleaning agent solutions such
as ethyl alcohol to clean the seals.

Maintenance and Service/Repair
SSM 281 | Version 1.02 19
- Detach the squeegee ledge from the machine (Fig. 27).
Fig. 27: Detach squeegee ledge
- Remove the rubber lip from the assembly (Fig. 28) and
reinsert it in the opposite way. The rubber lip so can be
used again.
Fig. 28: Remove rubber lip
- The rubber lip must be replaced when the wiping edges
are worn and can therefore no longer be reused.
- Then reassemble the parts in the machine in reverse
order.
Rear suction ledge
- Operate the lever (3, Fig. 5) to lower the suction lips.
- Detach the suction hose from the rear squeegee (1,
Fig. 26)
Fig. 29: Loosen the parts
- Screw off the knobs (2, Fig. 26).
- Remove the rear squeegee (Fig. 30)
Fig. 30: Remove squeegee ledges
- Pull out the rubber lip (Fig. 28) and reinsert it with the
wiping edge turned upside down. In this way, the rub-
ber lip can be reused once again.
- Then reassemble the parts back into the machine in re-
verse order
9.9 Replace brush
The brush has a number of red colored tufts which brist-
les are shorter than the rest (Fig. 31). When the black
bristle tufts are worn to the same length as the red brist-
les, the brush must be replaced.
Fig. 31: Replace brush
NOTE!
For notes on how to replace the brush, refer to the
chapter 'Mounting the brush'.

20 SSM 281 | Version 1.02
Malfunctions, Possible Causes and Measures
10 Malfunctions, Possible Causes and
Measures
10.1 Troubleshooting
General malfunctions
ATTENTION
If one of the following errors occurs, stop working
with the machine immediately. Before you start
troubleshooting, switch off the machine and dis-
connect the mains plug. Serious injury could result.
All repairs or replacement work may only be carried
out by qualified and trained personnel.
NOTE!
If you cannot solve the problems with your machine
yourself, please contact your nearest CLEANCRAFT
dealer.
Please write down the following information from the
machine or from the instruction manual beforehand,
so that they can help you with your problem in the
best possible way.
- Model of the machine
- Serial number of the machine
- Year of manufacture
- Exact error description
Malfunction Possible Cause Measure
Machine does not work - Low or empty battery
- Main switch is not activated
- Charge battery
- Activate main switch
Brush does not rotate - Brush control button is not activated
- Brush control lever is not activated
- Press the brush control button on
the control panel
- Operate brush control lever
Brush motor does not start easily - Machine is operating with a dry
brush on a rough surface
- Increase cleaning agent flow rate
Machine does not scrub evenly - Brush/pad worn out - Replace brush
Detergent solution does not reach
the brush
- Detergent tank empty
- Filter in tanks dirty
- Detergent hose clogged
- Fill tank
- Clean both filters
- Remove dirt inside the hose
Suction motor does not work - Suction button not pressed - Press the suction control button
Suction lips do not clean or vacuum
sucks weakly
- Rubber lips which touch the floor
are worn out
- Tank is full (fill level control triggers)
- Diverter valve dirty
- Blockage in suction hose or squee-
gee ledge
- Replace rubber lips
- Empty the dirt tank
- Clean the diverter valve
- Remove dirt
Battery does not reach the expected
operating time
- Battery charger does not work
- Battery defective
- Replace charger
- Insert new battery
This manual suits for next models
1
Table of contents
Popular Floor Machine manuals by other brands

SCANMASKIN
SCANMASKIN SCAN COMBIFLEX 450NS manual

Timberline
Timberline L Series Operator's manual

Tennant
Tennant EX-SC-1530 Operator's manual

Alto
Alto Clarke IMAGE 14 Operator's manual

Nilfisk-Advance
Nilfisk-Advance SelectGloss 21P 56010814 Operator's manual and parts list

Renown
Renown REN08026-VP Operator's manual


