CleanMaster Raptor 220F Product manual
MNL36400
-
E3F
Rev. 00 (05-01)
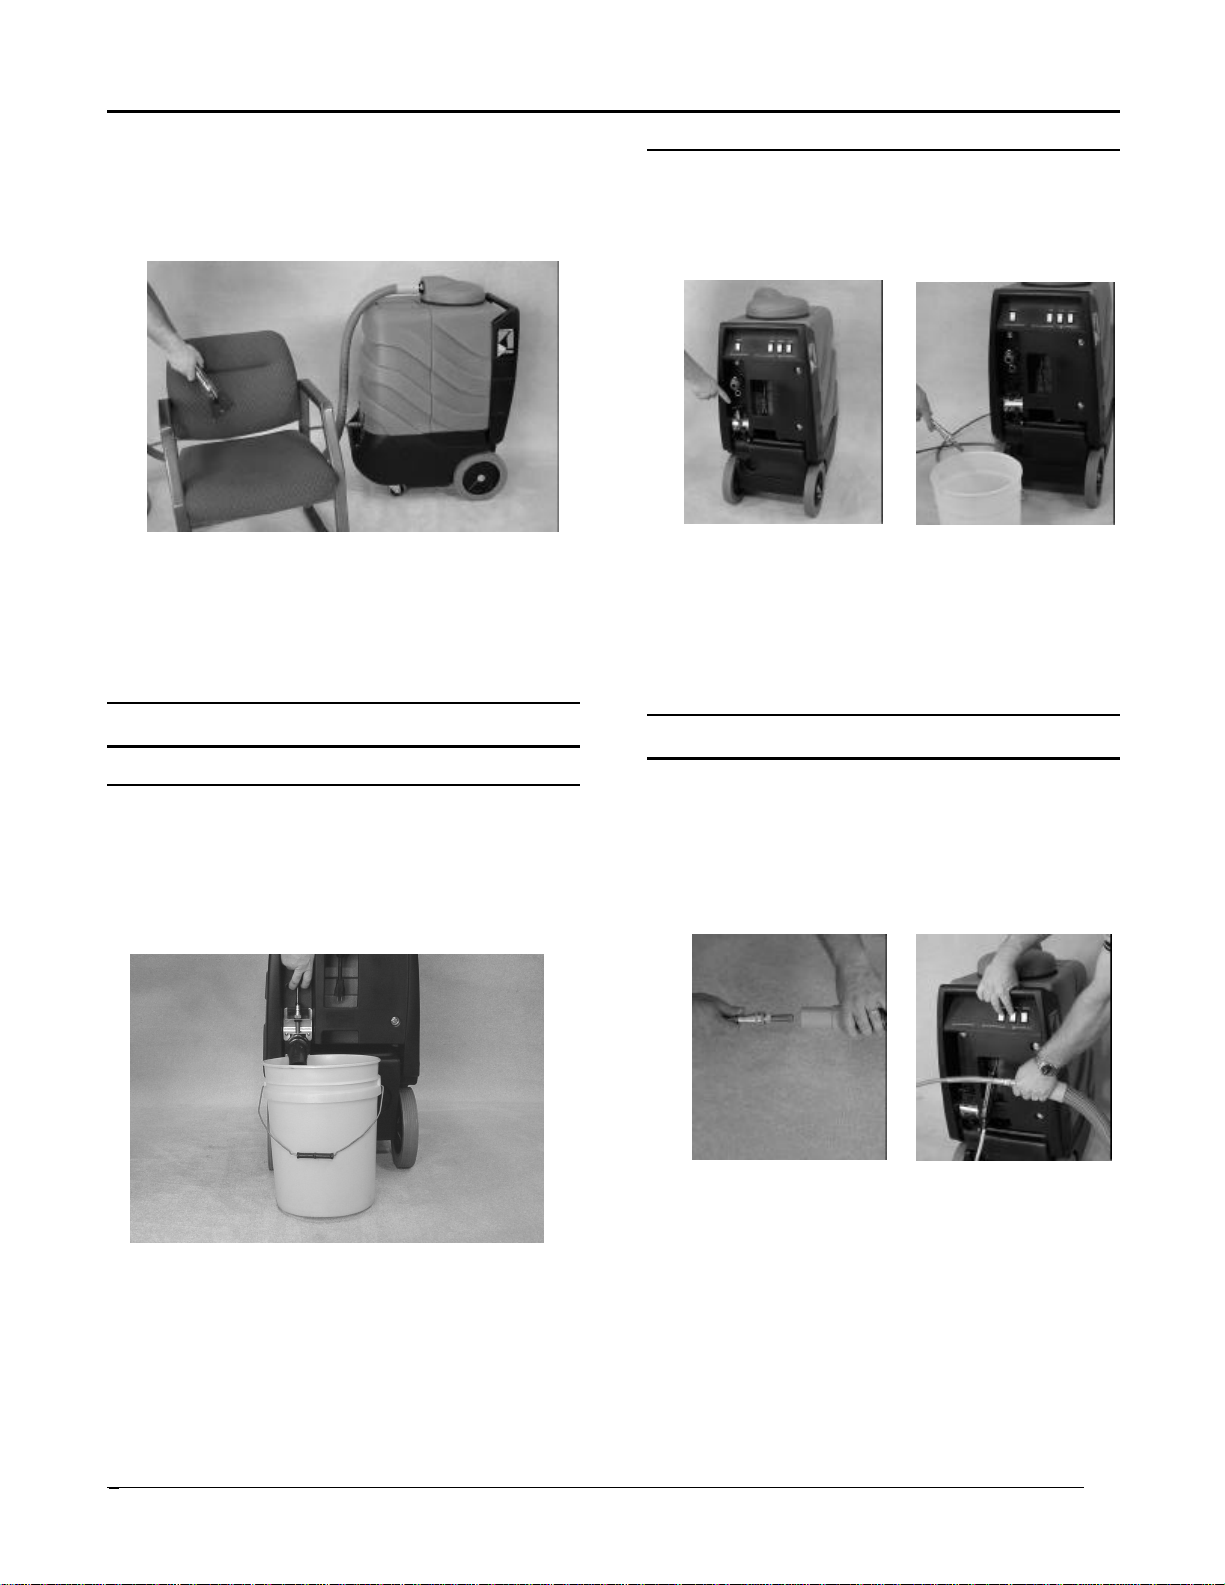
Raptor 220F
Carpet And Upholstery Cleaner
Model No.:
100-650-225
11 gal Extractor
CLEANMASTER
11015 47TH AVENUE WEST
MUKILTEO WA 98275 U.S.A.
FAX: 1-800-426-4225
WEBSITE: www.cleanmaster.com
CUSTOMER SERVICE: 1-425-775-7276
Operator and Parts Manual

36400-E3-Raptor 220F (05-01)
2
Please fill out at time of installation for future reference.
Model No.-_______________________________________
Install. Date-______________________________________
Serial No.-________________________________________
OPERATION
This manual is furnished with each new model. It
provides necessary operation and maintenance
instructions and an illustrated parts list.
Read this manual completely and understand the
machine before operating or servicing it.
Use the illustrated Parts Lists to order parts. Before
ordering parts or supplies, be sure to have your
machine model number and serial number handy.
Parts and supplies may be ordered by phone or mail
from any authorized parts and service center,
distributor or directly from Cleanmaster.
This machine will provide excellent service. However,
the best results will be obtained at minimum costs if:
•The machine is operated with reasonable care.
•The machine is maintained regularly –per the
maintenance instructions provided.
•The machine is maintained with manufacturer
supplied or equivalent parts.
MACHINE DATA
©Cleanmaster Printed in U.S.A.
Cleanmaster is a registered United States trademark
TABLE OF CONTENTS
SAFETY PRECAUTIONS.............................. 3
MACHINE COMPONENTS............................ 4
MACHINE SETUP......................................... 4
MACHINE OPERATION ................................ 5
DRAINING TANKS........................................ 6
FREEZE PROTECTION ................................ 6
FLOOD PUMP OPERATION ......................... 7
FLOOD PUMP REMOVAL............................. 7
FLOOD PUMP FILTER CLEANING ............... 7
MACHINE MAINTENANCE ........................... 8
STORING MACHINE..................................... 8
RECOMMENDED STOCK ITEMS.................. 8
TROUBLE SHOOTING.................................. 9
SPECIFICATIONS ........................................ 10
ELECTRICAL DIAGRAM .............................. 11
PARTS LIST................................................. 12
OPTIONS ..................................................... 17
WARRANTY POLICY.................................... 20

36400-E3-Raptor 220F(05-01) 3
OPERATION
SAFETY PRECAUTIONS
This machine is intended for commercial use. It is
designed to wet clean carpet and upholstery in a
indoor environment and is not constructed for any
other use. Use only recommended cleaning solutions
and accessory tools.
All operators must read, understand and practice the
following safety precautions.
The following safety-alert symbols are used throughout
this manual as indicated in their description:
WARNING: To warn of hazards or unsafe
practices which could result in severe personal
injury or death.
FOR SAFETY: To identify actions which must be
followed for safe operation of equipment.
The following information signals potentially dangerous
conditions to the operator or equipment.
FOR SAFETY:
1. Do not operate machine:
–Unless trained and authorized.
–Unless operator manual is read and
understood.
–In flammable or explosive areas.
–With damaged cord or plug.
–If not in proper operating condition.
–Unless cord is properly grounded.
–In outdoor areas.
–In standing water.
–With the use of an extension cord.
2. Before operating machine:
–Make sure all safety devices are in place
and operate properly.
3. When using machine:
–Do not run machine over cord.
–Do not pull machine by plug or cord.
–Do not pull cord around sharp edges or
corners.
–Do not unplug by pulling on cord.
–Do not stretch cord.
–Do not handle plugs with wet hands.
–Keep cord away from heated surfaces.
–Report machine damage or faulty operation
immediately.
–Follow mixing and handling instructions on
chemical containers.
–Connect hoses before turning on pump.
–Be sure chemicals are safe and non-toxic.
4. Before leaving or servicing machine:
–Turn off machine.
–Unplug cord from wall outlet.
5. When servicing machine:
–Unplug cord from wall outlet.
–Avoid moving parts. Do not wear loose
jackets, shirts, or sleeves.
–Use manufacturer supplied or approved
replacement parts.
WARNING: Hazardous Voltage. Shock or
electrocution can result. Always unplug machine
before servicing.
WARNING: Flammable materials can cause
an explosion or fire. Do not use flammable
materials in tank(s).
WARNING: Flammable materials or reactive
metals can cause an explosion or fire. Do not pick
up.
WARNING: Hot solutions up to 88°C (190°F).
Do not touch with any part of the body. Use
thermometer to gauge temperature.
WARNING: Contents of solution hoses may
be under pressure even after pump is off.
GROUNDING INSTRUCTIONS
Machine must be grounded. If it should
malfunction or breakdown, grounding provides a
path of least resistance for electrical current to
reduce the risk of electrical shock. This machine is
equipped with a cord having an equipment-
grounding connector and grounding plug. The
plug must be plugged into an appropriate outlet
that is properly installed in accordance with all
local codes and ordinances. Do not remove
ground pin; if missing, replace plug before use.
International models will have different cord ends.
GROUNDED OUTLET
(3 HOLE)
GROUNDING
PIN

36400-E3-Raptor 220F (05-01)
4
OPERATION
MACHINE COMPONENTS
1. Recovery Tank
2. Solution Tank
3. Recovery Tank Lid
4. Solution Tank Lid
5. Vacuum Switch
6. Pump Switch
7. Vacuum Switch
8. Waste Pump-Out Switch
9. Power Cord Connector
10. Empty-Out Nozzle
11. Vacuum Hose Connector
12. Waste Pump-Out Hose Connector
13. Recovery Tank Drain
14. Solution Hose Connector
MACHINE SETUP
1. Carefully check carton for signs of damage.
Report damages at once to carrier. The machine
is shipped fully assembled and is ready for use.
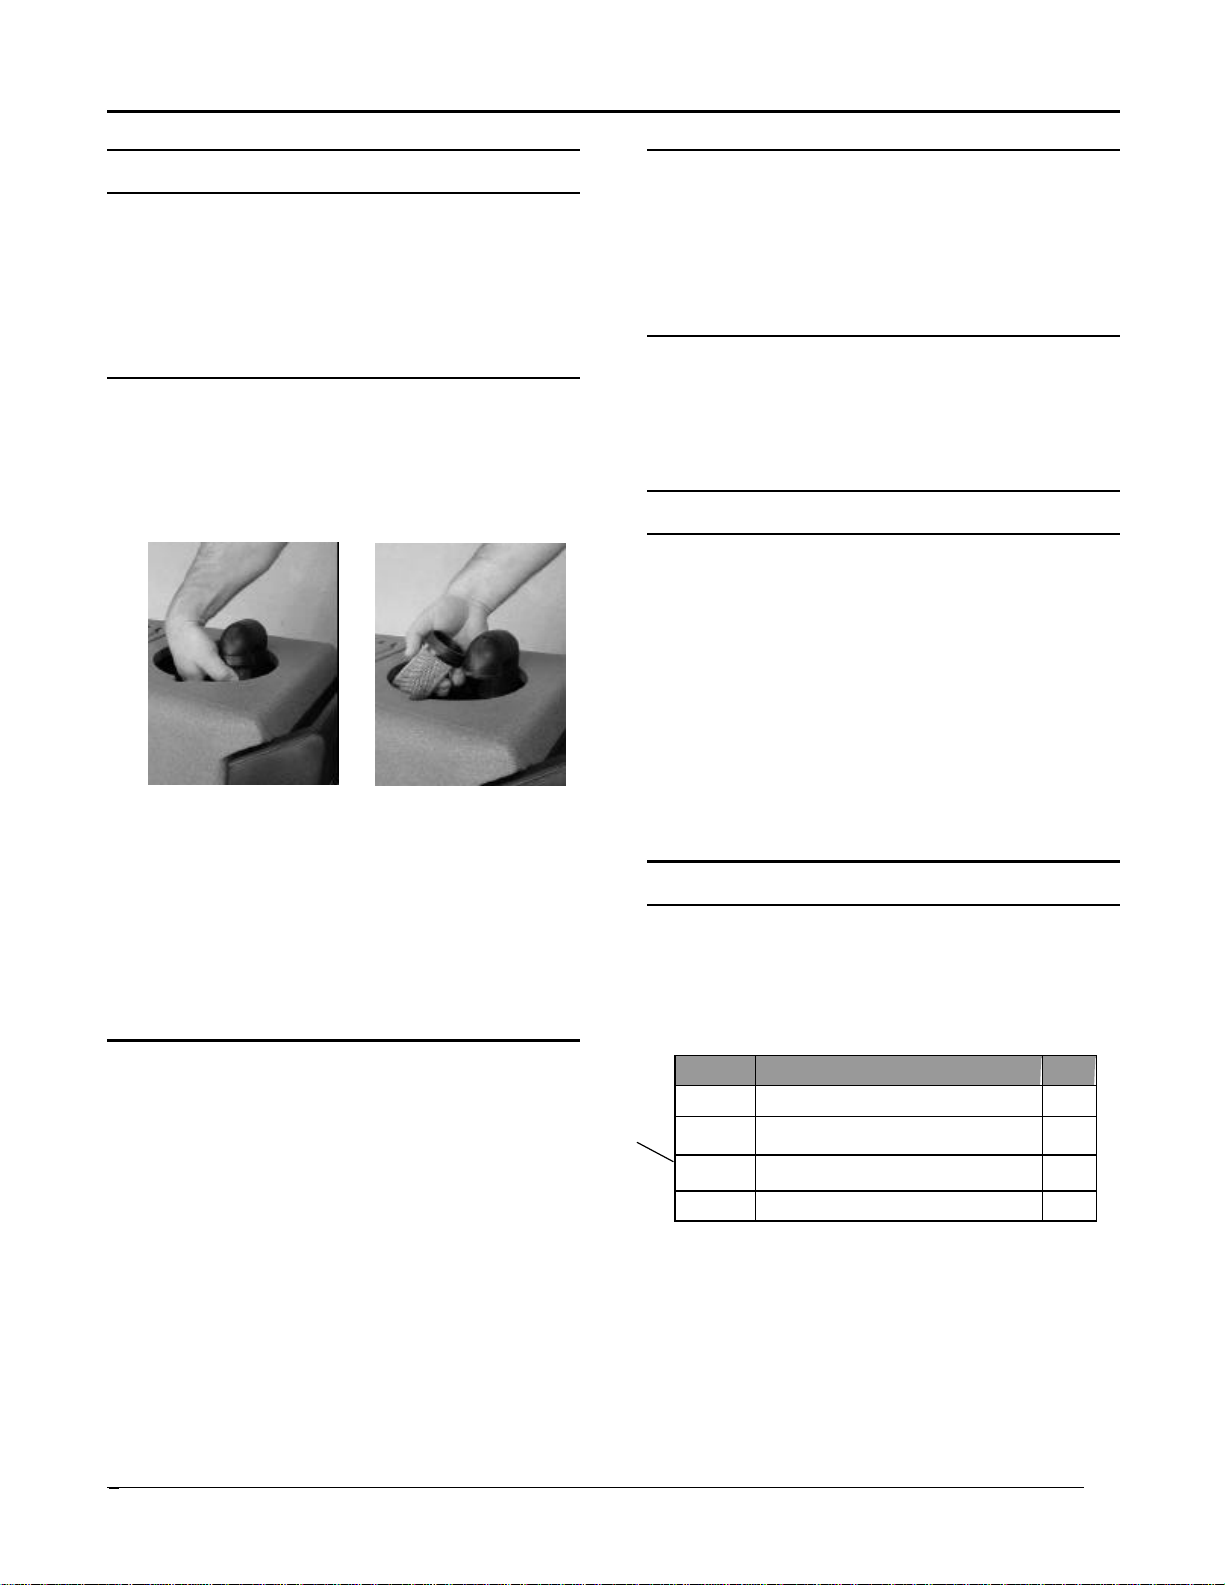
2. Connect hoses and tool to be used (Figure1).
3. Using a clean bucket or hose, fill solution tank
with 41 liters (11 gallons) of hot water, 60°C
(140°F) maximum (Figure 2).
WARNING: Flammable materials can cause an
explosion or fire. Do not use flammable materials
in tank(s).
4. Add a recommended cleaning chemical.
FOR SAFETY: When using machine, follow
mixing and handling instructions on chemical
containers.
Fig. 1
Fig. 2
4
3
6
9
2
10
13
1
5
7
12
11
14
8

36400-E3-Raptor 220F(05-01) 5
OPERATION
ATTENTION: If using powdered cleaning
chemicals, mix prior to adding.
NOTE: If desired, water alone achieves excellent
cleaning results.
5. Plug machine’s power cord into a grounded wall
outlet (Figure 3).
FOR SAFETY: Do not operate machine unless
cord is properly grounded.
FOR SAFETY: Do not operate machine with the
use of an extension cord.
6. Secure recovery and solution tank lids in place. It
is important to secure both lids whenever
vacuums are turned on.
MACHINE OPERATION
FOR SAFETY: Do not operate machine unless
operator manual is read and understood.
PRE-OPERATION
1. Vacuum carpet and remove other debris.
2. Inspect power cord for damage.
CLEANING CARPETS
1. Activate vacuum and pump switches (Figure 4).
2. Take carpet cleaning wand in hand and squeeze
valve trigger while moving the tool in short
forward and backward strokes over the carpet
(Figure 5).
WHILE OPERATING
1. Overlap each path by 50 mm (2 in).
Warning: Flammable materials or reactive
metals can cause an explosion or fire. Do not
pick up.
2. Periodically check for excessive foam buildup in
recovery tank. Use a recommended foam control
solution to prevent vacuum motor damage.
ATTENTION: Excessive foam buildup will not
activate the float shut-off screen.
3. To clean heavily soiled areas, repeat cleaning
path from a different direction.
4. Empty recovery tank every time water is added to
solution tank.
CLEANING WITH ACCESSORY TOOLS
1. Connect accessory tool hoses to the couplers at
the end of the hoses already attached to the
machine (Figure 6).
GROUNDED OUTLET
(3 hole)
GROUNDING
PIN Fig. 3
Fig. 4
Fig. 5
Fig. 6
36400-E3-Raptor 220F (05-01)
6
OPERATION
1. Operate accessory tool as normal (Figure 7).
NOTE: Before cleaning upholstery, always check
cleaning instructions sewn in furniture by
manufacturer.
2. After cleaning, relieve water pressure from tool
before disconnecting hose. Squeeze trigger for
five seconds after turning switches off.
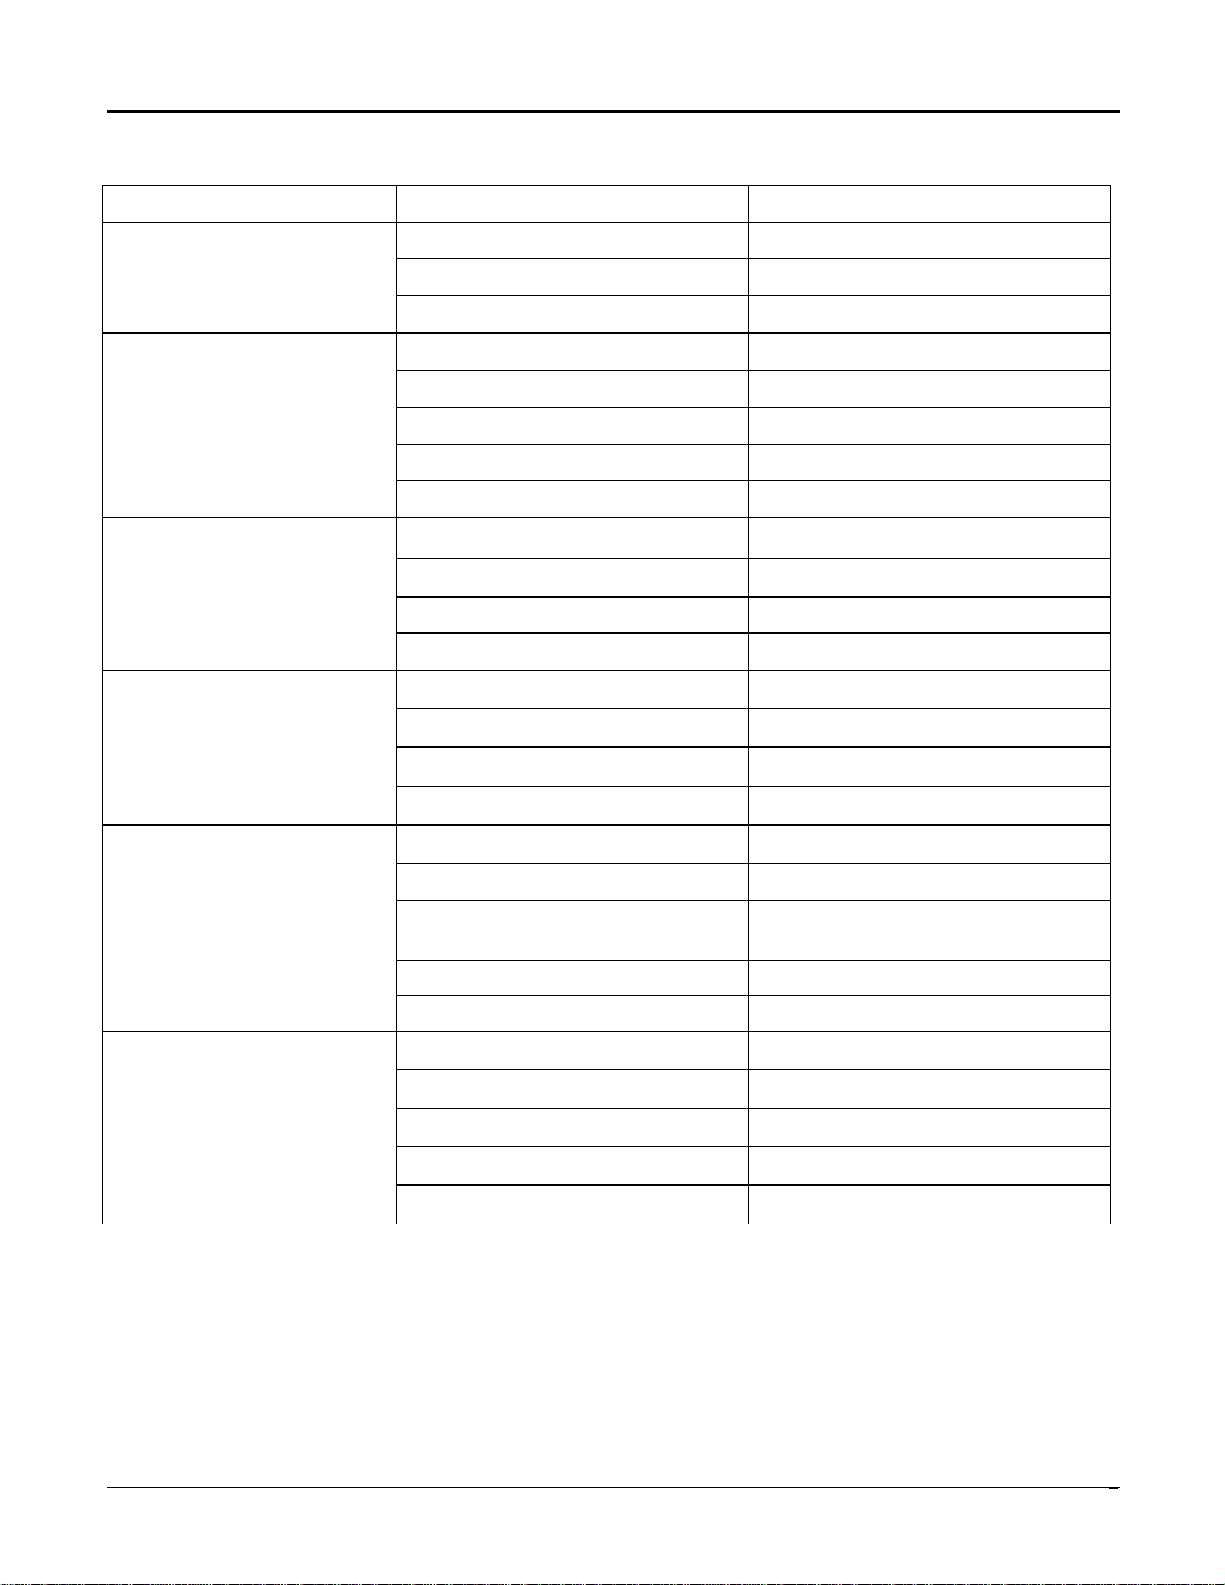
DRAINING TANKS
DRAINING RECOVERY TANK
1. Turn machine off.
2. Insert supplied 45°elbow in drain valve. Place a
bucket below it and slowly pull up on the handle
(Figure 8).
3. Rinse tank with clean water at the end of the day.
DRAINING SOLUTION TANK
1. Remove empty-out nozzle from its storage
bracket (Figure 9) and attach to end of solution
hose.
2. Place empty-out nozzle over a bucket and turn on
pump until all the solution has been pumped from
solution tank.
3. Replace empty-out nozzle to its storage location.
FREEZE PROTECTION
1. After draining solution tank as described in steps
one and two in the previous section (DRAINING
SOLUTION TANK), place empty-out nozzle in
end of vacuum hose and seal with hand
(Figure 10).
2. Turn on vacuum and pump for 15 seconds. This
will fill the pump and hoses with air and prevent
freezing.
3. Replace empty-out nozzle to its storage place.
Fig. 8
Fig. 8
Fig. 10
Fig. 9
Fig. 7

36400-E3-Raptor 220F(05-01) 7
FIG. 11
OPERATION
FLOOD PUMP OPERATION
1. Be certain that the flood pump is properly secured
in the bottom of the recovery tank. Take note of
the space between the case of the flood pump
and the attached stainless steel bracket. Lower
the pump so this space engages the bracket
mounted in the bottom of the recovery tank
(Figure 11).
2. Connect a garden hose (supplied by customer) to
the garden hose discharge fitting located in the
back on the machine (see item 12 page 4).
3. Place the other end of the garden hose at the
proper discharge place.
4. Turn on the pump-out switch (Figure 12). The
flood pump will not come on until the level inside
the recovery tank activates the float switch.
5. Proceed to clean. When completed, turn off the
pump-out switch and manually drain the last
amount of water from the recovery tank.
6. Never turn on the pump-out switch without a
garden hose connected.
FLOOD PUMP REMOVAL
1. Unlatch locking arms of bayonet coupler (Figure
13).
2. Lift flood pump off mounting bracket located in
the bottom of recovery tank. Note its position so it
can be returned to this location.
3. Guide float switch and flood pump through hole in
the top of the waste tank (Figure 14).
FLOOD PUMP FILTER CLEANING
1. Remove lint and debris from filter on bottom of
pump (Figure 15). Remove filter if necessary.
FIG. 12
FIG. 13
FIG. 14
FIG. 15
36400-E3-Raptor 220F (05-01)
8
OPERATION
MACHINE MAINTENANCE
To keep machine in good working condition, simply
follow machine’s daily, weekly and monthly
maintenance procedures.
FOR SAFETY: When servicing machine, unplug
cord from wall outlet.
DAILY MAINTENANCE
(Every 4 Hours of Operation)
1. Empty and rinse out recovery tank thoroughly.
2. Remove float shut-off screen from recovery tank
and clean (Figure 11.)
3. When solution tank is empty, remove and clean
solution filter screen located in the bottom of the
solution tank.
4. Wipe off power cord and check for damage,
replace if necessary. Coil cord neatly after use.
5. Clean machine with an all purpose cleaner and
damp cloth.
WEEKLY MAINTENANCE
(Every 20 Hours of Operation)
1. Inspect vacuum hoses for holes and loose cuffs.
2. Inspect spray pattern for plugging. If plugged,
remove spray tips and soak them in acetic acid
solution for up to six hours. Do not use pointed
objects to unplug tips, damage will occur.
FOR SAFETY: When using machine, follow mixing
and handling instructions on chemical containers.
3. Inspect cord and cord grip for damage. Replace
immediately if damaged.
4. Lubricate metal shaft on recovery tank drain with
water resistant oil.
5. Lubricate female hose couplers with lightweight
oil.
MONTHLY MAINTENANCE
(Every 80 Hours of Operation)
1. Lubricate wheels with water resistant oil.
2. Inspect machine for water leaks and loose
hardware.
QUARTERLY MAINTENANCE
(Every 250 hours of Operation)
Check vacuum motor for carbon brush wear. Replace
motor if worn to a length of 10mm (0.38”) or less.
STORING MACHINE
1. Before storing machine, be certain to drain and
rinse tanks of all water.
2. Store machine in a dry area in the upright position.
3. Open recovery tank lid to promote air circulation.
ATTENTION: Do not expose to rain. Store
indoors.
ATTENTION: If storing machine in freezing
temperatures, be sure that machine and solution
system are completely drained and dry.
RECOMMENDED STOCK ITEMS
Refer to Parts List section for recommended stock
items. Stock items are clearly identified with a bullet
preceding the parts description. See example below:
PART# DESCRIPTION QTY.
J-30. LID, DOME 1
•J-
38GRANITE TOP,SOL TANK ROTO GRANITE 1
J-
39.5GRANITE
HANDLE,WASTE TANK ROTO GRANI 1
J-39GRANITE
WASTE TANK, ROTO GRANITE 1
FIG. 11
36400-E3-Raptor 220F(05-01) 9
OPERATION
TROUBLE SHOOTING
PROBLEM CAUSE SOLUTION
Faulty switches or wiring. Contact Service Center.
Faulty power cord. Contact Service Center.
Machine does not operate.
Building circuit breaker tripped. Reset Breaker.
Faulty switch or wiring. Contact Service Center.
Faulty solution pump motor. Contact Service Center.
Faulty pump head. Contact Service Center.
Trigger on wand not pulled. Pull Solution Trigger.
Solution pump does not operate.
Quick couplers not fully engaged. Connect quick couplers.
Loose or broken wiring. Contact Service Center.
Faulty vacuum switch. Contact Service Center.
Defective vacuum motor. Contact Service Center.
Vacuum motor does not
operate.
Worn carbon brushes. Contact Service Center.
Faulty switch or wiring. Contact Service Center.
Float switch tangled in cord. Untangle cord in vacuum tank.
Filter screen clogged Clean filter screen under flood pump.
Flood pump does not work
Output of flood pump disconnected. Connect quick coupler in waste tank.
Recovery tank drain valve open.Close valve.
Defective recovery tank lid gasket. Replace gasket.
Clogged float shut-off screen. Remove recovery tank lid and clean
screen.
Loose vacuum hose connections. Secure cuffs to hose.
Poor solution pick-up.
Defective vacuum hose. Replace hose.
Plugged spray tips. Clean or replace tips.
Improper spray tip size or spray angle. Replace with proper tips.
Worn spray tips. Replace spray tips.
Solution tank low or empty. Refill solution tank.
Uneven or no spray.
Faulty solution pump. Contact Service Center.

36400-E3-Raptor 220F (05-01)
10
OPERATION
SPECIFICATIONS
MACHINE DIMENSIONS
Model 220
LENGTH 711 mm (28 in)
WIDTH 450 mm (17.7 in)
HEIGHT 1016 mm (40 in)
WEIGHT 50.3 Kg (111 lbs)
SOLUTION TANK CAPACITY 41 L (11 gal)
RECOVERY TANK CAPACITY 38L (10 gal)
SOLUTION PUMP 120 V, 10.2 bar (150psi), 1.04 A
VACUUM MOTORS –2 x 2 STAGE 2 @120 V, 8.6 A, 1032 W
FLOOD PUMP 120 V, 5 A, 600 W 56.8 LITERS (15 GAL)/MIN.
SEALED WATER LIFT 3810 mm (150 in)
TOTAL POWER CONSUMPTION 120V, 20 A, 1800 W
POWER CORDS 1 @ 15.2m (50 ft) 3/12
DECIBEL RATING 3 METERS (10 FT) FROM
MACHINE ON CARPET <78 db(A)
711 mm
(28 in)
1016 mm
(40 in)
450 mm
(17.7 in)
902 mm
(35.5 in)

36400-E3-Raptor 220F(05-01) 11
ELECTRICAL DIAGRAM RAPTOR 220
120 V WIRING DIAGRAM

36400-E3-Raptor 220F (05-01)
12
PARTS LIST RAPTOR 220
TANK GROUP

36400-E3-Raptor 220F(05-01) 13
PARTS LIST RAPTOR 220
TANK GROUP
PART # DESCRIPTION QTY
B-17.2 8-32 X 1/2 PHXSS 4
B-21 10-32 X 5/16 PHXSS 6
B-22 10-32 X 7/16 PHXSS 4
B-23 10-32 X 1/2 PHXSS 1
B-23.7 10-32 X 5/8 PHXSS 1
B-24 10-32 X 3/4 PHXSS 2
B-26.7 10-32 X 1 1/2 PHXZINC 2
B-28.01 NUT 10-32 HEX ZINC 2
B-28.02 NUT, 10-32 SS NYLOCK 2
B-33.05 1/4-20 X 1 HEX HD SS 2
B-36.02 NUT 1/4-20 NYLOK SS 2
B-38.6 WASHER, 1/4 FLAT SS 4
B-40.91 3/8-16 X 1 1/2 HEX ZINC 2
B-40.95 3/8-16 X 3 1/2 HEX ZINC 1
B-40.96 3/8-16 X 4 HEX ZINC 1
B-41.5 WASHER, 3/8 FLAT ZINC 3
B-42.7 WASHER, 3/4 FLAT BLKHD CP 1
B-49 NUT,BULKHEAD 3/4-16 X.225 2
C-01.25 BUSHING,HOLDER EMPTY-OUT 1
C-03.02 CLAMP, HOSE 1/4" #4 1
C-03.12 CLAMP, HOSE 1 1/2 #16 2
C-03.13 CLAMP, HOSE 1 3/4 #20 2
C-03.2 CLAMP, HOSE 2" #24 1
C-03.3 CLAMP, HOSE 2 1/4 #32 2
C-04.3 COUPLER, QC SHANK 1" HOSE 1
C-04.35 COUPLER,QC SHANK 1" X 1"FPT 1
C-04.4 COUPLER, QC MALE 1" HOSE 2
•C-05.05 FILTER, 1/4NPT 50MESH 1
•C-07.6 GASKET,LID FLD WATER RMVL 1
C-11.9 LATCH, SOFT DRAW BLACK 2
C-13.5 PLUG, HOLE NYLON .562 3
•C-26 FLOAT,VAC SHUT OFF ROTO 1
C-30.4 GASKET, 1"ID FLAT RUBBER 1
C-35.5 HOSE BARB,1 1/2XMPT W/FLA 1
C-57 FLAT WASHER 1.75 ID X 2.75 1
D-01.8OR BULK HEAD, 1/4" BRASS W/O-RING 1
D-11.86 COUP,1"MPT X 3/4MHT GRDN HOSE PLSTC 1
D-13.36 COUPLING, BELL 1" X 3/4" GALVANIZED 1
D-17.3 90 ST ELBOW 1" FPT PVC 1
D-20.01 ELBOW 90 1/4NPT X -4 SAE 1
D-41 NIPPLE, 1/4 NPT CLOSE BR 1
D-44.085 NIPPLE 3/4" CLOSE PVC 1
E-14.65 CUFF, 1 1/2 SLIP 1 1/2 HOSE 2
PART # DESCRIPTION QTY
•F-11 Q/C 1/4" SOC BR SHUT OFF 2
G-03.19 O-RING,VITON 2-020 BLKHD 1
J-48CLNMSTR LID, SOLUTION GRNGRANITE CM 1
J-49GRNGRNT LID, ROTO GREEN GRANITE 1
J-57 SPACER, ROTO 1.5"OD X 1.0"ID 1
J-57.5 SPACER,ROTO 3"OD X 2.4"ID 1
K-09.6 CORD 50' 12/3 SJT YELLOW W/LOCK 1
K-16.92 BUSHING, RELIEF 3/8 NPT 1
K-16.96 BUSHING,RELIEF 1/2 NPT 1
K-16.97 NUT,NYLON BUSHING REL.1/2 1
K-17.5 CLAMPS, NYLON CABLE 3/8 1
•K-21W SWITCH, SPST WATER RESIS 4
K-28.05 TIE, WIRE NYLON #10 SCREW 1
M-0791.03 BRACKET,SF-09 HOLDER 1
M-0791.05 BRACKET,DUMP VAL MNT 1
M-0792.1 PLATE,HANDLE SW COVR 1
M-09.1 BRACKET,SUB PUMP CORD SUPPORT 1
M-09.4 BRACKET, SIDE PUMPT MOUNT 1
M-09.45 BRACKET, BASE PUMP MOUNT 1
M-18.2 HINDGE, SOLUTION LID 1
N-30.107 PNL,SW P PVV 1
SC-05.023 ELBOW,90 ASM 3/4"PVC X 3/4FPT 1
SC-05.024 ELBOW, 45 ST VACUUM DUMP 1
SC-05.025E3 ELBOW,PVC LID ASSM 1
SC-35.5 HOSE BARB, ABS 1 1/2 CUT 1
•SD-94.4 CHECK VALVE, COMP FLDWTR RMVL 1
SE-06.7GRY/20 HOSE, 1/4"SOL GRY 20' W/QC'S 1
SE-06.7GRY/20A HOSE, 1/4"SOL GRY 20' 1/4MPTX1/4MPT 1
SE-09.7/8 HOSE, 1"ID VINYL 8"LONG 1
SE-10.05/31 HOSE, VAC 1.5" FLEX 31" 1
SE-10.6/20 HOSE,VAC 1 1/2 x 20' 1
SE-10.6/20A HOSE,VAC 1 1/2X20' W/ 1.5CUFFS 1
SE-12/2.25 HOSE,2" VINYL X 2.25" 1
SF-09 NOZZEL, EMPTY OUT MALE 1
•SG-16 VALVE,DUMP 1.5 W/PVC EXT 1
SJ-41SOLCUP/GRN-G-01
SOL TANK,E2/3 CUP BOT GRNGRNT DRILD 1
SJ-41VACE3/GRNGNT-02
VAC TANK,E3 FLOOD GRN GRNT DRILLED 1
SJ-42CM.3 HNDL,EDG CM BLK 4 SWT,W/DISHOLE RPT 1
SJ-43.75 COMP,VAC FLTR NECK ASSM 1
SJ-49.5GRNGRNT LID COMPLETE GREEN GRANITE 1
SK-09.8 CORD,PIG TAIL COMP. 1
SK-86FLD HARNESS, HANDLE C1P/OPVV 1
SL-23.25 PUMP, SUBMSBLE 115V W/FLT TRMNTED 1
•RECOMMENDED STOCK ITEMS

36400-E3-Raptor 220F (05-01)
14
PARTS LIST RAPTOR 220
BASE GROUP

36400-E3-Raptor 220F(05-01) 15
PARTS LIST RAPTOR 220
BASE GROUP
PART # DESCRIPTION QTY.
B-10 6-32 X 1/2 PHXSS 4
B-14 NUT 6-32 HEX SS 4
B-17.6 8-32 X 3/4PHX ZINC 4
B-18.02 NUT 8-32 NYLOK, ZINC 4
B-21 10-32 X 5/16 PHXSS 1
B-23.7 10-32 X 5/8 PHXSS 3
B-28.01 NUT 10-32 HEX ZINC 3
B-28.03 NUT, 10-32 NYLOK ZINK 4
B-32 1/4-20 X 3/4 HEX HD CP 8
B-33.38 1/4-20 X 3 HEX HD CP 1
B-33.4 1/4-20 X 3 3/4 HEX CP 5
B-36.01 NUT 1/4-20 NYLOK ZINK 13
B-38.5 WASHER, 1/4 FLAT CP 10
B-39.5 WASHER, 1/4 INT. STAR 1
B-42 WASHER 9/16 x 1 1/4 FLAT 4
C-02.3 CASTER 3 1/2" 2
C-03.3 CLAMP, HOSE 2 1/4 #32 3
C-04.1 COTTER, HAIRPIN 7/16-9/16 2
•C-06 GASKET, BLOWER/ARLON 1/4" 2
•C-07.3 GASKET,VAC SEAL BASE 1
C-23.8 WHEEL 10" -1/2"BORE 2
C-59 PUSHNUT FASTNER, 1/2 CAP 2
PART # DESCRIPTION QTY.
C-95 VELCRO, ONE WRAP STRAP 1/2" X 12" 1
D-17 90 ST ELBOW 1/4" NPT 1
D-20.03 ELBOW 90 3/8NPT X -6 SAE 1
E-14 CUFF, 1 1/2SLIP X 1 1/4HOSE 1
F-09 Q/C 1/4" PLUG BR SHUT OFF 1
K-17.3 CLAMP,NYLON CABLE 3/16" 2
K-17.4 CLAMP,NYLON CABLE 1/4" 2
M-0790.5 AXIL, ROD 1/2 ECONO 1
M-0791 AXIL, ROD 1/2 1
M-0791.3 PIVOT, TUBE 3.400" 2
M-0792NH PLATE,VAC MNT SERIES,NO QUIT,NO HTR 1
M-31.17 STANDOFF, 5.7 2.260" 6
M-72 SPACER, QUICK CONNECT 1
M-93 WASHER, .219 X .625 18GA 4
SE-06.7/31 HOSE,3/8NPT X -4SAEFMLSVL 31"LONG 1
SE-06.7/9.5 HOSE,1/4NPTX-6SAEFMLSVL 9.5"LONG 1
SE-12.5/10 HOSE,2" FLEX EXHAUST 10" 2
SJ-40BLK100200210 BASE,BLK DRLD SER NO QT 1
SK-85 HARNESS,BASE C1PVV 1
•SL-004.5 BLOWER,2STG 120V 5.7W/PLUG#11639200 2
•SL-23.7 PMP,DIAPH 150PSI 120V W/WIR&SWITCH 1
•RECOMMENDED STOCK ITEMS

36400-E3-Raptor 220F (05-01)
16
PARTS LIST
PUMP 150 PSI BREAKDOWN
PART # DESCRIPTION QTY.
SL-23.7 •PUMP SH FL 150 PSI 110V 1
N/A PUMP HEAD 150 PSI COMP ASM 1
L-23.76 •SWITCH ASM, 150 PSI SH FL 1
L-22.65 •CHECK VALVE ASM, 100 PSI SH FL 1
L-24.12 HEAD, PUMP DIAPHRAGM 1
L-23.74 •BYPASS VALVE ASM, 150 PSI SH FL 1
L-23.9 DIAPHRAGM, SOLID DRIVE ASM 150PSI
1
SL-23.75 MOTOR,150 PSI 120V SH FL PLG 1
•RECOMMENDED STOCK ITEMS
SL
-
23.7
N/A L-23.9
SL-23.75
L
-
23.76
L-22.65
L-24.12
L-23.74

36400-E3-Raptor 220F(05-01) 17
OPTIONS 20258 ECONO
FLOOR TOOL
PART # DESCRIPTION QTY.
B-24.1 10-32 X 3/4 PHXZINC 1
B-26.57 10-32 X 1 3/8 PHX ZINC 1
B-28.03 NUT, 10-32 NYLOK ZINK 2
B-40.15 5/16-18 X 3/4 HEX CP 2
B-40.33 NUT 5/16-18 NYLOCK, ZINC 2
C-07.9 GRIP, FLRTOOL 1 1/2 X 6 1
D-15.2 45 ST ELBOW 1/4 NPT 1
D-41 NIPPLE, 1/4 NPT CLOSE BR 1
PART #DESCRIPTION QTY.
•F-09 Q/C 1/4" PLUG BR SHUT OFF 1
G-23 VALVE, KNGSTN STD S BND 1
•H-37 JET, 11006 E VEE BRASS 1
M-16.5 HOE HANDLE,ECONO FLRTL 1
M-16.5A "U"CLAMP,SUPP HOE HNDL EC 1
M-19.5 WAND,FLOORTOOL COMP. ECONO
1
SC-82 TRIGGER,COMP KNGSTN VALVE 1
SE-06.7/47 HOSE,1/4 SOL 47"FLRTL ECO 1
•
RECOMMENDED STOCK ITEMS

36400-E3-Raptor 220F (05-01)
18
OPTIONS LP/20208; HP/20216
FLOOR TOOL
PART # DESCRIPTION QTY.
B-24.1 10-32 X 3/4 PHXZINC 1
B-26.57 10-32 X 1 3/8 PHX ZINC 1
B-28.03 NUT, 10-32 NYLOK ZINK 2
B-40.15 5/16-18 X 3/4 HEX CP 2
B-40.33 NUT 5/16-18 NYLOCK, ZINC 2
C-07.9 GRIP, FLRTOOL 1 1/2 X 6 1
D-15.2 45 ST ELBOW 1/4 NPT 1
D-41 NIPPLE, 1/4 NPT CLOSE BR 1
•F-09 Q/C 1/4" PLUG BR SHUT OFF 1
G-23 VALVE,KNGSTN STD "S" BEND 1
PART # DESCRIPTION QTY.
G-23.5 VALVE,KNSTN HP "S" BEND 1
H-02.5 BODY, TEE JET 1/4 BRASS 2
H-03 CAP NUT, TEE JET BRASS 2
•H-18.5 JET,11003 TEE BRASS 2
•H-18.7 JET,110015 E TEE BRASS 2
M-16.5 HOE HANDLE,ECONO FLRTL 1
M-16.5A "U"CLAMP,SUPP HOE HNDL EC 1
M-20 WAND,"S"BND FLTL COM W/HD 1
SC-82 TRIGGER,COMP KNGSTN VALVE 1
SE-06.7/39.2 HOSE,1/4"SOL BLU X39.25DB 1
•
RECOMMENDED STOCK ITEMS
36400-E3-Raptor 220F(05-01) 19
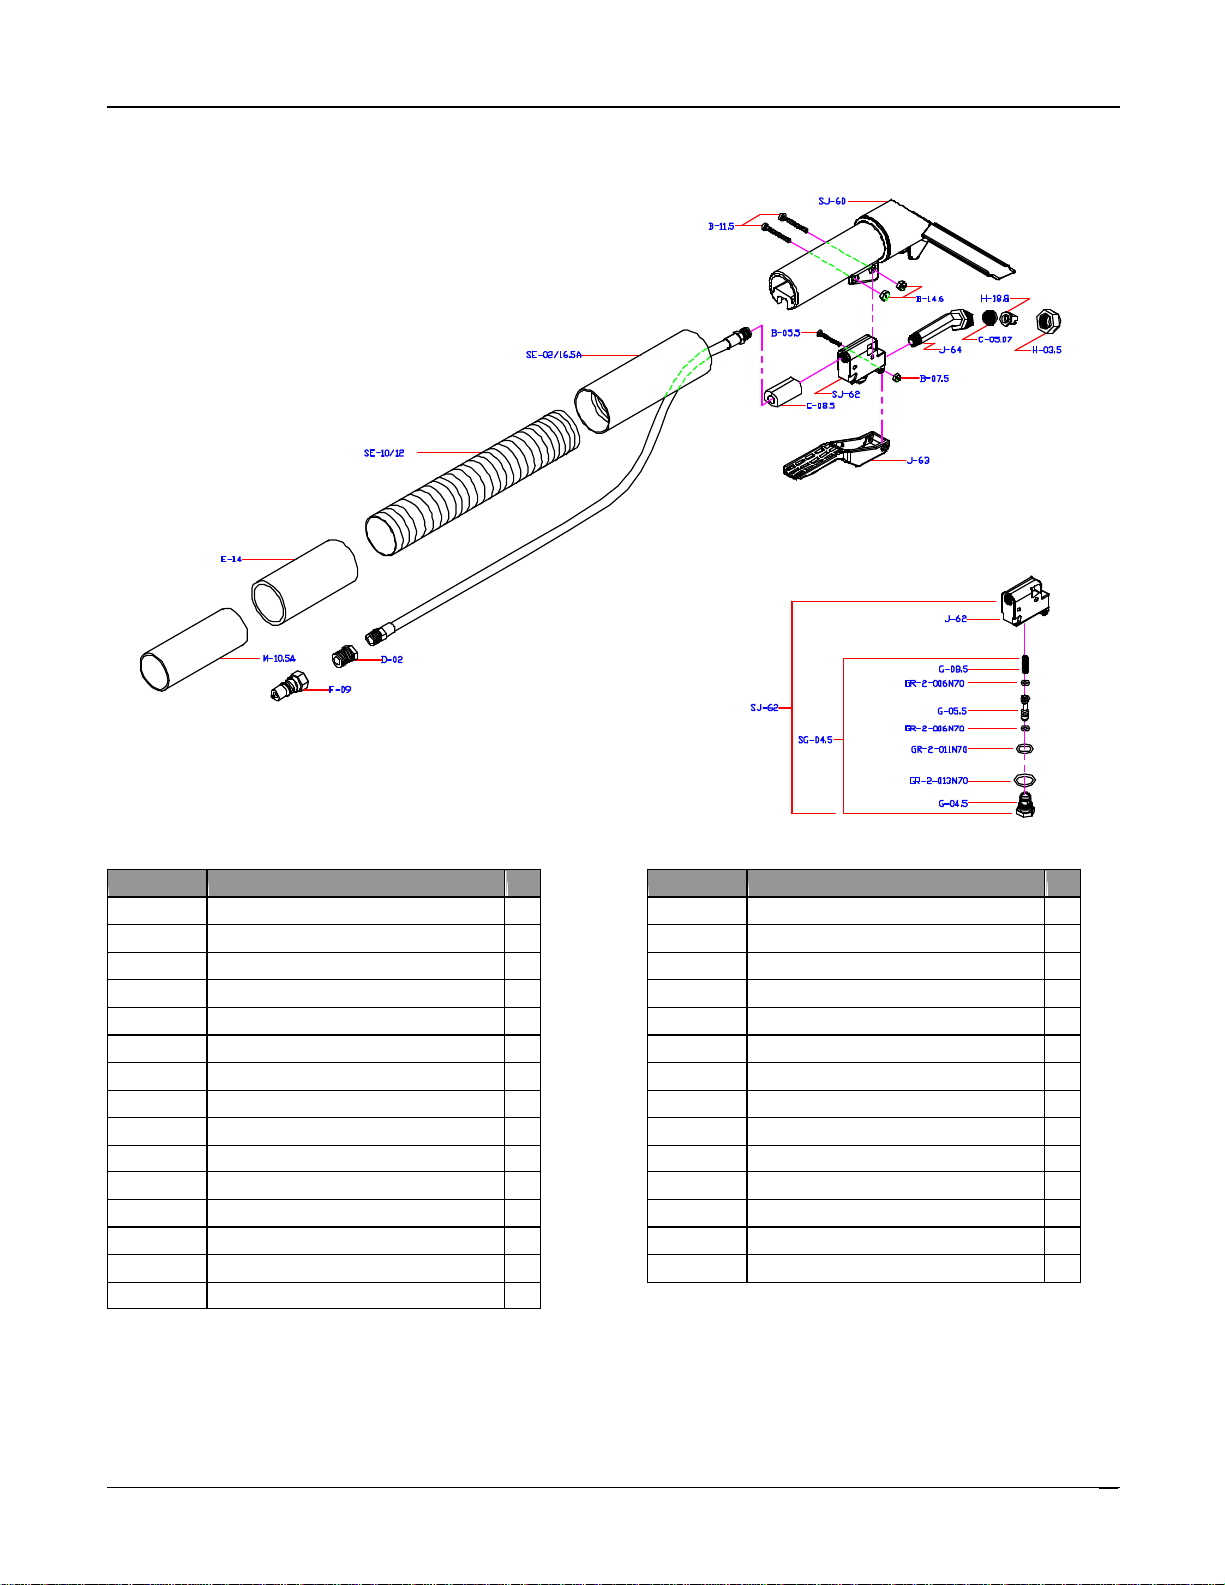
OPTIONS 20078A
HAND TOOL
PART# Description QTY.
B-05.5 4-40 X 7/8 PHXZINC 1
B-07.5 NUT, 4-40 HEX ZINC NYLOK 1
B-11.5 6-32 X 1 PHXZINC 2
B-14.6 NUT, 6-32 HEX ZINC NYLOK 2
B-16.2 8-32 X3/8 PHXSS 1
B-18.01 NUT 8-32NYLOK,SS 1
C-05.07 FILTER, 4" DETAIL TOOL 50 MESH 1
C-08.5 GROMMET, CLEAR DETAIL TOOL 1
D-02 BUSHING 1/4 X 1/8 NPT BR 1
E-13.5 CUFF,EXTRN HOSE 1 1/2SLPX1 1/4HOSE 1
E-14 CUFF, 1 1/2SLIP X 1 1/4HOSE 1
F-09 Q/C 1/4" PLUGBRSHUT OFF 1
G-04.5 GUIDE,VALVESTEMHEXBRASS 1
G-05.5 STEM, VALVE SS 4" DETAIL TOOL 1
G-08.5 SPRING,VALVE4"UPHTOOL 1
PART# Description QTY.
GR-2-006N70 O-RING,2-006 BUNA 70DR 2
GR-2-011N70 O-RING,2-011 BUNA 70DR 1
GR-2-013N70 O-RING,2-013 BUNA 70DR 1
H-03.5 CAP NUT,TEE JET POLYPRO 1
H-18.8 JET, 110015 STD FLAT SPRYTIP PLSTIC 1
J-62 VALVE, 4" DETAIL TOOL AS MOLDED 1
J-63 TRIGGER, 4" DETAIL TOOL 1
J-64 ELBOW, 4" DETAIL TOOL 1
M10.5A COUPLER,1.5"VACHOSEALUM 1
SE-02/16.5A HOSE, 1/8 BLK16.5"ASMW/EXTRNCUFF 1
SE-10/12 HOSE, VAC 1 1/4 GREY/BLACK 12" LONG 1
SG-04.5 STEM ASM 4"TOOL BUNA W/BRASS CAP 1
SJ-60 HANDLE ASM, 4" DETAIL TOOL 1
SJ-62 VALVE,NYLON COMPLETE STD 4"DETAIL 1

36400-E3-Raptor 220F (05-01)
20
WARRANTY POLICY
PARTS ONLY –STANDARD REPLACEMENT POLICY
For the first 12 months from the date of original purchase, in the event that a part believed to be under warranty fails,
simply call Cleanmaster to obtain a Return Authorization, ship the part freight prepaid to Cleanmaster and,
Cleanmaster will either repair or replace the part at no charge if it is determined that failure was a manufacturing
defect. Cleanmaster will then ship the repaired or replaced part back to you freight collect. Our service department
can usually talk a person through any part replacement procedure in a matter of minutes
HOW TO OBTAIN A RETURN AUTHORIZATION
Prior to shipping any part, assembly or machine to Cleanmaster a Return Authorization Number must be requested
from Cleanmaster and displayed prominently on the outside of all packages containing parts or machines for
warranty consideration to be processed and in effect. A Return Authorization can be obtained by calling
Cleanmaster Service Department at 1-425-775-7276. The machine and/or part serial number must be
communicated to Cleanmaster Customer Service to receive a Return Authorization Number. Any machine, part or
assembly must be returned with its original serial number as affixed by Cleanmaster for warranty consideration to be
in effect. All returns will be sent to Cleanmaster at 11015 47th Avenue West, Mukilteo Wa. 98275. Fax
Table of contents
Other CleanMaster Vacuum Cleaner manuals


