Clearblue 90859-2 User manual

Manufactured by ClearBlue Ionizer Inc.
3045 Southcreek Rd. Unit 45
Mississauga ON L4X 2E9
Tel. (866) 704-8404
www.clearblueionizer.com
MADE IN NORTH AMERICA
Active Ingredients
Copper (as elemental):
85.04%
Silver:
5.00%
Other Ingredients:
9.96%
Total Ingredients:
100%
KEEP OUT OF REACH OF CHILDREN
CAUTION
NOTICE TO USER: This control product is to be used
only as directed on this label. Read entire label along
with installation and operation manual before use.
ENVIRONMENTAL HAZARDS
This product is toxic to aquatic organisms.
STORAGE AND DISPOSAL
Store in closed, original container in a cool dry place. Do not store in direct sunlight. Dispose of packaging in
household garbage or recycling stream.
DIRECTIONS FOR USE
It is a violation of federal law to use this product in a manner inconsistent with its labeling. This product will
assist in controlling bacteria and algae in pools and spas by augmenting the bactericidal and algicidal activity of
primary disinfectants such as chlorine or bromine. See owner’s manual inside box for full installation
procedures, maintenance instructions and detailed directions for use. Ensure hardness, pH, alkalinity and TDS
are within acceptable levels. Excessive amounts of algae or bacteria must be controlled prior to installation. Run
the pump a minimum of 8 hours per day. A residual of 0.5ppm chlorine or bromine (equivalent to one 3” tablet
every week or two) should be maintained to break down organics. Once the copper concentration has reached
the required level of 0.2 –0.4 ppm, maintain 0.5 –3 ppm of free available chlorine in pools and 0.5 –5 ppm of
free available chlorine in spas. Shock may be required in cases of extreme weather conditions or increased
bather loads resulting in high contaminants. Regulated pools must follow provincial, state or municipal
guidelines. Before draining a treated pool, spa, hot tub, or fountain, contact your local sanitary sewer and storm
drain authorities and follow their discharge instructions. Do not discharge treated pool or spa water to any
location that flows to a gutter, storm drain or natural water body unless discharge is allowed by state and local
authorities.
REGISTRATION NUMBER 29954 PEST CONTROL PRODUCTS ACT
COMMERCIAL MODEL A-850 COPPER ION RELEASING DEVICE HELPS PREVENT ALGAE GROWTH IN SWIMMING POOLS AND SPAS
A maximum of 151,400L (40,000 Gal) of water can be treated with the ClearBlue Ionizer
NOTICE TO USER: This control product is to be used only in accordance with the directions on this label. It is an offence under
the Pest Control Products Act to use this product in a way that is inconsistent with the directions on the label. The user assumes
the risk to persons or property that arises from any such use of this product.
Read the label and the installation and operation manual before using
EPA MASTER LABEL
EPA REG. No. 90859-2
EPA EST. No. 90859-CAN-1

Page 2
Table of Contents
Electrical Requirements.................................................................................................................................................3
Installation Instructions for Pools..................................................................................................................................4
Install the Tee............................................................................................................................................................4
Cut plumbing and glue in the tee..........................................................................................................................4
Install the Mineral Cell ..............................................................................................................................................5
Install the System Controller.....................................................................................................................................5
System Controller Configuration ...................................................................................................................................6
Ion/Action .................................................................................................................................................................6
Large Dose.................................................................................................................................................................6
Calculating Pool Volume ...........................................................................................................................................7
Ion/Action and Large Dose Setting from Gallons ......................................................................................................8
Ion/Action and Large Dose Setting from Litres .........................................................................................................8
Program Lock (PL)......................................................................................................................................................8
Low TDS Mode (Two Decimals on Number Screen)..................................................................................................8
Topside Control Option (Hot Tubs Only) .......................................................................................................................9
Topside Ionizing Indicator .........................................................................................................................................9
Topside Large Dose Function ....................................................................................................................................9
Turn Off Ionizing........................................................................................................................................................9
Turn On Ionizing ........................................................................................................................................................9
Topside Cell Connection Indicator ............................................................................................................................9
Replacing the Mineral Cell.............................................................................................................................................9
Pool and Water Maintenance......................................................................................................................................10
Opening your Pool...................................................................................................................................................10
Filling your Pool.......................................................................................................................................................10
Water Parameters...................................................................................................................................................11
Regular Water Maintenance ...................................................................................................................................11
Closing the Pool.......................................................................................................................................................12
Cleaning and Care........................................................................................................................................................12
System Controller....................................................................................................................................................12
Mineral Cell .............................................................................................................................................................12
Troubleshooting ..........................................................................................................................................................13
Specifications...............................................................................................................................................................14
Warranty......................................................................................................................................................................14
Contact ........................................................................................................................................................................14
Page 3
Thank you for purchasing a ClearBlue Ionizer. This device will assist in controlling bacteria and algae in
pools and spas by augmenting the bactericidal and algicidal activity of primary disinfectants such as
chlorine or bromine. Once the copper concentration has reached the required level of 0.2 –0.4ppm,
maintain 0.6 –3ppm of free available chlorine in pools and 0.6 –5ppm of free available chlorine in spas.
Regulated pools must follow provincial, state, or municipal guidelines.
READ AND FOLLOW ALL INSTRUCTIONS
•WARNING: To reduce the risk of injury, do not permit children to use this product unless
they are closely supervised at all times.
•This unit is only water resistant when the mineral cell cable is plugged into the cell receptacle.
Failure to do this may result in internal water damage.
•Use this equipment only for its intended use as described in this manual.
•This system should be serviced only by the manufacturer. Contact the manufacturer for
examination, repair, or adjustment.
•Do not immerse cord or plug in water.
•Keep cord away from heated surfaces.
•Heavy bather loads may trigger the need for additional chlorine/bromine.
•Check the expiry date of the test kit as test results may be inaccurate if used after that date.
•Use a registered or scheduled pool or spa sanitizer to maintain an appropriate
chlorine/bromine residual in the water.
•The average life expectancy of the mineral cell is six months (2160 “on” hours)
•When replacing the mineral cell, use replacement cells having a label that clearly states that it
is a replacement mineral cell for a mineral ion releasing device manufactured by ClearBlue
Ionizer Inc.
Electrical Requirements
The retailer and manufacturer cannot accept any liability for damage to the equipment or personal
injury resulting from failure to observe the correct electrical connection procedures.
WARNING: Risk of Electric Shock. Connect only to a grounding type receptacle protected by a
ground-fault circuit-interrupter
WARNING: A ground-fault circuit-interrupter (GFCI) should be provided by the installer and should
be tested on a routine basis. To test the GFCI, push the test button. The GFCI should interrupt
power. Push the reset button. Power should be restored. If the GFCI fails to operate in this manner,
the GFCI is defective. If the GFCI interrupts power to the unit without the test button being pushed,
a ground current is flowing, indicating the possibility of an electric shock. Do not use this unit.
Disconnect the unit and have the problem corrected by a qualified service representative before
using.
WARNING: To reduce the risk of electric shock, replace systems with a damaged cord immediately.
SAVE THESE INSTRUCTIONS

Page 4
Installation Instructions for Pools
The ClearBlue Ionizer system install requires three components that are included in the kit. You will also
need a hacksaw or reciprocating saw, PVC primer and PVC glue that are not included.
System Controller
Clear PVC Tee
Mineral Cell
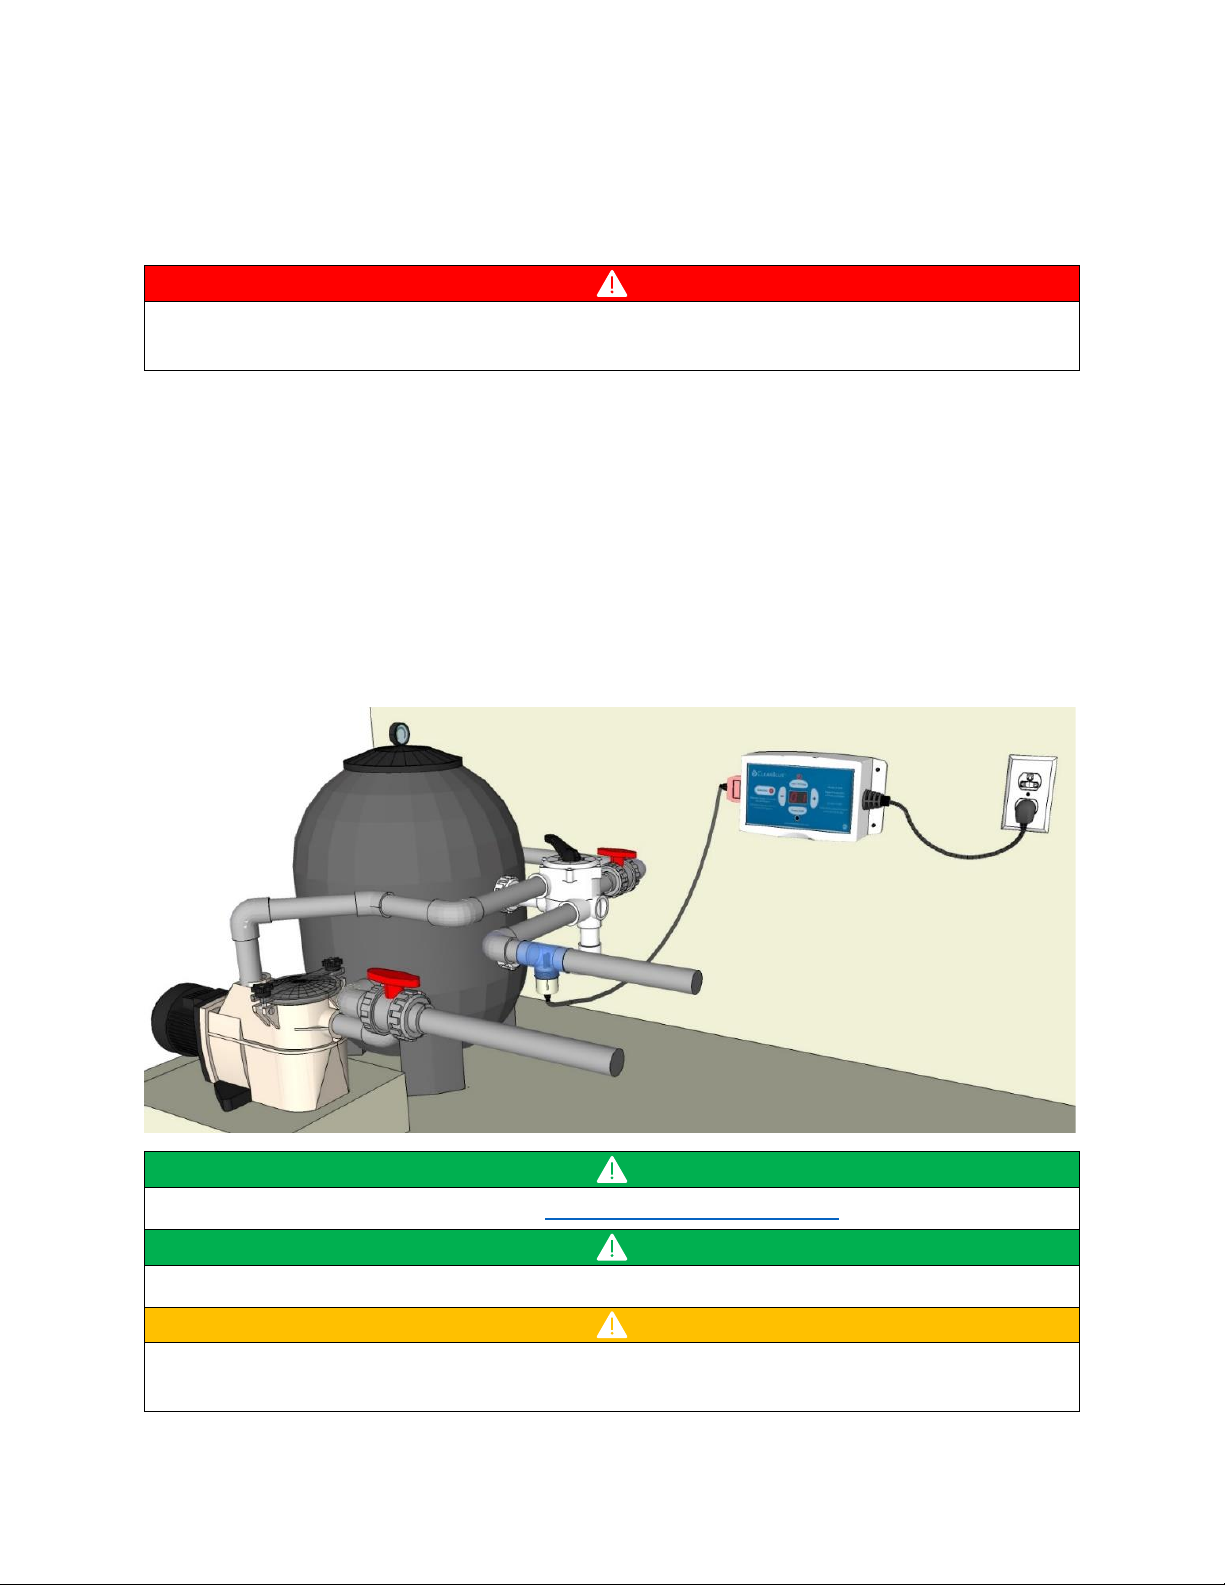
Install the Tee
The tee is installed by gluing it into your pool PVC plumbing. The ideal spot for it is on the return line,
after the pump, filter, and heater (if applicable). If you have a salt or inline chlorinator installed, the tee
should go before the chlorinator. If you do not have space on the return line for the tee, it can go
anywhere in the plumbing that it fits.
The tee should be oriented such that it looks like a capital T if possible. If it is not possible to install
in this manner, it can be installed in any orientation other than an ‘upside down’ capital T.
Cut plumbing and glue in the tee
1) Turn off the pool pump and let the water drain out of the pipe
2) Cut a 2.5” (63mm) section out of the PVC plumbing using a hacksaw or reciprocating saw
3) Remove any dust and burrs from the pipe
4) Apply PVC primer and glue both to the outside of the pipe and the inside of the tee
5) Slide the tee over the pipe on one side as far as it will go and then other side
6) For each glue joint, hold the tee in place for 30 seconds
7) Let the glue dry for 2 hours before turning on the pump
Page 5
Install the Mineral Cell
Once the PVC glue has dried, you can install the Mineral Cell by threading it into the tee. Teflon tape is
not needed. Tighten the cell until it is hand tight. Orient the bars such that the water will flow between
the two bars (or as close as possible with no leaking). Once the controller is mounted, you will plug the
cell into the controller.
Unplug or turn off the power to the controller before plugging in or unplugging the cell. Otherwise,
you could damage the control board.
Install the System Controller
The system controller can be mounted on a wall, wood post, the side of the above ground pool, or
anywhere else that it can be fastened with screws or Velcro tape. Make sure that the power cable for
the controller reaches the power source and the cable from the cell reaches the controller. The
controller is rated for outdoor use, but it should be protected from rain and out of the direct sunlight for
longest life. Placing the controller in a hut or weatherproof enclosure is recommended.
If you are hard wiring the controller into a 240V panel, you can have an electrician clip off the plug and
wire it per local electrical code. Once you have mounted the controller, you can plug the mineral cell
into the receptacle on the side of the controller.
Check out this installation video for pools: https://youtu.be/SGAK0yD6630
The same controller can be plugged into a 120V wall outlet or wired to a 240V panel.
Make sure that the power cable for the controller reaches the power source and the cable from the
cell reaches the controller.

Page 6
When the cell cable is plugged into the controller and the housing is completely threaded into the
tee with the two electrode bars under water, the ‘Ionizing’ light will illuminate or flash blue. If the
‘Ionizing’ light is flashing red, make sure that the cell is plugged in all the way and the two electrode
bars are completely under water.
If your controller has a standard wall plug, it must be plugged into a GFCI protected outlet.
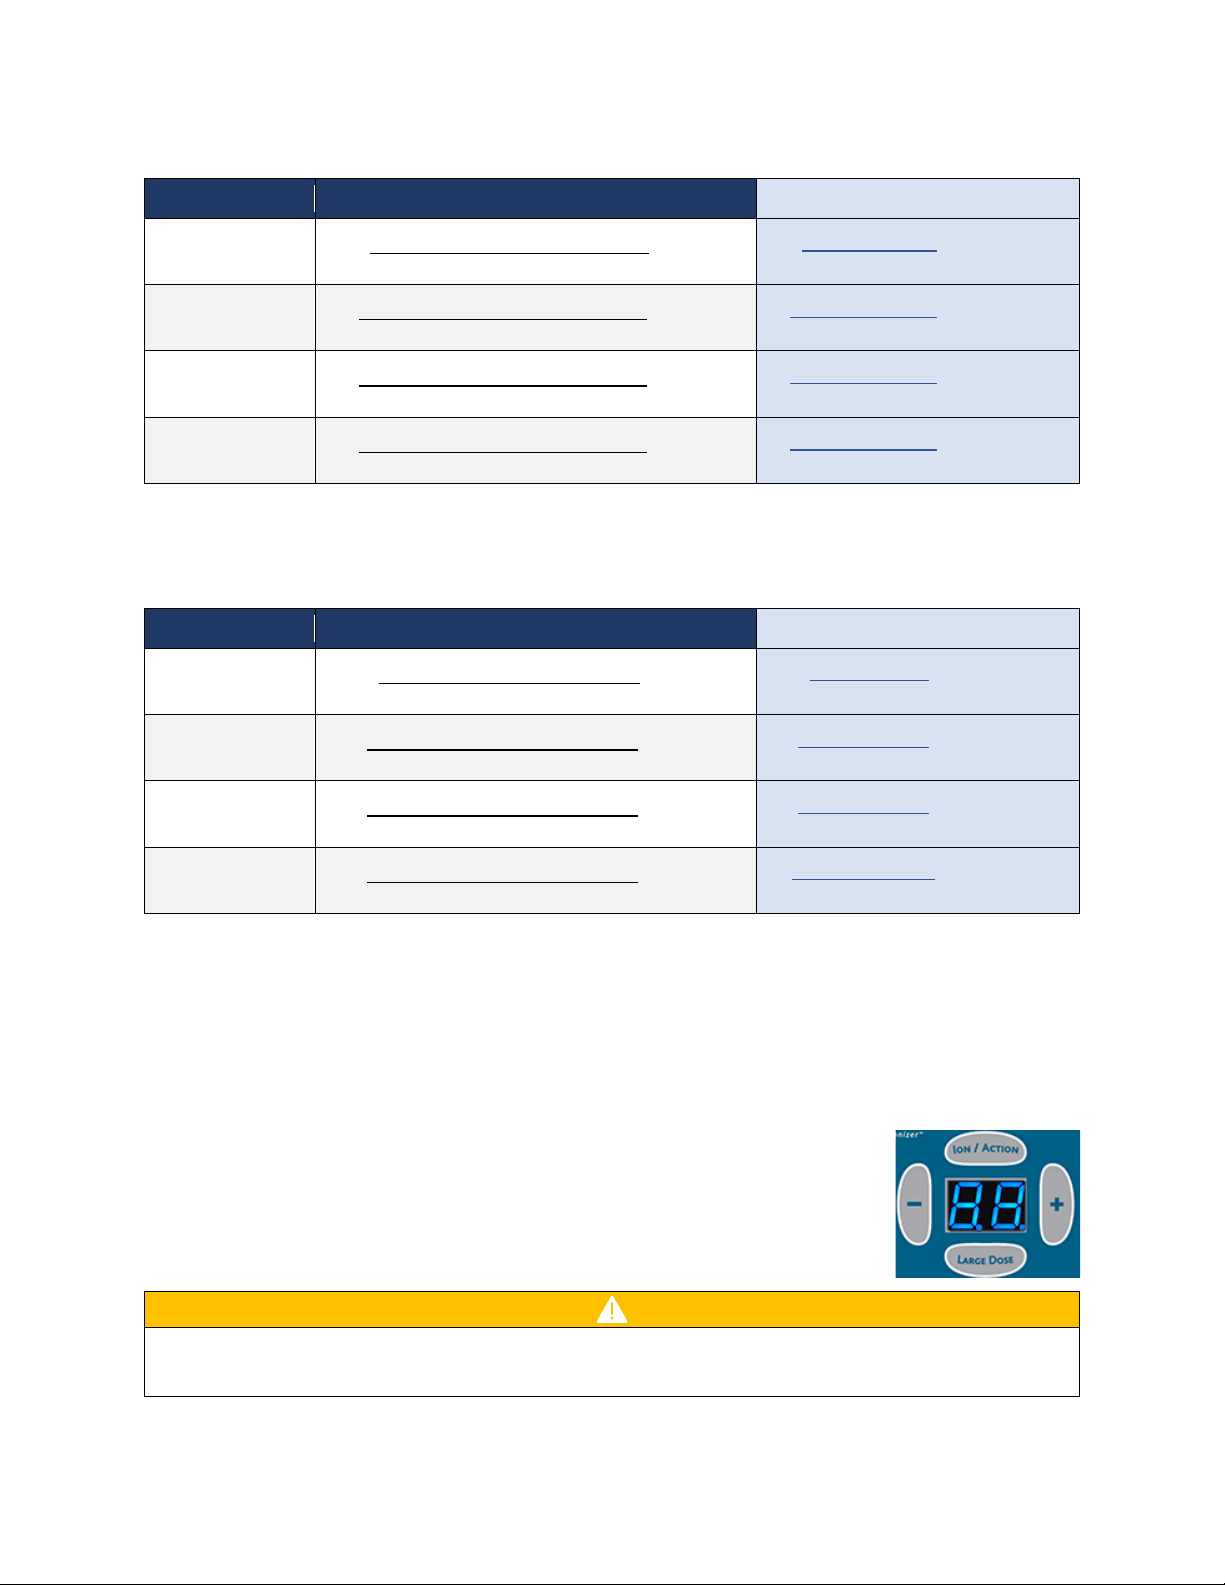
System Controller Configuration
The System Controller has two main functions: Ion/Action and Large Dose
Ion/Action
The Ion/Action setting is the maintenance setting. It represents a percentage of the maximum output
level and is set according to your pool or hot tub size. For example, an Ion/Action setting of 88 means
the controller is outputting minerals at 88% of maximum output. Use the + and –keys to increase or
decrease the number and reach the desired setting. When the controller is set to Ion/Action, the blue
light above the Ion/Action button will illuminate and the ‘Ionizing’ light will be solid blue.
Large Dose
The Large Dose setting is the ramp-up setting. It represents the number of hours that the controller is
set to maximum output. For example, a Large Dose setting of 88 means the controller will run on ‘full
blast’ for 88 hours. As the hours count down, the number will decrease by one each hour until it gets to
01. After the final hour, the controller will switch automatically to the Ion/Action mode.
Use the + and –keys to increase or decrease the number and reach the desired setting. When the
controller is set to Large Dose, the blue light below the Large Dose button will illuminate and the
‘Ionizing’ light will be flashing blue.
The Large Dose setting should be used when:
1) First filling the pool
2) Refilling in the Spring or throughout the season
3) Copper level has not reached 0.2ppm or dips below 0.2ppm
Page 7
Use the calculations below to calculate the setting for Ion/Action and Large Dose based on your
ClearBlue model and pool or spa volume. The Ion/Action and Large Dose can be set to the same
value.
Use the Large Dose Function as many times as needed until the copper level reaches 0.2ppm.
Set the Ion/Action setting first, then set the Large Dose. The Large Dose timer will count down and
then switch automatically back to the Ion/Action setting.
The setting calculations are guidelines only. You must use a copper test and increase or decrease
the Ion/Action setting as required to ensure the copper level is maintained at 0.2ppm to 0.4ppm.
DO NOT REDUCE CHLORINE/BROMINE CONCENTRATION UNTIL COPPER LEVEL REACHES 0.2PPM
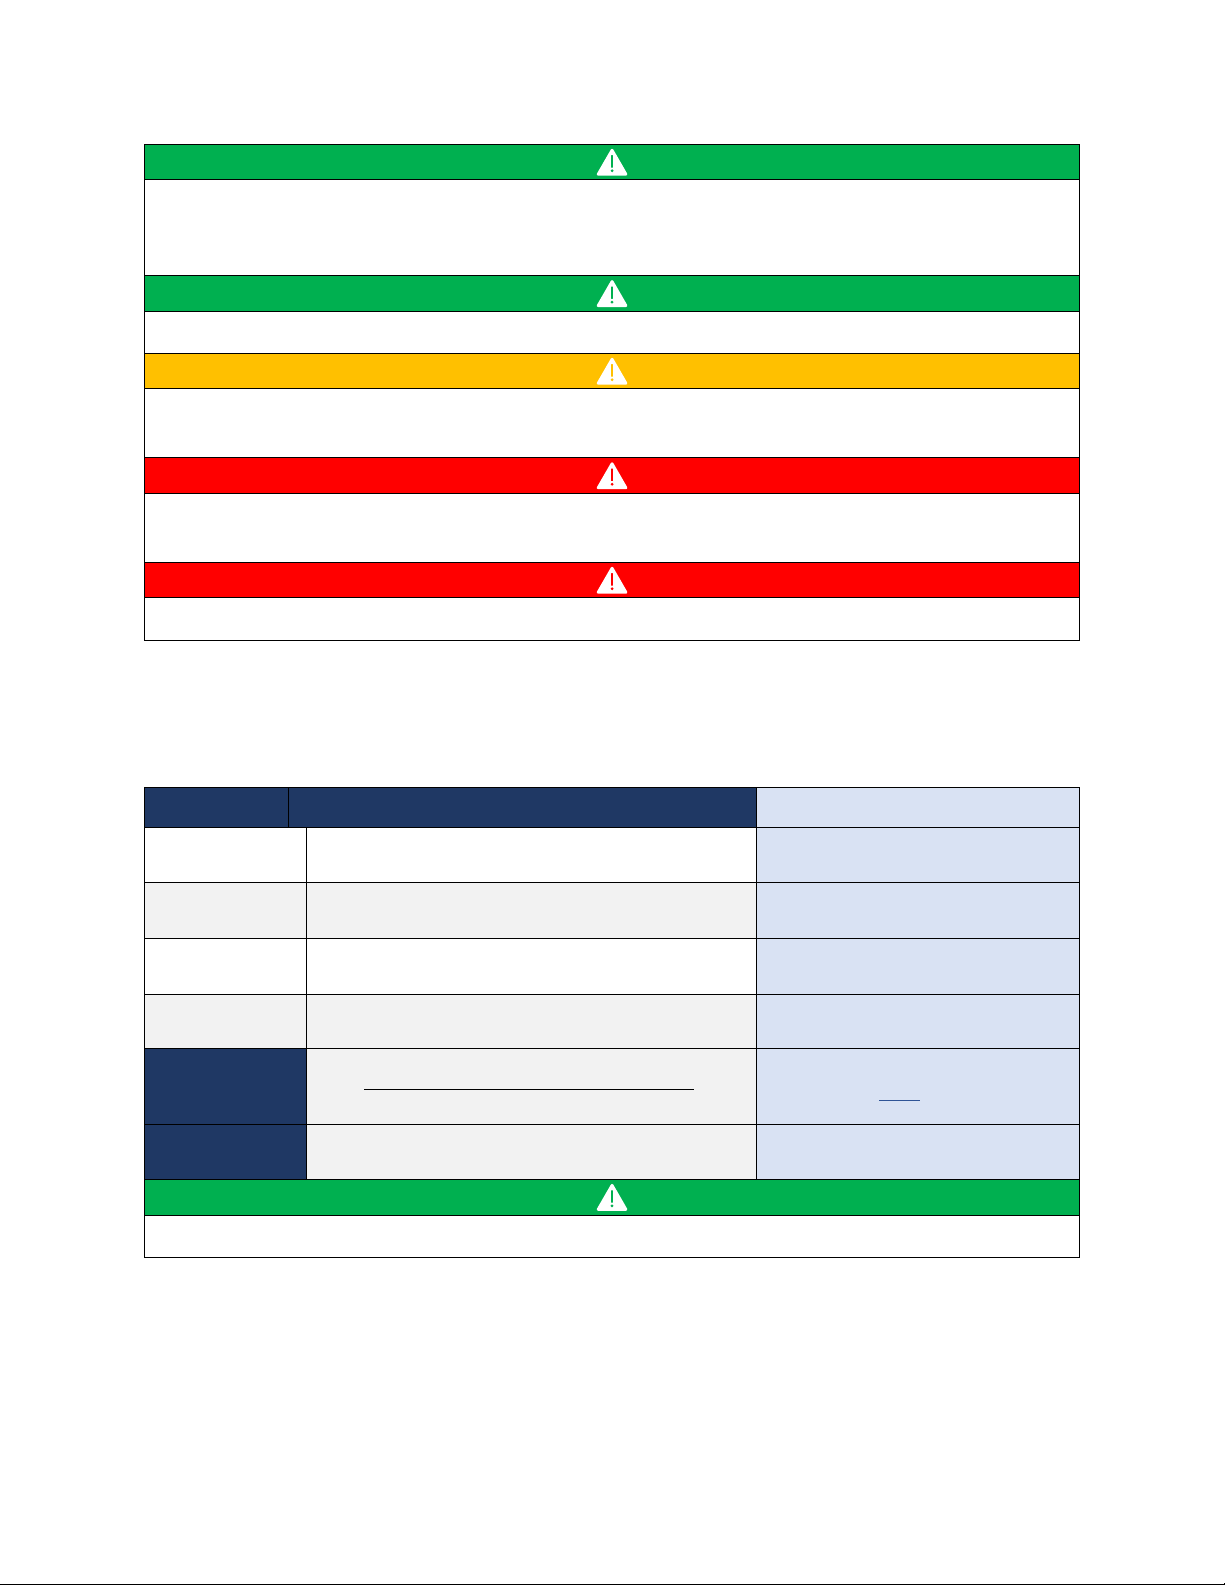
Calculating Pool Volume
The ClearBlue controller settings are based on the volume of water in your pool or hot tub. Please use
the calculations below to determine your water volume.
Pool Type
Calculation (Using Feet & Gallons)
Example
Rectangle
Length x Width x Avg. Depth x 7.5 = Volume (gal)
16 ft x 32 ft x 4 ft deep, 8 ft deep end
16 x 32 x 6 x 7.5 = 23,040 gal
Circle
Diameter x Diameter x Avg Depth x 5.9 = Volume (gal)
24ft round pool x 4ft deep
24 x 24 x 4 x 5.9 = 13,594 gal
Oval
Long Dia. x Short Dia. x Avg Depth x 5.5 = Volume (gal)
18ft x 33ft oval pool x 4ft deep
33 x 18 x 4 x 5.5 = 13,068 gal
Irregular Shape
Length x (Width 1 + Width 2) x 0.45 x Avg Depth x 7.5
= Volume (gal)
16 ft long 5 ft deep kidney pool
16 x (8 + 10) x 0.45 x 5 x 7.5 = 4860 gal
Average Depth
𝑫𝒆𝒆𝒑 𝑬𝒏𝒅 𝑫𝒆𝒑𝒕𝒉 + 𝑺𝒉𝒂𝒍𝒍𝒐𝒘 𝑬𝒏𝒅 𝑫𝒆𝒑𝒕𝒉
𝟐
4ft deep pool with 8ft deep end
8 + 4
2 = 6
Meters to Feet
𝐋𝐞𝐧𝐠𝐭𝐡 𝐢𝐧 𝐌𝐞𝐭𝐞𝐫𝐬 𝐱 𝟑. 𝟐𝟖𝟏 = 𝐋𝐞𝐧𝐠𝐭𝐡 𝐢𝐧 𝐅𝐞𝐞𝐭
10 meter long pool in feet
10 x 3.281 = 32.81 ft
For the water volume of a hot tub, please consult your hot tub dealer or manual
Page 8
Ion/Action and Large Dose Setting from Gallons
The model number is on the back of the controller.
Model
Ion/Action and Large Dose Setting Calculation
Example
A-400
2,500 gal max
𝑴𝒚 𝑺𝒑𝒂 𝑽𝒐𝒍𝒖𝒎𝒆 𝒊𝒏 𝑮𝒂𝒍𝒍𝒐𝒏𝒔
𝟐, 𝟓𝟎𝟎 𝑮𝒂𝒍𝒍𝒐𝒏𝒔 𝒙 𝟑𝟑
𝟕𝟓𝟎 𝑮𝒂𝒍𝒍𝒐𝒏𝒔
𝟐, 𝟓𝟎𝟎 𝑮𝒂𝒍𝒍𝒐𝒏𝒔 𝒙 𝟑𝟑 = 𝟏𝟎
A-700
18,000 gal max
𝑴𝒚 𝑷𝒐𝒐𝒍 𝑽𝒐𝒍𝒖𝒎𝒆 𝒊𝒏 𝑮𝒂𝒍𝒍𝒐𝒏𝒔
𝟏𝟖,𝟎𝟎𝟎 𝑮𝒂𝒍𝒍𝒐𝒏𝒔 𝒙 𝟏𝟎𝟎
𝟏𝟎,𝟎𝟎𝟎 𝑮𝒂𝒍𝒍𝒐𝒏𝒔
𝟏𝟖,𝟎𝟎𝟎 𝑮𝒂𝒍𝒍𝒐𝒏𝒔 𝒙 𝟏𝟎𝟎 =𝟓𝟔
A-800
25,000 gal max
𝑴𝒚 𝑷𝒐𝒐𝒍 𝑽𝒐𝒍𝒖𝒎𝒆 𝒊𝒏 𝑮𝒂𝒍𝒍𝒐𝒏𝒔
𝟐𝟓,𝟎𝟎𝟎 𝑮𝒂𝒍𝒍𝒐𝒏𝒔 𝒙 𝟏𝟎𝟎
𝟏𝟓,𝟎𝟎𝟎 𝑮𝒂𝒍𝒍𝒐𝒏𝒔
𝟐𝟓,𝟎𝟎𝟎 𝑮𝒂𝒍𝒍𝒐𝒏𝒔 𝒙 𝟏𝟎𝟎 =𝟔𝟎
A-850
40,000 gal max
𝑴𝒚 𝑷𝒐𝒐𝒍 𝑽𝒐𝒍𝒖𝒎𝒆 𝒊𝒏 𝑮𝒂𝒍𝒍𝒐𝒏𝒔
𝟒𝟎,𝟎𝟎𝟎 𝑮𝒂𝒍𝒍𝒐𝒏𝒔 𝒙 𝟏𝟎𝟎
𝟑𝟏,𝟎𝟎𝟎 𝑮𝒂𝒍𝒍𝒐𝒏𝒔
𝟒𝟎,𝟎𝟎𝟎 𝑮𝒂𝒍𝒍𝒐𝒏𝒔 𝒙 𝟏𝟎𝟎 =𝟕𝟖
Ion/Action and Large Dose Setting from Litres
The model number is on the back of the controller.
Model
Ion/Action and Large Dose Setting Calculation
Example
A-400
9,500 L max
𝑴𝒚 𝑺𝒑𝒂 𝑽𝒐𝒍𝒖𝒎𝒆 𝒊𝒏 𝑳𝒊𝒕𝒓𝒆𝒔
𝟗, 𝟓𝟎𝟎 𝑳𝒊𝒕𝒓𝒆𝒔 𝒙 𝟑𝟑
𝟐, 𝟖𝟒𝟎 𝑳𝒊𝒕𝒓𝒆𝒔
𝟗, 𝟓𝟎𝟎 𝑳𝒊𝒕𝒓𝒆𝒔 𝒙 𝟑𝟑 = 𝟏𝟎
A-700
68,100 L max
𝑴𝒚 𝑷𝒐𝒐𝒍 𝑽𝒐𝒍𝒖𝒎𝒆 𝒊𝒏 𝑳𝒊𝒕𝒓𝒆𝒔
𝟔𝟖,𝟏𝟎𝟎 𝑳𝒊𝒕𝒓𝒆𝒔 𝒙 𝟏𝟎𝟎
𝟑𝟕,𝟖𝟓𝟎 𝑳𝒊𝒕𝒓𝒆𝒔
𝟔𝟖,𝟏𝟎𝟎 𝑳𝒊𝒕𝒓𝒆𝒔 𝒙 𝟏𝟎𝟎 =𝟓𝟓
A-800
94,650 L max
𝑴𝒚 𝑷𝒐𝒐𝒍 𝑽𝒐𝒍𝒖𝒎𝒆 𝒊𝒏 𝑳𝒊𝒕𝒓𝒆𝒔
𝟗𝟒,𝟔𝟓𝟎 𝑳𝒊𝒕𝒓𝒆𝒔 𝒙 𝟏𝟎𝟎
𝟓𝟔,𝟕𝟖𝟎 𝑳𝒊𝒕𝒓𝒆𝒔
𝟗𝟒,𝟔𝟓𝟎 𝑳𝒊𝒕𝒓𝒆𝒔 𝒙 𝟏𝟎𝟎 =𝟔𝟎
A-850
151,400 L max
𝑴𝒚 𝑷𝒐𝒐𝒍 𝑽𝒐𝒍𝒖𝒎𝒆 𝒊𝒏 𝑳𝒊𝒕𝒓𝒆𝒔
𝟏𝟓𝟏,𝟒𝟎𝟎 𝑳𝒊𝒕𝒓𝒆𝒔 𝒙 𝟏𝟎𝟎
𝟏𝟏𝟕,𝟑𝟓𝟎 𝑳𝒊𝒕𝒓𝒆𝒔
𝟏𝟓𝟏,𝟒𝟎𝟎 𝑳𝒊𝒕𝒓𝒆𝒔 𝒙 𝟏𝟎𝟎 =𝟕𝟖
Program Lock (PL)
The Program Lock feature allows you to the lock the controls so that they are not inadvertently changed.
To activate the Program Lock, press and hold the + and –keys simultaneously for 20 seconds or until ‘PL’
is shown on the two-digit number screen. Do the same to remove the Program Lock.
Low TDS Mode (Two Decimals on Number Screen)
If the total dissolved solids (TDS) level of the water is low, the controller will go
into Low TDS Mode which is indicated by the two decimals on the screen coming
on. There is no impact to the performance of the system if it switches into Low
TDS Mode and these two decimals can be ignored. However, it is recommended
to test the TDS and increase if needed according to the levels given on page 9.
Low TDS Mode may be activated when the mineral cell is low. If the decimals appear but the TDS is
in range, check the cell. If the bars are worn down to 0.5” (10mm) or below it is time to change it.

Page 9
Topside Control Option (Hot Tubs Only)
Topside control found on some hot tubs
Topside Ionizing Indicator
When the mode of the controller is set to “Ion/Action” and the “Ionizing” light is illuminated on the
controller, the area in the center of the topside control will illuminate in blue.
Topside Large Dose Function
Press the center of the logo to engage the “Large Dose” mode for the number of hours programmed on
the controller. When “Large Dose” is active, the area in the center of the topside control will flash in
blue. Once the cycle expires, the controller will go back to “Ion/Action”, the center area will illuminate in
blue and the flashing will stop. To stop the Large Dose mode before the cycle finishes, hold down the
button in the center of the logo for 10 seconds.
Turn Off Ionizing
If the mineral level is too high, or you would like to shut off the ionizing for any other reason, hold down
the button in the center of the logo for 10 seconds or until the blue light goes off.
Turn On Ionizing
If the ionizing function has been turned off, press the button in the center of the logo to turn it back on.
The center of the logo will illuminate in blue to indicate that the system is ionizing.
Topside Cell Connection Indicator
When the mineral cell is unplugged, the electrode bars are not under water, or the cell is worn past its
useful life, the light in the center of the topside control will flash red.
Replacing the Mineral Cell
The mineral cell will last 3 –12 months depending on the size of the pool, the temperature of the water,
the amount and intensity of sun reaching the water, and pool usage. The first cell will always wear down
faster because it is used up quicker to ramp up the minerals.
Unplug or turn off the power to the controller before plugging in or unplugging the cell. Otherwise,
you could damage the control board.
It is important to check the cell regularly and make sure there is still some material left on the bars. If
the bars are worn down to 0.5” (10mm) in length or below, it is time to change the cell. When the cell is
completely used up, the ‘Ionizing’ light will flash red.

Page 10
For a pool, it is recommended to change the cell before the start of the pool season or at least every
6 months. For a hot tub, it is recommended to check the cell every 6 months and remove any scale
that has formed on the electrode bars.
To maximize the life of the mineral cell:
1) Keep the copper level at 0.2ppm
2) Cover the pool when it is not in use
3) Keep the chlorine/bromine level between 0.5ppm to 1ppm
4) Use a chlorine or non-chlorine shock once per week
5) Keep phosphates low
If the mineral cell life is less than 3 months or you are having trouble reaching 0.2ppm copper, even
with multiple Large Dose settings, make sure that the phosphate level of the water is below
200ppb. Phosphates act like fertilizer for algae, so the minerals are used up quicker fighting off
rampant algae growth. Your pool water can be tested for phosphates at your local pool store. There
are several products available that will reduce the phosphate level in your pool.
It is important to change the cell before it is completely used up. This is to ensure that the mineral
levels do not drop off which can lead to green water. Green water is unsafe and requires expensive
treatments to clear. Change the cell when the bars are worn to 0.5” (10mm) in length or below.
Pool and Water Maintenance
For the best results from your mineral pool, it is important to start with clean water, keep water
parameters in range, maintain a low chlorine/bromine residual and oxidize excess organic material
on a regular basis.
Opening your Pool
When you open your ClearBlue mineral pool, you can follow the instructions of your pool builder or pool
store. They may recommend an opening kit with products designed to condition the water and get you
swimming as quickly as possible.
Opening kits sometimes use a 'stain and scale remover' or other type of sequestering agent. We do not
recommend using this type of product because it will remove the ClearBlue minerals and neutralize new
mineral production for up to 6 weeks.
If your mineral cell is more than six months old, it should be replaced when you open your pool.
Filling your Pool
We recommend using a pre-filter that attaches to your garden hose when filling your pool. The pre-filter
removes unwanted metals and sediment from the water, so the water is as pure as possible for your
use. If you live in a rural area and are filling from a well, this is even more important.

Page 11
Metal removers, sequestering agents and some stain removers conflict with ClearBlue. If one of
these products is used, it will remove the ClearBlue minerals and neutralize minerals for up to 6
weeks. Unplug or power off the ClearBlue controller for at least 4 weeks after using these products
to prevent unnecessary wear to the cell.
Water Parameters
For the best results, maintain the water parameters in the following ranges.
Apart from the copper and low level of chlorine, the water parameters below are standard for any
pool or hot tub.
Parameter
Range
Notes
Copper
0.2 –0.4ppm
Once 0.2ppm is reached, test for copper every two weeks
pH
7.2 –7.6
pH out of range will cause the water to feel harsh
Alkalinity
80 –120ppm
Calcium
200 –400ppm
Calcium below 200ppm will cause etching to pool surfaces
and equipment; Calcium above 400ppm can lead to scaling
TDS
500 –2,000ppm
Phosphates
<100ppb
It is critical to keep phosphates low to ensure maximize the
life of the mineral cells and minimize chlorine/bromine usage
Chlorine
0.5 –1ppm
Chlorine should be 1 –3ppm until copper reaches 0.2ppm
Regular Water Maintenance
For your pool water to look, feel and smell the best, it is important to maintain a low level of chlorine or
bromine and oxidize regularly.
We recommend using one 3” chlorine or bromine per week and oxidizing with a chlorine or non-
chlorine shock once per week.
Adding an inline chlorine reservoir to your filtration system is a low-cost way to minimize the
chlorine maintenance. Simply fill the reservoir with chlorine or bromine tablets and set the setting
to 25% of maximum. Check weekly to make sure there are still tablets inside.
Using a non-chlorine shock once per week is a fast and easy way to keep lotions, sunscreens, and
organic material from building up in the water.

Page 12
Closing the Pool
When closing your pool, you can follow the closing instructions from you pool store or pool service. If
they recommend a closing kit, take note if there is a stain and scale or other sequestering product used
as part of the closing. This product is optional and if skipped, the minerals will keep fighting algae and
microorganisms in the water throughout the winter. You will find that the water is cleaner and clearer in
the Spring when you open the pool.
We recommend bringing the system controller indoors for the winter. If there is still life left on the cell,
you can leave it in the tee, but you must wrap up the plug end so that the winter weather does not
corrode it.
Cleaning and Care
System Controller
Clean the controller with a soft cloth dampened with water as needed. Do not use any type of cleaner
on the front control panel or plastic housing.
Mineral Cell
If your water is high in calcium, the electrode bars on the mineral cell may become coated with a white
or blue scale. Check the cell every 6 months and remove the scale with a standard metal file. The surface
of the bars does not have to be polished.
If the bars are too scaled up for the system to release minerals, the ‘Ionizing’ light on the controller
will flash red.

Page 13
Troubleshooting
Problem
Possible Cause
Solution
The ‘Ionizing’ light is flashing red
The cell is not plugged in all the way
Make sure the cell cable is completely
plugged into the controller
The electrodes are not under water
Make sure the electrode bars are
completely under water. An air pocket can
form when the pump is not running, and
the tee is installed upside down.
The cell is worn down past its useful life
Change the mineral cell
There is scale on the electrodes
File the scale off the electrodes with a metal
file
I cannot get my copper level to reach
0.2ppm
You have not used the Large Dose function
Set the controller to Large Dose and set the
number to 99. After 99 hours (about 4
days), test again. If your copper level is
below 0.2ppm, do another 99-hour Large
Dose. Repeat until 0.2ppm copper is
reached
The Ion/Action setting is too low
If you find that the copper level reaches
0.2ppm but then drops off, set your
Ion/Action setting higher to compensate
There is not enough chlorine in the water
The chlorine or bromine should be
maintained at 1-3ppm until the copper level
reaches 0.2ppm. Once the copper level
reaches 0.2ppm, you can reduce the
chlorine/bromine concentration to 0.6-
1ppm
The mineral cell needs to be changed
Check the electrode bars on the mineral
cell. If they are 0.5” (10mm) or shorter, it is
time to change the cell
The phosphate level in the water is too high
Have your water tested for phosphates at a
pool store. If the phosphate level is above
200ppb, use products recommended at the
store to bring it down. If you live in a rural
area, you may need to reduce the
phosphate level on a regular basis
The test kit is expired
Check the expiry date on the test kit and
purchase a new one if it is expired
The test kit instructions are not being
followed
Be sure to read the test kit instructions and
follow them exactly
There is no power to the controller
The power outlet is dead
Check the power to the outlet by plugging
in another appliance
The controller is dead
Test the controller in another outlet that
you know works. If there is still no power,
see Warranty section below
The controller display shows ‘PL’ and I can’t
change the settings
The controller is set to Program Lock
Press and hold the + and –buttons
simultaneously for 20 seconds or until the
PL changes back to a number
There are two decimal places showing on
the display between the numbers
The Total Dissolved Solids (TDS) of the
water is low
Increase the TDS to the range
recommended above
The cell is almost worn out
Change the mineral cell

Page 14
Specifications
Spec
Value
Input Voltage
100 –240 Volts AC
Input Frequency
50 to 60 Hertz
Output Voltage
38 VDC Max
Output Current
0.20 AMP Max
Controller Outside Dimensions
5” x 3” x 2.5” / 127mm x 76.2mm x 63.5mm
Shipping Weight for Complete Kit
3.6 lbs / 1.6 kg
Shipping Size for Complete Kit
7” x 7” x 7” / 178mm x 178mm x 178mm
Mineral Cell Life
Average 6 months (2,160 “on” hours)
Warranty
The ClearBlue Ionizer controller is covered by a 5-year limited warranty. The mineral cells are designed
to wear down and they do not have a warranty, however, they will be replaced free of charge if there is
an obvious defect.
information:
1) Photo of the serial number on the side panel or back of the controller
2) Model information on the back of the controller
3) Mailing address
4) Phone number
If a terminal problem is diagnosed, a replacement controller will be shipped within 14 days.
Contact
ClearBlue Ionizer Inc.
45 –3045 Southcreek Rd.
Mississauga ON Canada L4X 2E9
1-866-704-8404
support@clearblueionizer.com
Table of contents
Popular Air Ionizer manuals by other brands

TELEVAC
TELEVAC MX7M instruction manual

Real Spirit
Real Spirit Aqua-Ionizer Pro ionHealth Touch owner's manual

Illinois Tool Works
Illinois Tool Works SIMCO CENTURION Operation & maintenance manual

Desco
Desco TRUSTAT 04622 Installation, operation and maintenance

AlkaViva
AlkaViva Athena Classic manual

SMC Networks
SMC Networks IZS40-2020-08B-X10 Operation manual


