AlkaViva Athena Classic User manual

DO NOT VOID YOUR WARRANTY!
Make sure to complete the following steps:
STEP 1 - Watch the video - link below or installaon DVD provided
prior to installaon:
vimeo.com/183054128
STEP 2 - Test Your Tap Water - using the enclosed Hard Water Test
Strip. This will take you less than 2 minutes and potenally save you
hundreds of dollars in future repair costs.
STEP 3 - Validate Your Warranty - online at
alkaviva.com/warranty-form
Warranty must be completed within 30 days of purchase.
IMPORTANT NOTES:
IF YOUR IONIZER IS WET - Some residual water may be present. Wa-
ter is run through every machine for quality control and tesng pur-
poses.
WELL WATER - Before using any well water, it is crical that a water
test be done to ensure that your water is potable (safe for drinking).
For tesng, please visit:
alkaviva.com/professional-tesng
UNDERSINK CONVERSION KIT - If you have ordered an Undersink
Conversion Kit, see Installaon Requirement below.
INSTALLATION REQUIREMENT - For undersink installaons or instal-
laons directly connected to the cold water line (versus countertop
installaon connected to your faucet with a diverter), AlkaViva re-
quires installaon be performed by a qualied, licensed and bonded
professional plumber or contractor. AlkaViva will not be held responsi-
ble for any damages caused by improper installaon.
When having a professional install your ionizer, we recommend that
you email techsupport@alkaviva.com at least 48 hours in advance to
ensure a technician will be available during your installer’s visit. Our
oce hours are Monday—Friday, 8am—5pm, (PST).
WATER SOFTENER - Do not use an ionizer with a sodium or potassi-
um-based ion exchange soening system without rst consulng with
your AlkaViva Associate or Technical Support.
REMOVE THE FILM - The display on your unit comes with a remova-
ble protecve plasc lm.
DIVERTER VALVE - Your ionizer may come with a dierent one than
used in the installaon DVD. The installaon is the same. To operate
the pull-out style diverter, simply pull the actuator pin with the water
running.
Aenon: Never push the pin back in to turn o the water. Simply
turn o the faucet and the diverter will automacally turn o at the
same me.
CHECK FILTER(S) - The lter(s) may have come loose during shipment.
Refer to your Owner’s Manual and check your lter(s) prior to use.
For informaon on proper lter installaon, watch:
Athena: vimeo.com/141558328
IRON CAUSES MAJOR DAMAGE - Orange stains in your plumbing
indicate iron in your water supply.
UNDERSINK KIT OPTION - If you choose to install your ionizer under
the counter as described in your manual (installaon #3) always use
ONLY the AlkaViva approved Undersink Kit (double spouted faucet).
Never use a single spout faucet as this will damage your ionizer and
void your warranty.
Should you require assistance with your ionizer, always ll out
the Ionizer Repair and Support Form at:
alkaviva.com/repairs
DO NOT aempt to repair your water ionizer.
Doing so will VOID YOUR WARRANTY!
Athena Classic
IMPORTANT! Pages #4 and #9 in the Athena Classic manual
refers to the Flow Valve. This valve is no longer included with
this ionizer and your ionizer will not match this photo.. This
step is no longer needed.
Your ionizer no longer comes with 2 Calcium Inserts, but with
1 Calcium Insert for So Water and 1 Scale Guard Insert for Hard Water to be
placed in Mineral Port.
MANUAL UPDATES
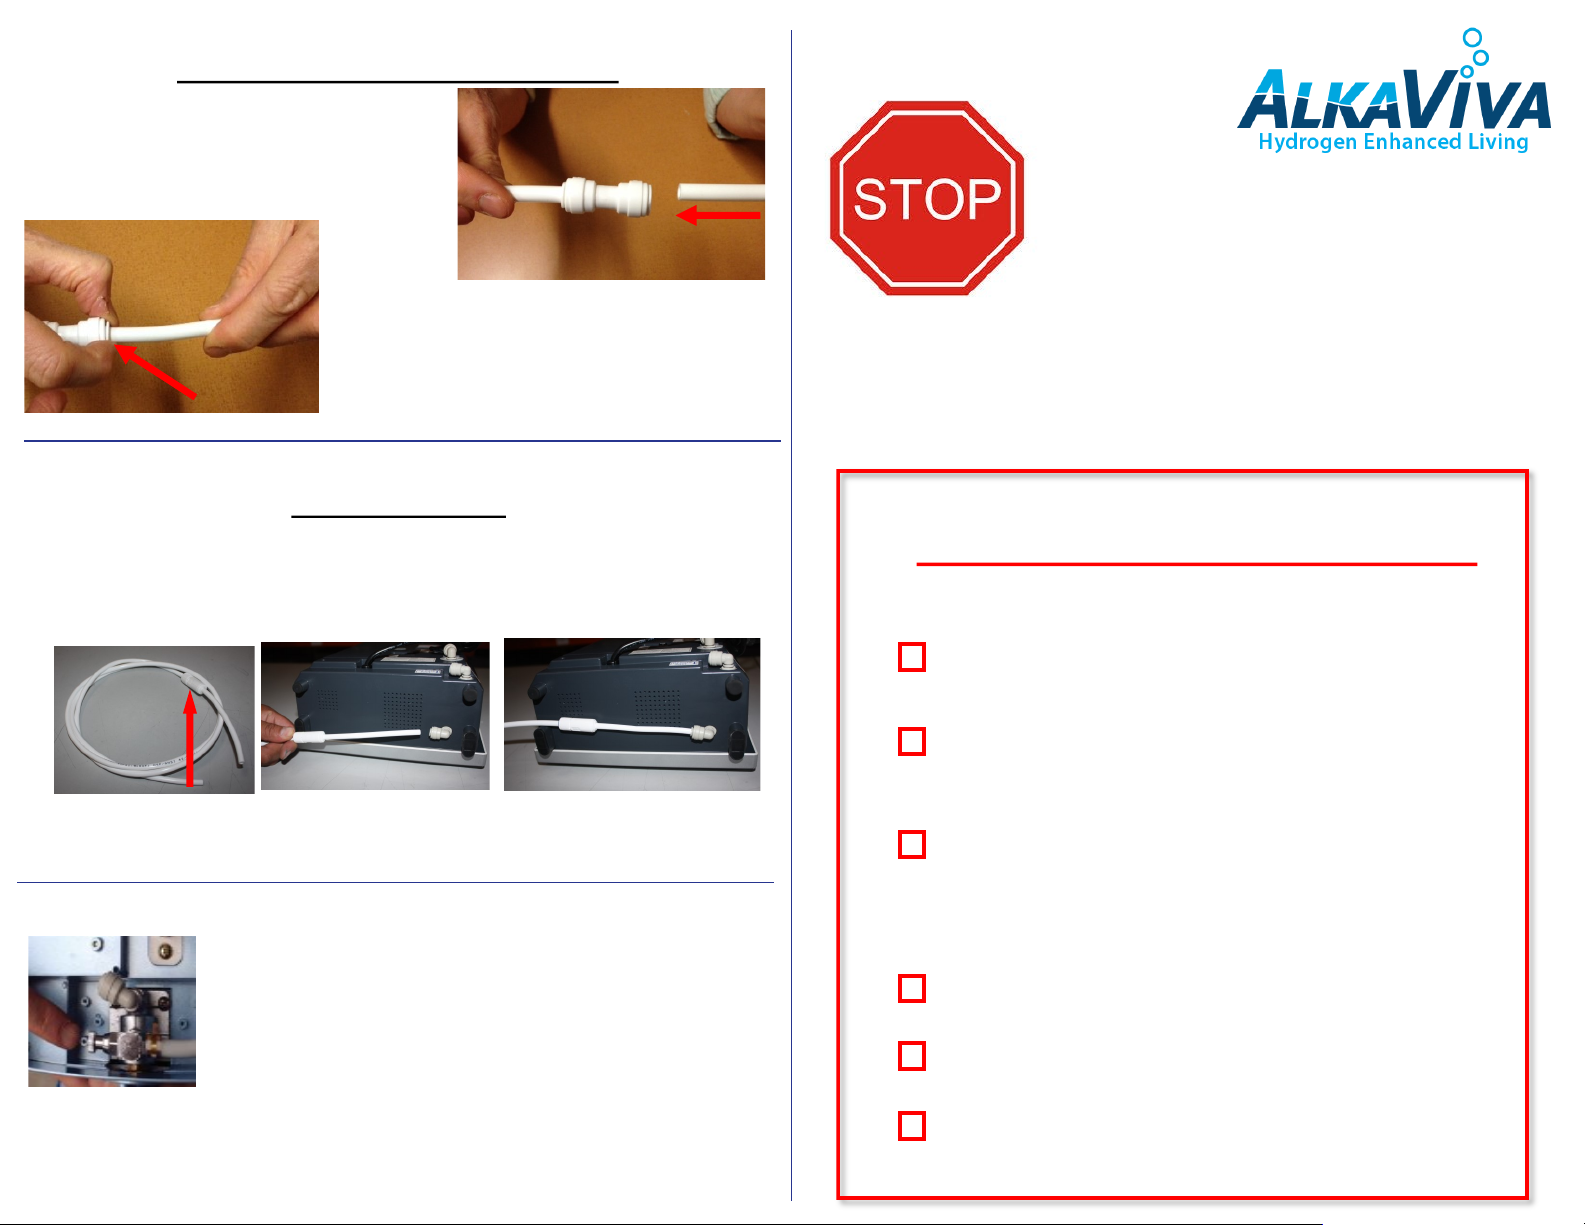
A dust pre-lter is included with all ionizer models. The dust pre-lter is
pre-installed on the 1/4” tubing that should be installed at the tap water
inlet. See photos below.
2. Install at Tap Water
Inlet.
3. Installed.
Dust Pre-Filter
1. Dust Pre-Filter
comes aached.
Quick Connect Fing Release
Install:
Insert 1/4” tubing into Quick Connect Fing
and PUSH IN rmly unl it can’t go further.
Removal:
Hold Quick Connect Fing end with thumb and
index nger. Press in on the ring while pulling out
the 1/4” tubing in opposite direcon.
Install
Removal
Press here
Read Me First!
Protect Your Investment
Step 1 - Read the “Read Me First”
Step 2 - Watch Installaon Video
Refer to video link in “Read Me First”
Step 3 - Test Your Tap Water
Hard Water Test Strip included
Refer to instrucons
Step 4 - Install Your Ionizer
Step 5 - Acvate Your Warranty
Step 6 - Enjoy Your Water!
© AlkaViva, LLC - January 2017
Other AlkaViva Air Ionizer manuals


Popular Air Ionizer manuals by other brands


Desco
Desco 50692 Installation, operation and maintenance manual

UFO
UFO UFO-ECH/10 user manual

Jonix
Jonix steel 1C Use and maintenance manual

Panasonic
Panasonic TK-AS66-ZEX instruction manual

Real Spirit
Real Spirit AQUA-IONIZER PRO ionHealth Pro owner's manual

SMC Networks
SMC Networks IZT41 Series Operation manual