ClearMirror Studio Series User manual

Handcrafted, Fog-free Vanity Mirrors
Models 19100-2436, 2436H and Custom
June 2018
Studio Series
Installation Instructions
IMPORTANT INSTRUCTIONS
Studio Series vanity mirrors with attached ClearMirror®Defogger is designed to be powered
by a switched circuit. A 15A or 20A fuse or circuit breaker at the electrical box should protect
the circuit. Read all instructions before using the Studio Series.

NOTICE: All wiring must be performed by a licensed electrician. Follow the National Electrical
Code or local codes as applicable.
WARNING: Failure to follow instructions could result in death or serious injury.
NOTICE: ClearMirror height is usually 2 inches higher than the tallest user’s height.
NOTICE: ClearMirror heater must be smaller than the mirror. Leave at least a 1” space from
mirror edges to the heater edges.
General Guidelines
Install the Studio Series with heater to a junction box in accordance with all applicable safety,
national and local electrical codes. All wiring between the mirror heater and the bathroom light
junction boxes must be installed per local and national electrical codes using wire system
identified by the National Electrical Code. Consult a qualified electrician for all wiring.
• Do not install on mirrors located on uninsulated external walls.
• Only wire the pad to a 110/220 volt power supply.
• These installation procedures are for mirrors that are not permanently installed. Consult
local authorities for variations in installation.
• Use caution with all electrical appliances. Install according to these instructions.
Installation
Wire the ClearMirror heater to a junction box in accordance with all applicable safety, national
and local electrical codes. All wiring between the mirror heater and the bathroom light junction
boxes must be installed per local and national electrical codes using wire system identified by
the National Electrical Code. Consult a qualified electrician for all wiring.
• Choose the mirror defogger location.
• Install an electrical junction box.
• Wire mirror defogger to junction box to switched 110/220 power supply to ensure it is turned
off when not in use.
• Use two people for safety.
TOOLS NEEDED
Electrical tape, flashlight, 4-yellow or red wire connectors, non-sheathed wire cable,
remodeler’s junction box, utility knife, wire strippers, screwdriver, pliers and keyhole saw.
WARNING: This stage requires a qualified electrician and conformance with both the National
Electrical Code and local building codes. Turn off the power to the circuit connected to the light
fixture at the disconnect means. Failure to do so could result in death or serious injury.
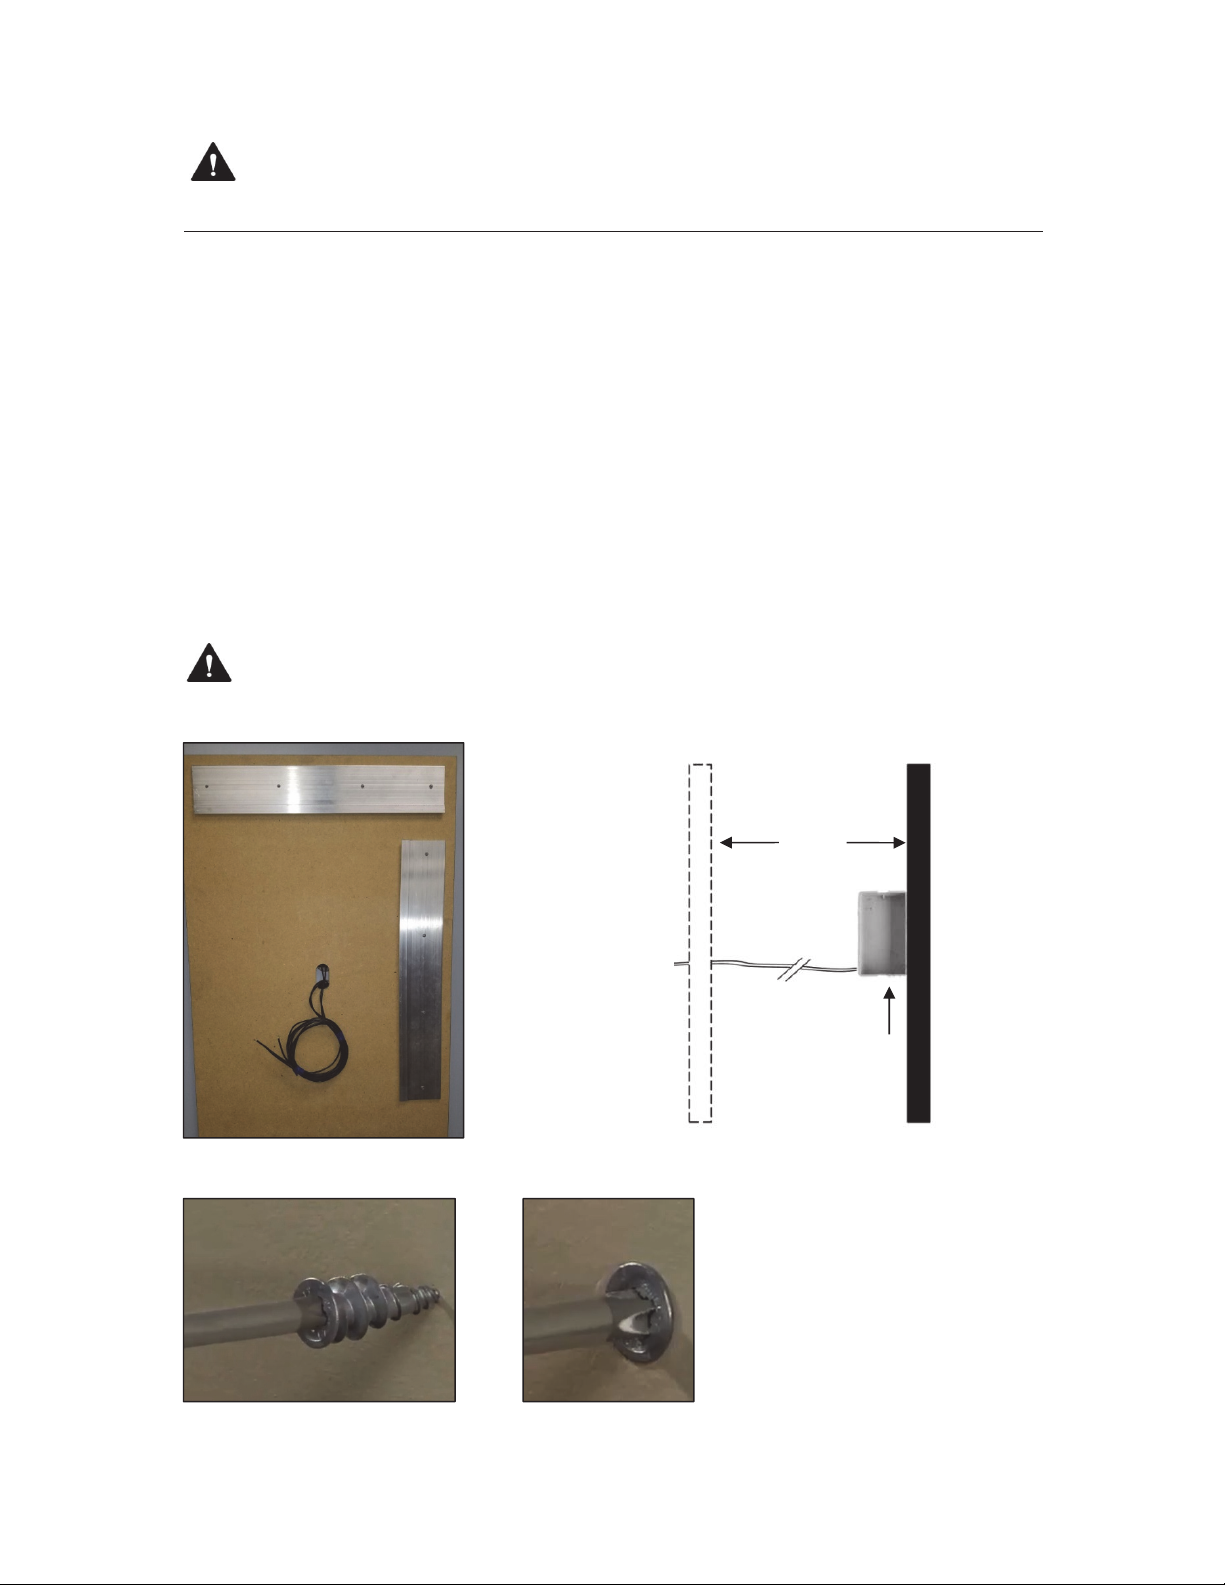
MEASURE FOR CLEARMIRROR INSTALLATION
With mirror removed, mark junction box location on the wall where the sink’s center meets the
top edge of the ClearMirror heater. Normally 2 inches higher than the tallest user as shown in
Figure 1.
INSTALL ELECTRICAL BOX
Shut off power to the circuit where heater is to be connected at the disconnect means.
• Use a keyhole saw or drywall router to cut a tight fit for the remodelers’ box.
• Install remodeler’s electrical junction box and tighten screws until junction box is secure in
the opening.
Figure 1. Location of ClearMirror wire leads and installing the junction box (Back View)
WARNING: Do not use any fuel-based cleaners.
FinishedFloor
Junction Box
Studs
Figure 1. Location of ClearMirror wire leads and installing the junction box (Back View)
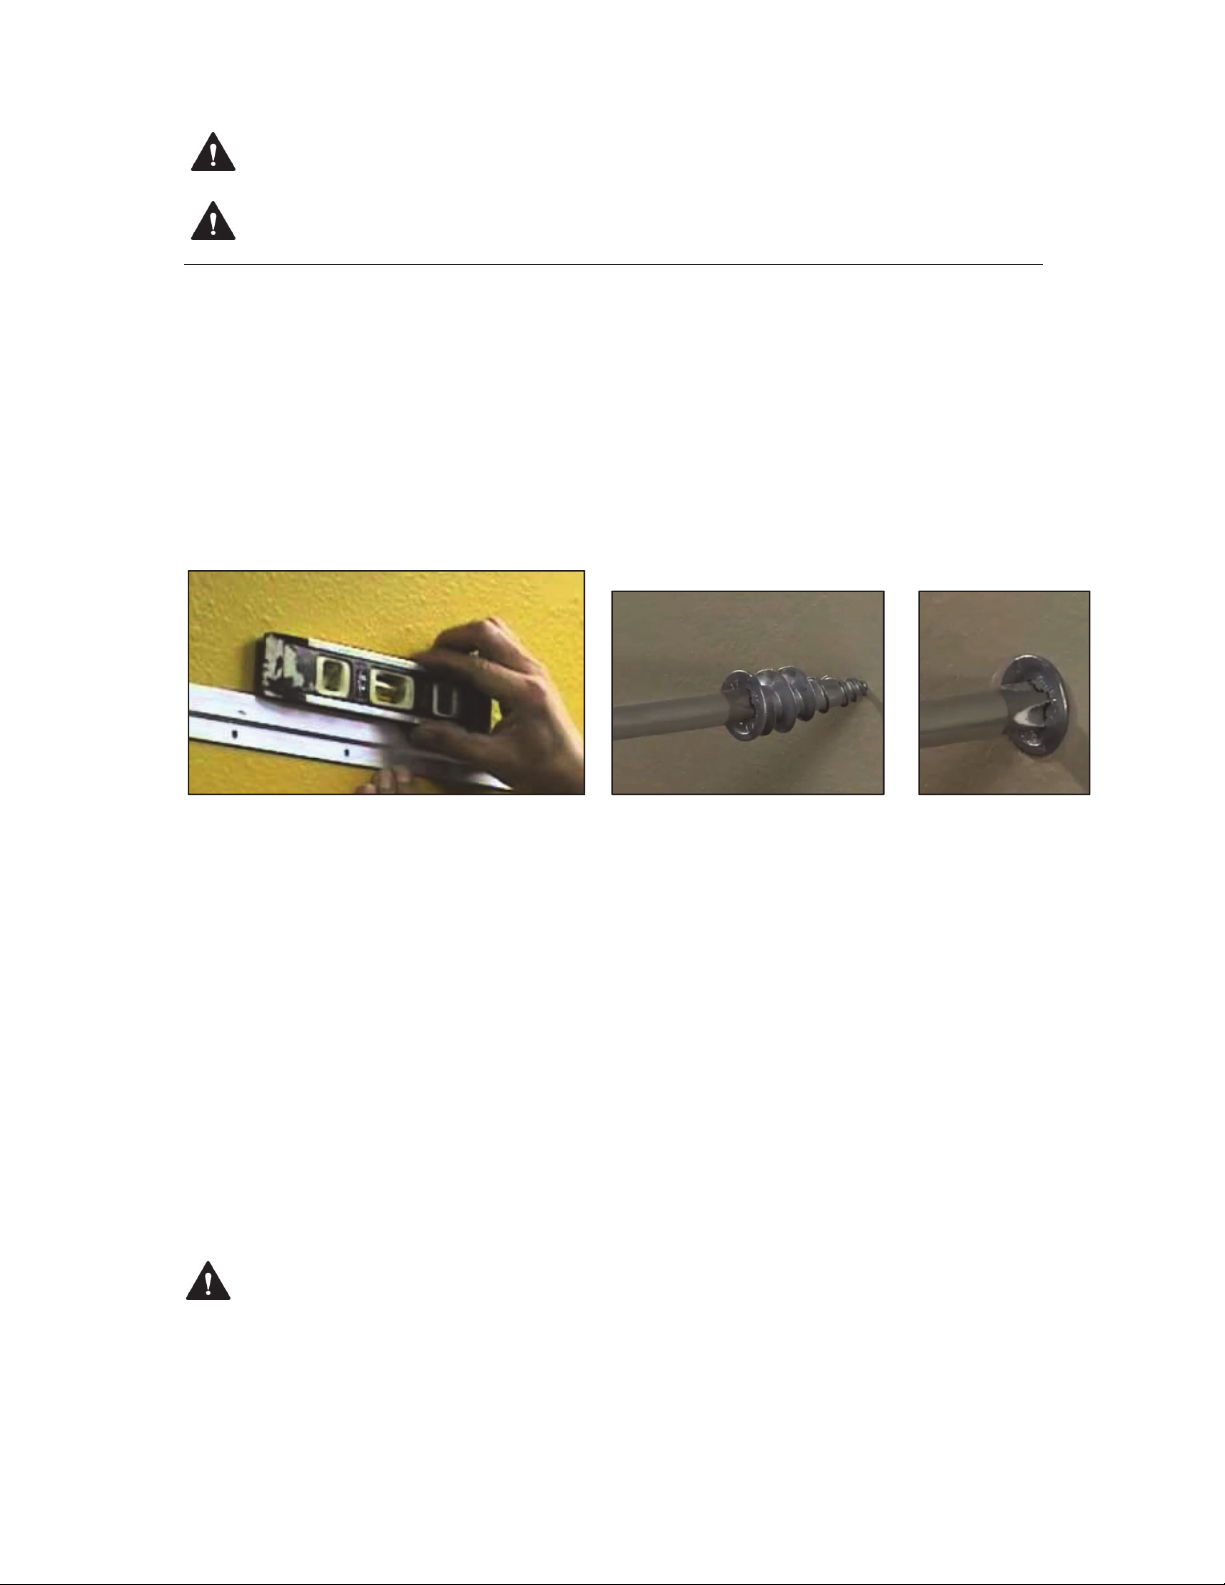
MOUNT Z-BRACKET TO WALL
1. Locate center on wall and mark
2. Place Z-bar bracket with tabs up and out a minimum of 6.5” from top edge of the mirror,
level and mark hole locations.
3. Locate and use studs, if possible. If no studs are found, use wall anchors (3 anchors are
provided - minimum weight of 75 lbs to be supported).
4. Mount Z-bar bracket on wall with screws (included).
5. Screw anchor in flush with wall.
WIRE TO OVERHEAD LIGHT FIXTURE
• Disconnect overhead light fixture base from the wall to expose the junction box.
• Drop down a Romex (non-sheathed) cable to the ClearMirror junction box below.
CONNECT LEADS TO POWER SUPPLY
1. With assistance of another person, position the mirror to connect the heater leads to the
wire cable in the junction box.
2. Connect the mirror heater and power wires.
3. Wrap wire connectors and wire with electrical tape and push excess into junction box.
4. Replace light fixture onto base.
5. Turn on circuit breaker and switch for overhead light.
6. Test ClearMirror by placing hand on surface of mirror. It should heat in two minutes.
NOTICE: Polarity is not relevant - there are neither positive nor negative connections on the
ClearMirror heater pad, nor are there any ground wires.
Figure 2. Locating position of Z-bar bracket.
NOTICE: Studio Series mirrors are heavy. Always use two people when moving and installing.
Figure 3. Installing drywall anchors
NOTICE: Ensure leads are not stuck between the mirror and the wall

IMPORTANT INSTRUCTIONS
SAVE THESE INSTRUCTIONS
Read all instructions before installing or using this heater.
When using electrical appliances, basic precautions should always be followed to
reduce the risk of fire, electric shock, and injury to persons, including the following:
• Do not operate any heater after it malfunctions. Disconnect power at service panel and
have heater inspected by a reputable electrician before reusing.
• Do not use outdoors.
• To disconnect heater, turn bath switch to off, and turn off power to heater circuit at main
disconnect panel (or operate internal disconnect switch if provided).
• Do not insert or allow foreign objects to enter any ventilation or exhaust opening as this
may cause an electric shock or fire, or damage the heater.
• To prevent a possible fire, do not block air intakes or exhaust in any manner.
• Use this heater only as described in this manual. Any other use not recommended by the
manufacturer may cause fire, electric shock, or injury to persons.
•DO NOT USE IN SHOWER APPLICATIONS!
Only the Shower ClearMirror and ShowerLite models are UL approved for use in a
shower.
OPERATING
• Original ClearMirror must be properly installed before it is used.
• Install Original ClearMirror over a bathroom vanity sink with wiring fed from behind the full,
wall-mounted assembly.
• Be certain that the controls are operational per the instructions above in that the bathroom
light, ceiling fan or alternate switch power on and power off the Original ClearMirror.
• Do not modify the installation from within (or outside) the assembly, and do not tamper
with any user-operated devices intended to reduce the risk of fire, electric shock, or injury
to persons; and warn against tampering with such devices.
• Any servicing should only be done by a qualified service person.

ClearMirror
2861 Eagandale Blvd • Eagan, MN 55121 • 651.251.9036
MAINTENANCE
• Be sure that all excess wires are stowed in the electrical box, and are not hanging outside of
the protective area of the mirror.
• As necessary, clean only the surface of the mirror with an approved glass cleaner and soft
cleaning cloth.
• All other servicing should be performed by qualified service personnel. Call ClearMirror
directly with any warranty or operational problems or concerns.
GROUNDING
This Original ClearMirror heater is for use with 120 volt power supply. The cord (leads) exiting
the back of the mirror assembly are 18-gauge and are not required to be grounded.
WARRANTY INFORMATION
NewHome Bath & Mirror, Inc. DBA ClearMirror and its affiliates will not warranty the labor or
material costs for installation, replacement or use of Original ClearMirror when operated in an
application that is lower than 50° F.
NewHome Bath & Mirror, Inc. and its suppliers cannot be held responsible for damage caused
by improper installation. These installation instructions are to be used as a guide only while
meeting all applicable building codes. Consult a professional installer if you have any
questions.
The Original ClearMirror product line is provided with a five-year warranty against defects in
workmanship or materials. Improper installation and/or cleaning voids the warranty. Contact
your installer or original place of purchase for issues relating to installation and replacement.
The warranty is void without proof of purchase, proper installation, or if product is
altered in any way.
This manual suits for next models
3
Table of contents
Other ClearMirror Indoor Furnishing manuals


Popular Indoor Furnishing manuals by other brands

Jysk
Jysk HAGE 116445 Assembly instructions

Castec
Castec Skystar installation instructions

VIPACK
VIPACK SCLB200 Assembly instructions

DIVERSIFIED WOODCRAFTS
DIVERSIFIED WOODCRAFTS LT-4424 Assembly instructions

Landscape Forms
Landscape Forms Carousel installation guide

Vivo
Vivo CHAIR-S04F instruction manual


Super Handy
Super Handy GUT153 Operator's manual

BLACK RED WHITE
BLACK RED WHITE KOEN S136-LOZ160x200 Assembly

Futureguard
Futureguard Vivista installation instructions

realspace
realspace Chase manual

akulaplus
akulaplus MIR9039BL instruction manual

Home Decorators Collection
Home Decorators Collection Halford BT0283D Assembly instruction