ClearSounds CS2000M User manual

OWNER'S MANUAL
WIRELESS TV LISTENING SYSTEM
with Dual Ear Volume Control
Model CS2000M
95 KHz Frequency
CS2000MOwner'sMan.indd 1 11/14/08 11:24:34 AM

INTRODUCTION
Our wireless infrared system allows you
to listen to your TV, Stereo, Radio, or
any other audio source at a volume that
is comfortable for you without disturb-
ing others in the room. Use it if you are hard of
hearing or if you simply want to watch televi-
sion when someone else is sleeping.
Infrared technology is considered to be the
best and clearest for sound transmission and
our headphones are lightweight for maximum
comfort.
The installation is very easy. Simply determine
which type of installation suits your needs
best. Please review the installation choices
that appear in this manual and determine what
features your television has before setting up
your ClearSounds® CS2000M.
CONTeNTs
Introduction .................2
How It Works ................3
Components.................3
Installation ................4-7
Placement of Transmitter .......8
Activating the Headphones .....8
Muting the Television Sound.....8
Troubleshooting ..............9
Technical Specifications .......10
For Your Well Being ..........10
Limited Warranty ............11
In-Warranty Procedure ........11
If you are having any difficulty, please
call our help desk at
1 (800) 965-9043
Monday - Friday, 8:30AM - 5:00PM CST
2
NOTE: CS2000M is not suitable for use with
Plasma and LCD flat screen TVs.
CS2000MOwner'sMan.indd 2 11/14/08 11:24:35 AM

The transmitter sits on your audio
source (TV/VCR, stereo, etc.) and
transmits an audio signal via infrared
light. The receiver in the headphones
captures the infrared light waves and
converts them back into sound. You
adjust the volume on the cordless
headphones to suit your personal
needs. Multiple headphones can
be used with one transmitter.
3
AC/DC TRANSFORMER
LARGE 6.3MM ADAPTOR
3.5MM/RCA MONO ADAPTOR
MICROPHONE ADAPTOR
HEADPHONE
RECEIVER
INFRARED
TRANSMITTER
HOW IT WORKs
COMPONeNTs
H
SMALL 3.5 MM ADAPTOR
H
CS2000MOwner'sMan.indd 3 11/14/08 11:24:36 AM

INsTALLATION
How you install your CS2000M
will depend on what type of
equipment you have. To determine
which setup procedure you should
follow, check to see if your equipment
has a single or double connection for
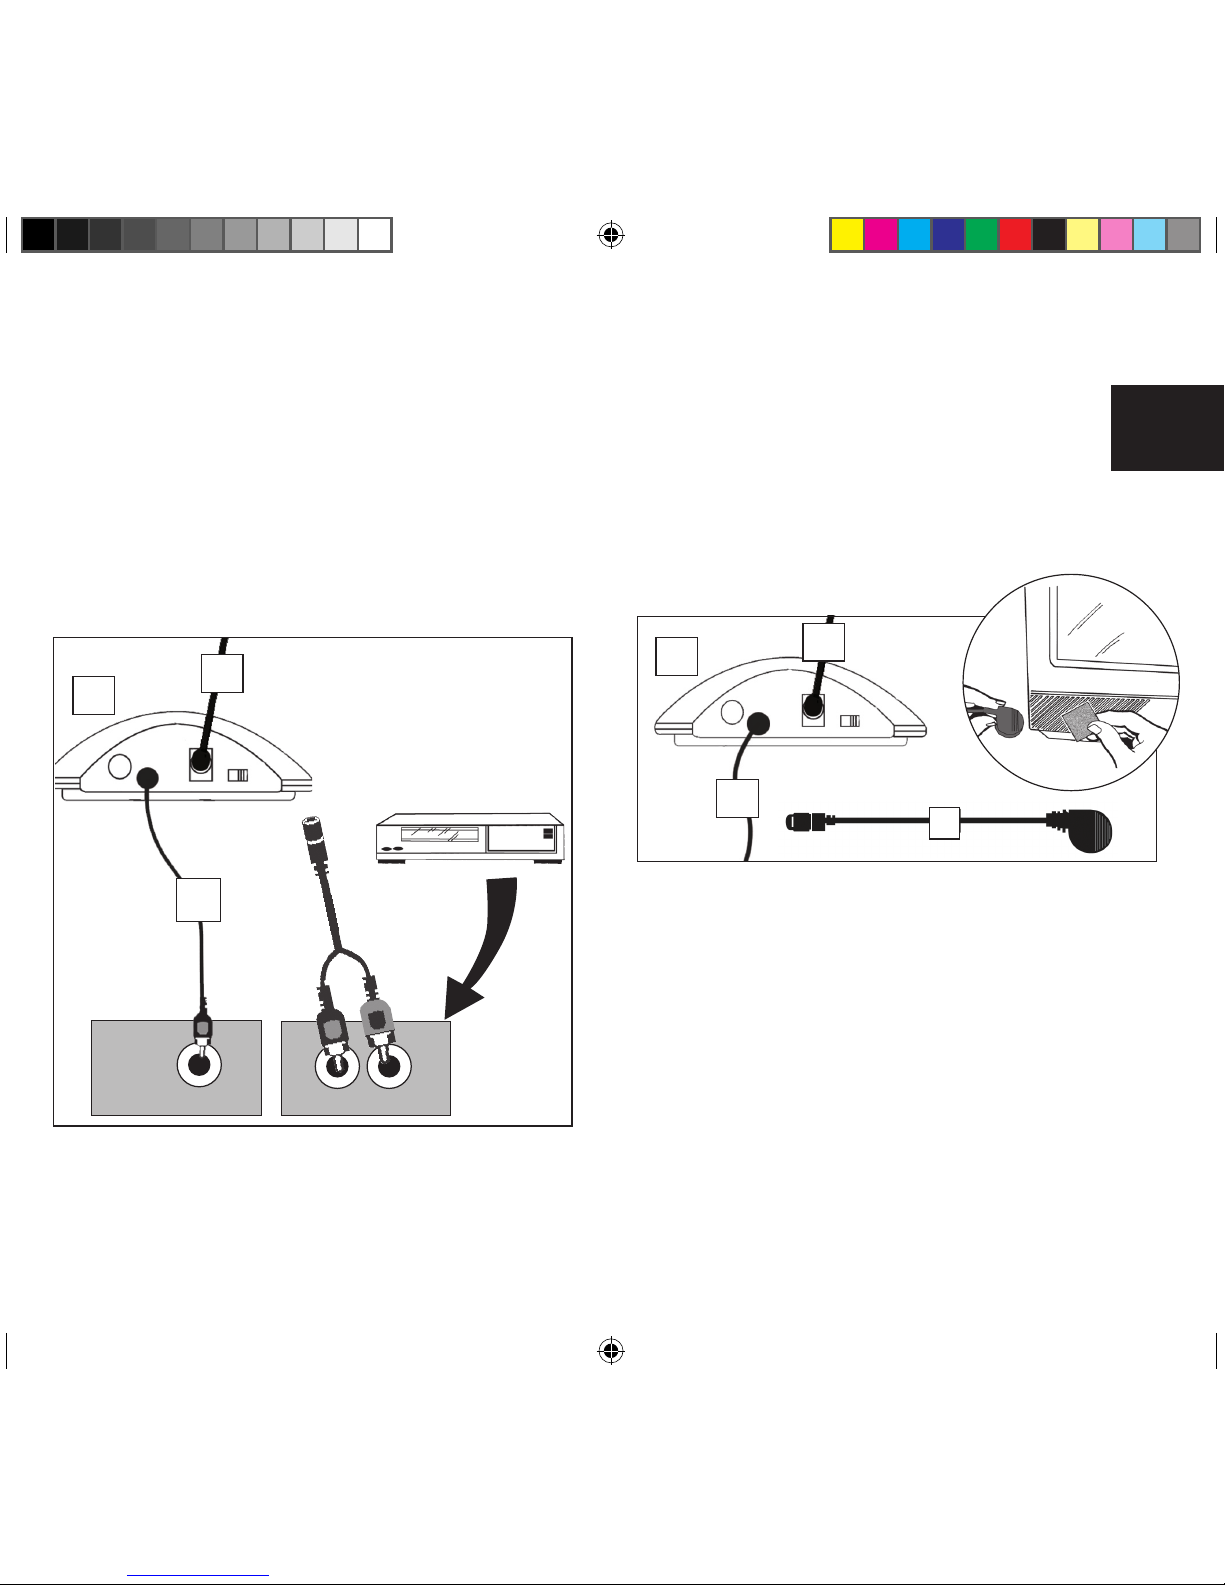
the RCA Adaptor. If you have a double,
your television is a stereo television You
will need to purchase a Stero/Dual RCA
3.5mm Adaptor, available at most major
electronic retail locations. If you have
a single, it is a mono television (use
Adaptor Cord F attached to the infrared
transmitter).
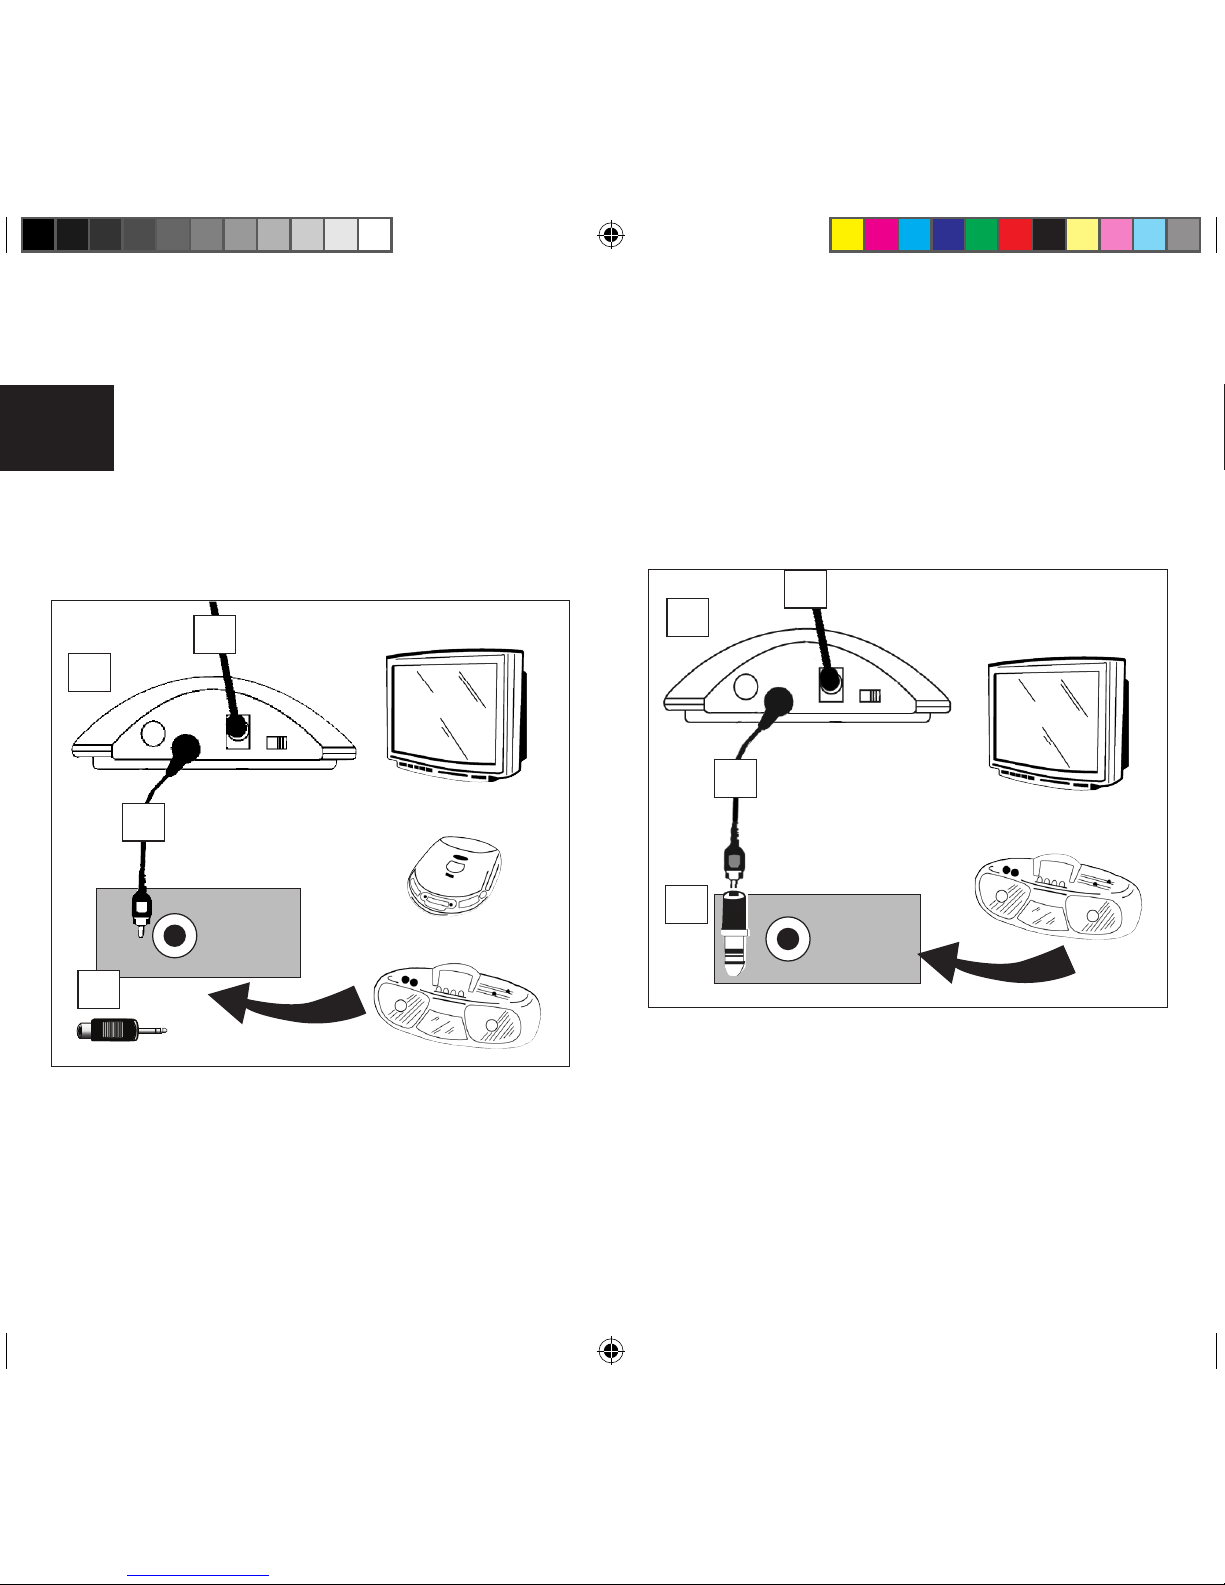
It is also important to note that because
not all TVs are the same, when you plug
something into the audio output jack,
one of two things will happen.
1. The sound from your television will
be automatically cut off and nobody
else in the room will be able to hear
the TV. This is okay if you don’t
want anyone else to be able to hear
the television but bad if you just want
to listen at a higher volume than oth-
ers in the room. To have the sound
continue to come out of your televi-
sion speakers, you must either use the
microphone adaptor or connect the
Transmitter to your VCR (see VCR
installation below).
2. The sound will continue to come out
of the TV speakers. This is okay if
other people want to listen as well,
but not if you want to be able to hear
exclusively through the headphones.
Furthermore, if you turn the volume
down a lot, you may reduce the signal
going to the TV’s audio output jack(s)
(see Muting the Television Sound).
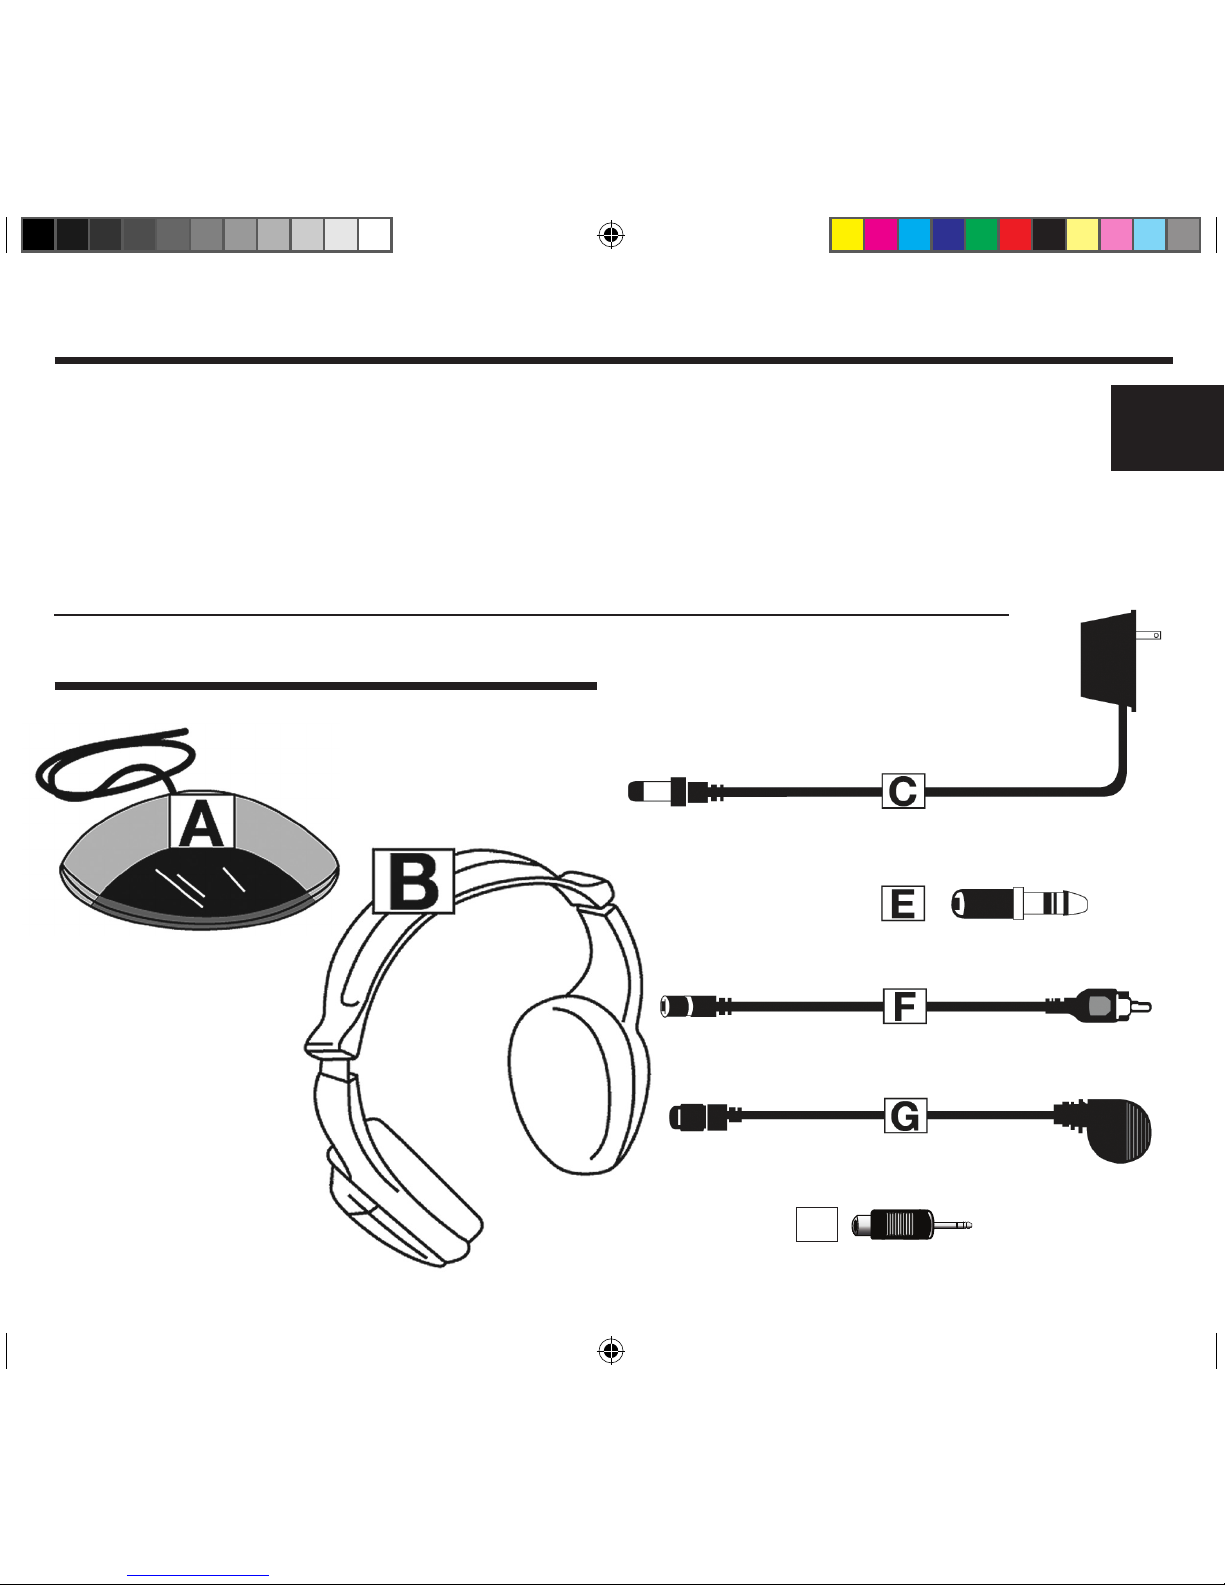
First, for all installations, insert the
plug of the AC/DC Transformer (C) into
the DC 12V input connection on the
back of the Infrared Transmitter (A) as
shown in Diagram 1 and then plug the
transformer into your electrical outlet.
Now choose the installation that matches
4
CS2000MOwner'sMan.indd 4 11/14/08 11:24:36 AM

Tv
or sTeReO
or vCR
A
C
5
Diagram 3
Mono Audio Output
Tv
or sTeReO
or vCR
Diagram 2
A
Audio Output
C
L R
A
Diagram 1
DC in 12 Volt
Power
Audio in
C
F
F
F
your equipment.
Standard Installation – for use with
TVs, VCRs, or stereos that have
two audio output jacks. Connect the
transmitter RCA/3.5mm cord (F) to a
Stereo (Dual) RCA/3.5mm adaptor cord.
Connect the Stereo/Dual Adaptor cord
to the audio output jacks as shown in
Diagram 2. Be sure to connect the
adaptor to the audio output and not
the video output.
Mono Installation –for use with
TVs, VCRs, or stereos that have
only one audio output jack. Connect
the Transmitter RCA 3.5mm Mono
Adaptor Cord (F) to the single Audio
output jack as shown in Diagram 3. Be
sure to connect the adaptor to the audio
output and not the video output.
CS2000MOwner'sMan.indd 5 11/14/08 11:24:38 AM

6
Small
Headphone
Jack
Tv
or CD PLAyeR
or TAPe PLAyeR
A
Diagram 4
C
H
Tv
A
e
CDiagram 5
or TAPe PLAyeR
Large
Headphone
Jack
F
F
H
Small Headphone Jack
Installation – for use with equip-
ment that has a small headphone
jack. Connect the Transmitter
directly into the equipment’s audio
output jack as shown in Diagram 4 (using
the small 3.5 adapter if needed).
Large Headphone Jack Installation
– for use with stereos that have a
large headphone jack. Connect the
Transmitter directly into the 6.3mm
Adaptor (E) and insert it into the head-
phone jack as indicated in Diagram 5.
VCR Installation – for use when you
have cable passing through your VCR
and no other audio output jacks are
available. The VCR must be on before
beginning this installation. If your VCR
has two audio output jacks, connect the
Transmitter (A) RCA/3.5mm Adaptor
Cord, and connect the Adaptor Cord to
the audio output jacks on the VCR. If
your VCR has two audio output jack, use
a RCA 3.5mm Dual Adaptor (purchased
separately). See Diagram 6.
CS2000MOwner'sMan.indd 6 11/14/08 11:24:39 AM

7
AC
vCR
Diagram 6
Audio Output
LR
Mono Audio Output
For
C
A
Diagram 7
F
G
Microphone Installation – for use when
your equipment does not have an audio
output jack. Connect the Transmitter
(A) to the Microphone Adaptor (G).
Affix the Microphone Adaptor directly
over the speaker by peeling the tape off
the back of the adhesive. For this installa-
tion you will have to keep your equipment
at a very low volume. See Diagram 7.
As an alternative to using the micro-
phone, if your television has a
cable box, locate an audio output
jack on the back panel of the cable
box. Plug the Transmitter into the
jack and mute the TV using the
mute function on your TV remote.
Do not use the cable box. Once the TV
is muted, the headphones can be used
exclusively to pick up the sound.
CS2000MOwner'sMan.indd 7 11/14/08 11:24:41 AM

PLACeMeNT OF THe
TRANsMITTeR
Turn on the Infrared Transmitter
(A). The infrared light rays are
emitted in a conical shape. For best
results, place your Transmitter above
your television or any other audio source.
The Transmitter will work best if it is
within 33 feet (apx. 10 meters) from the
headphone receiver (B). There should
not be anything obstructing the trans-
mission of the infrared light rays to the
receiver. See Diagram 8.
ACTIvATING THe
HeADPHONes
Place two AAA batteries into the battery
compartment in the left earpiece of the
headphone matching positive to posi-
tive and negative to negative. Turn on
the headphones making sure there is an
unobstructed line of sight between the
headphones and the Transmitter. Adjust
the television volume and the headphone
volume to a comfortable listening level
MUTING THe
TeLevIsION sOUND
Many televisions have speaker switches
located on the back panel. If your tele-
vision has one and you want to keep
the sound muted, move this switch to
the OFF position and listen to your TV
exclusively through the headphones.
Some televisions have speaker switches
that can only be controlled by the remote
control. If your television falls into this
category, press Menu on the TV remote
and locate SPEAKER on the screen
menu. Switch SPEAKER to the OFF
position and listen to the TV exclusively
through the headphones. To find out if
your television has this function, refer to
your owner’s manual.
Diagram 8
8
CS2000MOwner'sMan.indd 8 11/14/08 11:24:42 AM

9
TROUBLesHOOTING
PROBLEM POSSIBLE CAUSE
Red Power light
is not on
- AC Adaptor is not plugged in
- AC plug is not plugged into the transmitter
- The audio cord is not plugged into the audio source
- There is no audio output from the audio source
No sound from
headphones
- The audio cord is not plugged into the audio source
- There is no audio output from the audio source
- The transmitter is not ON
- The headphones are not ON
- The headphones have no batteries
- The batteries are inserted in the headphones incorrectly
- The batteries are dead and need to be replaced
Self-testing
of system
- Hook up the microphone to the transmitter and speak into the
microphone. You should hear your voice in the headphones
and you will confirm the unit is working
Sound too low
- Headphone volume control is too low
- Batteries are weak and need to be replaced
Poor sound
- Infrared sensor on headphone is not in line with the transmit-
ter
- Batteries are weak and need to be replaced
- Headphone volume control needs to be adjusted
Static
- Infrared sensor on headphones is not in line with the trans-
mitter
CS2000MOwner'sMan.indd 9 11/14/08 11:24:42 AM

Transmission Mode ..............Infrared 940 nanometers
Frequency Modulation (95KHz)
Operating Voltage ...............Transmitter - 12 VDC via 120 VAC,
60 Hz AD/DC adaptor
Frequency Response .............50 Hz — 10,000 Hz
Distortion ......................1% THD
S/N Ratio ......................45db (4M)
Battery Life ....................Up to 50 hours with 2 AAA batteries
Maximum operating distance ......33 feet
Input ..........................Jack - 3.5mm
Weight ........................Transmitter - 155g (5oz.)
. . . . . . . . . . . . . . . . . . . . . . . . . . . . . . Headphone Receiver 136.8g (4.8 oz.)
Accessory......................AC/DC adaptor
Warranty.......................One-Year limited warranty
TeCHNICAL sPeCIFICATIONs
10
FOR yOUR WeLL-BeING
Medical experts advise against play-
ing any audio device at a high volume
for continuous and extended play. If
you hear a ringing in your ears, reduce
the volume immediately or discontinue
use. The information in this manual is
intended as general information and
corresponds to the technical status at
the time of printing. The manufacturer
reserves the right to make changes
without notice.
CS2000MOwner'sMan.indd 10 11/14/08 11:24:42 AM

LIMITeD WARRANTy
Your CS2000M is warranted against
defects for a period of 12 months from
the original date of purchase.
IN-WARRANTy PROCeDURe
In the event service is required due to a
defect or malfunction during the warranty
period, ClearSounds®will replace or
repair the warranted product. The repair
or replacement of the defective item will
be free of charge excluding a $7.00 fee
for packing, handling, insurance, and
return postage. Repair or replacement of
the defective item is subject to verifica-
tion of the malfunction or defect when
delivered to the ClearSounds®Service
Center listed below.
NOTE: Prior to returning any CS2000M
to the ClearSounds®Service Center,
REPLACE THE EXISTING BATTERIES
WITH NEW ONES. Defective batteries
are the leading cause of problems with
this item and are not covered by the
Limited Warranty.
Enclose proof of purchase and
check or money order for the sum of
$7.00 payable to ClearSounds®.
Mail the package postage prepaid to the
following address:
ClearSounds®Service Center
8160 S. Madison St.
Burr Ridge, IL 60527
NOTE: The warrantor expressly dis-
claims liability for incidental, conse-
quential, or special damages of any
nature. (Some states do not allow the
exclusion or limitation of incidental or
consequential damages so the above
limitation or exclusion may not apply to
you.) This warranty does not cover (1)
A defect that has been caused by repair
or modifications; (2) A defect caused
by incorrect installation of/or defective
batteries; (3) Damage resulting from
improper operation; and (4) Batteries.
11
CS2000MOwner'sMan.indd 11 11/14/08 11:24:42 AM

©2007 ClearSounds P/N: R907770121
8160 S. Madison Street
Burr Ridge, IL 60527
Tel: 1-800-965-9043 / TTY: 1-800-814-5369
Need Help Hearing
On The Telephone?
Visit: www.clearsounds.com
CS2000MOwner'sMan.indd 12 11/14/08 11:24:42 AM
Other manuals for CS2000M
2
Table of contents