Clever Creations ECO SEALER User manual

ECO SEALER INSTRUCTIONS
Congratulations on your recent purchase of the Rechargeable ECO SEALER from
Clever Creations. You will find that the ECO SEALER will help you reducing food waste
and will soon become the most frequently used tool in your home!
WHY CHOOSE ECO SEALER?
Because ECO SEALER has multiple functions… “Food Saving, Storing, Packaging”
● Saves you money by keeping leftovers fresh.
● It can seal food in its original packing (chips, cookies, rice, nuts, etc.)
● Helps maintain vitamin and mineral content of food.
● Helps protecting fragile souvenirs, gifts, remote controls etc. from moisture and dust.
● Creates airtight and watertight seal.
● Safer environment for your refrigerator.
● Easy way to store clothes for the winter.
● Seals any kind of plastic bag up to 0.3 mm thickness.
● With the magnet strip on the backside, ECO SEALER is always ready to use on the refrigerator.
To Recharge: Plug the USB Cord in the socket of Sealer, and plug the USB Cord into the USB socket of your
Notebook or any adapter equipped with a USB socket. You will see the blue LED light turn on while recharging is in
progress. The LED light turns red when the battery is fully charged. It takes around 45 minutes to recharge the ECO
SEALER.
*** Please unplug the charging cable while using the product ***
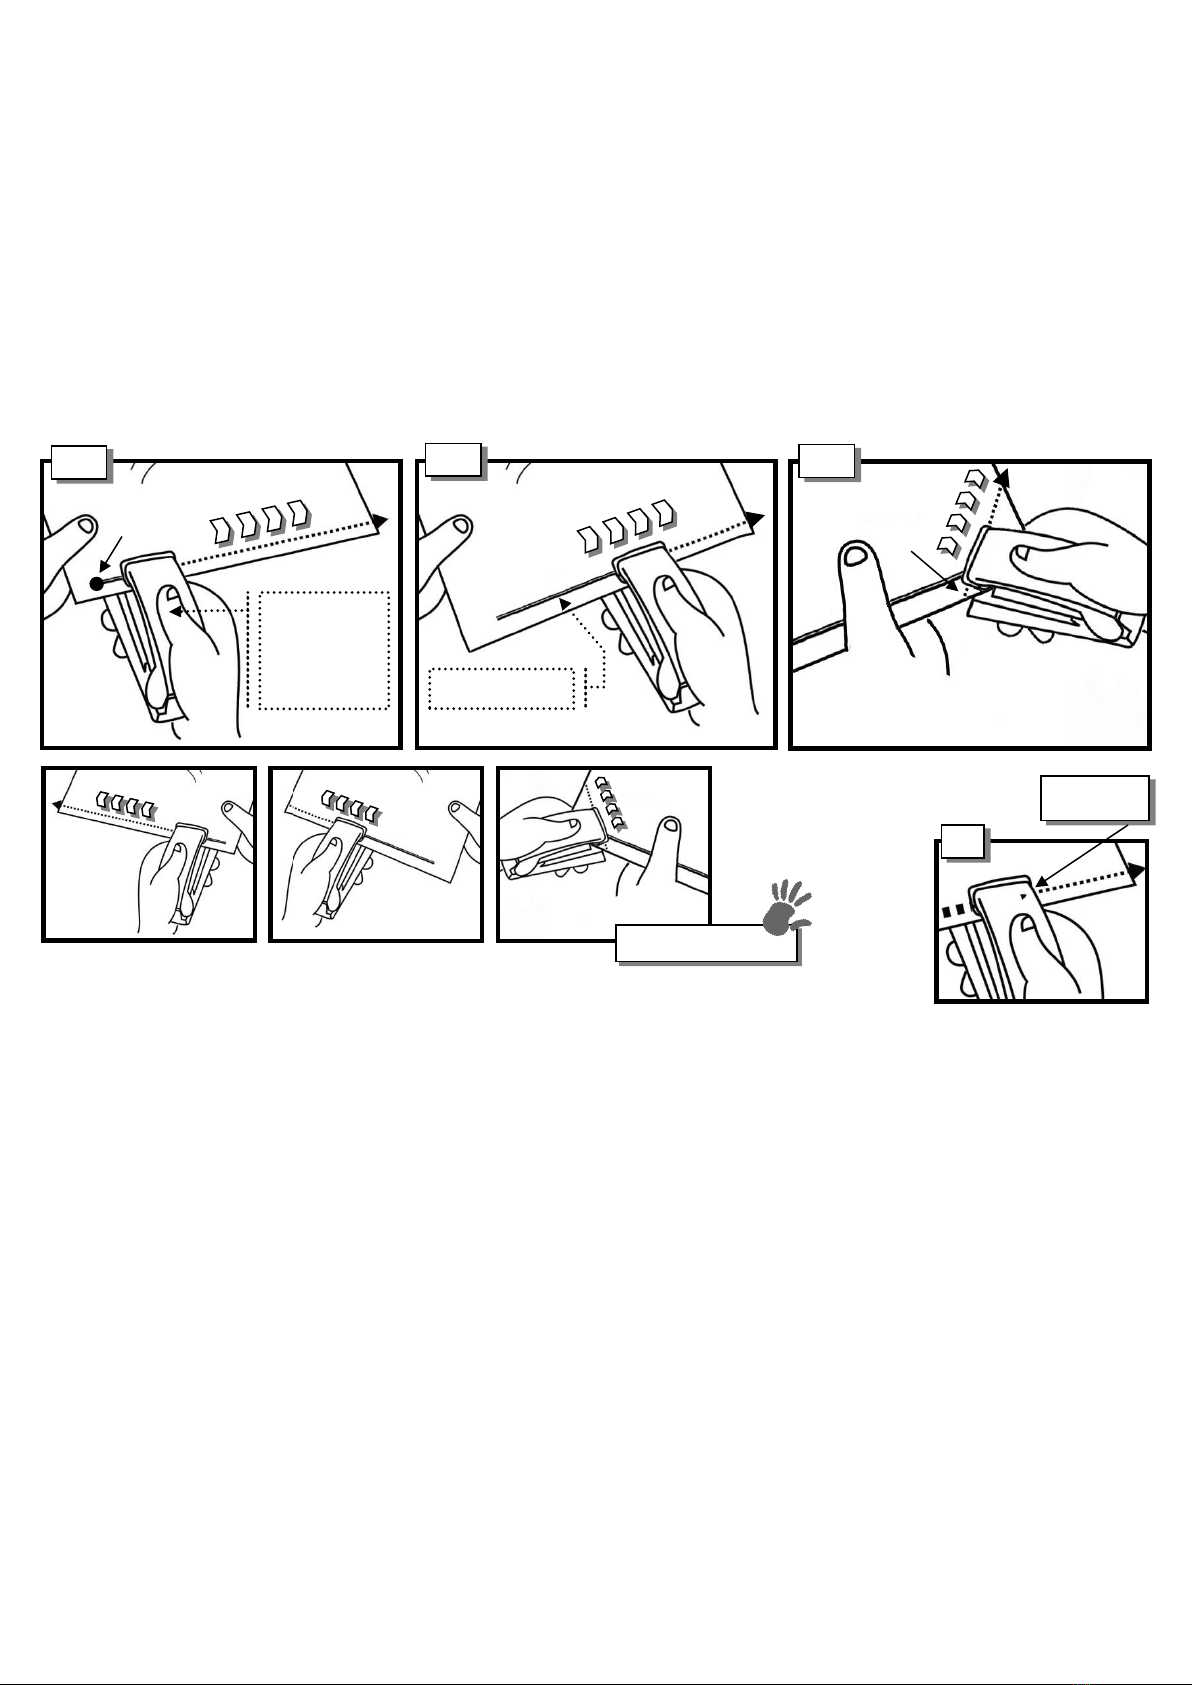
HOW TO SEAL THIN BAGS WITH YOUR ECO SEALER?
● Please make sure your ECO SEALER is fully charged!
● Place the plastic bag between the main body and the press bar. Hold the plastic bag with one hand and your ECO
SEALER with the other. (Please leave enough space for your hand to hold the plastic bag while sealing).
● Press down slightly until both sides of the heating pad engage and wait for 3 seconds to pre-heat (Place your thumb
in the middle of the press bar when sealing) [Pic.1].
● Start sliding your ECO SEALER from the starting point to the edge [Pic. 2]
*** During sealing process, thinner bags will be “CUT AND SEALED” at the same time. This is not a malfunction!
Turn the bag around and place the plastic bag on spot②(before the unsealed part), press down the press bar,
pre-heat again and slide until the end of the bag. The food inside the bag is now sealed air and water tight! [Pic. 3]
1
PRESS DOWN
AND PRE-
HEAT FOR 3
SECONDS
2
LEFT HANDED
3
2
HOW TO SEAL THICKER OR ALUMINUM FOIL BAGS WITH YOUR ECO SEALER
● Please make sure your ECO SEALER is fully charged!
● Place the plastic bag between the main body and the press bar. Hold the plastic bag with one hand
and ECO SEALER with the other. (Please leave enough space for your hand to hold the plastic bag while sealing).
Press down slightly until both sides of the heating pad engage and wait for 3 seconds to pre-heat (Place your
thumb in the middle of the press bar when sealing) [Pic.4]
● Begin sliding ECO SEALER from the starting point to the edge [Pic. 5]
*** During sealing process, thick bags will only be “SEALED” but ‘NOT CUT”. A Sealing line could be seen on the bag.
● In order to complete the unsealed part of the bag, please turn the bag around and place the sealer on spot②
press down the press bar, pre-heat again and slide your ECO SEALER by crossing over the earlier sealing line as
shown below [Pic. 6] The food inside the bag is now sealed air and water tight!
Important Notice: For thicker plastic bags, which ECO SEALER can seal but cannot cut through
please use the arrows at the tip of the press bar to align with the earlier sealing line. For thicker
bags such as aluminum foil bags you need to slide the ECO SEALER slower in order to get the best results [Pic.7]
PLASTIC BAGS & YOUR ECO SEALER
● There are several different sorts of plastic bags being used in the packaging industry and they differ from each other
primarily in thickness, material and heat resistance. ECO SEALER can seal any kind of plastic bag with up to
0.3mm thickness, most packages are not likely to exceed this measurement. The most common materials
that are used in plastic bags are…PP, PVC, PE, OPP & PET in addition, Non-woven bags and shrink film bags
(PVC, POF) can also be sealed by your ECO SEALER.
Depending on material, the above bags might have different heat resistance.
● Tip ①: When sealing bags with different thicknesses and bags made of different materials?
The key is “Pre-Heating”. When your ECO SEALER is pre-heated up to 3 seconds, the temperature of the heating
pads will reach 150°C and this temperature is enough to seal a regular thin food grade PE bag.
The operation/sealing time for such a bag is around 5-7 seconds (average bag width 20 cm).
For sealing thicker bags or bags with higher heat resistance, the “Pre-Heating” time should be longer (e.g. 10
seconds or more). This will allow the device to generate higher temperatures.
The Operation/Sealing time for thicker bags or bags with higher heat resistance should also be longer (e.g. 10
to 30 seconds). The maximum “Pre-Heating” time for your ECO SEALER is 30 seconds!
*** After a few times practicing, you will easily figure out the precise “Pre-Heating” and “Operation/Sealing times” on
bags with different specs.
PRESS DOWN
AND PRE-
HEAT FOR 3
SECONDS
4
LEFT HANDED
5
SEALING LINE
6
Arrow
7

REMEMBER…
● Press down slightly and do not apply too much pressure.
● Wait for 3 seconds to pre-heat [Pic. 1]
● Move slower or quicker, depending on thickness of the bag. Slower for thicker bags, quicker for thinner bags.
● If the bag is not sealed entirely, please repeat the process again.
● ECO SEALER is equipped with a magnet strip at the back side so it is always ready to use [Pic. 3]
● Cut and open re-sealed plastic bags with the help of a scissors
MAINTENANCE AND & SAFETY INSTRUCTIONS
● Check the heating pad once in a while and gently remove residual plastic bits if any! You may use an old
toothbrush to do this.
● Do not attach your ECO SEALER to an oven or a Microwave oven while in use! Extreme heat or microwaves may
cause permanent damage!
● Keep away from extreme humidity and water!
● Do not apply too much pressure on the press bar during sealing process! This may cause harm to the heating pads
and rip the bag!
● Do not touch or touch another person with the heating pads [Pic. 1]
● Do not place on or near a hot gas or electric burner, or a heated oven.
● Take care when operating this appliance near children.
● Close the Press-bar while the item not in use [Pic. 2-3]
3
Pre-heat
3 seconds
to 150°C
1
1
2
Slide the tray from
“Seal” position to
“Lock” position and
vice versa by placing
your finger on the
locking knob.
3
LED charging
indicator
USB socket
Press Bar
Press-bar
locking knob
Heating
Element
Main Body
Upper Heating
Element
PARTS OF ECO SEALER
Table of contents
Popular Food Saver manuals by other brands


IPG
IPG Intertape RSA 3036-SB Operation manual

FoodSaver
FoodSaver Freshsaver reference guide

G.Mondini
G.Mondini TRAVE-350 Technical documentation

TE Connectivity
TE Connectivity 91346 Series instruction sheet

Hamilton Beach
Hamilton Beach HVC406-CE Operation manual

nVent RAYCHEM
nVent RAYCHEM CS-100 installation instructions


