Climatech CFS308GB User manual

Instruction Manual
2 in 1 COMBI STEAM OVEN
Model Ref.:CFS308GB
Please read instructions carefully before installing and operating the
oven and retain this information for future reference.

1
Content
INSTALLATION 2
IMPORTANT SAFETY PRECAUTIONS 2
SPECIFICATION 4
DIAGRAM 4
CONTROL PANEL DESCRIPTION 5
HOW TO OPERATE THE OVEN 6
MODIFY DEFAULT VALUES 6
STEAM COOKING 7
CONCECTION 8
STEAM AND CONVECTION COMBINATION 8
DESCALING FUNCTION 9
CALIBRATION FUNCTION OF BOILING POINT 9
WATER SHORTAGE HINTS 10
PUMPING FUNCTION 10
AUTO COOK 10
CLEANING AND CARE 13
PROBLEM-SHOOTING 14

2
Installation
1. Take out packing.
2. Check if the steamer is damaged. If yes, contact the dealer or Servicing Dept.
immediately.
3. It must be placed on a level surface able to hold it.
4. When placed in corner, it must be horizontally placed and the position be well
checked.
5. The steamer must be used in a place with sufficient airflow and no corrosive
gas.
6. Never place anything on the top of oven. Keep at least 20 cm distances to the
top cabinet.
7. Keep 5cm to both sides and a minimum of 10 cm at back of the oven.
8. Warning: the oven should be well grounded to prevent from electric shocking.
Important Safety Precautions
1. Read the manual carefully before using this oven.
2. The oven is designed for household use, not for commercial use.
3. Warning: only allow children to use the oven without supervision when
adequate instructions have been given so that the child is able to use the
oven in a safe way and understands the hazards of improper use.
4. Warning: water tank must be fully filled before cooking and it should not be
displaced.
5. Warning: the oven is very hot in cooking and steam may burst out when door
is opened. Please keep children away.
6. If a problem occurs to water flow in cooking, out-of-water sign indicates on the
display and the oven beeps. It is because:
a. No water is left in the tank.
b. The tank is not placed.
c. Close the door, the oven will resume cooking after fixing the above
problems.
7. If there is no food in the oven, it should not be operated to prevent damage.
8. Use gloves when taking food out of oven to avoid possible burns due to
excessive heat.

3
9. Do not store food in the oven.
10. Baby bottle and food must be stiffed or shaken its temperature before serving
to avoid burns.
11. Warning: it is dangerous for anyone other than a qualified person to attempt
the repair the oven.
12. Warning: if door or door seal is damaged, the oven should not be used before
it is repaired.
13. Warning: do not use oven to heat liquid or other food in a sealed container, it
may explode.
14. Warning: if power cord is found damaged, it must be replaced before next
use.
15. Warning: the oven must be carefully attended; it should not be left alone in
cooking.
16. Warning: Accessible parts may become hot during use. Young children
should be kept away
17. The appliance becomes hot during use. Care should be taken to avoid
touching heating elements inside the oven.
18. This appliance is not intended for use by persons (including children) with
reduced physical, sensory or mental capabilities, or lack of experience and
knowledge, unless they have been given supervision or instruction
concerning use of the appliance by a person responsible for their safety.
19. Children should be supervised to ensure that they do not play with the
appliance.
20. If the power supply cord is damaged, to avoid danger, must by the producers,
the maintenance department or similar departments of professional personnel
change.
4
Specification
Rated Voltage/Power
220V/50Hz
Rated Input
1600W (steam) 800W (convection)
Dimensions
380mm(H)×496mm(W)×385mm(D)
Cavity Dimensions
247mm(H)×335mm(W)×275mm(D)
Capacity
22L
N.W.
18.1kg
Note: The above data need to be confirmed or updated. (Orders of dimensions
are Height x Width x Depth)
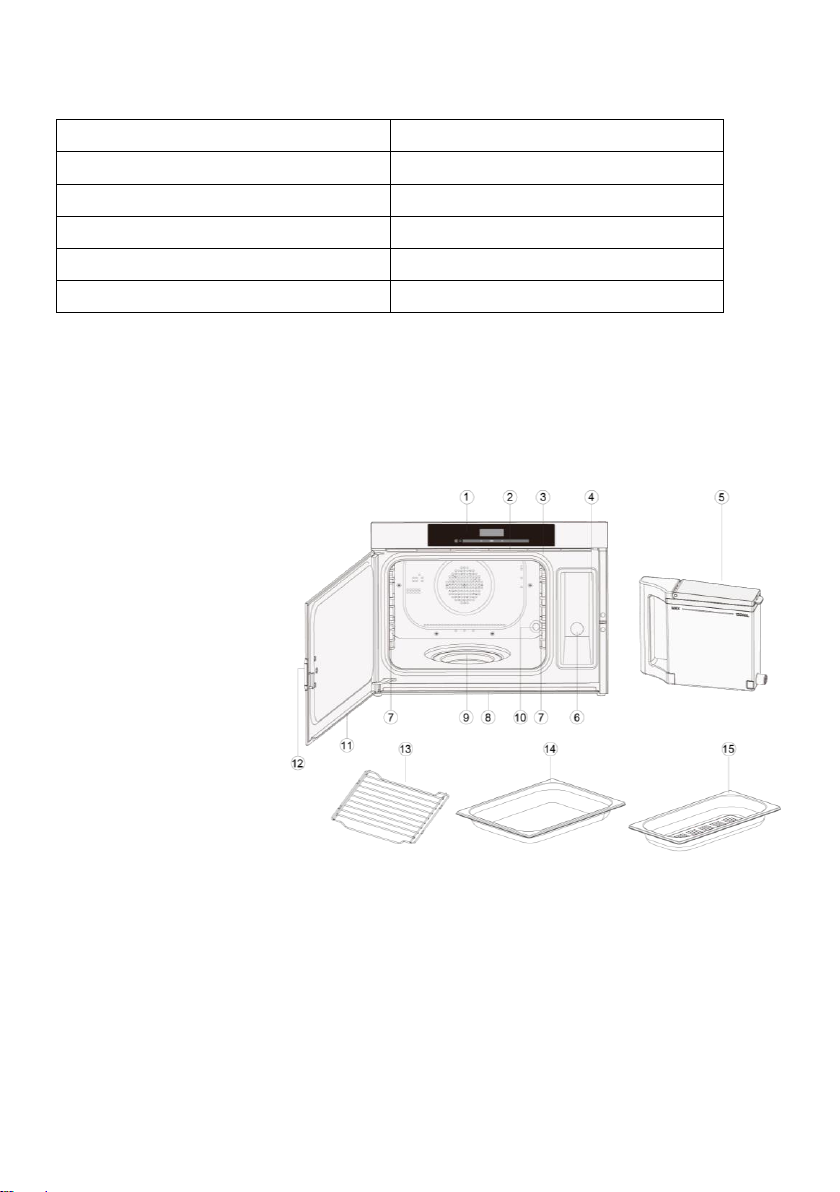
Diagram
1. Control Panel
2. Exhaust Vent
3. Seal Ring
4. Water Tank Slot
5. Water tank
6. Water tank outlet
7. Divider
8. Water Plate
9. Evaporation Pan
10. Steam Outlet
11. Door Sink
12. Door Release Button
13. Metal Rack
14. Oil Tray
15. Food Tray(only for vegetables)

5
Control Panel Description
DISPLAY
Cooking time, temperature, indicators and present time are displayed.
POWER
Press to turn the oven on and off
Press to select function mode.
Press to set time and temperature.
OK
Press to confirm your selection.
Press to start boiling point calibration.

6
How to operate the oven
When the oven is first plugged in, a beep will sound, then press POWER
button once to turn on the oven, beep will sound and the display will show
"0".
In standby mode, press or button to select function mode: Steam →
Convection →Steam and Convection →Auto Menu.
During cooking, if open the door, the program will be paused, then close the
oven door to resume.
In any state (except the shutdown state), press the POWER button once to
enter the shutdown mode
In the process of setting, broken about 20 seconds the oven will return to
standby mode.
After cooking end, the screen will display End and beep will sound every two
minutes until user press any button (except POWER button) or open the
door.
The electronically controlling system of the steam oven has the feature of
cooling. As for any cooking mode which cooking time above 2 minutes, after
cooking end, the oven fan will work about 3 minutes automatically to cool the
oven for prolonging the life of the oven.
In standby mode, the system will return to standby mode if there is not any
operation within 15 minutes.
MODIFY DEFAULT VALUES
1. In standby mode, press and hold button more than 3 seconds until the
display shows "P1".
2. Press or button repeatedly to select code P1 ~ P6.
3. Press OK button to confirm.
4. Press or button repeatedly to select subcode S0 ~ S4.
5. Press OK button to confirm.
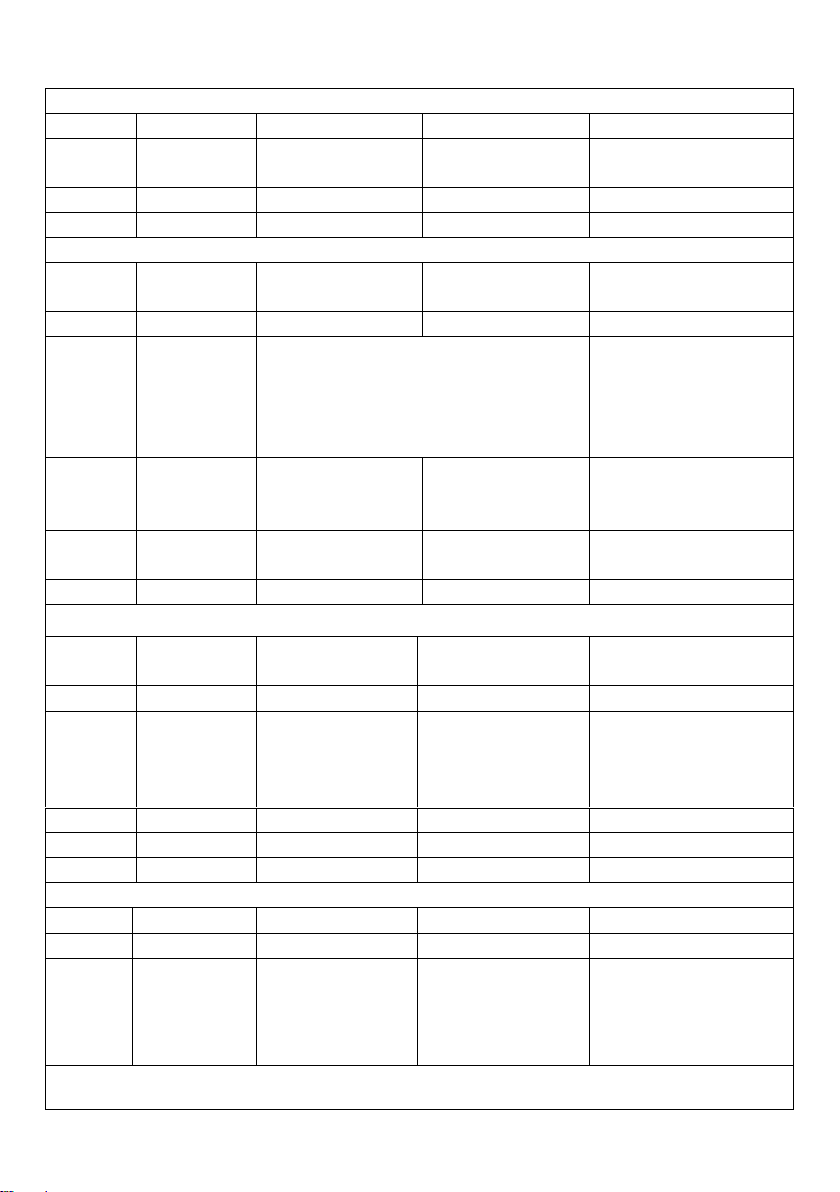
Code
Program
Subcode
Setting
P1
Restore factory
settings
S0 (default)
/
S1
Factory settings restored
P2
Demonstration mode
S0 (default)
Turn off and the oven will be
heated
S1
Turn on and the oven will not be

7
heated
P3
Prompt volume setting
S1
Very low
S2
Low
S3
Middle
S4 (default)
High
P4
Water hardness
Hardness
Hardness
(°dh)
mmol/L
S1
Soft
<8.4
<1.5
S2
Moderate
8.4-14
1.5-2.5
S3
/
/
/
S4 (default)
Hard
>14
>2.5
P5
Temperature unit
S1 (default)
"℃"
S2
"℉"
P6
Key tone
S0
Off
S1 (default)
On
NOTE: The harder the water quality is, the more frequent descaling is required. If
S4, S3, S2 and S1 work for 10, 12, 14 and 16 hours respectively, there will be
descaling warning (the display screen shows "dESC" and flashes).
STEAM COOKING
Before you setting steam cooking program, check the water tank to make sure
that there is enough pure water in it. The steam cooking temperature ranges are
40℃~100℃/5℃. The longest cooking time is 9 hours and 59 minutes.
1. Press POWER button once.
2. Press or button repeatedly until the display shows "100℃" and
"".
3. Press OK button once.
4. Press or button repeatedly, or press and hold or button to
set temperature.
5. Press OK button once.
6. Press or button repeatedly, or press and hold or button to
set cooking time.
7. Press OK button once.

8
NOTE: During cooking (Except when the temperature goes up), you can adjust
cooking time following the step 6. And you can check the temperature by pressing
OK button.
CONVECTION
During convection cooking, hot air is circulated throughout the oven cavity to
brown and make crisp foods quickly and evenly. The cooking temperature range
is 110℃~200℃/10℃. The longest cooking time is 9 hours and 59 minutes.
1. Press POWER button once.
2. Press or button repeatedly until the display shows "200℃" and " ".
3. Press OK button once.
4. Press or button repeatedly, or press and hold or button to
set temperature.
5. Press OK button once.
6. Press or button repeatedly, or press and hold or button to
set cooking time.
7. Press OK button once.
NOTE: During cooking, you can adjust cooking time following the step 6. And you
can check the temperature by pressing OK button.
STEAM AND CONVECTION COMBINATION
Before you setting steam and convection cooking program, check the water tank
to make sure that there is enough pure water in it. The steam cooking
temperature range is 160℃~200℃/10℃. The longest cooking time is 9 hours and
59 minutes.
1. Press POWER button once.
2. Press or button repeatedly until the display shows "200℃", " "
and " ".
3. Press OK button once.
4. Press or button repeatedly, or press and hold or button to
set temperature.
5. Press OK button once.
6. Press or button repeatedly, or press and hold or button to
set cooking time.
7. Press OK button once.
NOTE: During cooking, you can adjust cooking time following the step 6. And you
can check the temperature by pressing OK button.
9
DESCALING FUNCTION
Before you setting descaling program, check the water tank to make sure that
there is enough pure water in the water tank.
1. Open the door and add proper amount of scale remover into the evaporation
pan, then close the door.
2. Press POWER button once.
3. Press or button repeatedly until display shows "A-1" and " ".
4. Press OK button once.
5. Press or button repeatedly, or press and hold or button to
select "A-24".
6. Press OK button once.
NOTE:
During descaling, you can press or button repeatedly, or press and
hold or button to adjust descaling time, no less than 22 minutes is
recommended.
When the system reminds the user to remove the scale, the display screen
displays "dESC" and flashes. At this time, the "dESC" icon will disappear
automatically after the descaling is set and the operation is over; otherwise,
the prompt will always exist.
CALIBRATION FUNCTION OF BOILING POINT
Before calibration, check the water tank to make sure that there is enough pure
water in the water tank.
In order to user can use this product at different altitudes, it provides the function
of boiling point calibration based on actual elevation.
In standby mode and oven door is closed, press and hold OK button more than 5
seconds, the display will show ”0:15h”. the oven start calibration boiling point.
NOTE:
During calibration process, do not press POWER button or open the oven
door. Otherwise, the calibration fails.
During calibration, you can press or button repeatedly, or press and
hold or button to adjust calibration time.

10
WATER SHORTAGE HINTS
During cooking, if the water tank is not installed or the water tank is short of water,
the cooking automatically stop, the display shows " " and beep will sound to
remind user to add water or installed the water tank. After that, close the oven
door, press OK button once to resume cooking.
PUMPING FUNCTION
Make sure there is no water in the tank. If the steam oven will be leaved unused
for a long time, you’d better draw out water in the piping.
1. Press POWER button once.
2. Press or button repeatedly until display shows "A-1" and " ".
3. Press OK button once.
4. Press or button repeatedly, or press and hold or button to
select "A-25".
5. Press OK button once. The system will return to standby mode 5 seconds
later, then dry the cavity with a soft cloth.
AUTO COOK
For food or the following cooking mode, it is not necessary to program the cooking
time and power. It is sufficient to indicate the type of food that you want to cook as
well as the weight or servings of this food.
1. Press POWER button once.
2. Press or button repeatedly until display shows "A-1" and " ".
3. Press OK button once.
4. Press or button repeatedly, or press and hold or button to
select food code.
5. Press OK button once.
6. If you want to adjust the cooking time, press or button repeatedly, or
press and hold or button to set cooking time.
7. Press OK button once.
NOTE: During cooking, you can check the cooking temperature by pressing OK
button.
11
Auto cook menu:
Baking(Bottom second layer)
Code
Menu
Temperature
Time (min)
Weight/Serving
A-1
Cake
Convection
160℃
45
475 g
A-2
Pie
Convection 200℃
28
7-9 servings
A-3
Bread
Convection 170℃
25
6-9 servings
Grill(Bottom second layer)
A-4
Sweet
potato
Convection 200℃
45
600 g, diameter>3.5
cm. Cut into pieces
A-5
Bacon
Convection 200℃
18
200 g
A-6
Pork jerky
Convection 200℃15 min
Brush honey and turn over
Convection 180℃15 min
Brush honey and turn over
Convection 150℃10 min
200 g
A-7
Honey
chicken
wing
Convection 200℃
35
500 g
A-8
Korean
BBQ
Convection 200℃
30
400-500 g
A-9
Garlic ribs
Convection 200℃
35
400-500 g
Steaming-Daily(Bottom first layer)
A-10
Rice
Steam 100℃
35
300 g rice and 420 g
water
A-11
Ribs
Steam 100℃
20
500 g
A-12
Eggs
Steam 90℃
15
2 eggs, 220 g water
and proper amount of
salt
A-13
Fish
Steam 100℃
18
400-500 g
A-14
Shrimp
Steam 100℃
16
500 g
A-15
Pork
Steam 100℃
40
600 g
Steaming-Breakfast(Bottom first layer)
A-16
Corn
Steam 100℃
22
600 g
A-17
Dumplings
Steam 100℃
16
200~400 g
A-18
Noodles
Steam 100℃
15
500 g
Steaming-Dessert(A-19 Bottom first layer A-20/A-21 Bottom second layer)
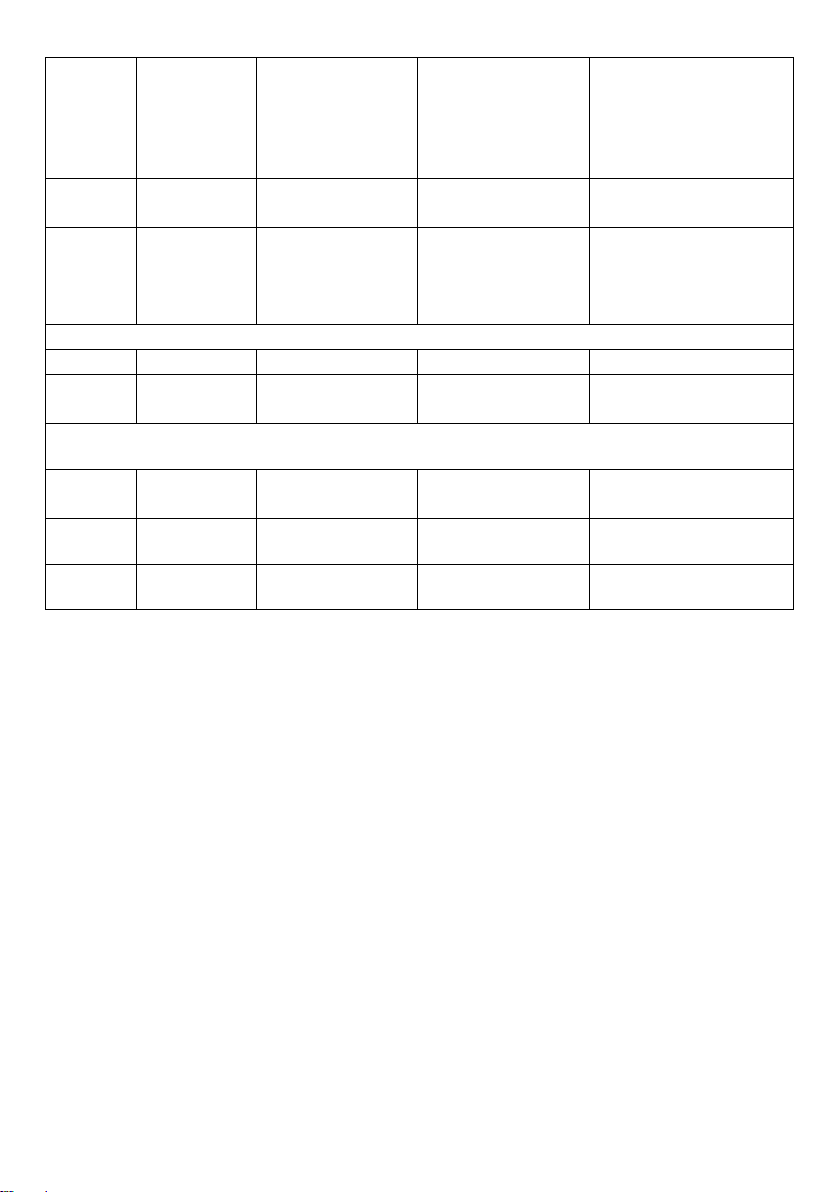
12
A-19
Tremella
and lotus
seed soup
Steam 100℃
50
Lotus seed 30 g,
tremella 10 g,
800 ml hot water.
proper amount of
rock sugar
A-20
Egg
pudding
Steam 90℃
18
2 eggs, milk 250 g
berry sugar 20 g
A-21
Papaya
milk
Steam 100℃
15
Milk 250 g, papaya
100 g,
proper amount of
sugar
Fermentation(Bottom second layer)
A-22
Dough
Steam 35℃
40
250 g dough
A-23
Yogurt
Steam 40℃
6 hour
1000 ml milk
1 g, yoghurt starter
Maintenance
A-24
Auto
cleaning
/
22
10 g citric acid
A-25
Auto drain
/
/
/
A-26
Disinfection
Steam 100℃
10
/

13
Cleaning and Care
Note: Forbidden the use of powerful cleansing agent, benzene, abrasive powders
to clean any parts of the oven.
1. Before cleaning the oven cavity, switch off power, and plug off from power socket.
2. Regularly keep the oven cavity clean. When food or soup splashed onto the
cavity walls, clean with a damp cloth, don't use a hard material for fear of
damaging the surface. If the cavity is very dirty, you may use a soft cleaning
agent, never use rough, abrasive cleaning agents.
3. It is recommended that the water used should be pure or distilled water. If using
the tap water for long time, there may be water scale on the hotplate.
4. The hotplate should be kept clean regularly. To clean the hotplate, use white
vinegar of 1/2 cup on the plate and wait for several minutes before using a cloth
to wipe it clean and finally use water to wash it. Do not use rough, abrasive
cleaning agents.
5. Check the water pipe once every month to see if any foreign matter blocking its
mouth. Take off the pipe if necessary to clean the dirt within.
6. After cooking, take out the water box and empty the remaining water, use the soft
cloth to dry it and then install it into the oven.
7. Check the water box once every month. Take off the box if necessary to wipe it
clean before replacing it back.
8. After cooking finished, the water collect board and the water box should be
cleared of water.
9. The door seal should be cleaned regularly and wipe with a soft dry cloth.
10. If the control board gets wet, use a soft dry cloth to wipe clean. Don't use a rough,
abrasive cleaning agent to wipe control board. Before cleaning the control board,
cut off the power to the steam oven to prevent inadvertent operation.
11. If the steam oven isn't used for long time, plug off from power socket, clean the
cavity and placed in a dry environment without corrosive gases.
12. If malfunction occurs to the steam oven, the repair should be done by specialist
from the manufacturer. It is dangerous for any other person to repair it.
13. Before changing the oven lamp, the power should be cut to the oven. Open the
oven casing, the lamp should be from the manufacturer.
14. The oven door should not be cleaned with abrasive cleaning matter or pointed
metal matter for it may break the glass.
15. WARNING: When cleaning the food plate and oil tray, use soft material such as
cloth, don't use hard material such as metal to prevent damage to the protective
layer of the utensils.
14
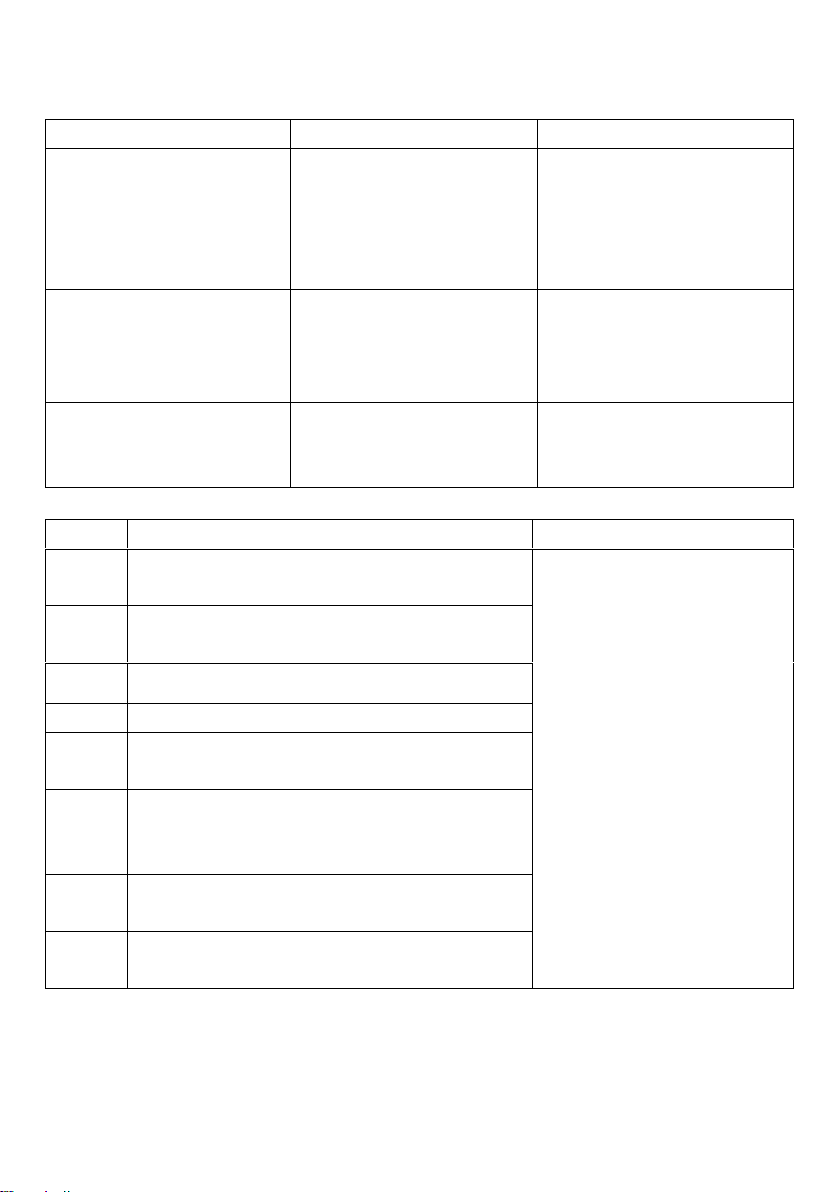
Problem-shooting
Problems
Possible causes
Problem solving
Dark display window
Oven is not connected
and the power cord does
not work properly
Make sure oven is
connected (fuse is in
place)
Contact the after sales
service
Lamp does not work
Lamp, fuse not comply
standards,
Lamp does not connect
to power.
Replacement of lamp
Connect the power cord
properly
Change the fuse
During cooking, water or
water vapor leaks out
from the door.
Door does not close
properly
Door seal is damaged
Contact after sales service
Code
Analysis
Solution
E-3
Cavity high temperature protection: more
than 230°C.
Contact service
professional, user should
not disassemble the oven.
E-4
Cavity low temperature protection: after
cooking 3 minutes less than 35°C.
E-5
Cavity sensor open circuit protection.
E-6
Cavity sensor short circuit protection.
E-7
Heating plate high temperature protection:
more than 250°C.
E-8
Heating plate low temperature protection:
after 3 minutes. Cooking, temperature less
than 40°C.
E-9
Heating plate sensor open circuit
protection.
E-10
Heating plate sensor short circuit
protection.
NOTE: During using process, if there is a mistake alarm, please press POWER
button once to turn off and contact service.
Table of contents


