CLOUDVOCAL ISOLO LITE User manual
ISOLO LITE User Manual
-
-
+
+
-
+
-
+

ISOLO LITE
User Manual
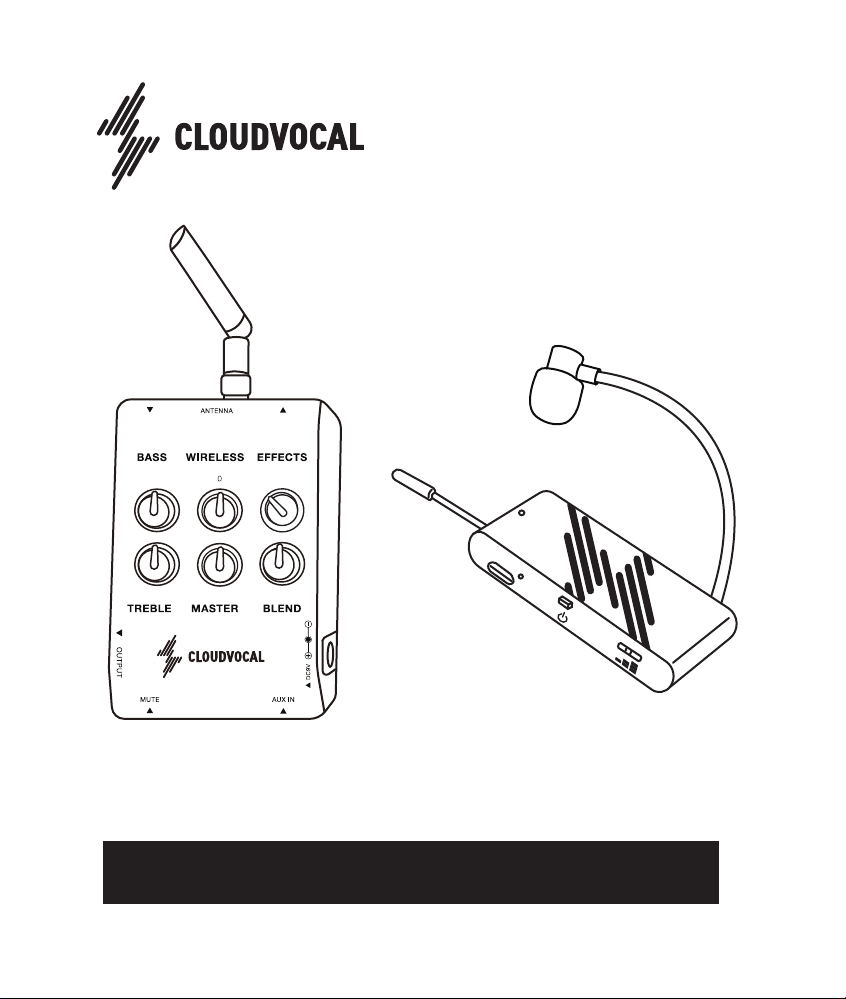
INTRODUCTION
ISOLO is the integrated system designed for wireless performances. Players can enjoy
studio grade tone without restrictions from cables. Stage receiver integrates preamp, EQ,
aux-in audio and built-in effects. It is the compact solution for live performances.
WARRANTY WARNING
ISOLO LITE
User Manual English
01
Your one year warranty will start after online
registration. During the warranty, Cloudvocal will be
responsible for defects and malfunctions under
normal use by providing repair or replacement
service. Be sure to check the instruction for
successful registration.
Please be noted that giveaway goods are excluded
from warranty. Meanwhile, please report to us if the
accessories are missing or blemished within 7 days
of your purchase.
Be sure to secure your receipts and order number to
validate your warranty.
The warranty DOES NOT cover: Damage from
physical abuse, damage due to liquid contamination,
damage resulting from any use other than that it
was intended for, unit that has been repaired or had
an attempted repair made to it by unauthorized
personnel, damage due to incorrect connection,
connection to faulty equipment or connection to
faulty or incorrect power supplies and damage in
transit as a result of inadequate packaging or
protection.
This product is made by electronic parts. Please
avoid liquid or moisture that may result in corrosion
and cause fire or electric shock.
If there is obvious damage on the mic or receiver,
please contact customer service or local dealers.
Cloudvocal is NOT responsible for damage caused
by inappropriate use.
English
- +
-+
- +
-+
- +
-+
- +
-+
English
ISOLO LITE
User Manual
02
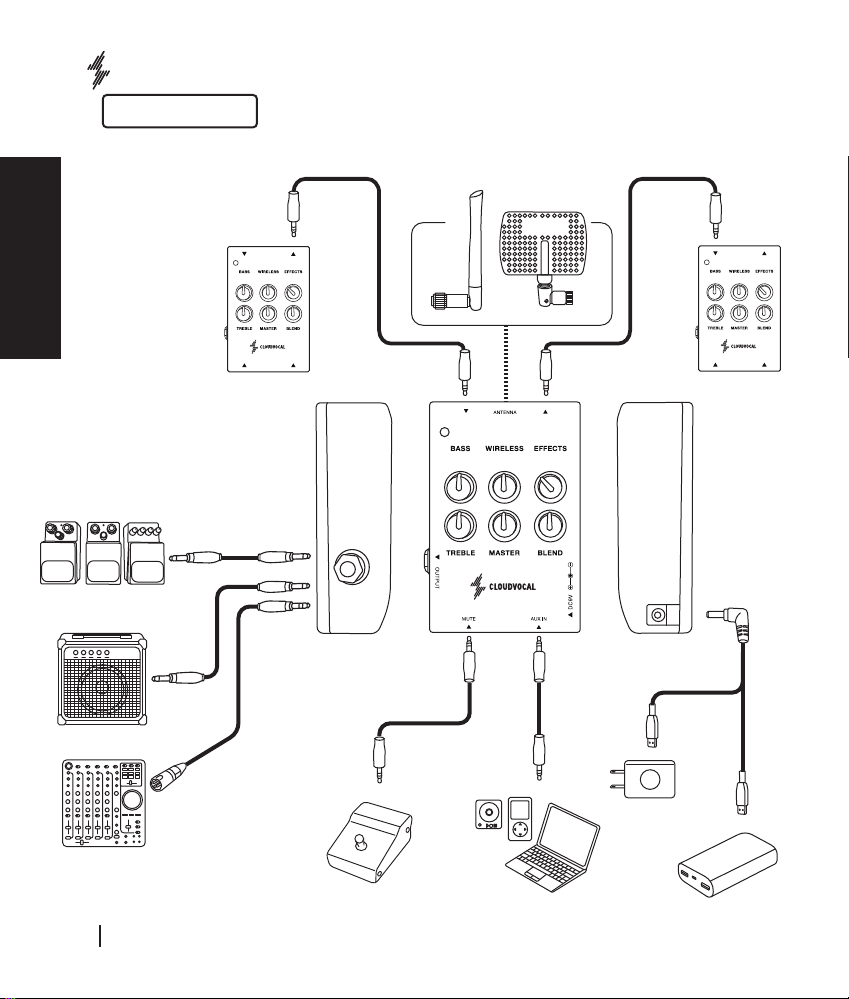
TS
TRS
TS
XLR
Amplifier
Mixer
Effect
6.3mm
6.3mm
6.3mm
Connection diagram
PRODUCT SPECIFICATION
Laptop, Music player,
external sound source
Mute pedal
Plug
Portable charger
3.5mm
3.5mm
TRS
TRS
3.5mm 3.5mm
TRS TRS
Antenna
(standard
equipment)
Directional antenna
(purchase as an
extra accessories)
English
- +
-+
- +
-+

QUICK START GUIDE
Screw in the antenna to the stage receiver (1) and
plug in the power (2). At this time, the power indicator
flashes blue meaning it’s ready to be paired (3).
Place the microphone close to the stage receiver
(about 10cm away), and press the power button
shortly (1).
When the transmitter is showing green indicates that
the two are paired (2).
Attach the microphone on to different
instruments: please refer to its mount
manual which comes with your ISOLO
model.
Press the power switch of the microphone
transmitter for 5 seconds (1), and the
pairing indicator starts to flash (2).
Step1 Setup stage receiver Step 2 Turn on Microphone
Step 3 Pair Microphone Step 4 Install the microphone
(1)
(3)
(2)
(2)
(2)
(1)
Please scan the QR-Code
to see the video reference.
(1)
(2)
10cm
English
English
ISOLO LITE
User Manual
04

①
③
④
⑤
⑥
⑦
②
MICROPHONE TRANSMITTER
① Power / Pairing button
② Charging Terminal
③ Charging /
Low Power Indicator
Use standard USB charger to charge the mic.
Please charge for 2 hours for the first use.
LED ON : Charging or low battery
LED OFF: Charging complete
④ Preamp Gain Low: 0dB / Medium: 8dB / High: 15dB
Omnidirectional condenser mic
Adjust to your preferred position. Avoid extreme
bending.
Flashing (slowly): On / Flashing (quickly): Pairing
Glowing: Paired and is operating
Press and hold for 5s: Turn on
Short click after turned on: Pairing
⑤ Mic Capsule
⑥ Low-rebound Gooseneck
⑦ Power / Pairing Indicator
English
ISOLO LITE
User Manual English
05
-
D
-
-
+
+
-
+
-
+
W
12 3 4
-
D
-
-
+
+
-
+
-
+
W
12 3 4
-
D
-
-
+
+
-
+
-
+
W
12 3 4
- +
-+
- +
-+
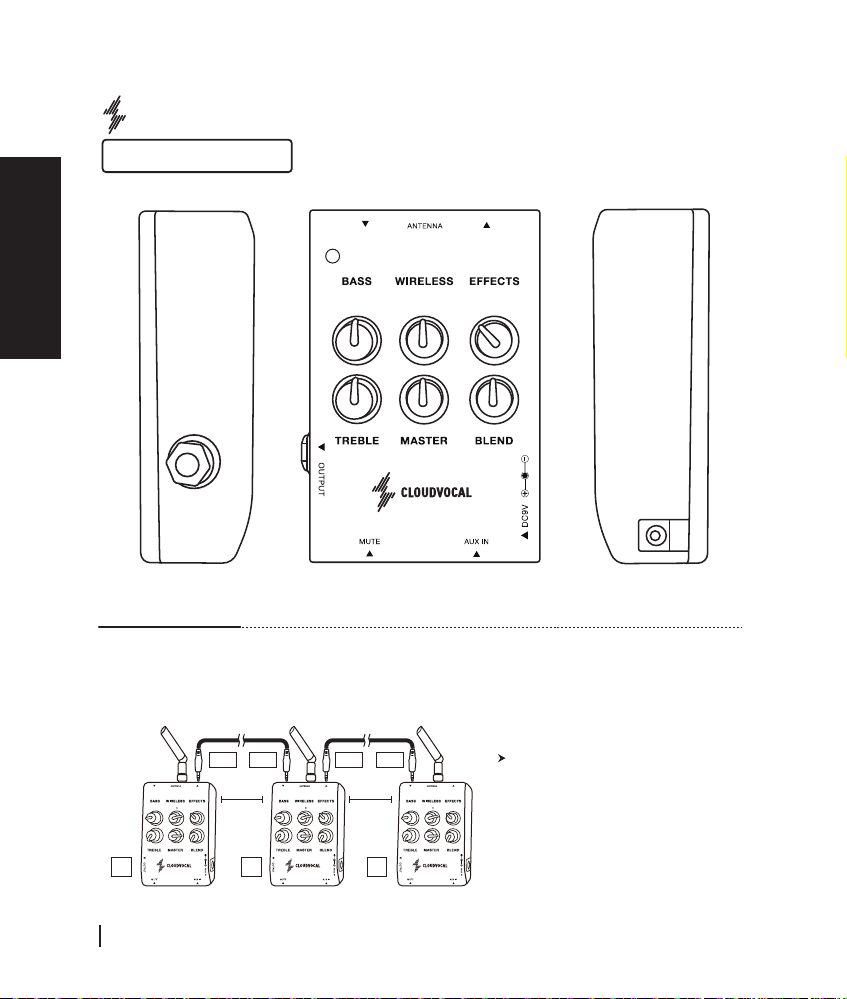
①③
④
⑫
⑬
⑤
⑧
⑨
⑩
⑪
⑥
⑦
⑭
②
123
1 meter1 meter
LITE Stage Receiver
Specification
Flashing (slowly): On / Flashing (quickly): Pairing
Glowing: Paired and is operating
①ANT
③SYNC IN
②SYNC OUT Using multiple receivers (up to 3 at a time), please connect the sync
out of the first unit to the sync in of the second unit (and so on) with
the 3.5mm TRS cable. We recommend to leave 1m distance between
each receiver.
SYNC IN / SYNC OUT Connection diagram
When receivers are syncing with each
other, all receivers will switch to range
boost mode and sync the wireless
signals to avoid interference.
OUT IN OUT IN
English
English
ISOLO LITE
User Manual
06

④MUTE
⑤AUX IN Connect via 3.5mm TRS cable to your phones, tablets,
mp3s or PCs to play backing track in receiver.
Connector for a foot switch via 3.5mm TRS cable to
mute / unmute signal from receiver.
* 6.3mm to 3.5mm adapter can be used in this case.
** foot switch is NOT included.
⑥BASS Bass control of wireless mic signal +/- 6dB @200hz
(shelf type)
⑦TREBLE Treble control of wireless mic signal +/- 6dB @2000hz
(shelf type)
⑧ WIRELESS Wireless mic gain control +/- 6dB
⑨ MASTER Master volume control Mute~0dB
⑪ BLEND Controls the balance of dry and wet signal.Turn the
knob counterclockwise all the way for 100% dry signal.
Digital effect processor with 4 presets
1. Room reverb
2. Hall reverb
3. Arena reverb
4. Delay + Reverb
Note: effects only work on wireless mic signal.
⑩ EFFECT
English
ISOLO LITE
User Manual English
07

Please check polarity as indicated when
using your own power supply.
⑫LINE / DI OUT
Stage Receiver output is defined as:
1. DI OUT (to mixers): balanced signal via 6.3mm TRS
to XLR cable.
2. LINE OUT (to amps): unbalanced signal via 6.3mm
TS cable.
⑬DC INPUT
Power supply input range (7-9 Volt DC)
There are two methods of supply power by using
power DC7V Converter Cable:
1. Connect it to power adapter (5V/2A), then plug
it into a wall socket.
2. Directly connect it to a power bank.
⑱POWER INDICATOR Battery time
< 10%
Battery time
80%~10%
Battery time
> 80%
Blue light Green light Red light
English
English
ISOLO LITE
User Manual
08

You Play Music.
We Mic It.
雲聲國際有限公司
Cloudvocal International Co., Ltd.
地址
電話
郵件
官網
台灣台北市中正區衡陽路 27 號 2 樓
+886-2-2388-7420
www.cloudvocal.com
ADD
TEL
E-MAIL
WEB
2F.,No. 27, Hengyang Rd., Zhongzheng Dist.,
Taipei City 100, Taiwan
+886-2-2388-7420
www.cloudvocal.com 雲聲官方網站
Table of contents
Other CLOUDVOCAL Musical Instrument manuals


