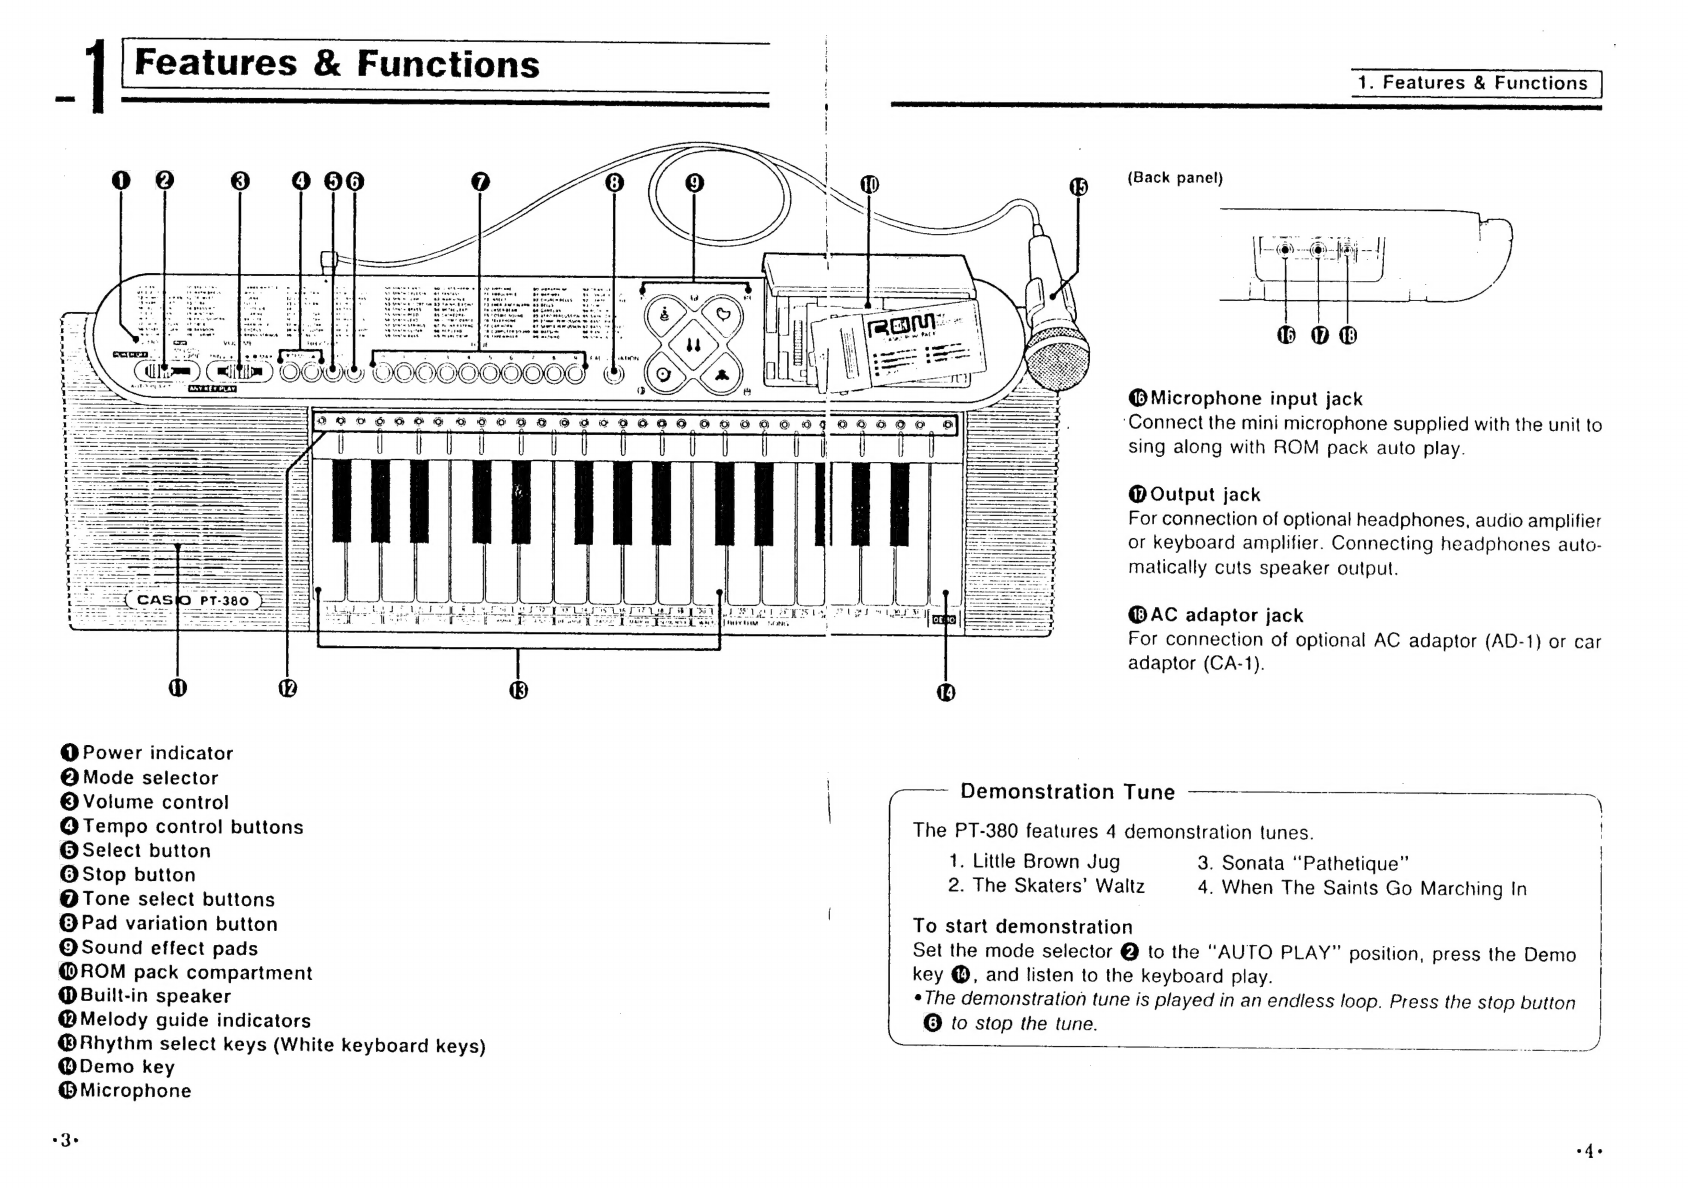
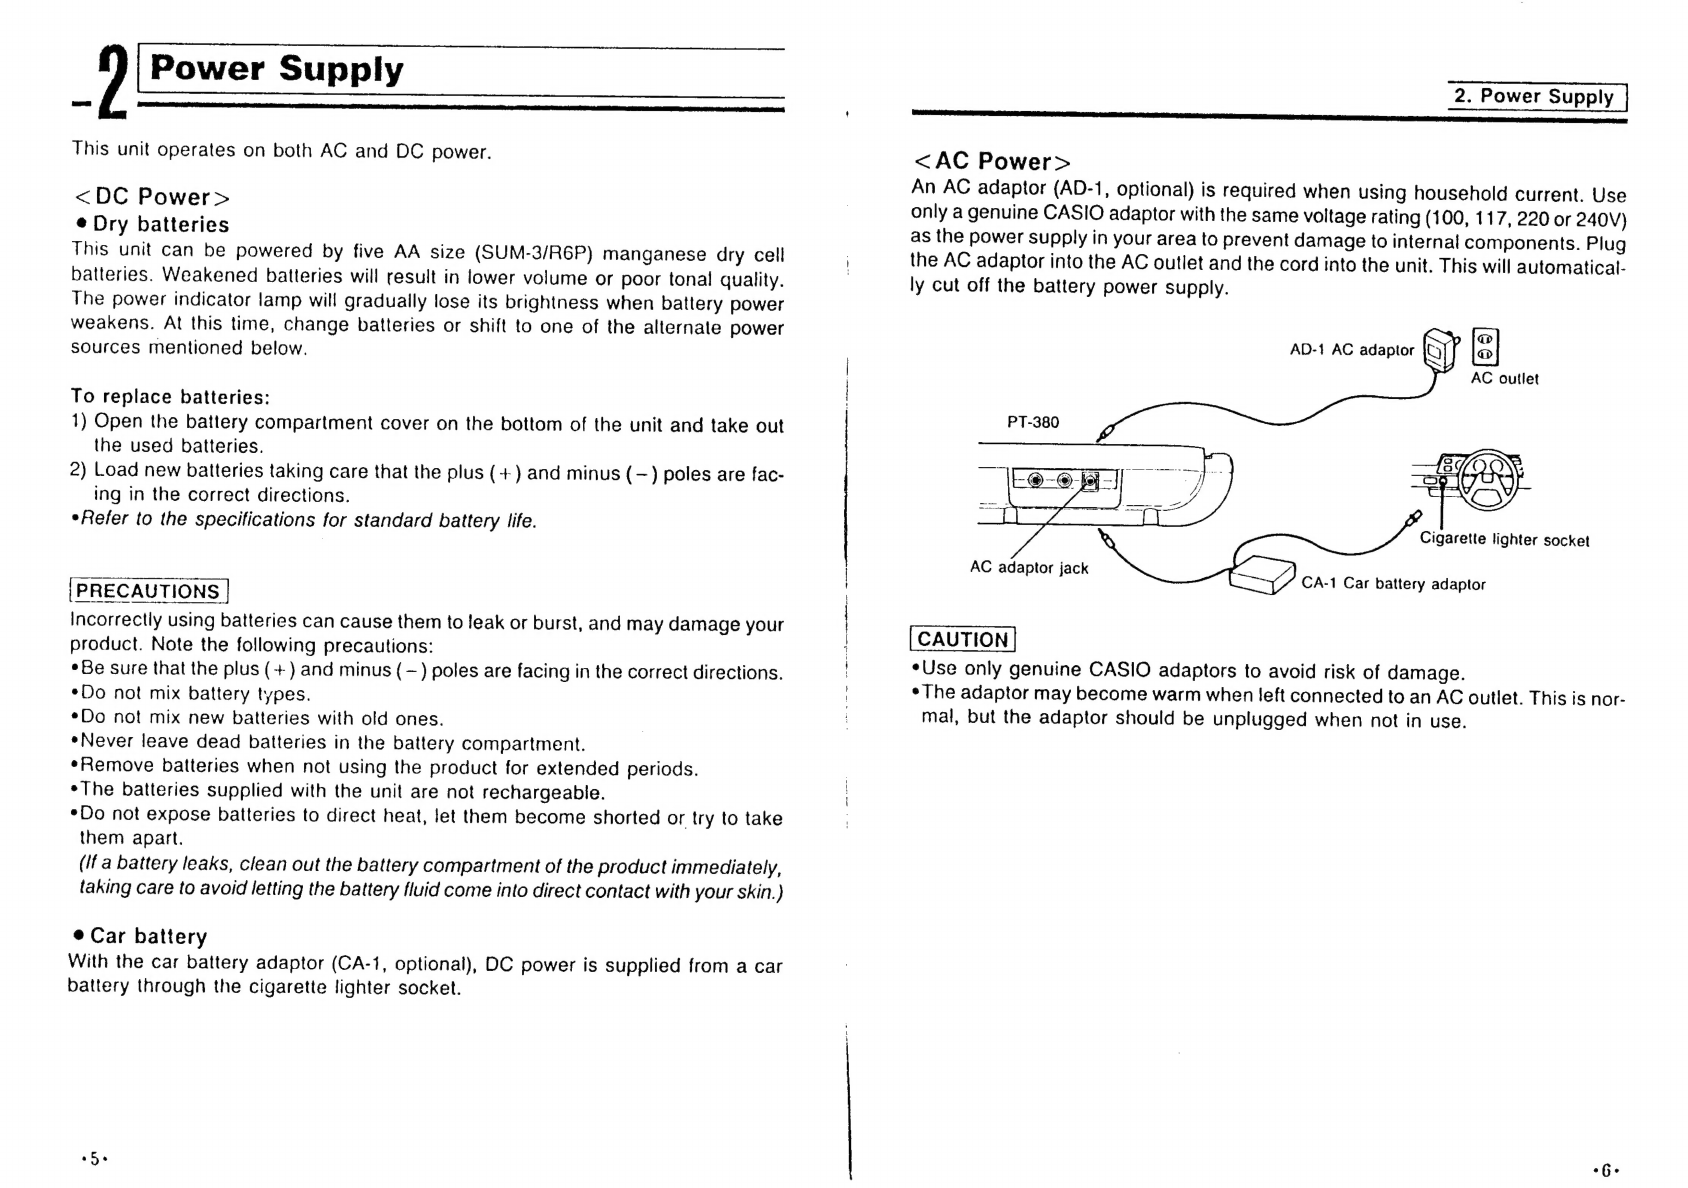
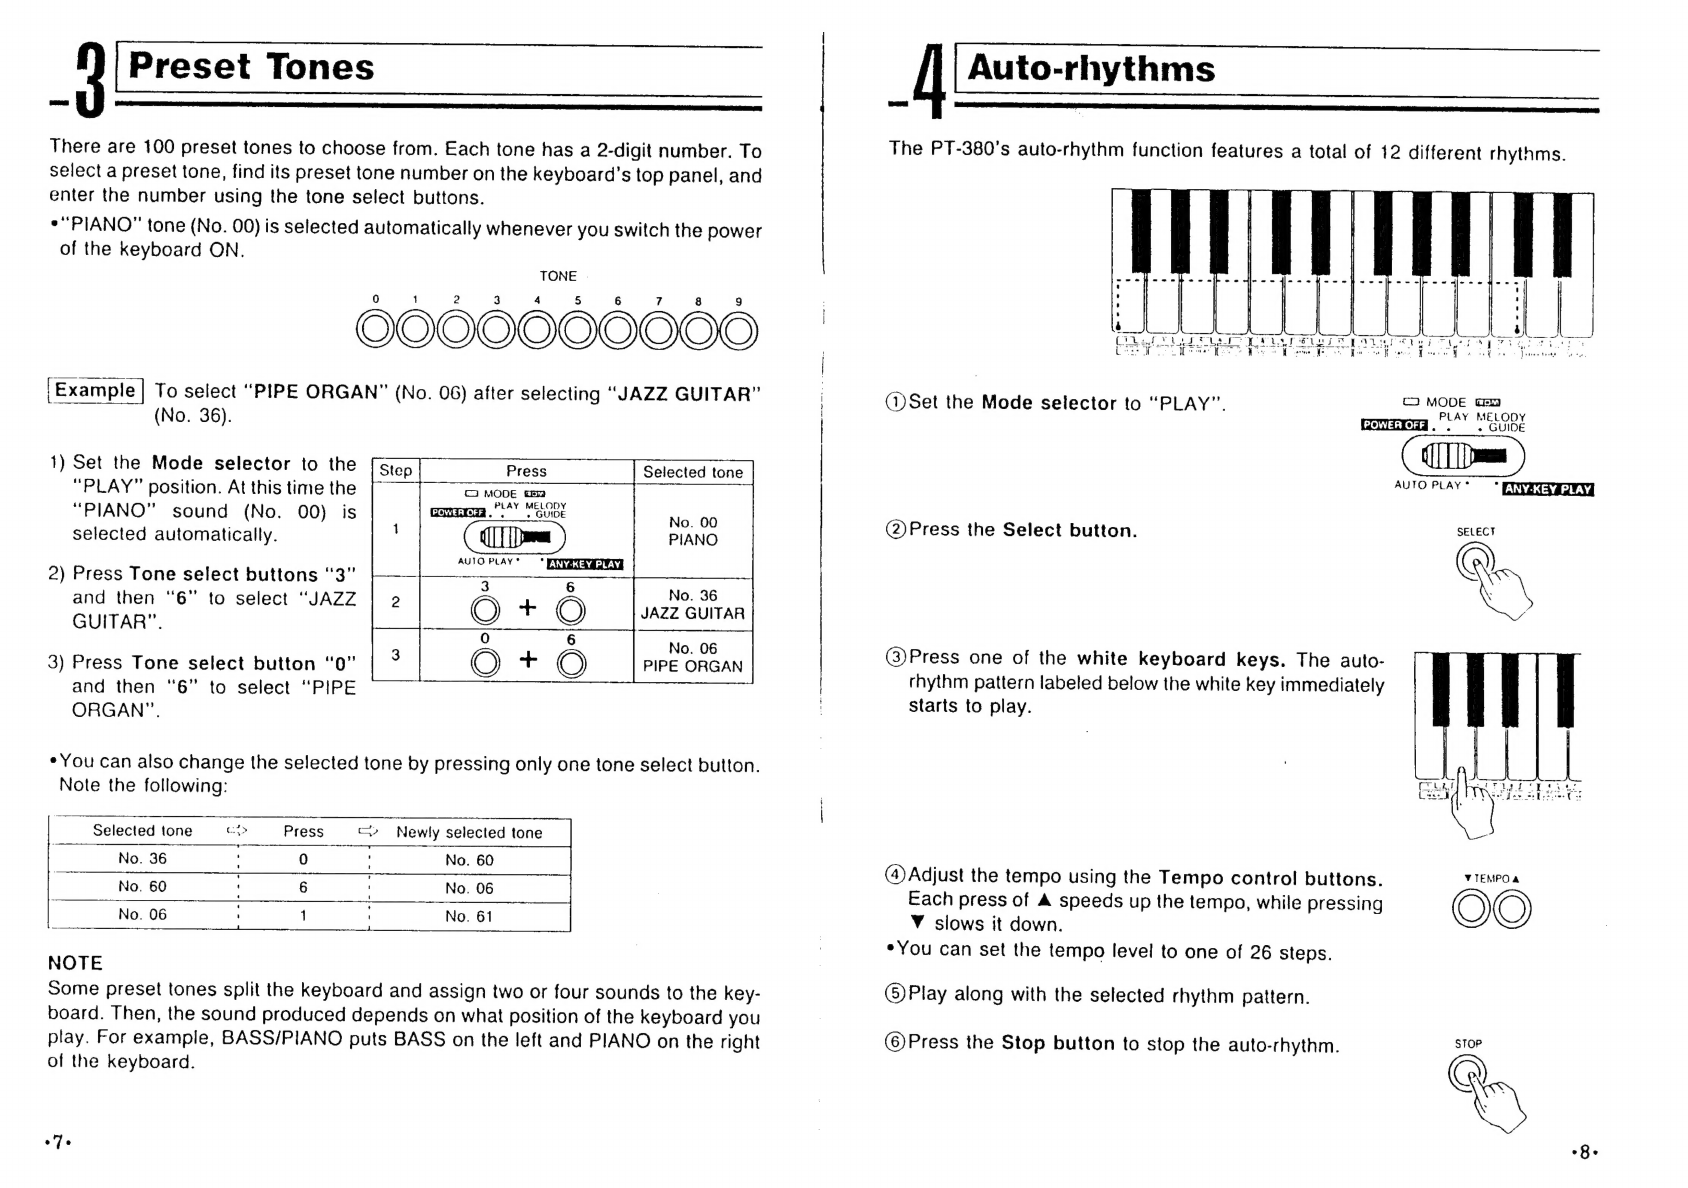
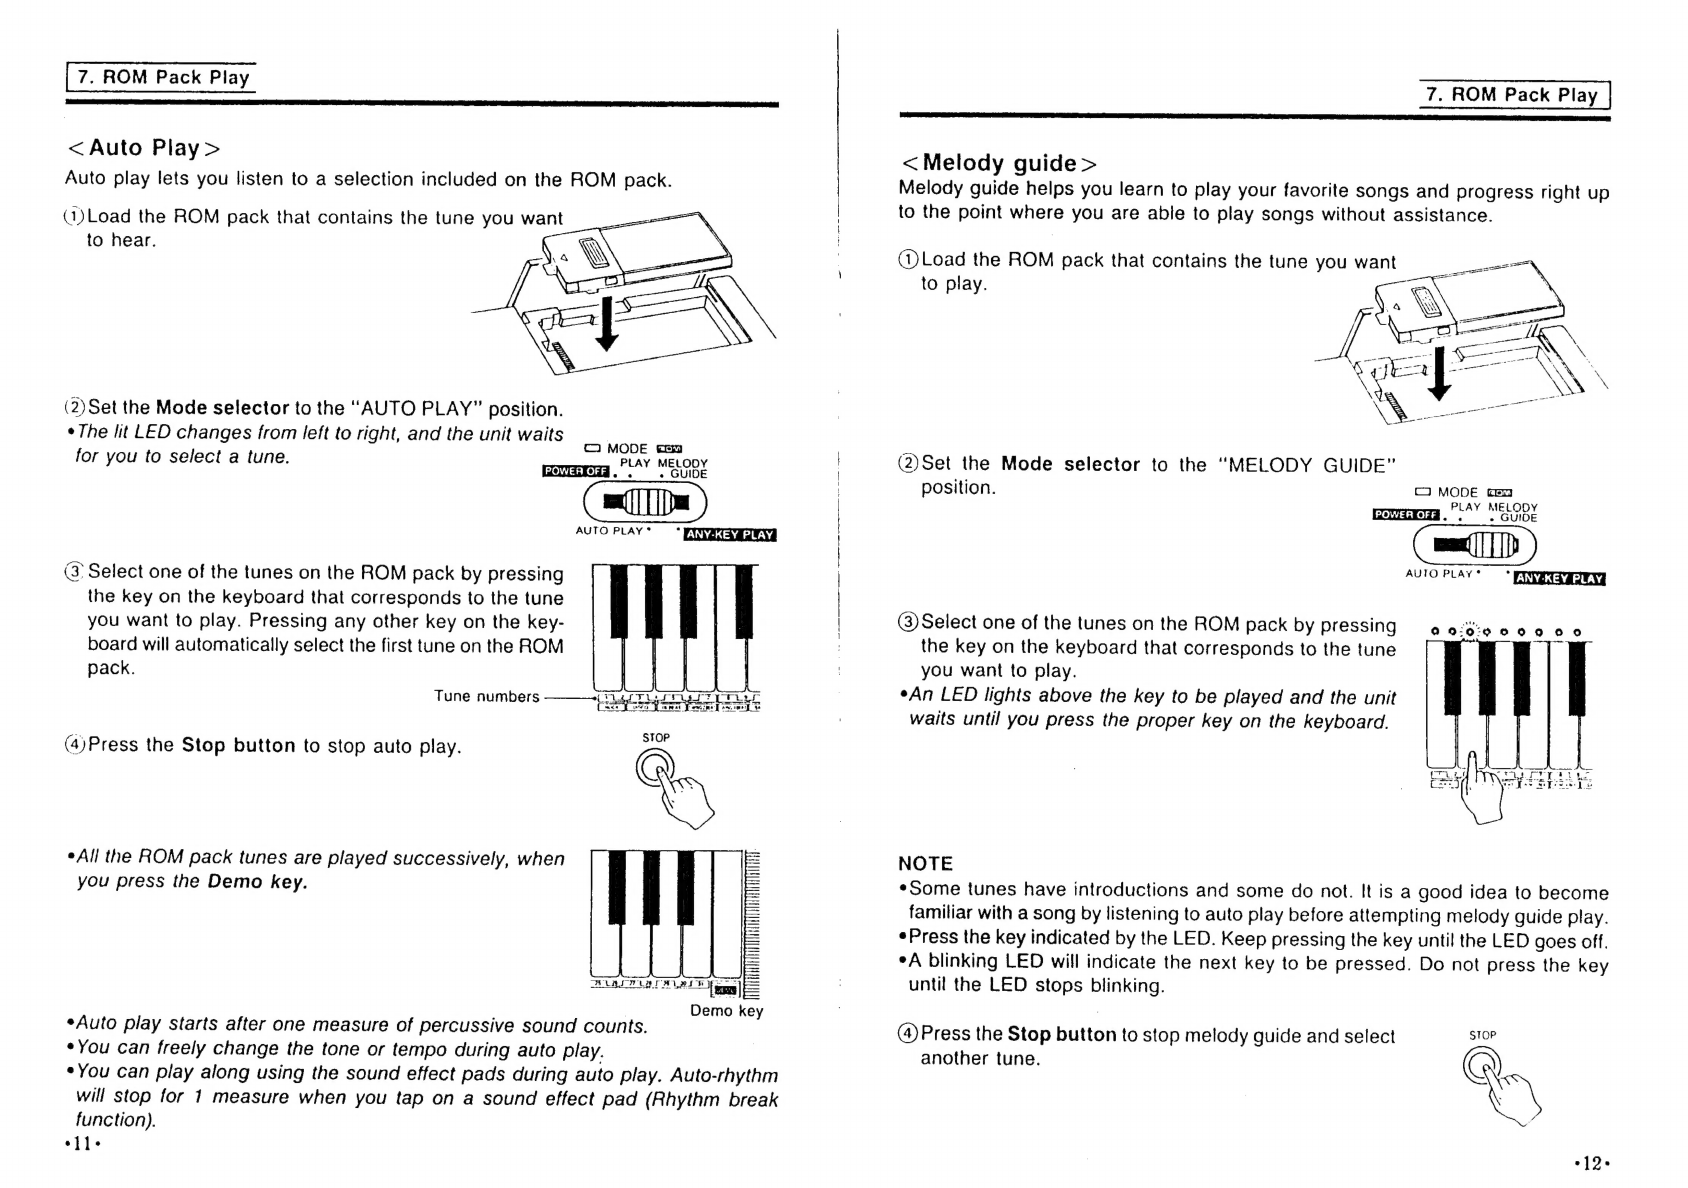
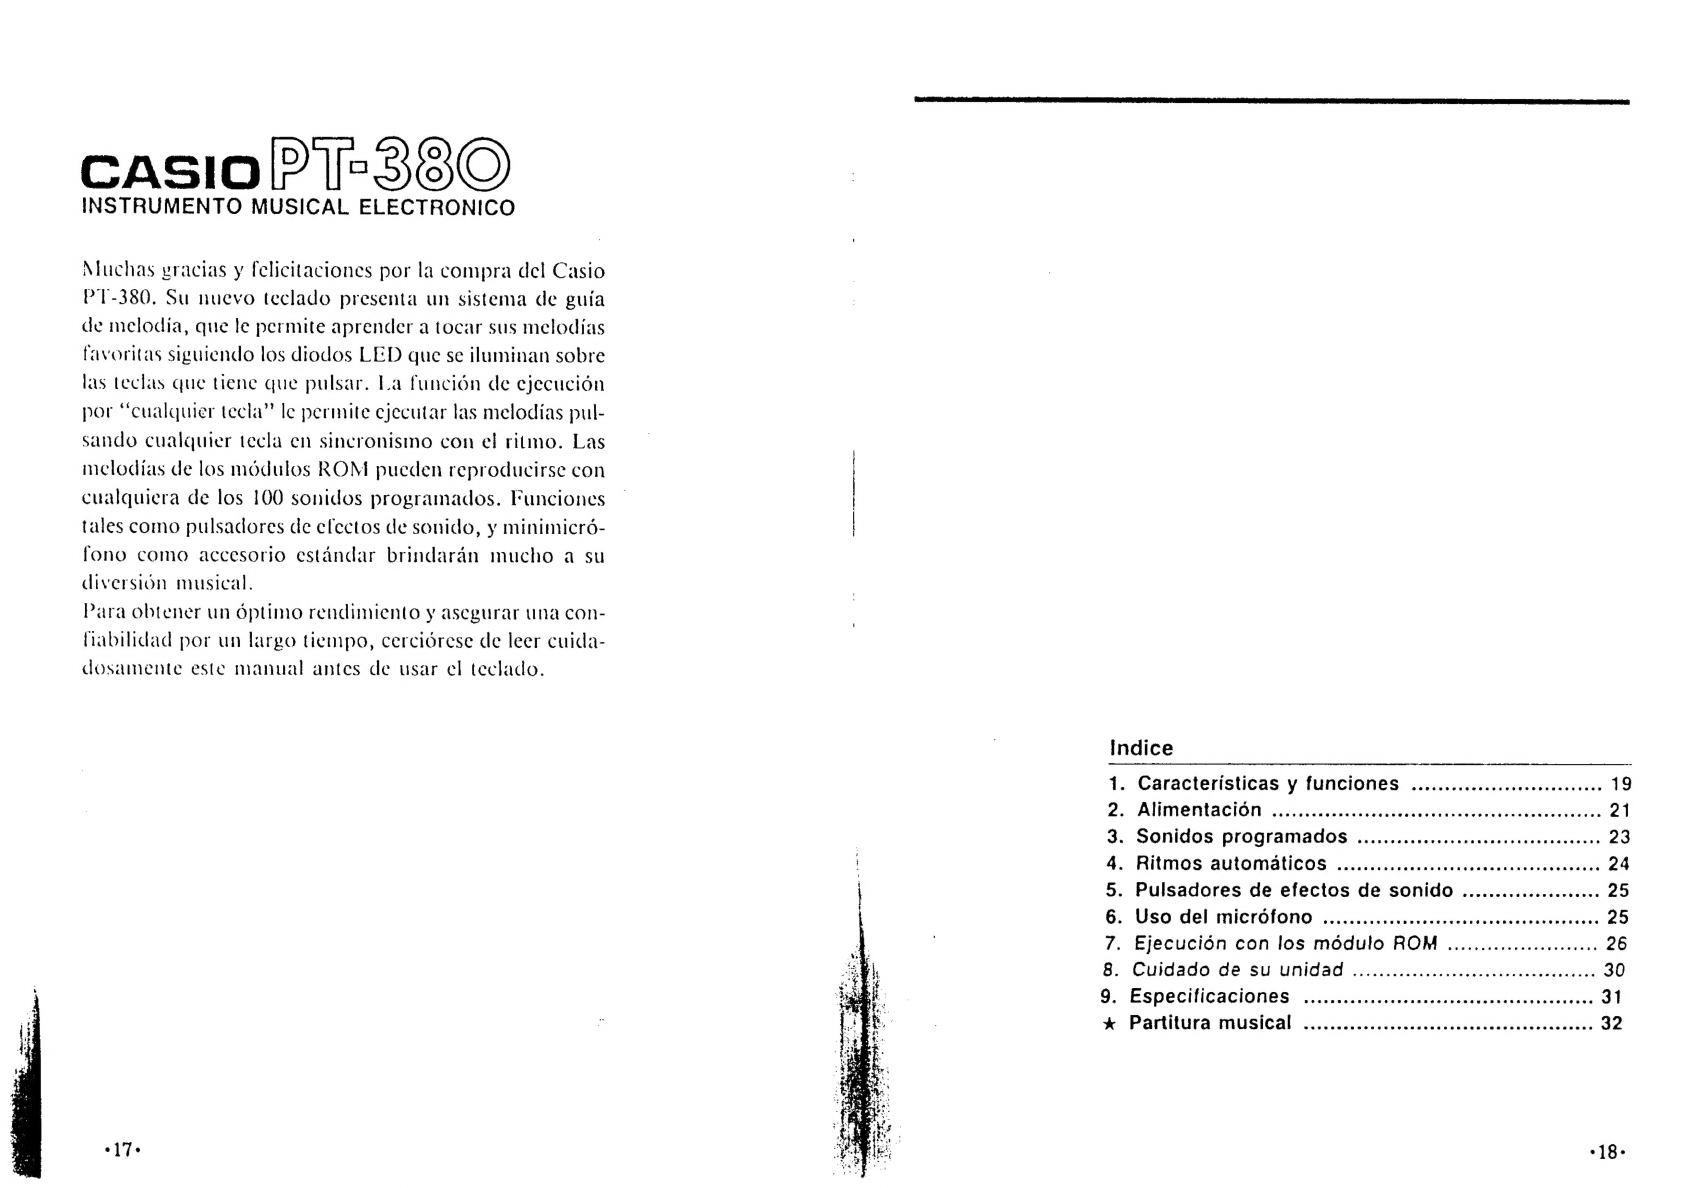
Casio MASTER PT-380 User manual

CASIO.
SAT
LOSO902A
eae
Printed
in
Japan
MAS
PTa38O
ELECTRONIC
MUSICAL
INSTRUMENT
INSTRUMENTO
MUSICAL
ELECTRONICO
OPERATION
MANUAL
.........
1
MANUAL
DE
OPERACION
a
ERE
aon
PHEEES
2
i
A
as
70°,
_
-~
-
GASIO.

SSTSAM
CASIO?
1¢>38O
ELECTRONIC
MUSICAL
INSTRUMENT
Thank
you
and
congratulations
on
your
purchase
of
the
Casio
PT-380.
Your
new
keyboard
features
a
melody
guide
system,
which
lets
you
learn
how
to
play
your
favorite
tunes
by
following
LEDs
that
light
above
the
keys
to
be
played.
The
Any-key
Play
function
lets
you
play
melodies
by
tapping
on
any
key
in
time
with
the
rhythm.
The
tunes
on
a
music
ROM
pack
can
be
played
with
any
of
100
preset
tones.
Functions
such
as
sound
effect
pads,
and
standard
accessory
mini
microphone
will
add
much
tO
your
musical
enjoyment.
To
obtain
optimum
performance
and
assure
long-term
rehability,
be
sure
to
read
this
manual
carefully
before
using
this
keyboard.
Contents
1.
Features
&
FUNCtiONS
........c
ccc
ccccccccecencccccecccccs
3
2s
FP
OWOI
SUD
DIY
oiieiei
ics
sacs
ced
aaaueoreannindaneweeeseeest
5
em
od
f=:
Ga
Ao
|
9
(>
eo
7
4
PRULO=COY
UNIS:
sxctaiccs.
cocenoosiuesontencniaidenetesiecsecaes
8
5.
Sound
Effect
Pads
.............ccccccccececcscccccccescesces
9
6.
Using
Microphone
..............ccccccccccececeeccececeneees
9
Te
MOM:
Pack:
Play
csaered
ccs
engatauasteddeocsieeenndososcass
10
8.
Care
of
Your
Unit.
sccccecctisseied
ccdviiwesentaeessccvsieses
14
9s
SPOCINCALIONS
~
5x.
seiseiccreceatsdanevssterecincsdasanveacis
15
fe
[MUSIC
SCOPES
scicstianets
tcl
antivniaaiceresiexeuaeneeeeGi
dence
32

|
Features
&
Functions
0
9
©
99606
O
ews
es
28
4s
ee
eee
he
oe
a
4m
oe
ee
kl
i:
:
fo
ha
bos
we
te
pe
ee
ee
de
:
:
icy
{
eoqtetie
the
ee
ae
:
@
Power
indicator
©
Mode
selector
©
Volume
control
Q@
Tempo
contro!
buttons
@
Select
button
@
Stop
button
@
Tone
select
buttons
©
Pad
variation
button
©
Sound
effect
pads
@
ROM
pack
compartment
@
Built-in
speaker
@
Melody
guide
indicators
@®
Rhythm
select
keys
(White
keyboard
keys)
@
Demo
key
@
Microphone
©
3s
ee
«nt
wat
arene
oi
-
y
=
Voor
o
GOOG
DEGCOGEHE
BCGHOBEBCEBEC6OGHH4S
O44
9660
3)
=
a
earn
senna
aS
;
|
———————
1.
Littlhe
Brown
Jug
To
start
demonstration
The
demonstration
tune
@
to
stop
the
tune.
~
Demonstration
Tune
——_---_--—
The
PT-380
features
4
demonstration
tunes.
2.
The
Skaters’
Waltz
4.
When
The
Saints
Go
Marching
In
Set
the
mode
selector
@
to
the
“AUTO
PLAY”
position,
press
the
Demo
key
@,
and
listen
to
the
keyboard
play.
1.
Features
&
Functions
|
(Back
panel)
@
Microphone
input
jack
‘Connect
the
mini
microphone
supplied
with
the
unit
to
sing
along
with
ROM
pack
auto
play.
@
Output
jack
For
connection
of
optional
headphones,
audio
amplifier
or
keyboard
amplifier.
Connecting
headphones
auto-
matically
cuts
speaker
output.
@
AC
adaptor
jack
For
connection
of
optional
AC
adaptor
(AD-1)
or
car
adaptor
(CA-1).
3.
Sonata
‘‘Pathetique”’
is
played
in
an
endless
loop.
Press
the
stop
button

?
|
Power
Supply
This
unit
operates
on
both
AC
and
DC
power.
<DC
Power>
¢
Dry
batteries
This
unit
can
be
powered
by
five
AA
size
(SUM-3/R6P)
manganese
dry
cell
batteries.
Weakened
batteries
will
result
in
lower
volume
or
poor
tonal
quality.
The
power
indicator
lamp
will
gradually
lose
its
brightness
when
battery
power
weakens.
At
this
time,
change
batteries
or
shift
to
one
of
the
alternate
power
sources
mentioned
below.
To
replace
batteries:
1)
Open
the
battery
compartment
cover
on
the
bottom
of
the
unit
and
take
out
the
used
batteries.
2)
Load
new
batteries
taking
care
that
the
plus
(+)
and
minus
(—)
poles
are
fac-
ing
in
the
correct
directions.
*Refer
to
the
specifications
for
standard
battery
life.
|
PRECAUTIONS
Incorrectly
using
batteries
can
cause
them
to
leak
or
burst,
and
may
damage
your
product.
Note
the
following
precautions:
¢Be
sure
that
the
plus
(+)
and
minus
(—)
poles
are
facing
in
the
correct
directions.
*Do
not
mix
battery
types.
*Do
not
mix
new
batteries
with
old
ones.
«Never
leave
dead
batteries
in
the
battery
compartment.
¢Remove
batteries
when
not
using
the
product
for
extended
periods.
¢The
batteries
supplied
with
the
unit
are
not
rechargeable.
¢Do
not
expose
batteries
to
direct
heat,
let
them
become
shorted
or
try
to
take
them
apart.
(If
a
battery
leaks,
clean
out
the
battery
compartment
of
the
product
immediately,
taking
care
to
avoid
letting
the
battery
fluid
come
into
direct
contact
with
your
skin.
)
e
Car
battery
With
the
car
battery
adaptor
(CA-1,
optional),
DC
power
is
supplied
from
a
car
battery
through
the
cigarette
lighter
socket.
2.
Power
Supply
|
LL
RSS
eS
TS
SP
ss
eeu
ptemmaepsanamndasabaammammmantnan
<AC
Power>
An
AC
adaptor
(AD-1,
optional)
is
required
when
using
household
current.
Use
only
a
genuine
CASIO
adaptor
with
the
same
voltage
rating
(100,
117,
220
or
240V)
as
the
power
supply
in
your
area
to
prevent
damage
to
internal
components.
Plug
the
AC
adaptor
into
the
AC
outlet
and
the
cord
into
the
unit.
This
will
automatical-
ly
cut
off
the
battery
power
supply.
@
AD-1
AC
adaptor
AC
outlet
Cigarette
lighter
socket
AC
adaptor
jack
CA-1
Car
battery
adaptor
«Use
only
genuine
CASIO
adaptors
to
avoid
risk
of
damage.
¢
The
adaptor
may
become
warm
when
left
connected
to
an
AC
outlet.
This
is
nor-
mal,
but
the
adaptor
should
be
unplugged
when
not
in
use.

|
Preset
Tones
There
are
100
preset
tones
to
choose
from.
Each
tone
has
a
2-digit
number.
To
select
a
preset
tone,
find
its
preset
tone
number
on
the
keyboard’s
top
panel,
and
enter
the
number
using
the
tone
select
buttons.
°“PIANO”
tone
(No.
00)
is
selected
automatically
whenever
you
switch
the
power
of
the
keyboard
ON.
TONE
|
0
1
2
3
4
5 6
7
8
9
|Example]|
To
select
“PIPE
ORGAN”
(No.
06)
after
selecting
“JAZZ
GUITAR”
(No.
36).
1)
Set
the
Mode
selector
to
the
“PLAY”
position.
At
this
time
the
“PIANO”
sound
(No.
00)
is
selected
automatically.
Selected
tone
C3
MODE
th
commana
SAY
MERE
AUIO
PLAY*
—*
EYEE
2)
Press
Tone
select
buttons
‘3”
and
then
“6”
to
select
“JAZZ
GUITAR”.
3
6
No.
36
O
—
O
JAZZ
GUITAR
0
6
No.
06
PIPE
ORGAN
3)
Press
Tone
select
button
‘0”
and
then
“6”
to
select
‘PIPE
ORGAN”.
¢You
can
also
change
the
selected
tone
by
pressing
only
one
tone
select
button.
Note
the
following:
Selected
tone
>
Press
<—
Newly
selected
tone
No.
36
0
No.
60
No.
60
!
6
:
No.
06
No.
06
;
1
No.
61
NOTE
Some
preset
tones
split
the
keyboard
and
assign
two
or
four
sounds
to
the
key-
board.
Then,
the
sound
produced
depends
on
what
position
of
the
keyboard
you
play.
For
example,
BASS/PIANO
puts
BASS
on
the
left
and
PIANO
on
the
right
of
the
keyboard.
|
Auto-rhythms
The
PT-380's
auto-rhythm
function
features
a
total
of
12
different
rhythms.
C2
MODE
Gay
PLAY
MELODY
«
GUIDE
aad.
AUTO
PLAY
° m
ANY-KEY
PLAY
(1)
Set
the
Mode
selector
to
“PLAY”.
(2)Press
the
Select
button.
SELECT
(3)Press
one
of
the
white
keyboard
keys.
The
auto-
rhythm
pattern
labeled
below
the
white
key
immediately
Starts
to
play.
(4)
Adjust
the
tempo
using
the
Tempo
contro!
buttons.
VTEMPO
a
Each
press
of
A
speeds
up
the
tempo,
while
pressing
OO
V
slows
it
down.
*You
can
set
the
tempo
level
to
one
of
26
steps.
(6)Play
along
with
the
selected
rhythm
pattern.
(6)Press
the
Stop
button
to
stop
the
auto-rhythm.
STOP
a

h
|
Sound
Effect
Pads
The
PT-380
features
5
sound
effect
pads
that
let
you
add
unique
fill-ins
and
ac-
cents
to
your
performance.
Preset
sound
effects
can
be
triggered
by
simply
tap-
ping
the
pads
with
your
finger(s).
The
sound
can
be
switched
to
percussion
sounds
by
pressing
the
pad
variation
button,
giving
you
a
total
of
10
sound
variations.
SS
7
S
PAD
VARIATION
©
(o
®
8
Rhythm
break
function
Auto-rhythm
will
stop
for
1
measure
and
only
the
sound
effect
will
sound,
if
you
tap
on
a
sound
effect
pad
while
auto-rhythm
is
being
played.
|
Using
Microphone
Connect
the
supplied
mini
microphone
to
the
microphone
input
jack,
located
on
the
rear
panel
of
the
unit.
The
microphone
can
be
attached
to
the
keyboard
using
the
microphone
stand
that
comes
with
the
unit.
Microphone
Microphone
stand
TerTeTiitiry
a
ee
ee
oe
le
*To
avoid
howling
caused
by
feedback,
be
sure
to
keep
the
mini
microphone
away
from
the
built-in
speaker.
¢Use
the
unit's
volume
control
to
adjust
the
volume
of
the
mini
microphone.
Qe
a
ee
ee
-~
|
ROM
Pack
Play
Casio’s
advanced
ROM
pack
system
not
only
provides
full
feature
auto
play
of
tunes,
it’s
a
great
way
to
learn
about
music.
This
unit
is
not
supplied
with
a
ROM
pack,
but
it
features
four
built-in
demonstra-
tion
tunes.
The
Auto
Play,
Melody
Guide,
and
Any-key
Play
function
can
be
used
with
the
demonstration
tunes
even
if
you
do
not
have
a
ROM
pack
loaded
in
the
unit.
<To
Load
a
ROM
pack>
(1)
Lift
up
the
ROM
pack
compartment
lid
on
the
top
panel!
of
the
unit.
ROM
pack
compartment
wy
PCB
pad
(2)Load
the
ROM
pack
into
the
compartment.
¢Place
the
ROM
pack
with
its
connector
facing
the
PCB
pad.
ROM
pack
_
ae
(Bottom)
¢The
internal
circuitry
of
the
ROM
pack
can
be
damaged
by
static
electricity.
Be
sure
to
ground
yourself
by
touching
some
metallic
object,
such
as
a
door-
knob
prior
to
handling
the
ROM
pack,
to
discharge
any
static
electricity.
:
e
Take
good
care
of
the
connector
part
of
the
ROM
pack
and
the
PCB
pad
of
the
unit.
They
must
be
free
from
dust
and
dirt,
so
avoid
touching
them.
Use
a
soft
damp
cioth
to
clean
them.
°10-

|
7.
ROM
Pack
Play
<
Auto
Play
>
Auto
play
lets
you
listen
to
a
selection
included
on
the
ROM
pack.
(1)Load
the
ROM
pack
that
contains
the
tune
you
want
to
hear.
(2)Set
the
Mode
selector
to
the
“AUTO
PLAY”
position.
¢
The
lit
LED
changes
from
left
to
right,
and
the
unit
waits
for
you
to
select
a
tune.
©
MODE
caw
Pp
M
momairaaa
SAY
MELORY
AUTO
PLAY
°*
m@
ANY-KEY
PLAY
(3:
Select
one
of
the
tunes
on
the
ROM
pack
by
pressing
the
key
on
the
keyboard
that
corresponds
to
the
tune
you
want
to
play.
Pressing
any
other
key
on
the
key-
board
will
automatically
select
the
first
tune
on
the
ROM
pack.
Lilszf
Ti
ah
ER
ccs
week
ker
oa}
PAY
CAL
ae
Tune
numbers
(4)Press
the
Stop
button
to
stop
auto
play.
—
°All
the
ROM
pack
tunes
are
played
successively,
when
you
press
the
Demo
key.
*Auto
play
starts
after
one
measure
of
percussive
sound
counts.
¢You
can
freely
change
the
tone
or
tempo
during
auto
play.
°You
can
play
along
using
the
sound
effect
pads
during
auto
play.
Auto-rhythm
will
stop
for
1
measure
when
you
tap
on
a
sound
effect
pad
(Rhythm
break
function).
ell-
7,
ROM
Pack
Play
|
<
Melody
guide>
Melody
guide
helps
you
learn
to
play
your
favorite
songs
and
progress
right
up
to
the
point
where
you
are
able
to
play
songs
without
assistance.
(Load
the
ROM
pack
that
contains
the
tune
you
want
—
to
play.
»
(2)Set
the
Mode
selector
to
the
“MELODY
GUIDE”
position.
C7)
MODE
caw
PLAY
Gomrega
O°”
MELODY
AUTO
PLAY
*
*
OAS
(3)
Select
one
of
the
tunes
on
the
ROM
pack
by
pressing
the
key
on
the
keyboard
that
corresponds
to
the
tune
you
want
to
play.
eAn
LED
lights
above
the
key
to
be
played
and
the
unit
waits
until
you
press
the
proper
key
on
the
keyboard.
0
0:0:°00900
NOTE
¢Some
tunes
have
introductions
and
some
do
not.
It
is
a
good
idea
to
become
familiar
with
a
song
by
listening
to
auto
play
before
attempting
melody
guide
play.
Press
the
key
indicated
by
the
LED.
Keep
pressing
the
key
until
the
LED
goes
off.
°A
blinking
LED
will
indicate
the
next
key
to
be
pressed.
Do
not
press
the
key
until
the
LED
stops
blinking.
(4)
Press
the
Stop
button
to
stop
melody
guide
and
select
STOP
another
tune.
°]Q2-

|
7.
ROM
Pack
Play
Raa
a
EC
RIA
9
OITA
TTI
STN
I
TTS
RISD
VETS
EES
PT
PROT
TD
SE
II
SS
TEE
RL
LS
NE
TEP
TR
TONLE
STEED
EI
TS
TEI
<
Any-key
play
>
When
any-key
play
is
selected,
the
unit
plays
a
note
of
the
tune,
no
matter
which
keyboard
key
you
press.
Any-key
play
helps
you
get
the
feeling
of
the
melody
you
want
to
master,
before
trying
to
play
the
correct
key
using
the
melody
guide
function.
.1.Load
the
ROM
pack
that
contains
the
tune
you
want
to
play.
2.Set
the
Mode
selector
to
the
“ANY-KEY
PLAY”
position.
CM
MODE
Gan
PLAY
MELODY
«
GUIDE
POWER
OFF
Sa
AUTO
PLAY
*
Mm
ANY-KEY
PLAY
4
(3:Select
one
of
the
tune
on
the
ROM
pack
by
pressing
the
key
on
the
keyboard
that
corresponds
to
the
tune
you
want
to
play.
An
LED
lights
above
the
key
to
be
played
and
the
unit
waits
until
you
press
a
key
on
the
keyboard.
You
need
not
worry
about
pressing
the
correct
key.
Just
concentrate
on
the
timing
and
tempo.
The
unit
automatically
plays
the
proper
note
as
you
press
any
key
on
the
keyboard.
¢
The
melody
performance
stops
automatically
when
the
end
of
the
tune
is
reached.
But
if
you
want
to
stop
along
the
way,
press
the
Stop
button.
c
iter
ite
Fea
ny
Naess
Ecaery
remit
ike
©
13°
B
[Care
of
Your
Unit
()
Avoid
heat,
humidity
or
direct
sunlight.
Do
not
overexpose
the
unit
to
direct
sunlight,
or
place
near
an
air
conditioner,
or
in
any
extremely
hot
place.
(2)Take
care
not
to
drop
the
unit
and
avoid
strong
impact.
Strong
impact
may
cause
malfunctions.
When
carrying
or
transporting
the
unit,
protect
the
keyboard
and
switches
with
soft
cloth
or
other
material.
(3)Keep
the
unit
free
of
liquids,
dust,
etc.
Do
not
allow
foreign
matter
to
get
between
the
keys,
especially
metallic
objects
such
as
hairpins,
sewing
needles
or
coins.
Also,
do
not
let
the
unit
get
wet.
(4)Never
attempt
to
modify
any
parts
of
the
unit.
The
unit
is
a
precision
instrument,
made
of
electronic
parts.
Any
modification
of,
or
tampering
with
inner
parts
may
cause
malfunction.
(5)Do
not
use
lacquer
thinner
or
similar
chemicals
for
cleaning.
Clean
the
keyboard
with
a
soft
cloth
dampened
in
a
weak
solution
of
water
and
a
neutral
detergent.
(Soak
the
cloth
in
the
solution
and
squeeze
until
it
is
almost
dry.)

CF
|
Specifications
0
Number
of
keys:
32
(mini)
¢Polyphony:
6-note
(maximum)
*Preset
tones:
100
*Auto-rhythms:
12;
ROCK,
DISCO,
16
BEAT,
SWING
2
BEAT,
SWING
4
BEAT,
SAMBA,
BOSSA
NOVA,
BEGUINE,
TANGO,
MARCH,
SLOW
ROCK,
WALTZ
*Built-in
speaker:
8
cm
dia.(output
=
1.0W)
*Built-in
pads:
5
sound
effect
pads
with
variation
button
*ROM
pack
play:
Auto
play,
Melody
guide,
Any-key
play
¢Terminals:
Output
jack
[output
impedance:
1002,
output
voltage:
1.0V(RMS)
MAX],
AC
adaptor
jack
(DC
7.5V),
Mic.
input
jack
[input
impedance
=
TOKQ,
sensitivity
=
4mV]
«Demonstration
tunes:
1.
Little
Brown
Jug
2.
The
Skaters’
Waltz
3.
Sonata
“Pathetique”
4.
When
The
Saints
Go
Marching
In
*Power
source:
3-way
AC/DC
power
sources:
AC:
100,
117,
220
or
240V
(+
10V),
50/60
Hz,
with
optional
AC
adaptor
AD-1
AC
adaptor.
DC:
5
AA
size
(SUM-3/R6P)
manganese
dry
batteries.
"Battery
life:
approx.
8
hours.
Car
battery:
Requires
optional
CA-1
car
adaptor
¢Power
consumption:
2.5W
¢Dimensions(W
x
D
x
H):
521
x
184x59
mm
(20%"
K
7%"
x
256")
*Weight:
1.2kg
(2.6lbs)
¢Standard
accessory:
Mini
microphone
(output
impedance
=
4002),
microphone
stand
and
test
batteries
“Design
and
specifications
are
subject
to
change
without
notice.
°15-
ne
reennnnnessernerntererisereeeterceeree
GUIDELINES
LAID
DOWN
BY
FCC
RULES
FOR
USE
OF
THE
UNIT
IN
THE
U.S.A.
(not
applicable
to
other
areas).
This
equipment
generates
and
uses
radio
frequency
energy
and
if
not
installed
and
used
properly,
that
is,
in
strict
accordance
with
the
manufacturer’s
instructions,
may
cause
interference
to
radio
and
television
reception.
It
has
been
type
tested
and
found
to
comply
with
the
limits
for
a
Class
B
computing
device
in
accordance
with
the
specifications
in
Subpart
J
of
Part
15
of
FCC
Rules,
which
are
designed
to
provide
reasonable
protection
against
such
interference
in
a
residential
installation.
However,
there
is
no
guarantee
that
interference
will
not
occur
in
a
particular
installation.
If
this
equipment
does
cause
interference
to
radio
or
television
recep-
tion,
which
can
be
determined
by
turning
the
equipment
off
and
on,
the
user
is
encouraged
lo
(ry
to
correct
the
interference
by
one
or
more
of
the
following
measures:
ies
reorient
the
receiving
antenna
oe
relocate
the
equipment
with
respect
to
the
receiver
ere
move
the
equipment
away
from
the
receiver
re
plug
the
equipment
into
a
different
outlet
so
that
equipment
and
receiver
are
on
different
branch
circuits.
If
necessary,
the
user
should
consult
the
dealer
or
an
experienced
radio/television
technician
for
additional
suggestions.
The
user
may
find
the
following
booklet
prepared
by
the
Federal
Communications
Commission
helpful:
‘‘How
to
Identify
and
Resolve
Radio-TV
Interference
Problems’’.
This
booklet
is
available
from
the
US
Government
Printing
Office,
Washington,
D.C.,
20402,
Stock
No.
004-000-00345-4.
716°

CASIO?
[=
38O
INSTRUMENTO
MUSICAL
ELECTRONICO
Muchas
vracias
y
felicitaciones
por
la
compra
del
Casio
PT-380.
Su
nuevo
teclado
presenta
un
sistema
de
guia
de
melodia,
que
le
permite
aprender
a
tocar
sus
melodias
favoritas
siguiendo
los
diodos
LED
que
se
iluminan
sobre
las
teclas
que
tiene
que
pulsar.
La
funcion
de
ejecucion
por
“cualquier
tecla’’
le
permite
cjecutar
las
melodias
pul-
sando
cualquier
tecla
cn
sincronismo
con
el
ritmo.
Las
melodias
de
los
médulos
ROM
pueden
reproducirse
con
cualquiera
de
los
100
sonidos
programados.
Funciones
tales
como
pulsadores
de
cfectos
de
sonido,
y
minimicro-
fono
como
accesorio
estandar
brindaran
mucho
a
su
diversion
musical.
Para
obtener
un
Optuumo
rendiniento
y
asegurar
una
con-
habihdad
por
un
largo
tiempo,
cercidrese
de
leer
cuida-
dosamente
este
manual
antes
de
usar
el
teclado.
°17
Indice
1.
Caracteristicas
y
fUNCIONES
...........ceccceeeeeeeeeeees
19
2.
PUMENMACION
:
sciciw.
zanncixs
vannseclaacatedeteiacetucenodietens
21
3.
SONIKOS
PrOgraMadOs
...........
cece
cece
eee
ceeeeeeaceeens
23
4.
Ritmos
automaticoS
........
ccc
ccc
cccceesccesecesenesers
24
5.
Pulsadores
de
efectos
de
SONICO
...........cccce
neces
25
6.
Uso
del
microfono
...........
SAcaeasare
sete
st
euiateasen.
20
7.
Ejecucién
con
los
médulo
ROM
...........ceeeeenees
26
8.
Cuidado
de
Su
Unidad
oo...
cece
cece
cece
neeeeeeees
30
9.
LESDECINCACIONES
sisicpcasnvuvasvosvivecenrauaedawevacel
ons
31
x
Partitira
MmuSiCal
soccccoccinciliceiivwcsucccscotwiinisreersins
32
-18-
Table of contents
Other Casio Musical Instrument manuals

Casio
Casio Privia PX-870 User manual

Casio
Casio DG-1 Operator's manual

Casio
Casio Celviano AP-80R User manual

Casio
Casio CTK6000 User manual

Casio
Casio PRIVIA PX-S1100WE User manual

Casio
Casio RAP-1 User manual

Casio
Casio Privia PX-S1000 Instruction Manual

Casio
Casio Privia PX-720 Troubleshooting guide

Casio
Casio CELVIANO AP-6OR User manual

Casio
Casio CTK-6250 User manual

Casio
Casio Celviano AP-460 User manual

Casio
Casio AP-710 User manual

Casio
Casio Privia PX-S3000 User manual

Casio
Casio CPS-300 User manual

Casio
Casio LK-170 User manual

Casio
Casio DM-100 User manual

Casio
Casio PRIVIA PX-3S User manual

Casio
Casio CTK-3400SK User manual

Casio
Casio LD-80 User manual

Casio
Casio Privia PX-S1100 User manual