Clymen Q7 User manual

Q7 User Manual
. .
Please watch our video manualon the website: www.clymen.com
Please send us an email with subject Extra Warranty to

Table of Contents
SAFETY INSTRUCTIONS.............................................3
FUNCTION OVERVIEW...............................................4
REPLACEABLE COMPONENTS.................................5
COMPONENTS............................................................6
OPERATING.................................................................8
MAINTENANCE............................................................13
SPECIFICATION..........................................................15
COMMON FAILURE.....................................................16
HAZARDOUS SUBSTANCE.........................................17
2
Safety Instructions
Before using this product, read the following safety instructions and follow
routine safety precautions.
Caution
Please carefully read this manual.
Please keep this manual well.
Not following the instructions may damage your robot cleaner
Besides our certified service technicians, no one may disassemble, repair or modify the product.
Do not use any charger other than the one included. It may result in damaging the product.
Do not touch any cord, power jack or the adapter with wet hands.
Do not get curtains or body parts drawn into the wheels of the product.
Do not place the product close to flammable objects such as a lighted cigarette or a lighter.
Do not clean this product when is recharging.
Do not force to bend the cord or place any sharp objects on the product.
This product is designed for indoor use, do no use it outdoors.
Do not sit on the product.
Do not use this product in damp places (such as the bathroom).
Before using this product, move away all fragile objects (such as glasses, lamps, etc.) on the
floor and
those (such as wires, paper and curtains) that may entangle side brushes and suction tunnel.
Do not place this product on a high place (such as tables and chairs).
Turn off the power during transportation or storage.
Make sure the adapter is well connected with power, or the battery may be damaged.
Do not operate robot cleaner when children and pets are left alone.
In case of a full dustbin, please remove the dust before use.
This product only operates between 0℃to 40℃.
Do not use this product under high temperature.
Remove the battery before discarding this product.
Do not remove the battery while connected to a power supply.
Recycle the battery in a safe way.
3

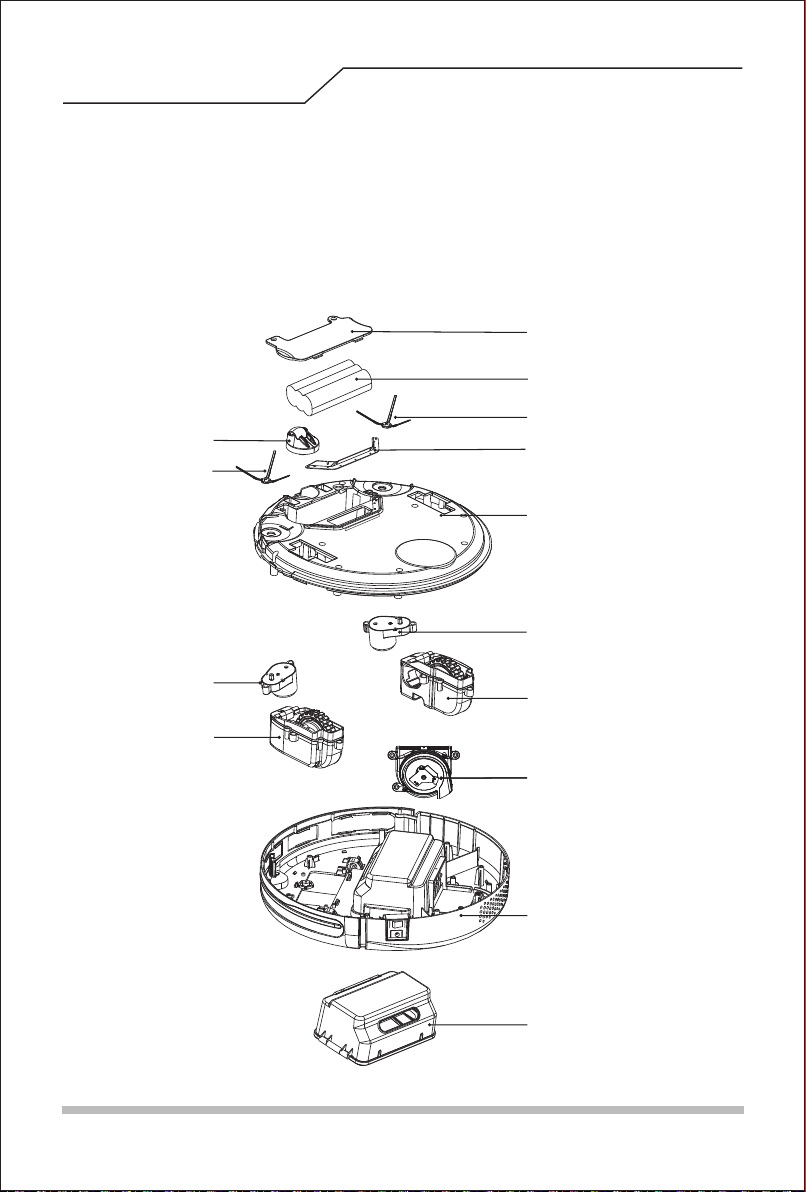
Function Overview
Robot overview
Infrared signal receiver
Panel
Bumper
Middle cover
Power Switch
Dustbin Cover
Primary filter
HEPA filter
HEPA bracket
Middle cover
Dustbin
Power jack
Auto-recharging poles
Left side brush
Battery cover
Universal wheel
Right side brush
Suction inlet
Right wheel
Bottom cover
Left wheel
4
Replaceable components of the product are as follows:
Replaceable components
Universal wheel
component
Left side brush
Right side brush
component
Right wheel
component
Surface cover
Left wheel component
Left side brush component
Bottom cover
Suction tunnel flap
component
Right side brush
Battery
Battery cover
Dustbin component
Fan component
5

Components
Display time setting, progress, recharging status, and error codes, etc.
Error display.。
“ ””Cleaning button
Press “ ”button for operations below::
A. Switch from sleep mode to selection mode; or switch from selection mode to sleep
mode by pressing on for 3 seconds.
B. Press this button to confirm the cleaning plan made.
“ ””Cleaning plan
A. Press to set cleaning plans under selection mode.
B. Under planning mode, press this button to switch between hour and minute.
C. Under planning mode, press on this button for 5 seconds to cancel planning.
“ ””Spot cleaning
Press “ ””button for operations below:
“ ””
Self-recharging button
Press“ ””button for operations below:
A. Under planning mode, press this button to subtract numbers.
B. Under selection mode, press this button to send the robot to the dock for
self-recharging.
A. Under planning mode, press this button to add numbers.
B. Under selection mode, press this button to start spot cleaning in a spiral pattern.
Panel
“ ”display
“ ”Display
“ ””display
Clean
Spot
Plan
Home
Clean
Clean
Plan
Spot
Spot
Home
Home
Turn constantly on for a full dustbin or a choked suction tunnel. 。
6

Components
Manual
Robot and Accessories
Item
Robot
1
2
3
4
5
6
1
1
1
1
1
1
Recharging dock
Remote control(without battery)
Adapter
Cleaning components
Manual
NO. Number
7
7

Operating
1. Auto-cleaning
2. Spot cleaning
3. Wall-following cleaning
4. Planned cleaning
You can order the robot to start cleaning at a specific time.
The robot will clean the room automatically under self-cleaning mode, and switch among different cleaning
modes according to floor status.
Place the robot beside the position needing spot cleaning and start the robot.
After detecting obstacles (such as wall edges), the robot may enter wall-following cleaning mode. The robot
will sweep along the obstacle under wall-following mode, and clean with its side brushes.
Multiple Cleaning Mode
12
3 4
8

Operating
This product works well on tiles, low-pile carpet (lower than 1.5cm), wooden
floor and hard floors.
Caution: Do not use it on the ground with water
Scope of Application
Tiles Wooden Floor Linoleum Low-pile carpet
Power on/Pause/Sleep
Sleep mode means the robot stops and the screen is also dark.
A. The robot will enter sleep mode after leaving it untouched for 20 seconds.
Attention: Turn off the power completely for storage.
Sleep
A. Make sure to turn on the power switch at the bottom.
B. Press the CLEAN button on the remote or the robot to start cleaning.
Power on
Pause means to switch from working to selection mode, and the
following operation can pause the robot:
A. Pause the robot by pressing any button on the screen;
B. Press the CLEAN button on the remoter to pause;
Pause
B. Press on the CLEAN button on the screen for 3 seconds, then it will enter sleep mode.
9

Operating
Remote Control
Automatic cleaning
Cleaning plan
Spot cleaning
Direction
Forward
Backward
Left
Right
Clean/Power button
Wall-following cleaning
Mechanism of this remoter is similar to a TV remoter. First turn on the switch on
its bottom, then control the robot using buttons on it, such as turning on/off the
robot, spot cleaning, wall-following cleaning, cleaning plan, and self-recharging.
Mount two AAA batteries before using
Remote control may fail when the robot stays near the charging dock
Remove its batteries for storing for a long time.
10

Operating
Cleaning Plan
Caution: A. Once turning off the power switch, all the cleaning plans will be erased.
How to plan a cleaning session?
Set on the screen
Set on the remoter
G. Press“ ” to awaken the robot, then press “ ” button, and the left part of "88:88", “88”
will start flickering;
H. Press“ ”button to button to add or subtract hours;
I. Press “ ” or“ ” button to switch from hours to minutes;
J. Press “ ”button to button to add or subtract minutes;
K. Press“ ” button to save.
L. For cancellation, adjust the number to "00:00" under cleaning plan mode.
Caution: All operations under cleaning plan mode shall be confirmed through voice prompts.
A.Press “ ”button to enter cleaning plan mode and the left part of "88:88", “88” will start flickering;
B. Press“ ” ” button and“ ” ”button to add or subtract the number;
C. Press“ ””button to switch from hours to minutes;;
D. Press“ ” ”button and “ ” ”button to add or subtract minutes;
E. Press “ ” ”button to save.
F. For cancellation, please press on the “ ””button for 3 seconds under cleaning plan mode.
Spot Home
Plan
Spot Home
Clean
Plan
You can order the robot to start cleaning at a specific time.
Cleaning plan of this product indicates delayed start (maximum delayed time is 23 hours
and 45 minutes). For example, if you plan delayed time of 6:30 at the 9 o’clock, the
robot will start working after 6 hours and 30 minutes, i.e. the robot will start working at
3:30 pm, and it will start working at 3:30 pm every day until its power switch is turned off.
B. Once a cleaning session planned, the robot will work at exactly the planned time every day.
11

Operating
1. As shown above, the dock should be pushed against the with no obstacle
two meters in front of and one meter to the left and right of the dock.
2. Turn on the power switch on the bottom, then the screen will flash and enter selection mode.
A. Directly plug the adaptor on the robot and then connect to power, as shown in the left picture below;
Infrared signal
window
Signal indicator
Recharging
terminals
Power jack
Charging Dock
Set the charging dock
Other methods for recharging the robot:
(Leaving the device untouched for 20 seconds will result in the device entering sleeping mode.)
Caution: A. Make sure to turn on the power or it will not work.
B. Removing the plug will clear the selected modes.
Top cover
B. Under selection mode, press self-recharging button on the remote to control the robot for self-recharging.
12
Maintenance
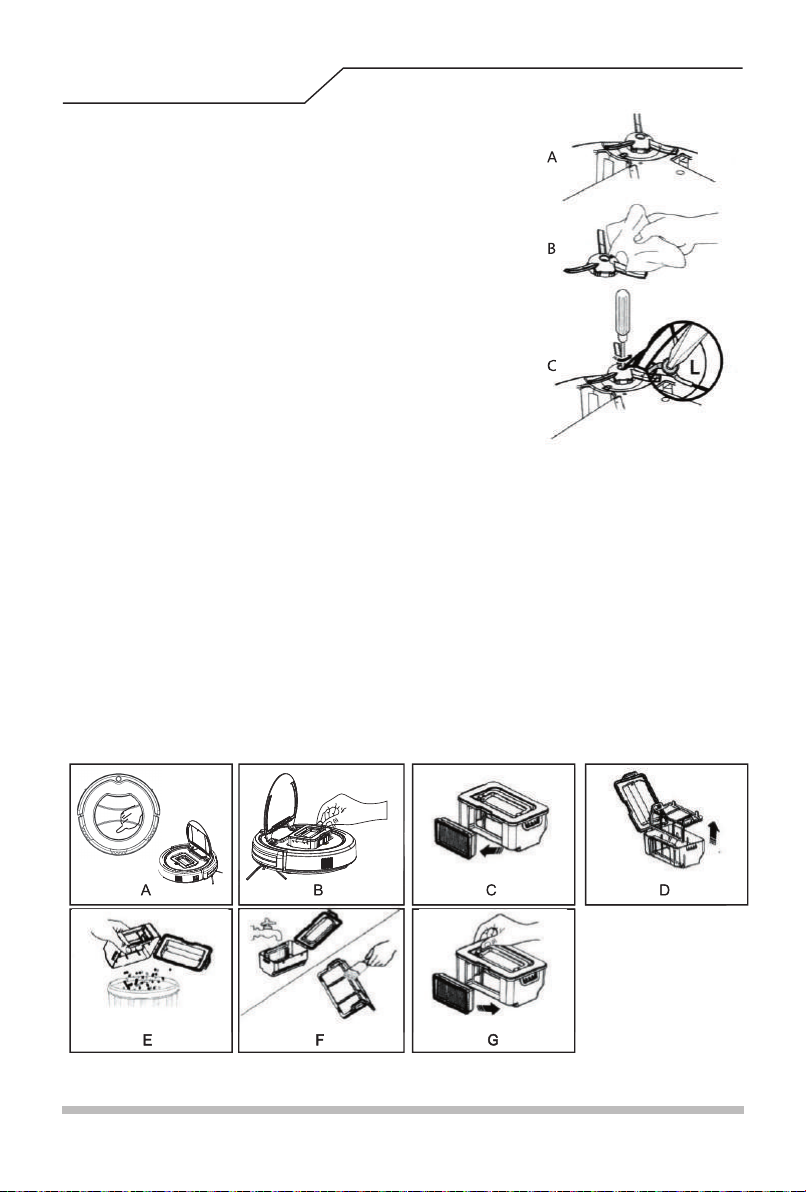
Cleaning side brushes
A. Status check: Check if the side brushes are damaged or dirty.
B. Clean side brushes with the small brush or a soft cloth.
C. Replace the side brush that is too damaged to work.
Cleaning the dustbin and filters
A. Press the "PUSH" sign on the cover to open the lid on top;
B. Remove the dustbin;
C. Remove the HEPA filter;
D. Open the dustbin cover and remove the primary filter;
E. Remove the dirt in the dustbin;
F. Clean the dustbin and primary filter with water and clean HEPA filter with the small brush;
2. It is recommended to clean the HEPA filter after 15-30 days of use; the maximum life span
of a HEPA filter is 24 months.
G. Install the primary and HEPA filters back into the dustbin;
Attention: 1. Make sure the primary and HEPA filters are completely dry before putting them back;
2. Do not place primary and HEPA filters under direct sunlight.
H. Cover the dustbin and install it back to the robot.
Attention: Primary and HEPA filters are a replaceable part.
Attention: 1. When the dustbin sign lights on the screen with the "!" sign, please clean the dustbin and suction
tunnel immediately;
13

Maintenance
Cleaning sensors and recharging poles
A. Polish sensors and recharging poles of the robot with a soft cloth or small brush at the
following locations 。
B. Polish the recharging terminals of the charging dock with a soft cloth or small brush
at the following locations.
C. Clean the suction tunnel and dust sensor with a soft cloth or small brush at the
following locations.
14

Category Item Parameter
Diameter 340mm
95mm
2.8±0.5kg
14.4V
24W
LI-I0N 2000mAh
0.5L
Self-recharging/Manual recharging
Self-cleaning, spot cleaning,
wall-following cleaning,
planned cleaning
About200-300min
≥90min
LED touch buttons
Type of Button on Robot
Height
Weight
Voltage
Battery
Power
Dustbin capacity
Type of recharging
Cleaning mode
Recharging time
Single cleaning time
Structure
Electronics
Cleaning
Specifications
15
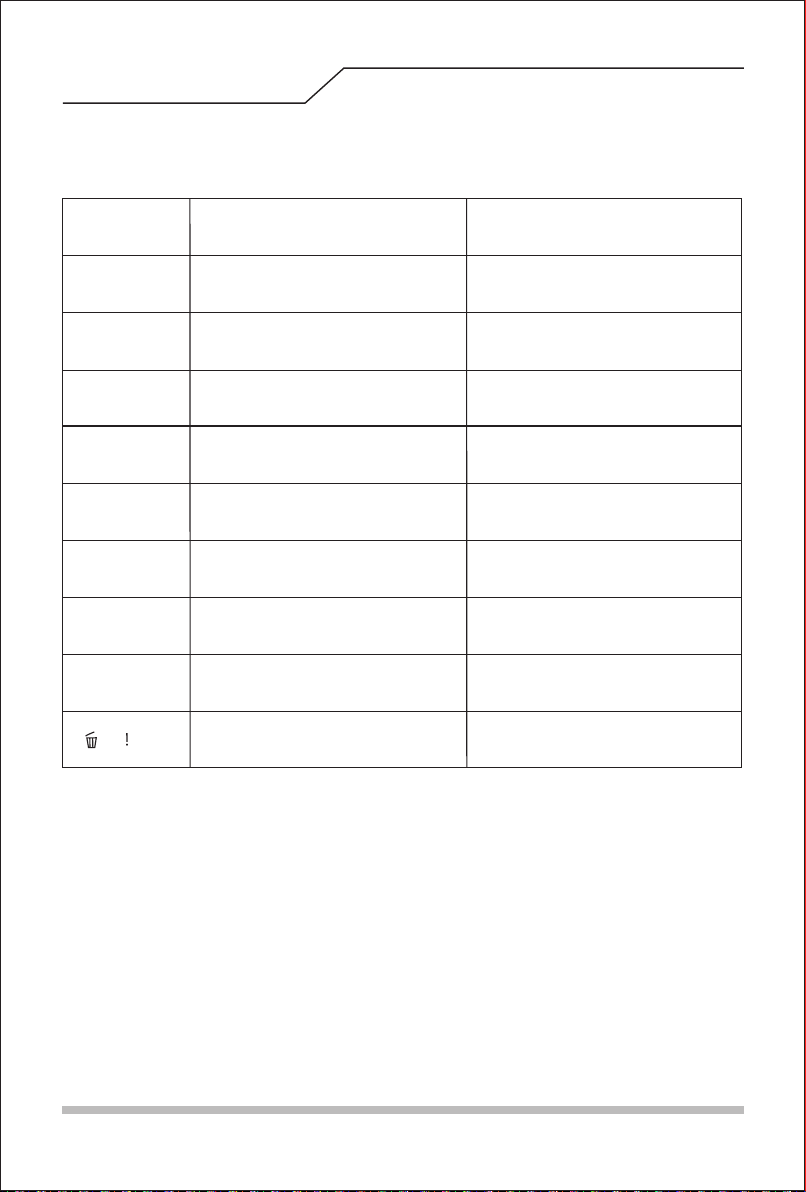
Common Failures
Warning Codes
In case of common failures, following warning codes shall be displayed on the screen.
Warning Code
E01
E02
E04
E05
E06E
E07
E08
E09
Left wheel stops working
Right wheel stops working
Robot suspended in midair
Cliff sensor failure
Bumper sensor failure
Left side brush stops working
Right side brush stops working
Robot trapped
Full dustbin or choked suction tunnel
Check the left wheel
Check the right wheel
Place the robot back to the floor
First, clean the cliff sensor. If the failure
continues, send it to the customer center
for repair
Check the left side brush
Check the sensitivity of bumper and
ensure there is no foreign body
Check the right side brush
Move the robot to another
place and reboot
Clean the dustbin or suction tunnel
and light on
Cause Troubleshooting
Caution: Try the following methods if the following tips do not work:
1. Reboot the robot using the power switch on the bottom;
2. If rebooting cannot help, please dial our customer service 400-0042-0899
16

Hazardous Substance
Name and content of hazardous substances in the product
Hazardous Substance
Name of
Component
Plastic parts 10
10
10
10
10
10
10
10
10
10
10
10
Mother board
Screen component
Drive wheels
Side sweeping wheel
Fan
Charging dock
Suction component
Fan component
Switch component
Dustbin component
Remote Control
Lead
(Pb)
Cadmi-
um
(Cd)
Hexavalent
chromium
(Cr6+ )
Mercury
(Hg)
Polybro-
minated
biphenyl
(PBB)
Polybrom
inated
diphenyl
ethers
ECO
Friendly
Use
Period
: indicates that the hazardous substance contained in homogeneous materials of
the product is under the limit prescribed in CE, CB, RoHS, SAA, UL, CCC, GS,
requirements of concentration limits for certain restricted substances in electrical
and electronic products.
:indicates that the hazardous substance contained in the homogeneous material
of part of the product exceeds the limit prescribed in CE, CB, RoHS, SAA, UL,
CCC, GS, which is not conform to European RoHS directive (including its
exemption clauses) either.
17

Table of contents


