CMI Health PC-66L User manual

User Manual forPulse Oximeter
I
Instructions to User
Dear Customer,
Thank you for purchasing this quality product. Please read the
manual very carefully before using this device. Failure to follow
these instructions can cause measuring abnormality or damage to
the Oximeter.
No part of this manual may be photocopied, reproduced or
translated into another language without the prior written
consent. We reserve the right to revise and amend it at any time
without prior notice.
Version of the Manual: Ver 1.6
Issued Date: November 6, 2018
Copyright CMI Health Inc.
All rights reserved.
Notes:
The contents contained in this manual are subject to change
without prior notice.
Information furnished by CMI Health is believed to be
accurate and reliable. However, no responsibility is
assumed by CMI Health for its use, or any infringements
of patents or other rights of third parties that may result from
its use.
3502-2490003

User Manual for Pulse Oximeter
II
Instructions for Safe Operation
Check the device to make sure that there is no visible
damage that may affect user’s safety and measurement
performance. It is recommended that the device should
be inspected minimally before each use. If there is
obvious damage, stop using the device.
Necessary service must be performed only by qualified
technicians. Users are not permitted to service this
device.
The oximeter must not be used with the devices and
accessories not specified in User Manual.
Cautions
Explosive hazard—DO NOT use the oximeter in
environment with inflammable gas such as some
ignitable anesthetic agents.
DO NOT use the oximeter while the Patient is under
MRI or CT scanning. This device is NOT MRI
Compatible.
Warnings
Discomfortable or pain may occur if using the sensor of
this device continuously on the same location for a long
time, especially for the patients with poor
microcirculation. It is recommended that the Oximeter
should not be applied to the same location for longer than
2 hours or less if any abnormal condition is found.
Frequently check and re-position the Oximeter sensor.

User Manual for Pulse Oximeter
III
For the individual patients, there should be a more
prudent inspecting in the placing process. The sensor can
not be placed on the edema and tender tissue.
The local law should be followed when disposing of the
expired device or its accessories.
Attentions
Keep the Oximeter away from dust, vibration, corrosive
substances, explosive materials, high temperature and
moisture.
If the Oximeter gets wet, please stop operating it and do
not resume operation until it is dry and checked for
correct operation. When it is carried from a cold
environment to a warm and humid environment, please
do not use it immediately. Allow at least 15 minutes for
the Oximeter to reach ambient temperature.
DO NOT operate the button on the front panel with sharp
materials or sharp point.
DO NOT use high temperature or high pressure steam
disinfection on the oximeter and probes. Refer to related
chapter for instructions regarding cleaning and
disinfection.
The intended use of this device is not for therapy purpose.
Declaration of Conformity
The manufacturer hereby declares that this device complies
with the following standards:
IEC 60601-1, ISO 9919:2009,ISO 80601-2-61:2011

User Manual for Pulse Oximeter
IV
and follows the provisions of the council directive
MDD93/42/EEC.

User Manual forPulse Oximeter
V
Table of Contents
1 Overview...................................................................................1
1.1 Appearance.........................................................................1
1.2 Product Name and Model.................................................. 2
1.3 Structure.............................................................................3
1.4 Features..............................................................................3
1.5 Intended Use...................................................................... 3
1.6 Working Environment........................................................3
2 Battery and Stand....................................................................4
3 SpO2Probe Connection...........................................................6
4 Operation..................................................................................8
4.1 Power on/off the Oximeter.................................................8
4.2 Default Display Screen...................................................... 8
4.3 Display Screen with PI Value.......................................... 10
4.4 Menu Setup...................................................................... 10
4.5 Data Recall.......................................................................17
5 Technical Specifications........................................................ 21
6 Over-limit Indication.......................................................... 23
6.1 Limit settings................................................................... 23
6.2 Over-limit indication sound mute setting........................ 23
7 Packing List............................................................................24
8 Repair and Maintenance.......................................................25
8.1 Maintenance.....................................................................25
8.2 Cleaning and Disinfecting Instruction............................. 25
9 Troubleshooting..................................................................... 26
Appendix................................................................................... 27
Display Screen
Navigation Key
Mode/OK
Power/Back
Recall/Mute
SpO2Probe
Connector
User Manual for Pulse Oximeter
1
1 Overview
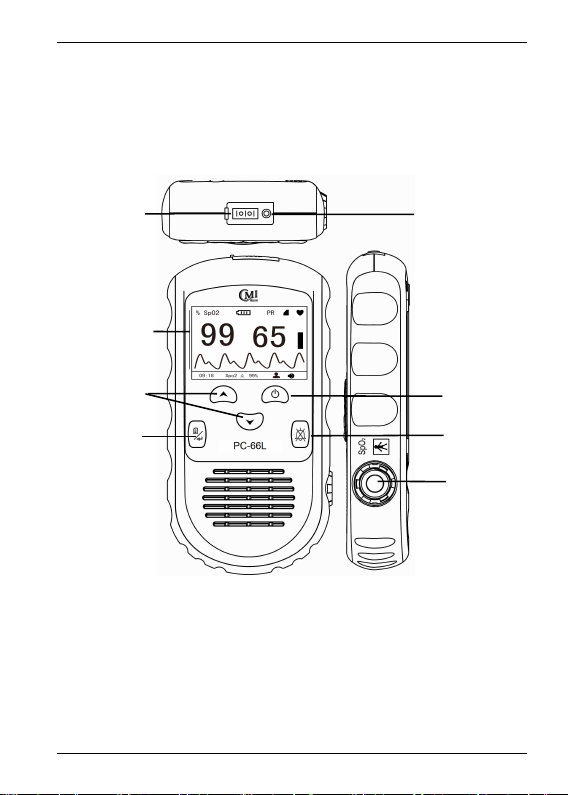
1.1 Appearance
Figure 1-1
1. Display screen: display SpO2plethysmogram and parameter
values.
2. Navigation keys:
: Up/Left/Increase
Data interface Charging Port

User Manual for Pulse Oximeter
2
Press this key, the default screen can be shifted to display pulse
rate (PR) or perfusion index (PI). If on the system setup screen,
press it to move the cursor upwards or to the left and adjust
parameter values.
: Down/Right/Decrease
Its function is similar with the key “
: Up/Left/Increase”.
3. (Mode/OK): press this key, the screen can be shifted
between default screen display and alternative screen display;
longtime press it, the menu screen will be displayed; when you
finish parameter setting, press this key to confirm.
4. (Data interface): used for uploading data (Optional
function).
5. (DC power input): used for connecting external DC
power input for recharging the built-in rechargeable battery.
6. (Power/Back): Power on/off the device by longtime
pressing; short time press it to back to the previous level of menu
while setting menu operation.
7. (Recall/Mute): Longtime press it to enter SpO2trend data
recall screen; when the device is beeping, short time pressing
will mute the indication sound, the mute state will persist for
about 90s. After this mute period (90s), then the indication sound
will resume.
8. Icon: “SpO2”: SpO2Probe Connector.

User Manual for Pulse Oximeter
3
Model: PC-66L
1.3 Structure
It consists of the main unit and an adult SpO2 probe.
1.4 Features
It is lightweight, small in size and easy to carry
Color LCD to display plethysmogram and parameters
Monitor SpO2 and Pulse Rate simultaneously
PI (Perfusion Index) display is available
Up to 384 hours storage and recall of SpO2 and PR data.
Audible and visual alert function is available
Data transmission to PC for view and analysis
Power saving mode is available
1.5 Intended Use
This Pulse Oximeter is intended for checking and recording
the pulse rate and functional oxygen saturation (SpO2) of adult and
children for wellness use. This device is not intended to diagnose
and/or treat any medical condition or disease.
1.6 Working Environment
Operating temperature: 5~40℃
Operating humidity: 30~80%
Atmospheric pressure: 70kPa~106kPa
1.2 Product Name and Model
Name: Pulse Oximeter

User Manual for Pulse Oximeter
4
2 Battery and Stand
1)The battery compartment is located at the back of the device
and can be open with a coin or a flat-head screwdriver, as shown
in Figure 2-1. DO NOT open the battery compartment unless
told by CMI tech support.
Figure 2-2 Metal Stand
Figure 2-1
2)Insert the metal stand as shown in Figure 2-2.

User Manual for Pulse Oximeter
5
Note: When changing the rechargeable litium battery, unplug the
old lithium battery and plug in the new battery into
the corresponding connector in the battery compartment.
Securely place the new battery in the battery compartment.
Do Not attempt unless told by CMI tech support.
Note: When the device shows low battery, the user should
recharge the battery in time. To recharge the battery, connect
one end of the charging cable to the device's top DC power
input, and connect the other end to the AC power adapter.
When the screen shows the rolling icon " ", it means the
battery is charging; When the screen shows icon " ",
it means the battery is fully charged. Unplug the charging
cable from the device, then the battery icon will go back to
normal.
Safety instruction for operation:
Do not throw the device or battery into water, liquid or fire.
Keep the battery out of the reach of the child.
Do not disassemble the battery.
The local law should be followed when disposing of the
expired device or its accessories in order to protect
environment from being polluted.

User Manual for Pulse Oximeter
6
If the device does not power properly or the battery is
damaged, please contact CMI customer service.
In order to prolong the lithium battery's using life, please
pay attention to the battery maintenance.
3 SpO2Probe Connection
Connect the SpO2probe to the connector labeled “SpO2” at the
right side of the Oximeter. After starting up the Oximeter, insert
one finger (index finger, middle finger or ring finger with
proper nail length) into the probe according to the
demonstration shown in the following figure.
Figure 3-1 Illustration of using SpO2 probe (adult finger clip)
Instructions of Operation
1. The finger should be put in properly and correctly.
2. Do not shake the finger and keep at ease during
measurement.
3. Do not put wet finger directly into sensor.

User Manual for Pulse Oximeter
7
4. Avoid placing the sensor on the same limb which is wrapped
with a cuff for blood pressure measurement or during
venous infusion.
5. Do not let anything block the emitting light from the sensor.
6. Vigorous exercise and electrosurgical device interference
may affect the measuring accuracy.
7. Using enamel or other makeup on the nail may affect the
measuring accuracy.
8. If the first reading appears with poor waveform (irregular or
not smooth), then the reading is unlikely true, the more
stable value is expected by waiting for a while, or a
re-inserting finger is needed when necessary.

User Manual for Pulse Oximeter
8
4 Operation
4.1 Power on/off the Oximeter
Press and hold " " power/back key for 2 seconds to
power the device ON or OFF.
During measurement, if the "Probe off" status is
showing for longer than one minute, and if there is no
keypad operation for one minute, then the device will
power off automatically.
4.2 Default Display Screen
Press and hold“ ” power key for 2 seconds to power on the
Oximeter. The display screen will show: "Please use
appropriate sensor according to the patient type and
change the related settings". Then the display will show the
default screen, as shown in Figure 4-1.
SpO2 value
Pulse
Plethysmogram
Current time
Battery indicator
Pulse rate mark Memory full icon
Pulse strength
bar-graph
Sound indicator
Patient type
Pulse rate
symbol
Figure 4-1 Default Display Screen
SpO2 mark
Pulse rate value
The current SpO2 lower alarm threshold

User Manual for Pulse Oximeter
9
Description:
Sound indicator " " means the device is on mute status, the
user can press recall/mute " " key to turn on the
indication sound. During the measurement, over-limit event or
probe off event can trigger the alarm.
“ ”: Memory full icon; if the memory is full, the memory
full icon will appear on the screen. No display of this icon
means the current storing space is not full. If the memory is
full, the data storing will continue in such way the new record
will overwrite the oldest record, so that it's recommended to
upload the stored data into the computer before the memory
gets full.
During the measurement, press recall/mute " " key to turn
off (or resume) the device sound (including pulse beep sound,
audible alert and key click), while the pulse symbol " " still
blinks. For alert sound mute function. Refer to Section 6.2 for
detail of the sound mute function.
Note: The pitch tone of pulse beep is modulated by the SpO2
value, that means the pitch tone changes when the measured
SpO2 changes. The higher the SpO2 value is, the higher the
tone frequency of pulse beep (sound becomes sharper); The
lower the SpO2 value is, the lower the tone frequency of pulse
beep (sound becomes flatter).
User Manual for Pulse Oximeter
10
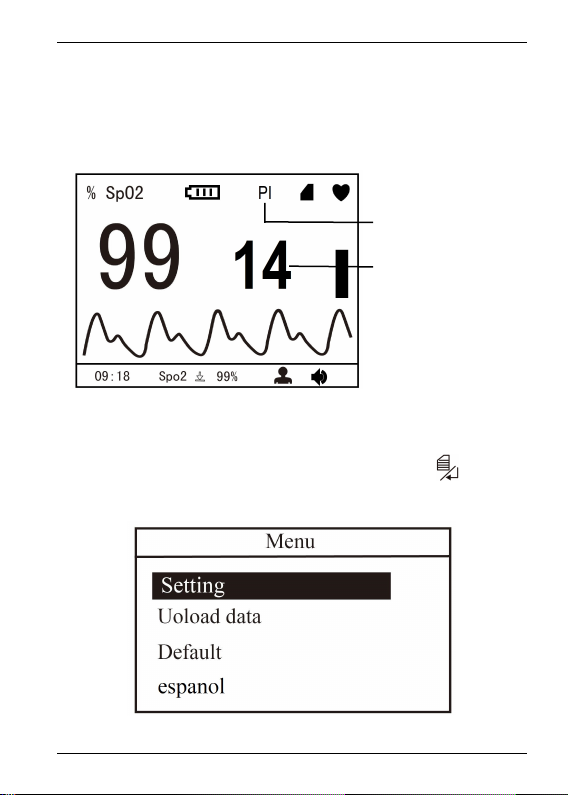
4.3 Display Screen with PI Value
On the default display screen, press “
/
” Navigation key to
shift screens between default screen and display screen with PI
value. The display screen with PI value is shown below.
4.4 Menu Setup
On the above mentioned screens, longtime press “ ” key for
entering into setup menu screen (as shown in Figure 4-3).
Perfusion index index
Perfusion index index
Figure 4-2 Display Screen with PI Value

User Manual forPulse Oximeter
11
Figure 4-3 Setup Menu Screen
Screen Description
“Setting”: set parameter values, refer to Chapter 4.4.1 for
details.
“Upload data”: enter into data uploading state, refer to
Chapter 4.4.2 for details.
"Default": enter into the factory default setting, refer to
Chapter 4.4.3 for details.
"espanol": this Oximeter provides the display with two
languages: English and espanol(Spanish).
“Version”: for viewing version number of the software,
refer to Chapter 4.4.5 for details.
4.4.1 Setting
On the menu screen, select “Setting” and then press “ ” key
for entering into system setup screen. The setup screen is as
shown in Figure 4-4.

User Manual for Pulse Oximeter
12
Figure 4-4 System Setup Screen
Operation Instructions:
Patient: two options:"ADU " for adult, and "PED "
for pediatric.

User Manual for Pulse Oximeter
13
SpO2Lo-Limit: SpO2low limit setting; range: 50%~99%,
the step is 1%. The factory default value for adult is 90%
and 95% for pediatric.
PR Hi-Limit: High limit setting of pulse rate; range:
100~240bpm. From 100 to 150, the step is 1bpm, and
from 150 to 240, the step is 5bpm. The factory default
value for adult is 120bpm and 160bpm for pediatric.
PR Lo-Limit: Low limit setting of pulse rate; range:
30~99bpm, and the step is 1bpm. The factory default
value for adult is 50bpm and 60bpm for pediatric.
Note: When the SpO2 reading is equal to or below the preset
alert setting or the PR reading is equal to or above the preset
alert setting, then the over-limit alert sound will trigger, and the
corresponding reading(s) will blink. When measured on
pediatric patients, the alert sound and blinking display will
trigger if the SpO2 reading is off the limit for 10 seconds.
Date: Date setting
1)When cursor stays on the Year of the date, press “ ”
(Mode/OK) key to active Year option, the cursor flashes on
the Year of the date;
2)Press
/
(Navigation key) to adjust year.
3)Press “ ” (Power/back) key or “ ” (Mode/OK) key to

User Manual for Pulse Oximeter
14
confirm and exit from date setting.
4)The procedures of adjusting Month value and Day value
are the same with Year adjustment.
Date Format: yyyy-mm-dd
Note: The setting operations of other parameters (such as TIME,
PATIENT, RECORDING INTERVAL, POWER SAVING etc.)
are the same with date setting.
Time: Time setting
Recording: Time interval for recording data (SpO2& PR),
there are five options: “1s, 2s, 4s, 8s” and “OFF”.
1) "1s": the least length of data record is set to 30 seconds, and
the maximal length for one record is limited to 1 hour. The
total storage time is up to 48 hours.
2) "2s": the least length of data record is set to 60 seconds, and
the maximal length for one record is limited to 2 hours.
The total storage time is up to 96 hours.
3) "4s": the least length of data record is set to 120 seconds,
and the maximal length for one record is limited to 4 hours.
The total storage time is up to 192 hours.
4) "8s": the least length of data record is set to 240 seconds,
and the maximal length for one record is limited to 8 hours.
The total storage time is up to 384 hours.
5) When the option is set to “OFF”, the device will not store the
measuring data.

User Manual for Pulse Oximeter
15
and "off". The factory default setting is "on". When the
power saving mode is set to "on" option, during the
measurement, if there is no key operation for 2 minutes,
the screen display will be dim for power saving. The
display brightness will resume to normal condition by
pressing any key.
Volume: 3 levels setting: "1", "2" and "3",
corresponding to the speaker volume icons of " ", " "
and " " respectively. The speaker volume icon indicates
the volume of any sound generated by the device for
key press, over-limit alarm, pulse beep and audible
probe-off indication etc..
4.4.2 Upload Data
On the menu screen, select “UPLOAD DATA” and then press
“” key for entering into connecting status (as shown in Figure
4-5).
Note: Make sure the provided USB data cable is well connected
between the device and PC before uploading data.
When you transmit data (SpO2and PR values) to your computer,
please let the oximeter stay in connecting status, then data
uploading will be activated. Refer to the instruction in “Oximeter
Data Manager User Manual”for detailed operation.
Power saving: power saving setting; two options: "on"
Other manuals for PC-66L
1
Table of contents
Languages:
Other CMI Health Medical Equipment manuals


Popular Medical Equipment manuals by other brands


BIOTRONIK
BIOTRONIK CardioMessenger II-LLT Technical manual

bort medical
bort medical Stabilo quick guide

EASYHALER
EASYHALER Budesonide Instructions for using

ACP
ACP OmniSWD user manual

Nasco Healthcare
Nasco Healthcare heartisense CPR PROMPT instruction manual

Carestream
Carestream DRX-Revolution Hardware guide


