Auping K2 User manual
Koninklijke Auping bv
Laan van Borgele 70
Postbus 67
7400 AB Deventer Holland
Tel. +31 570 68 19 11
Fax +31 570 50 12 21
E-mail: [email protected]
Auping K2
Type 88
NE PAS AFFRANCHIR
NIET FRANKEREN
RÉPONSE PAYÉE
PAYS-BAS
Koninklijke Auping bv
INT. ANTWOORDNUMMER
C.C.R.I. Numéro 3
7400 VB DEVENTER
NE PAS AFFRANCHIR
NIET FRANKEREN
RÉPONSE PAYÉE
PAYS-BAS
Koninklijke Auping bv
INT. ANTWOORDNUMMER
C.C.R.I. Numéro 3
7400 VB DEVENTER
Gebruiksaanwijzing
User manual
Mode d'emploi
Gebrauchsanweisung
Brugsvejledning
Användarhandbok
Manual de instrucciones
Voor België en Luxemburg/
Pour la Belgique et le
G.D. de Luxembourg:
Royal Auping nv/sa
Vlaamsekaai 55
B-2000 Antwerpen
Tel. +32 3 257 13 47
Fax +32 3 257 19 62
E-mail: [email protected]
Pour la France:
Auping Showroom Northern-
Feather
9, Rue Balard
FR-75015 Paris
Tel. +33 1 45579090
Fax +33 1 45575486
E-mail: infos@northern-
feather.fr
Für Deutschland:
Royal Auping
Postfach 67
7400 AB Deventer Holland
Tel. +31 570 68 19 11
Fax +31 570 50 16 37
E-mail: [email protected]
For Skandinavien:
Royal Auping
Kronprinsensgade 1
Postboks 1141
1010 København K
Danmark
Tel. +45 33 17 94 34
Fax +45 33 13 08 51
E-mail: [email protected]
Para España:
Royal Auping
Avda. Valdemarin 93 -
portal E-1A
28023 Madrid
Tel. +34 913 575 626
Fax +34 913 574 436
E-mail: [email protected]
For other countries, see
www.auping.com
6504170/11-2007
_006I7_3114 Omslag.pdf - pag.1 November 9, 2007
LET OP !!! Lage resolutie!

Stuur dit formulier terug naar Auping! /Send this warranty card to Auping!/Renvoyez ce
formulaire à Auping!
Vul dit formulier volledig in (in blokletters) en stuur het per omgaande terug naar Auping.
Het geeft u recht op de Auping Kwaliteitsgarantie. Bewaar uw aankooprekening alstublieft.
Complete this card (block capitals, please) and post it to Auping immediately. When Auping receives the card,
your purchase is covered by the Auping warranty. Please retain your purchase invoice.
Remplissez ce document complètement (en lettre capitales) et renvoyez-le par retour à Auping. Il vous
donne droit à la garantie de qualité Auping. Conservez votre bon d’achat s’il vous plaît.
Naam / Name / Nom
Voorletters / Initials / Initiales prénoms M / V* M / F* H / F*
Straat / Street / Rue
Postcode / Postcode / Code postal
Plaats / Town (county) / Localité
Land / Country / Pays
Aankoopdatum / Date of purchase / Date ‘dachat
Naam en vestigingsplaats leverancier / Name and address of supplier / Nom et localité du
détaillant
Ik heb gekocht / I have purchased / J’ai acheté:
Auping K2 Type 88
Graag ontvang ik meer informatie over / Please send me information about / Je désire une
information complémentaire sur:
o
* doorhalen wat niet van toepassing is / delete as applicable
/
biffer ce qui ne convient pas
Bitte unbedingt an Auping zurücksenden! /Retorne este formulario a Auping!/Returnér venligst
denne formular til Auping!/Skicka detta formulär till Auping!
Dieses Formular bitte vollständig ausfüllen (Druckbuchstaben) und umgehend an Auping einschicken. So
bald uns dieses Formular vorliegt, besteht Ihr Anspruch auf die Auping Qualitätsgarantie. Bitte behalten Sie
die Kaufrechnung.
Rellene completamente este formulario en letras mayúsculas y envíelo por correo a Auping. Le dará
derecho a la garantía de calidad de Auping. Guarde el recibo de compra.
Udfyld kortet (med blokbogstaver) og returnér venligst det hurtigst muligt til Auping. Produktet er således
dækket af Aupings garanti ved samtidig fremvisning af købskvitteringen.
Fyll i detta formulär fullständigt (var god texta) och skicka det omgående till Auping. Det ger dig rätt till
Aupings kvalitetsgaranti. Spara inköpskvittot.
Name / Apellidos / Efternavn / Namn
Vorname / Nombre / Fornavn / Initialer Frau / Herr* H / M* Hr / Fr* M / K*
Straße / Calle / Adresse / Gata
PLZ / Código postal / Postnummer / Postnummer
Wohnort / Localidad / By / Ort
Land / País / Land / Land
Kaufdatum / Fecha de compra / Købsdato / Inköpsdatum
Name und Anschrift Ihres Händlers / Nombre y lugar de establecimiento del proveedor /
Forretningens navn og adresse / Återförsäljarens namn och filialort
Ich habe gekauft / He adquirido / Jeg har købt / Jag har köpt:
Auping K2 Type 88
Senden Sie mir bitte zusätzliche Information über / Desearía recibir mayor información sobre /
Send mig venligst information om / Jag skulle vilja ha information om:
o
* nichtzutreffendes bitte streichen /
tachar lo que no proceda /
overstreg venligst, hvad der ikke er aktuelt /
stryk över det som
inte är aktuellt
Garantie-Formular
Formulario de garantía
Garantikort
Garantiformulär och användning
Garantieformulier
Warranty card
Formulaire de garantie
_006I7_3114 Omslag.pdf - pag.2 November 9, 2007
LET OP !!! Lage resolutie!

NL1
Auping K2 type 88
1. Inleiding 2
1.1 Opbouw van uw spiraalbodem 2
1.2 Afstandsbediening 2
1.3 Technische informatie 3
2. Veiligheidsaanwijzingen 3
3. Ingebruikname 4
3.1 De onderdelen van uw spiraalbodem 4
3.2 Aanbrengen van de elektromotor 4
3.3 Aansluiten hoofdsteunmotor 5
3.4 Bevestigen van de afstandsbediening 5
3.5 Positie van de onderzetpoten 5
3.6 Bevestigen van de matras 6
3.7 Gebruiksklaar maken 6
3.8 Tips voor het gebruik 6
4. Bediening 7
4.1 Elektrisch verstelbare delen 7
5. Storingen 7
5.1 Elektrische storingen 7
5.2 Mechanische storingen 7
6. Reiniging en onderhoud 8
7. Afvoer verpakking en product 8
8. Auping Garantie 9
_006IH_3114 BW.pdf - pag.1 November 9, 2007
LET OP !!! Lage resolutie!
NL2
1. Inleiding
U heeft gekozen voor een K2 spiraalbodem;
geheel afgestemd op uw eigen wensen. De
spiraalbodems verschillen per type in de ver-
stelmogelijkheden. De matrassen verschillen
in gebruik van materialen en functies.
Alle matrassen uit de Auping collectie zijn
geschikt voor gebruik op de verstelbare K2
spiraalbodems. De matras is door middel van
comfortzones aangepast aan de gewichts-
verdeling van het lichaam. De schouderzone is
iets soepeler, terwijl het zitgedeelte juist extra
verstevigd is. Deze zonering zorgt voor extra
comfort en een nog betere ondersteuning bij
zowel zitten als liggen op de matras.
Dankzij de gladde vezel glijdt de matras-
bodem, tijdens het verstellen, over het rugdeel
van de spiraalbodem.
Met de matraskoppelingen wordt de matras
op de spiraalbodem bevestigd. De matras kan
zo niet meer verschuiven en volgt de bewegin-
gen van de spiraalbodem moeiteloos. De
matrassen zijn asymmetrisch opgebouwd uit
verschillende materialen en hoeven daarom
niet te worden gekeerd.
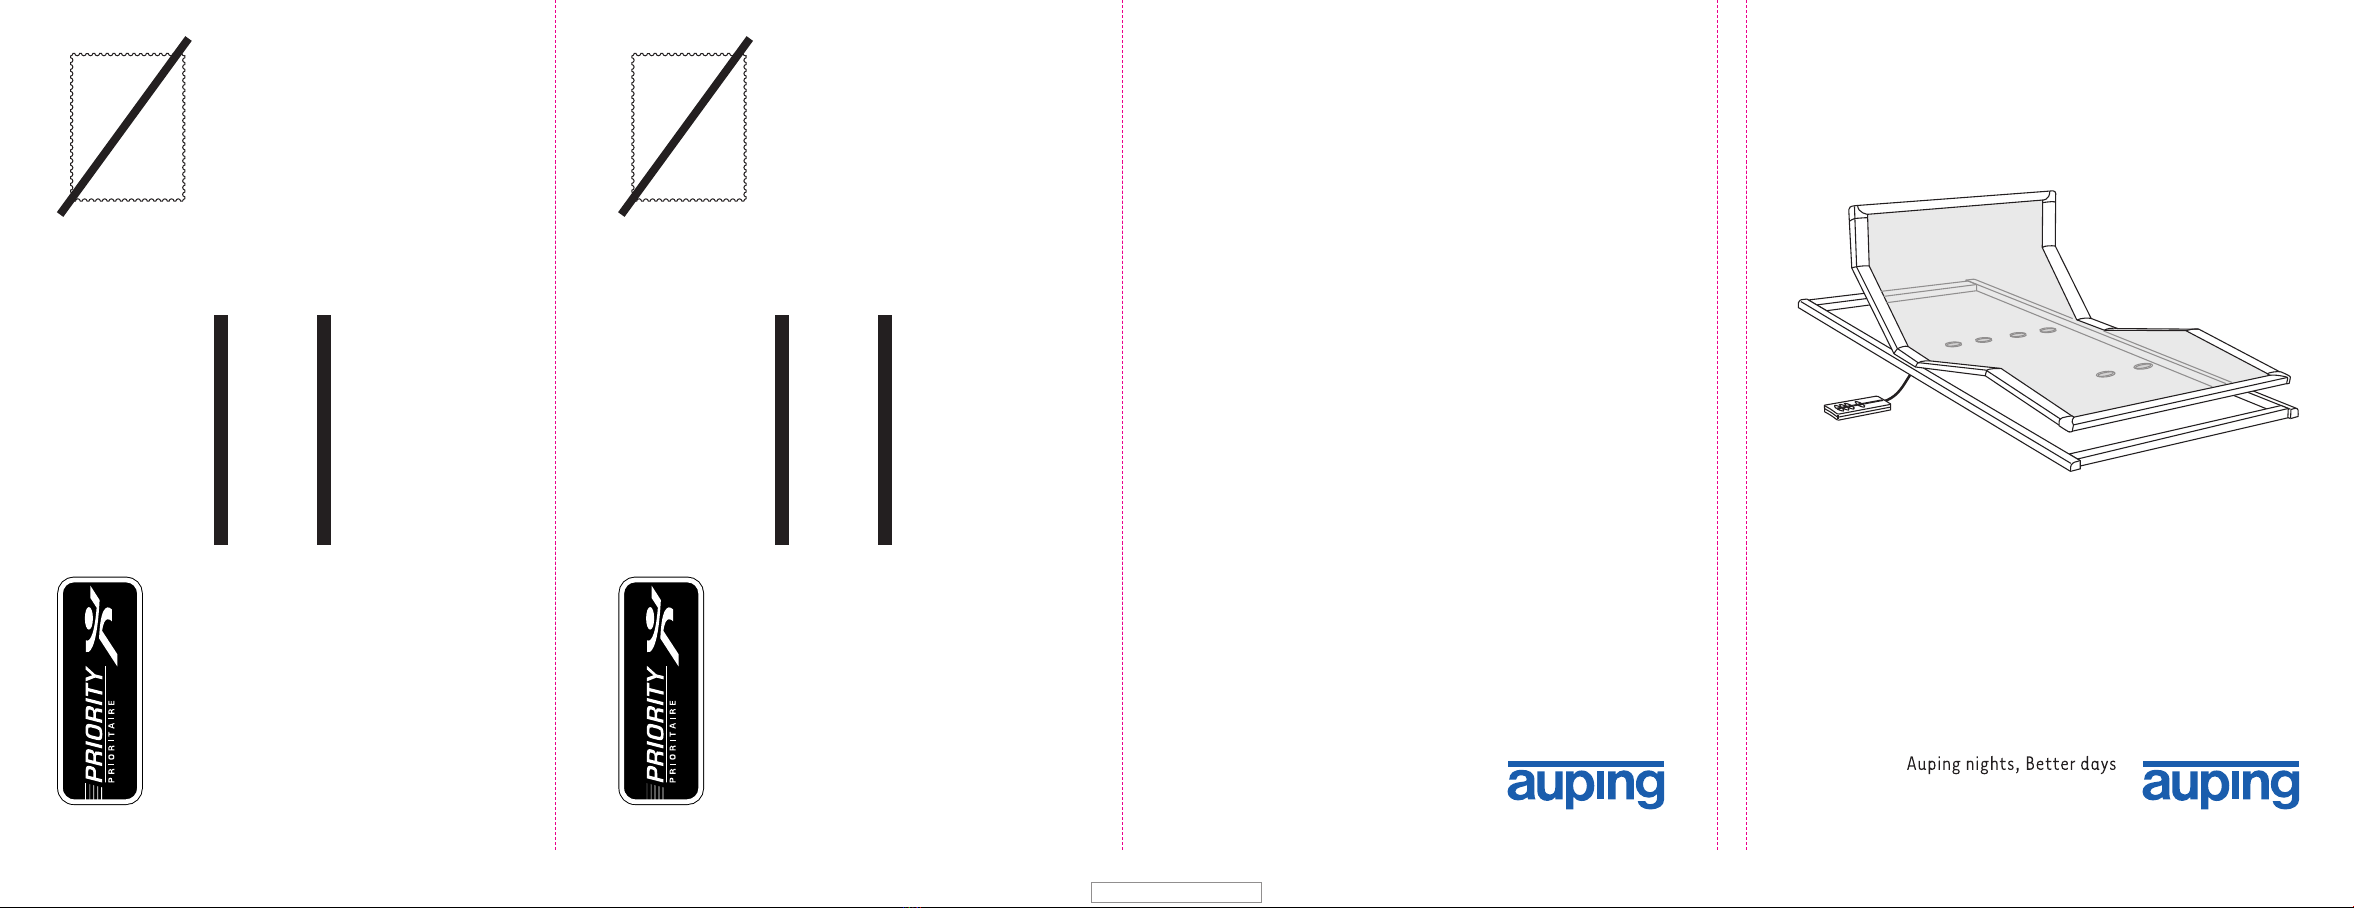
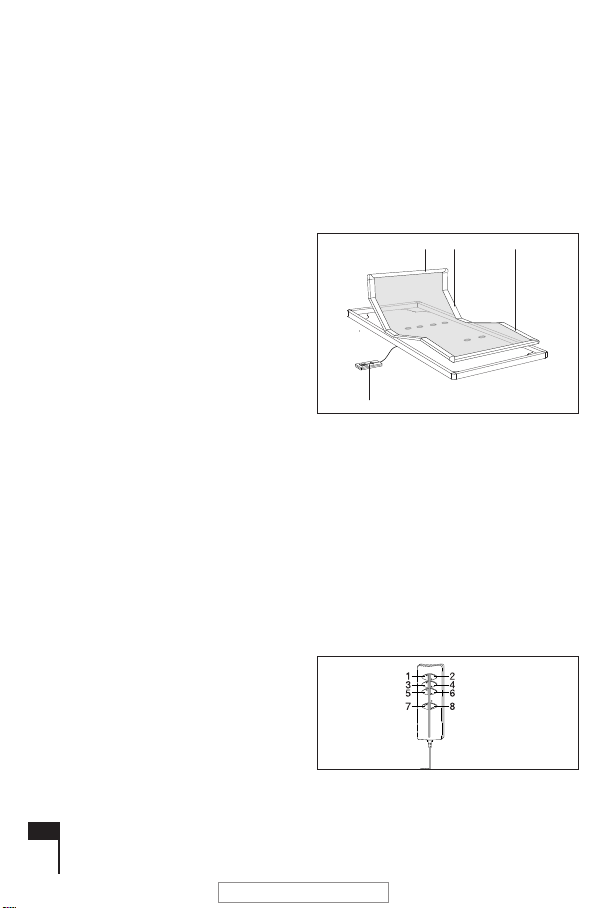
1.1 Opbouw van de spiraalbodem
1. Voeteneind elektrisch verstelbaar
2. Rugdeel elektrisch verstelbaar
3. Hoofdsteun elektrisch verstelbaar
4. Afstandsbediening
1.2 Afstandsbediening
1. Hoofdsteun omhoog
2. Hoofdsteun omlaag
3. Rugdeel omhoog
4. Rugdeel omlaag
5. Voeteneind omhoog
6. Voeteneind omlaag
7. Hoofdsteun, rugdeel en voeteneind
omhoog
8. Hoofdsteun, rugdeel en voeteneind
omlaag
fig. 1
4
123
Electromat E
fig. 2
Type 88
_006IH_3114 BW.pdf - pag.2 November 9, 2007
LET OP !!! Lage resolutie!

NL3
1.3 Technische informatie
Aandrijfmotor (per motor)
- Input 230 V~ (afhankelijk van het model
input 220/240/110 V~) 50/60 Hz 145 W.
- Gelijkstroommotor 24 V, 75 W.
Maximale inschakelduur 2 minuten
per 20 minuten.
Afstandsbediening
- Gespiraliseerde flexibele kabel 24 V.
- Druktoetsen voor verstelling van rugdeel,
voeteneinde en hoofdsteun.
Gewicht
- K2 type 88, maat 90 x 200: 37 KG.
Aandrijfmotor hoofdsteun
- Gelijkstroommotor 24V.
2. Veiligheidsaanwijzingen
■De K2 spiraalbodem mag alleen door de
Auping specialist worden gemonteerd en
aangesloten.
■De K2 spiraalbodem is alleen geschikt voor
particulier gebruik.
■De elektrische spiraalbodem beschikt over
een netvrijschakelaar die de netspanning
afsluit als er geen stroomtoevoer gevraagd
wordt. De netvrijschakelaar bevindt zich in
de stekker. Als er een bedieningstoets
ingedrukt wordt, schakelt de netvrij-
schakelaar automatisch de netspanning in.
Het groene lampje op de stekker geeft aan
dat er netstroom gebruikt wordt.
■De K2 spiraalbodem werkt op zwakstroom.
■Controleer of de aansluitspanning van de
transformator overeenkomt met de
netspanning in de woning.
■Verstelbare bedden hebben bewegende
delen. Zorg ervoor dat ledematen niet
bekneld kunnen raken.
■Verstel het bed alleen wanneer u in het bed
ligt. Let op dat tijdens het verstellen zich
geen kinderen onder het bed bevinden.
■Maak het bed spanningsloos voordat u met
schoonmaken begint. Trek de stekker uit
het stopcontact.
■De spiraalbodem is geen kinderspeelgoed.
Laat kinderen niet met het bed spelen.
■Gebruik het bed niet als trampoline of
trapje.
_006IH_3114 BW.pdf - pag.3 November 9, 2007
LET OP !!! Lage resolutie!

NL4
■De K2 spiraalbodem is niet bedoeld te
gebruiken door personen met een
geestelijke aandoening of geestelijke
achterstand en kinderen. Tenzij zij zijn
geïnstrueerd over het gebruik en de
gevaren.
■Gebruik een Auping K2 spiraalbodem in
combinatie met een Auping matras.
■Plaats het bed uitsluitend in droge ruimtes.
Vanwege de elektrische onderdelen is het
niet toegestaan het bed in vochtige ruimtes
te plaatsen.
■Let op dat de snoeren niet bekneld kunnen
raken. Controleer dit door het bed na instal-
latie eenmaal te verstellen.
■Trek de stekker uit het stopcontact bij
onweer.
3. Ingebruikname
3.1 De onderdelen van uw spiraalbodem
- Auping K2 spiraalbodem.
- Elektromotor met afstandsbediening.
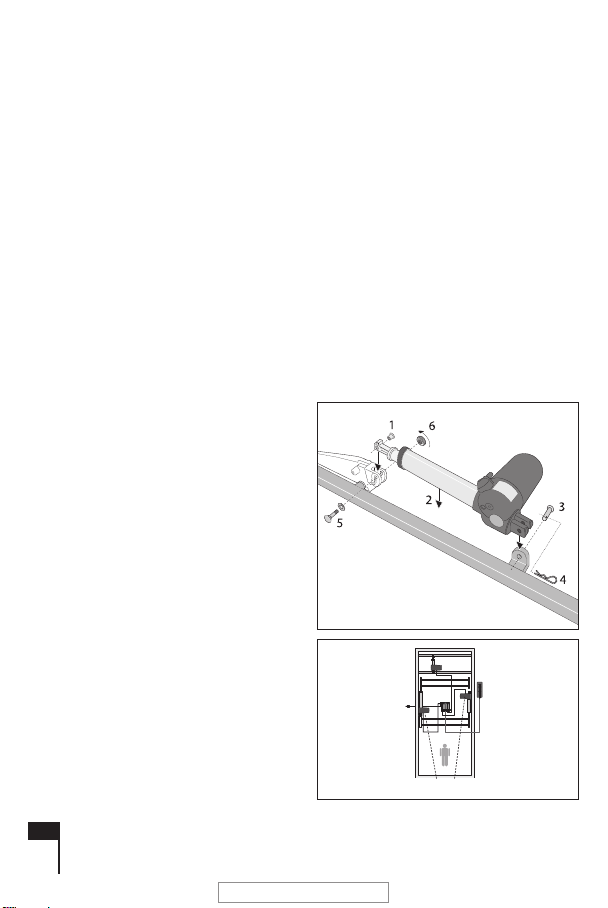
3.2 Aanbrengen van de elektromotor
1. De hoofdsteunmotor is vanaf de fabriek al
gemonteerd aan de spiraalbodem.
2. Bevestig de rugmotor (151747) aan de
onderzijde van de spiraal met behulp van
de schroef en borgpen, zoals aangegeven
op de illustraties.
3. Bevestig de bovenbeenmotor (151748)
aan de onderzijde van de spiraal met
behulp van de schroef en borgpen, zoals
aangegeven op de illustraties.
151747 / 151748
151747 151748
_006IH_3114 BW.pdf - pag.4 November 9, 2007
LET OP !!! Lage resolutie!
NL5
4. Steek de stekker van de rugmotor in de
besturingskast bij het aansluitpunt aan de
zijkant (aansluitpunt 4).
5. Steek de stekker van de bovenbeenmotor
in de besturingskast bij aansluitpunt 1.
6. Steek de stekker van de handset in de bes-
turingskast bij aansluitpunt 2.
7. Steek de stekker van de hoofdsteunmotor
in de besturingskast bij aansluitpunt 3.
8. Zet de snoeren vast onder de trekontlasting
op de besturingskast.
9. Steek de stekker van de besturingskast in
de wandcontactdoos.
3.3 Aansluiten hoofdsteunmotor
Sluit de gespiraliseerde kabel van de voorge-
monteerde hoofdsteunmotor
aan op de zijkant van de elektromotor rugdeel
en voeteneinde.
Leid de kabel over de dwarsbuis van het
verstelmechanisme van het rugdeel. De kabel
krijgt dan de ruimte om optimaal met het
rugdeel mee te bewegen.
3.4 Bevestigen van de afstandsbediening
• Voor het eenvoudig
bevestigen van de
afstandsbediening aan
de Auping Auronde en
Next of andere bed-
modellen.
• Plaats de klem aan de
onderkant van het zij-
paneel van de om-
randing (zie fig. 4).
• Click de afstands-
bediening in de klem.
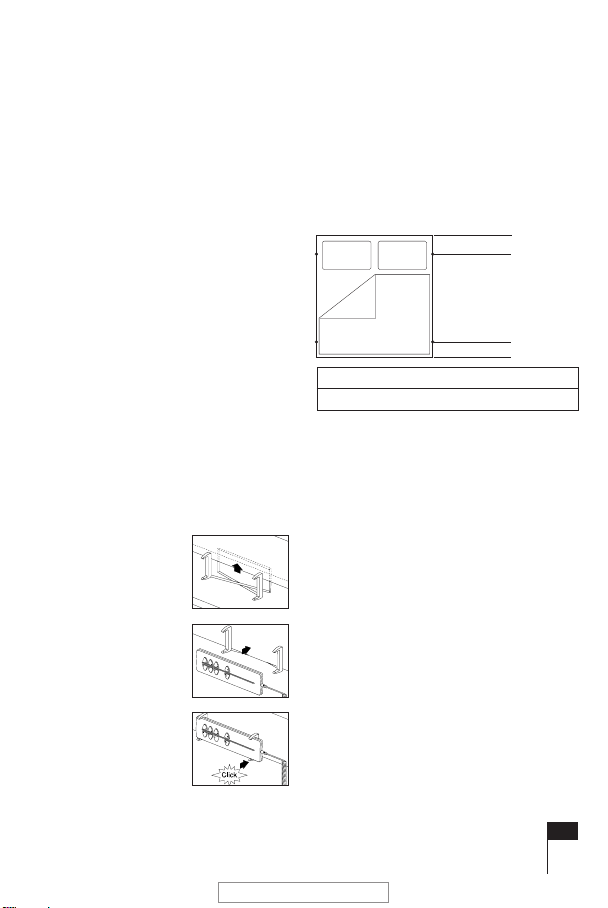
3.5 Positie van de poten
Voor een juiste gewichtsverdeling is het van
groot belang dat de onderzetpoten op de
juiste wijze worden gemonteerd.
Dit betekent dat de onderzetpoten op de
afstanden geplaatst moeten worden volgens
de afbeelding (bovenaanzicht van het bed):
fig. 4
Hoofdeind (HE)
Voeteneind (VE)
Lengte 190/200 cm: HE 20 cm VE 25 cm
Lengte 210/220 cm: HE 30 cm VE 25 cm
_006IH_3114 BW.pdf - pag.5 November 9, 2007
LET OP !!! Lage resolutie!

NL6
3.6 Bevestigen van de matras
Zet uw bed in de vlakke positie. Leg de matras
midden op de spiraalbodem.
Let er goed op dat de vijf pootjes van de
bevestigers in de breedterichting van het
netwerk komen te staan (zie fig. 5).
‘Click’ de bevestigers op de aangegeven plaat-
sen in het netwerk (zie fig. 6).
Let er op dat de bevestigers zich niet direct
boven een dwarsbuis bevinden.
3.7 Gebruiksklaar maken
Controleer of de spiraalbodem vrij kan bewegen.
Verstel de spiraalbodem alleen horizontaal
liggend in uw bedomranding, of staand op de
onderzetpoten.
Controleer of de matras goed aan de spiraal-
bodem bevestigd is.
Steek de stekker, voorzien van de veiligheids-
schakelaar in het stopcontact.
3.8 Tips voor het gebruik
Een nieuwe matras heeft een bepaalde
stramheid, die na een paar dagen verdwijnt.
Hierdoor zal uw matras de eerste verstel-
bewegingen van de spiraalbodem niet opti-
maal volgen. Wij raden u aan om op de matras
te gaan liggen tijdens de eerste verstel-
bewegingen.
fig. 5
fig. 6
_006IH_3114 BW.pdf - pag.6 November 9, 2007
LET OP !!! Lage resolutie!
NL7
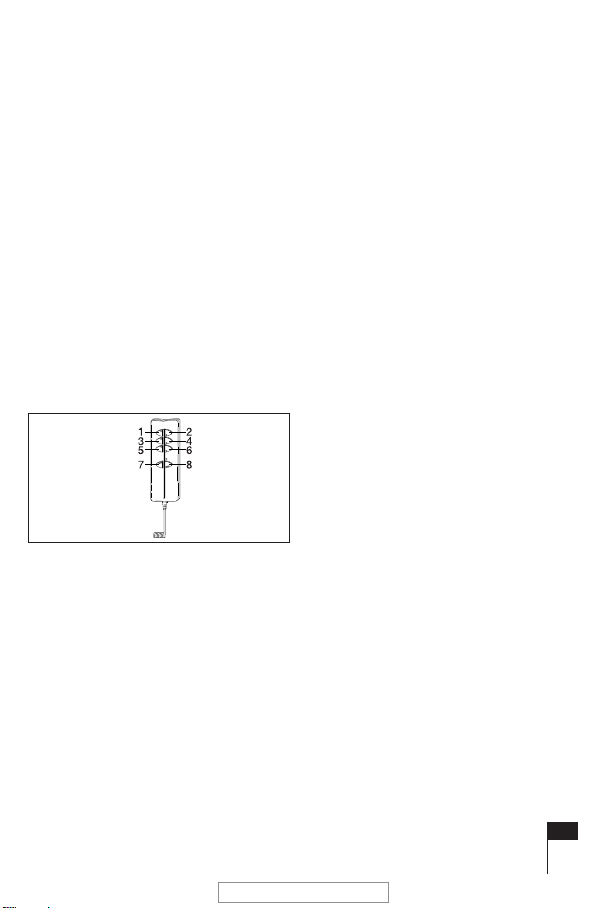
4. Bediening
4.1 Elektrisch verstelbare delen
Voor het verstellen van de elektrische delen
gebruik je de afstandsbediening (zie fig. 7).
1. Hoofdsteun omhoog
2. Hoofdsteun omlaag
3. Rugdeel omhoog
4. Rugdeel omlaag
5. Voeteneind omhoog
6. Voeteneind omlaag
7. Hoofdsteun, rugdeel en
voeteneind omhoog
8. Hoofdsteun, rugdeel en
voeteneind omlaag
Druk een 'op' of 'neer' toets in. Houd deze
ingedrukt tot de juiste stand bereikt is. Er kan
maar één toets tegelijk bediend worden.
5. Storingen
Een eventuele elektrische storing is lastig,
maar nooit gevaarlijk. De motor is voorzien
van alle veiligheidskeuringen en is dubbel geÏ-
soleerd.
5.1 Elektrische storingen
Controleer of:
- de stekker in het stopcontact zit;
- er netspanning aanwezig is.
5.2 Mechanische storingen
Ongewenste geluiden
(piepen en kraken van het bed)
Ongewenste geluiden worden meestal
veroorzaakt door bewegende delen die elkaar
raken.
De oorzaak hiervan kan een onderdeel zijn dat
mist. Ook kunnen delen niet goed vast zijn
gemaakt of los zijn geraakt door het verplaat-
sen van het bed.
Controleer of:
- het bed goed vlak staat;
- of het bed vrij van de muur staat;
- of er geen voorwerpen in het bed liggen die
daar niet horen (lepels, vorken, pennen, etc.).
fig. 7
_006IH_3114 BW.pdf - pag.7 November 9, 2007
LET OP !!! Lage resolutie!

NL8
6. Reiniging en onderhoud
Vlekken op de spiraalbodem werkt u weg met
een vochtig doekje en een zacht schoonmaak-
middel. Gebruik nooit een schuursponsje of
schuurmiddelen.
Stof de spiraalbodem en het onderstel af en
toe even af.
Vanwege de zorg van Auping voor het milieu,
is het product voorzien van poedercoating. In
de eerste weken na aanschaf kan onder het
bed wat lakstof vallen. Dit is onschuldig en laat
zich gemakkelijk verwijderen.
7. Afvoer verpakking
en product
Auping investeert jaarlijks in schonere produc-
tieprocessen en probeert door het gebruik van
duurzame materialen het milieu zo min
mogelijk te belasten. De matrassen worden
gemaakt van CFK-vrije materialen. De matras
wordt op een zodanige manier vervaardigd dat
er bij de productie geen onnodig afval
ontstaat. De spiraalbodems zijn gemaakt van
verzinkt staal. Dit is geschikt voor recycling.
Verhuizen
Zorg ervoor dat de spiraalbodem niet open
kan vallen tijdens het vervoer. Zet het onder-
en bovenframe vast, eventueel met sjorban-
den. Verwijder geen schroeven van de spiraal-
bodem.
Let op!
Bij het demonteren van de motor aan het
hoofdeind van een versteld bed, kan het
hoofdeind omlaag vallen.
Veilige afvalverwerking
Het frame staat onder hoge veerspanning
door het opgespannen netwerk van de spiraal-
bodem. Verzwak de constructie van het frame
op geen enkele wijze.
Het verpakkingsmateriaal bestaat uit karton
en polyethyleenfolie. Voer het verpakkingsma-
teriaal en uw oude bed op verantwoorde wijze
en conform de overheidsbepalingen af.
_006IH_3114 BW.pdf - pag.8 November 9, 2007
LET OP !!! Lage resolutie!

8. Auping Garantie
De merknaam Auping staat borg voor
jarenlang probleemloos functioneren. Auping
maakt gebruik van hoogwaardige en duurza-
me materialen. Elk product wordt met de
grootste zorg gefabriceerd en nauwkeurig
gecontroleerd voordat het de fabriek verlaat.
Auping geeft levenslange garantie op materiaal-
en fabricagefouten van alle bedbodems (waar-
onder te verstaan: spiraalbodems en stalen
frames) met uitzondering van de motoren,
gasveren en elektronica. Op materiaal- en
fabricage-fouten van laatstgenoemde artikelen
en van matrassen en dekbedden wordt 5 jaar
garantie gegeven op basis van jaarlijkse
afschrijving van 20% van de aankoop-waarde.
Dit houdt in dat, mochten zich materiaal- of
fabricagefouten voordoen, in het eerste jaar
na factuurdatum de volledige kosten van ver-
vanging of reparatie vergoed worden. In de
volgende 4 jaren wordt dit steeds 20% minder.
Op kussens is de garantietermijn 2 jaar. Op
overige artikelen wordt 5 jaar volledige garan-
tie gegeven. De garantietermijn gaat in op de
datum die vermeld staat op de factuur.
Voorwaarde is wel dat onze plaatsingsinstruc-
ties en onderhoudsadviezen correct gevolgd
zijn en dat sprake is van normaal huishoudelijk
gebruik.
Indien zich materiaal- of fabricagefouten voor-
doen, verplicht Auping zich zulke fouten gratis
te herstellen volgens de Auping garantie
voorwaarden. Indien het defect niet hersteld
kan worden, vervangt Auping het product
binnen de garantietermijn zonder kosten door
hetzelfde, of indien niet meer leverbaar, door
een gelijkwaardig product. Uitsluitend Auping
bepaalt of een fout hersteld wordt door
vervanging, reparatie of vergoeding.
Aanspraken op garantie voor gebreken/
beschadigingen ontstaan door ondoelmatig
handelen (bijvoorbeeld door overbelasting),
verkeerd of onoordeelkundig gebruik of door
normale slijtage, worden uitgesloten.
Combinaties met niet-Auping producten
kunnen, afhankelijk van de aard van de klacht,
tot beperkingen in de garantie-aanspraak
leiden.
Een aanspraak op garantie dient eerst door
Auping als gegrond erkend te worden. Bij een
gegronde klacht zal Auping het defecte
product of defecte onderdelen vervangen,
zonder berekening van materiaalkosten, of
tegen gereduceerde kosten in geval van
een garantie op basis van afschrijving.
Afhankelijk van het land waarin aanspraak op
onze garantie wordt gemaakt, omvat deze niet
automatisch de vergoeding van de kosten van
verzending van defecte producten naar de
Auping fabriek of de Auping distributeur voor
onderzoek van de klacht of voor reparatie.
Hetzelfde geldt voor retourzending van
vervangende of gerepareerde producten. De
reparatie zelf is binnen de garantietermijn gra-
tis. Voorrijkosten worden in rekening gebracht.
Een aanspraak op garantie kan alleen worden
gedaan onder overlegging van de originele
factuur. De garantie is alleen geldig voor de
oorspronkelijke koper. De aanmelding dient te
geschieden bij de Auping dealer bij wie het
product oorspronkelijk werd aangeschaft, ook
indien u inmiddels naar een ander land ver-
huisd bent.
De garantie vervalt, indien het product op enig
moment gedemonteerd of gemonteerd wordt
door personen die daarvoor door Auping niet
als gekwalificeerd zijn aangemerkt, tenzij de
gebruiksaanwijzing ‘do-it-yourself’ montage-
voorschriften bevat en deze nauwkeurig
worden opgevolgd. De Auping garantie geldt
in alle landen waar Auping vertegenwoordigd
is. Auping behoudt zich het recht voor, geen
garantie te verlenen op Auping producten die
naar landen worden gebracht waar Auping
geen vertegenwoordiging heeft.
NL9
_006IH_3114 BW.pdf - pag.9 November 9, 2007
LET OP !!! Lage resolutie!

NL10
_006IH_3114 BW.pdf - pag.10 November 9, 2007
LET OP !!! Lage resolutie!

Auping K2 type 88
1. Introduction 12
1.1 Structure of the mesh base 12
1.2 Handset 12
1.3 Technical specifications 13
2. Safety instructions 13
3. Preparing for use 14
3.1 Components of your mesh base 14
3.2 Installing the electric motor 14
3.3 Connecting the head support motor 15
3.4 Attachment of the handset 15
3.5 Position of the legs 15
3.6 Fitting the mattress 16
3.7 Preparing for use 16
3.8 Tips for use 16
4. Use 17
4.1 Electrically adjustable sections 17
5. Malfunctions 17
5.1 Electrical malfunctions 17
5.2 Mechanical malfunctions 17
6. Cleaning and maintenance 18
7. Disposal of packaging and products 18
8. Auping Warranty 19
GB11
_006IH_3114 BW.pdf - pag.11 November 9, 2007
LET OP !!! Lage resolutie!

1. Introduction
You have chosen a K2 mesh base, tailored to
meet your individual requirements. The ways in
which the mesh bases can be adjusted differ
per type. The mattresses differ in their use of
materials and their functions.
All Auping mattresses are suitable for the
adjustable K2 mesh bases. The mattress is
adapted to the weight distribution of the body
by means of comfort zones. The shoulder
zone is somewhat more pliable, while the sit-
ting area has been extra strengthened. This
zoning gives extra comfort and better support
for both sitting and lying on the mattress.
Thanks to its smooth fibres, the underside of
the mattress glides over the back section of
the mesh base during adjustment.
The mattress is fastened to the mesh base
with mattress connectors. Thus, the mattress
cannot slide down while adjusting the bed and
it will exactly follow the movements of the
mesh base. The mattresses are constructed
asymmetrically from various materials and
therefore do not need to be turned.
1.1 Structure of the mesh base
1. Electrically adjustable foot end
2. Electrically adjustable back section
3. Electrically head support
4. Handset
1.2 Handset
1. Raise head support
2. Lower head support
3. Raise back section
4. Lower back section
5. Raise foot end
6. Lower foot end
7. Raise head support, back section and
foot end
8. Lower head support, back section and
foot end
GB12
fig. 1
4
123
Electromat E
fig. 2
Type 88
_006IH_3114 BW.pdf - pag.12 November 9, 2007
LET OP !!! Lage resolutie!

1.3 Technical specifications
Drive motor (per motor)
- Input 230 V~ (depending on the model
input 220/240/110 V~) 50/60 Hz 145 W.
- motor 24 V, 75 W.
Maximum continuous operating time:
2 minutes per 20 minutes.
Handset
- Coiled flexible cable 24 V.
- Push buttons to adjust the head support,
back section and foot end of the mesh
base.
Weight (example)
- K2 type 88, dimensions 90 x 200: 37 KG.
Head support motor
- DC motor 24V.
2. Safety instructions
■The K2 mesh base must only be fitted and
connected to the electricity supply by an
Auping specialist.
■The K2 mesh base is only suitable for use
in the home.
■The electrical mesh base has a power-off
switch which switches off the electricity
supply from the mains when no power is
demanded. The power-off switch is in the
plug. When you press one of the control
buttons, the power-off switch automatically
turns the power on. The green light on the
plug indicates that power is being used.
■The K2 mesh base operates on 24 V low-
voltage current.
■Check that the voltage of the transformer is
the same as the mains voltage in the house.
■Adjustable beds have moving parts. Make
sure that your limbs cannot become trapped.
■Only adjust the bed while you are lying on it.
Make sure that no children are under the
bed while it is being adjusted.
■The mesh base is not a toy. Do not allow
children to play with the bed.
■Do not use the bed as a trampoline or
stepladder.
■Disconnect the bed from the power supply
before cleaning. Pull the plug out of the
socket.
■The K2 mesh base is not intended for use
by persons with a psychological complaint
or mental deficiency or children, unless
they have been properly instructed how to
use it and are aware of the risks.
GB13
_006IH_3114 BW.pdf - pag.13 November 9, 2007
LET OP !!! Lage resolutie!
■Use an Auping K2 mesh base in
combination with an Auping mattress.
■Only place the bed in a dry room. In view of
the electrical components it is not
permitted to place the bed in a damp room.
■Make sure that the cables cannot become
trapped. Check this by adjusting the bed
after it has been installed.
■Remove the plug from the socket during a
thunderstorm.
3. Preparing for use
3.1 Components of your mesh base
- Auping K2 mesh base.
- Electric motor with remote control.
3.2 Installing the electric motor
1. The head support motor is already factory-
mounted on the mesh base.
2. Attach the back motor (151747) to the
underside of the mesh with the screw and
locking pin, as shown in the diagrams.
3. Attach the upper leg motor (151748) to the
underside of the mesh with the screw and
locking pin, as shown in the diagrams.
GB14
151747 / 151748
151747 151748
_006IH_3114 BW.pdf - pag.14 November 9, 2007
LET OP !!! Lage resolutie!

4. Insert the plug of the back motor into the
control box at the connection point on the
side (connection point 4).
5. Insert the plug of the upper leg motor into
the control box at connection point 1.
6. Insert the plug of the remote control into
the control box at connection point 2.
7. Insert the plug of the head support into the
control box at connection point 3.
8. Secure the cords underneath the pull relief
on the control box.
9. Insert the plug of the control box into the
wall socket.
3.3 Connecting the head support motor
Connect the coiled flexible cable of the pre-
mounted head support motor to the side of
the electric motor for the back section and
foot end. Lead the cable over the cross bar of
the adjusting mechanism of the back section,
giving the cable enough play to follow the
movement of the back section.
3.4 Attachment of the handset
• In order to easily attach
the handset to the
Auping Auronde and
Next or other bed
model.
• Place the clamp on the
underside of the side
panel of the surround
(see fig. 4).
• Click the handset into
the clamp.
3.5 Position of the legs
Correct placement of the legs is essential for
a correct weight distribution. This means that
the legs must be placed at the distances from
head and foot end of the bed as indicated in
the following illustration (bed seen from
above):
GB15
fig. 4
Hoofdeind (HE)
Voeteneind (VE)
Lengte 190/200 cm: HE 20 cm VE 25 cm
Lengte 210/220 cm: HE 30 cm VE 25 cm
_006IH_3114 BW.pdf - pag.15 November 9, 2007
LET OP !!! Lage resolutie!

3.6 Fitting the mattress
Put your bed in the horizontal position. Put the
mattress on the mesh base and centre it.
Make sure that the five protruding clip-on pins
of the anchors are pushed widthways into the
mesh (see fig. 5).
‘Click’ the anchors into the mesh at the positions
indicated (see fig. 6).
Make sure that the anchors are not directly
above a cross bar.
3.7 Preparing for use
Check that the mesh base can move freely.
Only adjust the mesh base while it is in a horizon-
tal position, securely fixed to the supporting
legs, or to the supports provided within the
bed surround.Check that the mattress is
attached to the mesh base properly.
Check that the mattress is attached to the
mesh base properly. Insert the plug into the
wall socket. The plug has a safety cut-out.
3.8 Tips for use
A new mattress has a certain amount of rigidity,
which will disappear within a few days.
Consequently, your mattress will not optimally
follow the contours of the mesh base when it
is initially adjusted. We therefore recommend
that you lie down on the mattress while adjusting
the positions for the first time.
GB16
fig. 5
fig. 6
_006IH_3114 BW.pdf - pag.16 November 9, 2007
LET OP !!! Lage resolutie!

4. Use
4.1 Electrically adjustable sections
The handset is used to adjust the electrically
adjustable sections (see fig. 7).
1. Raise head support
2. Lower head support
3. Raise back section
4. Lower back section
5. Raise foot end
6. Lower foot end
7. Raise head support, back section
and foot end
8. Lower head support, back section
and foot end
Press one of the 'up' or 'down' buttons, holding
it down until the desired position is reached.
Only one button can be operated at a time.
5. Breakdowns
While an electrical fault may be a nuisance, it
is not dangerous. The motor is fitted with all
necessary safety provisions and has double
insulation.
5.1 Electrical malfunctions
Check that:
- the plug is in the socket;
- the current is switched on at the mains.
5.2 Mechanical malfunctions
Undesirable noises (bed squeaks and creaks)
Unwanted noises are usually caused by moving
parts touching each other.
The reason for this may be a missing part, or
parts that have not been tightened up properly
or have become loose when the bed was
moved.
Check that:
- the bed is properly horizontal;
- the bed is positioned away from the wall;
- there are no unwanted objects in the bed that
should not be there (spoons, forks, pens, etc.).
GB17
fig. 7
_006IH_3114 BW.pdf - pag.17 November 9, 2007
LET OP !!! Lage resolutie!

6. Cleaning and maintenance
Remove stains on the mesh base with a damp
cloth and gentle cleaning agent. Never use a
scouring sponge or scouring agents.
Dust the mesh base and leg frame occasionally.
As part of Auping’s commitment to caring for
the environment all metal parts have a powder
lacquer coating instead of a wet-lacquered
surface. Some of this coating material can
drop off underneath the bed during the first
weeks of use. This is harmless and can easily
be removed.
7. Disposal of packaging
and product
Every year Auping invests in cleaner produc-
tion processes and tries to save the environ-
ment as much as possible by using durable
materials. All mattresses are constructed of
CFC-free materials. The mattress is manufac-
tured in such way that no unnecessary waste
is created. The mesh bases are constructed
of galvanised steel, a material which is excep-
tionally well-suited for recycling.
Removal
Make sure that the mesh base cannot fall open
during transport - by lashing the subframe and
upper frame together, for example. Do not
remove any screws from the mesh base.
Please take care!
When disassembling the head end side of the
motor from the axle whilst the back section is
in a raised position, it may drop down on the
base frame; please let a second person hold it
in position.
Safe waste disposal
The frame of the mesh base is constructed of
a highly sprung tension mesh. Do not saw
through the frame; do not weaken or impair
the frame in any way.
The packaging is made up of cardboard and
polyethylene film (PE). Please dispose of these
materials in a responsible way in accordance
with the regulations of your local authority.
GB18
_006IH_3114 BW.pdf - pag.18 November 9, 2007
LET OP !!! Lage resolutie!
Table of contents
Languages:
Popular Medical Equipment manuals by other brands


Getinge
Getinge Arjohuntleigh Nimbus 3 Professional Instructions for use

Mettler Electronics
Mettler Electronics Sonicator 730 Maintenance manual

Pressalit Care
Pressalit Care R1100 Mounting instruction

Denas MS
Denas MS DENAS-T operating manual

bort medical
bort medical ActiveColor quick guide

AccuVein
AccuVein AV400 user manual


