Cobalt Digital Inc C01-CLASSIC Series User manual

2
Before use, read instructions and follow carefully.
CONTENTS
Page No.:
AIR BAGS
2
ADJUSTMENT
3
OPERATING CASTORS
4
ARM RESTS AND WINGS
5
MEAL TRAY
6
SPECIFICATIONS
7
CLEANING AND DISINFECTION CAUTIONS AND TIPS
7
WARRANTY CARD
8
AIR BAGS
Air bags are inflated in the factory to normal operating pressure, adjust
pressure in air bags to comfort and clinical requirements. Maximum clinical
benefits are achieved with an upper and lower air bag. The level of air in the
air bag/cushion is adjustable by inflation and deflation of the air bag through
the valves. Depending on your chair model, the valves are either located on
the right hand side of the patient under the seat, or has built-in pumps which
can be accessed by lifting two Velcro covers on the right and left sides of the
seat.
On models where there are not built in pumps to adjust pressure: to inflate
and deflate the air bags:
1. Tilt the chair fully backwards and fold away the arm rest.
2. Open Velcro under the seat and pull up cover to gain access to the
air bag valves (see photo above).
3. Remove the cap from the valve, inflate the air bag with the pump or
deflate the air bag by squeezing the valve.
A
I
R
B
A
G
S

3
4. Depress the valve and pull back cover, closing the Velcro under the
seat, and ensuring the cover is fitted snuggly to the chair.
On models where there are air bags in both the backrest and seat area of the
chair, these are inflated using the convenient built-in pumps.
1. The pump for the backrest air bag can be accessed by folding away
the right side-wing, and opening the Velcro strap, halfway up the side
of the chair (below, left image)
Upper Air bag
Lower Air bag
A
I
R
B
A
G
S
AIR BAGS

4
2. The pump for the seat air bag can be accessed by folding down the left
hand side-wing, and opening the Velcro strap near the middle of the
chair (above, right image).
3. For both the back rest and seat, to increase the pressure of the air bag,
squeeze the pump to let in more air. Ensure that the metal hand screw
is tightened so that air does not escape.
4. To reduce the pressure of either air bag, loosen the hand screw that is
attached to the pump, and apply pressure to the air bag by placing your
hand on the seat and applying some gentle pressure. Once the airbag
has attained the desired pressure, tighten the hand screw again.
5. You may need to adjust this several times to ensure that the pressure
meets desired comfort and clinical needs.
A
I
R
B
A
G
S
AIR BAGS

5
A
D
J
U
S
T
M
E
N
T
ADJUSTMENT
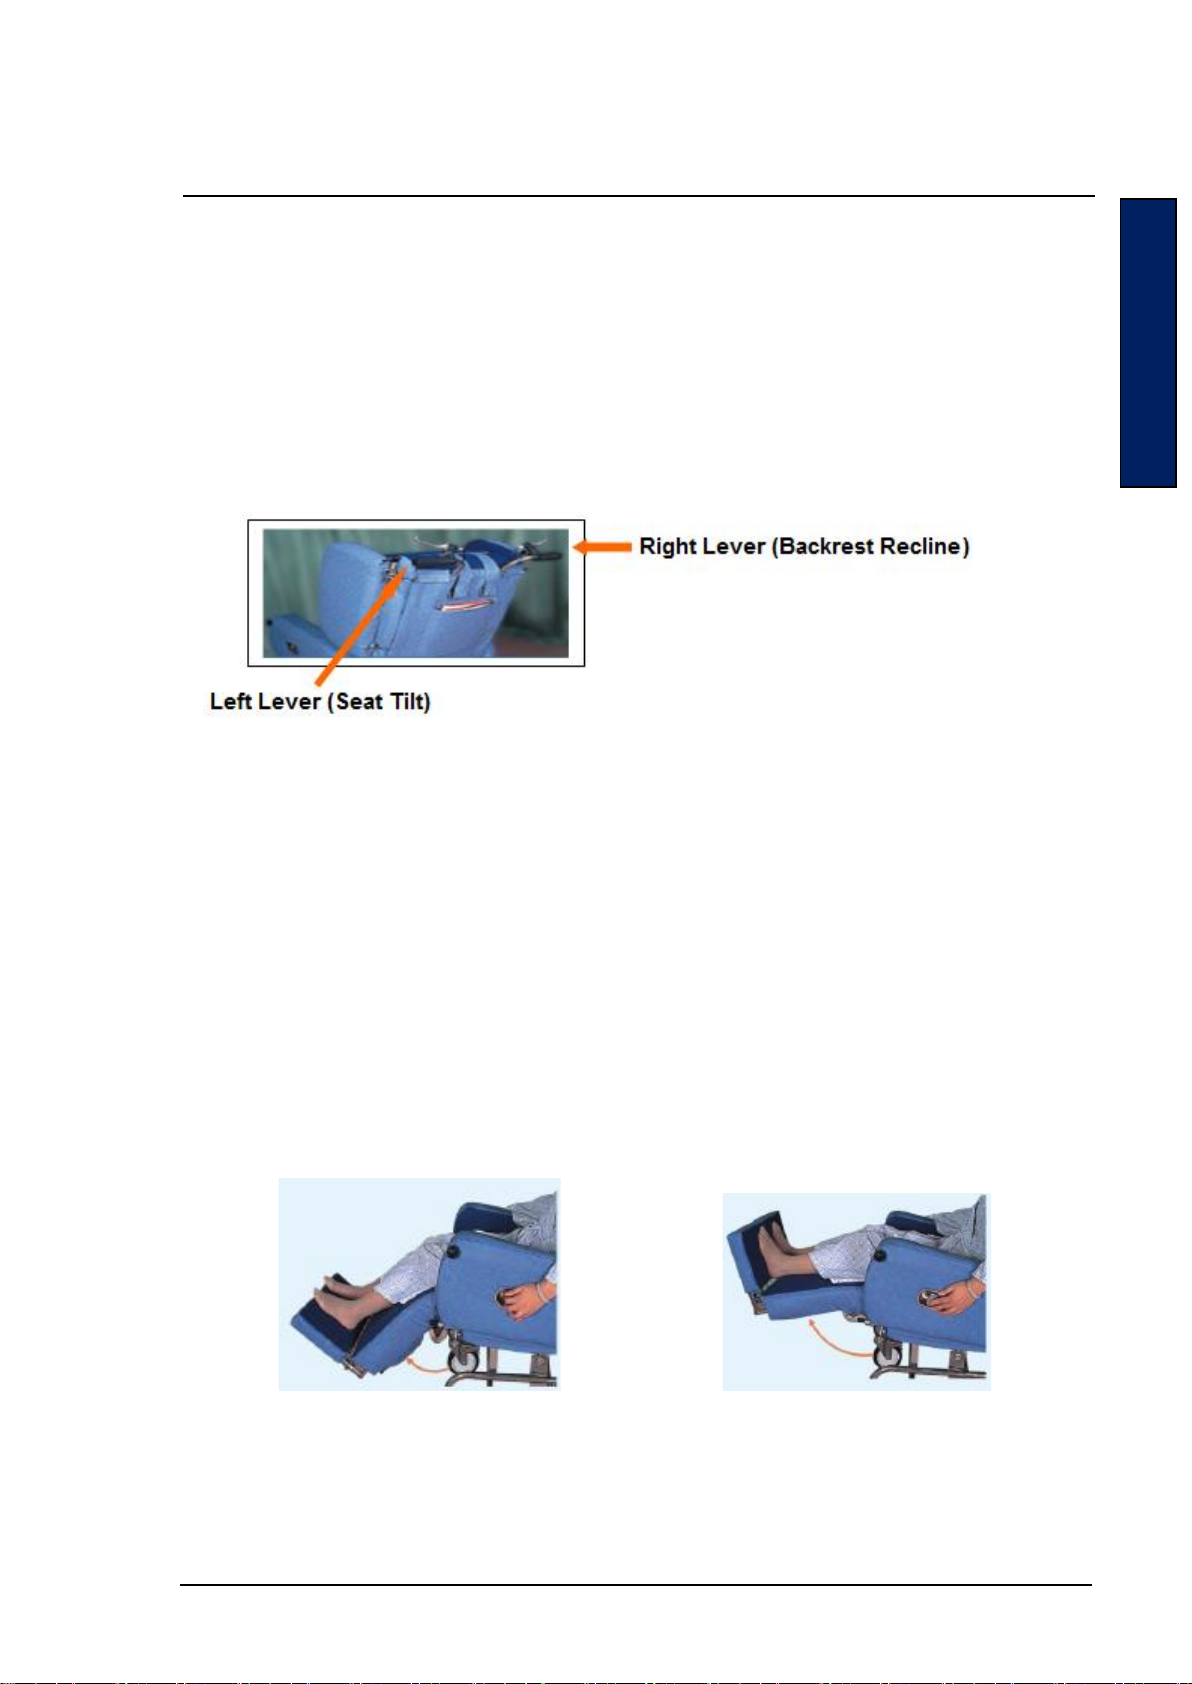
1. Seat Adjustment and Tilt
The whole seat can be tilted by 17degrees. To adjust the seat tilt, push and
hold the lever for tilt (on right hand side of the operator), position the seat at
the ideal level of tilt and release the lever. See photo below:
2. Backrest Adjustment –Recline
The backrest can be reclined by 39 degrees, between 97degreesto 136
degrees. To adjust the backrest, push and hold the lever for reclining (on left
hand side of the operator), move the backrest to the ideal level and release
the lever. See photo above.
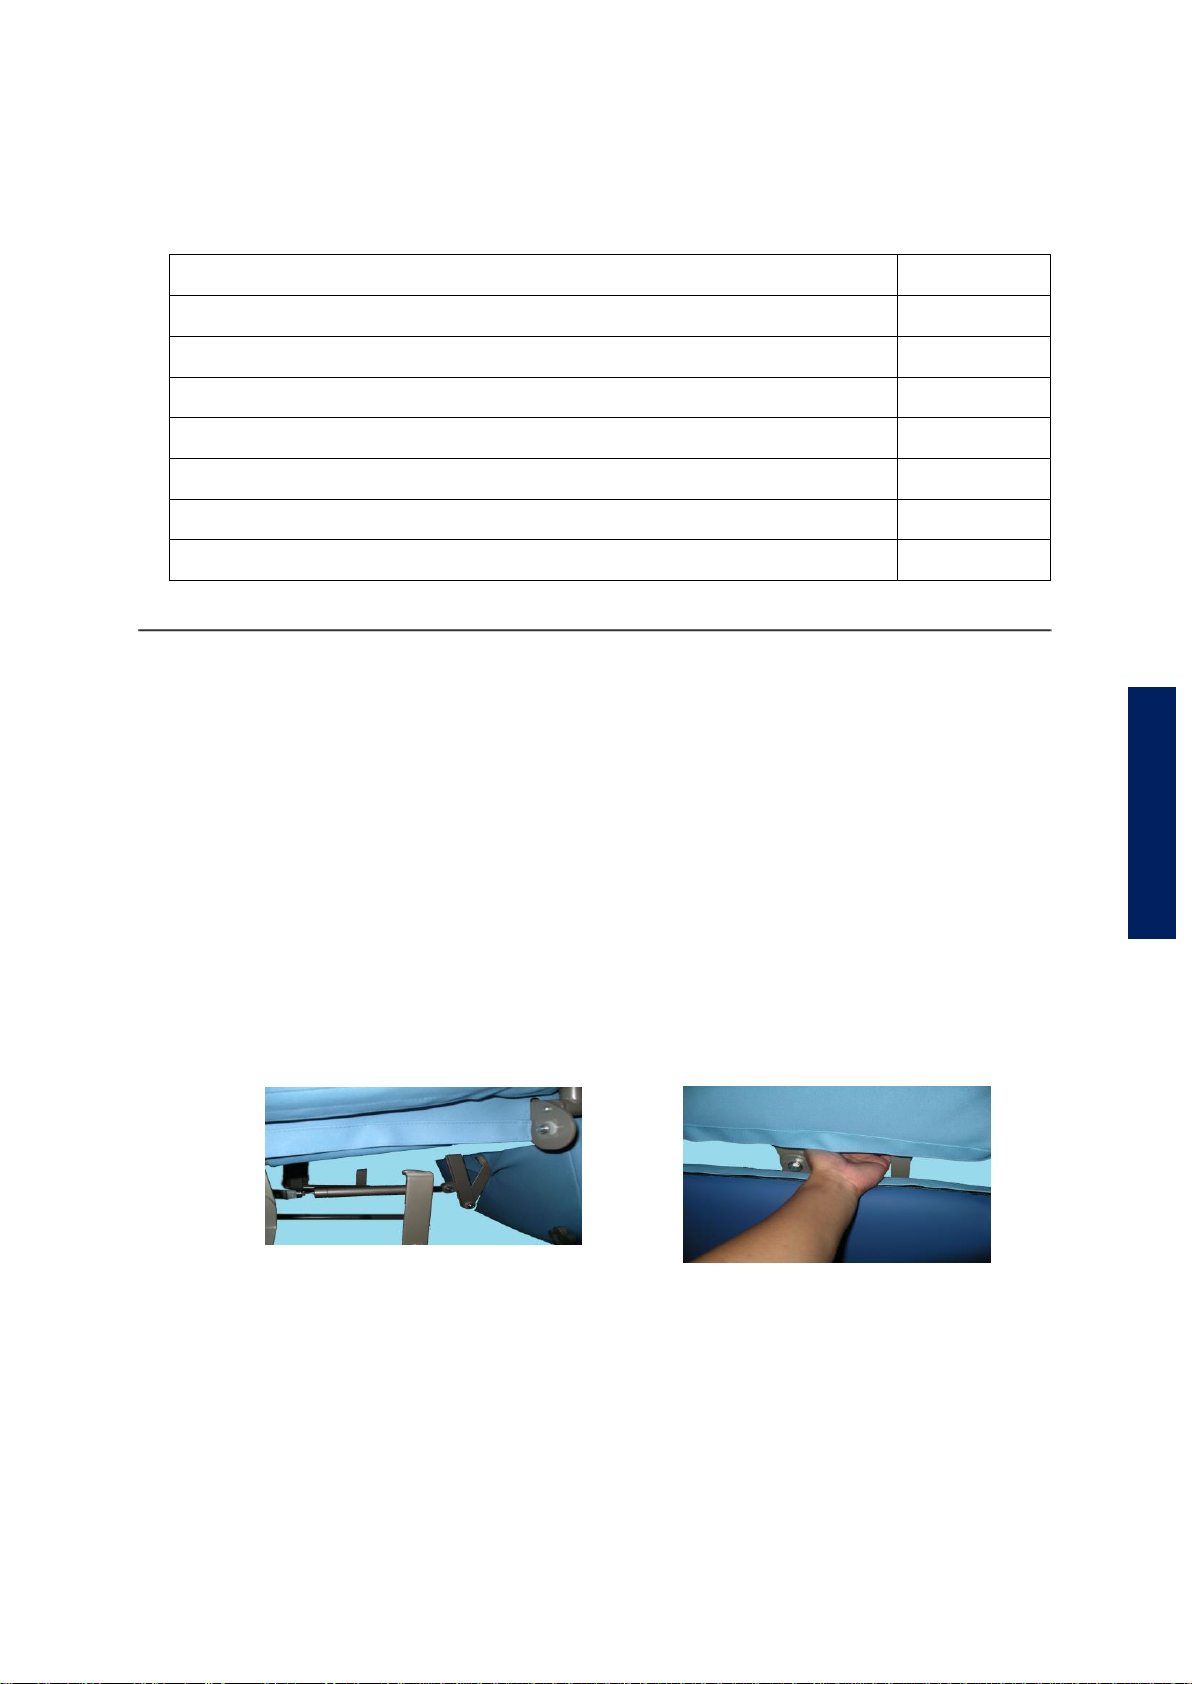
3. Leg Rest Adjustment - Elevating
To elevate the leg rest, pull the trigger and position the leg rest at the ideal
level, then release the trigger. To lower the leg rest, pull the trigger and push
the leg rest to the ideal elevation/height and release the trigger.
To lengthen leg rest, elevate leg rest to the highest position, release the hand
screws under the leg rest, and extend the foot rests to desired length.
4. Bed Extension

6
O
P
E
R
A
T
I
N
G
C
A
S
T
O
R
S
OPERATING CASTORS
Castor with Total Lock
The total lock function includes a brake and prevents swiveling of the castor.
Following illustrations show a castor with total lock at locked and unlocked
position:
Castor with Directional Lock –right rear
To lock the directional castor, press the lock as shown in following photos
and push the chair forward. The castor will lock in the straight direction. To
unlock the directional castor, press the unlock button above the lock button.
Unlocked Position
To lock press lock button
To unlock press unlock button.
Locked Position
Castor Locked
Locking the Castor
Unlocking the Castor
Lock Button
Unlock Button
OPERATING CASTORS

7
A
R
M
R
E
S
T
S
A
N
D
W
I
N
G
S
ARM RESTS AND WINGS
ARM RESTS
The arm rests can be folded away and detached. To fold away the arm rest, pull
the pin outwards and fold the arm rest away from the seat. To detach the arm rest,
undo the two bolts which connect the arm rest with the seat.
WINGS ON THE BACK REST
The position of the wings on back rest can be adjusted as following:
To detach a wing, undo the two bolts which
connect the wing to the back rest.
To adjust the position of the wing, pull
the pin outwards and lock the pin at
the ideal position.

8
M
E
A
L
T
R
A
Y
MEAL TRAY
•To install the meal tray, insert the arms into meal tray inserts as shown in the
photo and fastened both hand screws.
•To store the meal tray, take the tray off tray holders and insert the arms into
the storage ring & meal tray holder as shown in the photo. Fasten the hand
screw to the arm rest on right hand side of the resident.
Fasten the hand screws on
both sides.
Storage rings
Fasten this hand screw

9
Air Chair Classic
PRODUCT CODE:C01-CLASSIC-XXX (XXX = COLOUR)
AIR CHAIR WEIGHT:50 KG
INCLUDED ACCESSORIES:Meal Tray, Pillow, Foot Rests
Measurement
Seat Measurement (Internal)
Chair Measurement
(Overall)
Width
Height
Depth
Depth
Height
Width
mm
520
640
600
1350
1300
660
Reclining
Foot Rest
Tilt
SWL
97°~136°
0°~90°
0°~17°
150KG
Air Chair Active
PRODUCT CODE:C01-ACTIVE-XXX (XXX = COLOUR)
AIR CHAIR WEIGHT:50 KG
INCLUDED ACCESSORIES:Carilex Mattress, Pump, Case & Charger;
Meal Tray, Pillow, Foot Rests
Measurement
Seat Measurement (Internal)
Chair Measurement
(Overall)
Width
Height
Depth
Depth
Height
Width
mm
520
640
600
1350
1300
660
Reclining
Foot Rest
Tilt
SWL
97°~136°
0°~90°
0°~17°
150KG
Air Chair Slimline
PRODUCT CODE:C01-SLIMLINE-XXX (XXX = COLOUR)
AIR CHAIR WEIGHT:50 KG
INCLUDED ACCESSORIES:Meal Tray, Pillow, Foot Rests
Measurement
Seat Measurement (Internal)
Chair Measurement
(Overall)
Width
Height
Depth
Depth
Height
Width
mm
440
660
560
1350
1300
600
Reclining
Foot Rest
Tilt
SWL
97°~136°
0°~90°
0°~17°
150KG
S
P
E
C
I
F
I
C
A
T
I
O
N
S
SPECIFICATIONS

10
Air Chair Bariatric
PRODUCT CODE:C01-BARIATRIC-XXX (XXX = COLOUR)
AIR CHAIR WEIGHT:60 KG
INCLUDED ACCESSORIES:Meal Tray, Pillow, Foot Rests
Measurement
Seat Measurement (Internal)
Chair Measurement
(Overall)
Width
Height
Depth
Depth
Height
Width
mm
600
630
600
1480
1300
760
Reclining
Foot Rest
Tilt
SWL
97°~136°
0°~90°
0°~17°
200KG
C
L
E
A
N
I
N
G
A
N
D
D
I
S
I
N
F
E
C
T
I
O
N
CLEANING AND DISINFECTION
1. CLEANING OF AIR CHAIR
Hand wash with cloth or brush using cleansing agent and disinfectants. Dry after
cleaning.
DO NOT USE SOVENT TO CLEAN THE FABRIC.
DO NOT UNDO THE COVER WHILE CLEANING.
CAUTIONS AND TIPS
1. Ensure the castor brakes are fully engaged before seating or removing
patient.
2. Keep patient and operator clear of all moving parts.
3. Ensure entrapment does not occur during adjustment.
4. Washing Temperature up to 95°C
5. Don’t wring or mangle
6. After each wash course dry (Drying Cabinet)
7. Cleaning by 75% ethyl alcohol or PH 7 detergent washing

11
COBALT HEALTH WARRANTY CARD
Air Chair
Please retain this Warranty Card and Invoice as proof of purchase. These documents must be presented in
the event of making a claim under the following terms. A copy of the completed Warranty Card should be
posted or emailed to Cobalt Health at the below PO Box address or email address prior to a warranty service
being completed.
PURCHASER’S NAME
ADDRESS
POST CODE
PRODUCT NAME: AIR CHAIR
PRODUCT CODE: SERIAL NO.:
DATE OF INVOICE: INVOICE NO.:
DISTRIBUTOR:
AUTHORIZED SERVICE CENTER:
TERMS OF WARRANTY (AIR CHAIR)
3 YEARS WARRANTY ON FRAME
1 YEAR WARRANTY ON UPHOLSTERY AND STRUT
Should a defect in this due to either FAULTY MATERIAL or WORKMANSHIP become apparent within the
above period from the date of delivery of the product, such defect will be rectified by the authorized service
center, without cost to you for either labor or material, at the premise of the distributor or facility, subject to:
1. The Warranty being rendered invalid if the product is misused or if any unauthorized alteration,
modification, or substitution of any part of the product be made or the serial number is lost or altered.
2. Cost of transportation both ways to and from the authorized service center being met by the owner if
returning the product or any part to the authorized service center is necessary.
3. All (a) damage resulting from incorrect installation or use other than in accordance with the operating
instructions issued by the manufacturer (b) consequential damage, being excluded from this warranty.
4. A charge being accepted by the owner for traveling expenses incurred in connection with warranty
services at the user’s premises.
IMPORTANT NOTICE
1. Warranty starts from the date of delivery.
2. If the product or any parts returned to the authorized service center for any cause not covered by this
warranty, all costs involved, must be paid to the authorized service center.
3. Changes not covered by the term of this warranty must be borne by the owner. Such charges may
arise through the cost of any service call where (a) the product is found to be in incorrectly installed,
misuse of user controls, or failure to follow operating instructions.
Manufactured By:
Cobalt Health
Unit 34/9 Salisbury Road Castle Hill NSW 2154
PO Box 502, Beecroft, NSW, 2119
Tel: 02 8853 1100 Fax: 02 8850 0114
www.cobalthealth.com.au
SP
This manual suits for next models
3
Table of contents