manuals.online logo
Brands
  1. Home
  2. •
  3. Brands
  4. •
  5. Cobra
  6. •
  7. Plumbing Product
  8. •
  9. Cobra EL-1000 User manual

Cobra EL-1000 User manual

EL-1000
COBRA ELECTRONIC
TOUCH FREE TAP
INSTRUCTION MANUAL
MAINTENANCE
Whilst modern plating techniques are used in the manufacture of this
product, the surface will be affected if cleaned incorrectly.
Surfaces should be maintained using a clean damp cloth, no
abrasive agents or materials should be used or come into contact
with the surface finish, if this happens, it will invalidate your warranty.
Please read the instructions carefully before installation
Using its micro-computer controller, the tap self adjusts to the best detection
zone.
This
LIXIL Africa reserves the right to update the technology used in this product
when necessary without prior notice.
touch free tap
When your hands enter the sensing range, the indicator light in the
sensor window will illuminate, and water will start flowing out the
spout and will stop as soon as your hands are moved out of sensing range.
Water flow automatically stops after 70 seconds to avoid water wastage.
If more water is required, remove your hands from sensing range for 4
seconds and present them back within sensing range to restart water flow.
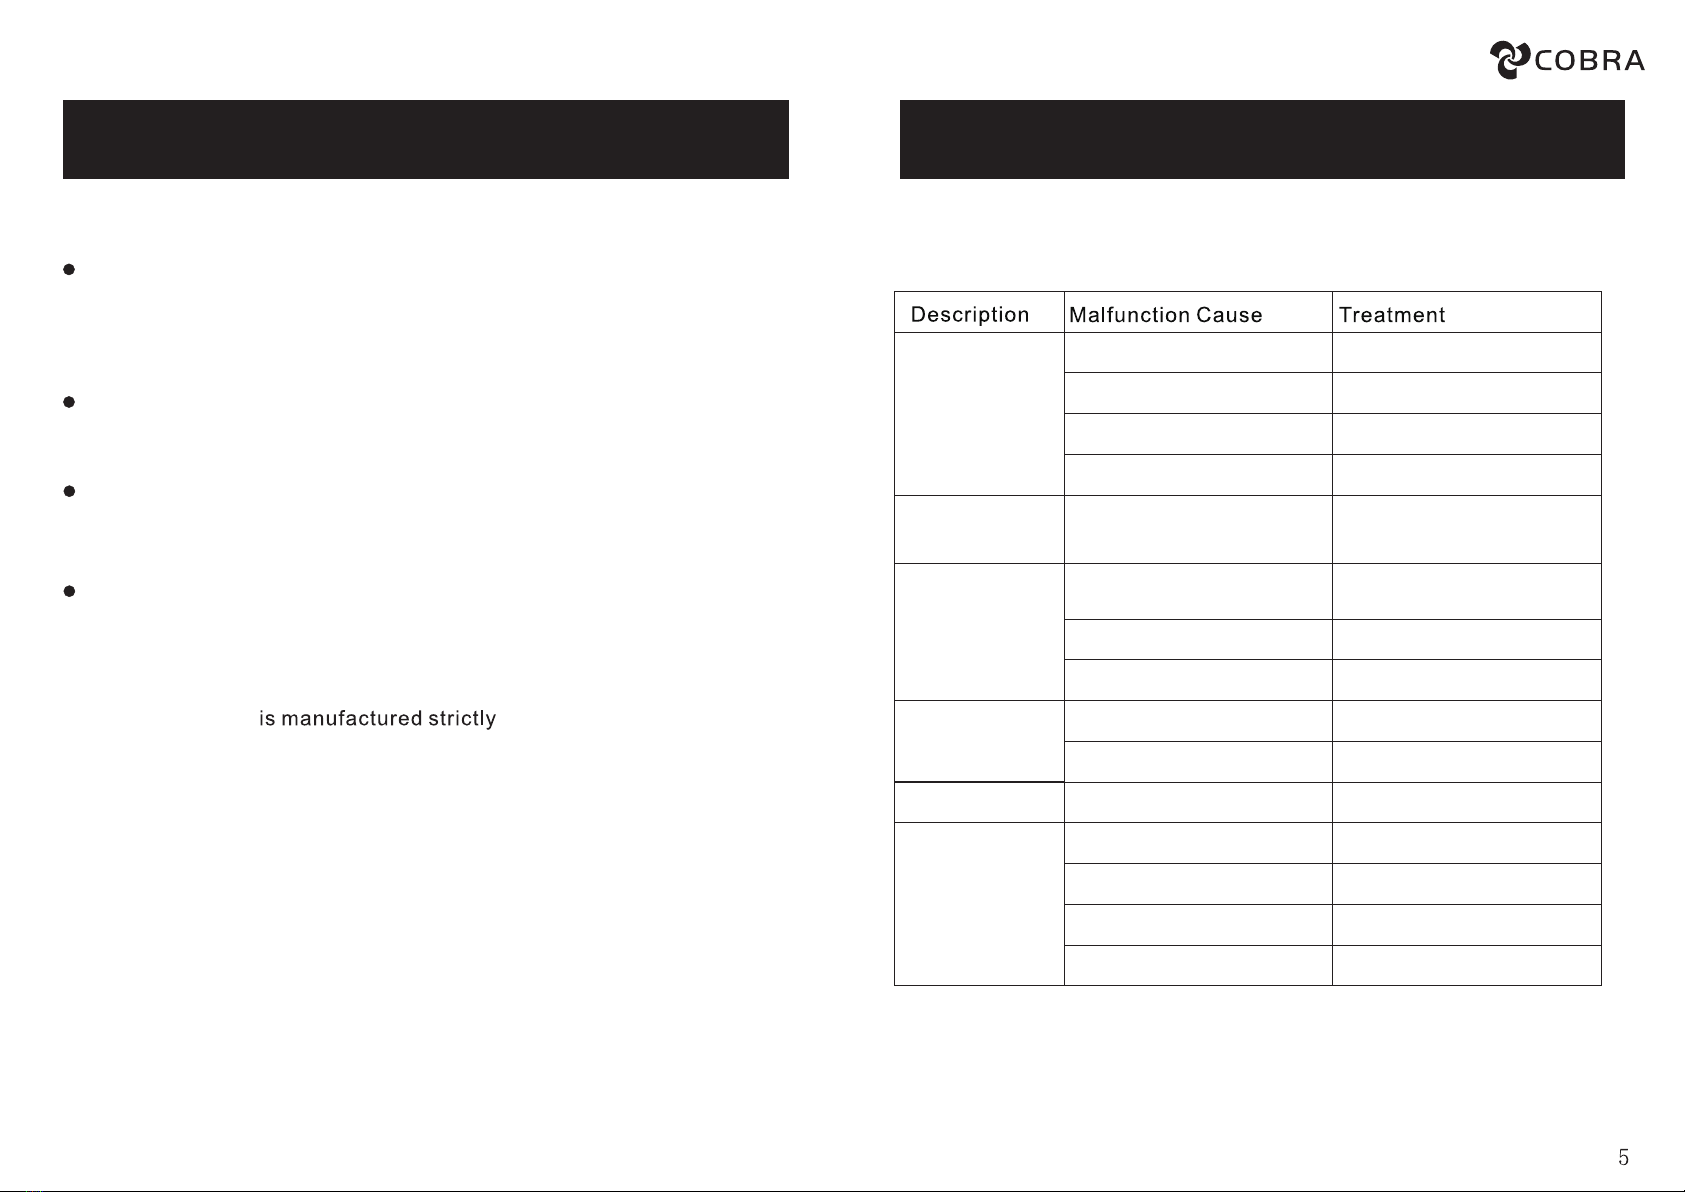
Raise the water pressure.
Adjust water supply.
Change the battery.
Change the batteries.Batteries are exhausted.
Check the battery connection.
Check water supply.
Clean the filter.
Clean the filter.
Adjust water supply.
Adjust water pressure.
Change to 4AA alkaline batteries.
Change the light or circuitry board.
Dry out the circuit board and or
signal line.
The circuitry board is wet or signal
line is wet.
Water supply is restricted by stop
valve or other system restrictions.
Water pressure is too low.
Dirt in the filter.
Water supply cut off.
The battery is exhausted (DC item).
Poor battery connection.
The light is broken.
Incorrect batteries.
Water pressure is too high.
Water supply is too high.
Water pressure is too low.
The filter is dirty.
Touch free activation to avoid surface contact.
Dirt on sensor window or
obstruction within sensor range.
Remove obstruction or dirt on
sensor window.
No water out.
Water will not turn off.
Too little water flow.
Excessive water flow.
Short cycles of battery.
The indicator light is
not illuminated.
AUTOMATIC WASTAGE PROTECTION
INTELLIGENT
HYGIENIC
WATER SAVING
to ISO9001 standards.
TROUBLESHOOTINGPRODUCT FEATURES
1. Screw flexible hose into tap body.
2. Screw in fixing bolts.
3. Insert rubber washer.
4. Place tap on basin and secure position using horseshoe washers and nuts.
5 & 6. Open control box and install 4 x AA batteries.
7. Install control box (using plugs and screws provided) close to the tap to
ensure it can be connected to the tap using the flexible hose.
8. Plug mainframe connector from tap into the socket on the control box,
screw on tightly.
9. Connect flexible hose from tap to control box (out).
10. Connect control box (in) to water supply.
11. Turn on water supply and test for any leaks.
Model No.
EL-1000
G1/2Inlet diameter
DC:6V(4AA alkaline batteries)
0.05MPa~0.8MPa
Power supply
Water pressure
Static power
consumption
Sensor
distance
28±10% cm(To white board)
Water
temperature
INSTALLATION STEPS TECHNICAL SPECIFICATION
Tap Body
A. Plastic Control Box
B. Mainframe Connector Socket
C. Water Inlet (with Filter)
D. Water Outlet
A. Flexible Hose
B. Water Inlet Flexible Hose (not included)
C. Fixing Bolt with Nut
D. Rubber Horseshoe
E. Brass Horseshoe
F. Plastic Wall Plug
G. Screw
COMPONENT DESCRIPTION
Always flush pipework before installation.
Kindly ensure the light in the desired installation location is not
abnormally intense as this may cause false activation.
INSTALLATION MAP
These taps are designed for indoor installation only

Popular Plumbing Product manuals by other brands

Kalia KURVE KF1267 Installation instructions / warranty

Kalia

Kalia KURVE KF1267 Installation instructions / warranty

DANIEL RUBINETTERIE ISTR038R instruction manual

DANIEL RUBINETTERIE

DANIEL RUBINETTERIE ISTR038R instruction manual

Hans Grohe AXOR Citterio Select 39863 Series Instructions for use/assembly instructions

Hans Grohe

Hans Grohe AXOR Citterio Select 39863 Series Instructions for use/assembly instructions

KWC DIVO-ARCO 10.041.013 Specifications

KWC

KWC DIVO-ARCO 10.041.013 Specifications

Bradley S19-120FMBF Installation

Bradley

Bradley S19-120FMBF Installation

Hans Grohe Vivenis 250 75040 Series Instructions for use/assembly instructions

Hans Grohe

Hans Grohe Vivenis 250 75040 Series Instructions for use/assembly instructions

Elkay LK133 Installation & owner's manual

Elkay

Elkay LK133 Installation & owner's manual

Franke F5SV1001 Installation and operating instructions

Franke

Franke F5SV1001 Installation and operating instructions

PHARO Shower Panels EL 40 Specifications

PHARO

PHARO Shower Panels EL 40 Specifications

Brizo Vettis 68488-BL installation instructions

Brizo

Brizo Vettis 68488-BL installation instructions

Hans Grohe Metris S Instructions for use and assembly

Hans Grohe

Hans Grohe Metris S Instructions for use and assembly

Helvex H201-EB-THD installation guide

Helvex

Helvex H201-EB-THD installation guide

KEUCO IXMO 59511 011100 Instructions for use

KEUCO

KEUCO IXMO 59511 011100 Instructions for use

ASI EZ FILL Installation and maintenance guide

ASI

ASI EZ FILL Installation and maintenance guide

Wickes 217-005 Nstallation instructions

Wickes

Wickes 217-005 Nstallation instructions

Kohler Parallel T23492-4-CP installation guide

Kohler

Kohler Parallel T23492-4-CP installation guide

Allen + Roth CAMERON 42MB installation manual

Allen + Roth

Allen + Roth CAMERON 42MB installation manual

Grohe Allure Brilliant 20 342 manual

Grohe

Grohe Allure Brilliant 20 342 manual

manuals.online logo
manuals.online logoBrands
  • About & Mission
  • Contact us
  • Privacy Policy
  • Terms and Conditions

Copyright 2025 Manuals.Online. All Rights Reserved.