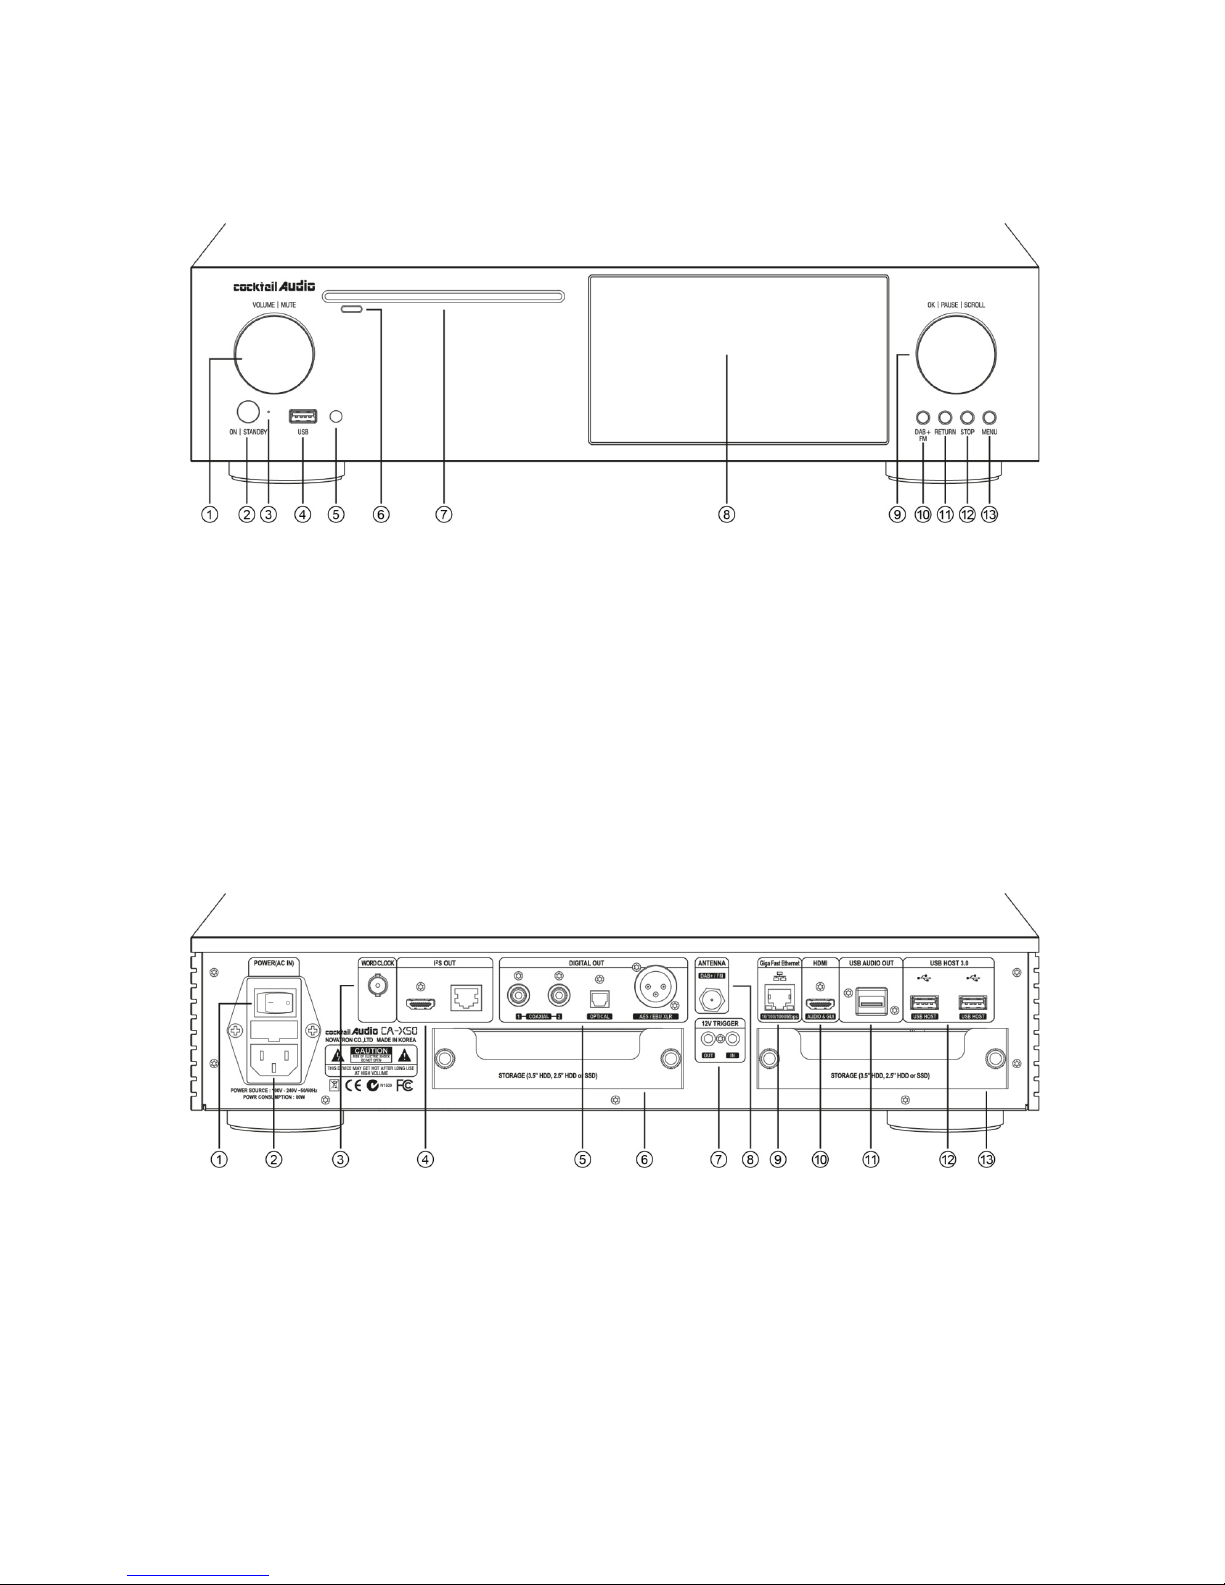
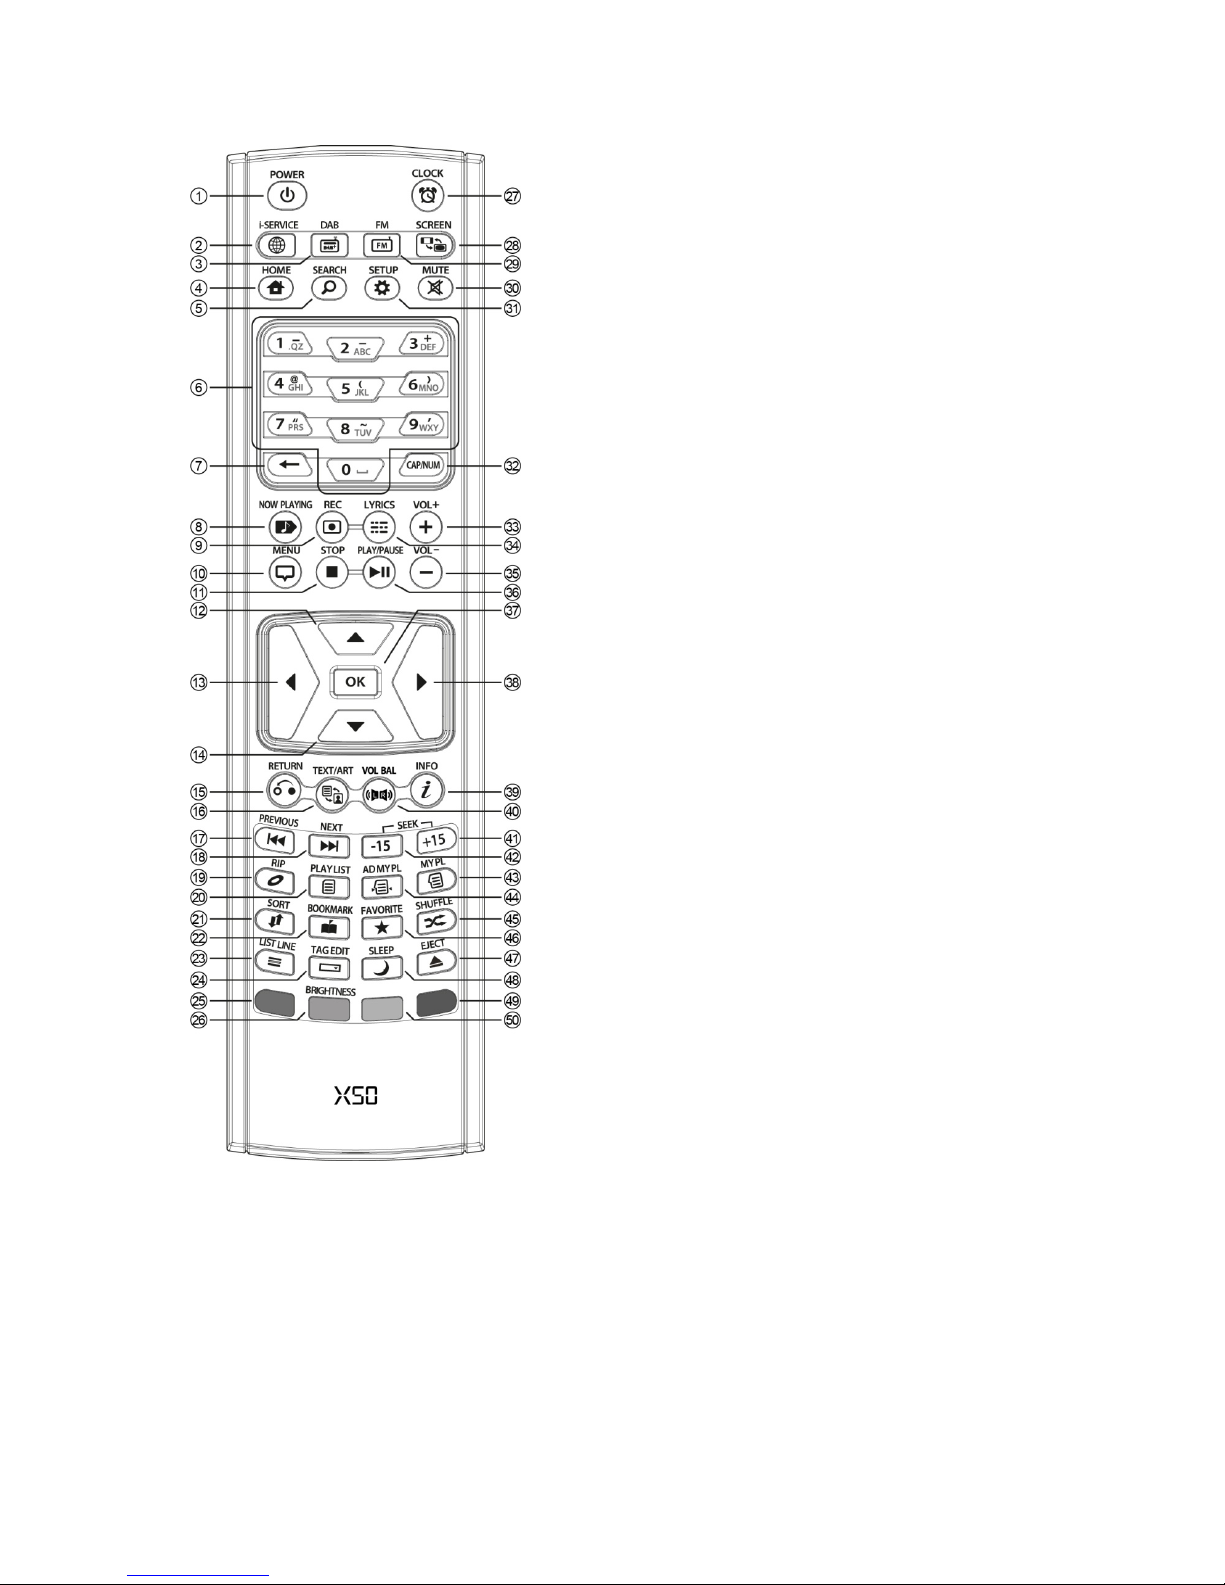
CocktailAudio X50 User manual

1
Rev1.0 English

2
Contents
Important safety instructions ……………………………………………………………………………………………………… 7
1. Product overview …………………………………………………………………………………………………………. 9
1-1. Front view ………………………………………………………………………………………………………………. 9
1-2. Rear view ………………………………………………………………………………………………….……………. 9
1-3. View of remote control and key function ……………………………………………………………..10
2. Prepare ……………………………………………………………………………………………………………….…….…… 11
2-1. Check the contents of X50 package …………………………………………………………….……….. 11
2-2. Install AAA batteries into the remote controller ………………….……………………….………. 11
2-3. Optional items, WiFi USB dongle …………………......................................................................... 11
2-4. X50 purchased without storage …….………………………………………………….……..……………. 12
2-4-1. HDD installation ……………………………………………………………………………..…………… 12
2-4-2. HDD Format …………………………………………………………….………………………..…………. 12
2-5. X50 purchased with an internal storage installed …………….…..………….……………..……. 12
2-6. HDD Installation for non-RAID system or RAID system .................................................... 12
2-6-1. How to connect for non-RAID system ......................................................................... 13
2-6-2. How to connect for RAID system ................................................................................... 14
2-6-2-1. Cable connection for RAID system ................................................................ 14
2-6-2-2. Switch settings for RAID mode ....................................................................... .14
2-6-2-3. Explanation for each mode of RAID ............................................................... 15
3. Turn ON and Start ……………………………………………………………………..………….…..…………………. 16
3-1. Wizard Setup (Setup Assistant) …………………………………………….…….…….…...………………..16
3-2. Turn ON for normal use ……………………………………………………….….…….………..……………….16
4. SETUP …………………………………………………………………………………………….………………………………. 17
4-1. Music DB ……………………………………………………………………….…….……………………...……………17
4-1-1. Display Mode …………………………………………………….…….………………………....……….….17
4-1-2. Album View …………………………………………………………….….…………..……….…....…….…..17
4-1-3. Track Numbering ……………………………………………………………………………………………. 18
4-1-4. Storage for Music DB ………………………………………………..……..……..……….……….…….18
4-1-5. Recovery ………………………………………………………………………..………………….…….....……18
4-1-5-1. How to run Music DB Recovery function ……………………..………..……...….19
4-1-5-2. Music DB Recovery run …………………………………….…..……….……..….…….….19
4-1-5-3. To create ‘Recovery MM-DD hh-mm’ folder automatically
On HDD(or USB) ………………………………………………………………………..……….19
4-1-5-4. Importing files from the ‘Recovery’ folder to the Music DB again….. 20
4-1-5-5. To clear the list on Recovery result ……………………………….….......………….20
4-1-6. Backup …………………………………………………………………………………..….………....…..….… 20
4-1-6-1. How to do Backup ................................................................................................... 20

3
4-1-6-2. How to check backup progress and result ................................................ 22
4-1-6-3. How to stop backup ............................................................................................. 22
4-1-7. Restore …………………………………………………………………………………………….…..………..18
4-1-8. MusicDB Integrity Check ..................................................................................................... 23
4-2. CD Ripping ……………………………………………………………………………………………………………. 23
4-2-1. Bit Rate and Quality …………………………………………………………………………………….. 23
4-2-2. Audio Format (Audio Rip Format) ……………………..………………………….…………….. 24
4-2-3. FreeDB TextCode ………………………………………………………………………………………….. 24
4-2-4. FreeDB Install ……………………………………………………………………………………………….. 25
4-2-5. FreeDB Update ……………………………………………………………………………………………... 25
4-2-6. FreeDB Delete ........................................................................................................................... 25
4-3. Audio ………………………………………………………………………………………………………………………20
4-3-1. Player View………………………………………………………………………………..……………………..21
4-3-2. USB/HDMI Audio Out.......................................... ……………………………….…………………..26
4-3-3. DSD Native ...............................................................…………………………………..…….…………27
4-3-4. Digital Out Volume …………..……………………………………………………….……….…………..27
4-3-5. Digital Out ………………….…………………………………………………………………………………. 27
4-3-6. ON/OFF for each digital output(AES/EBU, SPDIF, I²S out) ..........……..……………. 27
4-3-7. DSD via I²S Out.........………………………………………………….………………..……........……… 28
4-3-8. Gapless Play ……………………………………………………………………………….….………………28
4-3-9. Slide Show Effect ………………………………………………………………………………………….. 28
4-3-10. Slide Show Time …………………………………………………………………………………………. 28
4-4. Network ……………………………………………………………………….………………….….….………………. 29
4-4-1. Wired Setup …………………………………………………….………………………..….……………….. 29
4-4-1-1. DHCP (Auto IP) ………………………………………………………………………………….. 29
4-4-1-2. Static IP ……………………………………………….………………………………………..…… 29
4-4-2. Wireless Setup ………………………………………………….….………………….………………………30
4-4-2-1. Open SSID …………………………………………………………………………………………. 30
4-4-2-2. Hidden SSID ………………………………………………………………………………………. 30
4-4-2-3. WiFi Repeater Roaming function ........................................................................ 31
4-4-3. Network Info …………………………………………………….…………………………………………….31
4-4-4. Wireless Info …………………………………………………….……………………………………………..31
4-4-5. Wake ON LAN ............................................................................................................................31
4-5. Network Service …………………………………………………….…..……………………………………………31
4-5-1. Samba Server …………………………………………….………………………….……………………….32
4-5-2. Network Sharing (Samba Client) ……………….………………………….……………………….32
4-5-3. Web Server ………………………………………………….……………………….……..………………….34
4-5-3-1. How to enable Web Server ………………….……………….….….………………………34
4-5-3-2. How to start WebInterface …………………………………..………………………..…….35
4-5-4. UPnP Server ……………………………………………………..……………..………………………..…….36

4
4-5-5. FTP Server …………………………………………………………………….….…………………….………37
4-5-6. Shareplay(Airplay) ..................................................................................................................... 37
4-6. Internet Service ……………………………………………………….………….….…………………..……..…….37
4-7. System ……………………………………………………………………………….…….………………..…………… 38
4-7-1. OSD Language ………………………………………….………………..….……………….…..………… 38
4-7-2. Auto Play ………………………………………………………………….…………………………..……..... 38
4-7-3. Resume Play ……………………………………………………………..…..…………...…………..….….. 38
4-7-4. Play in Browser .......................................................................................................................... 39
4-7-5. Factory Reset ……………………………..……………………………..……...……..….……………..….. 39
4-7-6. HDD Sleep ………………………………………………………………..…………..………………………. 39
4-7-7. Format Storage ……………………………………………………..…….……..…………………………..40
4-7-8. File System Fix ……………………………………………………………….…….……………….….…40
4-7-9. Brightness ……..……………………………………………………………….….....….………….….…….. 40
4-7-10. Alarm …………………………………………………………………………….…….…………………………41
4-7-11. Auto Shutdown ………………………………………………………..……..….………………………...41
4-7-12. Scroll Speed …………………………………………………………….…..……..……………………….. 42
4-7-13. List Line Count ……………………………………………………….…….…..…………………………. 42
4-7-14. User Front ...................................................................................................................................43
4-8. Time …………………………………………………………….………………………..…..….…..…….………………. 43
4-8-1. Time Format ……………….………………………………………….…………….…..……....……………. 43
4-8-2. Time Set (Internet) …………………………………………………………….…...………….………….. 43
4-8-3. Time Set (Manually) ….………………………………………………..….…..…..…..….....………….. 44
4-9. Firmware ……………………………………………………………………………..……….....……….……………….44
4-9-1. Current Firmware ………………………………………………………….……...….……….…....……….44
4-9-2. Update manually (Firmware update manually) …………..………..……...……..…..……..44
4-9-3. Update automatically (Automatic Firmware Update by network) ….….…………..45
4-9-4. What is Automatic Firmware Update by network ? …………………..…………….…….45
4-9-5. Check now for new firmware ………………………………………………………………..………. 46
5. What is the CD Database(MusicDB) of X50 ………......……..………….……………..……………….… 46
6. CD Loading (Ripping) ………………………………………………………………………...………..…….………….. 46
6-1. When the X50 is connected to network (Internet)…………….………….….……….……………. 46
6-1-1. Ripping All ……………………………………………………………………………….…….…...…………… 47
6-1-2. Ripping Track ………………………………………………………………………….….…...………………. 48
6-2. In the case that X50 is NOT connected to network (Internet) ……..…..….…….….…..…… 49
6-2-1. Ripping All ……………………………………………………………………………………..….….…..…….. 50
6-2-2. Ripping Track ………………………………………………………………………….….……….….…..…… 51
6-3. If the FreeDB is installed onto the hard disk of the X50…………………………..…..……..….. 51
6-4. To check the status of CD ripping and converting………………….……….…..…..……...…..….. 51
7. How to use the Music DB(database)…………………………………………………..……..…..……..…….… 52
7-1. Play music loaded (ripped) onto the X50.…………………………..………..………..…...….….…….. 52

5
7-2. SEARCH function ………………………………………………………………………..……….…...…..………….. 54
7-3. How to manage Music DB ……………………………………………………..……………………..…..…..… 54
7-3-1. Deleting or renaming music in the Music DB…………………..…..…..……..……..………. 54
7-3-2. Cover Art ......................................................................................................................................... 55
7-3-3. Album Edit for Multi-Album .................................................................................................. 55
7-3-4. How to export music from the Music DB to other storage devices……….....……56
7-3-5. Creating .M3U and .PLS files when exporting ............................................................... 57
7-3-6. History function ………………………………….…………………………………………....………………52
7-3-7. Unconverted song(s) ................................................................................................................. 58
7-3-8. Set ‘Playing Section’ to play it repeatedly …………………………………….….……………. 58
8. Editing the TAG information of the music in the Music DB…………..…....…...…….…...…….. 58
9. Audio CD direct play ………………………………………….……………….……………..………...….…...….…….. 58
9-1. If the X50 is connected to a network (Internet)………………….…………….....………...….….…. 58
9-2. If the X50 is NOT connected to network (Internet) ……………………....….……….......……..… 60
9-3. In case that you have installed the FreeDB data onto the
hard disk of the X50 ……………………………………………………………………………….….…..…...…....……. 60
10. Data CD direct play ………………………………………………………………….…………….….…………..…...…. 60
11. Playlist ………………………………………………………….…………………….……………….....……....…..…….….. 61
11-1. Playlist …………………………………………………………….……………………………..………….….……….…61
11-1-1. How to make a Playlist ………………………………………………………..………..….……….……61
11-1-2. How to add songs to a Playlist whilst playing music …………….….……..………..….62
11-1-3. Shortcut to add song(s) in MusicDB to existing playlist .........................................63
11-1-4. How to play a Playlist …………………………………………………………………..……….……….63
11-1-5. How to change song position in a Playlist …………………………...…..….………..…..….64
11-1-6. How to edit a Playlist ……………………………………………………………….….……...….…..….64
11-2. My Playlist (Virtual Playlist)………………………………………………………….…….………..……..…… 64
11-3. Advanced My Playlist (Virtual Playlist) ………………….….…………....….……….……..………..…. 64
12. The Music Streaming function ………….………………………….……………...…..………….....…..………... 65
12-1. UPnP Server/Client and Samba Server/Client function …………..……….........……………… 65
12-2. Multiple X50’s on the same network ……………………………………....….…….........…….……… 66
12-3. The X50 works as a Music Server with Sonos……………… …………..…….......……….……… 66
12-4. Shareplay function ……………………………………………………………………………….….……………. 67
13. I – Service …………………………..…………………………………………..…………………………...…..….....……... 67
13-1. Internet Radio …………………………….………………………………………..……….…..….…………….… 67
13-1-1. How to play the Internet radio………………………………………..…….….…..…………… 67
13-1-2. How to add your favorite stations into My Favorites ……….....………..…………. 68
13-1-3. How to run a search function on the Internet Radio ……………..……..…….…... 68
13-1-4. Recording from the Internet Radio ………………………………….……...……..………… 68
13-1-4-1. How to record ……………………………………………………….……………….……… 69
13-1-4-2. Where is the recorded file stored?................................................................ 69

6
13-1-4-3. The recorded file name structure…………………………..…..….…….…….….. 69
13-1-4-4. How to edit the recorded file …………………………………...……...…….……. 70
13-1-5. Reservation Recording …………………………………………………………..….…….………… 70
13-1-5-1. How to set reservation recording …………………………….…..……….……… 70
13-1-5-2. How does the reservation recording start ………………….……..…………. 71
14. FM Radio …………………………..…………………………………………..……………………………...…..……….…... 72
14-1. How to play FM Radio ………….………………………………………..……….……….…..……..………… 72
14-2. How to record FM Radio …………………………………………………………………….………………… 73
15. DAB+ …………........………………..…………………………………………..……………………………...…..……….…... 73
15-1. How to play DAB+ ..............................................................................................................................73
15-2. How to record DAB+ ......................................................................................................................... 74
16. USB host port for USB devices …………………………………………...………………….…….……............. 74
17. Browser …………………………………………………………………………………………..………………….……….……74
17-1. Play audio file data CDs..………………………………………………..…………..……….………..……......74
17-2. File Management ……………………………………………………………………………..…………………... 75
17-2-1. Accessing information on the HDD, USB, folder or file ……………………………. 75
17-2-2. TAG Edit ……………………………………………………………………………………………………… 76
17-2-3. Import to DB ……………………………………………………………………….….…..……………… 76
17-2-4. Copy Files ………………………………………………….………………………….…………..………… 77
17-2-5. Move Files …………………………………………………………………………….….….…….……….. 77
17-2-6. Delete Files ………………………………………………………………………….….....……….……… 77
17-2-7. PLS or M3U files with Internet Radio stations …………….………..….…..…….……. 78
17-2-8. Convert Audio Format ….............…………………………………………....….………………… 78
17-2-9. Cut the recorded file (Cut ‘Playing Section’) ……………………...….…………………. 78
17-2-10. Create Folder ....................................................................................................................... 79
18. Extra function …………………………………………………………………………….....……….……….…..………… 80
18-1. Volume Balancing …………………………………………………………………..…………………..…….….. 80
18-2. External Screen ………………………………………………………………………..……………….….….……. 80
18-3. Photo Slide Show ……………………………………………………………………..………………..….……... 80
18-4. Listing by Text or Album cover art ……………………………………………..……....……….…..…...81
18-5. LYRICS …………………………………………………………………………………………..…….…………..………81
18-6. Bookmark ………………………………………………………………………………………..…….………...……. 81
18-7. Resume Play …………………………………………….………………………………………..….……….…..…. 82
18-8. CLOCK and Display (LCD) OFF ….……….………………………………………………..….…….……… 82
18-9. Changing the play mode .………………………………………………...……………….…...…….…….... 83
18-10. Alarm set ……………………………..………………………………………….………….………....….………... 83
18-11. Auto Shutdown ………………..…………………………………………………….……..…….…....….….…. 84
18-12. Sleep mode ..………………………………………………………………………………..…………..….…..….. 84
18-13. Auto Play ………..…………………………………………………………………………………………..….....… 85
18-14. Shortcut to find file in all list modes …………….…………………..…………..………..…...……. 85

7
18-15. Seek function on the Playing Screen ……………..…………………..……..….…………...….….. 85
18-16. How to rip(convert) the edited file into other
formats(MP3, FLAC, OGG, etc) and load onto the MusicDB ........................................86
19. Specification ……………………………………………………………………….………..………...…………….…….... 87
20. Troubleshooting …………………………………………………………….………………………..………….…….….. 88
Important safety instructions
For your own safety, please read the following important safety instructions carefully before
attempting to connect this unit to the main power supply. They will enable you to get the best
performance from the unit.
1.Read the instructions.
2.Keep the instructions.
3.Heed all warnings.
4.Follow all instructions.
5.Do not use this product near water.
6.Clean only with dry cloth.
7.Do not block any ventilation openings. Install in accordance with the manufacturer’s instructions.
8.Do not remove the casing of this product.
9.Only use this product indoors. Do not expose the product to water, rain or high humidity.
10.Keep this product away from direct sunlight, naked flames or heat.
11.Do not install near any heat sources such as radiators, heat registers, stoves, or other electrical
equipment(including amplifiers) that produce much heat.
12.Do not place any other electrical equipment on the product.
13.Do not place any sources of danger on the product(e.g. objects containing liquid, burning
candles)
14.This product includes batteries. Please refer to safety and disposal instructions for batteries in
this user manual.
15.Unplug this product during lightning storms or when unused for long time.
16.Refer all servicing to qualified service personnel. Servicing is required when the product has
been damaged, such as the power supply cord, damaged plug, liquid spillage, objects dropped on
the unit, exposure to rain or moisture, does not operate properly, or has been dropped.
WARNING
- Using headphones at a high volume can impair your hearing. This product can produce
sounds in decibel ranges that may cause hearing loss for a normal person, even for

8
exposure less than a minute. The higher decibel ranges are offered for those that may be
experiencing some hearing loss. Over time your hearing ‘comfort level’ adapts to higher
volumes of sound, so after prolonged listening, what sounds ‘normal’ can actually be loud
and harmful to your hearing. To guard against this, set your volume to a safe level.
- Loudspeakers : Before making any connections to loudspeakers, make sure all power is
turned off and only use suitable interconnects.
- Only use attachments/accessories specified and supplied by the manufacturer.
FCC regulations
NOTE: THE MANUFACTURER IS NOT RESPONSIBLE FOR ANY RADIO OR TV INTERFERENCE
CAUSED BY UNAUTHORIZED MODIFICATIONS TO THIS EQUIPMENT. SUCH MODIFICATIONS
COULD VOID THE USER AUTHORITY TO OPERATE THE EQUIPMENT.
This equipment has been tested and found to comply with the limits for a Class B
digital device, pursuant to Part 15 of the FCC Rules. These limits are designed to provide
reasonable protection against harmful interference in a residential installation. This equipment
generates, uses and can radiate radio frequency energy. If not installed and used in accordance
with the instructions, may cause harmful interference to radio communications. However, there is
no guarantee that interference will not occur in a particular installation. If this equipment does
cause harmful interference to radio or television reception, which can be determined by turning
the equipment off and on, the user is encouraged to try to correct the interference by one or
more of the following measures.
- Re-orient or relocate the receiving antenna.
- Increase the separation between the equipment and receiver.
- Connect the equipment into an outlet on a circuit different from that to which the
receiver is connected.
- Consult the dealer or an experienced radio/TV technician for help.

9
1. Product overview
1-1. Front View
1-2. Rear View
⑨ OK/PAUSE/SCROLL knob
⑩ DAB+/FM button
⑪ RETURN button
⑫ STOP button
⑬ MENU button
① Power Switch
② AC Power Inlet (with fuse)
③ WORD CLOCK
④ I²S OUT(HDMI, RJ45)
⑤ Digital Out(COAXIAL x 2, Optical,
AES/EBU XLR)
⑥ Storage #2
⑦ 12V Trigger IN/OUT
① Volume/Mute Knob
② Power/Standby button
③ Power/Standby Indicator
④ USB Host port
⑤ Remote control receiver
⑥ CE Eject button
⑦ CD-ROM Drive
⑧ LCD Screen
⑧ DAB+/FM Antenna
⑨ Giga Fast Ethernet LAN
⑩ HDMI Out for ext screen for GUI or Audio
Signal out
⑪ USB Audio Out
⑫ USB 3.0 Host port
⑬
Storage #1

10
1-3. View of Remote Controller and each key’s function
1. POWER: Power ON/OFF
2. i-SERVICE: Go to i-Service screen
3. DAB: Go to DAB+ screen
4. HOME: Go to home screen
5. SEARCH: To pop up search menu
6. Alphanumeric: Enter number & alphabet/
Seek at Playing Screen mode
7. : To delete typed alphabet
8. NOW PLAYING: Go to Playing Screen
9. REC: To record
10. MENU: Popup menu screen
11. STOP: Stop playing
12. ARROW: Move cursor to upper side
13. ARROW: Move cursor to left side
14. ARROW: Move cursor to down side
15. RETURN: Go back to upper level
16. TEXT/ART: To switch text or art mode
17. PREVIOUS: Play previous music
18. NEXT: Play next music
19. RIP: Pop up ripping menu
20. PLAYLIST: Go to playlist screen
21. SORT: Sort file list
22. BOOK MARK: Make bookmark
23. LIST LINE: To change text line number(size)
24. TAG EDIT: To popup tag edit screen
25. Reserved
26. BRIGHTNESS: To control screen brightness
27. CLOCK: Digital clock display/OFF screen
28. SCREEN: To switch LCD or HDMI screen
29. FM: Go to FM radio
30. MUTE: Mute/unmute sound
31. SETUP: Go to setup
32. CAP/NUM: Toggle numeric key, alphabet key
and special characters
33. VOL+ : Volume up
34. LYRICS: To show up lyrics on the screen
35. VOL- : Volume down
36. PLAY/PAUSE: Toggle Play and Pause
37. OK: Confirmation
38. ARROW: Move cursor to right side
39. INFO: Get more detailed info
40. VOL BAL: Control volume balance
41. SEEK/+15: Seek forward by 15 seconds.
42. SEEK/-15: Seek backward by 15 sec
43. MY PL: To make My Playlist
44. AD MY PL: To make advanced
My Playlist
45. SHUFFLE: To change play mode
46. FAVORITE: To add iRadio station or
song to Favorites folder
47. EJECT: Eject CD
48. SLEEP: Go to sleep mode
49. BLUE key: Reserved
50. YELLOW key: Reserved

11
2. Prepare
2-1. Check the contents of X50 package
<NOTICE> DAB Antenna is NOT provided to the countries where DAB is not available
2-2. Install AAA batteries into the remote control.
2-3. Optional items, WiFi USB dongle
If you purchased optional items, the WiFi USB dongle, it looks like below.
801.11b/g/n WiFi USB dongle
① X50 unit
② Remote controller + AAA batteries x 2EA
③ Power cord
④ Manual
⑤ FreeDB Data CD
⑥ FM Radio Antenna
⑦ DAB Antenna
⑥ Screw to install storage
Open the battery door and
insert the batteries.
[NOTICE] The wifi dongle not
approved by X50 manufacturer will
not work properly

12
2-4. X50 purchased without storage.
You need a 3.5” or 2.5” SATA hard disk or SSD, and install it into the X50 like below picture and
format it. For formatting of the installed storage into X50, please refer to the 4-7-7. Format
Storage (Page 40)
2-4-1. HDD installation
【 TIP 1 】 X50 supports 3.5” or 2.5” SATA hard disk and solid state drive (SSD)
2-4-2. HDD Format
※ Refer to the 4-7-7. Format Storage (Page 40)
2-5. X50 purchased with an internal storage installed.
Check whether the storage is formatted, or not. If the storage is not formatted, please format it
according to the 4-7-7. Format Storage (Page 40)
2-6. HDD installation for non-RAID system or RAID system
X50 CPU Board
There are three(3) connectors(#1, #2,
#3) to be connected to two Storages
on the CPU board like left picture.
#3
#1
#2

13
CPU Board, Audio Board, Storage #1 and #2
Storage #1, #2
2-6-1 How to connect for non-RAID system
<NOTICE> non-RAID system is default: All X50 units will be shipped with non-RAID system
Audio Board
Storage #2
CPU Board
Storage #1
1) How to connect each cable
-. Cable to Storage #1 to Connector #3
-. Cable to Storage #2 to Connector #2
-. Connect cables like left picture
2) X50 will recognize Storages like below;
-. Storage #1 as HDD1
-. Storage #2 as HDD2
3) Selecting HDD1 or 2 at SETUP
You need to select HDD1 or HDD2 for
MusicDB storage at SETUP, because two
Storages work independently
Storage #1 Storage #2
Cable to Storage #1
Cable to Storage #2

14
2-6-2 How to connect for RAID system
<NOTICE> For RAID system connection, we strongly recommend to ask our distributor or dealer
about 'how to connect' and 'matters that require attention'
2-6-2-1 Cable connection for RAID system
2-6-2-2. Switch settings for RAID mode
1) X50 offers two(2) modes of RAID
according to switch settings
-. SW1: ON, SW2: OFF is BIG mode
-. SW1: ON, SW2: ON is RAID1(Mirror)
mode
2) Activating RAID mode
After switch setting, you need to activate
RAID according to the below procedures
① Set RAID mode as you want
② Make X50 Power Switch at rear ON
③ Power X50 ON with RAID Switch
pressed.
④ Keep RAID Switch pressed until
Blinking LED blinks three times
How to connect each cable
-. Cable to Storage #1 to Connector #1
-. Cable to Storage #2 to Connector #2
-. Connect cables like left picture
Cable to Storage #1
Cable to Storage #2

15
2-6-2-3 Explanation for each mode of RAID
1) BIG mode:
-. Need to install two storages to work properly
-. Two HDDs will be concatenated and presented as a single disk
-. For example, if install 500GB HDD and 250GB HDD, it will recognize as 750GB single disk.
2) RAID-1 mode(Mirror):
-. Need to install two storages to work properly
-. It creates an exact copy of data and partition on two disks simultaneously.
-. Total size will be the capacity of smaller disk.
-. For example, if install 320GB and 250GB, the total size will be 250GB
-. Automatic data recovery If one of the disks fails and replace with new drive, data can be
recovered
-. The new disk where the data to be recovered must be equal or bigger than other disk;
otherwise recovery is no possible.
RAID Switch
Blinking LED

16
3. Turn On and Start
3-1. Wizard Setup (Setup Assistant)
During fist booting-up procedure, you will meet the Setup Assistant (Wizard Setup) as shown
below.
Select OK and confirm with the OK key to start Wizard Setup. If you want to run the set up after
booting up, you can select CANCEL at the 1st step.
<NOTICE> It will ask for OSD language, Audio Ripping Format, Network Setup, Time setting, HDD
format.
3-2. Turn ON for normal use
Switch the unit on at the rear of the X50. The power LED will be ON with green color. Power it on
using the remote control or the power button on the front of the X50. The power LED color will
be changed to blue and start booting – The X50 should take about 30~40 seconds to boot up as
it is looking to see if a network is connected.
After the X50 is powered ON, the below screen will show up in sequence.
1) Booting image 2) Booting completed and ready for use
Music DB: Play loaded(ripped) music in
X50 Music DB folder.
CD Play/Rip: Load(rip) CD or play it
Playlist: Make Playlist and play it.
i-Service : Play i-Radio or online music
service
FM Radio: Play FM radio
【 TIP ① 】 You will be asked about formatting the HDD only if the HDD installed has NOT
been formatted.
DAB: Play DBA
Browser : See all storages such as hard
disk of X50, USB host and networked
storages.
Setup : Change settings

17
4. SETUP
Go into SETUP menu with remote controller.
4-1. Music DB
4-1-1. Display Mode
You may set one of ten(10) options, see below. For example, if you set Title, the Music DB will
display the title (song) list when you go into the Music DB. (※ default: Album)
※ Default : Album
4-1-2. Album View
You can set the list to show albums in the Music DB by its album name (text) or album cover art
using this setup.( ※ default : text mode )
You can select each item with the arrow key and confirm it
with
the
OK button.
Select the Display Mode and confirm with the OK button.
※ For example
Artist/Track : Artist list → Title(song) list
Artist/Album : Artist list → Album list of the artist → Track (song) list of the album

18
※ Artist view, Genre view, Composer view and Track view also are available.
4-1-3. Track Numbering
4-1-4. Storage for Music DB
You can select either the HDD(SSD)1, HDD2(SSD), USB or NAS(Network attached storage) for
Music DB storage. If one of them is selected as MusicDB storage, its color will be red.
※ Default is HDD1
[CAUTION]
※ NOTE: Please remember to check this setting first when you see ‘Query Error’ on the screen in
trying access to your music DB. For example, you will see ‘Query Error’ on the screen when you
try accessing your Music DB of internal (installed) HDD with Music DB storage set to USB.
※ When you use an external USB hard disk, please make sure to supply Power to the external
USB hard disk in case the external USB hard disk is designed originally to connect to a Power
supply.
4-1-5. Recovery
It is possible for damage or errors to occur on the album or files in the Music DB when you run
several functions like; ‘Rename, Delete, Copy to DB, or CD ripping’ etc. If there are errors in the
Music DB, the X50 may not play the files properly or may not rip CDs properly. The Music DB
Recovery function will help to clear these problems.
With the Track Numbering option at SETUP, you may decide
whether you allow the track number to be added at the front of
title for each track when you rip CD. (※ Default: Enabled)

19
4-1-5-1. How to run Music DB Recovery function
① Go to the Music DB. ② Select Recovery and press the OK key.
※ It will take some time to start and finish if your Music DB is quite large.
4-1-5-2. Music DB Recovery run
After you run the Music DB Recovery, as shown above, you can see the results of the Recovery as
displayed below.
4-1-5-3. To create ‘Recovery MM-DD hh-mm’ folder
automatically on HDD (or USB)
During Music DB Recovery run, the X50 creates a ‘Recovery MM-DD hh-mm’ folder automatically
on the internal HDD (or USB). The checked files or album folders will be stored (moved) there.
Go to Music DB of SETUP and select Recovery Result.
The left screen will appear if your Music DB is OK
The left screen will appear if something was dubious
※ ‘Moved’ means the song file moved to ‘Recovery’ folder.
※ ‘song file’ is actual file.
※ ‘Deleted’ means the info in the Music DB was deleted.
※ ‘Album’, ‘genre’, ‘artist’ and ‘song’ are just info(text file).
They are not actual music files.

20
4-1-5-4. Importing files from the ‘Recovery’ folder to the Music
DB again.
After checking the files have moved to the ‘Recovery’ folder, you can import them to the Music
DB again with the ‘Copy to DB’ function.
4-1-5-5. To clear the list on Recovery Result
You can clear the list on the Recovery Result as follows:
4-1-6. Backup
4-1-6-1 How to do Backup
X50 offers two backup methods. One is 'Background backup', the other is 'Interactive backup'.
※ Background backup: You can do other works like playing even in backup processing.
※ Interactive backup: You can't do anything in backup processing.
① Place the cursor on the screen of the Recovery Result.
② Select the list you want to clear with the RIGHT key
③ Press the MENU key
④ You can clear all or the selected list only.
Table of contents
Popular MP3 Player manuals by other brands

RCA
RCA SL5008 - LYRA Slider 8 GB Digital Player quick start guide

Sony
Sony Walkman NWZ-E473 quick start guide

Philips
Philips SA2RGA08K manual

RCA
RCA SL5004 - Lyra Slider 4 GB Digital Player Manual de usuario

Sony
Sony NWZ-A726PNK Marketing Specifications (Pink) Specifications

RCA
RCA M5504 quick start guide