EXTENSION CORDS
A short power supply cord is provided to reduce the risk of tangling and
tripping. If an extension cord is used be sure:
• The electrical rating of the extension cord should be appropriate for the
electrical rating of the appliance.
• The longer cord should be arranged so that it will not drape over the
counter or table top where it can be tripped over, snagged, or pulled on,
especially if children are present.
3 PRONG PLUG
This appliance has a 3 prong plug to reduce the risk of electric shock. Do not
attempt to modify the plug.
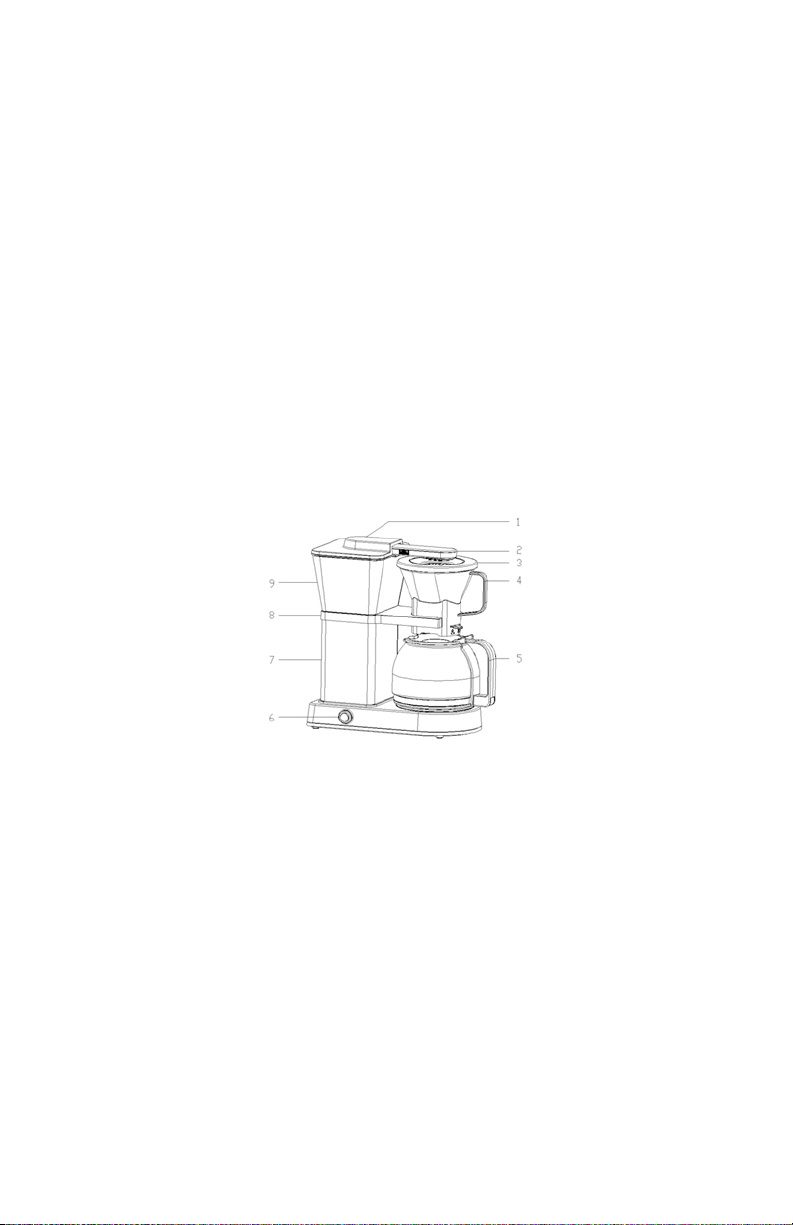
PRODUCT DIAGRAM
1. Water Tank Lid
2. Shower Head
3. Filter Basket Lid
4. Filter Basket
5. Glass Carafe
6. On/O Switch
7. Main Body
8. Filter Basket Bracket
9. Water Tank
TECHNICAL DATA
Rated Voltage: 120VAC 60Hz
Rated Power Input: 1560W
OPERATING YOUR COFFEE BREWER
BEFORE FIRST USE
1. Remove packaging materials, labels, and stickers from the coee brewer.
2. Clean the appliance by filling the water tank with clear, cold water to the
"MAX" level mark. Turn the coee brewer on to allow the water to run through.
3. Let the appliance cool down for 5 minutes before repeating the process. Brew
only water through the coee brewer at least 2 times before brewing any coee.
USING THE COFFEE BREWER
1. Remove the carafe from the coee brewer, raise the lid of the water tank and
pour in the required volume of cold water to the desired batch size. Do not fill
more than 8 cups (150ML for each cup).
2. Place a V-filter of #4 type in the funnel with both sides folded and scoop
ground coee into the filter. We recommend 6-9 grams of ground coee for
each cup. Place the lid on the funnel. NOTICE: Ensure the flow control switch of
funnel is at the position “OPEN” to avoid spilling during brewing. See the
following figure:
NOTICE: Ensure the flow control switch of funnel is at the position “OPEN” to
avoid spilling during brewing.
3. Place the water tank lid on the brewer, re-install the funnel within ground
coee in the funnel bracket, seeing Figure 3. Following Figure 3 to place glass
carafe on the warming plate.
4. Plug the coee brewer and press the on/o switch as Figure 4. The red LED
lights on showing brewing. Do not remove the glass carafe during brewing. Turn
o the appliance if you have to remove the carafe, and also place the flow
control switch “o”. Re-install the glass carafe, place the flow control switch
“on” and press the on/o switch to continue to brew.
5. Once the brewing is complete, the alarm will sound twice indicating the
completion. The appliance will preserve heat automatically for 40 minutes. If
you do not need heat preservation, press the switch to turn o the appliance.
Take out the carafe and pour coee carefully. After brewing around half an hour
to enjoy the best flavor.
6, The appliance can be switched o manually at any time by using the on/o
switch.
7. Remove the funnel after each time of brewing. Discard ground coee and
filter. Clean the funnel and dry it.
Optional: Freshly roasted coee has more CO2 trapped in the bean. If you are
brewing with freshly roasted coee, or you would like to pre-infuse the coee,
press and hold the power switch for 5 seconds. At that point the power switch
light will flash indicating that you've enabled the pre-infusion mode. Press and
release the power switch a second time to begin brewing. You can disable the
pre-infusion mode by pressing the power switch until the light blinks (5 sec.).
The brewer will remain in this mode until the mode is turned o or the brewer is
unplugged.
CLEANING AND MAINTENANCE
Proper cleaning and care when necessary will ensure years of service from this
coee brewer. Clean it after use for each time. Always unplug the coee brewer
before cleaning.
1. Do not touch the surfaces when it’s operating to avoid burns. Especially the
warming plate, which bears high temperature when operating. (Do not touch
the surface of the warming plate during the time after operating. Scalding may
occur as a result of waste heat.
2. Do not immerse the appliance in water when cleaning.
3. Unplug the coee brewer and make sure sucient cooling down before
cleaning. Use a soft, damp cloth to clean the outside of the machine.
4. Do not clean the machine and the warming plate with abrasive cleansers,
steel wool pads, or other abrasive materials.
5. We recommend that you descale your brewer once every two months. Use
descaling powder with specified proportioning according to the descaling
powder instruction, fill the water tank and brew. Clean the brewer by filling the
water tank with fresh, filtered, cold water to the MAX line.
6. Replace the glass carafe and funnel to the appliance after cleaning and
drying.
7. Remove the shower-head first and then clean it.
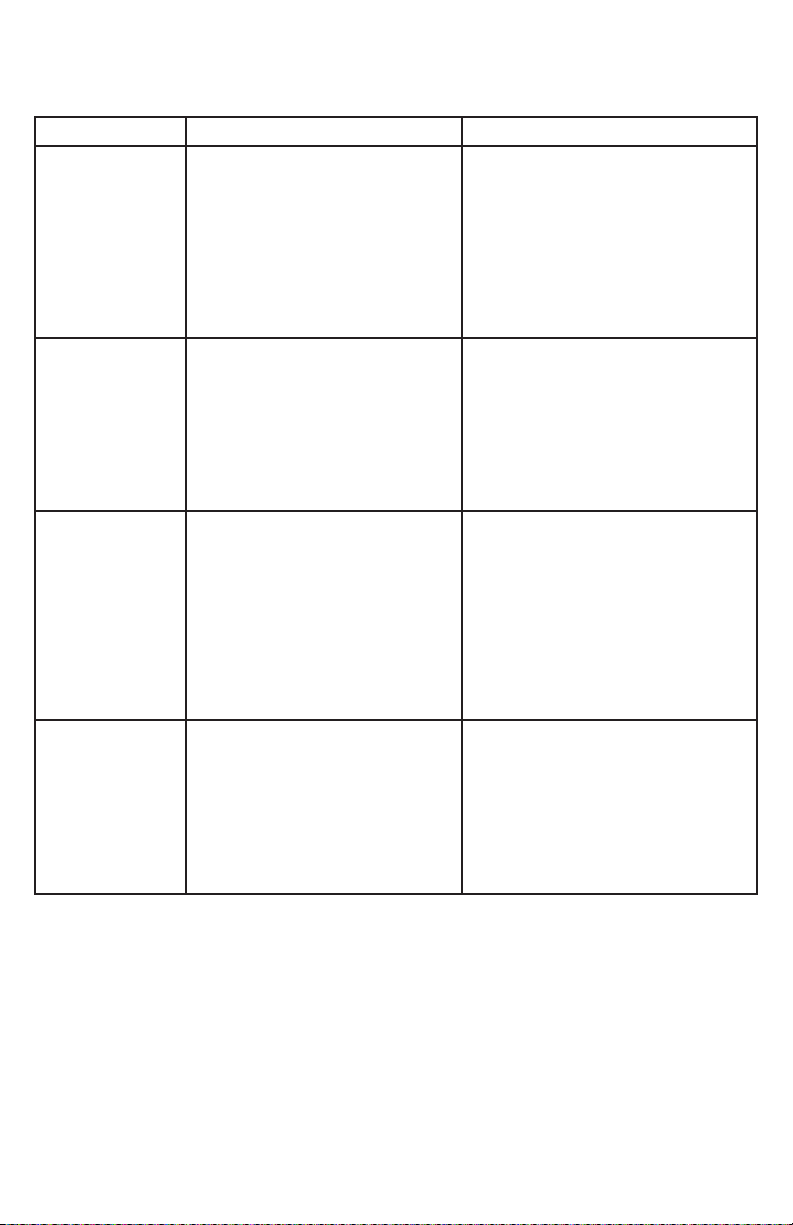
TROUBLESHOOTING
1. The flow control switch on
funnel is not set in
“on” position.
2. Ground coee clogs the
outgoing of the funnel.
3. The ground coee is so
fine that block up the funnel.
Spilling
Coeemaker
will not turn on
PROBLEM CAUSE SOLUTION
1. The power cord is not
plugged in properly.
2. Failure inside the appliance.
1. Plug in the power
cord properly.
2. Contact a professional
service agent.
Water filters
fast through
coee grounds
1. The ground coee is coarse.
1. Replace with finer ground coee.
We recommend a medium grind
for drip coee makers.
Slow or no
water flowing
through funnel
1. Fill in the water tank with
appropriate volume of water.
2. Clean the funnel.
3. Use a more coarse
ground coee.
Avoid compacting
the coee grounds.
1. No water in the water tank.
2. Funnel is clogged.
3. Ground coee is too
fine or compacted.
1. Set the flow control switch on
funnel to “on” position.
2. Clean the funnel.
3. Replace the current
ground coee.