Coitech VK1330PWDC User manual

Important!
Read the entire instruction manual carefully
and make sure that you fully understand
it before you use the equipment. Keep the
manual for future reference.
Viktig information:
Läs hela bruksanvisningen noggrant och
försäkra dig om att du har förstått den
innan du använder utrustningen. Spara
bruksanvisningen för framtida bruk.
Viktig informasjon:
Les disse anvisningene nøye og forsikre deg om
at du forstår dem, før du tar produktet i bruk.
Ta vare på anvisningene for seinere bruk.
Tärkeää tietoa:
Lue nämä ohjeet huolellisesti ja varmista
että olet ymmärtänyt ne, ennen kuin alat
käyttää laitetta. Säilytä ohjeet myöhempää
tarvetta varten.
Wichtiger Hinweis:
Vor Inbetriebnahme die komplette
Bedienungsanleitung durchlesen und
aufbewahren.
ENGLISHSVENSKANORSKSUOMIDEUTSCH
Torr- och våtsugare
Tørr- og våtsuger
Kuiva- ja märkäimuri
Nass- und Trockensauger
Art.no Model
40-8576 VK1330PWDC
Wet And Dry
Vacuum Cleaner
Ver. 20140516
Original instructions
Bruksanvisning i original
Original bruksanvisning
Alkuperäinen käyttöohje
Original Bedienungsanleitung

2

3
ENGLISH
Wet And Dry Vacuum Cleaner
Art.no 40-8576 Model VK1330PWDC
Please read theentire instruction manual before using theproduct and then save it for
future reference. We cannot be held responsible for any errors in thetext or images
or changes to technical data. If you experience any technical problems or have any
other questions, please contact our Customer Services (for address details, please
see back page).
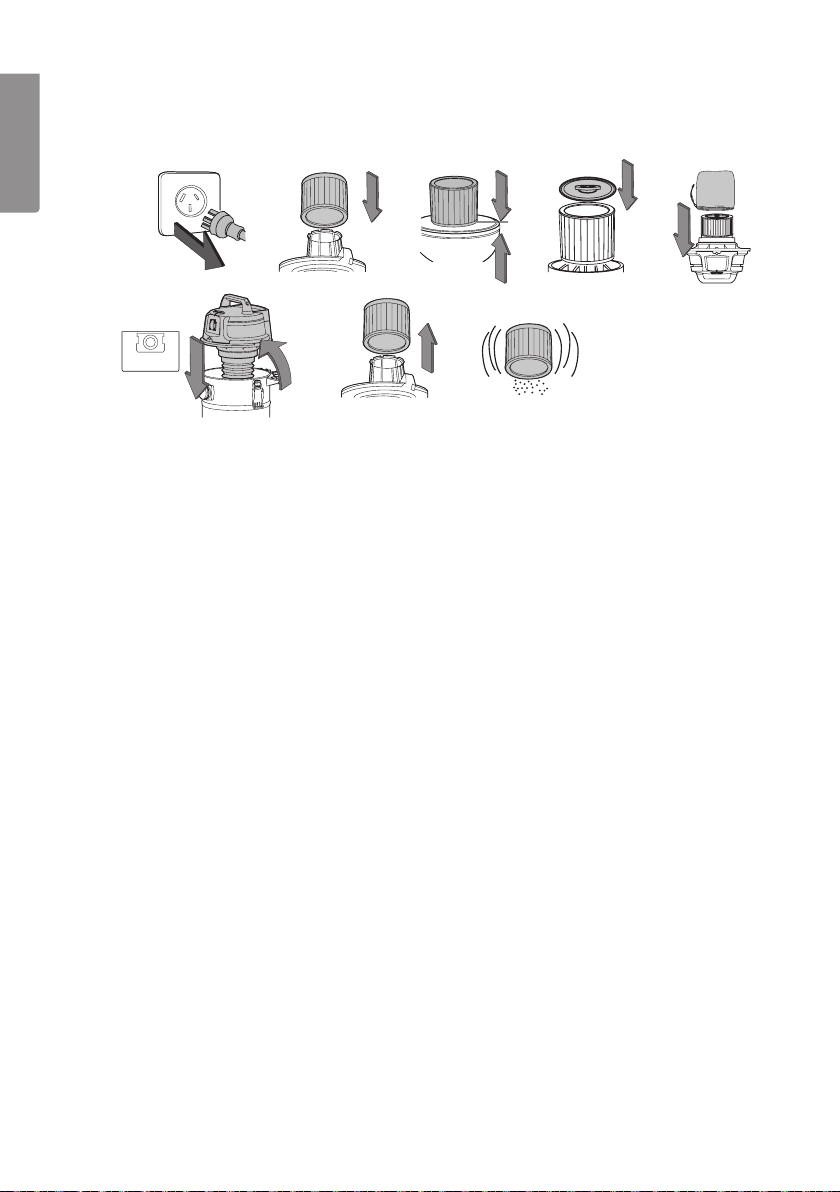
1. Safety instructions
• Make sure that thepower supply at theelectrical socket is 230 V AC.
• Do not use thewet and dry vacuum cleaner for vacuuming flammable substances/
liquids, hot coals, ashes or other hot substances. Fire hazard!
• Do not use thewet and dry vacuum cleaner for vacuuming large items or metal
objects as these could damage thevacuum.
• Do not run thewheels over themains lead.
• Do not use thewet and dry vacuum cleaner if themains lead is damaged.
• Do not let children play with thewet and dry vacuum cleaner, it is not atoy.
• Keep hair, fingers and loose clothing away from theopenings and moving parts of
thewet and dry vacuum cleaner.
• Never use thewet and dry vacuum cleaner without afilter.
• Do not use thewet and dry vacuum cleaner if thenozzle is blocked or if any part
is deformed.
• Do not use thewet and dry vacuum cleaner close to cookers, ovens or other
sources of heat.
• Carry thewet and dry vacuum cleaner using thehandle. Do not drag it around by
its hose or mains lead.
• Unplug thewet and dry vacuum cleaner when it is not in use.
• Do not expose theelectrical components of thewet and dry vacuum cleaner to
rain or moisture.
• Store thewet and dry vacuum cleaner indoors in adry area when it is not in use.
• If themains lead is damaged and needs changing it must be sent to themanufacturer,
anauthorised service facility or qualified person to be properly repaired.
• Thewet and dry vacuum cleaner may be used by children of eight years and
above and by persons with reduced physical, sensory or mental capability or
lack of experience and knowledge provided they have been given supervision
or instruction concerning use of theappliance in asafe way and understand
thehazards involved.
• Never let children play with thewet and dry vacuum cleaner.
• Cleaning and maintenance may be carried out by children but only under adult
supervision.
• Warning! Electrical appliances used close to water should be connected to thepower
supply via aresidual current device (tripping current 30 mA in not more than 30 ms).

4
ENGLISH
AC
H
M
RQ
B
G
L
D
I
N
S
E
J
O
T
F
K
P
1
2
3
4
5
6
7
8
9
10
11
12
13
2. Package contents
A) Wet and dry vacuum cleaner
B) Suction tube
C) Crevice nozzle for corners and
confined spaces
D) Universal nozzle for floors and carpets
E) Round brush
F) Tubes (2×)
G) Cartridge filter
H) Filter lid
I) Dust bag
J) Foam filter for wet vacuuming
K) Handle with suction setting
L) Step adapter
M) Pre-filter (filter back)
N) Wheel (2×)
O) Hub cap (2×)
P) R-pin (2×)
Q) Washer (4×)
R) Castor (2×)
S) Wheel axle
T) User manual
3. Description
1. Wheels
2. Over-centre catch
3. Power switch
4. HEPA filter
5. Hanging hook for cables or accessories
6. Storage compartment
7. Handle
8. Motor unit/top
9. Power tool socket
10. Vacuum port
11. Container
12. Drain cap
13. Castor

5
ENGLISH
1
5
2
6
3
7
4
8
4. Assembly
1. Warning! Always make sure theplug is disconnected before servicing or adjusting.
2. Open theover-centre catch.
3. Lift themotor unit/top.
4. Remove theaccessories from thecontainer. Check that all theparts are intact and
that nothing is missing.
5. Turn thecontainer upside down and press thecastors securely into thebrackets
on thebottom.
6. Attach thecastors.
- Press thewheel axle (S) through both brackets on thebottom of thecontainer.
- Attach awasher (Q) on each side of thewheel axle outside thebrackets.
- Attach awheel on each side of thewheel axle outside thewashers.
- Place awasher outside thewheel and press anR-pin (P) into thehole in
thewheel axle outside thebracket.
- Fit both thehub caps (O) onto thewheels.
7. Note! Different parts need to be attached for dry vacuuming and wet vacuuming
respectively. See 5.1 and 5.2. Thewet and dry vacuum cleaner is usually delivered
ready for dry vacuuming with thecartridge filter (G) and filter lid (H) already attached.
8. In other cases: press thefoam cartridge filter carefully and securely onto thefilter basket.

6
ENGLISH
9
13
10
14
11
15
12
16
9. Fasten thefilter cover by turning thelocking knob on thefilter cover to thelocked
position.
10. Slide on thepre-filter (thefilter bag) (M) outside thecartridge filter and pull thestring.
11. Use thedust bag (I) when necessary to achieve thebest possible filtering results.
Press it securely onto theinlet inside thecontainer.
12. Replace themotor unit/top on thecontainer.
13. Secure thetop section onto thecontainer with theover-centre catch.
14. Secure theaccessories.
15. Attach thesuction hose to thecontainer’s hose connection (10). Press in and turn
it clockwise until it is securely fastened.
16. Attach therequired accessories to thehose.
5. Use
• Warning! Read thewarning text before use.
• Warning! Always make sure theplug is disconnected before servicing or adjusting.
• Note: Thecartridge filter (G) is for vacuuming dry dust. Thefoam filter (J) must only
be used for vacuuming water.
• When vacuuming very fine-particled substances, both thedust filter and pre-filter
must be used in addition to any dust bag.
• Thewarranty will be void if thewrong type of dust bag has been used.

7
ENGLISH
1
5
9
2
6
3
7
4
8
5.1 Dry vacuuming
1. Warning! Always make sure theplug is disconnected before servicing or adjusting.
2. Press thecartridge filter carefully onto thefilter basket.
3. Fasten thefilter cover by turning thelocking knob on thefilter cover to thelocked
position.
4. Slide on thepre-filter (thefilter bag) (M) outside thecartridge filter and pull
thestring.
5. Use thedust bag (I) when necessary to achieve thebest possible filtering results.
Press it securely onto theinlet inside thecontainer.
6. Replace themotor unit/top on thecontainer. Secure thetop section onto
thecontainer using theover-centre catch.
7. Attach therequired accessories to thehose.
8. Plug themains lead into awall socket.
9. Start using thepower switch.

8
ENGLISH
1
5
2
6
3 4
5.2 Wet vacuuming
Warning: Do not use thewet and dry vacuum cleaner to vacuum toxic, hazardous or
flammable substances/liquids.
Note: Do NOT use thecartridge filter or dust bag when wet vacuuming.
1. Warning! Always make sure theplug is disconnected before servicing or adjusting.
2. Attach thefoam filter (J) before wet vacuuming. Slide thefoam filter carefully onto
thefilter basket making sure it covers theentire filter basket.
3. Attach therequired accessories to thehose.
4. Plug themains lead into awall socket.
5. Switch thevacuum on using thepower switch.
6. Remember to empty thecontainer once it is full.
Things to consider when wet vacuuming!
• Only use thefoam filter when wet vacuuming.
• Make sure that thefoam filter is clean and dry and secure it onto thefilter basket
before starting to wet vacuum.
• Thesafety cut-out float switch stops thesuction when thewater level in
thecontainer reaches acertain level, thus preventing water from entering
themotor. Themotor will race when thesuction function has been stopped by
thefloat. Switch themotor off and empty thecontainer.
• Empty thecontainer before it becomes totally full and clean it after use.
• Clean thefoam filter as and when required. Remove thefilter and wash it by hand
in water with amild detergent, let it air-dry.
• Do not submerge theentire nozzle under thesurface. Leave some space so that
air can also pass through when vacuuming alarge amount of liquid.
• Remember to reattach thefilter before using thevacuum again. NEVER use
thewet and dry vacuum without afilter.

9
ENGLISH
6. Power switch
Thepower switch (3) has three settings:
• IOn
• 0Off
• Auto Power tool socket – Thewet and dry vacuum cleaner starts and stops
automatically when themachine connected to themachine socket is turned on
and off.
7. Power tool socket
Theproduct has apower tool socket (9) which is designed to start thewet and dry
vacuum cleaner automatically.
• Connect theplug from acircular saw or similar machine to thepower tool socket.
Then connect thesuction hose (B) between thewet and dry vacuum cleaner and
thedust extractor port of thecircular saw (or whatever machine is connected).
Set thepower switch to theAuto position.
• TheON and OFF control of thewet and dry vacuum cleaner will now be controlled
by theconnected power tool. Thewet and dry vacuum cleaner will switch on as
soon as theconnected power tool has started and switch off about five seconds
after theconnected power tool has been switched off.
Note: Thepower tool socket must not be loaded over 2380 W.
8. Repair and maintenance
1. Warning! Always make sure theplug is disconnected before servicing or adjusting.
2. Remove thesuction hose.
3. Open theover-centre catch and remove themotor/top from thecontainer.
4. Clean thecontainer and hose and make sure that they are dry before putting
theproduct away for storage.
Replace or clean thefilters whenever needed. Make sure that thehose, filter, couplings and
mains lead are undamaged. If themains lead is damaged, have it replaced by aprofessional.

10
ENGLISH
1 2 3 4
6 7 8
5
8.1 Fitting and cleaning the cartridge filter
Assembly
1. Warning! Always make sure theplug is disconnected before servicing or adjusting.
Remove themotor unit/top and place it upside down.
2. Attach thecartridge filter to thefilter basket*, being careful not to damage thefilter.
3. Make sure that thefilter covers theentire filter basket.
4. Fasten thefilter cover (H) by turning thelocking knob on thefilter cover to
thelocked position.
5. Slide on thepre-filter (M) and pull thefriction lock.
6. Fit thedust bag (I) for extra efficient filtering. Replace themotor unit/top (8) onto
thecontainer (11) and fasten it with theover-centre catch (2).
*Note! Thecartridge filter fits best if theside with ahigh edge on theinside is placed
against themotor unit/top.
Cleaning the cartridge filter
7. Carefully remove thecartridge filter (G).
8. Brush or shake thefilter free from debris (remember to do this outdoors).
Wash thefilter by hand using amild detergent and then rinse with clean water.
Let it air-dry for about 24 hours. Replace thefilter only when it is completely dry.

11
ENGLISH
1 2 3 4 5
1
5b
2
6
3
7 8
4 5a
1. Warning! Always make sure theplug is disconnected before servicing or adjusting.
Remove themotor unit/top and place it upside down. Remove thecartridge filter
(G) from thefilter basket, being careful not to damage thefilter.
2. Carefully slide thefoam filter (J) onto thefilter basket.
3. Make sure that thefilter covers theentire filter basket.
Cleaning the foam filter
4. Carefully remove thefoam filter.
5. Wash thefilter by hand using amild detergent and therinse with clean water.
Let it air-dry and replace thefilter.
8.3 Cleaning the HEPA filter
1. Make sure that theplug is disconnected.
2. Push up thecatch in thegrille cover against thehanging hook (5).
3. Remove thecover over theHEPA filter.
4. Remove thefilter.
5. Clean theHEPA filter following option Aor B. Change theHEPA filter if it is not
possible to clean it.
- A. Carefully blow theHEPA filter clean using compressed air from theoutside
in. Or use asoft brush to help.
- B. Wash thefilter by hand using amild detergent and then rinse using clean
water. Let it air-dry and replace thefilter.
6. Replace theHEPA filter and cover.
7. Secure thetop of thecover first.
8. Secure thecover and fasten using thecatch.
8.2 Fitting and cleaning the foam filter
Assembly

12
ENGLISH
9. Troubleshooting
Problem Source of error Action
Motor does not start. No power supply to
thewall socket.
Check.
Fault in thepower switch,
lead or motor.
Get aqualified professional to
repair thedefective part.
Dust comes out of
themotor.
Thedust bag/filter is
missing or broken.
Change/insert adust bag/filter.
Poor suction and
high motor speed
or vibrations.
Thedust bag is full/filter
clogged.
Change dust bag/filter.
Nozzle, hose or coupling
clogged.
Check if something has blocked
theairflow.
Container is full. Empty thecontainer.
10. Care and maintenance
Unplug thedevice before cleaning it.
Wipe theproduct with amoist, soft cloth. Use amild detergent – never use asolvent
or strong, abrasive detergent, as this may damage theproduct.
11. Waste disposal
This product should be disposed of in accordance with local regulations.
If you are unsure what to do, contact your local authority.
12. Specifications
Rated voltage 230 V, 50 Hz
Protection class IP24
Power, motor 1300 W
Power tool socket, max 2380 W
Max power total 3680 W
Vacuum 180 mbar
Suction capacity 3600 l/min
Container volume 30 l
Hose Ø 35 mm, length: 2.5 m
Mains lead, length 5 m

13
SVENSKA
Torr- och våtsugare
Art.nr 40-8576 Modell VK1330PWDC
Läs igenom hela bruksanvisningen före användning och spara den sedan för framtida bruk.
Vi reserverar oss för ev. text- och bildfel samt ändringar av tekniska data. Vid tekniska
problem eller andra frågor, kontakta vår kundtjänst (se adressuppgifter på baksidan).
1. Säkerhetsinstruktioner
• Kontrollera att nätspänningen i eluttaget är 230 V AC.
• Använd inte torr- och våtsugaren till att suga upp brandfarliga ämnen/vätskor,
glöd, aska eller andra heta ämnen. Brandrisk!
• Använd inte torr- och våtsugaren till att suga upp stora saker eller metallföremål
eftersom den då kan skadas.
• Kör inte över nätkabeln med hjulen.
• Använd inte torr- och våtsugaren om nätkabeln är skadad.
• Låt inte barn leka med torr- och våtsugaren, den är ingen leksak.
• Håll undan hår, fingrar och löst hängande plagg från torr- och våtsugarens
öppningar och rörliga delar.
• Använd aldrig torr- och våtsugaren utan filter.
• Använd inte torr- och våtsugaren om munstycket är blockerat eller om någon del
är deformerad.
• Använd inte torr- och våtsugaren nära spisar, ugnar eller andra värmekällor.
• Bär torr- och våtsugaren i handtaget. Dra inte i slangen eller nätsladden för att
flytta den.
• Dra ur nätsladdens stickpropp när torr- och våtsugaren inte används.
• Skydda torr- och våtsugaren mot regn och fukt.
• Förvara torr- och våtsugaren inomhus i en torr lokal mellan användningstillfällena.
• Om nätsladden blir skadad och måste bytas ut ska detta göras av tillverkaren,
dess serviceställe eller motsvarande behörig person för att fara ska undvikas.
• Torr- och våtsugaren får användas av barn från 8 år och av personer med någon
form av funktionsnedsättning, brist på erfarenhet eller kunskap som skulle kunna
äventyra säkerheten, om de har fått instruktioner om hur den på ett säkert sätt ska
användas och förstår faror och risker som kan uppkomma.
• Låt aldrig barn leka med torr- och våtsugaren.
• Rengöring och skötsel får utföras av barn endast i vuxens närvaro.
• Varning! Elektriska apparater som kan användas nära vatten bör anslutas till
elnätet via en jordfelsbrytare (utlösningsström max 30 mA inom max 30 ms).

14
SVENSKA
AC
H
M
RQ
B
G
L
D
I
N
S
E
J
O
T
F
K
P
1
2
3
4
5
6
7
8
9
10
11
12
13
2. Förpackningen innehåller
A) Torr- och våtsugare
B) Sugslang
C) Fogmunstycke för hörn och springor
D) Universalmunstycke för golv och mattor
E) Rund borste
F) Sugrör (2×)
G) Veckfilter
H) Filterlock
I) Dammpåse
J) Skumplastfilter för våtsugning
K) Handtag med suginställning
L) Stegadapter
M) Förfilter (filterpåse)
N) Hjul (2×)
O) Navkapsel (2×)
P) R-sprint (2×)
Q) Bricka (4×)
R) Länkhjul (2×)
S) Hjulaxel
T) Bruksanvisning
3. Beskrivning
1. Hjul
2. Excenterlås
3. Strömbrytare
4. HEPA-filter
5. Upphängningskrok för kabel eller tillbehör
6. Förvaringsfack
7. Handtag
8. Motor/överdel
9. Maskinuttag
10. Anslutning för sugslang
11. Behållare
12. Avtappningslock
13. Länkhjul

15
SVENSKA
1
5
2
6
3
7
4
8
4. Montering
1. Varning! Kontrollera alltid att stickproppen är utdragen före service och justering.
2. Öppna excenterlåsen.
3. Lyft upp motor/överdel.
4. Ta ut tillbehören ur behållaren. Kontrollera att alla delar är hela och finns med
i förpackningen.
5. Vänd behållaren upp och ner och tryck fast länkhjulen i fästena på undersidan.
6. Montera hjulen.
- Tryck in hjulaxeln (S) genom de båda fästena på undersidan av behållaren.
- Montera en bricka (Q) på varje sida av hjulaxeln utanför fästena.
- Montera ett hjul på varje sida av hjulaxeln utanför brickorna.
- Lägg en bricka utanför hjulen och tryck fast en R-sprint (P) i hålet i hjulaxeln
utanför brickan.
- Tryck fast de båda navkapslarna (O) i hjulen.
7. Obs! Olika delar ska vara monterade vid torrsugning respektive våtsugning. Se 5.1 och
5.2. Torr- och våtsugaren levereras normalt färdig för torrsugning, med veckfilter (G)
och filterlock (H) monterat.
8. I annat fall: tryck försiktigt fast skumplastfiltret på filterkorgen.

16
SVENSKA
9
13
10
14
11
15
12
16
9. Fixera filterlocket genom att vrida låsvredet på filterlocket till låst läge.
10. Trä på förfiltret (filterpåsen) (M) utanpå veckfiltret och dra åt snöret.
11. Använd dammpåsen (I) vid behov för att uppnå bästa möjliga filtrering. Tryck fast
den på inloppet i behållaren.
12. Sätt tillbaka motor/överdel på behållaren.
13. Lås fast överdelen på behållaren med excenterlåsen.
14. Sätt fast tillbehören.
15. Skruva fast sugslangen i behållarens slanganslutning (10), tryck in och vrid medurs
tills den sitter fast.
16. Montera önskat tillbehör på slangen.
5. Användning
• Varning! Läs varningstexten före användning.
• Varning! Kontrollera alltid att stickproppen är utdragen före service och justering.
• Obs! Veckfiltret (G) ska användas vid sugning av damm. Skumplastfiltret (J) får
endast användas vid sugning av vatten.
• Vid sugning av mycket finkornigt material måste alltid både dammfilter och förfilter
användas samt ev. dammpåse.
• Garantin gäller inte om fel typ av dammpåsar har använts.

17
SVENSKA
1
5
9
2
6
3
7
4
8
5.1 Torrsugning
1. Varning! Kontrollera alltid att stickproppen är utdragen före service och justering.
2. Tryck försiktigt fast veckfiltret på filterkorgen.
3. Fixera filterlocket genom att vrida låsvredet på filterlocket till låst läge.
4. Trä på förfiltret (filterpåsen) (M) utanpå veckfiltret och dra åt snöret.
5. Använd dammpåsen (I) vid behov för att uppnå bästa möjliga filtrering. Tryck fast
den på inloppet i behållaren.
6. Sätt tillbaka motor/överdel på behållaren. Lås fast överdelen på behållaren med
excenterlåsen.
7. Montera önskat tillbehör på slangen.
8. Sätt i stickproppen i ett eluttag.
9. Starta med strömbrytaren.

18
SVENSKA
1
5
2
6
3 4
5.2 Våtsugning
Varning! Använd inte torr- och våtsugaren till att suga upp giftiga, farliga eller
brandfarliga ämnen/vätskor.
Obs! Använd INTE veckfiltret eller dammpåsen vid våtsugning.
1. Varning! Kontrollera alltid att stickproppen är utdragen före service och justering.
2. Montera skumplastfiltret (J) före våtsugning. Trä det försiktigt över filterkorgen och
se till att det täcker hela filterkorgen.
3. Montera önskat tillbehör på slangen.
4. Sätt i stickproppen i ett eluttag.
5. Starta med strömbrytaren.
6. Kom ihåg att tömma behållaren när den är full.
Tänk på detta vid våtsugning!
• Använd endast skumplastfiltret vid våtsugning.
• Se till att skumplastfiltret är rent och torrt och fäst det på filterkorgen innan
våtsugningen börjar.
• Säkerhetsflottören stoppar sugfunktionen när vattnet når för högt i behållaren,
innan det följer med in i motorn. Motorns varvtal ökar när sugfunktionen stoppas,
stäng då av motorn med strömbrytaren och töm ur behållaren.
• Töm ur behållaren innan den blir helt full och rengör den efteråt.
• Rengör skumplastfiltret vid behov. Ta bort filtret och tvätta det för hand i vatten
med milt diskmedel, låt det lufttorka.
• Tryck inte ner hela munstycket under ytan utan lämna en öppning så att luften kan
passera när du suger upp stora mängder vätska.
• Kom ihåg att montera filter före nästa användningstillfälle.
Använd INTE torr- och våtsugaren utan filter!

19
SVENSKA
6. Strömbrytare
Strömbrytaren (3) har tre lägen:
• IStart
• 0Avstängd
• Auto Maskinuttag – automatisk start och stopp av torr- och våtsugaren när en
maskin som är ansluten till maskinuttaget används.
7. Maskinuttag
Produkten har ett maskinuttag (9) som är avsett för att styra automatisk start och
stopp av torr- och våtsugaren.
• Anslut stickproppen från en cirkelsåg eller liknande maskin till maskinuttaget.
Anslut sedan sugslangen (B) mellan torr- och våtsugaren och spånstosen på
cirkelsågen (eller maskinen som används). Ställ strömbrytaren i läge Auto.
• Torr- och våtsugarens till- och frånslag kommer att styras automatiskt av den
anslutna maskinen. Tillslag av torr- och våtsugaren sker så fort den anslutna
maskinen har startats, och stängs av ca 5 sekunder efter att den anslutna
maskinen har stängts av.
Obs! Maskinuttaget får inte belastas med mer än 2380 W.
8. Service och underhåll
1. Varning! Kontrollera alltid att stickproppen är utdragen före service och justering.
2. Ta bort sugslangen.
3. Öppna excenterlåsen och ta bort motor/överdel från behållaren.
4. Rengör behållare och slang, se till att de är torra innan produkten ställs undan till förvaring.
Byt eller rengör filter vid behov. Kontrollera att slang, filter, anslutningar och nätkabel är
oskadade. Låt en fackman byta nätsladden om den är skadad.

20
SVENSKA
1 2 3 4
6 7 8
5
8.1 Montering och rengöring av veckfilter
Montering
1. Varning! Kontrollera alltid att stickproppen är utdragen före service och justering.
Ta bort motor/överdel och lägg den upp och ner.
2. Montera veckfiltret på filterkorgen*. Var försiktig så att inte filtret skadas.
3. Se till att filtret täcker hela filterkorgen.
4. Fixera filterlocket (H) genom att vrida låsvredet på filterlocket till låst läge.
5. Trä på förfilter (M) och dra åt friktionslåset.
6. Montera dammpåse (I) för extra effektiv filtrering. Montera motor/överdel (8) på
behållaren (11) och lås fast med excenterlåsen (2).
*Obs! Veckfiltret passar bäst om den sida som har en hög kant på insidan placeras
mot motor/överdel.
Rengöring av veckfilter
7. Ta försiktigt bort veckfiltret (G).
8. Borsta av eller skaka filtret (tänk på att göra det utomhus), tvätta det sedan för
hand i vatten med milt diskmedel och skölj med rent vatten. Låt det lufttorka
i 24 timmar. Sätt tillbaka filtret först när det är helt torrt.
Table of contents
Languages: