Cola DIANA CERAMICA User manual

Installation,
use and maintenance manual
Woodburning cooker
model DIANA CERAMICA
Read the instructions carefully before installation and startup.
48.41.30.060.EN-07/09

1
DIANA
1 –GENERAL INFORMATION
1.1 Introduction
1.2 Safety rules
1.3 Technical description
1.3.1 Fire door and ash pan
1.3.2 Primary air flow control
1.3.3 Stainless steel oven base plate
1.3.4 Oven
1.3.5 Oven bypass damper
1.3.6 Secondary air flow control
1.3.7 Cast iron hotplate
1.4 Permitted and prohibited fuels
1.5 Accessories supplied
1.6 Reference standards
1.7 Dataplate
1.8 Instructions for ordering replacement parts
1.9 Disposal of the cooker
2 –TRANSPORT AND INSTALLATION
2.1 Packing, handling, shipment and transport
2.2 Plinth panels assembly
2.3 Ceramic tile assembly instructions
2.4 Installation instructions
2.5 Connection to the flue
2.6 Room ventilation
2.7 Bottom flue gas baffle
2.8 Advice on flues and connections
3 – USE OF THE COOKER
3
.
1 Introduction
3.2 Adjusting the combustion air flow
3.3 First lighting
3.4 Lighting and refuelling the cooker
3.5 Normal operation
3.6 Slow burning operation
3.7 Warm weather operation
3.8 Operation of the oven
3.9 Idle/summer period
4 – ROUTINE CLEANING AND MAINTENANCE OF THE COOKER
4.1 Ash removal
4.2 Cleaning the glass
4.3 Cleaning the cast iron hotplate
4.4 Cleaning the oven and the flue gas baffle
4.5 Cleaning the pipes and the flue
5 – TROUBLESHOOTING
5.1 The cooker does not work
5.2 The cooker is difficult to light
5.3 Smoke leakage
5.4 The glass gets dirty quickly
5.5 Condensation in the firebox
5.6 The oven does not heat up
6– ATTACHMENTS
6.1 Warranty certificate
6.2 CE marking information

2
DIANA
1 –GENERAL INFORMATION
1.1 Introduction
Dear Customer,
First of all we wish to thank you for the trust placed in us by purchasing one of our products. Please read and
carefully follow the advice given in this installation, use and maintenance manual in order make best use of the
product.
Make sure:
-that the cooker is installed, tested and cleaned in accordance with the instructions given
in this manual and in compliance with applicable local regulations, including the
requirements of National and European standards; failure to do so will void the product
warranty.
-that the flue is inspected by a specialised technician.;
For operating faults, doubts or problems, please contact your nearest service centre.
1.2 Safety rules
- Read and follow the instructions given in the installation, use and maintenance manual
-Connect the stove to an approved flue not shared with other appliances.
-Make sure the stove is cold before carrying out any cleaning or maintenance.
-Do not use flammable liquids or substances such as alcohol or hydrocarbons to light the stove.
-The stove is suitable for intermittent combustion and must only be used
with fuels having the characteristics described in this manual.
-The room where the stove is installed must have openings or air inlets communicating
with the outside of the house and able to ensure a sufficient air change.
-Never close the combustion air inlet and fume outlet openings.
-Do not handle easily flammable or explosive substances in the vicinity of the stove
when it is operating.
-During operation, the intense heat generated by combustion of the wood makes the outside surfaces of
the stove very hot, and in particular the fire door, handle, fume exhaust pipe and cover.
Therefore avoid contact with these parts without suitable protection.
-Keep objects which are not heat resistant at a suitable distance.
-Clean the ash pan regularly.
-Hot ashes must not be put in waste bins or left unattended outdoors.
-Warn children and guests about the hazards described above.
-In case of operation anomalies, relight the stove only after eliminating
the cause of the problem.
-The oven/food-warmer must only be used for its intended purpose, i.e. for
heating and/or cooking food; any other use is deemed improper and hazardous.
.
Cola s.r.l. declines any liability for problems, breakage or accidents caused by failure to follow or apply
the instructions contained in this manual.

3
DIANA
1.3 Technical description
The DIANA is a solid fuel cooker designed for room heating and for cooking food both on the hotplate and in the
oven.The cooker has been tested with firewood logs and meets the requirements of UNI EN 12815.
Structure:
steel and cast iron
Radiant hotplate:
cast iron with chrome-plated steel handrail
L x D 846x550 mm
Fire door aperture:
H x W 225x245 mm
Firebox :
in 60 mm thick refractory material
Oven :
stainless steel H x W x D 325x270x450 mm
Rated heat output :
12.86 kW
Efficiency:
72.58 %
Wood consumption :
3.96 kg / h
Flue pipe:
150 mm
Flue outlet:
top (rear with modification)
Max. flue gas temperature:
289.7 °C
Flue draught required:
10 – 14 Pa
Weight:
211 kg
External dimensions:
H x W x D 850x970x610 mm
Safety clearance:
200 mm

4
DIANA
F E
A
B
C
D
I
Fig 1 Dimensions cooker Diana
1.3.1 Fire door and ash pan (A)
The fire door is opened by pulling the handle outwards; use the protective glove supplied with the cooker as the
handle is hot. Thin slots around the top and bottom edges of the glass door provide an airwash to keep the
glass clean.
1.3.2 Primary air flow control (B)
1
3 2 1
Fig.2
Primary air flow control
1.3.3 Stainless steel oven base plate (C)
The bottom of the oven is formed of a 4mm thick
stainless steel plate which can be easily removed to allow cleaning of the flue gas baffle and removal of any
sediment formed underneath the oven.
During operation of the cooker, the stainless steel plate must always be in the correct position, resting on the
ceramic fibre gasket so that the oven is hermetically sealed.
1.3.4 Oven (D)
The oven is heated by the flue gases that flow around it; the oven temperature is indicated on the thermometer
located in the door glass. An adequate flue draught and clean flueways are essential for maximum efficiency.
The oven is supplied with two shelves. When putting the pans into the oven, remember to allow space for the
food to rise, where applicable, to ensure a minimum clearance of 20 mm is maintained between the pan and the
sides of the oven.
The primary air flows into the bottom of the cooker
through the ash pan and the grate. Primary air is
necessary for the combustion process; it is
therefore important to empty the ash pan regularly
to prevent a build up of ash blocking the primary
air inlet. When the control is moved fully to the left,
the primary air inlet is closed; when the control is
moved fully to the right, the air inlet is opened to
the maximum.

5
DIANA
1.3.5 Oven bypass damper (E)
Fig 3 Oven bypass damper
1.3.6 Secondary air flow control (F)
The secondary air flow control is located above the fire door; secondary combustion burns any unburnt gases
produced by the primary combustion process. With the knob in position (C), the secondary air flow control is
closed; when the knob is in position (A), the flow control is open. To increase or reduce the air flow, turn the
knob in the direction + or – .
Fig 4 Secondary air flow control
1.3.7 Cast iron hotplate (I)
In the hot zone of the cast iron hotplate there is a series of concentric rings with a maximum diameter of 320
mm and a rectangular plate where a pan containing water may be inserted. The hotplate rings can be removed
using the poker to allow inspection of the firebox or to allow the insertion of pots as required.
1.4 Permitted and prohibited fuels
Permitted fuels are natural wood logs, dry and free of resin (beech, oak and birch), 20-25 cm long. The wood
should seasoned for at least two years; the maximum recommended moisture content is 20%, in order to obtain
combustion without excessive smoke and soot.
Do not use:
-coal dust;
-small pieces of wood (only permitted as kindling);
-bark and wood shavings;
-general waste;
-treated paper and cardboard;
-wood treated with preservatives.
The burning of waste is prohibited under European and National law.
The gases produced by combustion of unsuitable materials may cause damage to the stove and the
flue, as well as seriously harm your health.
The use of any fuel on the cooker that does not comply with the above indications
invalidate the warranty.
1.5 Accessories supplied
The cooker is supplied complete with the following:
-user instructions;
-poker;
-heat-resistant glove for hot handles.
C -
+ A
0 1
An oven bypass control lever is located above the oven door.
Pulling the lever towards the front of cooker (1) forces the flue
gases to circulate around the oven, thereby increasing the oven
temperature uniformly. When the lever is pushed towards the
inside of the cooker (0), the flue gases flow over the oven and
under the hotplate towards the flue outlet.

6
DIANA
1.6 Reference standards
EN 12815:European standard for cookers fired by solid fuel, containing requirements for design, fabrication,
construction, safety and performance , instructions and markings, together with the relative homologation test
methods.
UNI 10683/98: standard specifying installation requirements for wood fired heating appliances and cookers,
including stoves with natural and forced draught with heat outputs < 35kW.
1.7 Dataplate
The dataplate is affixed to the rear of the cooker. It bears the following data:
-model;
-serial number;
-type of fuel;
-heat output;
-max. consumption;
-min. flue draught;
-average flue temperature;
-efficiency;
-flue pipe size;
-cooker external dimensions;
-minimum safety clearance;
-weight.
1.8 Instructions for ordering replacement parts
For the end-user:
Contact your service centre and/or dealer to order replacement parts.
For the dealer:
To order replacement parts, contact the Cola s.r.l. service centre and/or send a fax clearly specifying the
following information:
-cooker model;
-serial number;
-date of purchase;
-list of parts required;
-details of any faults encountered.
- All work on components must be carried out by authorised and/or qualified personnel.
- Only use original Cola replacement parts.
1.9 Disposal of the cooker
For disposal, the cooker must be sealed inside strong packing; contact the local authority in charge of such
operations in order to proceed according to the current local regulations.
2 –TRANSPORT AND INSTALLATION
2.1 Packing, handling, shipment and transport
The cooker can be lifted using a lift truck, inserting the forks (of suitable length) in the openings provided in the
wooden pallet.
Make sure the equipment used for lifting and transport can support the weight of the stove, as specified on the
dataplate and in this manual.
Avoid taking the load in areas where it could be a danger if dropped.
Set the stove down on the floor carefully without jolting and position it in required place. Make sure the floor can
support the weight of the stove, otherwise consult a specialised technician.
In order to prevent possible damage, the plinths are supplied as separate parts which are to be assembled once
the cooker has been placed in the desired position.

7
DIANA
2.2 Plinth assembly
1- Engage the tab of the side plinth in the relative location (Fig. 5a- 5b)
Fig.5a
Fig.5b Fig.5c
2- Fix the side plinth with the two retaining screws (fig. 5c)
3
- After fixing the two side plinths, insert the front plinth in its location and secure with the retaining screws
(fig.6a-6b)
Fig. 6a
Fig. 6b
2.3 Ceramic tile assembly instructions
Fit the ceramic tiles as follows:
(fig.7) Remove the screws securing the rear
tile trim (a).
(Fig.8) Insert the tiles in the groove
of the front tile trim (b) taking care not to
chip the edges.
b
(Fig. 9) position two of the rubber buffers
supplied on the top edges of the ceramic
tiles and the plinth
a
(Fig.10) detail showing positioning of rubber
buffers on ceramic tiles
10
cm

8
DIANA
COLA ceramic tiles are hand-crafted products and therefore may have minor surface imperfections such as tiny
dots or slight colour variations.
We recommend using a soft dry cloth to clean the ceramic tiles; the use of detergents could highlight any
imperfections.
2.4 Instructions for safe installation
The successful operation of the cooker depends greatly on correct installation, which must be carried out by a
qualified person in accordance with the applicable safety regulations.
A cooker that has been installed incorrectly could cause very serious accidents (fires in the chimney,
insulating material, etc.).
There must be more than 20 cm clearance between the back and sides of the cooker and any combustible
materials. If the floor is made from a combustible material (wood, carpet, etc.), a protective steel sheet with a
recommended minimum thickness of 2-3 mm must be installed.
2.5 Connection to the flue
The DIANA cooker is to be connected to a chimney by way of the flue collar on the hotplate and commercially-
available flue pipes. Connection to the chimney must be made using strong, stable pipes, with a recommended
minimum wall thickness of 1.2-2 mm. The flue pipe connecting the cooker to the chimney should be as straight
and as direct as possible to prevent loss of draught. There must be effective seals at both ends of the flue gas
vent pipe.
When the cooker is operating at the rated output, the flue draught should be between 10 and 14 Pa.
For maximum cooker efficiency, a draught restrictor or damper should be installed in the flue or chimney.
Each appliance must vent its combustion gases through its own flue; two or more appliances must never share
the same flue.
2.6 Room ventilation
It is absolutely essential that the room in which a cooker with natural draught flue is installed receives an
adequate supply of air for combustion, i.e. at least 25 m³ per hour. Vents must be installed to ensure a sufficient
supply of external air; the cross-sectional area of the vents must comply with applicable local regulations. These
vents must be protected by grilles and must not be obstructed.
If the air supply is insufficient, even the operation of an extractor fan in the room could impair operation of the
cooker.
2.7 Bottom baffle
Before operating the cooker, make sure that the bottom baffle, located underneath the removable stainless steel
base plate of the oven, is in the correct position (as shown in the figure).
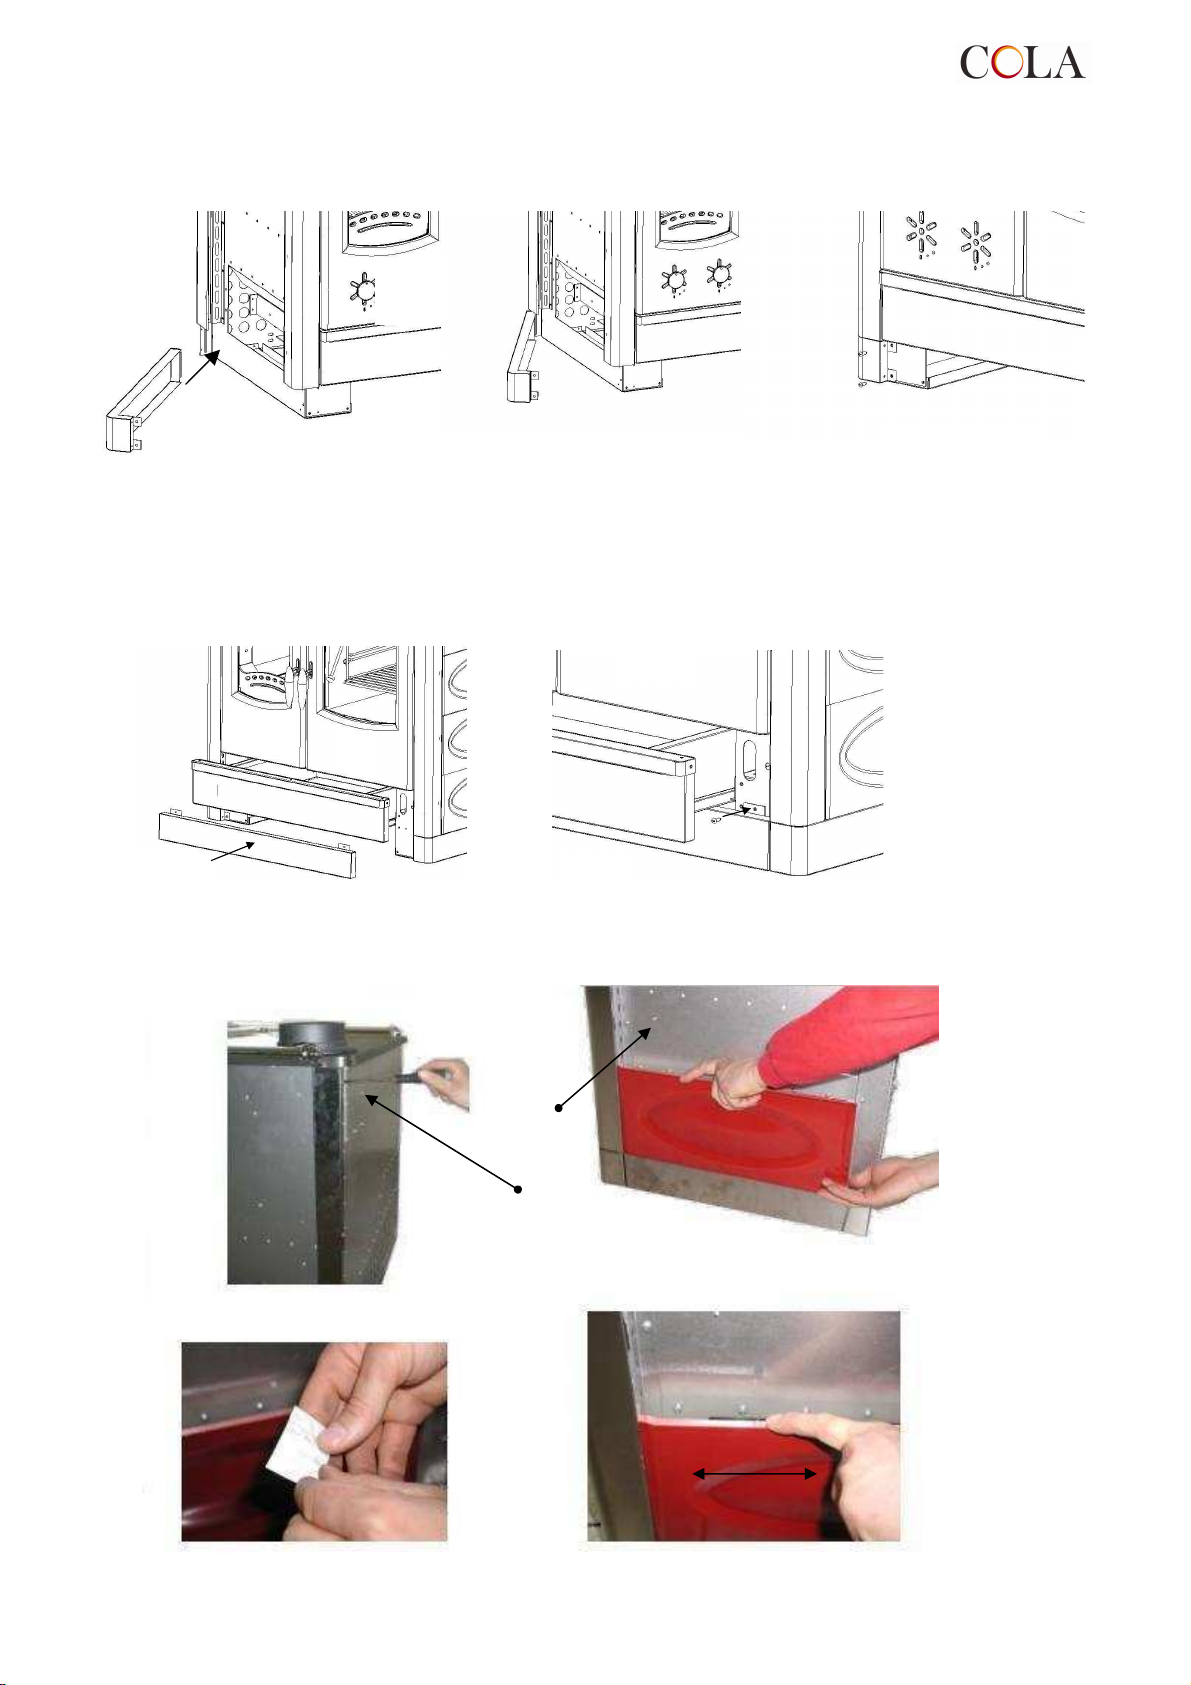
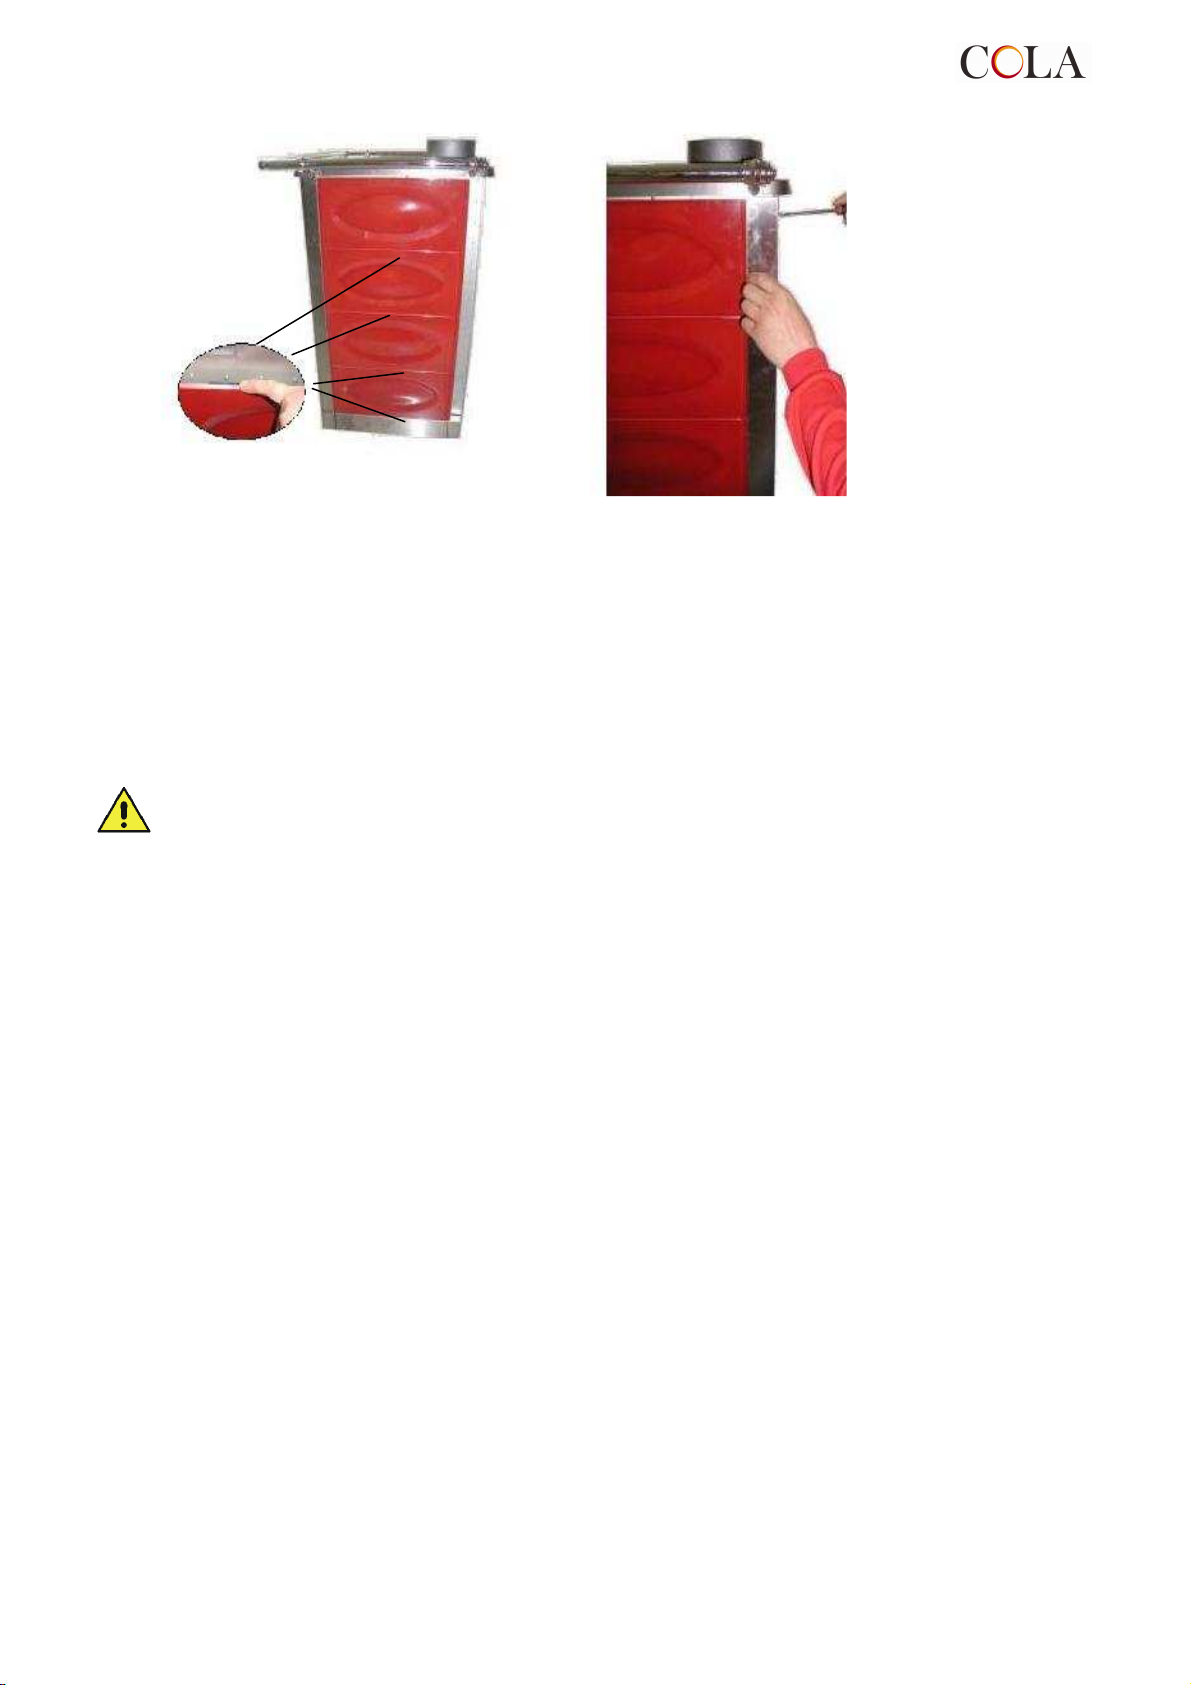
(fig.12) refit the rear tile trim,
taking care not to drop the tiles
and making sure they are fully
inserted in groove of the front
trim (b)
(fig.11) position two rubber buffers on each
tile as shown

9
DIANA
Roof pitch
(α)
(α)(α)
(α)
Distance A H
15° 1.00 m
30° 1.30 m
45° 2.00 m
60°
Greater than 1.85 m
2.60 m
Fig13 Position bottom baffle
2.8 Advice on flues and connections
Flues and chimneys must be constructed of suitable materials and properly insulated to prevent heat loss.
The inner walls must be perfectly smooth, with no restrictions or protrusions along the entire length so as to
avoid the creation of friction and vortices in the smoke with a consequent loss of draught.
The doors of all cleaning and inspection access points must properly closed when the cooker is in operation.
The chimney outlet must be 0.5 m higher than any obstacle located within a 10 m radius and must terminate in
a cowl or pot with a cross-sectional area at least twice that of the flue.
The two diagrams below give the positioning and clearance data for chimney cowls as prescribed by UNI
10683/98.
fig 14 Chimney cowl positioning and clearances
UNI 10683/98 tables
Before connecting a range cooker to an existing chimney, in addition
to the requirements described above, check that there are no apertures or cracks where air could penetrate and
cause heat loss and a consequent reduction in draught.
Check also that there are no obstructions caused by foreign bodies or a buildup of soot. In cases where the flue
pipe is not perpendicular to the axis of the chimney, it is advisable to make the connections with special steel
fittings that allow angles of up to 45°.
If the walls and ceiling are constructed from combustible materials, all
parts adjacent to the flue pipe must be suitably insulated. All connections must be properly sealed, particularly
the joint between the flue pipe from the stove and the chimney. If more than one stove or cooker is installed in
the building, each appliance must have its own flue. We strongly advise against making holes in the flue for the
connection of pipes from other appliances as this could impair the draught.
Roof pitch
(α)
(α)(α)
(α)
Distance B H
15° 0.50 m
30° 0.50 m
45° 0.50 m
60°
Less than 1.85 m
0.50 m
Check that the bottom baffle
is firmly engaged in its seating
and that it positioned so as to
allow the flow of combustion
gases.

10
DIANA
UNI 7429 stipulates that chimney cowls should meet
certain requirements; firstly, their cross-sectional area
must be at least twice that of the flue. It is advisable to
install an anti-downdraught chimney cowl or pot to
ensure the dispersal of flue gases even in the
presence of strong winds.
Fig 16 Chimney cowl design
3 - USE OF THE COOKER
3.1 Introduction
Never leave children unsupervised in the vicinity of the cooker; there is a very high risk of burns from the hot
surfaces.
Also:
- never use the cooker with the fire door open;
- never store firelighters or other easily combustible materials in the vicinity of the cooker;
- never attempt to move or lift the cooker by the handles.
3.2 Adjusting the combustion air flow
Primary air:
The primary air flow can be regulated by way of the manual control located under the fire door (fig. 2); the
primary air feeds the fire through the grate.
Secondary air:
secondary air enters the stove through the adjustable inlet located above the fire door.
Optimal combustion is achieved when the amount of primary combustion air required to feed the fire enters
through grate, while the secondary air entering through the top inlet ensures complete combustion of the gases
in the upper part of the firebox.
3.3 First use
The first time the cooker is lit, some unpleasant odours may be produced; ensure therefore that room is well
ventilated before lighting the cooker.
After lighting the cooker for the first time, allow it to burn with a low flame for several hours with the primary air
flow control open to 30% and very little fuel in the firebox.
You can then build up the fire gradually, thereby allowing the cooker to expand slowly and the gaskets and rope
seals to dry out.
The firebox, which has a refractory cement lining, is subject to thermal stress and expansion and contraction
during the heating and cooling cycles which give rise to the formation of fine cracks; however these cracks do
not have any effect on the efficiency or durability of the cooker.
Fig.15 cooker - flue connection

11
DIANA
3.4 Lighting and controlling the fire
To light the cooker, we recommend using small sticks and newspaper, or commercially available firelighters
(excluding all inflammable liquids).
While lighting the cooker, the primary air control under the fire door should be fully open; once the cooker is lit,
this control is used to regulate the heat output. During the lighting phase, it is also advisable to open the oven
bypass damper by pushing the lever towards the inside of the cooker.
Once the cooker has heated up, adjust the primary and secondary air flows and close the oven bypass damper
by pulling the lever towards the front of the cooker.
Never use petrol, alcohol or other flammable liquids to light the cooker.
3.5 Normal operation
Always remove the ashes from the grate before loading fuel. Put 2-3 logs of firewood on the fire bed.
Although the firebox has large capacity, we recommend putting no more than 2-3 logs on at a time. Overloading
the fire does not increase efficiency but causes the cooker to overheat, thus damaging it.
3.6 Slow burning operation
The heat output of the fire can be controlled by reducing the flow of combustion air. To allow the cooker to
continue burning slowly for several hours, the primary and secondary air flow controls should be open in the
minimum positions.
During slow burning operation, a patina may form on the glass due to the relatively low temperature in the
firebox.
Continuous operation at low heat output is not recommended, however.
3.7 Warm weather operation
When the external temperatures exceeds 15°C, the dr aught may be impaired as the heat output of the cooker
fire is reduced, so that combustion gases are not completely expelled (smell of smoke in the living space). If
this is the case, clean all the ash from the grate and increase the combustion air flow. Put less fuel on the fire
and clean the grate more frequently.
3.8 Operation of the oven
The cooker is equipped with a conventional static oven with a capacity of 39 litres, a stainless steel interior and
2 internal shelves.
A thermometer installed in the enamelled oven door shows the oven temperature.
When the cooker is lit for the first time, the oven should only be used after 1-2 hours operation at normal
temperature (200-250) °C with the oven door left slightly open to allow the elimination of gases produced by
residues of the manufacturing process, such as grease, oil and sealants; once this initial time period has
elapsed, the oven may be used to cook food.
Clean the oven after each use following the instructions given in the relative paragraph of this manual.
The oven may only be used for the purposes for which it is intended, i.e. the cooking of food; any other
use is deemed improper and potentially dangerous
.
3.9 Idle/summer period
In summer, it is good practice to clean the inside of the combustion chamber, the ash pan, the flueways in the
oven, the chimney and the flue; furthermore, all residue on the inside and outside of the cooker should be
removed completely and all seals and gaskets should be inspected and renewed where necessary.
The appearance of the hotplate and other cast iron parts can be maintained by applying neutral vaseline.
On completing the maintenance and cleaning of the cooker, close the doors and air controls to prevent dust and
dirt getting in.
If the cooker is not to be used for a long period, after cleaning as described above and disconnecting the flue,
cover the cooker with a protective sheet and store it in a safe, dry place.

12
DIANA
4 – ROUTINE CLEANING AND MAINTENANCE OF THE COOKER
Good maintenance is important to ensure the functionality, efficiency and durability of the cooker.
Daily, before lighting the fire, clean the grate removing any unburnt wood and any ash from the area around the
ash pan.
4.1 Ash removal
The DIANA continuous burning cooker is equipped with a removable grate that should be cleaned of ash before
each load of firewood using the poker provided.
The ash pan should be emptied regularly, as an accumulation of ash under the grate will obstruct the flow of
combustion air. This will cause the grate to overheat and be damaged.
To avoid risk of fire, allow the ashes to cool in the open air inside a metal container or in the cooker
itself, before disposing of them in accordance with local regulations.
4.2 Cleaning the glass
The glass can be cleaned using a damp cloth or ordinary non-abrasive detergents.
Do not allow any deposits to harden on the glass; remove as soon as possible using a suitable commercial
detergent.
The ceramic glass can withstand temperatures of around 750°C: in the case of breakage, it is advisable to
replace it with an original glass from COLA .
Do not clean the glass while the cooker is in operation, clean it only when the cooker is cold.
4.3 Cleaning the cast iron hotplate
Before lighting the cooker for the first time, we recommend that you clean the hotplate with a soft cloth in order
to remove the protective grease.
Before first use and after cleaning, the hotplate should be preheated for about half an hour with the oven door
open and the oven bypass damper lever pushed towards the inside of the cooker.
For ordinary everyday cleaning of the hotplate, we recommend the use of slightly abrasive materials (eg.: glass
paper or wire wool), rubbing gently in the direction of the surface finish.
Before periods of non-use, apply a thin film of olive oil or neutral vaseline to the hotplate to protect it.
4.4 Cleaning the oven and the bottom baffle
The oven should be cleaned after each use when only slightly warm or cold to prevent cooking residue from
hardening on the surfaces.
To clean the stainless steel surfaces of the oven, use a non-abrasive detergent with a soft cloth and then rinse
thoroughly to remove all traces of detergent which could otherwise contaminate food or corrode the oven.
To access the bottom baffle under the oven for cleaning, open the oven door and remove the stainless steel
base plate.
Fig.17 Removal of the Diana oven base plate
(to remove the oven base plate, first remove the grate and
its lateral supports, then lif
t and tilt the base plate and
remove it as shown in the figure).
Fig. 18 Detail of the DIANA oven bottom baffle
(Clean the surface under the bottom baffle, taking care
not to cut yourself on the sharp edges of the baffle)

13
DIANA
4.5 Cleaning the flue pipes
A reduction in the heat output can almost always be attributed to obstruction of the flue. The leakage of fumes
from the cooker can also indicate a blocked flue.
The cooker flue must be cleaned at regular intervals. The quantity of soot produced and the frequency of
cleaning will depend largely on the type of fuel burnt and how the cooker is used (i.e. with low or high output).
To clean the flue pipes, proceed as follows:
-clean only when the cooker is off;
-close all the openings which are not to be cleaned;
-remove the flue pipes and clean them outdoors;
-clean and remove with a vacuum cleaner all deposits inside the cooker, after removing the hotplate rings
and their support;
-all residue on the grate or in the ash pan must be removed
Take care when refitting the pipes not to damage enamelled or painted parts and the seals .
Dispose of cleaning waste in accordance with the current local regulations.
5 – TROUBLESHOOTING
5.1 The cooker does not work
- Check that the flue connector and the dimensions of the flue pipe are suitable for the heating
power of the cooker.
-Check that the flue is constructed in accordance with the applicable regulations.
-Check that any openings or inspection doors in the flue are properly closed and sealed.
-
Make sure that no other appliances are connected to the flue.
5.2 The cooker is difficult to light
-Open the primary air flow control and the oven bypass damper.
-Use wood and lignite blocks with a low moisture content.
-Check that the room is well-ventilated to ensure the cooker receives a sufficient quantity of oxygen.
-Check that the flue is suitable for the power output of the cooker.
5.3 Smoke leakage
-Check the flue draught.
-Check that the flue pipe connection is effectively sealed.
-Check that the flow of primary air through the grate is not obstructed by ash.
-Check that combustion residue is not blocking the flueways.
-Check that the primary air control is open.
5.4 The glass gets dirty quickly
- Check that the fuel is of the recommend type.
- Check that the firewood is properly seasoned and dry.
- Too much fuel in the firebox
.
- Check that the secondary air flow control is correctly adjusted.
- Check the flue draught .
5.5 Condensation in the firebox
-
Check that the procedure for first time lighting has been carried out properly.
-Check that the fuel is of the recommend type.
-Check that the firewood is properly seasoned and dry.
-Check that the flue is insulated and constructed in accordance with the applicable standards.
-
Check the flue draught.
5.6 The oven does not heat up
-
Check that the oven door is properly closed.
- Check that the oven bypass damper is closed (pos.1 - Fig. 3)
-Check that the fuel burns normally.
-Check that there is sufficient flue draught .
-
Check that flueways are clean
.

14
DIANA
6– ATTACHMENTS
6.1 Warranty certificate
For the warranty terms contact the importer or the authorised agent.
The product warranty is cancelled in case of any problem, breakage or accident due to non-compliance with
the
instructions given in this manual
.
The company reserves the right to make technical or aesthetic modifications to the products at any time without notice.
The drawings, measurements, diagrams and any other configurations are given only by way of example.

15
DIANA
6.2 CE marking information
CE MARKING INFORMATION
07
EN
12815
Solid fuel appliances
Minimum clearance from combustible
materials
:
200 mm
CO emissions in combustion products
:
0.320%
Maximum permitted water
pressure :
- bar
Flue gas temperature :
289.7 °C
Rated heat output :
12.86 kW
Efficiency
:
72.58 %
Fuel type
:
wood logs
Table of contents
Other Cola Cooker manuals
Popular Cooker manuals by other brands

Smeg
Smeg OPERA A31X Function guide

Bush
Bush BRCNB90DBLSS instruction manual

Caple
Caple CR 1200 instruction manual

Parkinson Cowan
Parkinson Cowan Renown RHG50MWN Owners handbook and installation instructions

Bosch
Bosch HXU09AH50A/04 instruction manual

Cannon
Cannon Professional 1000 Use and Installation Instructions