Cold War Glass Nixie Tube Clock #3 IN-14 User manual

Version 3.2, 10/29/2014
Glass Nixie Tube Clock #3
IN-14 Version
User's manual

User manual – Glass Clock Design #3 rev 3.2
!
Cold War Creations, 2014
2
1!Glass&Clock&Design&.................................................................&3!
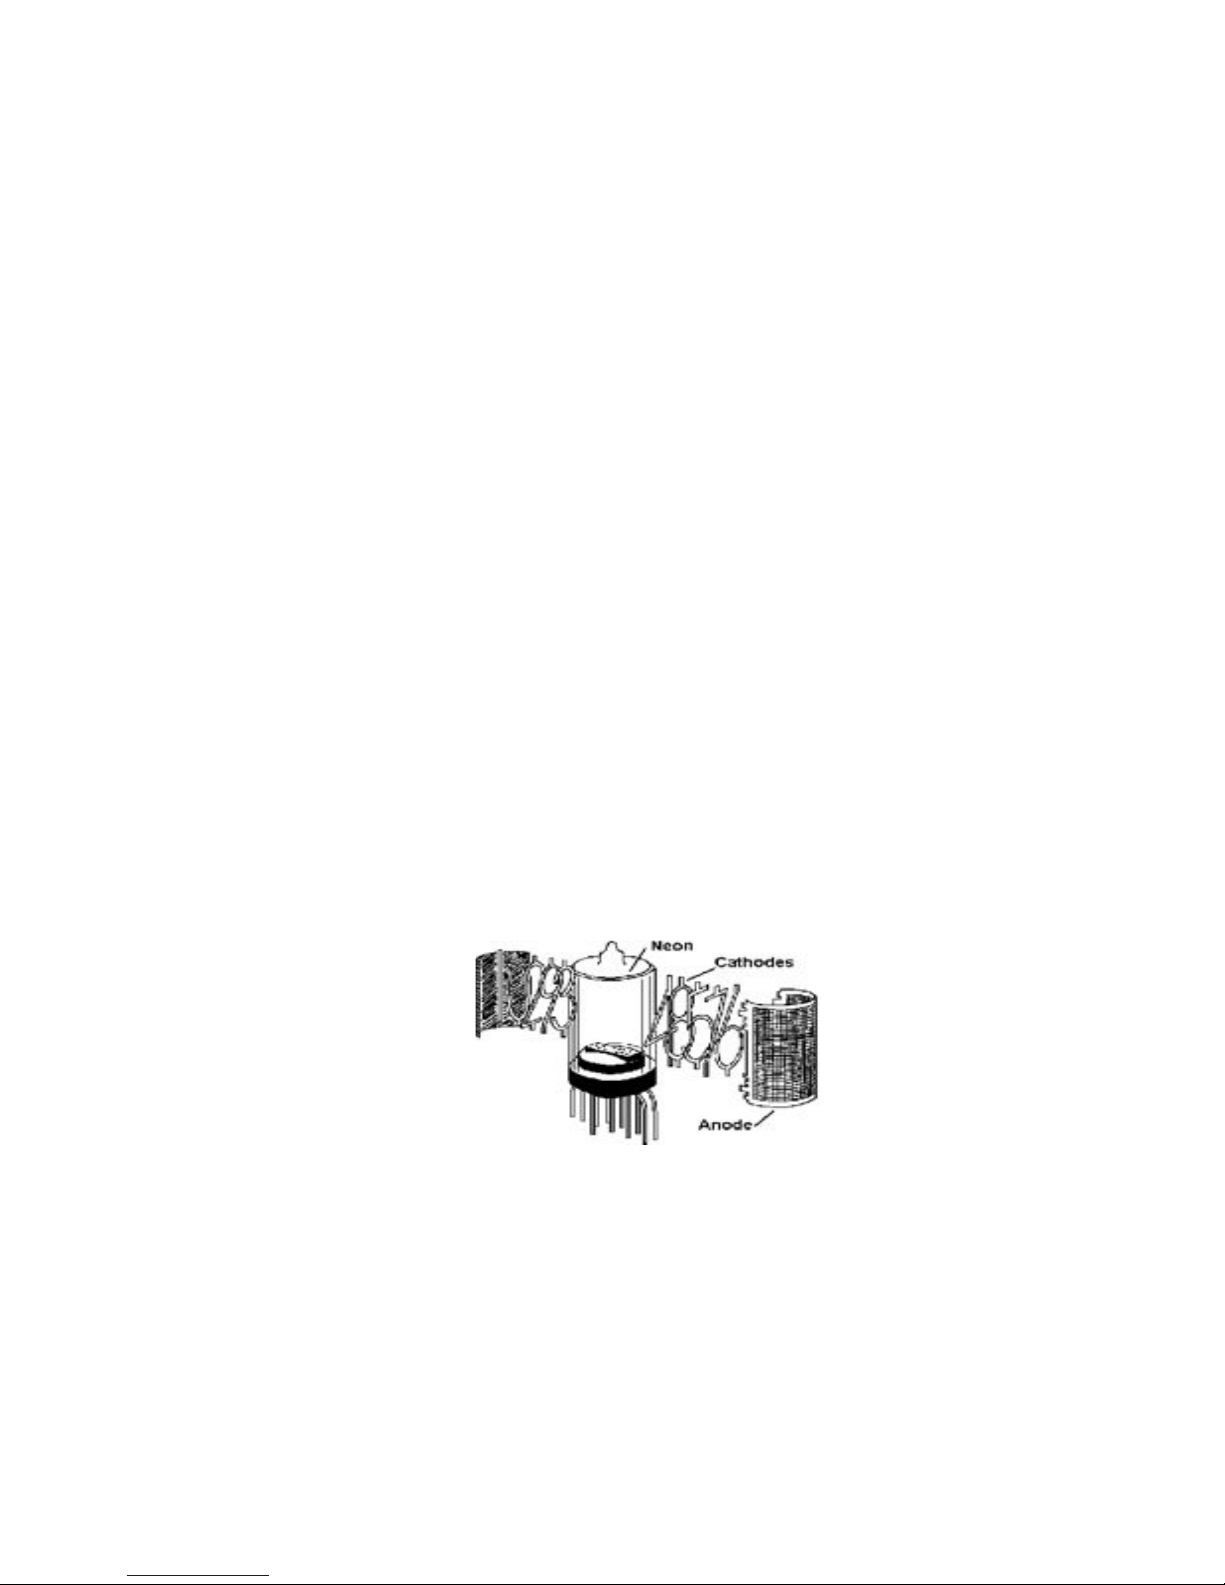
2!Introduction&to&Nixie&Tubes&.....................................................&4!
3!Clock&Features&..............................................................................&6!
4!Unpacking&and&setting&up&the&Clock&......................................&7!
5!Setting&the&Clock&..........................................................................&8!
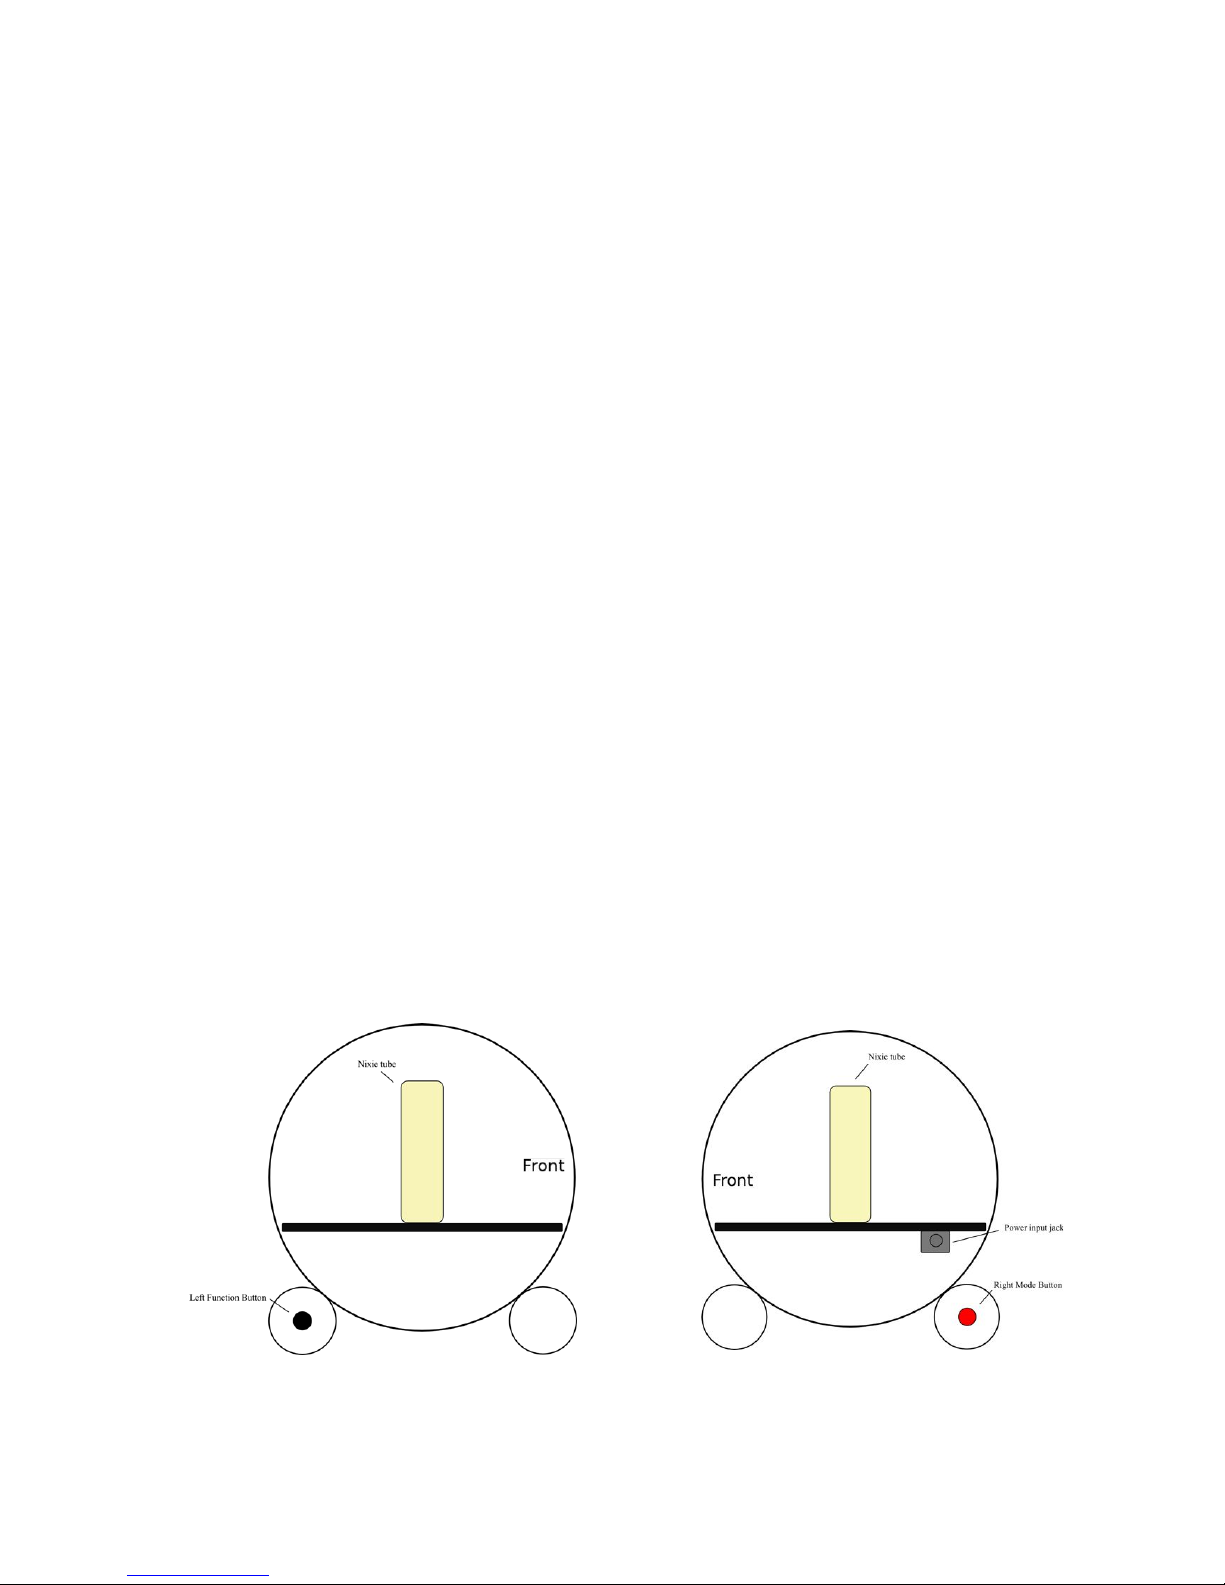
Clock&diagram&.......................................................................................................................................&8!
Setting&the&time&and&date&..................................................................................................................&8!
Set&time&mode&.......................................................................................................................................&9!
5.1.1!Setting!the!time!-!hours!.................................................................................................................!10!
5.1.2!Setting!the!time!–!minutes!...........................................................................................................!10!
5.1.3!Setting!the!time!–!change!hours!for!Daylight!Savings!......................................................!11!
Set&date&mode&.....................................................................................................................................&12!
5.1.4!Setting!the!date!–!month!...............................................................................................................!12!
5.1.5!Setting!the!date!–!day!.....................................................................................................................!12!
5.1.6!Setting!the!date!-!year!....................................................................................................................!13!
Changing&clock&options&...................................................................................................................&14!
5.1.7!Option!1!–!12/24!hour!mode!......................................................................................................!15!
5.1.8!Option!2!–!Date!format!display!option!...................................................................................!16!
5.1.9!Option!3!–!Display!options,!Special!effects!...........................................................................!18!
5.1.10!Option!4!–!Temperature!units,!F!or!C!...................................................................................!20!
5.1.11!Option!5!–!Brightness!level!.......................................................................................................!21!
5.1.12!Option!6!–!Anti-cathode!poisoning!function!.....................................................................!23!
5.1.13!Option!7!–!Colon!Display!Options!..........................................................................................!24!
5.1.14!Option!8!–!Floor!LED!Options!..................................................................................................!25!
Setting&the&display&ON/OFF×&...............................................................................................&26!
5.1.15!Entering!the!OFF/ON!set!time!enable!..................................................................................!26!
5.1.16!Setting!the!OFF!time!....................................................................................................................!27!
5.1.17!Setting!the!ON!time!......................................................................................................................!28!
5.1.18!Disabling!OFF/ON!time!..............................................................................................................!29!
5.1.19!Examples!for!setting!OFF/ON!time!.......................................................................................!30!
5.1.20!New!Year’s!Eve!display!...............................................................................................................!31!
6!Board&Options&.............................................................................&32!
Changing&clock&board&options&......................................................................................................&33!
6.1.1!Option!0!–!Serial!number!.............................................................................................................!34!
6.1.2!Option!1!–!Temperature!offset!value!......................................................................................!35!
6.1.3!Option!2!–!Auto!Off!Light!Level!value!.....................................................................................!36!
6.1.4!Option!3!–!Time!display!interval!value!..................................................................................!37!
6.1.5!Option!4!–!Date/Temperature!display!interval!value!......................................................!38!
7!Trouble&Shooting&the&Clock&....................................................&39!
7.1.1!Display!is!blank!.................................................................................................................................!39!
7.1.2!Time!not!working!............................................................................................................................!39!
7.1.3!Date!is!not!displayed!properly!...................................................................................................!39!
7.1.4!Temperature!display!not!working!...........................................................................................!40!
7.1.5!Colon(s)!not!working!.....................................................................................................................!40!
7.1.6!Decimal!point!of!tube!is!faintly!glowing!................................................................................!40!
7.1.7!Tube(s)!not!working!.......................................................................................................................!40!
8!Maintenance&and&Care&.............................................................&42!
Cleaning&...............................................................................................................................................&42!
Use&.........................................................................................................................................................&42!
9!Warranty&......................................................................................&43!
10!Specifications&..............................................................................&44!

User manual – Glass Clock Design #3 rev 3.2
!
Cold War Creations, 2014
3
1 Glass Clock Design #3
Congratulations on your purchase of this unique timepiece! This clock
uses Cold War era Nixie display tubes. The old is mixed with the new,
using a RISC processor based single chip computer – which has more
processing power than the old computers that originally used these Nixie
tubes.
The case is all optically clear Simax glass from the Czech Republic, and
uses clear acrylic support pieces to complement the glass vacuum tube
construction of the Nixies.
“Стекло часы Дизайн номер 3”, or “Glass Clock Design #3” is the third
design for my Nixie tube based clock. It uses a microprocessor that
multiplexes 3 tubes by 2 (meaning 2 tubes are on at a time, with 3 sets of
2). SMD (surface mount) construction is used throughout. A high
efficiency high voltage power supply is used to generate the 180v
required for the Soviet Nixie tubes.
This is the special version of the Glass Clock #3. It uses rare Soviet IN-
14 tubes. Each tube is socketed to the board, which allows easy
replacement if a tube fails. It’s an excellent size for larger offices and
living rooms.

User manual – Glass Clock Design #3 rev 3.2
!
Cold War Creations, 2014
4
2 Introduction to Nixie Tubes
Nixie tubes (gas indicator tubes) were invented during the Cold War in
the early 50's by a small vacuum tube manufacturer called Haydu
Brothers Laboratories. These tubes were sold by the Burroughs
Corporation, who came up with the trade name “Nixie”. This name refers
to "NIX I", an abbreviation that stood for, "Numeric Indicator
eXperimental No. 1”, which was a label for one of the drawings for the
tube. This was shortened to “NIXIE” and the name stuck.
Early computers and test instruments didn't have any means to display
digits easily until the Nixie tube appeared. Nixies found their way into
numerical computer displays, volt/ohm meters, frequency counters,
radiation counters and even calculators. By the mid 1970's, they were
obsolete (replaced by LED's and LCD displays) and were discontinued.
A Nixie tube display, which should really be called a gas indicator tube,
works like a neon bulb. A neon bulb works by a high voltage ionizing
neon gas, causing the gas to glow with an orange color. The Nixie tube
takes this a step further, by shaping the cathodes like a numeral (0 – 9).
When the cathode is energized, the numeral glows orange. There are
individual cathodes for each digit, 0 – 9. Some tubes have decimal points,
and others may contain special characters, such as “F” or “Hz”.

User manual – Glass Clock Design #3 rev 3.2
!
Cold War Creations, 2014
5
Nixie tubes require high voltage with special drivers for each digit,
provided by a special high voltage converter on the circuit board. There
are many failure modes for Nixie tubes: Breakage of the glass tube, loss
of seal between the metal pins and the glass, and cathode poisoning.
Cathode poisoning is when unused or seldom-used digits acquire a
coating of material “sputtered” off of the active digits. This coating
insulates the metal, making it difficult for the digit to glow.
The tubes used in this clock are Russian (Soviet) military tubes. The
Soviets, seeing the Western Nixie, came up with their own versions with
similar sizes and shapes. Unlike the U.S. Tubes, they were manufactured
well into the 1980's. Since the collapse of the Soviet Union, these tubes
became available on the surplus market. This clock contains the IN-14
series of tubes. One interesting feature is the ‘5’ digit. It is actually the ‘2’
digit upside down and reversed, making for a very unique looking ‘5’.
This clock uses socket pins for the Nixie tubes. The pins allow tubes to
be changed out without soldering. The pins are very small so as not to
change the look of the clock.

User manual – Glass Clock Design #3 rev 3.2
!
Cold War Creations, 2014
6
3 Clock Features
The glass clock has many features. They are listed below:
!Unique look of individually formed digits with a neon orange
glow.
!Optically pure Simax brand glass (from the Czech Republic) tubes
for the outer case and feet.
!Laser cut clear acrylic used for the case’s internal support pieces.
!Time can be displayed in either 12 or 24-hour format, with or
without leading zero blanking.
!Date can optionally be displayed in either “mm dd yy”, “dd mm
yy” or “yy mm dd” format.
!Auto Daylight savings time adjustment.
!Temperature can optionally be displayed in either Degrees F, or
Degrees C.
!Power loss time backup (up to 8 hours), will not lose the time if
power fails, and no battery to replace.
!Nixie tube anti-cathode protection software, helps prevent tube
failure. Once a day, once an hour, or every 15 minutes. User
selectable.
!Programmable display Off period – blanks display, while still
keeping time. Auto shutoff option when ambient light is low. Also
can be programmed to shut off the display during the weekend, or
during weekdays.
!Temperature compensated Quartz Crystal controlled time base for
accuracy.
!Automatic Leap Year correction.
!Auto display brightness settings.
!Options for special effects: cross fading digits, slot effect and
sliding digits.
!Pin sockets for Nixie tubes – allowing easy change out of failed
tubes.
!Optional Nixie tube floor lighting LEDs. Can be disabled at night.

User manual – Glass Clock Design #3 rev 3.2
!
Cold War Creations, 2014
7
4 Unpacking and setting up the Clock
Carefully unpack the clock from the box. The box contains a wall plug-in
power supply, the user manual and the clock itself.
The power supply plugs into the wall outlet. The other end plugs into the
clock’s power input jack.
When powered up for the first time, the clock will go through the self-
test checkout. This checkout will set all the digits to '9', and each digit
(starting with the leftmost digit) will count down from '9' to '0'. When
this is complete the display will read “00 00 00”. Then each digit will go
blank one at a time starting with the leftmost digit. This completes the
self-test.
The clock has two control buttons. On the back left is a black function
button, and on the back right is a red mode button.
At this point, the clock should show “0:00” with the leftmost digits
(hours) blinking. It is now in the time/date set mode. There is no need to
press the right mode button to enter the time set mode. Go to the next
section, “Setting the clock”. Note: Due to the time save function of the
clock, if it was disconnected from power less than 8 hours ago, it will not
enter the time set mode – it will show the current time.
Illustration 2: Side View, Right
Illustration 1: Side View, Left

User manual – Glass Clock Design #3 rev 3.2
!
Cold War Creations, 2014
8
5 Setting the Clock
This section describes how to set the clock. This includes setting the time
and date, plus all the display options. Setting the Nixie clock features is
accomplished by using the red mode button (right side) and the black
function button (left side).
Clock diagram
Setting the time and date
When setting the time/date, the time is entered first followed by the
date. Set the time by pressing the red mode button on the right
side momentarily (Note: when powered up the clock will already
be in set time mode, no need to push the mode button). When
pressed, the hour’s digits will flash on and off once a second
“00:00”. Note: If the mode button is held too long, the display will
blank, indicating that the clock is in the “set on/off time” mode.
Press and hold the red mode button until the display goes blank if
this happens and try again.
Illustration 3: Side view

User manual – Glass Clock Design #3 rev 3.2
!
Cold War Creations, 2014
9
Set time mode
When the clock is in the set time mode, the current time will be
displayed with the hours (2 leftmost digits) blinking “00:00”. The
left most colon will be on steady (no blinking) and the seconds will
be off.
If the colons are blinking, the clock is still in the normal display
mode, and the red mode button on the right side should be
momentarily pressed to enter the set time mode.
Note: If the clock loses time (first setup, or without power for an
extended period of time) the time displayed will be all zeroes:
0:00.
To skip setting the time and go directly to setting the date,
momentarily press the red mode button to skip the time set
functions.
To cancel setting the time value at any point, press and hold the red
mode button until the display goes blank. This will cancel setting
the time/date. When the mode button is released, the clock will go
back to the normal display. The old time value will be used.

User manual – Glass Clock Design #3 rev 3.2
!
Cold War Creations, 2014
10
5.1.1 Setting the time - hours
When the hours (leftmost) digits are blinking, the hour value can
be changed. Note: If changing only the hours, the clock will
continue to count seconds, making Daylight Savings time changes
easier.
The black function button on the left side will change the hour
value when pressed. Holding the function button on will quickly
cycle through the hours (0-23). Note: When setting the hours, 24
hour mode is used, regardless of the hour format setting (12/24
hour display mode). This means '00' is 12 AM (midnight), and '13'
is 1 PM (afternoon). The hour format setting will be used when
displaying the time normally.
Once the hours are set to the proper value, press the red mode
button (right side) momentarily. The clock will then go to the
minutes set mode.
5.1.2 Setting the time – minutes
When the minutes (middle) digits are blinking, the minutes value
can be changed.
The black function button (left side) will change the minute value
when pressed. Holding the function button on will quickly cycle
through the minutes (0-59).
After the minutes are set correctly, momentarily press the red
mode button (right side). At this point, all the digits
(Hours:Minutes:Seconds) will flash once a second. Pressing the
mode button again will update the time to the new settings. Note:
The seconds value will be reset to '00' when the time is set.
Now that the time is set, the clock will go to the set date mode.

User manual – Glass Clock Design #3 rev 3.2
!
Cold War Creations, 2014
11
5.1.3 Setting the time – change hours for Daylight Savings
When changing hours for Daylight Savings time, only the hours
need to be changed, the minutes and seconds will stay the same.
Seconds will continue to count up during the hours set.
When the hours (leftmost) digits are blinking, the hour value can
be changed.
The black function button on the left side will change the hour
value when pressed. Holding the function button on will quickly
cycle through the hours (0-23). Note: When setting the hours, 24
hour mode is used, regardless of the hour format setting (12/24
hour display mode). This means '00' is 12 AM (midnight), and '13'
is 1 PM (afternoon). The hour format setting will be used when
displaying the time normally.
Once the hours are set to the proper value, press the red mode
button (right side) momentarily. The clock will then blink the
minutes. Press and hold the red mode button until the display goes
blank. Let go of the red mode button.
Now that the time is set, the clock will go to the set date mode.
Press and hold the red mode button until the display goes blank.
Let go of the red mode button.
The time is now changed, and the display will go back to normal
time display. Only the hours were changed, the minutes and
seconds are unchanged, and seconds continued to count.
Also an available function to automatically adjust the time for
Daylight Saving Time, see the Options section. Will change the
hour +1 or -1 depending on the time of year. Available in USA-
Canada, Europe or Australian DST zones.

User manual – Glass Clock Design #3 rev 3.2
!
Cold War Creations, 2014
12
Set date mode
When the clock is in the set date mode, the current date will be
displayed with the days (2 leftmost digits) blinking. The colons
will both be off.
The clock will automatically compensate for leap year.
If not in the date set mode, see the “Setting the time and date”
section. Before the date can be set, the time must be set. Note: If
only the date needs to be set, enter time set mode, and momentarily
press the red mode button to go through the hours, minutes until
the date mode appears. The time will not change.
To cancel setting the date value at any point, press and hold the red
mode button until the display goes blank. This will cancel setting
the date. When the mode button is released, the clock will go back
to the normal display. The old date value will be used.
5.1.4 Setting the date – month
At this point, the month number (digits selected depend on date
format) will be blinking. Use the function button to change the
month value ('01' = January, '12' = December, etc).
Once the month value is set to the proper value, press the red mode
button momentarily. The clock will then go to the day set mode.
5.1.5 Setting the date – day
At this point, the day number (digits selected depend on date
format) will be blinking. Use the black function button (left side)
to change the day value (01 – 31).
Once the day value is set to the proper value, press the red mode
button momentarily. The clock will then go to the year set mode.

User manual – Glass Clock Design #3 rev 3.2
!
Cold War Creations, 2014
13
5.1.6 Setting the date - year
At this point, the year number (digits selected depend on date
format) will be blinking. Use the function button to change the
year value ('10' = 2010, '99' = 2099, etc).
Once the year value is set to the proper value, press the red mode
button (right side) momentarily. At this point the date is set and the
clock will go back to the normal display mode.

User manual – Glass Clock Design #3 rev 3.2
!
Cold War Creations, 2014
14
Changing clock options
There are several clock and display options available that can be
changed by the user. When changed, these options will be saved to
permanent memory. They will be saved even if the power is off for
an extended period of time.
Enter the options mode by pressing and holding the black function
button (left side) until the display goes blank. Then release the
function button. The 2 leftmost digits will flash with '12', '24',
‘01’, or ‘02’ value, (indicating option 1). Each option is displayed
one after another (by pressing the red mode button), starting with
option 1 and ending with option 8.
To exit clock options mode, press and hold the red mode button
until the display goes blank. Then release the mode button. Clock
will then go back to normal time display mode.
Table of clock options
Option 1
12/24 hour mode, leading zero blanking
Option 2
Date format option: mm-dd-yy, dd-mm-yy
or yy-mm-dd, Auto DST adjust
Option 3
Display option, time/date/temperature, digit
special effects
Option 4
Temperature units, F or C
Option 5
Brightness level, auto or fixed brightness
Option 6
Anti-cathode poisoning mode start time
Option 7
Colon display options
Option 8
Optional Floor LED lighting options

User manual – Glass Clock Design #3 rev 3.2
!
Cold War Creations, 2014
15
5.1.7 Option 1 – 12/24 hour mode
Display: “12 ☐☐ ☐☐”, left most colon ON
This option selects the hour style displayed:
"12 hour style is 1:00 →12:00 AM/PM (default). Leading
zero on hours blanked. Displays “12 ☐☐ ☐☐”.
"24 hour style is 0:00 →23:00. Leading zero on hours
blanked. Displays “24 ☐☐ ☐☐”.
"Leading zero 12 hour style is 1:00 →12:00 AM/PM
(default). Leading zero on hours displayed, example: 1 AM
would be ’01 00 00’. Displays “01 ☐☐ ☐☐”.
"Leading zero 24 hour style is 0:00 →23:00. Leading zero
on hours displayed, example: 1 AM would be ’01 00 00’.
Displays “02 ☐☐ ☐☐”.
A blinking '12', '24', ‘01’, ot ‘02’ will be displayed in the 2 leftmost
digits, indicating the hour style. To change the style, press the
black function button (left side). Press the red mode button (right
side) when the desired hour style is displayed. Then the next option
will be displayed.
To cancel the option mode, press and hold the red mode button
until the display goes blank. Release the mode button and the clock
will go back to normal operation, aborting setting option 1.

User manual – Glass Clock Design #3 rev 3.2
!
Cold War Creations, 2014
16
5.1.8 Option 2 – Date format display option
Display: “☐☐ 01 ☐☐”, left most colon ON
This option selects the date format displayed. Also, Auto Daylight
Saving Time adjustment. There are 12 different date display/Auto
DST formats available:
"‘01’ = display date format: mm dd yy (default). No DST
adjust.
"‘02’ = display date format: dd mm yy. No DST adjust.
"‘03’ = display date format: yy mm dd. No DST adjust.
"‘11’ = display date format: mm dd yy (default). USA auto
DST adjust.
"‘12’ = display date format: dd mm yy. USA auto DST
adjust.
"‘13’ = display date format: yy mm dd. USA auto DST
adjust.
"‘21’ = display date format: mm dd yy (default). EU auto
DST adjust.
"‘22’ = display date format: dd mm yy. EU auto DST adjust.
"‘23’ = display date format: yy mm dd. EU auto DST adjust.
"‘31’ = display date format: mm dd yy (default). Australia
auto DST adjust.
"‘32’ = display date format: dd mm yy. Australia auto DST
adjust.
"‘33’ = display date format: yy mm dd. Australia auto DST
adjust.

User manual – Glass Clock Design #3 rev 3.2
!
Cold War Creations, 2014
17
A blinking '01' →'33' will be displayed in the 2 middle digits,
indicating the selected date display format. To change the format,
press the black function button (left side). Press the red mode
button (right side) when the desired display format is shown. Then
the next option will be displayed.
To cancel the option mode, press and hold the red mode button
until the display goes blank. Release the mode button and the clock
will go back to normal operation. Option 1 will still be saved, but
option 2 will not be saved.
USA DST auto adjust:
When enabled, will adjust the hour for DST adjustment as
follows:
•Ahead 1 hour the 2nd Sunday in March.
•Back 1 hour the 1st Sunday in November.
•Note: time changes at 2 AM.
EU DST auto adjust:
When enabled, will adjust the hour for DST adjustment as
follows:
•Ahead 1 hour the last Sunday in March.
•Back 1 hour the last Sunday in October.
•Note: time changes at 2 AM.
Australian DST auto adjust
When enabled, will adjust the hour for DST adjustment as
follows:
•Ahead 1 hour the 1st Sunday in October.
•Back 1 hour the 1st Sunday in April.
•Note: time changes at 2 AM.

User manual – Glass Clock Design #3 rev 3.2
!
Cold War Creations, 2014
18
5.1.9 Option 3 – Display options, Special effects
Display: “☐☐ ☐☐ 13”, left most colon ON
There are 3 different display styles available; the following code
numbers are used:
"‘00’ = display time only. No special effects.
"'01' = display time and date. No special effects.
"'02' = display time and temperature. No special
effects.
"'03' = display time, date and temperature. No special
effects.
"‘10’ = display time only with digit crossfade.
"'11' = display time and date with digit crossfade.
"'12' = display time and temperature with digit
crossfade.
"'13' = display time, date and temperature with digit
crossfade (default).
"‘20’ = display time only with digit slot effect.
"'21' = display time and date with digit slot effect.
"'22' = display time and temperature with digit slot
effect.
"'23' = display time, date and temperature with digit
slot effect.
"'31' = display time and date with digit slide across and
crossfade.
"'32' = display time and temperature with digit slide
across and crossfade.
"'33' = display time, date and temperature with digit
slide across and crossfade.
Time is displayed HH:MM:SS (HH = hours, MM = minutes, SS =
seconds) with blinking colons between the digits.
Date is displayed MM:DD:YY (MM = Month, DD = day, YY =
year), or DD:MM:YY.

User manual – Glass Clock Design #3 rev 3.2
!
Cold War Creations, 2014
19
Temperature is displayed TT (TT = temperature, Deg C or Deg F,
see option 4).
The time will display for 15 seconds, followed by the date (if
enabled) for 2 seconds, followed by the temperature (if enabled)
for 2 seconds, then back to the time display.
The Crossfade style option is when a digit changes value (seconds
counting up, etc) the old digit fades out while at the same time the
new digit fades in. This is a user preference, and other than
changing the look of the digits as they change, has no other effect.
The Slot effect option is when a digit changes value (seconds
counting up, etc) the old digit rapidly cycles different digits until it
reads the new value, looking something like a slot machine. This is
a user preference, and other than changing the look of the digits as
they change, has no other effect.
The Slide Across style option is when a switching to a different
display value (time/date/temperature). The old digits “slide” off the
display on the right side and the new digits slide in from the left
side. This is a user preference, and other than changing the look of
the digits as they change, has no other effect.
A blinking '00' →'03', '10' →'13', '20' →'23', '31' →'33' will be
displayed in the 2 rightmost digits, indicating the selected display
style. To change the style, press the black function button (left
side). Press the red mode button (right side) when the desired
display style is shown. The next option will be displayed.
To cancel the option mode, press and hold the red mode button
until the display goes blank. Release the mode button and the clock
will go back to normal operation. Option 1 & 2 will still be saved,
but option 3 will not be saved.

User manual – Glass Clock Design #3 rev 3.2
!
Cold War Creations, 2014
20
5.1.10 Option 4 – Temperature units, F or C
Display: “01:☐☐ ☐☐”, right most colon ON
This option selects the temperature units displayed:
"'00' format is Degrees Celsius.
"'01' format is Degrees Fahrenheit (default).
A blinking '00' or '01' will be displayed in the 2 leftmost digits,
with the colon on. To change the temperature display format, press
the black function button (left side). Press the red mode button
(right side) when the desired hour format is displayed. The next
option will be displayed.
To cancel the option mode, press and hold the red mode button
until the display goes blank. Release the mode button and the clock
will go back to normal operation. Option 1, 2 & 3 will still be
saved, but option 4 will not be saved.
Table of contents