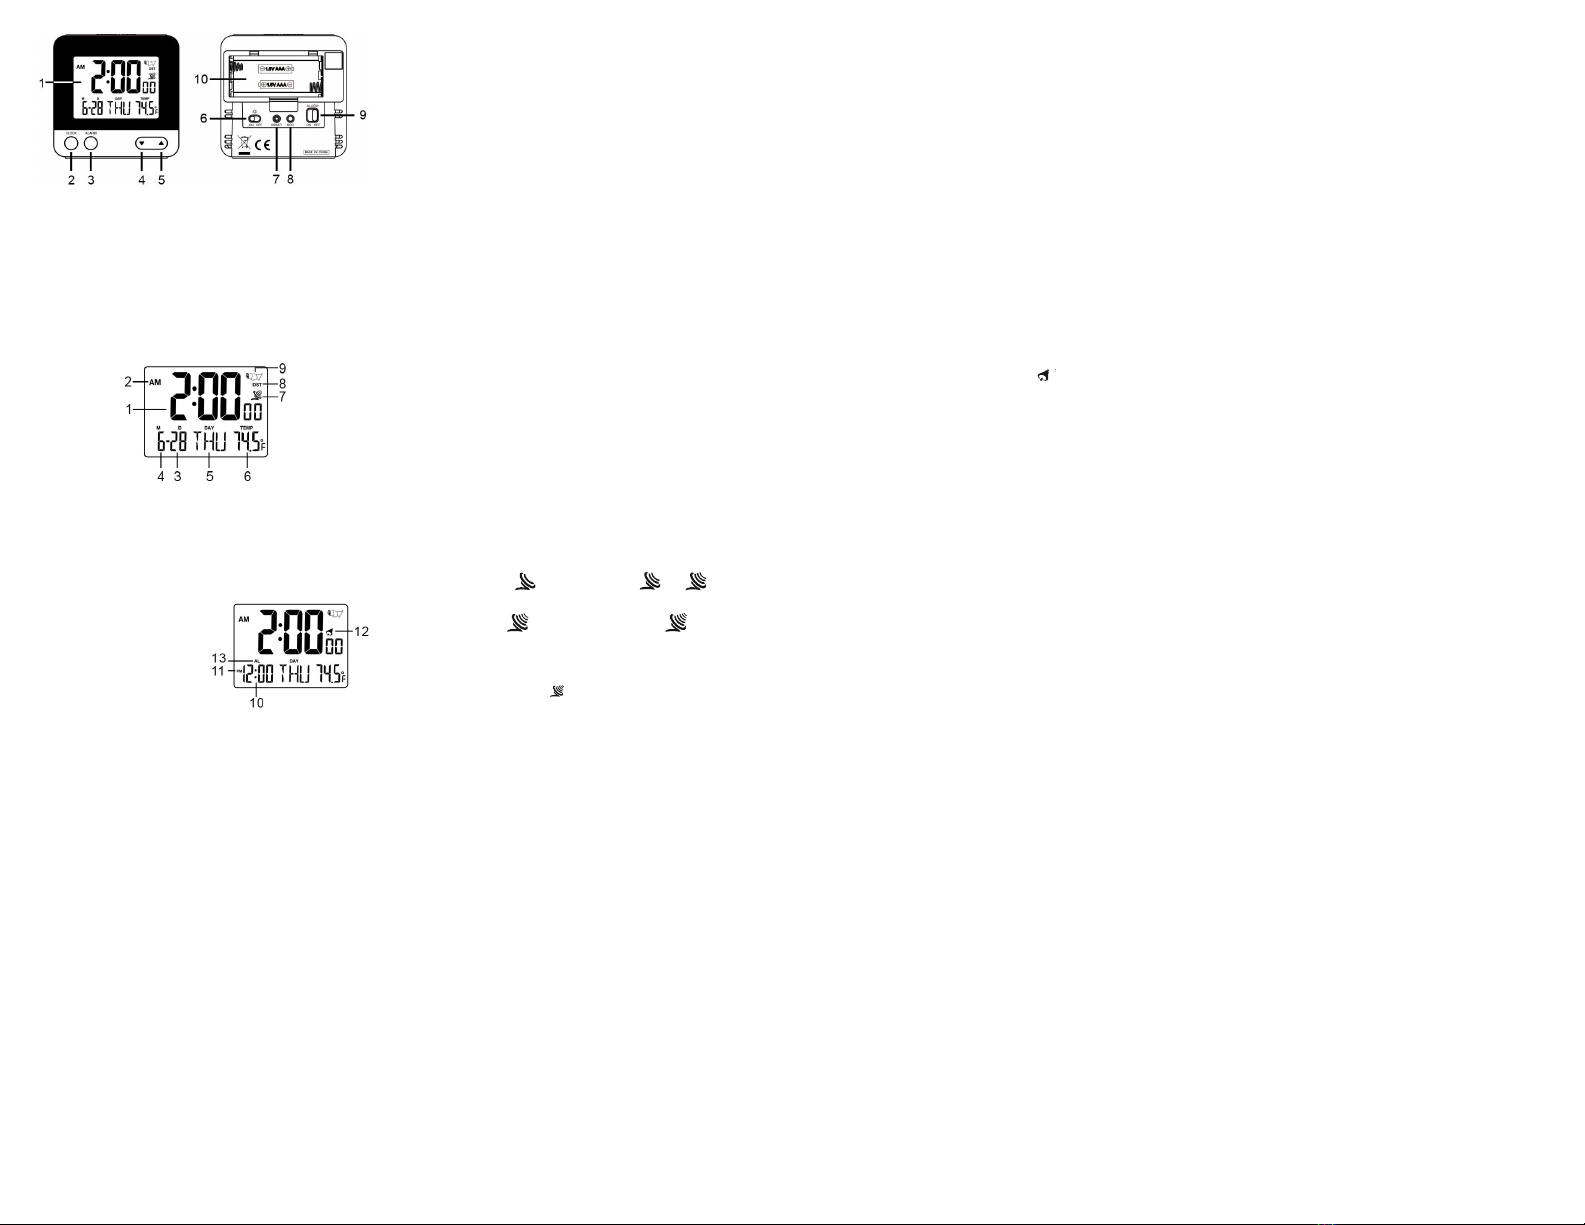
LCD
1. Time
2. AM/PM
3. Month
4. Date
5. Day of the week
6. Temperature
7. Signal strength
indication
8. Daylight saving time
9. Time zone map
ALARM TIME MODE
10. Alarm time
11. AM/PM
12. Alarm icon
13. Alarm setting engaged
CLOCK BUTTON
1. In normal time mode, press and hold CLOCK button
to enter time setting mode.
2. In setting mode, press CLOCK to move through
setting items or press and hold CLOCK button to save
the setting and return to normal time mode.
ALARM BUTTON
1. In normal time mode, press and hold ALARM button
to enter alarm time setting mode.
2. In setting mode, press ALARM to move through
setting items.
3. After setting, press ALARM again to save setting
values.
DOWN KEY
In setting mode, press to decrease setting value.
Press and hold it to speed up the setting.
UP KEY
In setting mode, press to increase setting value.
Press and hold it to speed up the setting.
ALARM ON / OFF SLIDE SWITCH
• Slide it to ON position to turn on alarm function.
• Slide it to OFF position to turn off alarm function.
SNOOZE/LIGHT
• Press SNOOZE/LIGHT key once to turn on back-light
for 5 seconds.
• When unit is alarming, press it to snooze alarm.
NIGHT LIGHT FUNCTION ON/OFF SWITCH
Slide it to ON position to turn on the night light, that the
back-light will turn on automatically when the light-sensor
can not sense light in dark environment.
Slide it to OFF position to turn off the night light function.
RCC KEY
Press it to switch between Celsius and Fahrenheit.
Press and hold it for 3 seconds to receive the RC signal
for reception testing.
RESET KEY
Press it to set all values to default values. In case of
malfunction, the unit may be required to reset.
DAYLIGHT SAVING TIME (DST)
The clock has been programmed to automatically switch
when the daylight saving time is in effect. Your clock will
show “DST” during the summer.
SIGNAL STRENGTH INDICATOR
The signal indicator displays signal strength in 4 levels.
Wave segment ashing means time signals are being
received. The signal quality could be classied into 4
types:
If the radio-controlled clock receives signal successfully,
a sync-time symbol “
4
DAYLIGHT SAVING TIME (DST)
The clock has been programmed to automatically switch
when the daylight saving time is in effect. Your clock will
show “DST” during the summer.
SIGNAL STRENGTH INDICATOR
The signal indicator displays signal strength in 4 levels.
Wave segment flashing means time signals are being
received. The signal quality could be classified into 4 types:
If the RC clock receives signal successfully, a sync-time
symbol “ ” will appear on the LCD. The unit has already
received the time signal. Otherwise the signal strength
symbol will disappear from the LCD display.
Note
You may use the “RCC” button to receive the time signal
manually. The unit will exist the receive mode automatically
after 6-12 minutes. Receive mode consumes more battery
power that may reduce battery lifetime.
TIME AND CALENDAR SETTING
If the clock does not receive the time signal successfully,
you can set the time manually. As soon as the transmitter
is received again, the clock will automatically synchronize
with the received time.
1. In normal time mode, press and hold CLOCK key for
2 seconds until the Time zone digit flashes.
2. Press UP or DOWN key to set the desired value of
the flashing digit, press and hold UP or DOWN key
to speed up the setting.
3. Pres s C LOCK k e y agai n u ntil t h e next d igit
flashes.press UP or DOWN key to change its value.
4. Repeat above operations to set the time and calendar
in this order:
Time zone > Year > Month > Date > 12/24-hr > Hour
> Minute > Second > Language(WWVB version)
5 . Press the CLOCK key to save and exit the setting, or
let it exit automatically 30 seconds later without
pressing any key.
ALARM TIME SETTING
1. In normal mode,press and hold ALARM key for 2
seconds until Hour digit flashes.
2. Press UP or DOWN key to set the desired value,
press and hold UP or DOWN key to speed up the
setting.
3 . Press ALARM key again until Minute digit flashes.and
press UP or DOWN key to change its value.
4 . Press ALARM key again to save and exit the setting,
or let it exit automatically 30 seconds later without
pressing any key.
USING ALARM AND SNOOZE FUNCTION
1. Slide ALARM ON/OFF switch to ON position to turn
on the alarm, with the alarm icon “ ” displayed on
the LCD.
2. Slide ALARM ON/OFF switch to OFF position to turn
off the alarm.
3. When it is sounding,press SNOOZE/LIGHT to stop
the current alarm and enter the snooze mode,with
the alarm icon flashing. Or the sound will stop
automatically one minute later.
4. Once the snooze function is activated, the 4 step
crescendo alarm will sound 5 times in 5-minute
interval. The alarm duration is 60 seconds.
BATTERY REPLACEMENT
When the LCD becomes dim, replace with 2 new AA size
batteries at once. Pay attention to the battery polarity.
Note
Attention! Please dispose of the used unit or batteries in
an ecologically safe manner.
SUGGESTION
Make sure you read the instructions before operating this
delicate clock. We have developed this sophisticated
instrument for the best reception performance; however,
the signal transmitted from USA Atomic Clock transmitter
will be affected in certain situations. We advise you to note
the following instructions:
1. It is strongly recommended to start this clock at night
and let the clock receive the signal automatically
during midnight.
2. Always place the unit away from interfering sources
such as TV set, computer, etc.
3. Avoid placing the unit on or next to metal plates.
4. Closed areas such as airport, basement, tower block,
or factory are not recommended.
5. Do not start reception in moving vehicles such as
cars or trains.
No si g na l qua l i t y
Accep t a b l e s ignal qualit y E x c elle n t s i gna l qua l i t y
Normal t im e m ode Year set t ing Mont h set t ing
12/ 24 Hr set t ing
Second set t in g
Time zone set t ing( W W VB versio n o nly )
Hour set ti ngMinut e set t i ng
Language
set t ing
Alarm t im e set t ing m ode Hour set t in g Minut e set t ing
Warning: Changes or modifications to this unit not expressly
approved by the party responsible for compliance could void the
user's authority to operate the equipment.
NOTE: This equipment has been tested and found to comply with
the limits for a Class B digital device, pursuant to Part 15 of the
FCC Rules. These limits are designed to provide reasonable
protection against harmful interference in a residential installation.
This equipment generates, uses and can radiate radio frequency
energy and, if not installed and used in accordance with the
instructions, may cause harmful interference to radio communica-
tions. However, there is no guarantee that interference will not
occur in a particular installation. If this equipment does cause
harmful interference to radio or television reception, which can be
determined by turning the equipment off and on, the user is
encouraged to try to correct the interference by one or more of the
following measures:
– Reorient or relocate the receiving antenna.
– Increase the separation between the equipment and receiver.
– Connect the equipment into an outlet on a circuit different from
that to which the receiver is connected.
– Consult the dealer or an experienced radio/ TV technician for
help.
” will appear on LCD. Otherwise,
signal strength symbol will disappear from the LCD
display.
NOTE: Use the “RCC” button to receive time signal
manually. Unit will exit receive mode automatically after
6-12 minutes. Receive mode consumes more battery
power that may reduce battery lifetime.
TIME AND CALENDAR SETTING
If clock does not receive time signal successfully, you
can set the time manually. As soon as signal is received,
clock will automatically synchronize with received time.
1. In normal time mode, press and hold CLOCK key for
2 seconds until the Time zone ashes
2. Press UP or DOWN key to set desired value of the
ashing digit, press and hold UP or DOWN key to
speed up the setting.
3. Press CLOCK key again until the next digit ashes.
press UP or DOWN key to change its value.
4. Repeat above operations to set the time and calendar
in this order: Time zone > Year > Month > Date >
12/24-hr > Hour > Minute > Second > Language.
Note: selectable languages and setting order: GB
(English), FR (French), DE (German), ES (Spanish),
IT (Italian).
5. Press CLOCK key to save and exit the setting, or let
4
DAYLIGHT SAVING TIME (DST)
The clock has been programmed to automatically switch
when the daylight saving time is in effect. Your clock will
show “DST” during the summer.
SIGNAL STRENGTH INDICATOR
The signal indicator displays signal strength in 4 levels.
Wave segment flashing means time signals are being
received. The signal quality could be classified into 4 types:
If the RC clock receives signal successfully, a sync-time
symbol “ ” will appear on the LCD. The unit has already
received the time signal. Otherwise the signal strength
symbol will disappear from the LCD display.
Note
You may use the “RCC” button to receive the time signal
manually. The unit will exist the receive mode automatically
after 6-12 minutes. Receive mode consumes more battery
power that may reduce battery lifetime.
TIME AND CALENDAR SETTING
If the clock does not receive the time signal successfully,
you can set the time manually. As soon as the transmitter
is received again, the clock will automatically synchronize
with the received time.
1. In normal time mode, press and hold CLOCK key for
2 seconds until the Time zone digit flashes.
2. Press UP or DOWN key to set the desired value of
the flashing digit, press and hold UP or DOWN key
to speed up the setting.
3. Press CLOCK key again until the next digit
flashes.press UP or DOWN key to change its value.
4. Repeat above operations to set the time and calendar
in this order:
Time zone > Year > Month > Date > 12/24-hr > Hour
> Minute > Second > Language(WWVB version)
5 . Press the CLOCK key to save and exit the setting, or
let it exit automatically 30 seconds later without
pressing any key.
ALARM TIME SETTING
1. In normal mode,press and hold ALARM key for 2
seconds until Hour digit flashes.
2. Press UP or DOWN key to set the desired value,
press and hold UP or DOWN key to speed up the
setting.
3 . Press ALARM key again until Minute digit flashes.and
press UP or DOWN key to change its value.
4 . Press ALARM key again to save and exit the setting,
or let it exit automatically 30 seconds later without
pressing any key.
USING ALARM AND SNOOZE FUNCTION
1. Slide ALARM ON/OFF switch to ON position to turn
on the alarm, with the alarm icon “ ” displayed on
the LCD.
2. Slide ALARM ON/OFF switch to OFF position to turn
off the alarm.
3. When it is sounding,press SNOOZE/LIGHT to stop
the current alarm and enter the snooze mode,with
the alarm icon flashing. Or the sound will stop
automatically one minute later.
4. Once the snooze function is activated, the 4 step
crescendo alarm will sound 5 times in 5-minute
interval. The alarm duration is 60 seconds.
BATTERY REPLACEMENT
When the LCD becomes dim, replace with 2 new AA size
batteries at once. Pay attention to the battery polarity.
Note
Attention! Please dispose of the used unit or batteries in
an ecologically safe manner.
SUGGESTION
Make sure you read the instructions before operating this
delicate clock. We have developed this sophisticated
instrument for the best reception performance; however,
the signal transmitted from USA Atomic Clock transmitter
will be affected in certain situations. We advise you to note
the following instructions:
1. It is strongly recommended to start this clock at night
and let the clock receive the signal automatically
during midnight.
2. Always place the unit away from interfering sources
such as TV set, computer, etc.
3. Avoid placing the unit on or next to metal plates.
4. Closed areas such as airport, basement, tower block,
or factory are not recommended.
5. Do not start reception in moving vehicles such as
cars or trains.
No signal quality
Acceptable signal quality Excellent signal quality
Norm al t ime mo de Year set t in g Mo nt h s et t ing
12/ 24 Hr sett ing
Seco nd set t ing
Time zone set t ing (W W V B v er sion only )
Hour set t in gMi nut e set t in g
Langu age
s et t ing
Alarm t im e set t ing mo de Hour set t ing M inut e set t in g
Warning: Changes or modifications to this unit not expressly
approved by the party responsible for compliance could void the
user's authority to operate the equipment.
NOTE: This equipment has been tested and found to comply with
the limits for a Class B digital device, pursuant to Part 15 of the
FCC Rules. These limits are designed to provide reasonable
protection against harmful interference in a residential installation.
This equipment generates, uses and can radiate radio frequency
energy and, if not installed and used in accordance with the
instructions, may cause harmful interference to radio communica-
tions. However, there is no guarantee that interference will not
occur in a particular installation. If this equipment does cause
harmful interference to radio or television reception, which can be
determined by turning the equipment off and on, the user is
encouraged to try to correct the interference by one or more of the
following measures:
– Reorient or relocate the receiving antenna.
– Increase the separation between the equipment and receiver.
– Connect the equipment into an outlet on a circuit different from
that to which the receiver is connected.
– Consult the dealer or an experienced radio/ TV technician for
help.
it exit automatically 30 seconds later without pressing
any key.
ALARM TIME SETTING
1. In normal mode, press and hold ALARM key for 2
seconds until Hour digit ashes.
2. Press UP or DOWN key to set the desired value,
press and hold UP or DOWN key to speed up the
setting.
3. Press ALARM key again until Minute digit ashes and
press UP or DOWN key to change its value.
4. Press ALARM key again to save and exit the setting,
or let it exit automatically 30 seconds later without
pressing any key. Minute digit ashes and press UP
or DOWN key to change its value.
USING ALARM AND SNOOZE FUNCTION
1. Slide ALARM ON/OFF switch to ON position to turn
on the alarm, with the alarm icon “
4
DAYLIGHT SAVING TIME (DST)
The clock has been programmed to automatically switch
when the daylight saving time is in effect. Your clock will
show “DST” during the summer.
SIGNAL STRENGTH INDICATOR
The signal indicator displays signal strength in 4 levels.
Wave segment flashing means time signals are being
received. The signal quality could be classified into 4 types:
If the RC clock receives signal successfully, a sync-time
symbol “ ” will appear on the LCD. The unit has already
received the time signal. Otherwise the signal strength
symbol will disappear from the LCD display.
Note
You may use the “RCC” button to receive the time signal
manually. The unit will exist the receive mode automatically
after 6-12 minutes. Receive mode consumes more battery
power that may reduce battery lifetime.
TIME AND CALENDAR SETTING
If the clock does not receive the time signal successfully,
you can set the time manually. As soon as the transmitter
is received again, the clock will automatically synchronize
with the received time.
1. In normal time mode, press and hold CLOCK key for
2 seconds until the Time zone digit flashes.
2. Press UP or DOWN key to set the desired value of
the flashing digit, press and hold UP or DOWN key
to speed up the setting.
3. Press CLOCK key again until the next digit
flashes.press UP or DOWN key to change its value.
4. Repeat above operations to set the time and calendar
in this order:
Time zone > Year > Month > Date > 12/24-hr > Hour
> Minute > Second > Language(WWVB version)
5 . Press the CLOCK key to save and exit the setting, or
let it exit automatically 30 seconds later without
pressing any key.
ALARM TIME SETTING
1. In normal mode,press and hold ALARM key for 2
seconds until Hour digit flashes.
2. Press UP or DOWN key to set the desired value,
press and hold UP or DOWN key to speed up the
setting.
3 . Press ALARM key again until Minute digit flashes.and
press UP or DOWN key to change its value.
4 . Press ALARM key again to save and exit the setting,
or let it exit automatically 30 seconds later without
pressing any key.
USING ALARM AND SNOOZE FUNCTION
1. Slide ALARM ON/OFF switch to ON position to turn
on the alarm, with the alarm icon “ ” displayed on
the LCD.
2. Slide ALARM ON/OFF switch to OFF position to turn
off the alarm.
3. When it is sounding,press SNOOZE/LIGHT to stop
the current alarm and enter the snooze mode,with
the alarm icon flashing. Or the sound will stop
automatically one minute later.
4. Once the snooze function is activated, the 4 step
crescendo alarm will sound 5 times in 5-minute
interval. The alarm duration is 60 seconds.
BATTERY REPLACEMENT
When the LCD becomes dim, replace with 2 new AA size
batteries at once. Pay attention to the battery polarity.
Note
Attention! Please dispose of the used unit or batteries in
an ecologically safe manner.
SUGGESTION
Make sure you read the instructions before operating this
delicate clock. We have developed this sophisticated
instrument for the best reception performance; however,
the signal transmitted from USA Atomic Clock transmitter
will be affected in certain situations. We advise you to note
the following instructions:
1. It is strongly recommended to start this clock at night
and let the clock receive the signal automatically
during midnight.
2. Always place the unit away from interfering sources
such as TV set, computer, etc.
3. Avoid placing the unit on or next to metal plates.
4. Closed areas such as airport, basement, tower block,
or factory are not recommended.
5. Do not start reception in moving vehicles such as
cars or trains.
No signal quality
Acceptable signal quality Excellent signal quality
Norm al t im e mode Year se t t ing Mo nt h set t ing
12/ 2 4 Hr sett ing
Seco nd set t in g
Tim e zone sett ing(W W V B versio n only )
Hour se tt i ngMi nut e set t i ng
Lang uage
s et t ing
A larm t im e se t t ing m ode Hour se t t ing M inut e set t ing
Warning: Changes or modifications to this unit not expressly
approved by the party responsible for compliance could void the
user's authority to operate the equipment.
NOTE: This equipment has been tested and found to comply with
the limits for a Class B digital device, pursuant to Part 15 of the
FCC Rules. These limits are designed to provide reasonable
protection against harmful interference in a residential installation.
This equipment generates, uses and can radiate radio frequency
energy and, if not installed and used in accordance with the
instructions, may cause harmful interference to radio communica-
tions. However, there is no guarantee that interference will not
occur in a particular installation. If this equipment does cause
harmful interference to radio or television reception, which can be
determined by turning the equipment off and on, the user is
encouraged to try to correct the interference by one or more of the
following measures:
– Reorient or relocate the receiving antenna.
– Increase the separation between the equipment and receiver.
– Connect the equipment into an outlet on a circuit different from
that to which the receiver is connected.
– Consult the dealer or an experienced radio/ TV technician for
help.
” displayed on
the LCD.
2. Slide ALARM ON/OFF switch to OFF position to turn
off the alarm.
3. When it is sounding,press SNOOZE/LIGHT to stop
the current alarm and enter the snooze mode,with the
alarm icon ashing. Or the sound will stop automati-
cally one minute later.
4. Once the snooze function is activated, the 4 step cre-
scendo alarm will sound 5 times in 5-minute interval.
The alarm duration is 60 seconds.
ALL OPERATIONAL DIFFICULTIES
If this clock does not function properly for any reason,
replace the battery with a new high quality battery (see
the “Battery Replacement” section). Low battery power
can occasionally cause any number of “apparent”
operational difculties. Replacing the battery with a new
fresh battery will solve most difculties.
BATTERY REPLACEMENT
Erratic readings, a faint display, no display, or a battery
symbol appearing on the display are all indications that the
batteries must be replaced. Remove the battery cover locat-
ed on the back of the unit. Remove the exhausted batteries
and replace them with two (2) new AAA alkaline batteries.
Insert the new batteries with the proper polarity as indicated
by the illustration in the battery compartment. Replace the
battery cover.
Replacing the batteries will reset all settings to default
values.
Warning: Changes or modications to this unit not expressly
approved by the party responsible for compliance could void
the user’s authority to operate the equipment.
NOTE: This equipment has been tested and found to comply
with the limits for a Class B digital device, pursuant to Part
15 of the FCC Rules. These limits are designed to provide
reasonable protection against harmful interference in a
residential installation. This equipment generates, uses and
can radiate radio frequency energy and, if not installed and
used in accordance with the instructions, may cause harmful
interference to radio communications. However, there is no
guarantee that interference will not occur in a particular in-
stallation. If this equipment does cause harmful interference
to radio or television reception, which can be determined by
turning the equipment off and on, the user is encouraged to
try to correct the interference by one or more of the following
measures:
• Reorient or relocate the receiving antenna.
• Increase the separation between the equipment and
receiver.
• Connect the equipment into an outlet on a circuit
different from that to which the receiver is connected.
PRODUCT DESCRIPTION
1. LCD display
2. CLOCK key
3. ALARM key
4. DOWN key
5. UP key
6. NIGHT LIGHT ON/
OFF switch
7. RESET key
8. RCC key
9. ALARM ON/OFF
10. Battery compartment


