Colnatec Eon-LT User manual

user guide
eon-LT
pc-based monitor
for vers. 3.0.11 software
TM

5
5
7
9
9
13
13
13
14
15
16
17
17
17
18
19
19
19
20
20
21
21
21
21
21
21
Chapter 1: Eon-LT™ at a Glance
Eon-LT™ Connectors
Accessories
Chapter 2: Getting Started
Eon-LT™ System Assembly
Chapter 3: Program Control
Program Control Screen
Process List
Layer List
Layer Properties List
Chapter 4: Settings
Settings Screen
Backup & Restore
Sensor Alerts
Log
Restore Defaults
Relay Control
Sensor Zeroing
Chapter 5: Vertical Tool Bar
Aborting a Process
Logging Eon-LT™ Status
Zeroing the Sensors
Activating Relay 2
Exiting Eon-LT™ Software
Contents
2
Contents

23
23
24
24
25
25
26
26
27
27
27
28
28
29
29
29
30
30
31
32
33
33
33
33
Chapter 6: Status
Status Screen
Health, Layer,
Zero Sensor
Temperatures
Chapter 7: Green Status Bar
Process Control
Chapter 8: Graphs
Graph Screen
Graphs
Color Key
Chapter 9: Screen Lock
Eon-LT™ Screens
Screen Lock Button
Locking a Screen
Setting a New
Resetting the
Chapter 10: Troubleshooting
Chapter 11: Specifications
Process Display
Communications
Contents
3
Contents

4
Contents
34
34
35
35
35
35
35
36
36
36
36
36
37
37
37
37
38
39
41
42
42
42
42
42
44
45
45
46
Appendix A: Phoenix-Eon-LT™ System
Phoenix-Eon-LT™
Appendix B: Quick Info
Screen Selection Tool Bar
Process
Renaming a Process
Deleting a Process
Process
Process
Copy a Layer
Layers
Changing Properties of a Layer
Layer Properties List
Removing a Layer
Deleting a Layer
Changing the Material for a Layer
Settings
Appendix C: Safety, Handling, & Support
About Eon-LT™
Inspection & Initial Setup
Appendix D: Tooling Factor
Appendix E
Index
Contents

Eon-LT ™at a Glance 1
Eon-LT™ software version 3.0.11.
5
Chapter 1 Eon-LT™ at a Glance
Type K Thermocouple
Inputs
Measures temperature
using thermocouples.
BNC Sensor Inputs
Connects to sensor
oscillator.
Outputs
Eon-LT™ Front
Eon-LT™ Back
Eon-LT™ Connectors
Power Input
Connects to
power input
RS-232
Connects Eon-LT™ to
PC. (Always use the
USB-to-RS232
LED Indicator
Displays status

WARNINGEon-LT™
the Phoenix-
WARNINGEon-LT™.
6
Chapter 1 Eon-LT™ at a Glance

7
Accessories
The Eon-LT™ ships with a variety of accessories.
Chapter 1 Eon-LT™ at a Glance
Power supply and cable
USB to RS-232 adapter
RS-232 extension cable. Male-to-female serial cable.
Euro
US

8
Chapter 1 Eon-LT™ at a Glance
External oscillator (optional). Replaces the Eon-LT™ internal oscillator.
Software CD. Contains Eon™ software suite.

Getting Started 2
9
Chapter 2 Getting Started
Eon-LT™ System Assembly
Eon-LT™ monitor into a
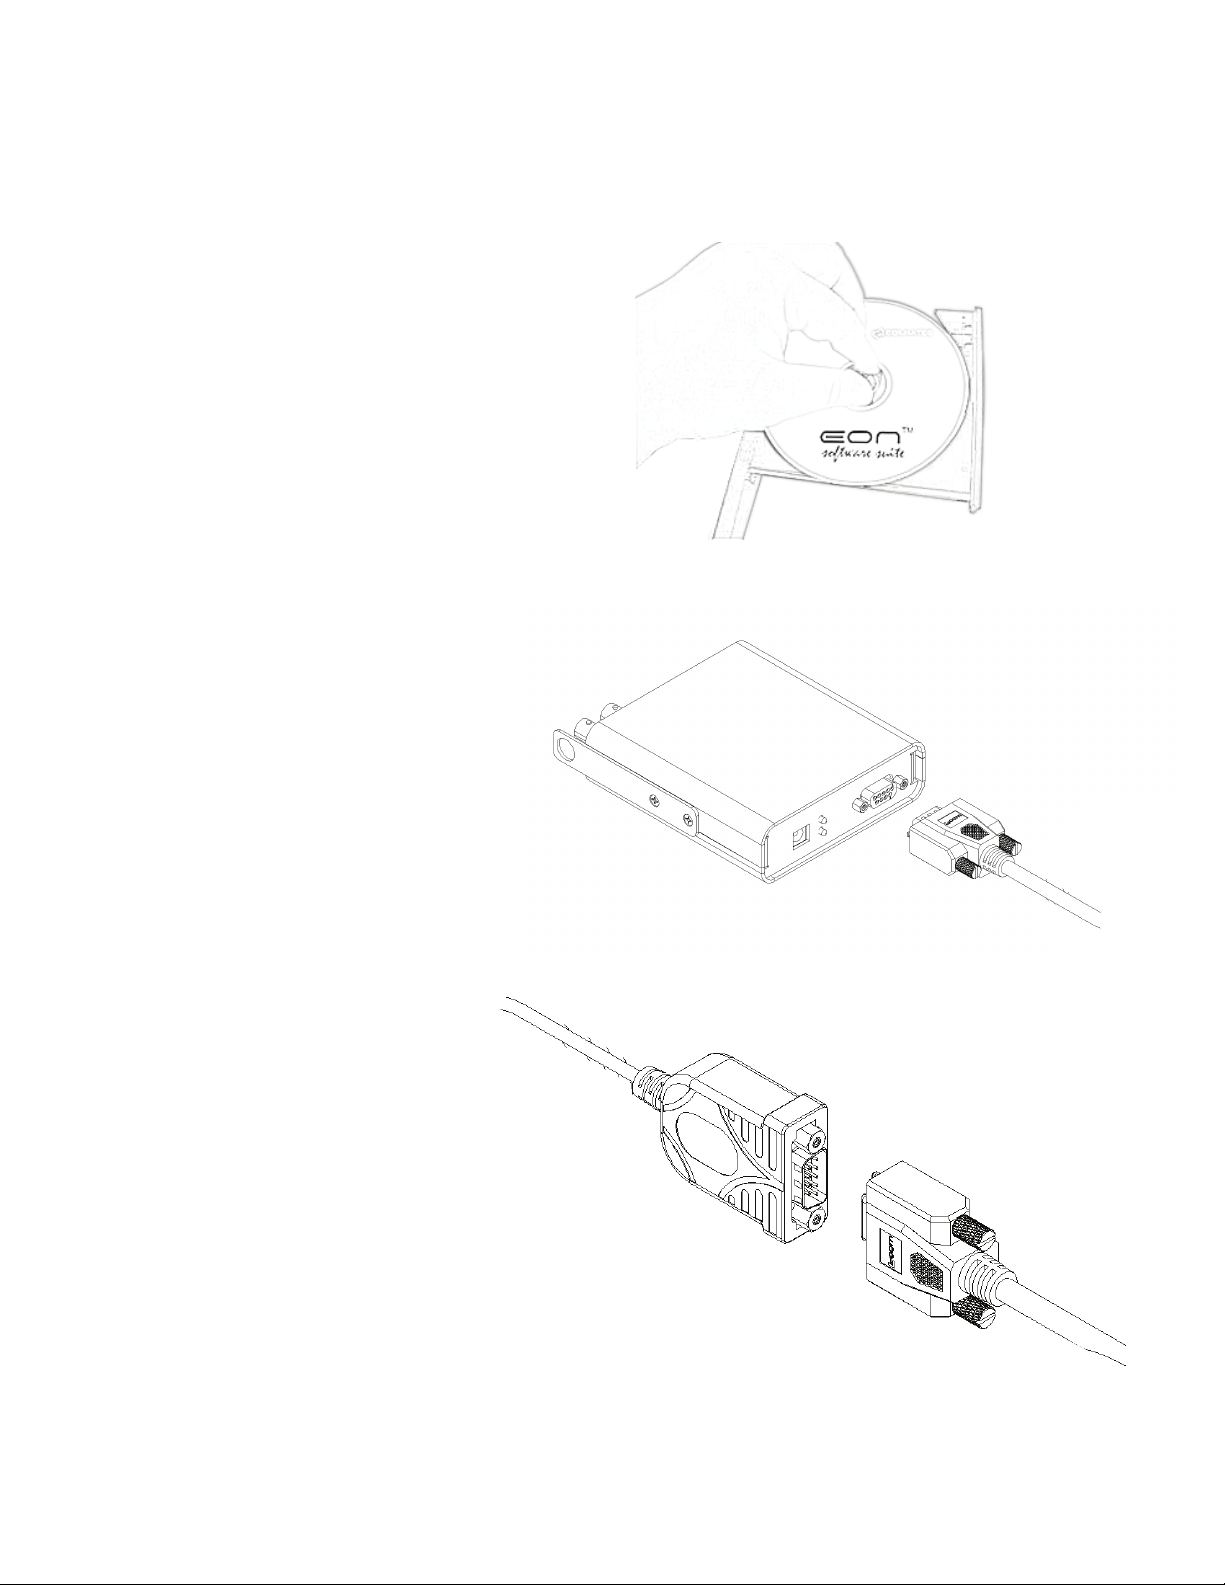
1. Connecting to QCM
Connect SMA Coaxial Cable
to QCM
Spin cable in place using
cable shaft until resistance is
felt. (Twisting cable shaft past
point of resistance may
over connector to tighten.
2. Connecting to Eon-LT™
Connect QCM to Eon-LT™
Connect BNC extension cable
to SMA, which then connects
of the BNC extension cable to
the Eon-LT™ coaxial input
TC to Eon-LT™
(applies only if using
Phoenix™ sensor)
Plug thermocouple
connector into the Eon-ID™.

10
Chapter 2 Getting Started
2. RS-232 to Eon-LT™
Plug RS-232 connector
into female serial port
on rear panel. Tighten
Connecting Eon-LT™ to PC
1. Install Eon-LT™ Software
onto PC
Insert the accompanying
Eon-LT™ software CD into
install software onto PC.
3. RS-232 cable to USB
Adapter
RS-232 cable into the USB-

4. Plug USB-to-RS-232
Adapter into PC
Plug USB-
11
Chapter 2 Getting Started
5. Connect Power to
Eon-LT™
Plug Eon-LT™ power
Then plug DC connector
into the Eon-LT™.
6. Start Eon-LT™ Software
Start
navigate to the Program
Control screen to begin
creating your processes

12
Chapter 2 Getting Started
If
installing software.
USB cable.
Eon-LT™ to your PC.
Reboot PC following Eon-LT™ software installation.

Program Control 3
13
Chapter 3 Program Control
Program Control Screen
Click the Program button in the Control Menu to access the
layer properties.
Process List
Create a new process.Process List
Process List
Layers List Layer Properties List
Create new, or
delete existing
process
Permanently
delete layer
Screen Selection Tool Bar
Vertical Tool bar
Create new, or
delete existing
layers

Layers List
Open the Layers List.Click a process name.
rate,
Add a layer.Click a process name.
Select a layer. Single-click.
Edit layer name. Double-click a thickness. Click
14
Chapter 3 Program Control
Renaming a process. Double-click a process in the Process Layers List.
Copy Layer
Change order of layerslayer up or
Remove Layer
Delete a process.

Permanently remove layer
15
Chapter 3 Program Control
Layer Properties List
or change the value of a layer property. (Note: Sensor operate
Open Layer Property Value window. Double-click a layer property at any time, even
Create new layer
an existing layer by typing in the
list of currently available layers.

• Materials
The
to “Custom” if the Density or
prevent mismatch.
• Density
• Z-Factor
material.
• Tooling [%]
the sensor.
16
Chapter 3 Program Control
Select a materialMaterial row to open the Materials List.
Select the applicable
Z-Factor is automatically set.
LayerPropertiesDened
settings must be set correctly for the software to function properly.
If the
can then manually enter your custom Z-Factor settings in the Layer Properties
List. Note also that whenever you manually change Z-Factor settings to an
material, the software will automatically classify the material as “Custom”.
Materials list.

Settings 4
17
Chapter 4 Settings
Settings Screen
Click the Settings button in the Screen Selection tool bar to access the Settings screen.
Use tabs to select settings operations. The Settings screen enables user to perform
Backup & Restore
The
Eon-LT™ software.
Selecting Backup brings up the Backup screen.
Vertical Tool bar
Screen Selection Tool Bar
Settings Screen Tab Group

Sensor Alerts
The Sensor Alerts
crystal failure alerts, which occur when the crystal
environment.
18
Chapter 4 Settings
Backup screen, click on the item you wish to save.
Restoring backed up settings. Selecting the Restore button opens
the Restore screen.
clicking on the appropriate button. Note: The restoration process will overwrite any of the
current settings you restore.

Log
Append Log Name
Eon-LT™ software.
Note
name to take effect.
Note
[ * / > “ : | ]. Eon-LT™ software raises a prompt to warn the
19
Chapter 4 Settings
Restore Defaults
The Restore Defaults
results.
Openingsavedlogles. Selecting the Open Log Folder opens
“Public Documents\EON_LOGS\”.
Period Control
The Period
collection
current value.
Changing the measurement magnitude only affects the Status screen.

Before Log. Pressing
20
Chapter 4 Settings
Relay Control
The Relay Control
Manual
Sensor Zeroing
Sensor ZeroingSensor 1 or Sensor 2.
Other manuals for Eon-LT
2
Table of contents
Other Colnatec Monitor manuals