GETTING STARTED
Congratulations on your purchase, not to mention your good taste.
Welcome to a more colorful world brought to you by Color Kinetics
and Chromacore®, our patented technology that generates colored
light and effects using a microprocessor to control Red, Green and
Blue LEDs. This guide contains important information not only on
operating your new ColorBlast™, but also on using it safely. For your
protection, please read it carefully before you embark on your color-
ful adventure. There are very few rules, but those that exist are there
for your safety.
Included in this box:
(1) ColorBlast with base and canopy assembly
(2) fastening screws for indoor installation
(1) swivel bracket for indoor installation
(1) user guide
IN THE BEGINNING
Setting Up Your New System
This section examines how to find your way around ColorBlast and
how Chromacore tells ColorBlast to “think.”
Lay of the Land
Fig.1: ColorBlast Light Fixture below indicates the components of each
ColorBlast fixture.
Installation
This fixture should be installed by a qualified electrician in accor-
dance with NEC and relevant local codes for Class 2 power sources.
ColorBlast can be installed indoors or outdoors. When mounting on
walls and ceilings, an electrical junction box must be in place (electri-
cal junction box is not included with ColorBlast) and a 24V DC
Class 2 power supply must be available for each light. Color Kinetics
offers a number of power supply options. Contact Color Kinetics for
recommended power supplies.
MOUNTING COLORBLAST INDOORS
Flush mounting to electrical box on surface i.e., wall, ceiling
Attach the flat legs of the swivel bracket to the electrical junction box
using the screws supplied with the junction box. (See Fig. 2.)
Place the two fastening screws (included with ColorBlast) through
the two holes in the base and canopy assembly as shown in Fig.2.
Insert the screws in the holes in the bent leg of swivel bracket, but do
not tighten them. Rotate the light to the desired position. Tighten the
screws to hold the light in place.
Standing on floor without connecting to electrical box
When the light will be standing on the floor or other level surface,
you can choose to use it with or without the canopy. We recommend
removing the cable from passing through the baseplate, so that the
unit lies flat. To remove the cable from the baseplate, loosen the lock-
nut on the topside of baseplate. Pull the cable through the grommet. If
you wish to remove the canopy, remove the locknut on the underside
of the baseplate. Remove the canopy and remove the grommet from
the baseplate. The unit can now be placed securely on the floor.
MOUNTING COLORBLAST OUTDOORS
When used outdoors, ColorBlast must be mounted to a 4" electrical
junction box rated for outdoor use. To insure a tight seal, the canopy
must first be removed.
To remove the canopy, remove the locknut on the underside of the
baseplate. Remove the canopy and replace the locknut on the grom-
met. To mount to an outdoor electrical junction box, be sure to use the
screws that come with the junction box (not included with ColorBlast).
Note: Do not use the screws included with ColorBlast.
Place the two outdoor mounting screws through the two holes in the
baseplate. Place the screws through the gasket (supplied with the out-
door electrical junction box) and into the electrical junction box.
Tighten the screws to hold the light in place, as shown in Fig.3 below.
MAKING ELECTRICAL CONNECTIONS TO COLORBLAST
WARNING: DO NOT HOT SWAP. Make sure the power supply is
off before connecting or disconnecting fixtures. Otherwise, damage to
the fixture may result.
Power connections
ColorBlast requires 24V DC. Once the product is installed, run the
power/data cable to your power supply (for most multiple light
installations) or your Power/Data Adapter (for most single light instal-
lations).
NOTE: Each light must receive power directly from a power supply.
It is not possible to daisy chain power from ColorBlast to ColorBlast.
ColorBlast must use only the cable supplied with the unit. Use of other
cables may result in light failure. Custom cable lengths are available
from Color Kinetics.
ColorBlast cable contains five color-coded wires. The color-coding is:
• Black = Ground
• White = +24VDC
• Red = Data input +
• Green = Data input –
• Bare = Data shield
For details on connecting ColorBlast to a power supply, refer to the
power supply documentation.
Data connections
For multiple light installations, data connections for ColorBlast can be
made through the power supply (See Fig.4).
For single light installations, data connections can be made through
the Power/Data Adapter (See Fig.5).
Do the DIP
Your ColorBlast has been pre-programmed with an assortment of
Shows. The back of each ColorBlast light holds the key to setting your
colorful world. Control, Effects and Variations are all determined by
setting the DIP switches. We suggest you reposition DIP switches with
a blunt object such as a stylus or pen cap, not with a sharp object
which may damage the units.
In order to select or change the Control, Effects, or Variations, discon-
nect the power to ColorBlast, configure the DIP switches according to
the desired Show, and then repower the unit. New Shows will not be
displayed until the unit is repowered.
TALK THE TALK
For the most part, the language of Color Kinetics and Chromacore is
oriented around three categories: Control, Effects, and Variations.
If you look at nothing else in this guide, don’t miss Table 1: Settings
Table. This table is the key to what each DIP switch setting governs.
You’ll see from this table that in general, DIP Switches #10-12 deter-
mine the method of Control and the Effect. DIP Switches #1-9 govern
the Variations within the Effects.
Control
“Control” refers to input—how the user chooses to control ColorBlast
in order to produce the desired Shows. ColorBlast can operate via
either of these control methods:
• Networked Control (externally directed control)
If externally controlled, ColorBlast will run according to the data fed
to it from the external controller. You can set ColorBlast to take exter-
nal signal via either of the following methods of Networked control:
DMX512 control or PC control. If this is your method of Control,
you can skip directly to the “Wired” section of this user guide.
• Stand Alone (“on-board” or built-in control)
In Stand Alone mode, ColorBlast will repeat the same Show for as
long as it is being powered. If you are using Stand Alone mode,
proceed directly to the next section to choose the desired effect.
Effects (For Stand Alone operation only.)
“Effects” refer to what type of output, or displays, are produced. With
ColorBlast you can select any of the following Effects in Stand Alone
mode:
• Fixed Color • Random Color
• Color Wash • Fixed Color Strobe
• Cross Fade • Variable Color Strobe
Variations (For Stand Alone operation only.)
Once you have chosen the desired Effect, you can then choose differ-
ent Variations which will further modify the Effect by adjusting factors
such as:
• Color • Saturation
• Speed • Cycle Direction
• Brightness • Strobe Rate
Not every Variation is available with every Effect. Each Effect has
a unique combination of variables. But if you follow the Color
Kinetics Easy Step Program you can start experimenting to your
heart’s content:
1. Pick a desired Effect
2. Customize the Effect within the existing range of Variations
3. Sit back and enjoy the compliments—ColorBlast isn’t the only thing
with a brain!
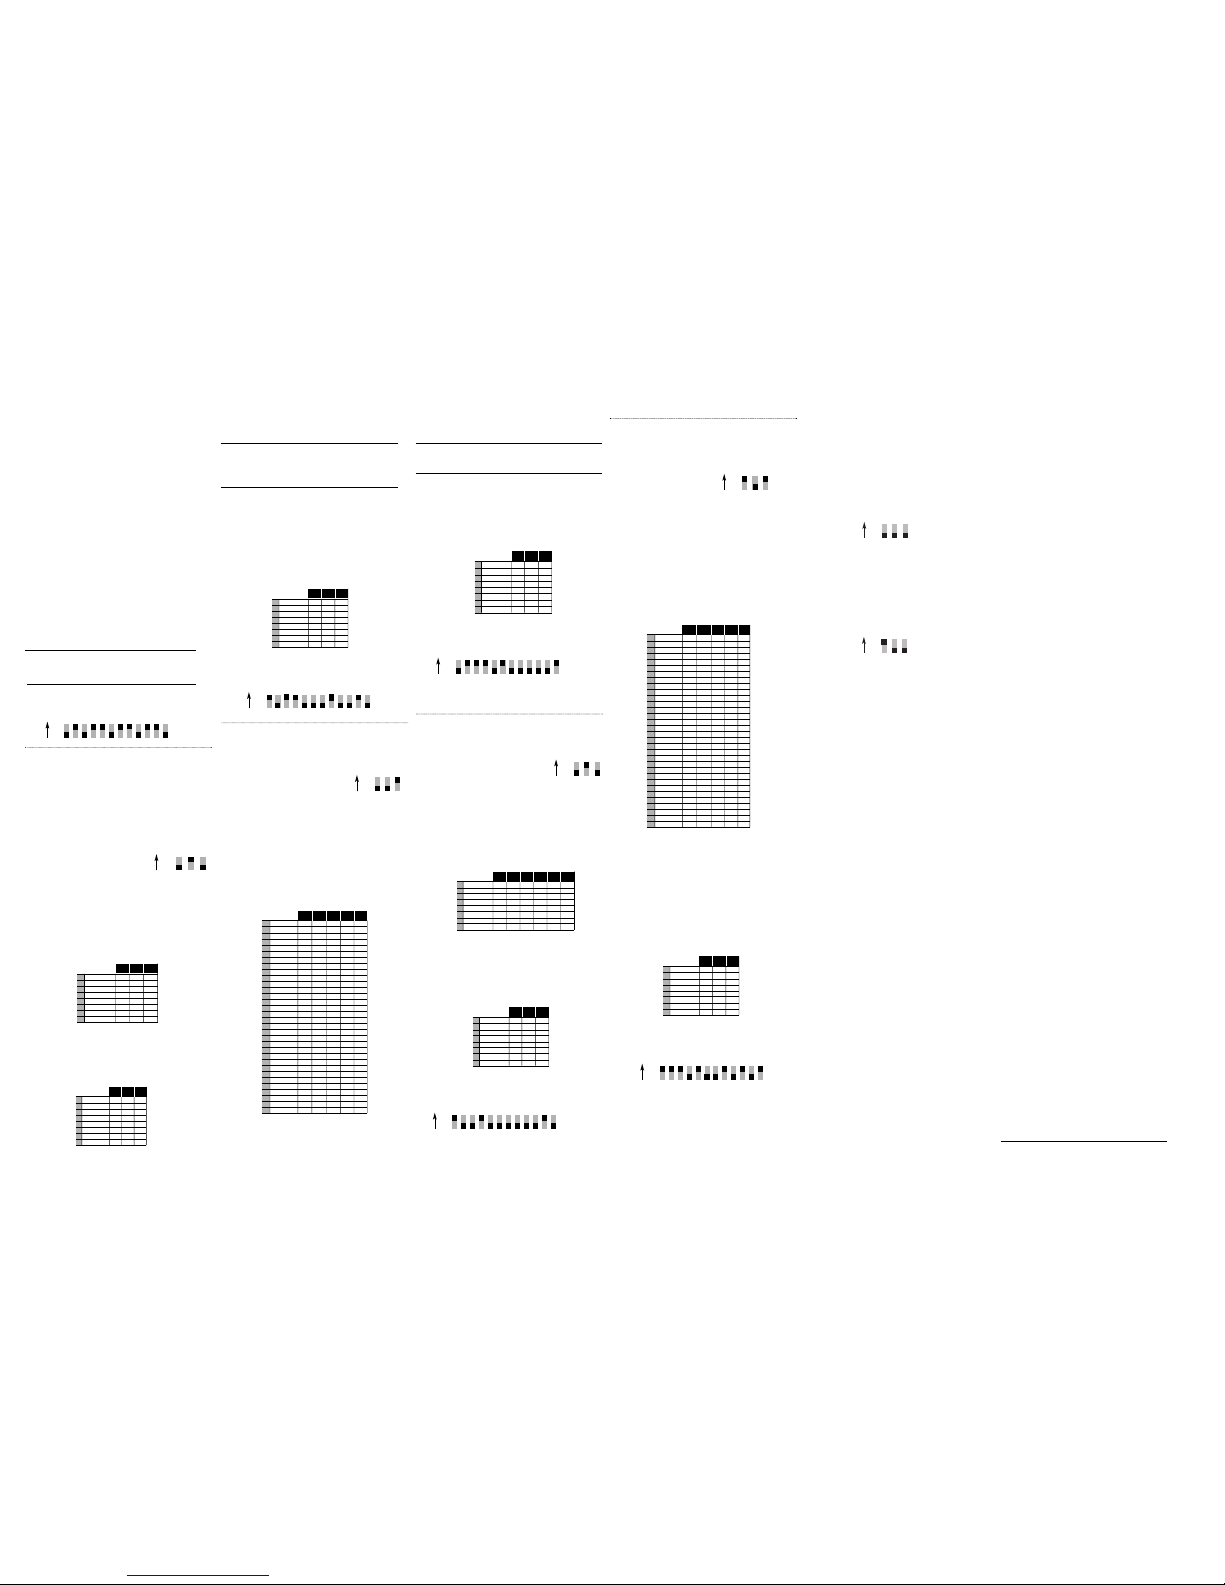
FIXED COLOR
Fixed Color allows the static display of any one of 512 possible col-
ors. A Fixed Color Effect is generated by blending the primary colors
of Red, Green and Blue (remember additive color mixing and that
smart microprocessor).
To select Fixed Color, first set the switches for the Fixed Color Effect
(remember that ON is the UP position).
CHOOSE THE EFFECT: FIXED COLOR
Switches #10, 11 and 12: ON
CHOOSE THE VARIATION: FIXED COLOR
The Variation on Fixed Color is choosing one of 512 discrete colors.
◆ Discrete Color
Switches #1-3 control hues of Red. Switches #4-6 control hues of
Green. Switches #7-9 control hues of Blue. To illustrate the principles
behind the DIP switch configurations let’s look at Blue (display of Reds
and Greens follow similar principles). In general, the fewer switches
in the ON position, the lighter the shade of color which is displayed.
So, to get a very light “sky
blue,” turn ON only
Switch #7. The next hue
would be Switch #8 only
and so on. Remember,
throughout this guide, this
symbol ■indicates the
switch should be ON.
(See Example 1)
With additive color mixing
(thanks to Chromacore
technology’s ability to
think), you can mix Reds,
Greens and Blues to pro-
duce secondary colors.
The illustration at right
shows how secondary
colors are produced.
In other words, if you want:
Desired Color Mix
Green Green
Yellow Green and Red
Magenta Blue and Red
Cyan Green and Blue
White Red, Green, Blue
Let’s look at one more example before we move on
to the next Effect. Refer to the following table
(Example 2). If you’d like to produce purple (or “Magenta”) hues,
you’ll need to mix Red (Switches #1-3) and Blue (Switches #7-9).
That means that Switches #4-6 (the Greens) should remain in the
OFF position.
EXAMPLE OF FIXED COLOR EFFECT
Full Intensity Red
COLOR WASH
The Color Wash Effect moves sequentially around the spectrum of
colors in either clockwise (ROYGBIV) or counterclockwise (VIBGYOR)
direction, repeating the same cycle over and over, at user-definable
speeds. The Color Wash differs from Random Color which has no
distinct or sequential pattern of color generation.
To select Color Wash, first set the switches for the Color Wash Effect
(remember that ON is the UP position).
CHOOSE THE EFFECT: COLOR WASH
Switches #10 and 11: ON
Switch #12: OFF
CHOOSE THE VARIATION: COLOR WASH
The Color Wash can be varied by Speed, Saturation, Brightness
and Cycle Direction.
colorblast™
USER GUIDE
Color Kinetics Incorporated
10 Milk street, Suite 1100
Boston, MA 02108 USA
Tel 888 Full RGB
Tel 617 423 9999
Fax 617 423 9998
www.colorkinetics.com
A GLOSSARY OF TERMS
BRIGHTNESS: aka (that’s detective talk for also known as) “intensity” or “luminance” of
light. A measure of the rate of flow of light energy (luminous flux) per unit area leaving a sur-
face in a particular direction. (For the purpose of this guide, a lower level of Brightness has
nothing to do with being intellectually challenged.)
COLOR: Color specification can be described in many ways, but in general three qualities
describe “color:” brightness (the intensity of the color), hue (the wavelength which determines
how similar it is to one or a combination of the perceived colors red, yellow, green or blue),
and saturation (the amount of white light mixed in). We can see approximately 200 hues
with the naked eye. The other colors we can identify are due to variations in brightness and
saturation.
COLOR WASH: A Color Wash Effect moves sequentially around the spectrum of colors in
either clockwise (ROYGBIV) or counterclockwise (VIBGYOR) Cycle Direction at user definable
speeds. Color Wash differs from the Random Color Effect which has no distinct or sequential
pattern of color generation.
CROSS FADE: Cross Fade Effects slowly increase the intensity of one color of light while
simultaneously reducing the intensity of another color. A Cross Fade Effect differs from a
Color Wash Effect in that a Cross Fade alternates between only two colors while the Wash
cycles through the color spectrum. In Cross Fades, users will select a Starting Color and an
Ending Color (don’t choose the same color!) and then select the desired Speed to go from the
first to the second and back again.
CYCLE DIRECTION: The sequence in which colors move through the spectrum. The
sequence can be in either clockwise (ROYGBIV) or counterclockwise (VIBGYOR) direction.
DMX AND DMX512: DMX is a shortened form of “digital multiplex.” It describes a stan-
dard method of data transmission that makes possible the interconnection of lighting control
equipment by different manufacturers. The DMX512 protocol was developed in 1986 by a
committee of the USITT (United States Institute for Theater Technology) to provide a standard
interface with which to control dimmers from lighting consoles. In DMX512, each data link
supports up to 512 dimmers (hence the name and number – clever, no?).
DIP SWITCH: Dip switches are tiny binary devices located on the back of each C-Series
lighting fixture in banks of 12, signaling either ON or OFF. With a single dip switch there
are two possible combinations or settings, with two dip switches there are 22or 4 possible
settings, and so on. With nine switches, a total of 512 (remember DMX512), or 29, combina-
tions are possible. Color Kinetics products use a “base zero” address where a given setting
is determined by the sum of the value of the switches in the ON (or “up”) position, plus one.
ENDING COLOR: This Variation allows the user to define the Ending Color of the Cross
Fade Effect. For instance, if a Cross Fade goes from red to blue, the Starting Color Variation
would be set to red and the Ending Color would be set to blue.
FIXED COLOR: (aka, Constant Color) The Fixed Color Effect allows the static display of any
ONE of 512 possible colors. Fixed Color is generated by blending (or independently dis-
playing) any of the primary colors (Red – 8 shades of red, Green –8 shades of green, and
Blue–8 shades of blue). White light will be produced when all colors (Red, Green and Blue)
are added together (remember additive color mixing, where all colors combine to white?).
LED: (Light Emitting Diode) The source of light used by the Color Kinetics™ C-Series and the
secret to its ultra-long source life, LEDs have a predicted source life rated at 100,000 hours
under normal operating conditions—that’s 11.4 years of continuous use! An LED is a p- n
junction, solid-state diode that emits light through the combination of specially prepared high
purity semiconductor material and two additives. One additive produces negatively charged
output (excess electrons) and the other produces positively charged material (a shortage of
electrons, or holes, which act as positive charges). Please forgive this foray into techno-speak,
we had to use it somewhere in the manual.
NETWORKED: Refers to a method of control. Networked control utilizes the C-Series‘ data
interface ports for external direction of the units. Information is perceived from an external
source such as a DMX512 controller or PC instead of from the on-board microprocessor.
ON: (Dip Switch Position) A switch is considered to be ON if it is in the UP position.
Throughout the guide, we will use the symbol ■to indicate a switch is ON.
RANDOM COLOR: aka “step” or “jump.” Each Random Color Effect produces a ran-
domly generated set of 128 colors at user definable speeds. Colors step (in discrete
increments) from one hue to the next in increments of at least 25% of the color spectrum
so no two colors in a row will have similar values. Random Color differs from a Color
Wash which sequentially and smoothly moves through the color spectrum.
ROY G. BIV: An acronym used by many to remember the order of the longest to the
shortest wavelengths of the visible spectrum (R=red, O=orange, Y=yellow, G=green,
B=blue, I=indigo, V=violet). Also, a popular friend of all users of ColorBlast lighting.
SATURATION: This Variation refers to the purity of color, or the amount of white light which
has been mixed into a color. More technically, it describes how much of a color is near the
dominant wavelength. Primary colors are fully saturated, while pastels are less saturated.
SHOW: In Stand Alone operation, a “Show” is the display generated by one complete cycle
of an Effect. In Networked operation, a “Show” is determined by the controller being used.
SPEED: Determines the duration of an Effect. In Color Wash, Speed is defined as the amount
of time which elapses between the initial display of the Starting Color in cycle one (red in
ROYGBIV, or violet in VIBGYOR), and its next display which begins cycle two. In Cross Fade,
Speed is defined as the amount of time which elapses between the initial display of the
Starting Color to the display of the Ending Color and back again (round trip). In Random
Color, Speed is defined as the amount of time a color is displayed before it “jumps” to the
next color. In Variable Color Strobe, speed determines how fast the colors advance around
the spectrum which in turn affects what color will be flashed at each strobe.
STAND ALONE: aka “built-in,” “on board,” or “automagic” (when automatic mixes with
magic). Refers to a method of Control. Stand Alone means that the unit is controlled by the
built-in microprocessor, thus utilizing “on-board” Effects which are set via the unit’s dip switch-
es. Stand Alone differs from Networked in that the unit is controlling itself versus taking direc-
tion from an external source such as a DMX512 controller or PC.
STARTING COLOR: Allows the user to define the beginning color of an Effect. For instance,
if a Cross Fade goes from red to blue, the Starting Color Variation would be set to red and
the Ending Color would be set to blue. Each time the unit is repowered with this Effect, it will
begin with red.
STROBE: A “stop motion,” or rapid series of very short intense light flashes which can make
actions seem intermittent. The Color Kinetics Variable Color Strobe Effect cycles through a
sequence of colors, generating flashes of different color which can then be customized with
various Speed, Cycle Direction or Strobe Rate settings. The Color Kinetics Fixed Color Strobe
allows for a single color to be flashed which can then be customized by altering the Strobe
Rate.
STROBE RATE: Refers to the number of flashes per second or how many times in one
second the light is illuminated.
ON
OFF
10 11 12