Colortrac Gx+28 User manual

P/N: P005530
PAS176
Web Site: http://www.colortrac.com
User Instructions
Large Format Scanner
Type: SmartLF
Scanner models: Gx+/Gx+T 28/42/56
includes stand P0053x0
Before use, please read these instructions completely
Version 3.1 August 2011
MODEL UPGRADE
THICKNESS
Gx+ 28
E
MTM
Gx+ 42
C
Gx+ 56
M
S/N:

2SMARTLF USER INSTRUCTIONS GX+ / GX+T
P/N: P005530 Colortrac Ltd © 2011
1
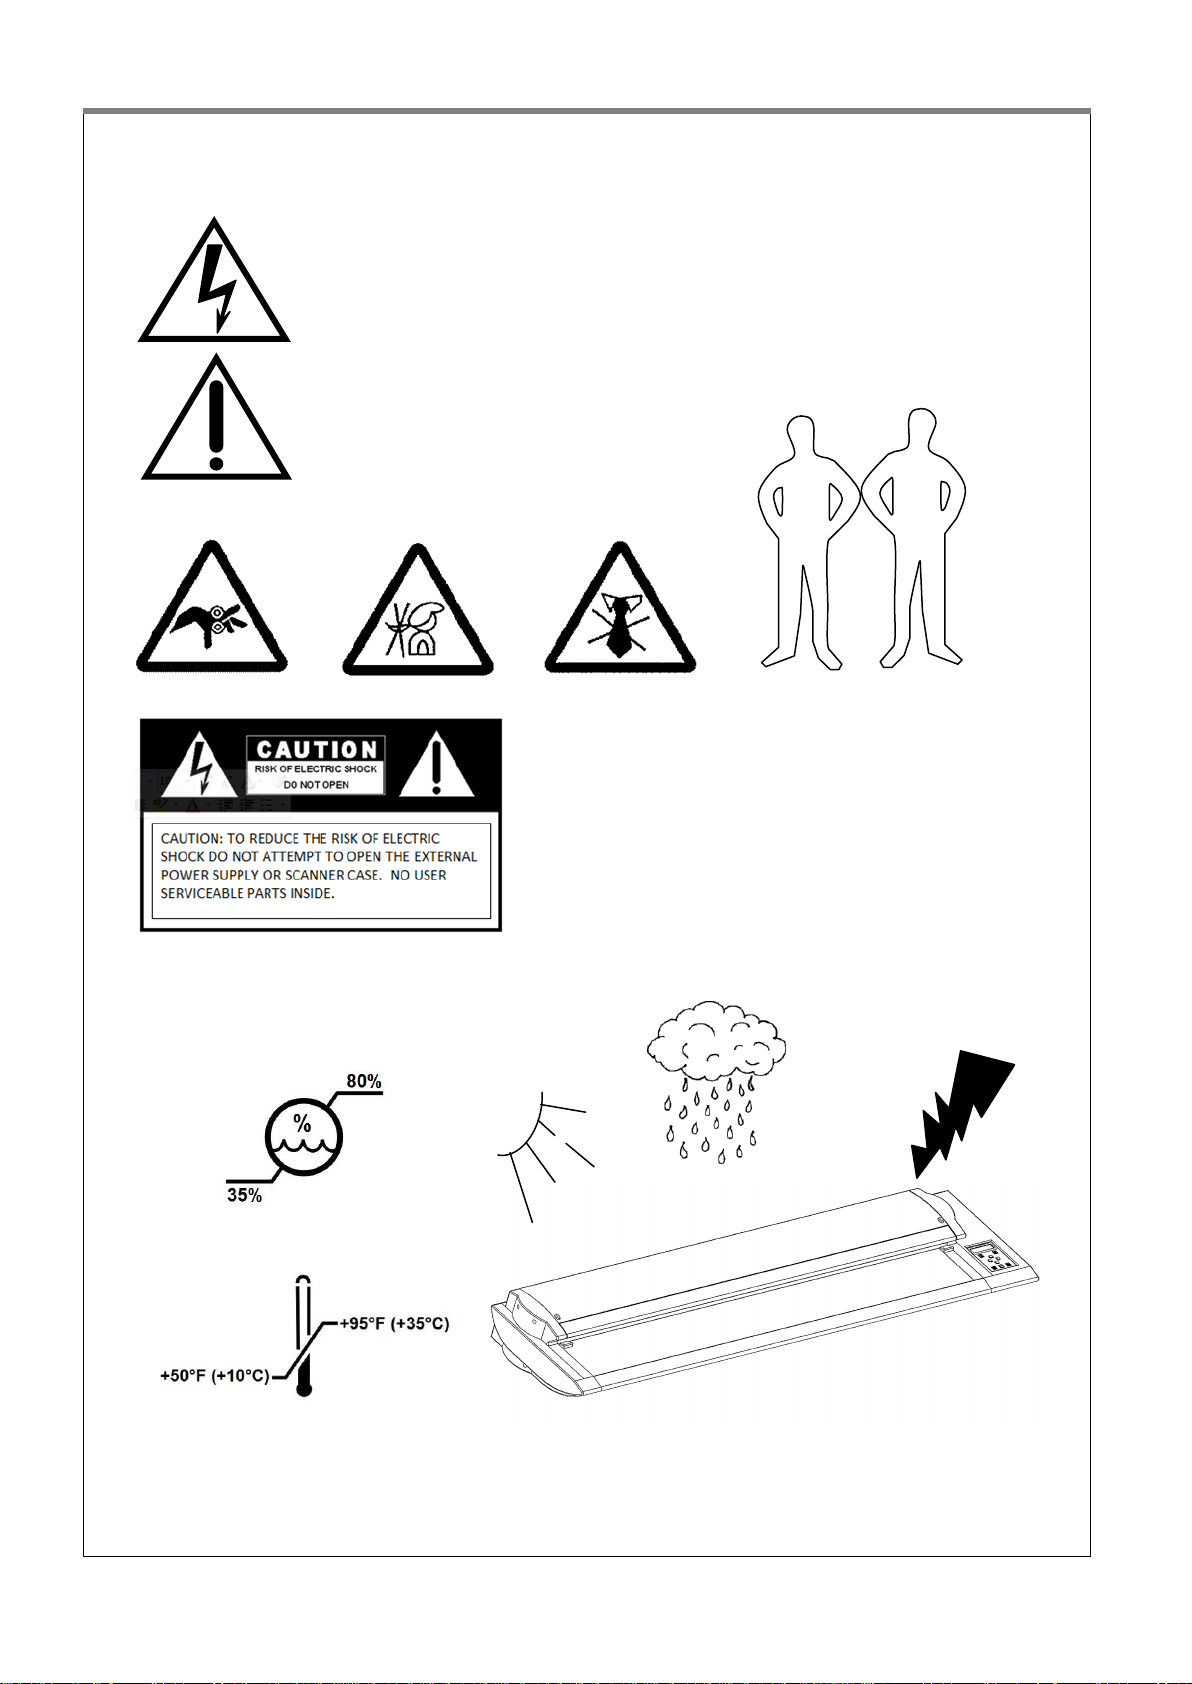
1.1 Never open the electrical power supply.
1.2 Beware of finger trap.
1.3 Do not operate in excessive heat or cold
1.4 Do not expose to water
1.1 No abra nunca la fuente de alimentación eléctrica.
1.2 Tenga cuidado de no pillarse los dedos.
1.3 No lo haga funcionar con calor o frío excesivos.
1.4 No lo exponga al agua.
1.1 Niemals das Netzteil öffnen.
1.2 Vorsicht: Einklemmgefahr!
1.3 Nicht in extremer Hitze oder Kälte benutzen.
1.4 Keinem Wasser aussetzen.
1.1 Veillez à ne jamais ouvrir le bloc d'alimentation électrique.
1.2 Attention de ne pas vous coincer les doigts.
1.3 Veuillez ne pas utiliser par un froid ou une chaleur excessive.
1.4 Veuillez ne pas mettre au contact de l'eau.
1.1 Evitare di aprire l'alimentatore elettrico.
1.2 Prestare attenzione all'intrappolamento delle dita.
1.3 Evitare di utilizzare l'unità con temperature eccessivamente basse o alte.
1.4 Evitare di esporre all'acqua.
1.1 Nigdy nie otwieraj zasilacza.
1.2
1.3
1.4 Nie wystawiaj
1.1 Nunca abra a fonte de alimentação eléctrica.
1.2 Cuidado para não entalar os dedos.
1.3 Não trabalhe com a máquina sob condições de calor ou frio excessivo.
1.4 Não expor a água.
1.1 切勿打开外置电源适配器。
1.2 小心手指被夹住。
1.3 不要在极高或极低温度下使用。
1.4 不要在潮湿的环境中使用。小心不要将水洒入扫描仪。
1.1 絶対に電源を開けたりしないでください。
1.2 指を挟んだりしないように気を付けてください。
1.3 極端な温度条件下で使用しないでください。
1.4 スキャナが濡れたりすることがないようにしてください。
1.4
1.1 전원 공급장치를 열지 마십시오.
1.2 손가락이 끼이지 않도록 주의하십시오.
1.3 과도한 고온이나 저온에서 작동하지 마십시오.
1.4 물에 젖지 않도록 주의하십시오.
.
"
ARB
KOR
RUS
JPN
CHS
POR
POL
ITA
FRA
DEU
ESP
ENG

SMARTLF USER INSTRUCTIONS GX+ / GX+T 3
P/N: P005530 Colortrac Ltd © 2011
1

4SMARTLF USER INSTRUCTIONS GX+ / GX+T
P/N: P005530 Colortrac Ltd © 2011
2
Gx+/Gx+T 28/42/56
2.1 Carefully unpack the box and identify all of the main parts. Parts contained inside a dotted line
might not be included in this system or be Energy Star rated.
2.1 Desembale con cuidado la caja e identifique todas las piezas principales. Las piezas contenidas
dentro de una línea punteada tal vez no se incluyan en este sistema o tengan la calificación Energy
Star.
2.1 Inhalt des Karton auspacken und nachsehen, ob alle Hauptteile vorhanden sind. In einem
gestrichelten Kästchen gezeigte Teile gehören u. U. nicht zum Lieferumfang dieses Systems oder
tragen nicht das Energy Star-Zeichen.
2.1 Déballez avec soin et identifiez les principales parties. Les pièces entourées de pointillés peuvent
ne pas être incluses dans ce système ou ne pas être homologuées Energy Star.
2.1 Disimballare con attenzione la scatola e identificare tutti i componenti principali. I componenti
racchiusi da una linea tratteggiata potrebbero non far parte di questo sistema o non essere omologati
Energy Star.
2.1
Star.
2.1 Desembale a caixa cuidadosamente e identifique todas as peças principais. As peças contidas
dentro de uma linha tracejada não poderão ser incluídas neste sistema ou ser classificadas com o
rótulo Energy Star.
2.1小心打开包装箱,找出所有主要部件。虚线内的部件可能未包括在此系统中,不符合能源之
星(Energy Star)规范。
2.1開梱時に全部品が揃っているか確認して下さい。この取扱説明書に表示されている点線
で囲まれている部品はご購入の製品のパッケージに含まれていない場合があります。または
エナジースターの規格を満たしていない場合があります。
2.1
Star.
2.1주의해서 포장을 풀고 주요 부품이 모두 들어 있는지 확인하십시오. 점선 안에 들어 있는
부품은 이시스템에 포함되지 않거나 에너지 스타 등급이 아닐 수있습니다.
2.1
ARB
KOR
RUS
JPN
CHS
POR
POL
ITA
FRA
DEU
ESP
ENG

SMARTLF USER INSTRUCTIONS GX+ / GX+T 5
P/N: P005530 Colortrac Ltd © 2011
2
1
2
3
4
5
6
7
8
10
9
11
12

6SMARTLF USER INSTRUCTIONS GX+ / GX+T
P/N: P005530 Colortrac Ltd © 2011
3
P0053x0
3.1 Carefully unpack the box and identify all of the main parts. Parts contained inside a dotted line
might not be included in this system or be Energy Star rated.
3.1 Desembale con cuidado la caja e identifique todas las piezas principales. Las piezas contenidas
dentro de una línea punteada tal vez no se incluyan en este sistema o tengan la calificación Energy
Star.
3.1 Inhalt des Karton auspacken und nachsehen, ob alle Hauptteile vorhanden sind. In einem
gestrichelten Kästchen gezeigte Teile gehören u. U. nicht zum Lieferumfang dieses Systems oder
tragen nicht das Energy Star-Zeichen.
3.1 Déballez avec soin et identifiez les principales parties. Les pièces entourées de pointillés peuvent
ne pas être incluses dans ce système ou ne pas être homologuées Energy Star.
3.1 Disimballare con attenzione la scatola e identificare tutti i componenti principali. I componenti
racchiusi da una linea tratteggiata potrebbero non far parte di questo sistema o non essere omologati
Energy Star.
3.1
oznaczenia Energy
Star.
3.1 Desembale a caixa cuidadosamente e identifique todas as peças principais. As peças contidas
dentro de uma linha tracejada não poderão ser incluídas neste sistema ou ser classificadas com o
rótulo Energy Star.
3.1小心打开包装箱,找出所有主要部件。虚线内的部件可能未包括在此系统中,不符合能源之
星(Energy Star)规范。
3.1開梱時に全部品が揃っているか確認して下さい。この取扱説明書に表示されている点線
で囲まれている部品はご購入の製品のパッケージに含まれていない場合があります。または
エナジースターの規格を満たしていない場合があります。
3.1
Star.
3.1주의해서 포장을 풀고 주요 부품이 모두 들어 있는지 확인하십시오. 점선 안에 들어 있는
부품은 이시스템에 포함되지 않거나 에너지 스타 등급이 아닐 수있습니다.
3.1
ARB
KOR
RUS
JPN
CHS
POR
POL
ITA
FRA
DEU
ESP
ENG

SMARTLF USER INSTRUCTIONS GX+ / GX+T 7
P/N: P005530 Colortrac Ltd © 2011
3
10
ITEM
DESCRIPTION
#
1
Ethernet interface cable
1
2
USB interface cable
1
3
Low voltage power supply
1
4
Mains cord
1
5
Software CD
1
6
Paper guides
3/5
7
User instructions (this document)
1
8
Stitch target
1
9
Normalisation target
1
10
Gx+ (T) scanner
1
11
Magnetic paper guide
1
12
Scanner packaging
1
13
Leg upright (right)
1
14
Leg upright (left)
1
15
Cross piece
1
16
Left foot
1
17
Right foot
1
18
M6x16 black hexagon bolt (feet)
4
19
M6 spring washer
8
20
M6x25 black hexagon bolt (crosspiece)
4
21
M5x40 black hexagon bolt (scanner)
4
22
M5 spring washer
4
23
Scanner stand packaging
1
23
13
14
15
18
LEFT
RIGHT
21
19
19
20
22
16
17

8SMARTLF USER INSTRUCTIONS GX+ / GX+T
P/N: P005530 Colortrac Ltd © 2011
4
4.1 Locate and attach the right upright to the right foot using shortest bolt and split washer (2x).
4.2 Locate and attach the left upright to the left foot using shortest bolt and split washer (2x).
4.1 Join en posición vertical para el pie más corto con el perno y la arandela (lado derecho)
4.2 Join en posición vertical para el pie más corto con el perno y la arandela (lado izquierdo)
4.1 Das rechte Standbein mit dem rechten Fuß unter Verwendung der kürzeren Schrauben und
Federringe (2x) verbinden.
4.2 Das linke Standbein mit dem linken Fuß unter Verwendung der kürzeren Schrauben und
Federringe (2x) verbinden.
4.1 Repérez et fixez la barre verticale droite au pied droit en utilisant les plus petites vis et 2 rondelles.
4.2 Repérez et fixez la barre verticale gauche au pied gauche en utilisant les plus petites vis et 2
rondelles.
4.1 Join eretta ai piedi con brevi vite e rondella (lato sinistro)
4.2 Join eretta ai piedi con brevi vite e rondella (lato sinistro)
4.1
4.2
4.1 Join em posição vertical para pé com menor parafuso e arruela (lado direito)
4.2 Join em posição vertical para pé com menor parafuso e arruela (lado esquerdo)
4.1 用2个最短的螺栓和垫圈将右侧支柱(如图)与右侧滚轮底座固定。
4.2 用2个最短的螺栓和垫圈将左侧支柱与左侧滚轮底座固定。
4.1 右専用のフットバーと右専用のスタンド支柱を一番短いボルト(2個)とワッシャー(2個)で固定します。
4.2 左専用のフットバーと左専用のスタンド支柱を一番短いボルト (2個) とワッシャー (2個) で固定します。
4.1 - 2
4.2 - 2
4.1 가장 짧은 볼트와 와셔(2X)를이용하여 오른쪽 기둥과 오른쪽 받침을 연결하세요
4.2 가장 짧은 볼트와 와셔(2X)를이용하여 왼쪽 기둥과 왼쪽 받침을 연결하세요
( ) 4.1
4.2
ARB
KOR
RUS
JPN
CHS
POR
POL
ITA
FRA
DEU
ESP
ENG

SMARTLF USER INSTRUCTIONS GX+ / GX+T 9
P/N: P005530 Colortrac Ltd © 2011
13
17
14
14
16
16
19
19
18
2x
4.1
4.2
2x
18
13
17

10 SMARTLF USER INSTRUCTIONS GX+ / GX+T
P/N: P005530 Colortrac Ltd © 2011
5
5.1 Attach cross piece feet to left and right uprights using 2x mid-length bolt and 2x spring washer at
each cross piece end. CHECK ALL BOLTS FOR TIGHTNESS.
5.1 Adjuntar cruz pieza a los montantes izquierdo y derecho usando 2x mitad de la longitud del perno
y arandela en cada extremo 2x travesaño. Revise todos los pernos estén apretados.
5.1 Den Querbalken unter Verwendung der mittellangen Schrauben und Federringe (je 2x) mit den
Standbeinen verbinden. ALLE VERBINDUNGEN AUF FESTEN SITZ PRÜFEN.
5.1 Fixez la barre principale aux deux montants latéraux en utilisant les vis de longueur moyenne avec
les rondelles. VERIFIEZ QUE TOUTES LES VIS SONT BIEN SERREES.
5.1 Fissare il bar principale per i due montanti laterali con le viti con le rondelle di media lunghezza.
Assicurarsi che tutte le viti siano ben serrate.
5.1
5.1 Anexar a barra principal para os dois postes laterais através de parafusos com arruelas de
comprimento médio. Certifique-se de todos os parafusos estão apertados.
5.1用2个稍长的螺栓和弹簧垫圈将横梁与左侧支柱固定,同理固定右侧。确保所有螺栓都已安装牢固。
5.1先ほど組み付けをした右側と左側のスタンドの支柱とクロスバーを左右それぞれ中サイズのボルト
(2個) とワッシャー (2個) で固定します。全ボルトがしっかりと固定されているか確認して下さい。
5.1
5.1중간길이 볼트와 와셔(2X)를이용하여 가로지름 기둥을 왼쪽과 오른쪽 기둥과 연결하세요.
볼트를 단단히 고정하세요.
5.1
ARB
KOR
RUS
JPN
CHS
POR
POL
ITA
FRA
DEU
ESP
ENG

SMARTLF USER INSTRUCTIONS GX+ / GX+T 11
P/N: P005530 Colortrac Ltd © 2011
5
19
18
18
19
2x
2x
15
15

12 SMARTLF USER INSTRUCTIONS GX+ / GX+T
P/N: P005530 Colortrac Ltd © 2011
6
6.1 WITH 2 PERSONS lift scanner onto stand locating rubber feet under scanner into holes on stand
top. Stand leans away from operator.
6.2 Attach scanner to stand using 4x long bolts and 4x spring washers.
6.1 Con 2 personas, coloque el escáner en el stand. Coloque las patas de goma en los orificios.
6.2 Conecte el escáner al soporte con los 4 tornillos largos provistos de
arandelas.
6.1 MIT 2 PERSONEN den Scanner auf das Untergestell setzen. Die Gummifüße rasten in die entspr.
Löcher ein. Die Standbeine neigen sich dem Benutzer abgewandt.
6.2 Den Scanner mit den 4 langen Schrauben am Untergestell fixieren.
6.1 AVEC 2 PERSONNES, placez le scanner sur le Pied en positionnant les pieds en caoutchouc dans les
trous prévus à cet effet.
6.2 Fixez le scanner sur le Pied en utilisant les 4 longues Vis munies de rondelles.
6.1 Con 2 persone, posto lo scanner sul supporto. Posizionare i piedini di gomma nei fori forniti.
6.2 Collegare lo scanner al supporto utilizzando le 4 viti lunghe fornito
rondelle.
6.1
otworach no górze podstawy.
6.2
6.1 Com 2 pessoas, colocar o scanner no suporte. Coloque os pés de borracha nos furos fornecido.
6.2 Anexar o scanner no suporte com os 4 parafusos fornecidos com prazo
arruelas.
6.1请务必两人抬起扫描仪,将扫描仪底部的橡胶底脚落入支架上的缺口内。注意摆放方向。
6.2 使用4个长螺栓及弹簧垫圈将扫描仪固定在支架上。
6.1 スキャナ本体のゴム足がスタンドのゴム足用の穴に入るようにスキャナをスタンドに載せます。こ
の作業は二人で行ってください。。
6.2 4個の長いボルトと4個のワッシャーでスキャナをスタンドに固定します。
6.1
6.2 -
6.1두사람이 스캐너를 들어올려 스탠드 윗부분의 구멍에 스캐너 아래의 고무 받침을 끼우세요.
6.2 Ethernet을이용하고자 스캐너 메뉴 시스템에 들어가면 IP Address, Data port, Command port
값을 정할 수있다.
2 6.1
4
6.2
ARB
KOR
RUS
JPN
CHS
POR
POL
ITA
FRA
DEU
ESP
ENG

SMARTLF USER INSTRUCTIONS GX+ / GX+T 13
P/N: P005530 Colortrac Ltd © 2011
21
20
21
20
2x
2x
21
20
4x
6.1
6.2

14 SMARTLF USER INSTRUCTIONS GX+ / GX+T
P/N: P005530 Colortrac Ltd © 2011
7
7.1 Fit the paper guides. DO NOT USE EXCESSIVE FORCE.
7.1 Ajuste las guías del papel. NO EJERZA UNA FUERZA EXCESIVA.
7.1 Papierführungen anbringen. KEINE ÜBERMÄSSIGE GEWALT ANWENDEN.
7.1 Installez les guides papier. VEILLEZ À NE PAS FORCER.
7.1 Fissare le guide per la carta. NON UTILIZZARE FORZA ECCESSIVA.
7.1
7.1 Encaixe as guias de papel. NÃO EXERÇA DEMASIADA FORÇA.
7.1 插好导纸板。切勿用蛮力。
7.1メディアガイドを取り付けます。無理に押し込まないようにしてください。
7.1
7.1 용지 가이드를 맞추십시오. 무리한 힘을 가하지 마십시오.
. .7.1
ARB
KOR
RUS
JPN
CHS
POR
POL
ITA
FRA
DEU
ESP
ENG

SMARTLF USER INSTRUCTIONS GX+ / GX+T 15
P/N: P005530 Colortrac Ltd © 2011
7
#
10
6

16 SMARTLF USER INSTRUCTIONS GX+ / GX+T
P/N: P005530 Colortrac Ltd © 2011
8
8.1 Open the scanner by pressing the two buttons on the ends of the scanner lid.
8.2 Remove the foam protection.
8.3 Close the scanner by pushing down on the sides of the lid with two hands.
8.1 Abra el escáner presionando los dos botones de los extremos de la tapa del escáner.
8.2 Extracción de la película de espuma que protege el vidrio
8.3 Cierre el escáner presionando hacia abajo en los laterales de la tapa con ambas manos.
8.1Scanner durch Drücken der beiden Tasten an den Enden der Scannerabdeckung öffnen.
8.2 Schaumstoffstreifen entfernen (Transportsicherung).
8.3 Scanner durch Herunterdrücken an den Seiten der Abdeckung mit beiden Händen schließen.
8.1Ouvrez le scanner en appuyant sur les deux boutons situés d'une part et d'autre du couvercle.
8.2 Retirez le film en mousse qui protége la glasse.
8.3 Refermez le scanner en appuyant sur les côtés du couvercle avec les deux mains.
8.1Aprire lo scanner premendo i due pulsanti alle estremità del coperchio dello scanner.
8.2 Rimuovere la pellicola di schiuma che protegge il vetro
8.3 Chiudere lo scanner spingendo giù sui lati del coperchio con due mani.
8.1
8.2
8.3
8.1Abra a máquina digitalizadora pressionando os dois botões nas extremidades da tampa da
máquina.
8.2 Remover o filme de espuma que protege o vidro
8.3 Feche a máquina pressionando os lados da tampa com as duas mãos.
8.1 按扫描仪盖两端的两个按钮打开扫描仪。
8.2拿掉泡沫保护垫纸。
8.3 用双手按下盖两边关上扫描仪。
8.1スキャナのカバーの両端にあるボタンを押しスキャナのカバーを開けます。
8.2スキャナを保護しているフォームを取り除きます。
8.3スキャナのカバーの両端を両手で押さえて閉じます。
8.1
8.2
8.1스캐너 리드 끝에 있는 두개의 버튼을 눌러 스캐너를 여십시오.
8.2포장재를 제거하십시오
8.3 두손으로 리드 측면을 아래로 눌러 스캐너를 닫으십시오.
. 8.3
8.2
. 8.1
ARB
KOR
RUS
JPN
CHS
POR
POL
ITA
FRA
DEU
ESP
ENG

SMARTLF USER INSTRUCTIONS GX+ / GX+T 17
P/N: P005530 Colortrac Ltd © 2011
8.2
8.3
8.1
10
10
10

18 SMARTLF USER INSTRUCTIONS GX+ / GX+T
P/N: P005530 Colortrac Ltd © 2011
9
9.1 Connect all cables with the scanner and computer SWITCHED OFF. Switch ON the scanner and
computer and follow these instructions.
91. Conecte todos los cables con el escáner, y el ordenador DESCONECTADOS. Encienda el escáner y
el ordenador y siga estas instrucciones.
9.1 Alle Kabel bei ABGESCHALTETEM Scanner und Computer anschließen. Scanner und Computer
einschalten und diese Anweisungen befolgen.
9.1 Connectez tous les câbles au scanner avec l'ordinateur ÉTEINT. Allumez le scanner et l'ordinateur,
et suivez ces instructions.
9.1 Collegare tutti i cavi con lo scanner e il computer SPENTI. Accendere lo scanner e il computer e
seguire le presenti istruzioni.
9.1
9.1 Ligue todos os cabos com a máquina digitalizadora e o computador DESLIGADOS. Ligue a
máquina e o computador e siga estas instruções.
9.1 在关机的情况下,连接扫描仪、打印机和计算机的所有连线。打开扫描仪和计算机,
按照以下说明进行操作。
9.1スキャナ、プリンタ、コンピュータの電源が入っていない状態で全てのケーブルを接続
します。スキャナとコンピュータの電源を入れて次の指示に従ってください。
9
9.1 스위치를 끈상태에서 모든 케이블을 스캐너, 프린터, 컴퓨터에 연결하십시오. 스캐너와
컴퓨터의 스위치를 켜고 다음 지시사항을 따르십시오.
.
.9.1
ARB
KOR
RUS
JPN
CHS
POR
POL
ITA
FRA
DEU
ESP
ENG

SMARTLF USER INSTRUCTIONS GX+ / GX+T 19
P/N: P005530 Colortrac Ltd © 2011
9
100-240V
1
USB
ETHERNET
19V
ON/OFF
10
2
3
4
1
2
2
2
2

20 SMARTLF USER INSTRUCTIONS GX+ / GX+T
P/N: P005530 Colortrac Ltd © 2011
10
10.1 If reloading or loading the software for the first time switch OFF the scanner, insert the CD and
click the large install button. When the installation completes, switch ON the scanner. An Internet
connection will be required for the computer to download country specific Microsoft .NET (first install
only).
10.1 Si está recargando o cargando el software por primera vez, desconecte el escáner, introduzca el
CD y haga clic en el gran botón de instalación. Cuando la instalación se complete, conecte el escáner.
Será necesaria una conexión a Internet para que el ordenador descargue Microsoft .NET específico de
cada país (solamente la primera instalación).
10.1 Wenn die Software erneut oder das erste Mal geladen wird, den Scanner AUSSCHALTEN, die CD
einlegen und auf die große Installationsschaltfläche klicken. Wenn die Installation abgeschlossen ist,
den Scanner EINSCHALTEN. Für den Computer ist eine Internetverbindung erforderlich, um
länderspezifisches Microsoft .NET (nur bei der Erstinstallation) herunterzuladen.
10.1 Si vous installez le logiciel pour la première fois ou le réinstallez, ÉTEIGNEZ le scanner, insérez le
CD et cliquez sur le gros bouton d'installation. Une fois l'installation terminée, mettez le scanner en
MARCHE. Une connexion Internet est nécessaire pour permettre à l'ordinateur de télécharger la
version de Microsoft .NET (première installation uniquement) qui convient pour le pays.
10.1 Se si sta reinstallando il software o è la prima volta che viene installato, spegnere lo scanner,
inserire il CD e fare clic sul grande pulsante d'installazione. Una volta completata l'installazione,
accendere lo scanner. Sarà necessaria una connessione a Internet perché il computer sia in grado di
scaricare la versione Microsoft .NET specifica per il paese (solo alla prima installazione).
10.1
internetowe w celu pobrania Microsoft .NET (tylko przy pierwszej instalacji).
10.1 Em caso de recarregamento ou carregamento do programa pela primeira vez, DESLIGUE a
máquina digitalizadora, insira o CD e clique no botão grande de instalação. Quando a instalação estiver
concluída, ligue a máquina digitalizadora. Será necessária uma ligação à Internet para que o
computador descarregue Microsoft .NET específico de cada país (apenas para a primeira instalação).
10.1如果重装软件或首次安装软件,请关闭扫描仪,插入光盘,单击大安装按钮。安装完成后,
打开扫描仪。计算机需要连接到 Internet 才能下载特定国家的 Microsoft
.NET(仅限第一次安装时)。
10.1 ソフトウェアを再インストール、または初めてインストールする場合、スキャナの電源はOFF
の状態にし、CDを挿入してインストールします。
インストールが完了したらスキャナの電源を入れてください。マイクロソフトの.NETをダウンロー
ドする場合はインターネットに接続してください。
10.1
-
10.1소프트웨어를 다시 로드하거나 처음으로 로드하는 경우, 스캐너를 끄고, CD를삽입하고,
커다란 설치 스위치를 클릭하십시오. 설치가 완료되면, 스캐너를 켜십시오. 컴퓨터에서 국가별
Microsoft .NET을다운로드하려면 인터넷에 연결되어 있어야 합니다(최초 설치에만 해당).
. .
Microsoft .NET (
).10.1
ARB
KOR
RUS
JPN
CHS
POR
POL
ITA
FRA
DEU
ESP
ENG
This manual suits for next models
5
Table of contents