manuals.online logo
Brands
  1. Home
  2. •
  3. Brands
  4. •
  5. Comfort
  6. •
  7. Indoor Furnishing
  8. •
  9. Comfort 60-5800T User manual

Comfort 60-5800T User manual

For fastest service, please visit our website at
www.comfortproducts.net/support
e-mail: customerservice@comfortproducts.net
Keep your sales receipt as documentation of your ownership.
CUSTOMER SERVICE
COMMODORE II BIG & TALL LEATHER EXECUTIVE CHAIR
OPERATION MANUAL
MODEL 60-5800T
1
CONTENTS
EXTRA SPARE HARDWARE INCLUDED FOR YOUR CONVENIENCE. ITEMS ARE NOT SHOWN TO SCALE.
PART DESCRIPTION STOCK# QTY..
ABack Cushion 61-5800TA 1
BSeat Cushion 61-5800TB 1
CArmrest (left)
Armrest (right)
61-ARM5800TL
61-ARM5800TR 1
1
DSeat Plate 61-PLATE5800T 1
EGas Lift (seat post) 61-POST5800T 1
FStar Base 61-BASE5800T 1
GCaster 61-CAST5800T 5
HGas Lift Cover 61-COVER 1
IBase Cover 61-COVERBC 1
JHead Rest 61-5800THR 1
PARTS LIST
PART DESCRIPTION QTY.
KScrewcaps 4
LM8 x 25mm Screw 4
MM8 x 35mm Screw 4
NM8 x 70mm Screw 4
OSmall Allen Wrench 1
PLarge Allen Wrench 1
HARDWARE KIT
STOCK# 61-SCRWST5800T
REPLACEMENT PARTS
IF YOU ARE MISSING ANY OF THE PARTS ABOVE, OR IF YOU HAVE A DAMAGED PART, PLEASE VISIT
WWW.COMFORTPRODUCTS.NET/SUPPORT. SIMPLY COMPLETE THE INFORMATION, AND THE PART YOU
NEED. THE PART WILL NORMALLY SHIP WITHIN 48 HOURS.
2
STEP 4
Attach the left armrest (C) to the seat cushion (B) and back
cushion (A), using the screws (N) and the screwcaps (K) as
shown. Repeat for right armrest (C). Then attach headrest
(J) to back cushion (A) as shown. Simply insert the 2 posts
of headrest into the plastic clips at the top of the back
cushion, and adjust to the desired height.
ASSEMBLY INSTRUCTION (60-5800T)
DO NOT TIGHTEN SCREWS UNTIL COMPLETELY ASSEMBLED
STEP 2
Align seat plate (D) over pre-drilled holes under seat
cushion (B). (NOTE the position of seat plate handle to seat
cushion FRONT). Attach seat plate (D) to seat cushion (B)
using four screws (L) as shown. Tighten securely with allen
wrench.
STEP 1
Insert casters (G) into holes of star base (F). Snap the
2-piece base cover (I) over center of base as shown. Insert
gas lift (E) into center hole of star base (F). Place gas lift
cover (H) over gas lift (E) as shown.
STEP 3
Place the back cushion (A) on a flat, clean surface such as a
table. Position the seat cushion (B) as shown and align the
four holes in the back and seat cushion together. Connect
the seat cushion to the back cushion using four screws
(M) as shown. Do not fully tighten until after armrests are
attached (see step 4).
Seat front
Seat plate
handle
H
E
G
F
I
I
D
B
L
FRONT
A
B
D
M
J
D
C
B
A
N
KC
33
ASSEMBLY AND FUNCTION INSTRUCTION (60-5800T)
While seated, lean forward, lifting your body weight from
the seat. Reach underneath the right side of chair and
locate the handle. Lift the handle up slowly to allow the
chair to rise to the desired height. To lower seat height, lift
the handle slowly while seated.
TO ADJUST SEAT HEIGHT
Reach under the front center of the chair seat and grasp the
round black tension knob. To loosen the tilt mechanism,
turn the knob clockwise. This lessens the effort required to
recline the back cushion of the chair. To tighten the tension
knob, rotate counter-clockwise. Rotate the knob until the
desired resistance is reached.
TO ADJUST TILT TENSION
Right
Handle
Round tension
knob
Right handle:
* Pull outward
to allow tilting
* Push inward
to lock out
the tilt
While seated, reach underneath the right side of chair and
locate the handle. Slide the handle all the way out towards
the right (away from the seat). When the handle is in this
position, leaning back will cause the chair to tilt backwards.
To lock the chair in the upright (vertical) position, sit in the
chair, and push the handle in to the left (towards center of
seat).
TO OPERATE TILT LOCKOUT
STEP 5
Turn assembled chair frame upright. Position the center
hole in seat plate (D) over the gas lift (E). Then carefully
lower the chair onto the gas lift.
E
4
FREQUENTLY ASKED QUESTIONS
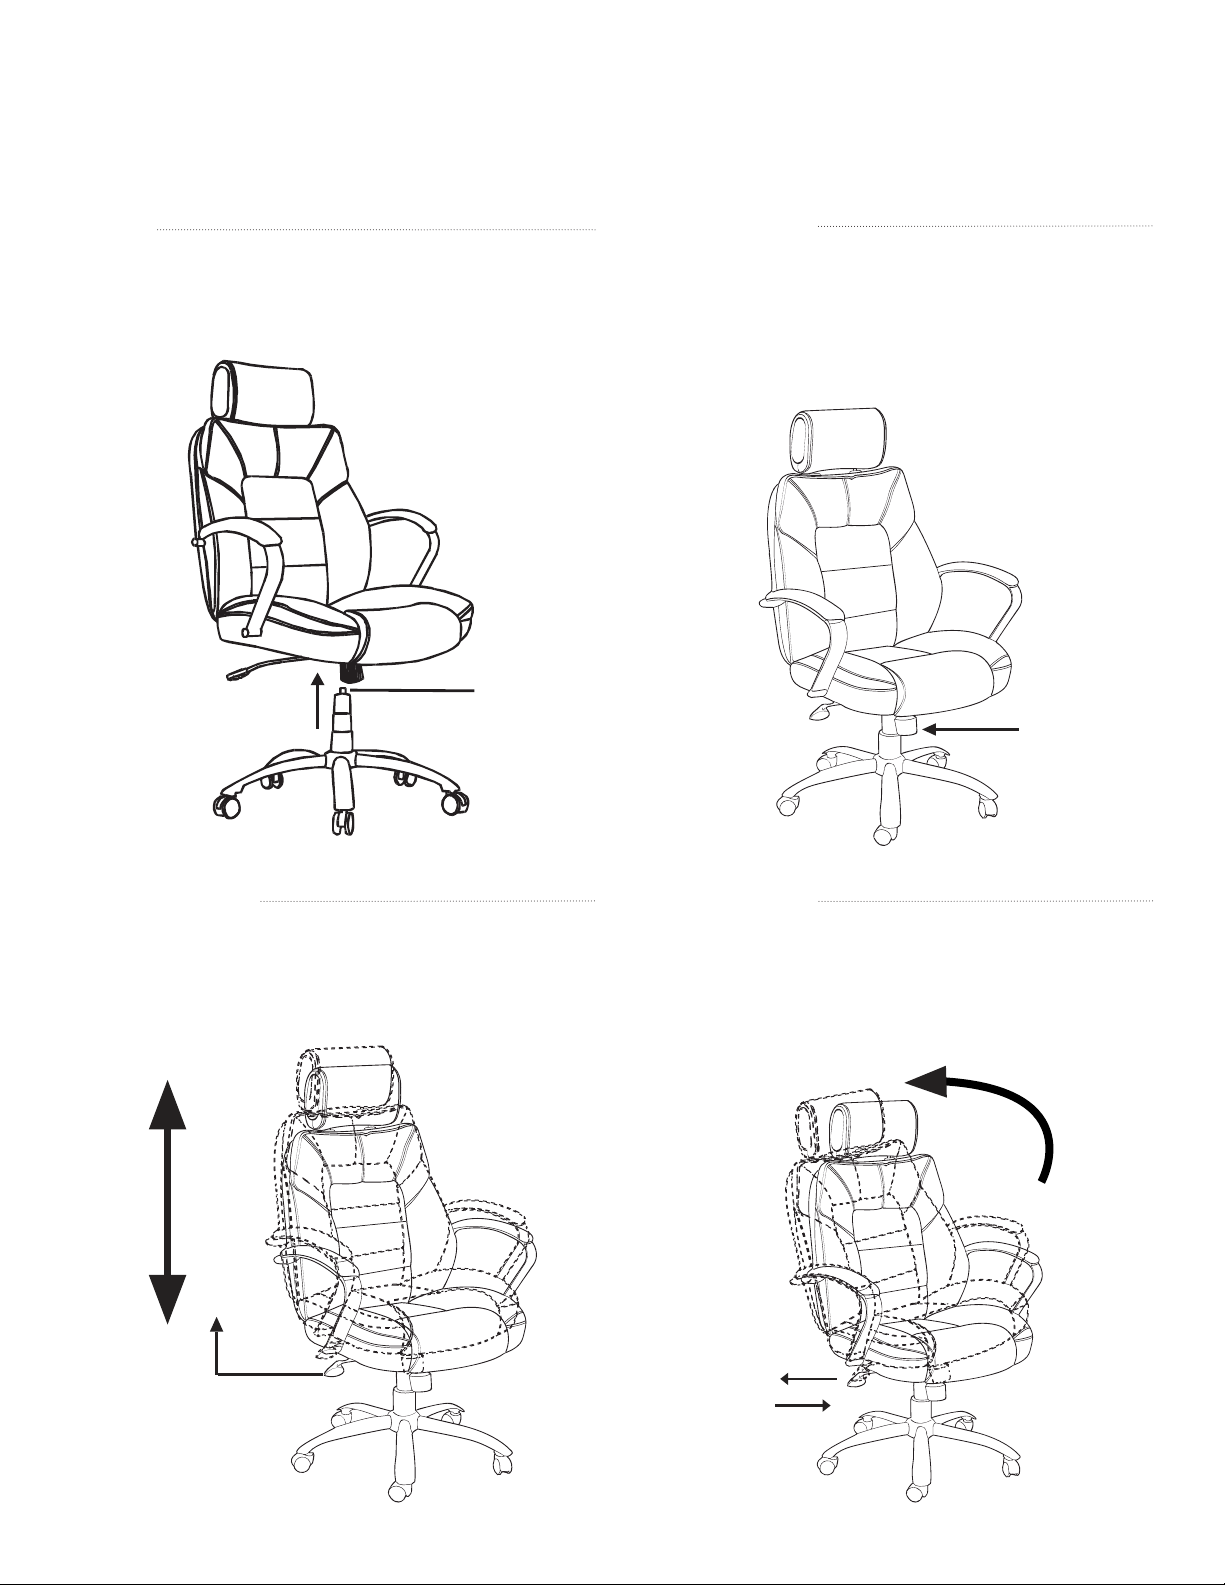
• HOW DO I ADJUST THE SEAT HEIGHT?
While seated, lean forward, lifting your body weight from the seat. Reach underneath the right side of chair and locate the handle. Lift the handle
up slowly to allow the chair to rise to the desired height. To lower seat height, lift the handle slowly while seated.
• HOW DO I ADJUST THE TILT TENSION?
Reach under the front center of the chair seat and grasp the round black tension knob. To loosen the tilt mechanism, turn the knob clockwise. This
lessens the effort required to recline the back cushion of the chair. To tighten the tension knob, rotate counter-clockwise. Rotate the knob until the
desired resistance is reached.
• HOW DO I OPERATE THE TILT LOCKOUT?
While seated, reach underneath the right side of chair and locate the handle. Slide the handle all the way out towards the right (away from the
seat). When the handle is in this position, leaning back will cause the chair to tilt backwards. To lock the chair in the upright (vertical) position, sit in
the chair, and push the handle in to the left (towards center of seat). If your chair tilts backwards, then you may have the seat plate on backwards.
• HOW DO I INSTALL THE CASTERS?
The metal stem needs to be fully inserted into the bottom of the star base in order for the caster to stay in. There are 2 options. One: lay the base
on the carpeted ground, with the bottom of the base facing upward. Insert each caster into the hole by applying pressure. They should pop in
easily. Two: hold the 5-star base in an upright position (One leg is on a carpeted floor). Insert each caster into the hole. Apply pressure with one
hand, while using the other to hold the base in place. You may need push the caster in with a little force, (twisting or using a soft mallet to tap in).
• MY CASTER BROKE HOW DO I REMOVE THE METAL STEM FROM THE BASE?
You can use a pair of pliers to remove the metal pin.
• HOW SHOULD THE CHAIR BE CLEANED?
Unplug the power adapter before cleaning the upholstery. While we do not recommend a particular cleaning product, you can use a damp cloth
to wipe down your chair. Furniture stores should be able to recommend a product that is safe for the particular material on your chair. If you would
like to use a cleaning product, we suggest that you test the product on the bottom side of the seat cushion first to make sure the product doesn’t
alter the material, before applying the product on the entire chair. Please note that any type of discoloration or alteration made to the chair from a
cleaner will automatically void the warranty.
• WHAT MAINTENANCE IS RECOMMENDED FOR THE CHAIR?
We recommend tightening all screws every 6 months.
• WHERE DO I FIND THE MODEL NUMBER FOR MY CHAIR?
The chair model number is located on a sticker underneath the seat cushion, and on the front page of your instruction manual.
• HOW DO I ORDER REPLACEMENT PARTS? WHEN AM I GOING TO RECEIVE THEM?
For fastest service, please visit us at www.comfortproducts.net/support. Simply fill in the information, and the part you need. If your chair is
covered under warranty, there is no charge for replacement parts. We normally ship replacement parts within 48 hours.
• SHOULD THE CLIP AT THE BOTTOM OF THE GAS LIFT BE REMOVED?
No, the clip needs to remain on the gas lift. Removing this clip will inhibit the gas lifts functions and void the warranty of the gas lift.
• THE CHAIR SINKS OR THE GAS LIFT (SEAT POST) DOES NOT MAINTAIN ITS PRESSURE.
Refer to first question above, “How do I adjust the seat height?” If the seat still sinks, order a new gas lift at www.comfortproducts.net/support.
Just fill out the information on the form. The part # for a new gas lift is 61-POST5800T. To remove your gas lift from the seat plate, refer to the
instructions below, “How do I remove/replace the seat plate and/or gas lift?” If you are unable to remove the defective gas lift from the seat plate,
simply request part # 61-PLATE5800T along with the gas lift.
• HOW DO I REMOVE/REPLACE THE SEAT PLATE AND/OR GAS LIFT?
To remove the seat plate from the gas lift: you will need to turn your chair over. Next, get a hammer. You will want to hit around the area that the
gas lift (Cylinder) goes inside the seat plate (The black metal plate attached to the seat that has a handle and a knob). After you hit the seat plate,
give the gas lift a pull and see if it is coming loose. These two items are locked together by pressure; the more you hit the seat plate the more
pressure will be released. Eventually the two items will separate. To remove the gas lift from the five star base: please turn the chair upside down.
There are about one to two inches where the gas lift (Cylinder) goes through the 5 star base (The legs with wheels). Next, grab a hammer. Then,
if you look in the center of the gas lift, there is a little clip. You DO NOT want to hit the clip in the middle as it will release the pressure needed in
order to raise or lower your chair. You will want to hit the outer edge or the rim of the gas lift. The more you hit the gas lift the more pressure will
be released. After you give the gas lifts a few hits, it should come right out, or give it a pull and see if its loose. If it still won’t budge, then visit
www.comfortproducts.net/support to order a new seat plate and gas lift.
• HOW DO I REMOVE/REPLACE THE BASE FROM THE GAS LIFT?
You will need to use a rubber mallet and tap the post from the underside of the base. If you are still unable to disengage the base, order a new gas
lift post and seat plate.If it still won’t budge, visit us at www.comfortproducts.net/support and simply request a new base #61-BASE5800T.
• THE CHAIR SEEMS TO WOBBLE SIDE-TO-SIDE. HOW CAN I FIX IT?
Make sure all screws are properly tightened, especially the screws attaching the seat plate to the seat cushion.
• THE ARMRESTS SEEM LOOSE. HOW CAN I FIX THEM?
Make sure all screws are properly tightened.
• THE PARTS DON’T SEEM TO ALIGN. WHAT SHOULD I DO?
Do not tighten the hardware completely into the component you are assembling. Tighten hardware a quarter of the way. When all components are
aligned, and the product is sitting level, then you can tighten all the screws.
• THE SCREWS WON’T THREAD INTO THE HOLES. WHAT SHOULD I DO?
Be certain that you are aligned with the hole. Sometimes holes in soft upholstered areas are deep set, and you may not be making contact with
the female inset for the screw. Also, check that there is no debris on the screw or in the inset for the screw. You can also try the spare screw.
Comfort Products, Inc.
P.O. Box 999
Memphis, TN 38101
e-mail: customerservice@comfortproducts.net
www.comfortproducts.net
LIMITED WARRANTY
PLEASE VISIT WWW.COMFORTPRODUCTS.NET FOR WARRANTY INFORMATION
Comfort Products warrants this product to be free from defects in material and workmanship for 1 year. This warranty is
made by Comfort Products only to the original end-user customer acquiring the product directly from Comfort Products’
authorized dealers as shown by the original sales receipt. The end-user customer remedy pursuant to this warranty is
limited to repair or replacement of parts at Comfort Products’ option within a reasonable amount of time. Comfort Products
reserves the right to require damaged parts to be returned to Comfort Products upon request. Natural markings such as
scars, brands, grain, variations, wrinkles, color variations, etc. will be considered normal characteristics, and not construed
as defects. Comfort Products cannot warrant leather against scratching or scuffing, as all leather is subject to blemishes
with use. Consent from Comfort Products must be obtained before any warranty work is performed. This warranty shall
not apply to any products which must be replaced because of normal wear and tear, negligence, abuse, or “accident”,
shipping damage or product use and installation other than in accordance with written instructions or warnings. It will also
not apply when a product has been modified or altered, repaired, refurbished by someone other than Comfort Products
or because of natural variations over which Comfort Products has no control. When repairing or replacing a defective
product, Comfort Products does not guarantee matching color, grain, texture or dye lots. This warranty does not cover the
cost of transportation or labor. In no event shall Comfort Products be liable in either tort or contract for any loss or direct,
special, incidental, consequential or exemplary damages. This Limited Warranty is NOT applicable to end-user customers
who use Comfort Products for rental purposes. This warranty applies only to end-user customers in the United States. All
warranties are limited to the original purchaser for normal use which is defined as a standard work week of 40 hours by
a person weighing 400 lbs. or less (unless otherwise specified). For claims or questions concerning this warranty, please
visit www.comfortproducts.net/support. e-mail [email protected]. Any authorized return should be
shipped prepaid to: Comfort Products, 9475 Fulmer Road, Olive Branch, MS 38654.
MODEL: 60-5800T. Made in China.
SAFETY AND MAINTENANCE
• DO NOT stand on the chair. DO NOT use the chair as a stepladder.
• Use this product for seating one person at a time.
• DO NOT use this chair unless all bolts and screws are firmly secured.
• Avoid contact with sharp objects to prevent puncturing the fabric.
• Every 6 months, check all bolts and screws to ensure they are tight.
• To clean, spot clean only using a damp towel and mild cleaner. First test on a small, obscure area of fabric.
• Chair weight limit not to exceed 400 lbs.
• WHAT IS THE WARRANTY LENGTH?
The warranty for your specific chair or furniture item is based on the year your item was purchased. Please note that proof of purchase is required
for validation of warranty. The current warranty for seating is: one year for cushions and parts (unless otherwise specified). You do not need to
register your warranty.
• HOW IS THE WARRANTY VALIDATED?
Your warranty time period is validated by the purchase date on your original purchase receipt. (Please note that the warranty can not be validated
without your original purchase receipt).
• WHAT IS THE WEIGHT LIMIT ON MY CHAIR?
The 60-5800T chair has been tested to meet BIFMA standards, and has a weight limit of up to 400 lbs.
tension
knob
Metal“L”bar
STAR BASE
(part#
61-BASE5800)
CASTERS
(part#61-CAST5800)
SHORT BOLT
(screw kit #61-SCRWSET5800T)
M8x25mm
MEDIUM BOLT
(screw kit #61-SCRWSET5800T)
LONG ARMREST BOLT
(screw kit #61-SCRWSET5800T)
SCREWCAP
(screw kit #61-SCRWSET5800T)
ALLEN WRENCH
M8x35mm
M8x70mm

Other Comfort Indoor Furnishing manuals

Comfort GRANTON GO-60-582105 User manual

Comfort

Comfort GRANTON GO-60-582105 User manual

Comfort 60-6212 User manual

Comfort

Comfort 60-6212 User manual

Comfort VIROQUE 60-552204 User manual

Comfort

Comfort VIROQUE 60-552204 User manual

Comfort IONA APPLE 60-51840006 User manual

Comfort

Comfort IONA APPLE 60-51840006 User manual

Comfort 60-5607M08 User manual

Comfort

Comfort 60-5607M08 User manual

Popular Indoor Furnishing manuals by other brands

Teamson Fantasy Fields W-7482A quick start guide

Teamson

Teamson Fantasy Fields W-7482A quick start guide

Steelcase Monarch Assembly Directions

Steelcase

Steelcase Monarch Assembly Directions

Royalcraft Modena Wentworth Seychelles Assembly instructions

Royalcraft

Royalcraft Modena Wentworth Seychelles Assembly instructions

Rauch M0003 Assembly instructions

Rauch

Rauch M0003 Assembly instructions

Bob's Discount Furniture QUEEN STORAGE HEADBOARD Assembly instructions

Bob's Discount Furniture

Bob's Discount Furniture QUEEN STORAGE HEADBOARD Assembly instructions

PHI VILLA THD7-0604-105 Use and care guide

PHI VILLA

PHI VILLA THD7-0604-105 Use and care guide

Costway HW64308 user manual

Costway

Costway HW64308 user manual

overstock BAR STOOL Assembly instructions

overstock

overstock BAR STOOL Assembly instructions

ROBERTO FIORE Cabinets To Go BC24 Assembly instructions

ROBERTO FIORE

ROBERTO FIORE Cabinets To Go BC24 Assembly instructions

KI Instruct All Terrain Mobile Instructor's... Assembly instructions

KI

KI Instruct All Terrain Mobile Instructor's... Assembly instructions

Crown EM 240 manual

Crown

Crown EM 240 manual

Birlea OSLO 4'6 BED Assembly instructions

Birlea

Birlea OSLO 4'6 BED Assembly instructions

Human Touch Perfect Chair Accessory Table Installing

Human Touch

Human Touch Perfect Chair Accessory Table Installing

Gladiator GANF03WFMTS Assembly instructions

Gladiator

Gladiator GANF03WFMTS Assembly instructions

Emmezeta VNKL1163 Assembling Instruction

Emmezeta

Emmezeta VNKL1163 Assembling Instruction

Coaster 107222 Assembly instructions

Coaster

Coaster 107222 Assembly instructions

Tcil CAMA CASAL SERRANO Assembly instructions

Tcil

Tcil CAMA CASAL SERRANO Assembly instructions

Deltaco Gaming DC220 user manual

Deltaco Gaming

Deltaco Gaming DC220 user manual

manuals.online logo
manuals.online logoBrands
  • About & Mission
  • Contact us
  • Privacy Policy
  • Terms and Conditions

Copyright 2025 Manuals.Online. All Rights Reserved.