comfortel cassandra II User manual

#1538 CASSANDRA II
cassandra II
washlounge
comfortel.com.au
owners manual
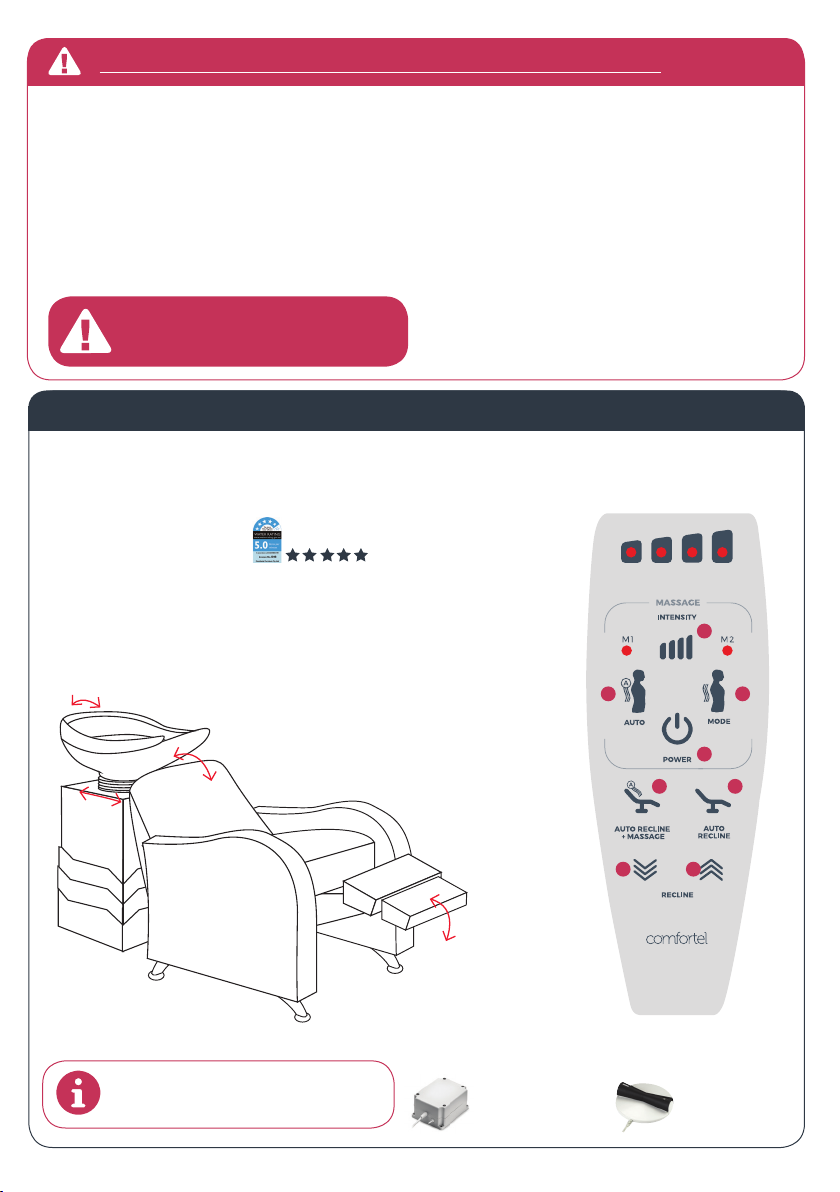
FUNCTIONS
Sit in chair, using hand held remote the client can be
reclined to suit the clients comfort.
Optional foot control also available.
FUNCTIONS
1. Massage Power
2. Massage Intensity
3. Massage Auto Setting
4. Massage Custom Mode
5. Auto Recline & Massage
6. Auto Recline
7. Manual Recline Down
8. Manual Recline Up
OPERATION: HAND REMOTE
MASSAGE & RECLINE
FOR BEST SUPPORT PLEASE ADVISE
CLIENT TO SIT WELL BACK INTO THE SEAT.
CASSANDRA II
Electric reclining wash lounge with massage.
Optional basin colour of black or white.
Width: 700mm
Length: 1560mm-1900mm
Basin Height: 900mm
GET STARTED
BATTERY BACKUP
Controls wash lounge
when salon has no power
FOOT CONTROL
OPTIONAL UPGRADES
07 08
03 04
01
02
05 06
IMPORTANT
Listed below are essential safety precautions:
GENERAL SAFETY
1. Read carefully and keep these instructions in a safe place.
2. Use this product only for its intended function and
do not use attachments not recommended by the
manufacturer.
3. Do not use outdoors.
PLUMBING
1. This unit must be plumbed by a licensed plumber
ELECTRICAL APPLIANCES
1. All GPO’s must be installed by a qualified Electrician in
accordance with local electrical standards.
2. DO NOT allow children to operate the electric motors in
this product.
3. Turn the power o and remove the plug when not in use.
4. Turn the power o and remove the plug when cleaning
the chair cushions.
5. Do not let the power cord get damaged in any way.
6. Keep the power cord away from heat sources.
7. Do not use an extension cord unless the cord complies
with local electrical safety standards.
8. Periodically inspect the power cord for signs of damage.
9. Do not operate any electrical item with a damaged
power cord.
IMPORTANT PLEASE READ THESE SAFETY INSTRUCTIONS
DO NOT ALLOW CHILDREN AROUND THE
WASHLOUNGE WHEN IN USE
WELS RATING

POSITIONING: BASIN STAND OPTION
DIAGRAM A
DIAGRAM B
If washing from rear of stand, add extra distance of 400mm from wall.
If washing from side add 400mm between each chair. All measurements are in mm.
ALL PLUMBING MUST BE COMPLETED
BY A LICENSED PLUMBER
GPO’S MUST BE INSTALLED BY A QUALIFIED
ELECTRICIAN IN ACCORDANCE WITH
AUSTRALIAN STANDARDS.
IMPORTANT IMPORTANT
PLUMBING ACCESS OPTIONS
Determine the best way to connect plumbing
OPTION 1: PLUMBING
From behind the basin stand connect plumbing to
the wall. From the back of the stand, plumbing can be
installed from a maximum height of 400mm from the floor.
OPTION 2: PLUMBING
From under the basin stand connect plumbing to the floor.
A
C
B
D
Wall
400 1030
2030
520 80
650 250
GPO for
massage
700 700 700 700
100 100 10050 50
400 400
800 800 800
3200
ELECTRICAL ACCESS FOR RECLINE AND MASSAGE
Determine the best way to connect Power.
OPTION C+D: GPO
Install GPO to the wall (option C) or under the chair (option D).
GPO 1 x GPO MAX 2A 240V, 50Hz

POSITIONING: BENCH KIT OPTION
WASHING FROM BEHIND BENCH CONFIGURATION
DIAGRAM C DIAGRAM E
DIAGRAM D
If washing from side add
400mm between each chair
All measurements are in mm.
650
350 1030
2280
400 500
242
225
35
35 330
161 85
400
CUT OUT DETAIL
DRILL 4 HOLES
7
400 400800 400 400 800
3200
700 700 700 700
10050 100 100 50
BASIN BENCH KIT
Choose this option if a bench kit is purchased. Basin Bench Kit is available in 2 or 3. For a 4 Position Bench, please see 4
Position Diagram, where 2 x Basin Bench Doubles are installed next to each other. Basin Bench Kit is recommended for
situations requiring washing from behind when the plumbing is not through the floor.
For more information about the product go to www.comfortel.com.au.
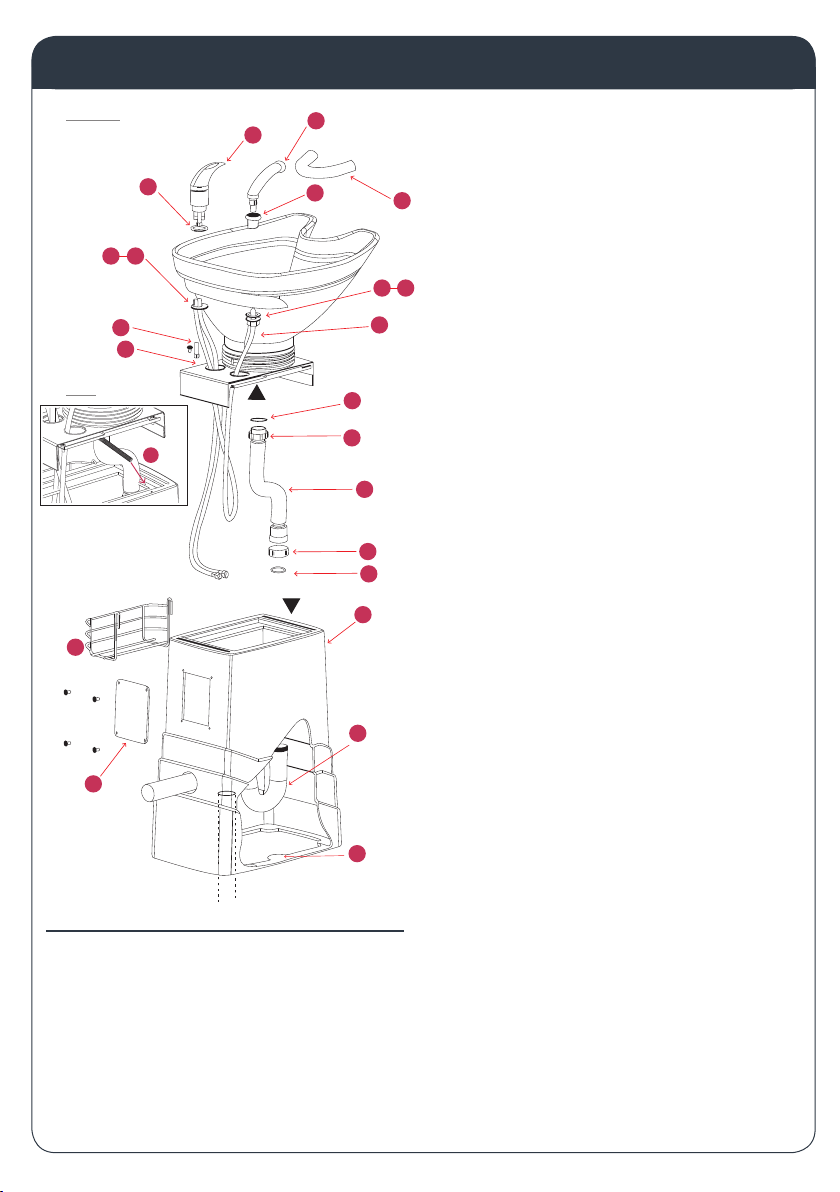
INSTALLATION & ASSEMBLY: BASIN STAND OPTION
15
14
13
17
12
11
16
10
9
8
7
5 6
22
21
19
18
20
2
1
34
MUST USE
‘P’ TRAP
REAR
25
DIAGRAM E
INSERT
STAND ASSEMBLY
1. Position stand as required. If plumbing location is in
wall drill hole in rear of stand; if plumbing location is
on the floor place stand over. (P trap not supplied).
2. Basin stand MUST be secured to the floor. Use
middle lugs (Fasteners not supplied). Rear Access
Panel may be removed to facilitate access.
BASIN ASSEMBLY
3. Install Flick Mixer using O-ring, plastic and metal
washers & (Long Nut) and Shower Head using the
Showerhose Basin Collar, O-ring, Foam Washer &
Plastic Nut as indicated.
4. Place Flick Mixer and Shower Head Hoses through
the holes in the Vinyl Strap.
5. Connect Flexible Waste Pipe to Plug and Waste
which is already installed making use of the with Flat
Seal and fitted Flange.
STAND-BASIN ASSEMBLY PLUMBING CONNECTION
6. Connect Flexible Waste Pipe to P trap (not supplied)
making use of Seal and Flange.
7. Using four screws found on top of Stand, fix
assembled Basin to stand making use of holes at
end of rail channels.
8. Connect hot and cold (½” connection) water
braided hoses to respective supplies.
9. Connect Basin Spring which is already connected
to the tilt and slide plate to the hole in the stand at
the top left corner. (See insert)
10. Place both ends of Vinyl Cover into the slots
provided on front and back of Stand.
11. Please attach Comfortneck to the basin.
12. Fit Shampoo Tray (optional extra) to the side of
your choice.
BEFORE INSTALLING YOU SHOULD CONSIDER THE
FOLLOWING:
Allow for the necessary room around the unit for free
movement.
• If installing against a wall, a minimum distance of
80mm between wall and bottom back of stand is
required to allow free backward movement of basin.
• If plumbing location is in wall (see Diagram A), drill a
hole in rear wall of stand. For neatness of finish it is
preferable to bring water and waste into the stand in
the same hole.
• If plumbing location is on floor (see Diagram A), place
stand over.
1Flick Mixer
2Showerhead
3Showerhose basin collar
4Comfortneck
5Foam washers
6Plastic nut
7Showerhead hose
8Flat seal
9Fitted flange
10 Flexible waste pipe
11 Flange
12 Seal
13 Stand
14 P trap (not supplied)
15 Middle lugs
16 Rear Access Panel
17 Shampoo tray
(optional extra)
18 Vinyl strap
19 Long nut
20 Plastic washers
21 Metal washers
22 O-ring
23 Basin Spring
BASIN ASSEMBLY

INSTALLATION & ASSEMBLY: BENCH KIT OPTION
2
7
8
10
11
9
12
13
5 6
3
4
1
17
16
15
14
BENCH FIXING DETAIL
1. Position Bench as required.
2. Bench must be secured to the floor, or wall.
(Fasteners not provided)
3. Seal base – seal the base of the bench inside and outside
with silicone.
BASIN ASSEMBLY
4. Install Flick Mixer using the O-ring, plastic and metal
washers & Long Nut, and Showerhead using the
Showerhose Basin Collar, O-ring, Foam Washer and
Plastic Nut as indicated.
5. Place Flick Mixer and Showerhead Hoses through the
holes in the Vinyl Strap.
6. Connect Flexible Waste Pipe to Plug and Waste which is
already installed making use of end with Flat Seal and
fitted flange.
BENCH KIT ASSEMBLY
7. Using 4x40mm Stainless Steel bolts with spring washers
and nuts (supplied) fix Bench Kit Frame to top of Bench.
8. Connect hot and cold (½” connection) water braided
hoses to respective supplies.
9. Connect Flexible Waste Pipe (supplied) to P Trap (not
supplied) making use of Seal and Flange.
10. Connect Basin Spring which is already connected to the
tilt and slide plate to the hole in the Bench Kit Frame at
the front left corner.
11. Place both ends of Vinyl Cover into the slots provided on
front and back of Bench Kit Frame.
1Flick Mixer
2Showerhead
3Showerhose Basin Collar
4Comfortneck
5Foam Washer
6Plastic Nut
7Showerhead hose
8Vinyl Strap
9Flat seal
10 Flexible Waste Pipe
11 Fitted flange
12 Flange
13 Seal
14 Long nut
15 Plastic & Metal Washers
16 O-ring
17 O-ring
18 Basin spring
19 Bench Kit Frame
Comfortel Furniture Pty Ltd ABN 60 300 719 042
www.comfortel.com.au
Victoria (Head Office)
39-41 Nelson Street
Moorabbin VIC 3189
T 03 9553 5504
F 03 9553 5516
New Zealand
Comfortel Furniture Ltd
128a Hugo Johnston Drive
Penrose Auckland NZ
T 09 525 3357
F 09 525 3355
New South Wales
64 Hotham Parade
Artarmon NSW 2064
Ph: 02 9966 5900
Fax: 02 9966 5955
Queensland
18/6 Maunder Street
Slacks Creek QLD 4127
T 07 3209 1444
F 07 3209 1666
Western Australia
2/25 Catherine Street
Bentley WA 6102
T 08 9258 4446
F 08 9258 6601
South Australia
2A West Thebarton Road
Thebarton SA 5031
T 08 8443 3703
F 08 8443 3702
19
18
DIAGRAM F
ALL PLUMBING MUST BE COMPLETED
BY A LICENSED PLUMBER
GPO’S MUST BE INSTALLED BY A QUALIFIED
ELECTRICIAN IN ACCORDANCE WITH
AUSTRALIAN STANDARDS.
IMPORTANT IMPORTANT
BASIN ASSEMBLY
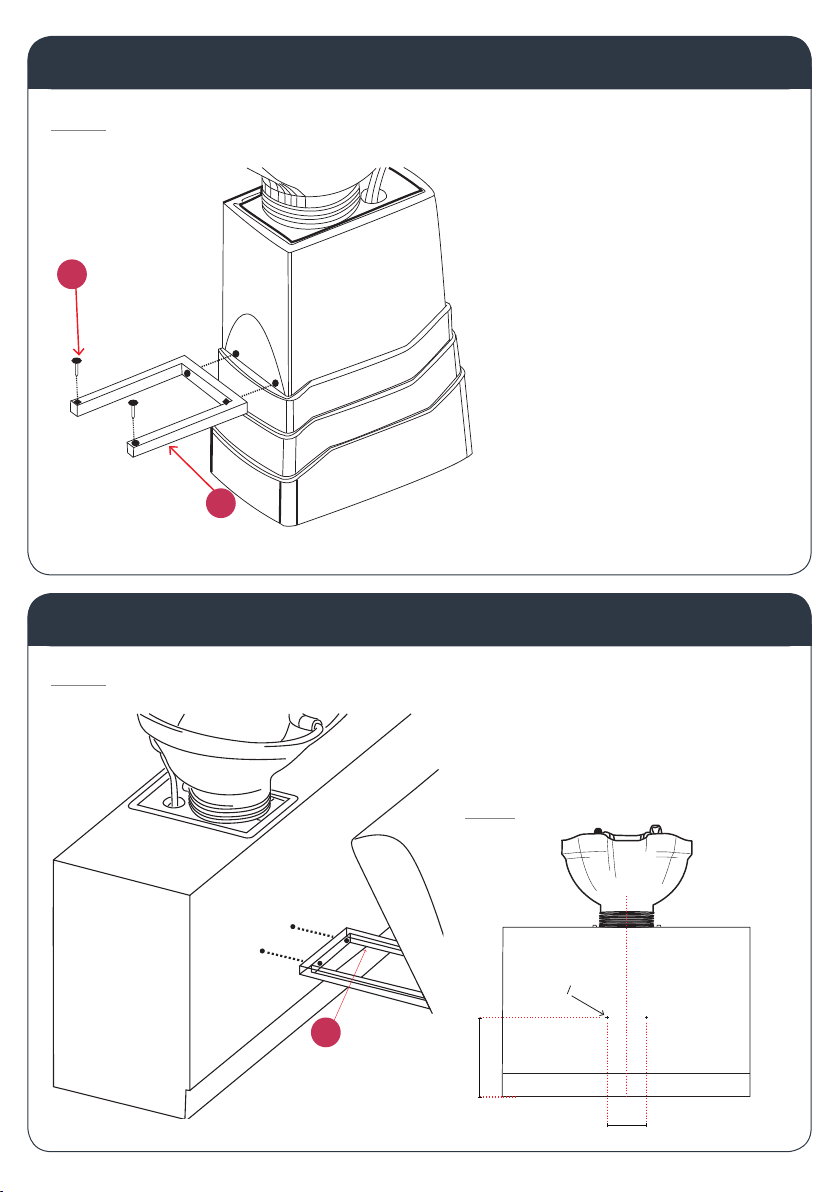
INSTALLATION & ASSEMBLY: CHAIR TO BASIN STAND
INSTALLATION & ASSEMBLY: CHAIR TO BASIN BENCH
DIAGRAM G 28 Connector
28 Connector
INSTALL CHAIR TO BASIN STAND
• Fix Connector to stand front using two bolts and
nuts provided.
28
28
28
DIAGRAM H
O7
305
150
INSTALL CHAIR TO BASIN BENCH
• Fix Connector to Bench front using two bolts and
nuts provided. Refer to sketch for drilling details.
• It is recommended to install these brackets before
installing bench for easy access.
DIAGRAM I

The information contained in this document is subject to change without notice and
should not be construed as a commitment by Comfortel Furniture Pty Ltd.
Comfortel Furniture Pty Ltd. assumes no responsibility for any errors that may appear in
this document nor does it make expressed or implied warranty of any kind with regard
to this material, including, but not limited to, the implied warranties of merchantability
and fitness for a particular purpose.
Comfortel Furniture Pty Ltd. shall not be liable for incidental or consequential damages
in connection with or arising out of the use of this document and the program material.
PRODUCT CODE
PURCHASE DATE INVOICE NUMBER
NOTE YOUR PURCHASE DATE & INVOICE NUMBER FOR FUTURE REFERENCE
A periodic inspection of all
components and fasteners should be
made to ensure that your Comfortel
Product is structurally intact and
functioning properly.
Damaged and broken parts should
be replaced and loose fasteners
tightened.
All maintenance to be carried out by
a suitably qualified tradesperson.
CLEANINGMAINTENANCE
PLEASE RETAIN THIS INFORMATION FOR FUTURE REFERENCE
For more information about our products and services, contact us at comfortel.com.au
comfortel.com.au
#1538 CASSANDRA II WASH LOUNGE
Revision Date: 18.04.2018
UPHOLSTERY
· All upholstery needs some care; good housekeeping will help to prolong
the life of any upholstered products.
· Avoid extreme temperatures. Extreme cold can make your vinyl prone to
cracking, while extreme heat can cause permanent stretching.
· Avoid exposing to direct sunlight for prolonged periods of time.
ALWAYS FOLLOW THE CLEANING INSTRUCTIONS
· Clean regularly (weekly) to remove body oils which cause hardening
· To clean use a sponge which has been moistened in warm soapy water
· After cleaning with a sponge, dry with a soft, clean cloth
· Stubborn grime may require gentle scrubbing with a soft brush
Do not use:
·acetone ·furniture polishes ·bleach
·detergent ·abrasive cleaners ·steel wool
Damage caused by any improper treatment of this product is not covered
by the product warranty
HOW TO CHANGE A SHOWERHEAD
Please view our online video on how
to change a showerhead:
www.youtube.com/user/Comfortel
©Comfortel Furniture 1997-2018. All rights are reserved.
No part of this document may be photocopied,
reproduced or translated to another language without
written consent of Comfortel Furniture Pty Ltd.
PERIOD AND DESCRIPTION PRODUCTS
12 MONTHS PARTS & LABOR All products
2 YEARS PARTS ONLY All products excluding small electrical appliances
3 YEARS PARTS ONLY Linak electric actuators
5 YEARS PARTS ONLY Taps cartridge, ceramic basins
TERMS AND CONDITIONS
For more information about our warranty, please contact us at comfortel.com.au.
WARRANTY PERIOD
This manual suits for next models
1
Table of contents
Other comfortel Washer manuals


