COMMERCIAL AUDIO 36374 User manual

Commercial Audio
40 Watt Wall Mount Music Amplifier
P/N 36374
User's Manual

2
SAFETY WARNINGS AND GUIDELINES
Please read this entire manual before using this device, paying
extra attention to these safety warnings and guidelines. Please
keep this manual in a safe place for future reference.
This device is intended for indoor use only.
Do not expose this device to water or moisture of any kind.
Do not touch the device, the power cord, or any other
connected cables with wet hands.
Do not expose this device to excessively high
temperatures. Do not place it in, on, or near heat sources,
such as a fireplace, stove, radiator, etc. Do not leave it in
direct sunlight.
Do not place or install this device in an area where it can
be exposed to excessive amounts of dust, humidity, oil,
smoke, or combustible vapors.
Prior to operation, check the unit for physical damage. Do
not use if physical damage has occurred.
Ensure that power is turned off and disconnected before
making any electrical connections.
Remove the battery from the controller if it will go unused
for a lengthy period of time.

3
Clean using a soft, dry cloth only. Do not use chemical
cleaners, solvents, or detergents. For stubborn deposits,
moisten the cloth with warm water.
This device has no user serviceable parts. Do not attempt
to open, service, or modify this device.
Cables run through the wall must be rated for in-wall use.
FEATURES
40 watt class D differential amplifier (10 watts/channel
RMS, 20 watts/channel peak)
Includes IR remote control
Bluetooth® radio for streaming audio from a paired device
Built-in audio player compatible with wav, mp3, wva, ape,
flac, aac, aiff, and wma files on a USB flash drive or
microSD™ card
Supports up to 128GB USB drives
Supports up to 64GB microSD cards
Built-in FM radio with automatic and manual tuning and
the ability to store 20 station presets
Two AUX inputs with adjustable input sensitivity

4
CUSTOMER SERVICE
The Monoprice Customer Service department is dedicated to
ensuring that your ordering, purchasing, and delivery experience
is second to none. If you have any problem with your order,
please give us an opportunity to make it right. You can contact a
Monoprice Customer Service representative through the Live
Chat link on our website www.monoprice.com or via email at
support@monoprice.com. Check the website for support times
and links.
PACKAGE CONTENTS
Please take an inventory of the package contents to ensure you
have all the items listed below. If anything is missing or damaged,
please contact Monoprice Customer Service for a replacement.
1x Wall mount music amplifier
1x Back box
2x Machine screws
1x IR remote control with installed CR2032 battery
1x User's manual

5
PRODUCT OVERVIEW
Front Panel
Bottom Panel
6
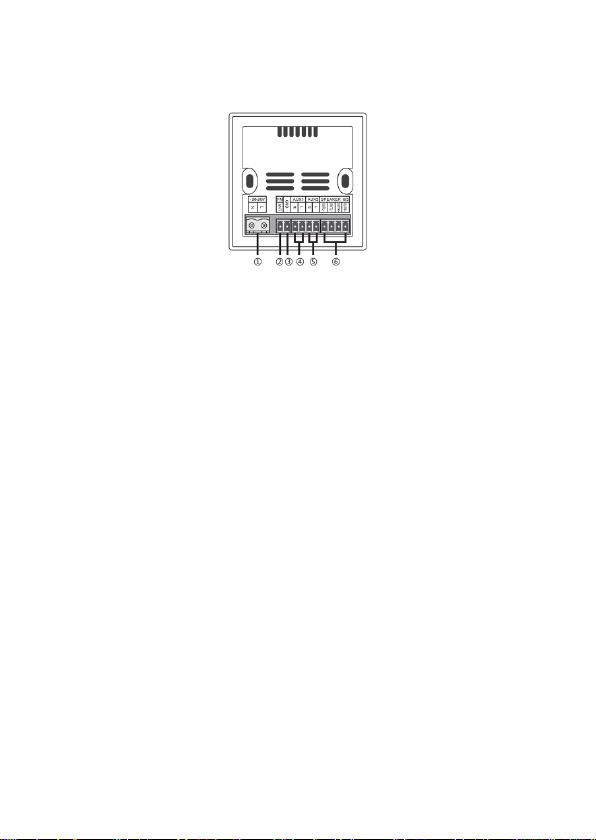
Rear Panel
1. Power: Power connector for connecting an AC power cord
(not included).
2. FM: Connector for attaching an FM antenna (not included).
3. GND: Connector for attaching the signal ground/common.
4. AUX1: Connectors for attaching the left and right channel
inputs from a line level source.
5. AUX2: Connectors for attaching the left and right channel
inputs from a line level source.
6. SPEAKER 8Ω: Connectors for attaching the left and right
channel speakers.
Remote Control
1. Standby: Press the button to turn the system on or to put
it into standby mode.
2. EQ: Press the button to cycle through the Voice, Normal,
Pop, Rock, and Jazz effects.

7
3. Control Pad: The control pad consists of
five buttons, including Play/Pause,
Previous Track, Next Track, Volume Up,
and Volume Down.
4. Mode: Press the button to cycle through
the FM, USB, microSD™, Bluetooth®,
AUX1, and AUX2 inputs.
5. Mute: Press the button to turn audio muting on or off.
6. Null: Not used.
7. Play Mode: Press the button to toggle between the Repeat
All and Repeat 1 play modes. This is only available for the
USB and SD™ input modes.
8. Keypad: In SD and USB playback modes, use the keypad to
directly select the track to play.
INSTALLATION
Important! Installation of structural materials and electric wiring
should always be performed by a qualified contractor or engineer.
All cables should be rated for in-wall use.
1. Select a location for the amplifier. Ensure that there are no
obstructions behind the wall.
2. Using a drywall saw, cut a 3 5/16" x 3 5/16" (84.13 x 84.13
mm) square hole in the wall.

8
3. Ensure that the power cord and audio cabling is installed in
the wall to the amplifier installation location.
4. Punch open needed holes in the back can, then pull the
cables through the hole(s). Be sure to keep the power cord
as far as possible from the audio cables.
5. Fit the back can into the hole, then use the self-tapping
screws to secure it to at least one stud or frame.
6. Select two buckles in either the A or B direction, as
indicated in the image below. Pull the outer edge of it so
that the snap is disengaged. Carefully disconnect the front
panel from the amplifier base.
7. Make all audio and control connections to the amplifier
connectors. Be sure to match polarity for all connections to
ensure proper function and quality of sound.

9
8. Connect the amplifier base to the back can using the 2
included machine screws.
9. Attach the front panel to the amplifier base.
OPERATION
FM Radio
Momentarily press the Mbutton to start playing the last
station selected.
Press and hold the Play/pause button to start the
automatic channel search. When a station with a strong
enough signal is found, the amplifier will save it as a preset.
Momentarily press the Previous or Next buttons to cycle
through the saved station presets.
Press and hold the Previous and Next buttons together to
enter manual tuning mode. Momentarily press either the
Previous or Next buttons to decrease or increase the radio
frequency in 0.1MHz increments. If no buttons are pressed
within 5 seconds, the amplifier will exit manual tuning
mode.

10
Momentarily press the Volume down or Volume up
buttons to adjust the volume level.
USB Mode
Insert a USB flash drive with audio files into the USB port
on the amplifier.
Momentarily press the Mbutton until Usb is visible on the
Display screen. If no USB device is connected, the display
will blink NO. If a USB device is present but no playable
audio files are found, the display will show - - - -. If audio
files are found, the display will briefly show the track
number, then will change to show the track timer.
Momentarily press the Play/pause button to pause and
resume playback.
Momentarily press the Previous or Next buttons to select
tracks.
Press and hold the Previous or Next buttons to rewind or
fast forward through the track.
SD™ Card Mode
Insert a microSD™ card into the microSD card slot on the
amplifier.
Table of contents
Other COMMERCIAL AUDIO Amplifier manuals


