Commercial CHEF CHTO40B User manual

Page 1
User Manual
Toaster Oven
MODEL: CHTO40B
1. READ these instructions carefully before installing and operating the
appliance. Keep them for further reference.
2. Record in the space below the “SERIAL/MODEL NUMBER” found on the back
or bottom of your appliance and retain this information for future reference.
SERIAL NUMBER:
MODEL NUMBER:
DATE OF PURCHASE:
Save and staple your sales receipt to your manual for warranty coverage.

Page 2
CONTENTS
SAFETY INFORMATION
Important Safety Instructions............................................................................................................... 3-4
Electrical Requirements................................................................................................................................ 5
SET UP & USE
Specifications.....................................................................................................................................................6
Installation Guide .............................................................................................................................................6
Parts & Features ...............................................................................................................................................6
Operation Instructions...............................................................................................................................7-8
CLEANING & CARE................................................................................................................................................9
TROUBLESHOOTING & WARRANTY
Before You Call For Service...................................................................................................................... 10
Customer Service........................................................................................................................................... 10
Troubleshooting.............................................................................................................................................. 10
Limited Warranty.............................................................................................................................................11

Page 3
SAFETY INFORMATION
DANGER
DANGER - Immediate hazards
which WILL result in severe
personal injury or death
WARNING
WARNING - Hazards or unsafe
practices which COULD result in
severe personal injury or death
CAUTION
CAUTION - Hazards or unsafe
practices which COULD result in
minor personal injury
1. Read all instructions
2. Do not touch hot surfaces. Use handles or knobs.
3. To protect against electrical shock do not immerse cord, plugs, in water or
other liquid.
4. Close supervision is necessary when any appliance is used by or near
children.
5. Unplug from outlet when not in use and before cleaning. Allow to cool
before putting on or taking off parts.
6. Do not operate any appliance with a damaged cord or plug or after the
appliance malfunctions or has been damaged in any manner. Return
appliance to the nearest authorized service facility for examination, repair, or
adjustment.
7. The use of accessory attachments not recommended by the appliance
manufacturer may cause injuries.
8. Do not use outdoors.
9. Do not let cord hang over edge of table or counter, or touch hot surfaces.
10. Do not place on or near a hot gas or electric burner, or in a heated oven.
11. Extreme caution must be used when moving an appliance containing hot oil
or other hot liquids.
12. To disconnect, turn any control to “OFF,” then remove plug from wall outlet.
13. Do not use appliance for other than intended use.
14. Oversize foods or metal utensils must not be inserted in a toaster-oven as
they may create a re or risk of electric shock.
IMPORTANT SAFETY INSTRUCTIONS
WARNING
When using electrical appliances, basic safety precautions
should be followed, including the following

Page 4
SAFETY INFORMATION
15. A re may occur if the toaster-oven is covered or touching ammable
material, including curtains, draperies, walls, and the like, when in operation.
Do not store any item on top of the appliance when in operation.
16. Do not clean with metal scouring pads. Pieces can break off the pad and
touch electrical parts involving a risk of electric shock.
17. Extreme caution should be exercised when using containers constructed of
other than metal or glass.
18. Do not store any materials, other than manufacturers recommended
accessories, in this oven when not in use.
19. Do not place any of the following materials in the oven: paper, cardboard,
plastic, and other similar products.
20. Do not cover crumb tray or any part of the oven with metal foil. This will
cause overheating of the oven.
21. This appliance is not intended for use by persons (including children) with
reduced physical, sensory or mental capabilities. Or lack of experience
and knowledge unless they have been given supervision or instruction
concerning use of the appliance by a person responsible for their safety.
22. Use extreme caution when removing tray or disposing of hot grease.
23. This appliance has a tempered, safety glass door. The glass is stronger than
ordinary glass and more resistant to breakage. Tempered glass can break,
but pieces will not have sharp edges. Avoid scratching door surface or
nicking edges.
24. Do not place eyes or face in close proximity with tempered safety glass door
in event that safety glass breaks
25. This appliance is OFF when both Time/Toast and Temperature controls are
in OFF position.
SAVE THESE INSTRUCTIONS
HOUSEHOLD USE ONLY

Page 5
SAFETY INFORMATION
ELECTRICAL REQUIREMENTS
POWER SUPPLY CORD
This appliance has a polarized plug (one blade is wider than the other). To reduce the
risk of electric shock, this plug is intended to t into a polarized outlet only one way.
If the plug does not t into the outlet, reverse the plug. If it still does not t, contact a
qualied electrician. Do not attempt to modify the plug in any way.
NOTE: This appliance requires a minimum of 1000 watts and it should be the only appliance
operating on the circuit.
1. A short power supply cord is provided to reduce the risk of becoming entangled in
or tripping over a longer cord.
2. If the power supply cord is too short, do not use an extension cord. Have a
qualied electrician or serviceman to install an outlet near the appliance.
3. If it is absolutely necessary to use longer cord sets or an extension cord, extreme
care must be exercised.
a) Use an extension cord rated no less than 10-amperes.
b) The marked electrical rating of the cord set or extension cord must equal to
or be greater than the electrical rating of the appliance. The longer cord should
be arranged so that it will not drape over the counter top or table top where it
can be pulled on by children or tripped over unintentionally.
NOTE: Neither Commercial Chef nor the dealer can accept any liability for damage to the product
or personal injury resulting from failure to observe the electrical connection procedures.

Page 6
SET UP & USE
SPECIFICATIONS
INSTALLATION GUIDE
• Power: 1000W
• Outside Dimensions (W x D x H): 14.57” x 11.42” x 7.95”
• Oven Cavity Dimensions (W x D x H): 10.24” x 9.06” x 6.55”
• Oven Capacity: 0.35 cu. ft.
• Net Weight: Approx. 6.16 lbs.
1. Make sure that all the packing materials are removed from the inside of the door.
2. Check the oven for any damage, such as misaligned door, damaged door
and sealing surfaces, broken or loose door hinges, and dents inside the cavity. If
there is any damage, do not operate the oven. Contact qualied service personnel.
3. This toaster oven must be placed on a at, stable surface capable of
supporting the weight of the oven plus the heaviest food likely to be cooked in the
oven.
4. Do not place the oven where heat, moisture, or high humidity are generated, or
near combustible materials.
5. To function correctly, the oven must have sufcient airow on all sides. Allow 8”
of space above the oven, 4” at back, and 2” at both sides. Do not cover or block
any openings on the appliance. Do not remove feet on which oven stands.
6. Make sure that the power supply cord is undamaged and does not run under the
oven or over any hot or sharp surface.
7. The socket must be readily accessible so that the cord can be quickly reached and
easily unplugged in an emergency.
PARTS & FEATURES
Diagram for instructional purposes only.
Top Heating Elements
Baking Pan/Drip Tray
Bottom Heating Elements
Power Indicator Light
Temperature Knob
Timer Knob
Handle
Crumb Tray
Oven Rack

Page 7
SET UP & USE
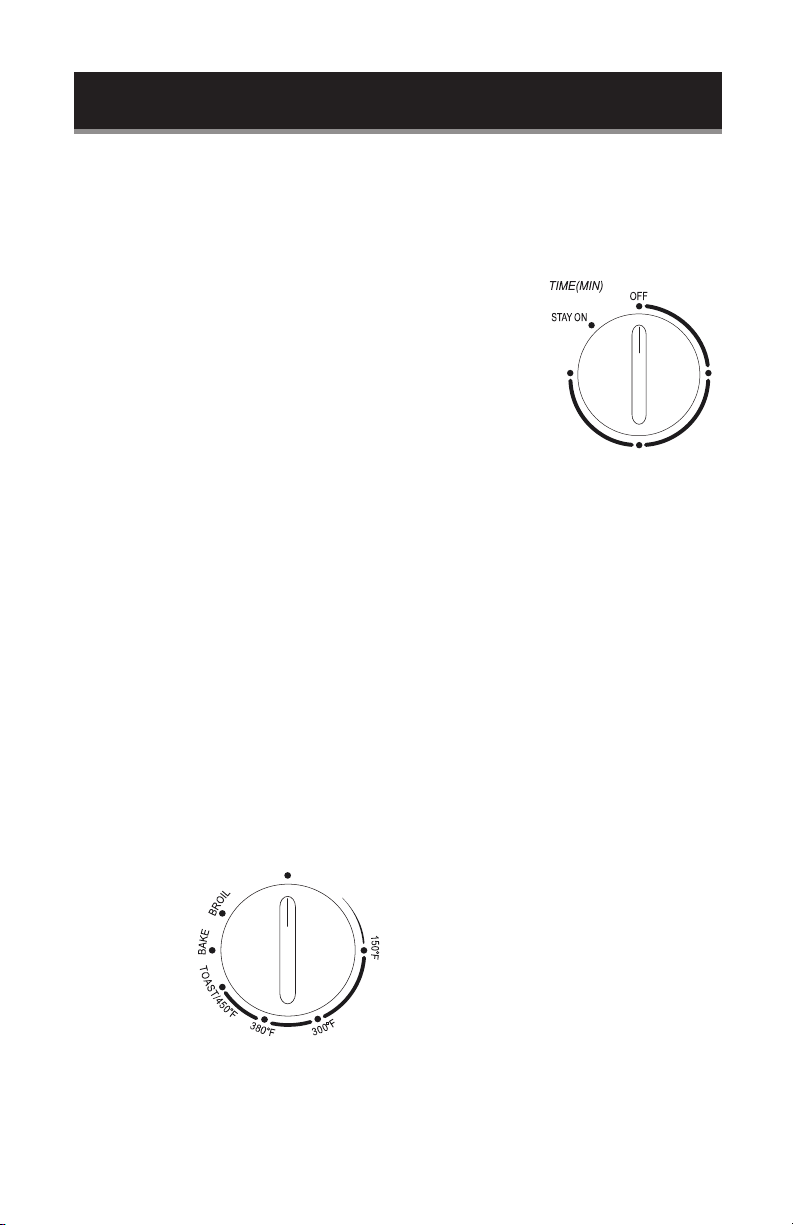
OPERATION INSTRUCTIONS
BEFORE FIRST USE TIME SETTING
BROILING
TOASTING
1. Remove all accessories and shipping
materials packed inside the oven.
2. Wash the rack and pan in warm
soapy water. Wipe the inside of the
oven with a damp cloth or sponge.
Blot dry with paper towels to be
sure the unit is dry before using.
3. Place oven on a at counter or other
stable surface DO NOT OPERATE
ON THE SAME CIRCUIT WITH
ANOTHER APPLIANCE.
4. Position the oven so that it is at least
2 inch (5cm) on both sides and 4”
at the back from any object. Ensure
that nothing has been placed on top
of the oven.
5. Make sure the crumb tray is properly
in place before using. For the rst
time only, turn the temperature knob
to 450 F and the timer knob to 15
minutes. This will burn off any oils
still on the oven.
NOTE: · The oven may smoke during this
process. This is normal for a new
oven and will not last more than 10-15
minutes.
Choose
your crust
preference by
rotating the
timer knob
clockwise to
select toasting
time. Start
toasting at
short time
period, as toasting varies according to
humidity, thickness and texture, each
type of bread will toast differently
according to these properties.
NOTE: ·For cooking times which are under
ten minutes, rst rotate the timer to
a longer time and then turn the knob
back to the time you require When
the toast cycle is nished a bell will
ring and the electrical power will
automatically turn off. To stop the
cycle at any time, rotate the timer
knob counterclockwise to “OFF”
position till the bell rings.
·Bread may catch re if the toasting
time is set for a very long period.
Close supervision is necessary during
toasting. In the “TOAST” setting,
both the heating elements will work.
1. Slide in the drip tray under the oven
rack. Always use the drip tray when
broiling the food like chicken wings
or drumstick which contains fat.
2. Place food on the oven rack. In
“BROIL” setting, only top heating
element will work.
NOTE: · We always suggest preheating oven
about 3-5 minutes before placing the
food in the oven.
Rotate the
temperature
knob clockwise
to “TOAST”
position. Open
the oven door
and place the
bread slice on
the oven rack. If
a single slice of bread is toasted, place it
in the center of the oven rack. If 4 slices
are being toasted, place them side by
side.
5
10
15

Page 8
SET UP & USE
3. Rotate the temperature knob
clockwise to “BROIL” position
4. The timer knob is in OFF position.
a) For short time broiling, rotate
the timer knob clockwise (up to
15 minutes), when the cycle is
nished, the bell will ring and the
power is automatically turned off.
b) For longer time broiling, rotate
the time knob counterclockwise
from the OFF position to “STAY
ON” setting. The cooking will
continue until the timer knob
is manually turned to “OFF”
position and the bell will ring.
NOTE: · Always monitor the food at this
setting to prevent overcooking. Turn
the food over during the process
or add the avoring as necessary.
Always use oven mitts to prevent the
risk of scalding.
There are 2 rack levels. The baking pan
or oven rack can be slid into the groove
for either level.
1. Slide the baking pan into the bottom
rack level.
2. Place food on the baking pan.
NOTE: · We always suggest preheating oven
5 minutes at this setting before place
the food in the oven.
3. Rotate the temperature knob
clockwise to “BAKE” position.
4. Set the time based on the food type
and thickness. The heating element
will cycle on and off to maintain a
constant cavity temperature. The
maximum time that can be set by
timer is 15 minutes, if longer time is
needed, you must set the timer to
“STAY ON” position. Rotate the time
knob counterclockwise from the
OFF position. In this case you must
ABOUT RACK LEVELS
BAKING
stop the oven manually by turning
the timer knob to OFF position once
the food is ready.
NOTE: · Always monitor the food at this
setting to ensure that you are not
overcooking.
Upper Rack Level Lower Rack Level

Page 9
This appliance has a drop open crumb
tray at the bottom of the baking
chamber. First unplug this appliance
and allow the oven to cool down. To
clean out the crumbs, simply tilt the unit
backwards and push the crumb tray
slide knob towards the rear. This will
release the crumb tray and allow it to
tilt down on the counter. Wipe interior
of crumb tray with a damp cloth. After
cleaning, simply push the knob towards
the rear and place the crumb tray in its
position. Washing of the interior of the
crumb tray is accomplished by placing
unit on its back side and allow crumb
tray to fall forward for easy cleaning.
CLEANING THE BOTTOM
OF THE CRUMB TRAY
CLEANING AND CARE
1. Before cleaning unplug the toaster
oven and allow it to cool completely.
2. Wash all the attachments with mild,
soaped water.
3. Do not use abrasive cleansers,
scrubbing brushes and chemical
cleaner as this will cause damage to
the non-stick coating of baking pan.
4. Using a wet cloth to wipe the inner
of the oven.
5. Clean the door by using a wet cloth
saturated with detergent or soap.
6. Never immerse the unit in water or
other liquid.
7. Any other servicing should be
performed by an authorized service
representative.
1.
2.
3.
4.
Close
Open To
Close
To
Open
Crumb Tray Slide Knob
Crumb Tray
Close
Open

Page 10
TROUBLESHOOTING & WARRANTY
BEFORE YOU CALL FOR SERVICE
CUSTOMER SERVICE
IF THE OVEN FAILS TO OPERATE:
A) Check to make sure that the oven is plugged in securely. If it is not, remove the
plug from the outlet, wait 10 seconds and plug it in again securely.
B) Check for a blown circuit fuse or a tripped main circuit breaker. If these seem to
be operating properly, test the outlet with another appliance.
IF NONE OF THE ABOVE SOLVES THE PROBLEM, CONTACT A QUALIFIED
TECHNICIAN. DO NOT TRY TO ADJUST OR REPAIR THE OVEN YOURSELF.
IMPORTANT
DO NOT RETURN THIS PRODUCT TO THE STORE
If you have a problem with this product, please contact the W
Appliance Co. Customer Satisfaction Center at 1-855-855-0294.
DATED PROOF OF PURCHASE, MODEL # AND SERIAL #
REQUIRED FOR WARRANTY SERVICE
TROUBLESHOOTING
Troubleshoot your problem by using the chart below. If the toaster oven still does
not work properly, contact W Appliance Co. customer service center or the nearest
authorized service center. Customers must never troubleshoot internal components.
TROUBLE POSSIBLE CAUSE
Oven will not start Electrical cord for oven is not
plugged in.
Unevenly cooked foods Cooking time, power level is
not suitable.
Food is not turned or stirred.
Overcooked or
undercooked foods
Cooking time, power level is
not suitable.
POSSIBLE REMEDY
Plug into the outlet.
Use correct cooking time,
power level.
Turn or stir food.
Use correct cooking time and
power level.

Page 11
TROUBLESHOOTING & WARRANTY
LIMITED WARRANTY
Commercial Chef brand is used under license.
Any repair, replacement, or warranty service,
and all questions about this product should
be directed to W Appliance Co. at 1 (855)
855-0294 from the USA or Puerto Rico.
W Appliance Co. warrants to the original purchaser
that the product will be free from defects in material,
parts and workmanship for the period designated for
this product. The warranty commences the day the
product is purchased and covers up to a period of
1 year (12 months) for labor/1 year (12 months) for
parts (manufacturing defects only)/carry in service.
W Appliance Co. agrees that it will, at its option,
replace the defective product with either a new or
remanufactured toaster oven equivalent to your
original purchase during the warranty period.
Exclusions: This warranty does not apply to the
below:
1. If the appearance or exterior of
the product has been damaged or
defaced, altered or modied in design
or construction.
2. If the product original serial number
has been altered or removed or cannot
be readily determined.
3. If there is damaged due to power line
surge, user damage to the AC power
cord or connection to improper
voltage source.
4. If damage is due to general misuse,
accidents or acts of God.
5. If repair attempts are done by
unauthorized service agents, use of
parts other than genuine parts or parts
obtained from persons other than
authorized service companies.
6. On units that have been transferred
from the original owner.
7. On products that have been purchased
as refurbished, like new, second-hand,
in a “As-Is” or “Final Sale” terms.
8. To products used in a commercial or
rental setting.
9. To products used in settings other than
ordinary household use or used other
than in accordance with the provided
instructions.
10. To damages for service calls for
improper installations.
11. To glass or replaceable light bulbs or
parts and other accesory items that
are included with the unit.
12. Transportation and shipping costs
associated with the replacement of
the unit.
13. Food loss for loss due to product
failure or delay in service, repair or
replacement.
14. Service calls to instruct you how to
use your toaster oven.
15. Service calls to repair or replace the
house fuse, reset the circuit breaker or
correct the wiring in the house.
REPAIR OR REPLACEMENT AS PROVIDED UNDER
THIS WARRANTY IS THE EXCLUSIVE REMEDY
OF THE CUSTOMER; W Appliance Co. SHALL
NOT BE LIABLE FOR ANY INCIDENTAL OR
CONSEQUENTIAL DAMAGES FOR BREACH OF
ANY EXPRESS OR IMPLIED WARRANTY ON THIS
PRODUCT, EXCEPT TO THE EXTENT PROHIBITED
BY APPLICABLE LAW. ANY IMPLIED WARRANTY
OF MERCHANTABILITY OF FITNESS FOR A
PARTICULAR PURPOSE ON THIS PRODUCT IS
LIMITED TO THE DURATION OF THE WARRANTY.
Some states do not allow the exclusion or limitations
of incidental or consequential damages, or limitations
on how long the warranty lasts. In these cases the
above exclusions or limitations may not apply to you.
This warranty gives you specic legal rights and you
may also have other rights which vary from state to
state.
Obtaining Service: To obtain service, product
literature, supplies or accessories please call
1 (855) 855-0294 to create a ticket for exchange/
repair. Please make sure to provide the date of
purchase, model number and a brief description of
the problem. Our customer service representative
will contact you or send detailed return instructions.
W Appliance Co. does not warrant that the appliance will work
properly in all environmental conditions, and makes no warranty
and representation, either implied or expressed, with respect
to the quality, performance, merchantability, or tness for a
particular purpose other than the purpose identied within this
user’s manual. W Appliance Co. has made every effort to ensure
that this user’s manual is accurate and disclaims liability for any
inaccuracies or omissions that may have occurred. Information
in this user’s manual is subject to change without notice and
does not represent a commitment on the part of W Appliance
Co.. W Appliance Co. reserves the right to make improvements
to this user’s manual and/or to the products described in this
user’s manual at any time without notice. If you nd information
in this manual that is incorrect, misleading, or incomplete, please
contact us at 1- 855-855-0294.
W Appliance Co.,
New York, NY 10018

Manuel d’Utilisation
Grille-Pain Four
MODÈLE: CHTO40B
1. LISEZ attentivement ces instructions avant d’installer et d’utiliser l’appareil.
Gardez-les pour référence ultérieure.
2. Enregistrez dans l’espace ci-bas le “NUMÉRO DE SÉRIE/MODÈLE” situé à
l’arrière ou au bas de votre appareil et gardez ces informations pour référence
ultérieure.
NUMÉRO DE SÉRIE:
NUMÉRO DE MODÈLE:
DATE D’ACHAT:
Gardez et agrafez votre reçu de vente à votre manuel pour une couverture de
garantie.

Page 13
FRANÇAIS
TABLE DES MATIÈRES
CONSIGNES DE SÉCURITÉ
Consignes De Sécurité Importantes................................................................................................14-15
Exigences Électriques.................................................................................................................................. 16
CONFIGURATION ET UTILISATION
Spécifications....................................................................................................................................................17
Guide d’Installation ........................................................................................................................................17
Pièces Et Caractéristiques..........................................................................................................................17
Mode d’Emploi ...........................................................................................................................................18-19
NETTOYAGE ET ENTRETIEN................................................................................................................ 20
DÉPANNAGE ET GARANTIE
Avant d’Appeler Le Service........................................................................................................................21
Service Client ....................................................................................................................................................21
Dépannage.........................................................................................................................................................21
Garantie Limitée .............................................................................................................................................22

Page 14
FRANÇAIS
CONSIGNES DE SÉCURITÉ
DANGER
DANGER - Risques immédiats
qui VONT entraîner des blessures
graves ou la mort
AVERTISSEMENT
AVERTISSEMENT - Risques ou
pratiques dangereuses POUVANT
entraîner des blessures graves ou
la mort
ATTENTION
ATTENTION - Risques ou
pratiques dangereuses POUVANT
entraîner des blessures corporelles
mineures
1. Lisez toutes les instructions
2. Ne touchez pas les surfaces chaudes. Utilisez des poignées ou des boutons.
3. Pour se protéger contre les chocs électriques, ne plongez pas le cordon, les
prises, dans l’eau ou tout autre liquide.
4. Une surveillance étroite est nécessaire lorsqu’un appareil est utilisé par ou
près des enfants.
5. Débranchez la prise de courant lorsqu’elle n’est pas utilisée et avant de la
nettoyer. Laisser refroidir avant de mettre ou d’enlever des pièces.
6. N’utilisez aucun appareil avec un cordon ou une che endommagé ou
après que l’appareil fonctionne mal ou a été endommagé en aucune façon.
Renvoyez l’appareil à l’atelier de réparation agréé le plus proche pour
examen, réparation ou réglage.
7. L’utilisation d’accessoires non recommandés par le fabricant de l’appareil
peut causer des blessures.
8. Ne pas utiliser à l’extérieur.
9. Ne laissez pas le cordon pendre sur le bord de la table ou du comptoir, et ne
touchez pas les surfaces chaudes.
10. Ne pas placer sur ou près d’un brûleur à gaz chaud ou électrique, ou dans un
four chauffé.
11. Il faut être extrêmement prudent lors du déplacement d’un appareil
contenant de l’huile chaude ou d’autres liquides chauds.
12. Pour débrancher, mettez n’importe quelle commande à “ARRÊT”, puis
enlevez la che de la prise murale.
13. Ne pas utiliser l’appareil pour une utilisation autre que celle prévue.
14. Les aliments surdimensionnés ou les ustensiles métalliques ne doivent
pas être insérés dans un grille-pain four four parce qu’ils peuvent créer un
incendie ou un risque de choc électrique.
CONSIGNES DE SÉCURITÉ IMPORTANTES
AVERTISSEMENT
Lors de l’utilisation d’appareils électriques, les précautions de
sécurité de base devraient être suivies, y compris les suivantes

Page 15
FRANÇAIS
CONSIGNES DE SÉCURITÉ
15. Un incendie peut se produire si le grille-pain four est recouvert ou touche un
matériau inammable, y compris des rideaux, draperies, murs et similaires,
pendant son fonctionnement. Ne rangez aucun article sur le dessus de
l’appareil en cours de fonctionnement.
16. Ne pas nettoyer avec des tampons à récurer en métal. Les pièces peuvent
se détacher du tampon et toucher des pièces électriques impliquant un
risque de choc électrique.
17. Il faut faire preuve d’une extrême prudence lors de l’utilisation de récipients
construits en d’autres matériaux que le métal ou le verre.
18. Ne rangez aucun matériau, autre que les accessoires recommandés par le
fabricant, dans ce four lorsqu’il n’est pas utilisé.
19. Ne placez aucun des matériaux suivants dans le four: papier, carton,
plastique et autres produits similaires.
20.Ne couvrez pas le ramasse-miettes ou toute partie du four avec une feuille
métallique. Ceci entraînera une surchauffe du four.
21. Cet appareil n’est pas destiné à être utilisé par des personnes (y compris des
enfants) ayant des capacités physiques, sensorielles ou mentales réduites.
Ou un manque d’expérience et de connaissances à moins qu’ils n’aient reçu
une supervision ou des instructions concernant l’utilisation de l’appareil par
une personne responsable de leur sécurité.
22. Faites preuve d’une extrême prudence lors du retrait du plateau ou de
l’élimination de la graisse chaude.
23. Cet appareil dispose d’une porte en verre trempé et de sécurité. Le verre est
plus résistant que le verre ordinaire et plus résistant à la rupture. Le verre
trempé peut se briser, mais les morceaux n’auront pas d’arêtes vives. Évitez
de rayer la surface de la porte ou d’entailler les bords.
24. Ne placez pas les yeux ou le visage à proximité de la porte en verre de
sécurité trempé en cas de bris du verre de sécurité
25. Cet appareil est ÉTEINT quand les commandes Time/Toast et Temperature
sont en position ARRÊT.
GARDEZ CES INSTRUCTIONS
USAGE DOMESTIQUE UNIQUEMENT

Page 16
FRANÇAIS
CONSIGNES DE SÉCURITÉ
EXIGENCES ÉLECTRIQUES
ALIMENTATION ÉLECTRIQUE
Cet appareil est équipé d’une che polarisée (une lame est plus large que l’autre).
Pour réduire le risque de choc électrique, cette che est conçue pour s’insérer dans
une prise polarisée dans un seul sens. Si la che ne rentre pas complètement dans la
prise, inversez la che. Si elle ne rentre toujours pas, contactez un électricien qualié.
Ne modiez pas la che en aucune façon.
REMARQUE: Cet appareil exige un minimum de 1000 watts et il devrait être le seul à fonctionner
sur le circuit.
1. Un cordon d’alimentation court est fourni pour réduire le risque de s’emmêler
ou trébucher sur un cordon plus long.
2. Si le cordon d’alimentation est trop court, n’utilisez pas de rallonge. Demandez
à un électricien ou réparateur qualié d’installer une prise à proximité de
l’appareil.
3. S’il est absolument nécessaire d’utiliser des cordons plus longs ou une
rallonge, une extrême prudence doit être exercée.
a) Utilisez une rallonge d’au moins 10 ampères.
b) Le calibre électrique marqué de l’ensemble de cordons ou la rallonge
doit être égal à ou supérieure à la puissance nominale de l’appareil. Le
cordon plus long doit être disposé de manière à ne pas draper le dessus
du comptoir ou de la table où il peut être tiré par les enfants ou trébucher
involontairement.
REMARQUE: Ni Commercial Chef ni le détaillant ne peuvent accepter aucune responsabilité pour
les dommages causés au produit ou les blessures résultant du non-respect des
procédures de connexion électrique.

Page 17
FRANÇAIS
CONFIGURATION ET UTILISATION
SPÉCIFICATIONS
GUIDE D’INSTALLATION
• Puissance: 1000W
• Dimensions Extérieures (L x P x H): 14.57po x 11.42 po x 7.95po
• Dimensions De La Cavité Du Four (L x P x H): 10.24” x 9.06” x 6.55”
• Capacité Du Four: 0.35 pi. cu
• Poids Net: Env. 6.16 livres.
1. Assurez-vous que tous les matériaux d’emballage sont enlevés de l’intérieur de la
porte.
2. Vériez que le four n’est pas endommagé, comme une porte mal alignée, une
porte endommagée et des surfaces d’étanchéité, des charnières de porte cassées
ou desserrées, et des bosses à l’intérieur de la cavité. S’il y a des dommages, ne
faites pas fonctionner le four. Contactez du personnel de service qualié.
3. Ce grille-pain four doit être placé sur une surface plane et stable capable de
supporter le poids du four ainsi que les aliments les plus lourds susceptibles d’être
cuits dans le four.
4. Ne placez pas le four où de la chaleur, de la moiteur ou une humidité élevée sont
générées, ou près de matériaux combustibles.
5. Pour fonctionner correctement, le four doit avoir un débit d’air sufsant de tous les
côtés. Allouez 8” d’espace au-dessus du four, 4” à l’arrière, et 2” des deux côtés.
Ne couvrez ni ne bloquez aucune ouverture sur l’appareil. N’enlevez pas les pieds
sur lesquels se tient le four.
6. Assurez-vous que le cordon d’alimentation n’est pas endommagé et ne passe pas
sous le four ou sur une surface chaude ou tranchante.
7. La prise doit être facilement accessible an que le cordon puisse être rapidement
atteint et facilement débranché en cas d’urgence.
PIÈCES ET CARACTÉRISTIQUES
Schéma à titre indicatif uniquement.
Éléments Chauffants Du Haut
Bac De Cuisson/
Bac d’Égouttage
Éléments De Chauffage Du Bas
Voyant d’Alimentation
Bouton De
Température
Bouton De Minuterie
Poignée
Ramasse-Miettes
Grille De Four

Page 18
FRANÇAIS
CONFIGURATION ET UTILISATION
MODE D’EMPLOI
AVANT LA PREMIÈRE UTILISATION RÉGLAGE DE TEMPS
GRILLER
GRILLAGE
1. Enlevez tous les accessoires et matériaux
d’expédition emballés à l’intérieur du four.
2. Lavez la grille et le bac à l’eau chaude
savonneuse. Essuyez l’intérieur du four
avec un chiffon humide ou une éponge.
Séchez avec des serviettes en papier
pour être sûr que l’appareil est sec avant
utilisation.
3. Placez le four sur un comptoir plat ou
une autre surface stable. NE PAS FAIRE
FONCTIONNER SUR LE MÊME CIRCUIT
AVEC UN AUTRE APPAREIL.
4. Positionnez le four de sorte qu’il soit d’au
moins 2” (5cm) des deux côtés et 4” à
l’arrière de tout objet. Assurez-vous que
rien n’a été placé sur le dessus du four.
5. Assurez-vous que le ramasse-miettes
est bien en place avant de l’utiliser. Pour
la première fois seulement, tournez le
bouton de température à 450 F et le
bouton de minuterie à 15 minutes. Ceci
brûlera toutes les huiles encore sur le four.
REMARQUE: · Le four peut fumer pendant ce
processus. Ceci est normal pour un
nouveau four et ne durera pas plus
de 10-15 minutes.
Choisissez votre
préférence de
croûte en tournant
le bouton de
minuterie dans le
sens horaire pour
sélectionner le
temps de grillage.
Commencez à
griller à court
terme, car le
grillage varie selon
l’humidité, de l’épaisseur et de la texture, chaque
type de pain grillera différemment selon ces
propriétés.
REMARQUE: · Pour les temps de cuisson inférieurs à
dix minutes, tournez d’abord la minuterie à un
temps plus long, puis remettez le bouton au
temps souhaité. Quand le cycle de toast est
terminé, une cloche retentit et l’alimentation
électrique s’éteint automatiquement. Pour
arrêter le cycle à tout moment, tournez le
bouton de minuterie dans le sens antihoraire
sur la position “ARRÊT” jusqu’à ce que la
cloche sonne.
· Le pain peut prendre feu si le temps de
grillage est réglé sur une très longue période.
Une surveillance étroite est nécessaire
pendant le grillage. Dans le réglage “TOAST”,
les deux éléments chauffants fonctionneront.
1. Glissez le bac d’égouttage sous la grille du
four. Utilisez toujours le bac d’égouttage
quand vous faites griller les aliments comme
des ailes de poulet ou un pilon qui contient
de la graisse.
2. Placez la nourriture sur la grille du four. En
position “GRIL”, seul l’élément chauffant du
haut fonctionnera.
REMARQUE: · Nous vous suggérons toujours
de préchauffer le four environ 3 à 5
minutes avant de placer les aliments
dans le four.
Tournez le
bouton de
température dans
le sens horaire en
position “TOAST”.
Ouvrez la porte
du four et placez
la tranche de pain
sur la grille du
four. Si une seule
tranche de pain est grillée, placez-la au centre
de la grille du four. Si 4 tranches sont grillées,
les placer côte à côte.
5
10
15

Page 19
FRANÇAIS
CONFIGURATION ET UTILISATION
3. Tournez le bouton de
température dans le sens horaire
en position “GRIL”
4. Le bouton de minuterie est en
position ARRÊT.
a) Pour un court grillage, tournez
le bouton de minuterie dans le
sens horaire (jusqu’à 15 minutes),
quand le cycle est terminé, la
cloche sonne et l’alimentation est
automatiquement coupée.
b) Pour un temps de cuisson plus
long, tournez le bouton d’heure
dans le sens antihoraire de la
position ARRÊT à la position
“RESTER EN MARCHE”. La
cuisson se poursuivra jusqu’à ce
que le bouton de minuterie soit
tourné manuellement en position
“ARRÊT” et que la cloche sonne.
REMARQUE: · Surveillez toujours les
aliments à ce niveau pour éviter une
surcuisson. Tournez les aliments
pendant le processus ou ajoutez
l’arôme au besoin. Utilisez toujours
des gants de cuisine pour prévenir le
risque d’échaudage. Il y a 2 niveaux de grille. La plaque de
cuisson ou la grille de four peut être
glissée dans la rainure pour l’un ou
l’autre niveau.
1. Glissez la plaque de cuisson dans le
niveau de grille du bas.
2. Placez la nourriture sur la plaque de
cuisson.
REMARQUE: · Nous vous conseillons toujours
de préchauffer le four 5 minutes à ce
réglage avant de placer les aliments
dans le four.
À PROPOS DES NIVEAUX
DE GRILLE
CUISSON
3. Tournez le bouton de température
dans le sens horaire sur la position
“CUIRE”.
4. Réglez le temps selon le type
d’aliment et l’épaisseur. L’élément
chauffant s’allume et s’éteint
pour maintenir une température
constante de la cavité. Le temps
maximum qui peut être réglé par
la minuterie est de 15 minutes, si
un temps plus long est nécessaire,
vous devez régler la minuterie sur
la position “RESTER EN MARCHE”.
Tournez le bouton de minuterie
dans le sens antihoraire à partir de la
position ARRÊT. Dans ce cas, vous
devez arrêter le four manuellement
en tournant le bouton de minuterie
sur la position ARRÊT dès que la
nourriture est prête.
REMARQUE: · Surveillez toujours les aliments
à ce niveau pour vous assurer que
vous ne les cuisez pas trop.
Niveau de grille haut Niveau de grille bas

Page 20
FRANÇAIS
Cet appareil dispose d’un ramasse-miettes
ouvrable au fond de la chambre de cuisson.
Débranchez d’abord cet appareil et
laissez refroidir le four. Pour nettoyer les
miettes, inclinez simplement l’appareil vers
l’arrière et poussez le bouton coulissant du
ramasse-miettes vers l’arrière. Ceci libérera
le ramasse-miettes et lui permettra de
basculer vers le bas sur le comptoir. Essuyez
l’intérieur du ramasse-miettes avec un
chiffon humide. Après le nettoyage, il suft
de pousser le bouton vers l’arrière et de
placer le ramasse-miettes dans sa position.
Le lavage de l’intérieur du ramasse-miettes
est effectué en plaçant l’unité sur son côté
arrière et en permettant au ramasse-miettes
de tomber vers l’avant pour un nettoyage
facile.
NETTOYAGE DU FOND DU
RAMASSE-MIETTES
NETTOYAGE ET ENTRETIEN
1. Avant le nettoyage, débranchez le
grille-pain four et laissez-le refroidir
complètement.
2. Lavez tous les accessoires avec de
l’eau douce et savonneuse.
3. N’utilisez pas de nettoyants
abrasifs, brosses à récurer et
nettoyants chimiques, car ceci
pourrait endommager le revêtement
antiadhésif de la plaque de cuisson.
4. Utilisez un chiffon humide pour
essuyer l’intérieur du four.
5. Nettoyez la porte à l’aide d’un
chiffon humide saturé de détergent
ou de savon.
6. Ne plongez jamais l’appareil dans
l’eau ou un autre liquide.
7. Tout autre entretien doit être
effectué par un représentant de
service autorisé.
1.
2.
3.
4.
put
fermeture
Pour
Ouvrir
Bouton Coulissant Du Ramasse-Miettes
Ramasse-Miettes
Fermer
Ouvrir
Fermer
Ouvrir
Table of contents
Languages:
Other Commercial CHEF Oven manuals