Constellation audio Inspiration INTEGRATED 1.0 User manual


CAUTION: NO USER SERVICEABLE PARTS INSIDE. Do not open the amplifier chassis or remove any of its
screws. Contact Constellation or your dealer if you have service needs.
WARNING: Do not expose this amplifier to moisture or excessive humidity, and do not use it outdoors. Fire
hazard may result.
The lightning flash with arrowhead, within an
equilateral triangle, is intended to alert the us-
er to the presence of uninsulated dangerous
voltage within the product enclosure that may
be of sufficient magnitude to constitute a risk
of electrical shock to persons.
The exclamation point within an equilateral
triangle is intended to alert the user to the
presence of important operating maintenance
(servicing) instructions in the literature accom-
panying the appliance.
Contents
Page Topic
3 Warranty information
4 Before you install the Inspiration Integrated
Unpacking
Installation notes
In the event of malfunction
5 Input and output connections
XLR inputs
RCA inputs
Speaker outputs
Headphone output
XLR output
AC power input
RS 232 / control
USB / control
Trigger output
9 Controls / displays / indicators
Front panel knobs and buttons
Rear panel controls
11 Remote control
12 Control screens
14 Step-by-step operating procedure
15 Maintenance
15 Troubleshooting

Limited warranty
Dear purchaser
This product has been designed and manufactured to the highest quality standards. Howev-
er, if something does go wrong with this product, Constellation and its national distributors
warrant the replacement of defective parts including labor (exclusions may apply) in any
country served by an official Constellation distributor. This limited warranty is valid for a
period of 3 years from the date of purchase.
Terms and conditions
1. The warranty is limited to the repair of the equipment. In the event that your equipment requires service, the
customer must first obtain a return authorization from Constellation or its authorized distributor. The custom-
er is responsible for returning the equipment to Constellation or its authorized distributor. In the event that the
repair is determined to be under warranty, Constellation will return the equipment to the customer at no
charge. Except as indicated, neither transportation, shipping, nor any other costs, nor any risk for removal,
transportation and installation of products are covered by this warranty.
2. With the exception explained below, this warranty is only valid for the original owner. It is not transferable.
It is valid only when purchased from an authorized Constellation dealer or distributor. A valid receipt show-
ing the purchaser’s name, date of purchase, and dealer information must be submitted with all warranty
claims.
2A. In the event that this equipment is purchased as a used or trade-in equipment from an authorized Con-
stellation dealer or distributor, the second owner shall receive the balance of the original warranty based
upon the original date of purchase. Valid receipts showing the purchaser’s name, date of purchase, and
dealer information for the current owner and the original purchase must be submitted with all warranty
claims.
3. This warranty will not be applicable in cases other than defects in materials and/or workmanship at the time
of purchase and will not be applicable for damages caused by incorrect installation, connection or packing; for
damages caused by any use other than correct use described in the user manual; for damages caused by negli-
gence, modifications, or use of parts that are not made or authorized by Constellation, LLC; for damages
caused by faulty or unsuitable ancillary equipment; for damages caused by accidents, lightning, water, fire,
heat, extreme weather condition, war, public disturbances or any other cause beyond the reasonable control of
Constellation and its appointed distributors; for products whose serial number has been altered, deleted, re-
moved or made illegible; or if repairs or modifications have been executed by an unauthorized person.
4. This guarantee complements any national/regional law obligations of dealers or national distributors and
does not affect your statutory rights as a customer.
5. Unauthorized dismantling of this product will render this warranty void.
6. Constellation strives to manufacture the very finest possible equipment, and therefore reserves the right to
make changes or improvements without notice.

Before you install the Inspiration Integrated
Unpacking
Take care when you remove the Inspiration Integrated from its packaging. Because of its machined aluminum
chassis components and large transformer and heat sinks, it is heavier than you might expect. Have an extra
person nearby to help if you need it. You may wish to use gloves to protect your fingers and avoid leaving fin-
gerprints on the surface.
Installation notes
To avoid noise, the Inspiration Integrated uses passive cooling with no internal fans. It must be located in an
area with adequate ventilation so that cool air can flow through its heat sinks. There should be at least 6 in/15
cm of clearance between the sides and top of the integrated amp and the nearest wall or cabinet. If the Inspira-
tion Integrated is installed in a cabinet or an equipment closet, ensure adequate ventilation. Installation in an
unventilated cabinet or closet may cause the Inspiration Integrated to overheat, reducing its lifespan.
The Inspiration Integrated requires a room-temperature environment to operation properly. Ambient tempera-
ture should be about 70°F/21°C, plus or minus 10°F/5°C. Never install the Inspiration Integrated in a place
where it may be exposed to direct sunlight, and do not install it next to a heater, radiator, air conditioner, etc.
Make sure the Inspiration Integrated will not be exposed to moisture. Do not locate it in an area where it might
be spilled on, and do not place it in a humid location (such as an unfinished basement).
Before you make or change any connections to the Inspiration Integrated, be sure to turn off the master power
switch on the back panel and let the unit cool down for at least 1 minute.
When you connect or disconnect the AC cord, always grasp it by the plug, not by the cord itself. Pulling the
plug out by the cord can damage the cord, the AC socket, and/or the Inspiration Integrated.
Installing the Inspiration Integrated in a place where it will be exposed to direct sunlight or moisture, or where
it will not have adequate ventilation, will void your warranty.
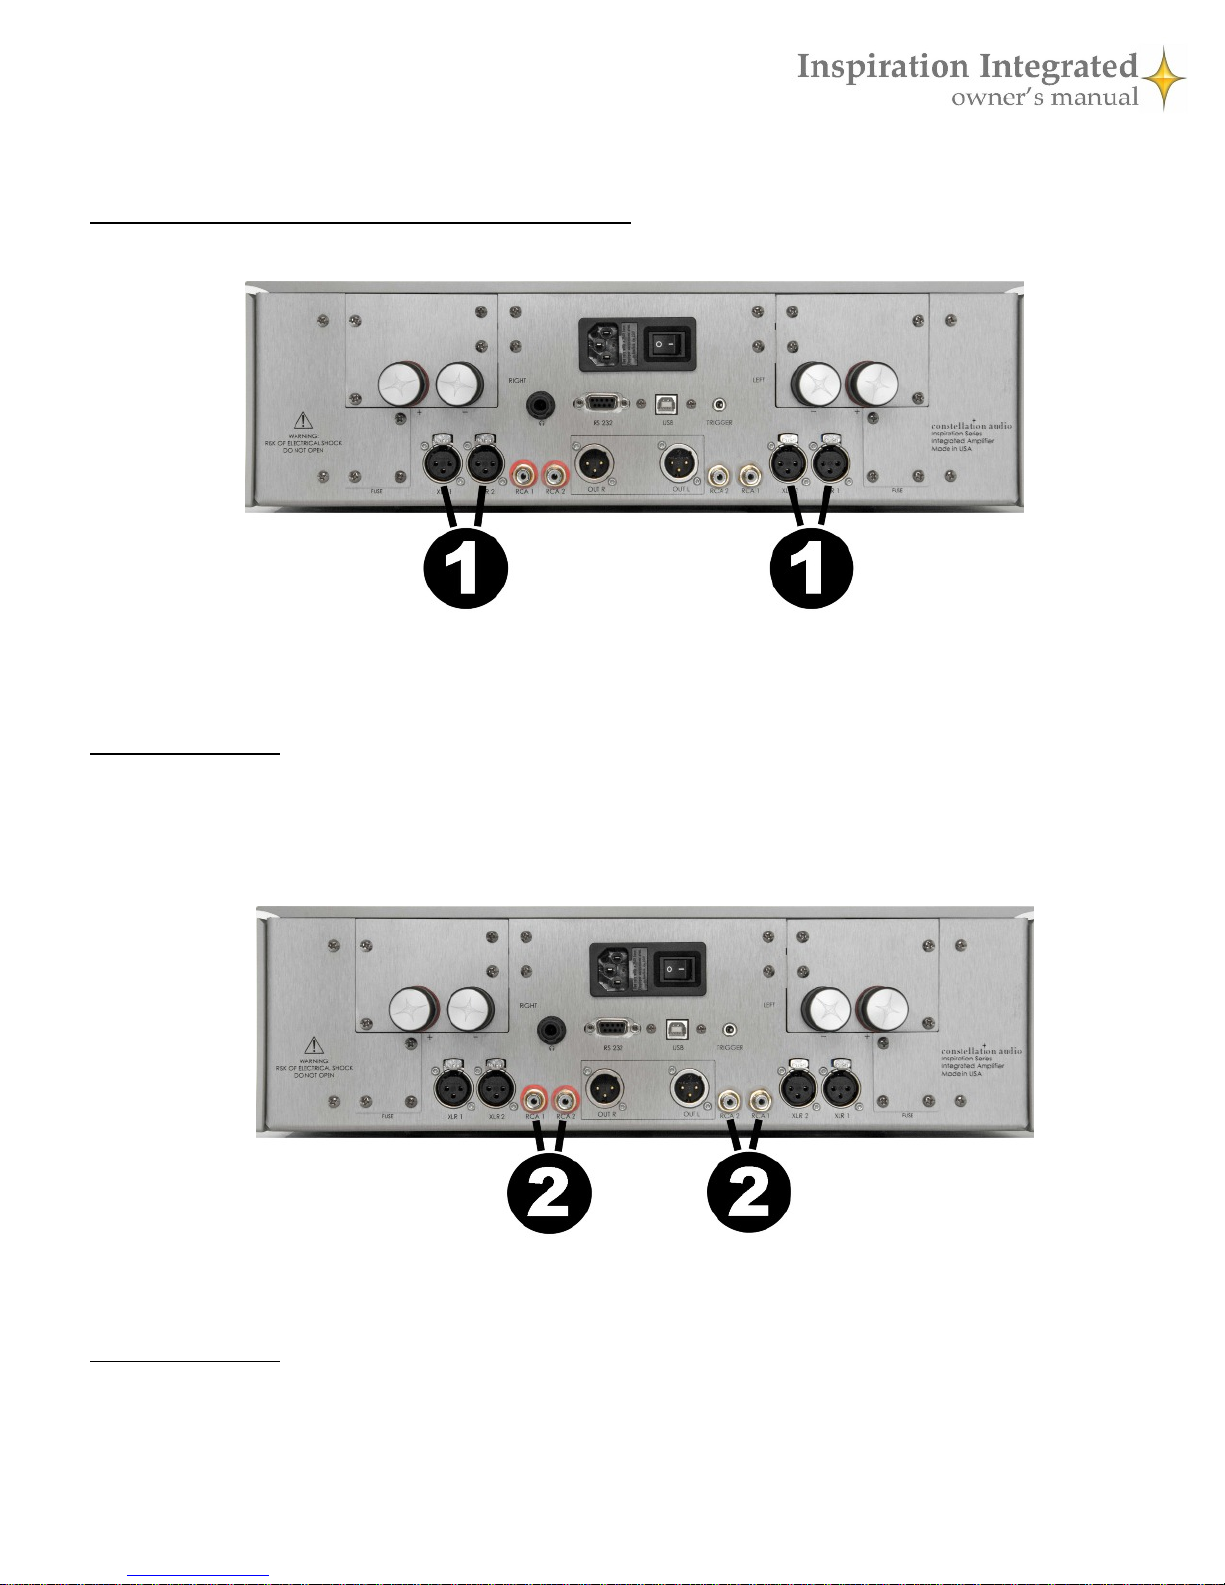
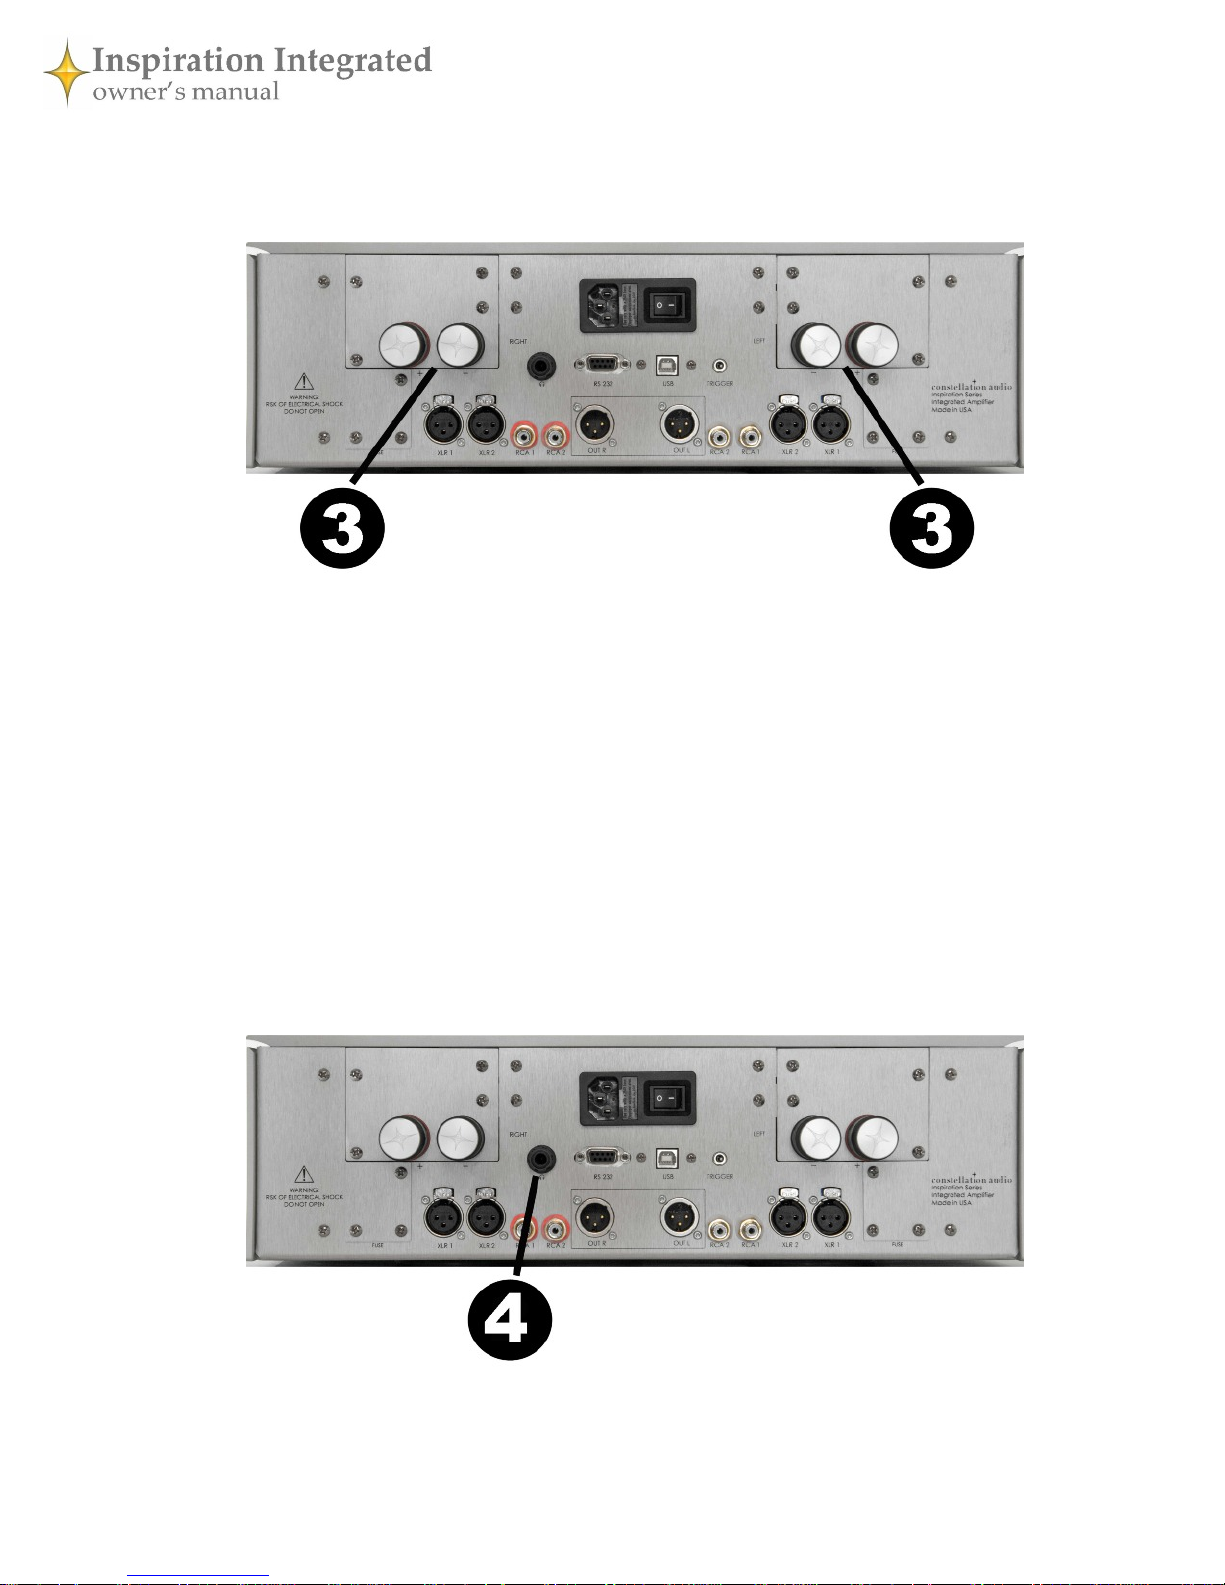
Use of external amplifiers and subwoofers
The Inspiration Integrated is equipped with XLR line-level outputs. These allow you to connect a separate,
more powerful amplifier, such as our Hercules or Centaur amps; to connect a second amplifier to drive a sec-
ond speaker system in another room; or to connect a powered subwoofer. Should the device you’re connecting
to have only RCA line-level inputs, you’ll have to use XLR-to-RCA adapters between the Inspiration Integrated
and the connected device. Please consult your Constellation dealer if you need adapters.
BE VERY CAUTIOUS if you intend to connect the speaker outputs of the Inspiration Integrated to the
speaker-level input of a powered subwoofer or subwoofer amplifier. It could result in serious damage to
the Inspiration Integrated. Before attempting this, read the full explanation on page 6.
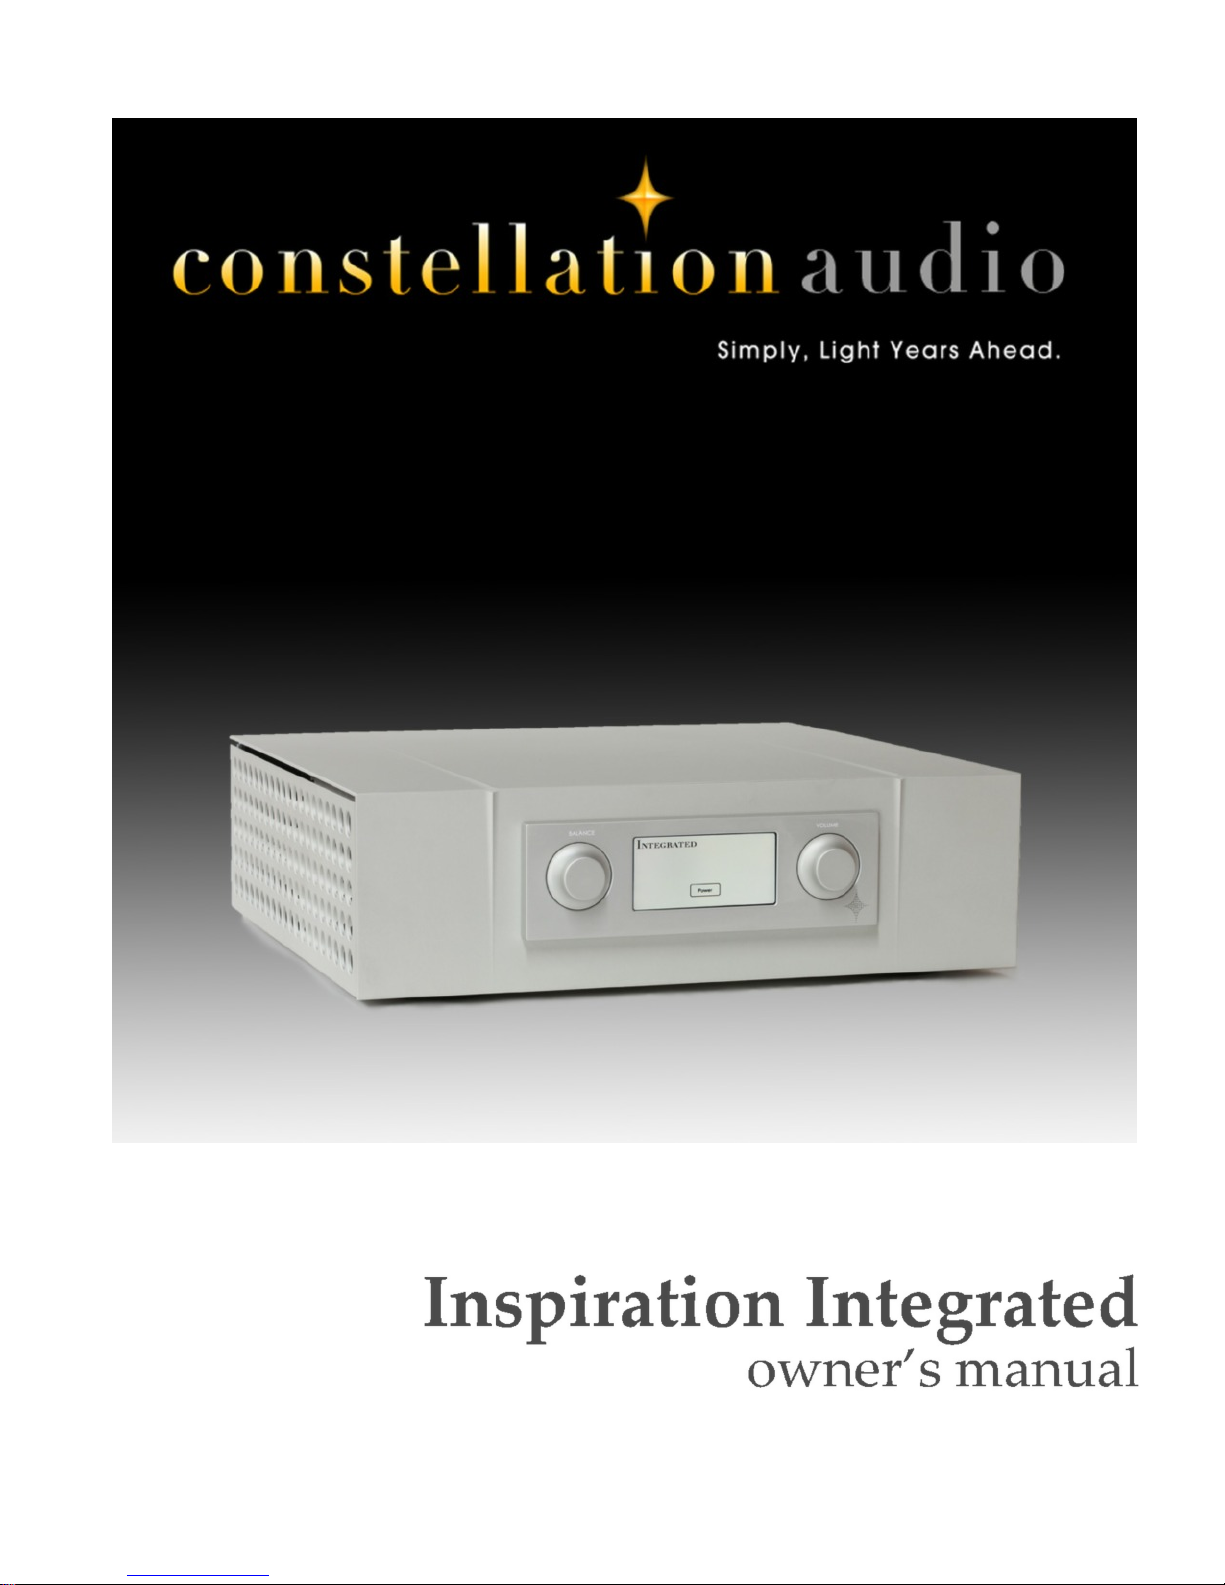
Source components
The Inspiration Integrated has four analog audio inputs—two balanced (XLR) and two unbalanced (RCA)—
and can be used with any audio source component with line-level analog outputs. An XLR connection will pro-
vide the highest quality signal, and should be used when possible. If you are using a record turntable, you will
need to connect a high-quality phono preamp, such as the Constellation Perseus, between the turntable and the
Inspiration Integrated.
In the event of malfunction
Do not under any circumstances open the chassis of the Inspiration Integrated. There are no user-serviceable
parts inside. Opening the chassis can present a shock hazard even if the AC power is disconnected. Any altera-
tion or modification of the Inspiration Integrated’s internal parts or circuit will void your warranty. If your In-
spiration Integrated does not function correctly, refer to the Troubleshooting section at the end of this manual.
If you are still unable to resolve the problem, contact your Constellation dealer. If liquid is spilled on the Inspi-
ration Integrated, or if any metal object (such as a staple or a paper clip) is inadvertently forced inside, immedi-
ately disconnect the AC power and contact your Constellation dealer.

Input and output connections
1. XLR inputs
On the rear of the Inspiration Integrated are four XLR inputs, two on each side. As you are looking at the rear panel, the
left two XLR inputs are for the right channel, the right two inputs are for the left channel. Underneath each jack is the cor-
responding input number. Use of XLR connections is recommended for the best possible audio quality. To remove an
XLR plug, push on the tab above the jack and pull the plug out.
IMPORTANT NOTE: To preserve true dual-mono operation, the Inspiration Integrated uses a symmetrical circuit layout.
This configuration requires that the amplifier’s back panel connections be laid out a little differently from those on most
integrated amps. For example, the left-channel connection for Input 1 is on the right side of the back panel, and the right-
channel connection is at the left side. Connecting the cables in the usual side-by-side fashion will result in an incorrect in-
stallation and the mixing of sounds from different source devices.
2. RCA inputs
These unbalanced inputs are provided as a convenience for use with unbalanced signal sources. Whenever possible, we
recommend using XLR connections instead. Connecting to an unbalanced source is handled in the same way an XLR bal-
anced source. To remove an RCA plug, grasp the plug and pull it out. Do not pull on the cable.
IMPORTANT NOTE: To preserve true dual-mono operation, the Inspiration Integrated uses a symmetrical circuit layout.
This configuration requires that the amplifier’s back panel connections be laid out a little differently from those on most
integrated amps. For example, the left-channel connection for Input 1 is on the right side of the back panel, and the right-
channel connection is at the left side. Connecting the cables in the usual side-by-side fashion will result in an incorrect in-
stallation and the mixing of sounds from different source devices.

3. Speaker outputs
The Inspiration Integrated offers one set of Argento speaker cable binding posts for each channel. Connect the marked
connector or cable conductor for the left speaker cable to the left positive (+ or red) binding post and the unmarked con-
nector to the negative (- or black) binding post. Repeat with the right speaker cable. Make sure the speaker cables on both
channels are connected identically, with the marked cable conductor or connector to red, unmarked conductor or connec-
tor to black. Do not allow the speaker cable terminals to touch each other or to touch the amplifier chassis.
SPECIAL NOTE FOR CONNECTING THE INSPIRATION INTEGRATED TO A SUBWOOFER: If you intend to con-
nect this amplifier to the speaker-level inputs of a powered subwoofer or a subwoofer amplifier, BE VERY CAUTIOUS.
The negative input terminals of a powered subwoofer or subwoofer amp are almost always grounded together, and this
is incompatible with the Balanced Bridged design of this amplifier. Serious damage to the Inspiration Integrated could
result. Consult the manufacturer of the subwoofer or subwoofer amplifier to find out if the negative speaker input termi-
nals are grounded together.
If the manufacturer doesn’t know or isn’t sure, you can use a multimeter (available for less than $10 on Amazon) to check.
Setthemultimeterforohms(Ω).Whenyoutouchtheprobesfromthemetertogether,itshouldread0ohms(ormaybe
0.1 or 0.2 ohms). Now touch the probes to the metal parts of the two negative (black) binding posts on the subwoofer’s
input. If it reads 0 or some tiny amount like 0.1 ohms, DO NOT connect the Inspiration Integrated to this input. Instead,
use the amp’s XLR line outputs, which will prevent damage to the amplifier and will also deliver better sound quality.
4. Headphone output
The Inspiration Integrated offers a single headphone output on a 1/4-inch (6.2mm) jack. To activate this output (and mute
the speaker outputs), you must use the front-panel controls. The Inspiration Integrated’s headphone amplifier has enough
power to drive any dynamic or planar magnetic headphones. If your headphones have a 1/8-inch (3.5mm) plug, use a 1/8-
inch to 1/4-inch adapter. Many headphones come with the adapter.

5. XLR outputs
The two inner XLR connections on the rear of the Inspiration Integrated are outputs. These can be connected to a larger,
more power amplifier such as the Inspiration Stereo or Mono. They can also be connected to a system in a second room,
or to a powered subwoofer.
Be sure to match the output to the correct channel on your amp. As you are looking at the back of the Inspiration Integrat-
ed, the output on the left side is for the right channel, and the output on the right side is for the left channel. To remove an
XLR plug, push on the tab on the connector body and pull the plug out.
6. AC power input
This jack accepts a standard 15-amp IEC AC connector. You can use the AC cord supplied with the Inspiration Integrated,
or substitute your own cord. Before making this connection, turn the power switch above the AC input off. Connect the
AC cord to the Inspiration Integrated, then plug the AC cord into the wall or your power conditioner, then turn the am-
plifier’s power switch on.

7. RS 232 / control
This connector is used to interface the Inspiration Integrated
with third-party control systems such as those from AMX, Cre-
stron and Control4, and also to update the amplifier’s firmware.
For more information, contact your dealer.
8. USB / control
This USB jack interfaces the Inspiration Integrated with third
party control systems such as those from AMX, Crestron and
Control4, and also to update the amplifier’s firmware. For more
information, contact your dealer
9. Trigger output
This 1/8-inch/3.5mm jack outputs a 12-volt DC trigger signal when the Inspiration Integrated is powered on. This
signal can be used to automatically turn on a connected amplifier (if the amp has a DC trigger input), or to trig-
ger home automation systems.

Controls / displays / indicators
10 - 16. Front panel controls
The front panel includes an LCD touchscreen and two knobs plus five buttons positioned underneath the dis-
play. These buttons allow you to control the Inspiration Integrated without its remote. The functions of the but-
tons are shown using icons on the touchscreen. Here are the functions of the buttons and knobs:
10. Balance
This knob adjusts left-to-right balance when an input screen is displayed—i.e., when an input is selected. Turn
the knob counterclockwise to shift the balance to the left, clockwise to shift the balance to the right. An onscreen
indicator will indicate if the balance is centered or how far it is shifted to one side or the other.
11. Volume
The volume control is always active when the Inspiration Integrated is powered up and the mute is deactivated.
Note that the control is calibrated in negative decibels (-dB), reaching maximum volume at 0.0 dB and minimum
at -99.0 dB. Thus, when you turn the volume up (clockwise), the number on the front display will decrease.
When you turn the volume down (counterclockwise), the number will increase. The adjustments steps are in 1
dB increments between -99.0 dB and -50.0 dB, and 0.5 dB increments from -49.5 dB to 0.0 dB.
12. Home
This button brings you to the input select screen no matter which control screen you are currently viewing.
13. Return/back
This button brings you back to the previous control screen. For example, from any input’s screen, such as XLR 1,
it will take you back to the input selector screen.
14. Standby/power
Push this button to turn the Inspiration Integrated on and off. When you turn the unit on, it will take a few sec-
onds for the unit to warm up. When it is ready for use, its LCD screen will show the most recently selected input.
To put the unit in Standby mode, press this button again after turning on the power.
Hold this button down for 5 seconds to turn the Inspiration Integrated off. The unit will enter cool-down mode
for 10 seconds. During cool-down, no buttons on the unit or remote will operate.

15. Multifunction button
The multifunction button serves different functions depending on which control screen is shown. A label on the
LCD display will show the function of the button. Note that when an input screen is shown, this button switches
between speaker and headphone output.
16. Mute
Press this to button to silence the Inspiration Integrated temporarily. The numerical volume readout will flash.
Press again to restore the audio. Because the Inspiration Integrated uses a relay to perform the mute function, it
may take a second or so for this control to respond.
17. Rear-panel power switch
This is the master power switch for the Inspiration Inte-
grated. The power/standby buttons on the front panel and
remote control will not function when this switch is
flipped down. To power up the Inspiration Integrated,
first flip this switch up, then either press the Standby but-
ton on the remote, or press the front of the touchscreen
and hit the onscreen Power button or the middle button
under the touchscreen.

Remote control
The remote operates the basic functions of the Inspiration Integrated. It does not operate Constellation source
devices, such as the Perseus phono preamp and the Cygnus digital file player.
18. Standby
Push this button to turn the Inspiration
Integrated on and off. When you turn the
unit on, it will take a few seconds for the
unit to warm up. When the amp is ready
for use, its LCD screen will show the most
recently selected input. To put the unit in
Standby mode, press this button again
after turning on the power.
Hold this button down for 5 seconds to
turn the integrated amp off. The unit will
enter cool-down mode for 10 seconds.
During cool-down, no buttons on the unit
or remote will operate.
19. Mute
Press this to button to silence the Inspira-
tion Integrated temporarily. The numeri-
cal volume readout will flash. Press again
to restore the audio. Because the Inspira-
tion Integrated uses a relay to perform the
mute function, it may take a second or so
for this control to respond.
20. Volume up/down
Press these buttons to raise or lower the volume. Each press changes volume by 1 dB at volumes below -50.0 dB,
and 0.5 dB at volumes above -50.0 dB. Holding the buttons down raises or lowers the volume quickly.
21. Balance left/right
Press these buttons to shift the balance to the left or right. Each press changes the balance by 0.1 dB.
22. Input
Press this button to select among the Inspiration Integrated’s XLR and RCA inputs. You will have to wait a sec-
ond or so between pushes of this button, because for best sound quality the Inspiration Integrated uses relays to
switch inputs.
23. Headphones
Push this to activate the headphone output. This will mute the sound from the speakers. To restore the sound in
the speakers, push the headphones button again.

Standby
This screen appears if you touch the touchscreen when the rear-panel master
power switch is flipped up. Pushing the onscreen Power button (or the Standby
button on the remote) will power up the Inspiration Integrated and put it into
warmup mode.
Powering on
This screen appears after you press the onscreen Power button or the Standby
button on the remote while the Inspiration Integrated is powered down. It indi-
cates that the Inspiration Integrated is in warmup mode. No buttons will func-
tion when this screen appears. After about 10 seconds, the Inspiration Integrated
will become active and an input screen will appear.
Powering off
This screen appears for about 10 seconds if you push the Standby button under
the middle of the front touchscreen or on the remote while the Inspiration Inte-
grated is powered on. It indicates that the amplifier is powering off and going
into Standby mode. No buttons will function when the screen appears.
Input selector (Home)
This screen appears when the power is on and the unit is warmed up. Touching
any input button onscreen will switch to that input. The setup screen can be ac-
cessed from this screen using the multifunction button below the display.
Volume/balance
When you select an input, this screen will appear. It provides a large volume
display as well as the display for the balance control. The balance control
functions only when this screen is shown. Pushing the multifunction button
under the Setup label enters the input setup screen.
Note that when the input screen is displayed, the output of the Inspiration
Integrated can be set for speakers or headphones. The fourth indicator on the
lower part of the touchscreen (identified by the red arrow in the screen at right)
shows whether speakers or headphones are selected.
Control screens
Many functions of the Inspiration Integrated are controlled through the LCD touchscreen.
Here is how the control screens function:

Input setup
When you press the multifunction button labeled Setup on the input screen, this
screen will appear. It allows you to set up a home theater bypass input, and set
minimum and maximum output levels.
To set minimum and/or maximum levels: Adjust the Inspiration Integrated's
volume to the desired minimum or maximum level, and press either the Set Min
or Set Max button, depending on which function you want, and hit Apply to
accept the setting. To clear the setting, press either CLR Min or CLR Max as appropriate, or press Default to clear
both settings.
To set up a home theater bypass input: First select the input you want to use for this function, then adjust the
volume on the Inspiration Integrated to the desired level. Push the Set Min button, then the Set Max button, then
the Apply button. To clear these settings, press CLR Min then CLR Max, or press Default.
Screen setup
To adjust LCD brightness: Press the + and – buttons on the left side of the screen,
on either side of the dark dot.
To adjust LCD contrast: Press the + and – buttons on the right side of the screen,
on either side of the half-dark/half-light dot.
To adjust LCD backlight timeout: Press the Timeout button in the lower left
corner to keep the screen lit for 15 sec., 30 sec., 1 min., 5 min., 10 min., and
always on.
To accept or cancel screen setting changes: Press the Apply or Cancel button, respectively.
To return to the factory default settings: Press the Default button. This will bring up a screen asking “Are you
sure you want to set this device to its default settings?” Hit the Yes button to go to default settings, the No
button to cancel.
Configuration
This screen is accessed using the multifunction button labeled Info on the screen
setup screen. It is for servicing use only.

Step-by-step operating instructions
We’ve covered all of the basic controls and indicators of the Inspiration Integrated. Here’s how you use them
to perform the basic operations of turning the unit on, selecting a source, adjusting the sound, and turning the
unit off.
STEP 1: Before making or changing any connections, make sure the master power switch is turned off. If the
AC has not been connected, connect the amplifier to the wall AC power socket using the supplied cord.
STEP 2: To turn on the Inspiration Integrated from the front panel, first make sure the power switch on the
back of the unit is on. Now touch the touchscreen. It will illuminate and a power button will appear onscreen.
To power up the Inspiration Integrated, press the onscreen Power button, the middle button under the touch-
screen or the Standby button on the remote
When you turn on the power, you will hear the Inspiration Integrated’s internal relays click as the unit goes
into warmup mode. The touchscreen will read Powering On. After about 10 seconds, an input screen will ap-
pear and the most recently used input will be selected.
STEP 3: To change to a different input from the front panel, press the button under the Home icon. This will
bring up the input select screen. Push an onscreen button (XLR-1, RCA-1, etc.) to select the input you want.
The screen for that input will appear. Alternatively, you can scroll through the available inputs using the In-
put button on the remote. Enable playback on the chosen source device.
STEP 4: Adjust listening volume with the volume knob on the front of the unit or the volume up/down but-
tons on the remote. Note that the control is calibrated in negative decibels (-dB), reaching maximum volume
at 0.0 dB and minimum at -99.0 dB. Thus, when you turn the volume up (clockwise), the number on the front
display will decrease. When you turn the volume down (counterclockwise), the number will increase.
STEP 5: To adjust left-to-right balance, turn the balance knob. Counterclockwise shifts the balance to the left,
clockwise shifts it to the right. Or use the buttons on the remote; left shifts the balance to the left, right shifts to
right. The onscreen indicator will show you the balance setting in 0.1 dB increments.
STEP 6: You may wish to set a maximum output level to prevent damage to your speakers if the level is acci-
dentally turned up too high, and a minimum output level so that the Inspiration Integrated always delivers an
audible volume. To do this, adjust the Inspiration Integrated’s volume to the desired minimum or maximum
level. Push the multifunction button labeled Setup. Press either the Set Min or Set Max button, depending on
which function you want. Hit Apply to accept the setting, or Cancel to return to the original setting. To clear
the setting, press either CLR Min or CLR Max as appropriate, or press Default to clear both settings.
STEP 7: If you want to use the Inspiration Integrated in a home theater system, in conjunction with a sur-
round-sound processor, you should set up one input for home theater bypass. When you switch to this input,
volume and balance will be at fixed settings and your channel balance adjustments in the surround processor
will be preserved. To do this, first select the input you want to use for this function. Now adjust the volume
on the Inspiration Integrated to the desired level. Push the multifunction button labeled Setup. Push the Set
Min button, then the Set Max button, then the Apply button. To clear these settings, press CLR Min then CLR
Max, or press Default.
STEP 8: To turn the system off, stop playback on the source device. Hold the Standby button in the middle
under the LCD touchscreen or on the remote down for 5 seconds. The unit will enter cool-down mode for 10
seconds, during which no buttons will work. After cool-down mode finishes, you can turn the unit back on
again as described in Step 1 above.

Maintenance
The Inspiration Integrated requires no regular maintenance.
If the unit’s surface becomes dusty, simply wipe it off with a soft dry cloth. Do not spray cleaners on the sur-
face. To clean fingerprints from the surface of the integrated amplifier, spray a small amount of mild window
cleaner such as Windex onto a soft dry cloth, then use the cloth to remove the fingerprints. Do not spray the
cleaner directly onto the amplifier.
Troubleshooting
Unit will not turn on
1. First, check to see if the rear master power switch is on. If it is, try the following steps in order. After you
perform each step, touch the touchscreen on the front of the unit. If it illuminates, the unit is functioning cor-
rectly and there is no need to continue to the next steps.
A. Check power cable connections between the wall and the Inspiration Integrated. Push the wall plug
and the connector at the power supply in firmly.
B. If the Inspiration Integrated is plugged into an AC line conditioner, make sure the line conditioner is
turned on.
C. Flip the master power switch off and on again. This will reset the Inspiration Integrated's internal cir-
cuit breaker.
D. Check the circuit breaker for the AC circuit that the Inspiration Integrated is plugged into. If the break-
er is tripped, flip it back on. If it will not turn on, there is likely a short circuit somewhere in the lines or in
a device connected to this AC circuit. Check the power cords for your components to make sure none
have been damaged.
E. If none of these conditions restores power, it is possible one of the Inspiration Integrated's internal fuses
is blown. Do not attempt to change the fuse yourself—the Inspiration Integrated requires the use of spe-
cial high-voltage fuses that are not commonly available. Contact your Constellation dealer.
Unit is on but no sound is produced
1. If the front touchscreen is blank, touch it. If it illuminates and shows anything other than the onscreen Pow-
er button, the unit is on. If it shows the onscreen Power button, touch the button to power up the unit.
2. If the front touchscreen shows the message “Powering On,” wait about 10 seconds. Once the unit is
warmed up, an input screen should appear and the sound should come from the speakers or headphones.
3. If the volume numbers on the LCD panel are flashing, hit the Mute button on the front panel or on the re-
mote to restore sound.
4. Make sure the correct output mode (speakers or headphone) is selected. This can be set only from an input
screen (see page 14). With an input screen selected, the fourth icon from the left, along the bottom of the
touchscreen, will show you if the unit is in speakers or headphone output mode. Press the button under the
icon to change the mode.
5. If none of the above steps restores the sound, try the following steps in order. If any one of the steps re-
stores the sound, there is no need to continue to the next steps.
A. Check you are on the correct input. Cycle through available inputs using the front touchscreen con-
trols, or select the desired input using the remote.
B. Check that the source component is on and playing back—i.e., if it is a CD player, make sure that the
CD is playing and not in pause mode.
C. Check the connections between the Inspiration Integrated and your speakers or headphones, and be-
tween the Inspiration Integrated and the audio source device. If a cable is disconnected, reconnect it. If
this does not restore sound, try substituting a different set of cables in order to make sure the original set
was functioning properly.
D. Check that the volume is at a sufficient level. Do not turn the volume all the way up to check this, as if
sound is reestablished while the Inspiration Integrated is set to output maximum volume, damage can be
done to your speakers and amplifiers.

Sound seems unfocused
1. Play a CD of typical pop vocals and sit in front of your speakers at an equal distance from both (at least 8
feet away from each speaker). If the vocals seem to come from between the speakers, they are connected cor-
rectly. Alternatively, you can use the “barking dog” test from the Stereophile Test CD or a similar phase check
test from another test CD.
2. If the vocals seem to come from all around you, make sure that the cables between the Inspiration Integrat-
ed and your speakers are connected properly, with the marked connector or cable connected to the positive
(red or +) binding post on the amplifier, and the unmarked connector or cable connected to the negative (black
or -) binding post.
3. If you need to change the speaker cable connection, turn the Inspiration Integrated off first. To avoid possi-
ble electrical shock or damage to the amplifier, you must discharge the energy stored in the power supply. To
discharge the power supply, turn the power off with music playing. It may take up to a minute or so for the
sound to die out. After the sound dies out, it is OK to change or adjust the cables.
Sound comes from the wrong speaker
If left-channel sounds are coming from the right or vice-versa (i.e., the violins in an orchestral recording come
from the right speaker, not the left), check the cable connections between the source and the Inspiration Inte-
grated, and the Inspiration Integrated and your speakers. Make sure left-channel cables are connected to the
left channels of the Inspiration Integrated and amp, and right to the right channels.
Only one speaker is working, or one speaker is playing a different piece of music
1. Check each cable between the Inspiration Integrated and the source components. Make sure the left channel
of the source goes to the left input on the Inspiration Integrated (which is on the right side, as you're looking
at the back panel), and the right channel to the right input (which is on the left side). On the back of the Inspi-
ration Integrated, the left and right inputs are NOT next to each other. They are on opposite sides of the unit.
In other words, the XLR and RCA input numbers are 1, 2, 2, 1.
2. If you’re listening to your speakers, check to make sure both speaker cables are firmly connected.
3. If you’re listening to headphones, check to make sure the headphone plug is pushed all the way into the In-
spiration Integrated’s headphone jack. If you’re using an adapter, make sure the headphone plug is fully in-
serted into the adapter, that the adapter is fully inserted into the Inspiration Integrated’s headphone jack, and
that the connection between the headphone cable and the headphones are secure.
Remote control does not work
1. Move the remote a few feet away to a different location and try again. The remote requires a clear line-of-
sight to the infrared detector on the Inspiration Integrated’s front panel.
2. If the remote still doesn’t work, use a 3/32” Allen wrench to remove the remote’s battery compartment cov-
er, then replace the remote’s two AAA batteries and replace the cover.
Balance and volume controls do not function
1. If you are using the input configured for home theater bypass, this situation is normal—volume and bal-
ance controls do not function in this mode.
2. If you are not using an input configured for home theater bypass, you need to clear out the minimum and
maximum volume settings for the input you are using. Press the multifunction button labeled Setup on the
screen, then press the Default button.
For more information
Your Inspiration Integrated amplifier should give you many years of trouble-free, maintenance-free service. If
you encounter any problems you cannot solve or have technical questions, please contact your Constellation
dealer. For more information about Constellation products, please visit our website:
constellationaudio.com
Table of contents
Other Constellation audio Amplifier manuals

Constellation audio
Constellation audio Orion User manual

Constellation audio
Constellation audio Inspiration PREAMP 1.0 User manual

Constellation audio
Constellation audio PERSEUS User manual

Constellation audio
Constellation audio Virgo II User manual

Constellation audio
Constellation audio Hercules II User manual

Constellation audio
Constellation audio Inspiration PREAMP 1.0 User manual