Consul CQG22 User manual

REFRIGERATOR
REFRIGERADOR
REFRIGÉRATEUR
ABSORPTION
ABSORCIÓN
ABSORPTION
REFRIGERATOR
Page 1
REFRIGERADOR
Page 17
REFRIGERATOR
Page 1
REFRIGERADOR
Page 17

WARNING:
Improper installation as well as inadequate adjustment and
maintenance of this product may cause personal and material damage.
Before installing and using this Refrigerator, carefully read this manual.
If you are in doubt, call the Authorized Assistance Shop.
FOR YOUR SAFETY, IF YOU SMELL GAS:
1- Open the windows;
2- Do not switch lights on/off;
3- Turn off any flames;
4- Immediately close the gas valve and call the Authorized Assistance Shop.
FOR YOUR SAFETY:
Do neither store or use gasoline or any flammable product (vapor or liquid)
near this Refrigerator.
AVISO:
La instalación inadecuada, así como ajuste y mantenimiento
incorrectos de este producto, puede causar daños personales y materiales.
Antes de la instalación y uso de este Refrigerador, lea este manual
atentamente. En caso de duda, consulte la Asistencia Técnica Autorizada.
PARA SU SEGURIDAD, SI USTED SIENTE OLOR A GAS:
1- Abra las ventanas;
2- No accione interruptores de luz;
3- Apague cualquier llama;
4- Cierre inmediatamente la válvula de gas y llame al Servicio Autorizado.
PARA SU SEGURIDAD:
No deje o utilice gasolina o cualquier otro producto inflamable (vapor o
líquido) en las proximidades de este Refrigerador.
ENGLISH
ESPAÑOL
AVERTISSEMENT: L’installation impropre ainsi que l’ajustement et entretien inadéquats
de ce produit peuvent causer d’accidents et de dommages personnels et matériels.
Avant d’installer et d’utiliser ce Réfrigérateur, veuillez lire soigneusement ce manuel
d’instructions. Si vous avez de doutes, contactez le Service Autorisé.
POUR VOTRE SURETE, DANS LE CAS OUVOUS SENTEZ DE GAZ:
1- Ouvrez les fenêtres;
2- N’allumez ni éteignez les interrupteurs;
3- Eteignez tous les flammes;
4- Fermez, immédiatement, la soupape du gaz et contactez le Service Autorisé.
POUR VOTRE SURETE:
N’approvisionnez ni utilisez d’essence ou un autre produit inflammable (vapeur ou
liquide) auprès ce Réfrigérateur.
FRANÇAIS

1
2
3
4
5
6
CongratulationsContents
1
You have just acquired a safe and
quality product.
This product line
represents a true
innovation in terms of
desing and conception.
Your Refrigerator has been
carefully developed within
international technological
standards, making it the fruit
of a successful union of
technology and good taste.
Read manufacturer’s instructions
before use - this appliance shall
be installed according to the rules
in force.
Appliance designed for
freestanding use and only in a
well-ventilated area above ground
and protected from rain.
Read this manual very carefully as
any damages caused by not
following the instructions
contained in this manual are your
responsibility.
You will obtain the maximum use
and longest life of your
Refrigerator as well as
guaranteeing your own personal
safety.
You will soon discover why this
Refrigerator is so special and why
your choice was so right.
INTRODUCTION
✔Safety Instructions 02
✔General Characteristics 03
INSTALLATION
✔Installation 05
✔First Time Use 06
OPERATION
✔Loading your Refrigerator 08
✔Inside Lighting 09
✔Temperature Control 09
✔Reversing the Doors 09
✔Operation of the Electric Kit 10
CLEANING AND MAINTENANCE
✔Partial Defrosting 11
✔Total Defrosting 11
✔General Cleaning 12
✔Cleaning the Burner 13
✔Cleaning the Heater Pipe 13
✔When You are Away 14
✔Recommendations 14
TROUBLESHOOTING MINOR PROBLEMS
✔15
TECHNICAL CHARACTERISTICS
✔16
ENGLISH

2
1Introduction
To obtain the best and long-lasting
performance from your Refrigerator,
and for your own personal safety,
carefully read the following.
The symbols used in this manual
contain safety information.
Understand what they mean:
safety symbols:
SAFETY INSTRUCTIONS
✔Do not allow children to play with
the Refrigerator, even when it is
turned off.
✔ Your Refrigerator is designed
exclusively for home use.
✔ Do not store liquids such gasoline,
kerosene, varsol, etc., inside your
Refrigerator, thus avoiding the risks
of explosions and fire.
✔ Do not store toxic materials inside
your Refrigerator, as they could
contaminate food items.
✔ Your Refrigerator should be used
only by those who have read this
manual or those that have been
adequately instructed by someone
who has read it.
DANGER
WARNING
If not avoided, this situation will
result in death or serious injury.
If not avoided, this situation may
result in death or serious injury.
ATTENTION
If not avoided, this situation might
result in light to moderate injury.
ENGLISH

3
GENERAL CHARACTERISTICS
Freezer
Light Bulb
Uses two
1.5 V
batteries
(dry cells)
Evaporator
Removes the heat from the
inside of the appliance using
the heat exchanger fins
Drip Tray
Removable,
collects the
water from
defrosting
Shelves
Removables
Vegetable
Drawer
Removable
Leveling Feet
Control Panel
Features the Refrigerator control
buttons and a sight-glass to
view the burning gas flame
Electric Temperature Control
Is featured only in those models
equipped with the electric kit that
allow them to be used with electricity
Firing Button
Creates a spark which ignites the gas
to light the flame
Sight-lass
Allows you to check if the flame is lit
Gas Temperature Control
Allows the interior temperature
of the Refrigerator to be controlled by
regulating the intensity of the gas flame
Selection Valve
The on and off
switch which
controls the flow
of gas to the flame
Reversible Doors
The doors can be regulated
to open either from the left
or from the right sides
(see page 9)
Egg Tray
Magnetic Seal
This is the rubber seal that goes around
the doors to keep them sealed
ENGLISH

4
Evaporation Vessels
Collects the water from defrosting
which later evaporates
Check weather the flame is
centered in relation to the
heater pipe (A) (chimney).
If it is not (B), turn the product
off and call a service agency. Do not run the
Refrigerator under this circumstance.
Chimney
Lets off the hot air that comes
from the heater pipe
Coils
Transports the
fluid responsible
for the cooling of
the appliance.
External Heat
Dissipator
Dissipates the heat
taken out of the
Refrigerator
Do not place
cloths or wet
clothes on top of it
to dry.
Heater Box
Houses the system that replaces
the motor of a conventional
Refrigerator.
Important: Do not allow the hose
or gas connection pipe to touch
the heater box or pass behind it.
Heating Pipe
Where the heat from the flame is
used to circulate the fluid through
the coils and cool the interior of
the Refrigerator.
Deflector Unit
Distributes the heat derived from
the gas combustion within the
heating pipe. Has, as well, a
strangulation valve which limits the
amount of air passing through the
pipe.
Flame Unit
The component which ignites and maintains
the flame.
Ignition System
Controlled by the button on the control panel,
an electric piezo system provides a spark
which ignites the flame.
Injection System
Connected to the burner, regulates the flow of
gas. The flow remains constant, as it
passes through a small opening in
a ruby disc.
Burner
Keeps the flame in position
just below the flame pipe. The
burner screen should be
checked and cleaned
regularly.
Gas Control Unit
Filters the amount of gas that feeds the flames.
Features a safety device that interrupts the flow of
gas in the event the flame goes out.
AB
Protection
Hood
Isolates
and
protects
the gas
burner.
ENGLISH
ATTENTION

2
15 cm
10 cm
10 cm
5
Installation
Choosing the best location
Choose a well ventilated location, but
do not install the Refrigerator in the
open air.
✔The Refrigerator shall neither be
installed next to heat sources
(stoves, heaters
etc.) nor in a
place that
receives direct
sun rays.
Consider the
following minimum distances to
assure adequate air circulation:
✔10 cm on the sides.
✔10 cm at
the rear.
✔15 cm
on the top.
✔Avoid humid places, as humidity
leads to more rapid ice buildup.
WARNING
If ventilation in the room is not
adequate, the Refrigerator may
produce carbon monoxide.
The inhalation of that gas, which has
no odor and color, may cause
dizziness, nausea, and in extreme
cases even death.
If your Refrigerator has been damaged
during transportation, call your dealer.
✔Clean the inside wall panels of
your Refrigerator with mild soap
and warm water to eliminate the
odor that is characteristic of a new
product.
✔ Do not use toxic products
(ammonia, alcohol or removers
etc.), abrasive products (abrasive
powders etc)
and scouring
pads or
brushes.
These products
may damage
the Refrigerator
and leave an
unpleasant
smell.
✔With the Refrigerator in the chosen
location, adjust the four leveling
screws.
Then affix the plastic floor
protectors that are provided
together with this manual.
WARNING
Never install your Refrigerator
directly on carpets or next to
flammable materials (such as
curtains or wall paper)
WARNING
Do not install this
Refrigerator in trailers,
motorhomes, boats etc.
It is your sole responsibility
if accidents or damages
occur.
ENGLISH

6
✔If your
appliance has a
hose to gas
connection, use
a wrench to
firmly attach
both.
✔The hose used
for the gas connection shall
conform with the national
standards in force.
The maximum length shall be of
1,5m and it should not be metallic.
✔To substitute the gas tank do as
follows:
- Close the empty tank valve.
- Connect the gas hose to the
pressure regulator of the new
tank, placing the seals against
leaks.
- Tighten the metallic clamp.
✔Check for leakage at the
connections using water and soap.
If you observe bubbles, check the
connections and the seals.
Check again.
FIRST TIME USE
WARNING
Never allow the gas hose
to pass behind the heater
box.
WARNING
Do not turn the
Refrigerator on in case of
Gas leakage.
Call Technical Assistance
or the Gas Supplier.
To turn on your Refrigerator use the
following procedure:
✔To be able to
carry out the
following
procedures,
remove the
protective hood
from the back of
the Refrigerator.
✔Hook-up the gas supply.
✔Set the thermostat button to the
coldest position.
ENGLISH
✔The gas flask or outlet should be
located on the right side of your
Refrigerator.
✔Push the selector valve button and
turn to the open position.
✔ Keeping the button pressed, ignite
the flame using the ignite button, do
this several times until the flame is
ignited. (Look through the sight-glass
to see the sparks and the blue flame
when ignited).
Gas Temperature
Control

7
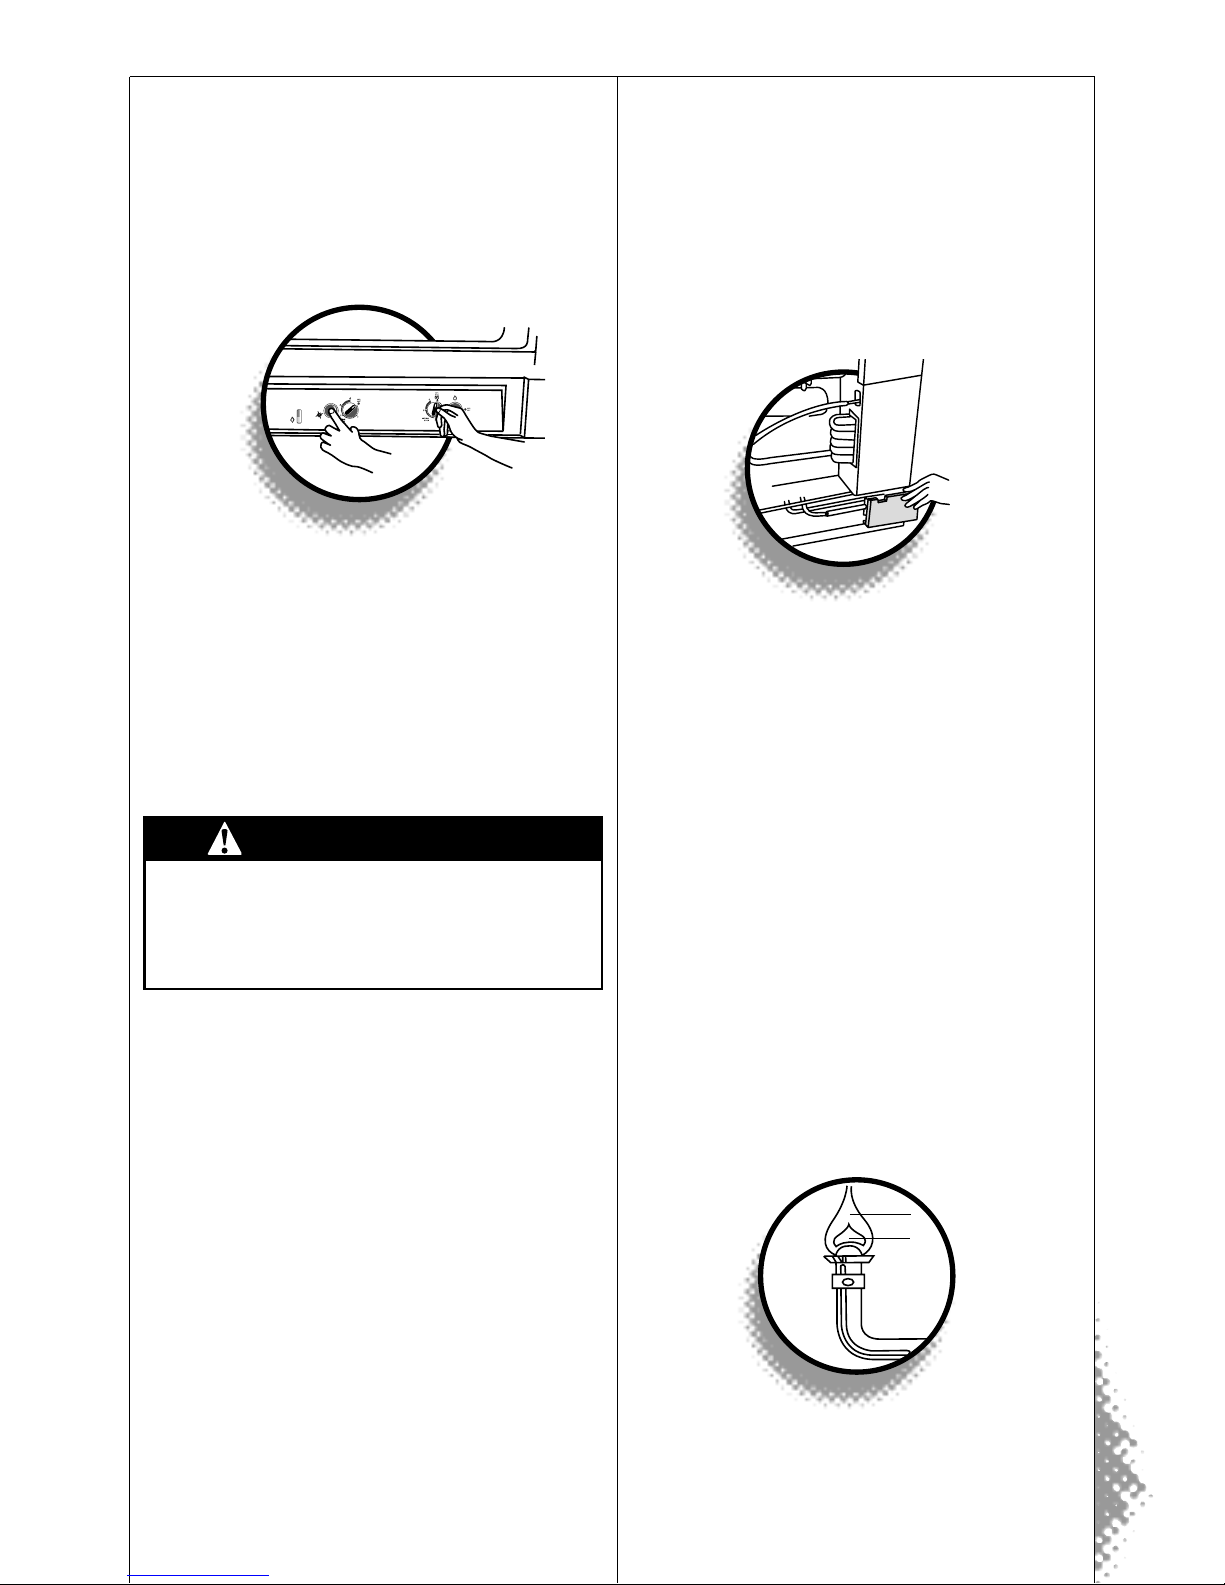
✔The first time you use your
Refrigerator, it is most likely that
there is air in the gas lines. However,
keep the selector valve button
pressed for 1 or 2 minutes, and use
the ignite button every 3 to 5
seconds until the flame is ignited.
✔Keep the selector valve button
pressend for 5 seconds.
If the flame goes out when the
button is released, repeat the
operation.
Keeping the selector valve button
pressed for 10 seconds and check to
see if the flame remains lit after
your release the button.
✔If there are any problems doing this,
see the section on Troubleshooting,
on page 15.
✔To test the operation of the
appliance, use the following
procedures.
Testing Operation
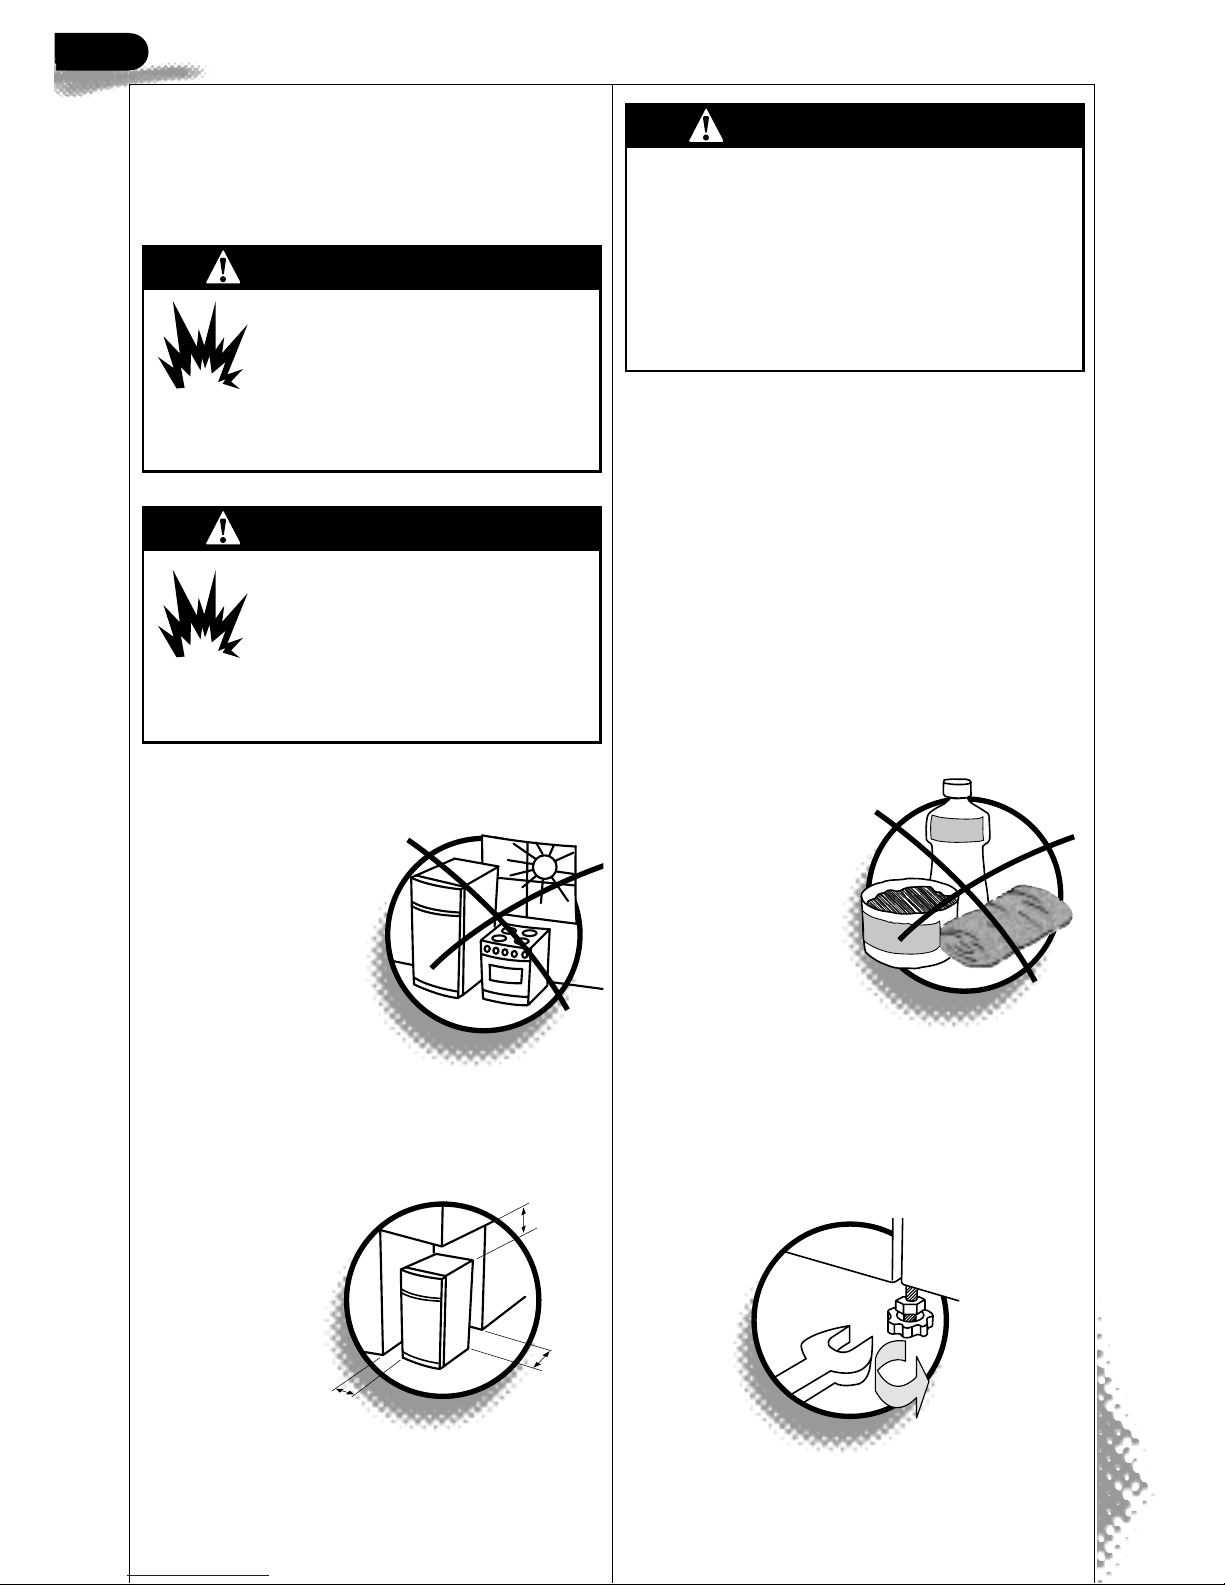
For your own safety and that of the
appliance, it is fundamental that you
perform the tests described below,
immediately after your first turn on the
appliance.
ATTENTION
When trying to light the flame, press
the selector valve button for more
than 10 seconds.
✔The Refrigerator must be turned on
and without the protection hood on
the back (if the protection hood is
still in place and the Refrigerator
turned on, turn it off and remove
the hood.
Be careful, as the hood could be
very hot.
Turn the Refrigerator back on).
✔Let the Refrigerator operate for at
least 30 minutes, during this time
check if there is any gas leakage.
Check each connection from the
source to the gas injector using a
mixture of detergent and water.
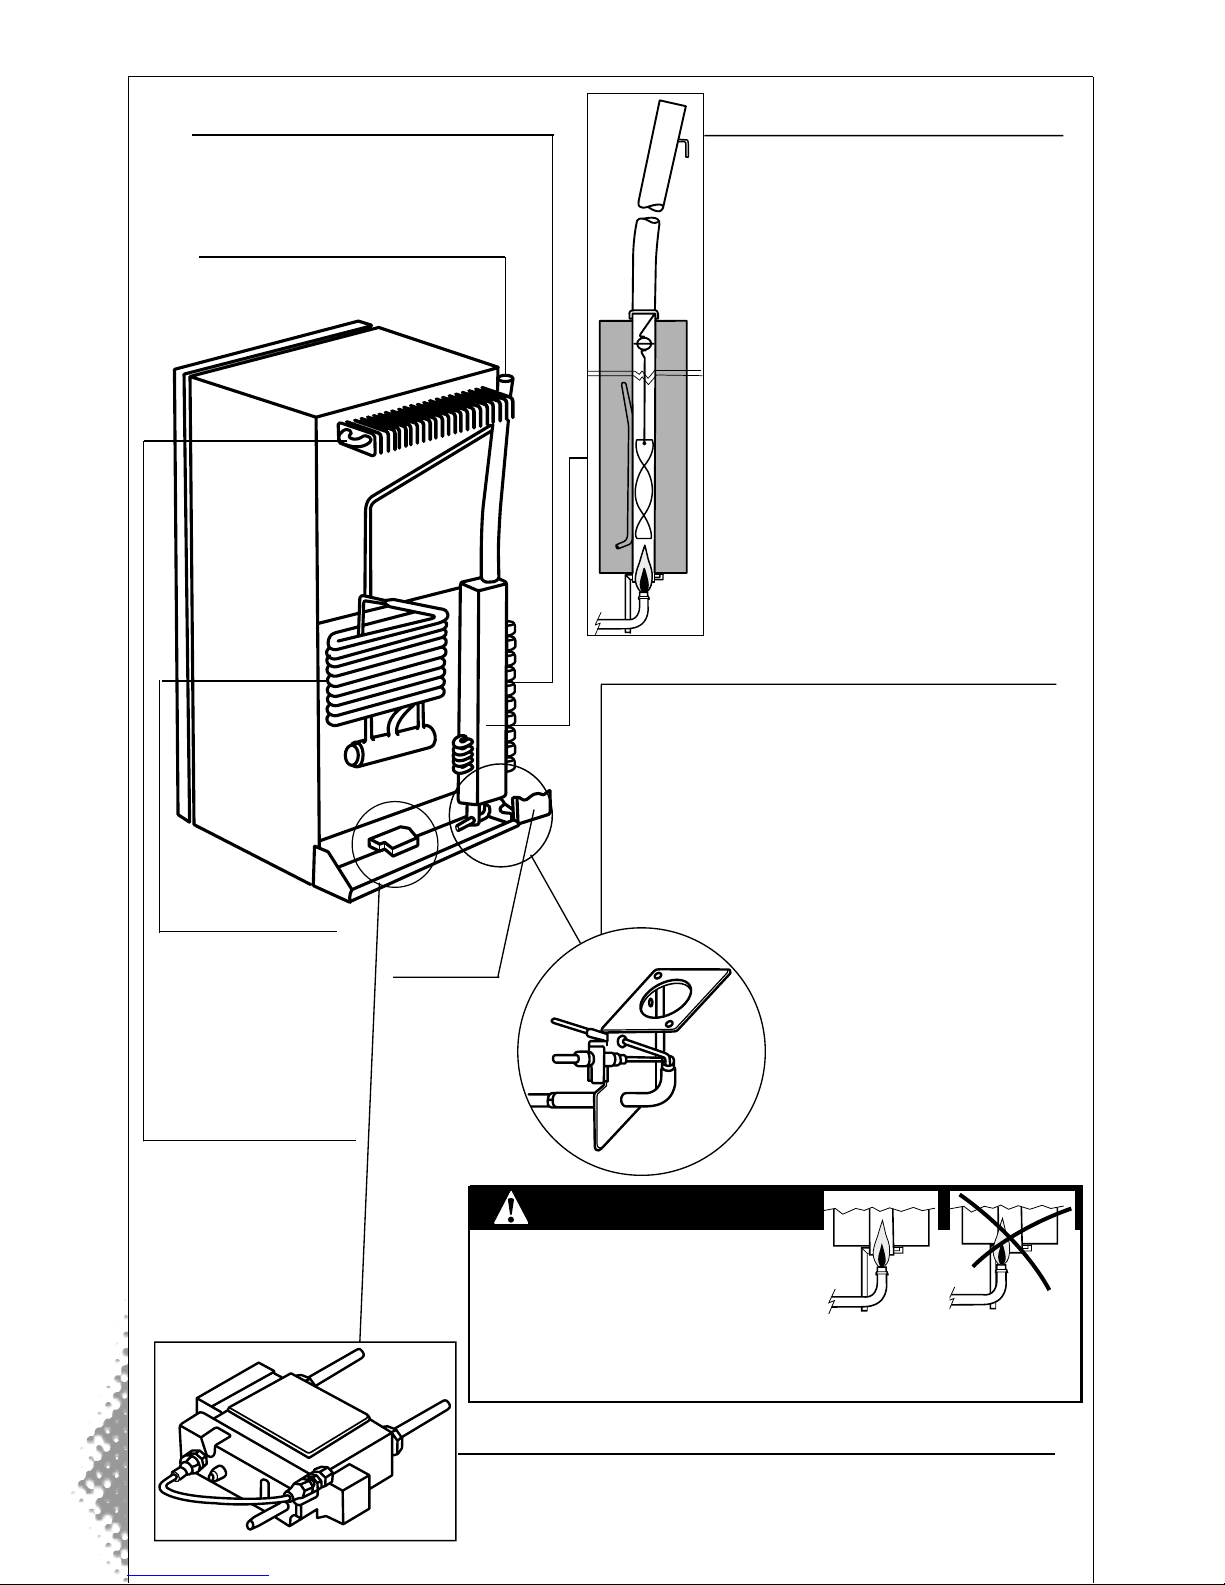
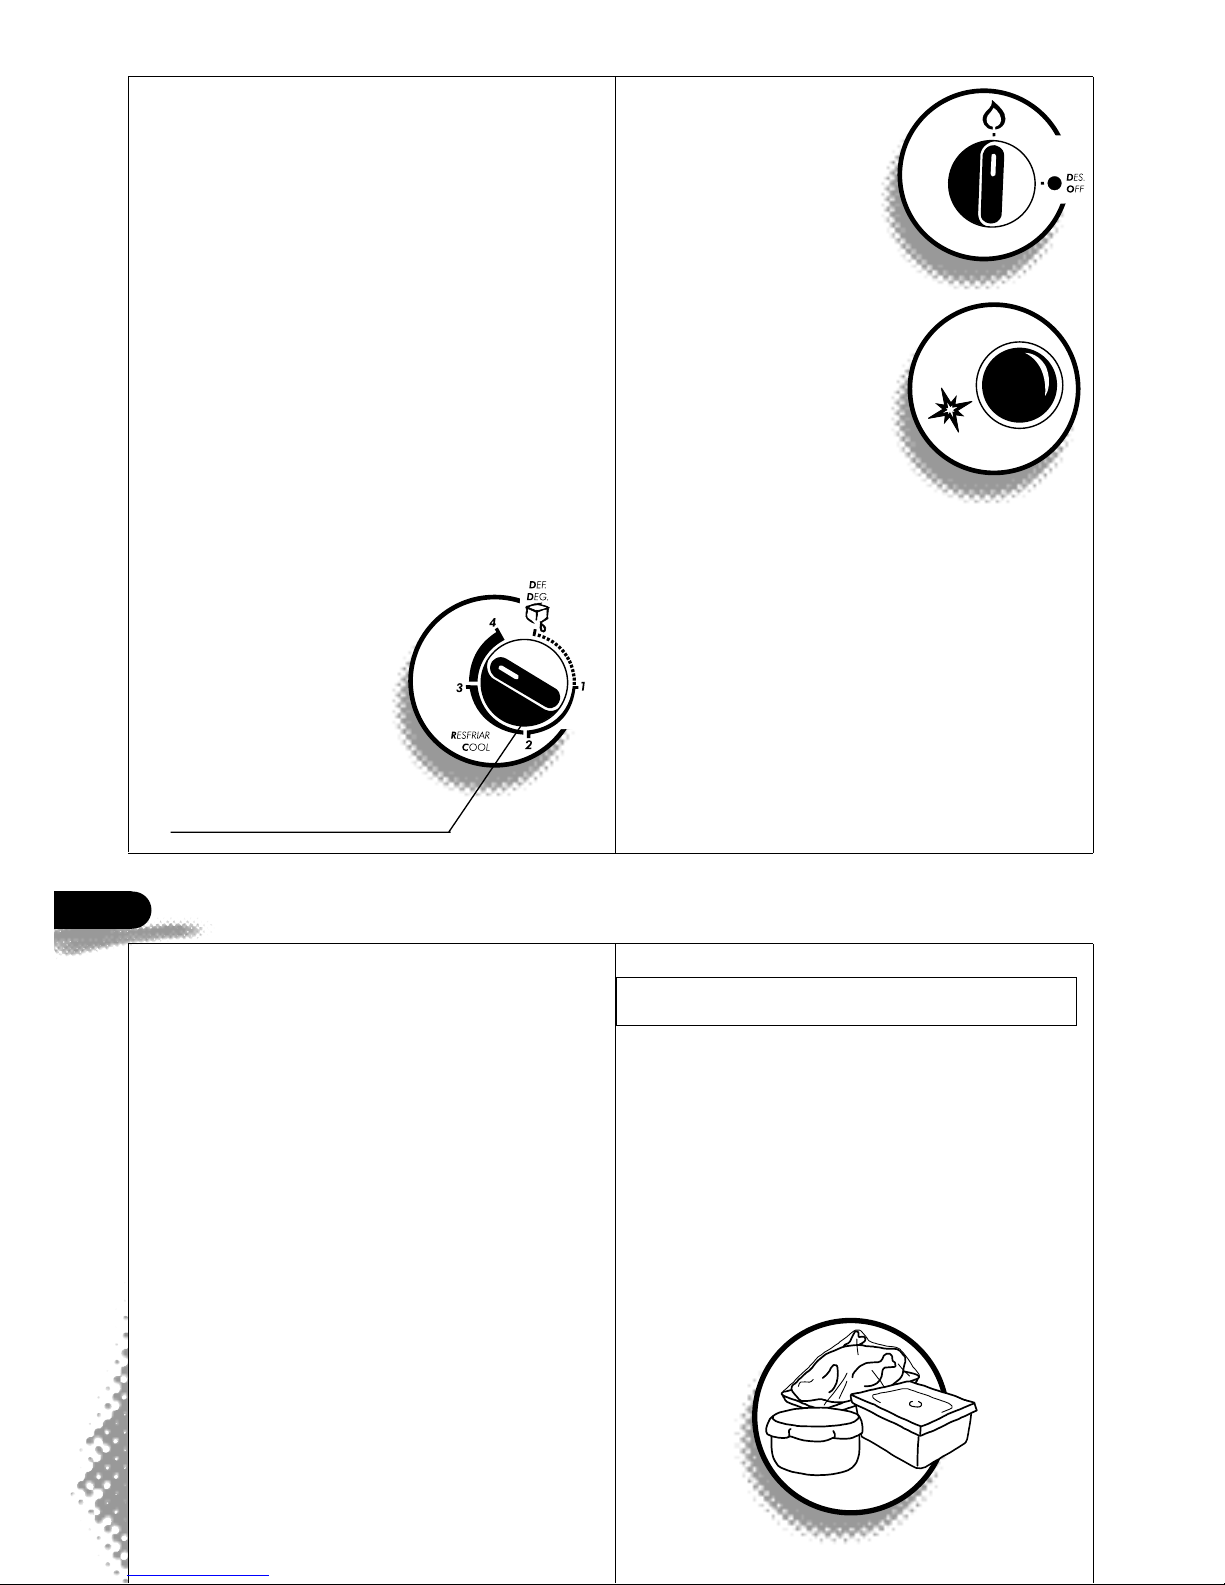
✔Check that the flame does not
touch the heat deflector (the curved
metal part located inside the
heating pipe). It normally is slightly
incandescent.
✔Check the flame, comparing it with
that in ilustration.
The blue flame should be 10 to
15 mm in height and be very close
to the burner screen, without any
extra large areas of flame.
VIOLET
BLUE
ENGLISH

8
✔The side of flame should be of a
light violet color.
✔A yellow flame indicates a lack of
oxygen, probably because the flame
is too high.
Testing the Safety Device
Your Refrigerator is equipped with a
safety device that interrupts the flow
of gas in the event that the flame goes
out. To test its operation, extinguish
the flame leaving the gas to continue
to flow, as in the following
instructions:
✔ Leave the
Refrigerator
operating with
the flame turned
up, the
thermostad in
coldest position.
The operation of an absorption
Refrigerator is completely silent and
thus one cannot hear if it is working
or not.
Even so, the inside of the Freezer
will become cold after an hour of
operating.
Within 6 to 12 hours, depending on
the room temperature, the
Refrigerator will attain its operating
temperature.
We suggest that you leave the
Refrigerator working without loading
it with food for several hours.
✔Shut and then
open the selector
valve button.
✔The flame will go
out but the supply
of gas will
continue. (If you
have any doubts,
ignite the gas, and
you will see the
flame appear.
Wait a few
minutes and repeat
the preceding
operation).
✔With the flame put out and the gas
turned on, wait 30 to 40 seconds
and the valve will shut off, making
a low but distinctive “clicking”
sound.
✔Using the ignition button check that
the flame will no longer ignite,
indicating that the safety device is
working and has shut off the gas
supply.
3Operation
LOADING YOUR REFRIGERATOR
✔Even with the Refrigerator working,
avoid loading it all at once with a
large amount of food.
✔We recommend that food be stored
in adequate packages such as
plastic bags or containers with lids.
It avoids the removal of food natural
humidity, preserving quality.
ENGLISH
Gas Temperature Control

9
✔Do not cover the shelves (racks)
with towels, plastic or trays as they
will hinder the circulation of air
inside the Refrigerator obstructing
its operation.
✔Liquids increase in volume when
frozen. Take care when storing bottles
or other closed containers in the
Freezer.
Those containers may break.
Upon opening the door, the light is
turned on. The light operates with two
large batteries, 1.5 volts each.
To change the batteries, use the
following procedure:
✔Remove the plastic cap from the
ilumination container.
INSIDE LIGHTING
✔On very cold days, the thermostat
button should be set to the
beginning of the scale.
✔Under normal operating conditions,
set the thermostat to a position
between the bands 1 and 3 or 1
and 2 when using electricity.
✔On very hot days, or when the
Refrigerator is being used a lot,
select a band which is much colder.
TEMPERATURE CONTROL
If you need to change the door
hinging to facilitate acces into the
refrigerator proceed according to the
instruccions that follow the product.
DOOR HINGING
WARNING
Do not store flammable
substances such as gasoline
and kerosene in your
Refrigerator to avoid the risk
of explosion and fire.
ENGLISH
Gas Temperature
Control
✔Replace the batteries as
suggested.
✔To change the light bulb, turn it
anti clockwise.
✔Replace the plastic cap from the
ilumination container.

10
Your Refrigerator can be converted
to work with electricity by using an
electric kit.
The kit is an optional feature that
can come already installed with
your Refrigerator or can be
acquired and installed later.
To operate with electricity, if the
Refrigerator already has the kit
installed, use the following
procedures:
✔For your total safety, all electrical
appliances should be adequately
grounded.
Thus, attach a ground wire from
your Refrigerator (the green wire
attached to the rear hauling
frame) to an efficient ground.
✔If the power supply cord is
damaged, it shall be replaced by
the assistance shop (or dealer) in
order to avoid the risk of
accidents.
✔To adjust the temperature of your
Refrigerator use the temperature
control on the console panel.
OPERATION WITH THE
ELECTRIC KIT
ATTENTION
Never use gas and electricity
simultaneously.
ENGLISH
Electric
Temperature
Control
The product does
not work in this
position
✔Check that the electric system
where the Refrigerator is to be
installed uses number 14 AWG
or equivalent (1.5 mm2) wire,
complying with official
standards.
✔Make sure that the voltage to be
used by your appliance is
compatible with the electric
system.
✔Always use an exclusive plug, do
not use extension cords or
multiple plugs to hookup your
appliance.

4CleaningandMaintenance
Defrosting is one of the most
important routines for the
maintenance of your Refrigerator.
Over time a layer of ice builds up in
the Freezer and on the fins of the
evaporator, making thermal heat
exchange difficult and hindering the
efficiency of your Refrigerator. There
are two possible types of defrosting:
ATTENTION
Only allow qualified personel to
serve the product. For assistance,
consult your dealer.
Partial defrosting should be carried out
once a week or when one half of the
space between the fins of the
evaporador is filled with ice.
It is not necessary to take out the food
from the inside of your Refrigerator.
It is enough to follow the instructions
below.
✔Set the thermostat to the defrost
position, preferably overnight.
✔After several hours (the time varies
according to the room temperature)
check if the evaporator fins are free
of ice.
✔Once the fins are unobstructed, set
the thermostat control back to the
original position.
PARTIAL DEFROSTING
✔If ice covers more than one half of
the area of the evaporator fins it is
possible that the ice to be melted is
more than one liter wich will cause
the evaporator vessel to overflow.
To avoid this, before starting to
defrost, remove the drip tray and
turn it around
It is recommended that total defrosting
and general cleaning are carried out
every 2 months or when the ice layer
in the Freezer is thicker than 1 cm,
following the instructions below.
✔Turn off the gas, setting the selector
in the OFF position.
TOTAL DEFROSTING
11
so that the drain is in the front and
place a container large enough
below the drain to receive the water
from defrosting.
ENGLISH
Electric
Temperature Control
Gas Temperature
Control
Electric
Gas
The product does not work in this position

12
✔Remove all food from the
Refrigerator, store it in thermal
containers to keep it cool.
✔Remove all other removable inside
components, including the batteries
that operate the light.
✔Remove the drip tray and turn it
around so that the drain faces the
front.
WARNING
Never use knives or sharp objects to
remove the ice layer. You may cause
leakage in the ammonia system.
GENERAL CLEANING
✔The cleaning of the inside and
outside (burner, heater pipe) should
been carried out every 2 months
(take advantage of the defrosting
routine to clean).
✔Clean the inside with a damp cloth
and a solution of one tablespoon of
detergent or soap (mild) for two
liters of warm water, and dry with a
clean cloth.
✔Clean the outside with a damp
cloth and soap, drying with a clean
cloth.
✔Do not use strong detergents,
abrasive powders or heavy and
rough sponges.
✔Do not use ammonia, alcohol or
chemical and inflammable
products, as they can cause fires.
✔Do not wash the parts of your
Refrigerator in the dishwasher.
WARNING
Do not use flame to check
for leakage in the gas
tubes.
✔Leave the doors open while
defrosting and collect the water from
defrosting in a container under the
drain.
✔Put the food and parts back inside of
the Refrigerator.
✔Turn the drip tray around to its
original position and check that ice
is not obstructing the drain that
connects the Freezer and the
Refrigerator.
✔Always when carrying out total
defrosting, clean the inside of the
Refrigerator according to the
following instructions.
ENGLISH

13
WARNING
Do not use thin objects to
either clean or unblock
the injector.
✔Put a cloth on the burner to protect
it from dirt.
✔Loosen and remove the chimney.
✔Remove the deflector unit.
✔Clean and inspect the unit.
The deflector can have burn
powder and superficial corrosion.
The point, however, must be intact
and not corroded.
✔Pass a brush over the chimney
tube. There should be no soot.
✔Put the deflector unit back in
position, checking that the
deflector wire fits into the chimney
slots.
✔Take the cloth off the burner and
put the protection hood back on.
✔Test the operation of the
Refrigerator following the
instructions on pages 7 to 8.
Take off the protection hood and do
the following:
✔Clean the openings and the burner
screen with a toothbrush.
✔Clean and inspect the electrode and
thermocouple. If either is corroded,
have it changed. Check that they
are well attached and if necessary
tighten the screws.
✔Check that the spark is created by
pressing the electric piezo ignite
button on the control panel.
CLEANING THE BURNER
CLEANING THE HEATER PIPE
ENGLISH

14
✔Use only LPG (liquid petroleum
gas-Butane/Propane) as the fuel
for your Refrigerator.
✔When using gas tanks, use
tanks of 5 kg or 10 kg.
✔Use a pressure regulator adequate
to the kind of gas used and as per
national standards in force.
✔Whenever it is necessary to clean
the evaporator vessels be sure to
reposition them at 180° in
relation to the previous position.
✔Always keep your Refrigerator
clean, chiefly the burner and
chimney.
RECOMMENDATIONS
✔Do not let excessive ice accumulate
on the evaporator fins, as
accumulation will cause lower
efficiency.
✔Do not obstruct the chimney (on
top of the Refrigerator), by putting
paper, wood or other materials on
it, for this will not only affect the
operation of the Refrigerator, but, as
well, can cause fire.
✔Always, replace the gas hose for
another of the same quality,
whenever the validity period is
coming to an end.
✔Never put hot
items in the
Refrigerator,
wait until they
are at room
temperature.
✔To obtain the best performance from
your Refrigerator set the thermostat
control button to the correct
position and avoid opening the
doors unnecessarily.
✔Do not attempt to hurry-up the
removal of ice by using knives or
other pointed objects.
You could cause serious damage to
your Refrigerator.
Let the ice melt naturally.
✔Before getting rid of the product:
- batteries should be removed and
properly disposed of, according
to regulations in force.
(see item: inside lighting).
- the power supply cord, if present,
shall be cut.
✔Do neither place nor use electric
gadgets inside the product.
✔The power supply cord plug, if
present, shall always be accessible
when the product is installed.
✔When leaving your Refrigerator for
short periods (a few days), set the
thermostat button to the minimum
position.
WHEN YOU ARE AWAY
✔For long periods of time, it is
advised that you leave the
Refrigerator cleaned and turned
off. Remove all that is inside the
Refrigerator and perform total
defrosting and cleaning following
the instruction on page 11/12/13.
Remove, as well, the ice trays.
Leave the door open to avoid the
build up of odors.
ENGLISH
Electric
Temperature Control
Gas Temperature
Control

5
PROBLEM PROBABLE CAUSE SOLUTION
The ignition
system does
not produce
a spark
Low
performance
or the flame
goes out
Humidity
in the
Refrigerator
The light does
not
turn on
Bad contact or a short in the
ignition system.
The distance is too large between
the electrode and the burner.
The gas regulating valve register
on the gas flask is partially
closed.
The valve on the flask is broken
or badly regulated.
An empty, or about to be empty
gas flask. It is advised not use it
to the end.
Gas leakage in the connections.
Soot in the chimney, on the
deflector and flame reduction
unit and the injection unit.
The appliance is not leveled the
deflector and flame reduction
unit are out of alignment.
The thermoelement is loose.
Injection system is broken.
The circulation of cold air is
blocked by poor distribution of
food inside the Refrigerator.
Temperature control button is set
to the incorrect gradation.
Excessive opening of the door.
The appliance is incorrectly
installed.
The relative humidity of the air is
very high.
The magnetic seal of the door is
working incorrectly.
The batteries are low or the light
bulb has burnt out.
Check the contacts on the
thermocouple.
Reposition the electrode closer
to the burner.
Completely open the gas regulating
valve register.
Have the valve checked by your gas
supplier.
Change the empty flask.
Seal.
Clean. 12/13
Level the appliance and correctly
reposition the reflector and flame
reduction unit. 5/6/7
Reposition the thermoelement
and tighten the nut.
Change.
Redistribute the food and avoid
covering the shelves with towels,
plastic or trays. 9
Adjust the control button according
to the item Temperature Control. 9
Avoid excessive opening of the door. 14
Follow the instructions in the item
Installation. 5
Normal for days with high humidity.
Level the appliance.
Change the batteries or change
the light bulb. 9
MORE
INFORMATION
ON PAGE
TroubleshootingMinorProblems
Before calling your assistance shop or your dealer, just run through
the following table.
15
ENGLISH

Type CQD22
Dimensions without the packing (mm)
Height (including leveling feet) 1450
Width 611
Depth 720
Depth (with the door open 90°) 1270
Capacity (liters)
Total 231
Refrigerator 200
Freezer 31
Maximum weight allowed per part (kg)
Vegetable drawer cover (glass) 12
Doors 16
Shelves (each) 12
Vegetable drawer 8
Gas (Butane/Propane/LPG)
Classification of product Type A11
Pressure
Butane 28-30 mbar
Propane 37 mbar
Appliance category I3+
Thermal insulation Polyurethane
Injector diameter 0,370 mm 0,355 mm
Nominal heat input (GCV) 0.55 kW / 40 g/h 0.50 kW / 36.4 g/h
Minimum heat input (GCV) 0.25 kW / 18 g/h 0.25 kW / 18 g/h
Weight not including the packing 73.0 kg
6TechnicalCharacteristics
16
ENGLISH

1
2
3
4
5
6
BuenasNoticiasSumario
17
Usted acaba de adquirir un
producto con seguridad y
principalmente calidad.
Este Refrigerador fue
desarrollado cuidadosamente
dentro de las más exigentes
normas internacionales de
tecnología, convirtiéndose
en el fruto de una exitosa
unión de la técnica con el
buen gusto.
Lea las instrucciones del
fabricante antes del uso - este
aparato debe ser instalado según
las normas en vigor.
El producto, fue proyetado para
instalar solamente en un área bien
ventilada sobre el suelo y
protegido de la lluvia.
Los daños causados por el
incumplimiento de las
instrucciones contenidas en este
manual son de su responsabilidad,
por lo tanto léalo atentamente.
De esta manera conseguirá
obtener el mejor rendimiento y
duración de su Refrigerador y
garantizar su propia seguridad
personal.
Descubrirá usted porqué este
Refrigerador es tan especial y
porqué su elección fué tan
acertada.
INTRODUCCIÓN
✔Instrucciones de Seguridad 18
✔Características Generales 19
INSTALACIÓN
✔Instalación 21
✔Primera Conexión 22
OPERACIÓN
✔Abastecimiento 24
✔Iluminación Interna 25
✔Control de la Temperatura 25
✔Reversión de las Puertas 25
✔Operación con el Kit Eléctrico 26
LIMPIEZA Y MANTENIMIENTO
✔Deshielo Parcial 27
✔Deshielo Total 27
✔Limpieza General 28
✔Limpiando el Quemador 29
✔Limpiando el Tubo del Calentador 29
✔Cuidados en las Ausencias 30
✔Recomendaciones 30
SOLUCIONES PRÁCTICAS
✔31
CARACTERÍSTICAS TÉCNICAS
✔32
ESPAÑOL

18
1Introducción
Para obtener el mejor rendimiento y
durabilidad de su Refrigerador y para
su propia seguridad personal, lea
atentamente los apartados siguientes.
Los símbolos usados en este manual
contienen informaciones de
seguridad. Entienda y esté seguro de
sus significados.
Símbolos de seguridad:
INSTRUCCIONES DE SEGURIDAD
✔No permita que los niños jueguen
con el Refrigerador, aunque esté
desconectado.
✔ Su Refrigerador fué proyectado
exclusivamente para uso
doméstico.
✔ No almacene o utilice líquidos
inflamables tales como gasolina,
queroseno, aguarrás, etc. en las
cercanías de su Refrigerador, para
evitar riesgos de explosion o
incendio.
✔ No deben almacenarse productos
tóxicos en el Refrigerador, ya que
pueden contaminar los alimentos.
✔ El Refrigerador debe ser utilizado
solamente por personas que hayan
leído este manual o que hayan
sido correctamente instruídas por
alguien que lo haya leído.
✔ Ver hoja anexa:
Instrucciones para su instalación
en Territorio Español.
PELIGRO
AVISO
Una situación en que, si no es
evitada, resultará mortal o en
lesiones graves.
Una situación que, si no es
evitada, podrá resultar mortal o
en lesiones graves.
ATENCIÓN
Una situación que, si no es
evitada, puede resultar en
lesiones leves o moderadas.
ESPAÑOL
Table of contents
Languages:
Other Consul Refrigerator manuals