Continental Refrigerator CD7426UB-OR User manual

CD7426UB-OR
CD RADIO / USB MP3 / WMA / Bluetooth®24V
OWNER’S MANUAL

2
Safety Information Contents
Safety Information ........................................ 2
Contents ....................................................... 2
Panel Controls.............................................. 3
Operate guide .............................................. 4
Sound setting ............................................... 5
System Setting Item List ................................... 6
USB MP3/WMA Overview ............................ 7
Bluetooth Operations.................................... 8
Electrical Connections................................ 10
Troubleshooting........................................... 11
Specications ............................................. 12
FCC ............................................................ 13
Precautions
• Use only in a 24-volt DC negative-ground
electrical system.
• Disconnect the vehicle's negative battery
terminal while mounting and connecting
the unit.
• When replacing the fuse, be sure to use
one with an identical amperage rating.
Using a fuse with a higher amperage rating
may cause serious damage to the unit.
• DO NOT attempt to disassemble the unit.
Laser beams from the optical pickup are
dangerous to the eyes.
• Make sure that pins or other foreign objects
do not get inside the unit, they may cause
malfunctions, or create safety hazards
such as electrical shock or laser beam
exposure.
• If you have parked the car for a long
time in hot or cold weather, wait until the
temperature in the car becomes normal
before operating the unit.
• Keep the volume at a level you can hear
outside warning sounds (horns sirens,
etc.).
CD Notes
• Playing a defective or dusty CD can cause
dropouts in sound.
• Hold CDs as illustrated.
• Do not touch the unlabeled side.
• Do not attach any seal, label or data protec-
tion sheet to either side of a disc.
• Do not expose a CD to direct sunlight or ex-
cessive heat.
• Wipe a dirty CD from the center outward
with a cleaning cloth.
• Never use solvents such as benzine or
alcohol.
• This unit cannot play 3-inch ( 8cm ) CDs.
NEVER insert a 3-inch CD contained in the
adapter or an irregularly shaped CD. The
unit may not be able to eject it, resulting in a
malfunction.
• Disc can not have foreign body, the damage
caused by the disc with foreign body do not
belong to the warranty scope.
Before Operation
• Do not raise the volume level too much,
as this will block outside sounds, making
driving dangerous. Stop the car before
performing any complicated operation.
CAUTION
• DO NOT open covers and do not repair
yourself. Consult the dealer or an
experienced technician for help.
* In addition to ordinary CDs, this unit can
playback CD - R or CD - RW, MP3.
Note: The system just support the English
and number display, not all kinds letters are
compatible with the unit.

3
1. - Disc eject
2. - Rotate to adjust volume.
- Radio: Mute
- CD/MP3: Pause
- Hold it to power off
3. - Band select
4. - 1-6 preset
- Automatically search and save station
5. - Channel 1/Play/Stop/Top
6. - Channel 2/SCN
7. - Channel 3/RPT
8. - Channel 4/RDM
9. - Channel 5/FOLDER-
10. - Channel 6/FOLDER+
11. - Display paly time and clock in the CD
state.
- the LCD will display the ID3 TAG information
recycle: le name/folder name/ID3 TAG/system
time in the MP3 state.
- Display PTY info and system time in the
Radio state.
12. - Menu select
13. - USB connector
14. - Seek+/Select the next track
15. - Seek-/Select the previous track
16. - Disc slot
17. - SCR button
Radio
Disc(when disc is in)
USB(when USB inserted)
AUX IN
18. - Reset hole
19. - Press to select VOL/BAS/TRE/BAL/LOUD/
FAD/AF/TA/PTY, rotate VOL knob to adjust
- RADIO: Rotate to adjust radio tune
- CD /MP3: Rotate to select the previous/
next track
20. - 1-6 preset:
Press to tune in a preset station.
Hold for more than 2 seconds to store a
desired station.
21. - Microphone
Panel Controls

4
Operate Guide
Disc Load / Eject
Load : Insert the disc into the slot.
Eject: Press to eject the disc.
Band Mode
Press the button to change bands:
FM1 FM2 FM3 AM1 AM2 LW
SRC
Press the [SRC] button to switch between
and select available sources, the mode as
follows: TUNER->CD/MP3/USB->AUX.
Auto Memory Store(Radio mode)
Press the [PS/AST] button to scan the preset
stations 1-6 for 10 seconds each.
Hold the [PS/AST] button more than 2
seconds, the strongest available stations
will be automatically saved in the memory of
preset button 1-6 .
Seek Mode
Disc/USB playback: Press the / to
select the next or previous track.
Hold the / to enter fast forward or
reverse back mode.
EQ Loud Mode
Press the [TUNE] Knob and rotate to se-
lect sound effect EQ OFF POP ROCK
CLASSIC JAZZ CUSTOM
Press the [TUNE] button and press
/ to select BAS/TRE, rotate the
[TUNE] knob to adjust value.
Clock Setting
if RDS clock (CT) doesn’t work, you can
adjust manually the Clock time.
Long press the [DISP] button to set the time.
Select [CLOCK] with the search buttons.
/
Press [TUNE] knob and rotate it to adjust the
hours.
Press [TUNE] knob and rotate it to adjust the
minutes.
Press the [TUNE] knob to exit the clock
setting.
System Setting
On the radio source hold the [DISP] to enter
the system setup menu, press the /
to select: TA TA RETUN AF REG
CT DX/LO ST/MONO CLOCK
12/24H BEEP SWRC SET LOGIC
AREA SET, and rotate the [TUNE] to setting.
BEEP setting: The beep tone feature allows the
selection of an audible beep tone to be heard
each time the menu is accessed.
SWRC setting: Rotate the [TUNE] knob to select
ON or OFF.
DX/LO setting: Rotate the [TUNE] knob to se-
lect DX or LO.
CT setting: Rotate the [TUNE] knob to select
ON or OFF.
REG setting: Rotate the [TUNE] knob to select
ON or OFF.
AF setting: Rotate the [TUNE] knob to select
ON or OFF.
TA RETUN setting: Rotate the [TUNE] knob
to select RETUNE S or L. Setting for “L”, Auto
search the TA time space for 180 sec,Setting for
“S”, auto search the TA time space for 45 sec.
TA setting: Rotate [TUNE] knob to select ON or
OFF.
AREA SEL setting: Rotate the [TUNE] knob to
select USA, EUROPE, NORTH AFRICA, ASIA,
JAPAN.
LOGIC ON/OFF: Logic ON to limit the use of
the set to one hour when the car ignition is
switched off. Logic OFF to prevent the set from
turning on when the car ignition is switched off.
SCROLL setting(CD SRC): Rotate the [TUNE]
knob to select ON or OFF.
MIC SEL setting(Bluetooth SRC): Rotate the
[TUNE] knob to choose Microphone EXTERNAL
or INTERNAL.
AUTO CON(Bluetooth SRC): To link incoming
calls automatically.

5
Operate Guide Sound Setting
MP3 Track Search
CD/MP3 mode:
Press the [MENU] button to select “TRACK
SCH” mode, and press the [TUNE] knob to en-
ter searching mode. Then rotate and press the
[TUNE] knob to select a track number which
you want, then press the [TUNE] knob to con-
rm.
RDS(PTY SEEK)
Only the radio region is Europe and on the FM
the PTY can be seached. Press the [MENU]
button to PTY function, rotate the [TUNE] knob
to display the program types, and press [TUNE]
to select the desired.
Note: If radio region isn’t Europe, RDS won’t
display.
Press the [TUNE] knob to enter sound effect
setting mode. First press shows current EQ.
Rotate the [TUNE] knob to changes BEAT
EQ in this order:
EQ OFF -> POP -> ROCK -> CLASSIC ->
JAZZ -> CUSTOM
Rotate the [TUNE] knob to select CUSTOM,
and press the knob, then press the
/button to select: BAS-G -> TRE-G,
rotate the knob to select a value.
BAS-G / TRE-G: (-7)- (+7)
Press the [TUNE] button, and press
/ button to select USER preset:
BALANCE -> FADER -> LOUD, rotate the
[TUNE] knob to select a value.
BALANCE: LEFT 1-7->CENTER->RIGHT
1-7
FADER: FRONT 1-7->CENTER->REAR 1-7
LOUD: ON/OFF

6
System Setting Item List
JAPANASIA
Radio source BT source
Radio region: Europe
Radio region: USA/Asia/Japan
SETUP
DX/LO DX LO
CT
REG
AF
TA ON
ON
ON
ON
ON
ON
ON
OFF
OFF
OFF
OFF
OFF
OFF
OFF
ST/MONO STEREO MONO
LOGIC
AREA SET EUROPE USA
JAPANASIA
AREA SET EUROPE USA
CLOCK _ _:00 00:_ _
12/24H 24HOURS 12HOURS
BEEP
SWC SET
TA RETUN RETUNE L RETUNE S
TA ON OFF
SETUP
ON
ON
ON
ON
OFF
OFF
OFF
OFFAUTO CON
INTERNAL EXTERNAL
LOGIC
CLOCK _ _:00 00:_ _
12/24H 24HOURS 12HOURS
BEEP
SWC SET
MIC SEL
Radio source BT source
SETUP
DX/LO DX LO
ON
ON
ON
OFF
OFF
OFF
ST/MONO STEREO MONO
LOGIC
CLOCK _ _:00 00:_ _
12/24H 24HOURS 12HOURS
BEEP
SWC SET
CD source
TA ON OFF
SETUP
ON
ON
ON
ON
OFF
OFF
OFF
OFF
SCROLL
LOGIC
CLOCK _ _:00 00:_ _
12/24H 24HOURS 12HOURS
BEEP
SWC SET
CD source
SETUP
ON
ON
ON
ON
OFF
OFF
OFF
OFF
SCROLL
LOGIC
CLOCK _ _:00 00:_ _
12/24H 24HOURS 12HOURS
BEEP
SWC SET
SETUP
ON
ON
ON
ON
OFF
OFF
OFF
OFFAUTO CON
INTERNAL EXTERNAL
LOGIC
CLOCK _ _:00 00:_ _
12/24H 24HOURS 12HOURS
BEEP
SWC SET
MIC SEL

7
USB MP3/WMA Overview
Note on MP3
• MP3 is short for MPEG Audio Layer 3 and
refers to an audio compression technology
standard.
• This product allows playback of MP3 les
on CD-ROM, CD-R or CD-RW discs.
• The unit can read MP3 les written in the
format compliant with ISO 9660.
However it does not support the MP3 data
written by the method of packet write.
• The unit can not read an MP3 le that has
a le extension other than ".mp3".
• If you play a non-MP3 file that has the
“.mp3" extension, you may hear some
noise.
• In this manual, we refer to what are called
"MP3 le" and "folder" in PC terminology
as "track" and "Album", respectively.
• Maximum number of directory level is
8, including the root directory. Maximum
number of les and folders per disc is 256.
• The unit may not play tracks in the order
of Track numbers.
• The unit plays only the audio tracks if a
disc contains both audio tracks and MP3
les.
• When playing a disc of 8 kbps or VBR*, the
elapsed playing time in the display window
will not be correct and also the intro play
may not function properly. *VBR: Variable
Bit Rate
Note on creating your own CD-Rs or
CD-RWs containing MP3 les
• To enjoy high quality sound, we
recommend converting to MP3 files with
a sampling frequency of 44.1 kHz and a
xed bit rate of 128 kbps.
• DO NOT store more than 256 MP3 files
per disc.
• For ISO 9660 -compliant format, the
maximum allowable depth of nested
folders is 8, including the root directory
(folder).
• When CD-R disc is used, playback is
possible only for discs which have been
nalized.
• Make sure that when MP3 CD-R or CD-
RW is burned that it is formatted as a data
disc and NOT as an audio disc.
• You should not write non-MP3 files or
unneeded folders along with MP3 les on
the disc otherwise it takes a long time until
the unit starts to play MP3 les.
• With some CD-R or CD-RW media, data
may not be properly written depending on
their manufacturing quality.
In this case, data may not be reproduced
correctly. High quality CD-R or CD-RW disc is
recommended.
• Up to 16 characters are displayed for the
name of an Album or a Track. ID3 TAG
version 1.x is required.
• Note that the unit may not play Track in the
order that you wrote them to the disc.
USB Notes
USB functions (ash memory type) MP3 music
play.
(1) USB ash memory 2 in 1 support
(2) FAT 12/FAT 16/FAT 32 format supported.
(3) File name: 64 byte/dir name: 64 byte/tag
name: 30 byte.
(4) Tag (id3 tag ver 2.0)
- title/artist/album: 32 byte support.
(5) USB 1.1 support, USB 2.0 support (For 2.0,
speed performance is as USB 1.1)
(6) Not all USB devices are compatible with
the unit.
(7)
USB connector is support maximum work
power with 500 mA.

8
Bluetooth Operations
The Bluetooth allows you to utilize your car’s
built-in audio system for wireless mobile phone
or music handsfree communication. Some
Bluetooth mobile phones have the audio
features, and some portable audio players
support Bluetooth feature. This system can play
audio data stored in a Bluetooth audio device.
The car stereo with Bluetooth will be able to
retrieve phonebook contacts, received call,
dialed call, missed call, incoming calls, outgoing
call and listen to music.
Notes:
• Do not leave the microphone of Bluetooth
handsfree in the places with wind passing such
as air outlet of the air conditioner, etc. This may
cause a malfunction.
• If leave it in the places subjected to direct
sun, high temperature can cause distortion,
discoloration which may result in a malfunction.
• This system will not operate or may operate
improperly with some Bluetooth audio players.
• Cannot guarantee the compatibility of all
mobile phones together with unit.
• Audio playback will be set to the same volume
level as set during telephone call. This might
cause problems, if extreme volume level is set
during telephone call.
Handsfree Operations
Pairing
1.Turn on Bluetooth function of your mobile phone.
2.Enter mobile phone’s Bluetooth setup menu.
3.Search for new Bluetooth devices.
4.Select Bluetooth devices from the pairing list
on the mobile phone.
5.Enter “1234” as the password (The
password default setting is “1234 ”).
6.After pairing successfully, BT and HPF icons
will light up.
A2DP icon will light up after A2DP
connected.
Making a call
Operation from Bluetooth menu
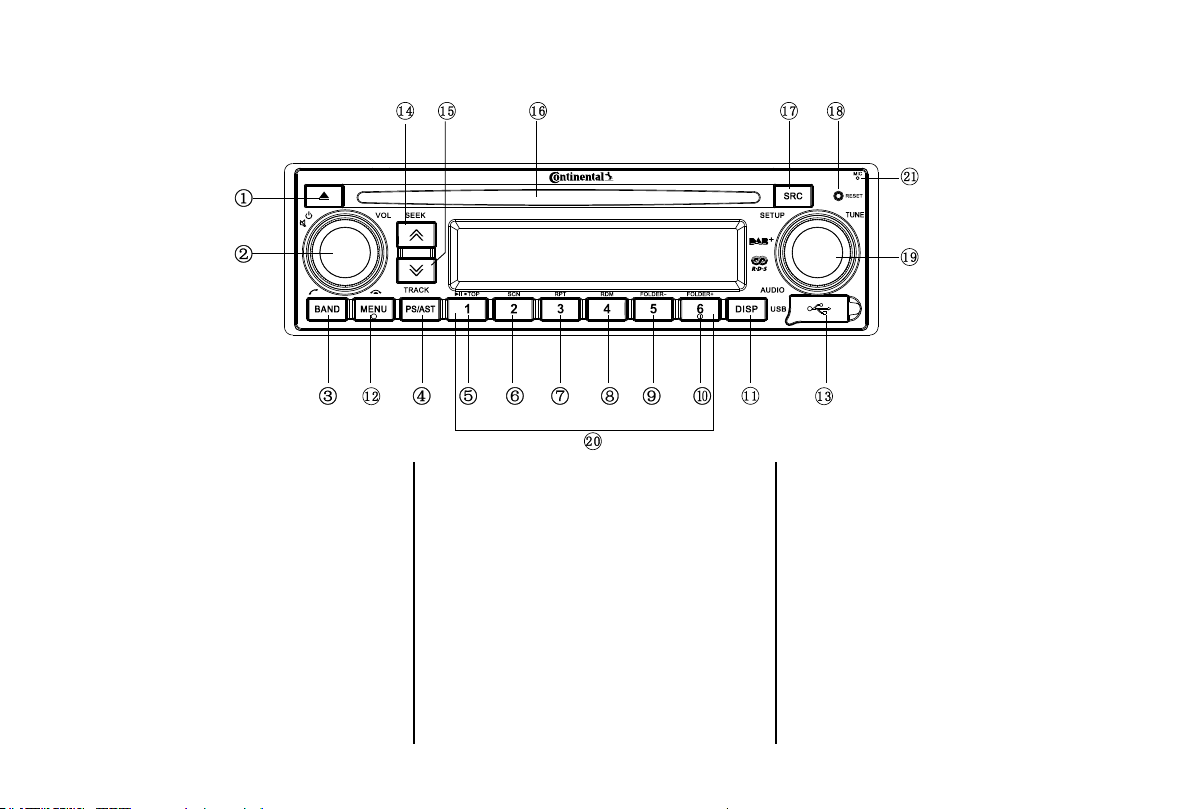
Press the [SRC] button to switch the source to
“BT MUSIC”. When display "A2DP" press the
[MENU / ] button to switch to “DIAL NUM”.
• Dial Number
1.Press the [TUNE] knob on the front panel to
conrm to dial number.
2.Rotate the [TUNE] knob to select a number,
press the knob to confirm, and continue to
input the next digit. Repeat above until all
numbers inputted.
3.Press the [BAND / ] button to dial.
4.Press the [MENU / ] button to terminate
call.
• Dialled/Missed/ Received
You can search any Dialled/Missed/Received.
1.Rotate the [TUNE] knob to select
“DIALLED”, “MISSED”, “RECEIVED”.
2.Press the [TUNE] knob to enter the selected
call history.
3.Rotate the [TUNE] knob to scroll the contacts.
4.When the contact name or mobile phone No.
is displayed, press the [BAND / ] button to
call the mobile phone No. of that contact.
* Press the [MENU/ ]button to end the call.
• Call from Phonebook
User can search the contact name in the
phonebook and make call.
1.Rotate the [TUNE] knob to select “USER
PBK”.
2.Press the [TUNE] knob to enter the selected
phonebook.
3.Rotate the [TUNE] knob to scroll the contacts.
4.The phone number and the name to scroll
display.When the contact name is displayed,
press the [BAND / ] knob to call the mobile
phone No. of that contact.
*Press the [MENU / ] button to end the call.
Note:
• Some mobile phones may not be able to
transfer data of Phonebook.
• Transfer Call
You can switch handsfree call and mobile phone
call.
Press the [BAND / ] button during call.

9
Bluetooth Operations
• Answering a call
You can answer an incoming call by pressing
the [BAND / ] button.
* Press the [MENU / ] button to reject an
incoming call.
Audio Streaming Operations
What is audio streaming?
Audio streaming is a technique for transferring
audio data such that it can be processed
as a steady and continuous stream. Users
can stream music from their external audio
player to their car stereo wirelessly and listen
to the tracks through the car’s speakers.
Please consult your nearest dealer for more
information on the product of wireless audio
streaming transmitter offered.
CAUTION
Please avoid operating your connected
mobile phone while audio streaming as
this may cause noise or sound choppy on
the song playback.
Audio streaming may or may not resume
after telephone interrupt as this is
dependent on mobile phone.
System will always return to Radio mode if
audio streaming is disconnected.
Note:
Be sure to read the chapter “Pairing” before
proceeding.
Play / Pause a track
1.Push the [ 1 ] button to pause audio
playback.
2.To resume audio playback, push the [ 1 ]
button again.
Selecting a track
Track-up
Press the button to move to the
beginning of the next track.
Track-down
Press the button to move to the
beginning of the previous track.
Note:
Playing order will depend on Bluetooth audio
player. When the button is pressed,
some A2DP devices will restart the current
track depends on the duration of playback.
During music streaming playback, “A2DP
and HFP” will be shown on the display. When
A2DP device is disconnected, “DISCONN”
will be shown on the display Some Bluetooth
audio players may not have play / pause
synchronized with this unit. Please make sure
both device and main unit are in the same
play / pause status in BT MUSIC mode.

10
Electrical Connections
Wiring Diagram
ANT REMOTE/Blue and White
ILLUMINATION/Pink
Battery/Yellow
Ground/Black Rear Left-/Green and Black
Rear Left+/Green
Front Left-/White and Black
Front Left+/White
Rear Right-/Purple and Black
Rear Right+/Purple
Front Right-/Gray and Black
Front Right+/Gray
ACC-IN/Red
TeleMute/Brown and Black
A
B
7
2 4 6 8
13 5 7
24 6 8
135
White
Red
SWRC

11
Option Selectable values Function
General
No power or no sound
Car's engine switch is not on Turn your car's key to ACC or ON
Fuse is burnt Replace fuse
Volume is too low Check volume or mute on / off
If the above solutions cannot help Press the RESET button
Disc
Disc is inside but is no sound Disc is upside down Place disc in the correct direction, and the label side up
Disc is dirty or damaged Clean disc or change another disc
Disc sound is skips,tone quality is low Disc is dirty or damaged Clean CD or change another CD
Radio
Much noise in broadcasts Station is too far, or signals are too weak Select other stations of higher signal level
Error Display Messages
CD ERR
Disc is upside down Place disc in the correct direction, and the label side up
Disc format is not support or le date is wrong check the disc
Disc is wrong
Press button more than 2 seconds to eject the disc. In
case that the disc cannot be ejected by pressing button,
press the RESET switch and press the button 2 seconds
to eject the disc. If still not ejecting, consult your dealer.
Troubleshooting
If you suspect something is wrong, immediately switch power off. Do not use the unit in abnormal condition, for example without sound, or with smoke
or foul smell, can cause re or electric shock. Immediately stop using it and call the store where you purchased it. Never try to repair the unit yourself
because it is dangerous to do so.
Note: If the set inserts a non-standard size disc or card.you may long press the button for 5 second,then it will be eiected forcibly.

12
Specications
General
Power supply: 24 V DC negative ground
Maximum power output: 15 W x 4 channels (4 )
Suitable speaker impedance: 4
ESP: 10 s (CD-DA)/40 s (MP3)
Dimensions(WxDxH): 178x161x50 mm
Weight: 1.33 kg
Note: For different bit-rate MP3, ESP time are different;
40 seconds only for the bit-rate MP3 le of the 128Kbps
FM Stereo Radio
Frequency range: 87.5-108.0 MHz
Usable sensitivity: < 14 dBμ
Frequency response: 50 Hz - 10 KHz
Stereo separation: ≥ 22 dB (1 KHz)
Image response ratio: ≥ 40 dB
IF response ratio: ≥ 60 dB
Signal/noise ratio: ≥ 50 dB
AM(MW) Radio
Frequency range: 522-1620 KHz
Usable sensitivity(S/N=20dB): < 35 dBμ
Disc Player
System: Disc digital audio system
Frequency response: 20 Hz - 20 KHz
Signal/noise ratio: > 72 dB (dBA)
Total harmonic distortion: Less than 1% (1 KHz)
Channel separation: > 55 dB
Note: Specifications and the design are subject to change without
notice due to improvements in technology.
NORTH
AFRICA
JAPAN
531- 1602KHz
153 - 252KHz

13
FCC STATEMENT
1. This device complies with Part 15 of the
FCC Rules. Operation is subject to the
following two conditions:
(1) This device may not cause harmful
interference.
(2) This device must accept any interference
received, including interference that may
cause undesired operation.
2. Changes or modifications not expressly
approved by the party responsible for
compliance could void the user's authority to
operate the equipment.
NOTE: This equipment has been tested and
found to comply with the limits for a Class
B digital device, pursuant to Part 15 of the
FCC Rules. These limits are designed to
provide reasonable protection against harmful
interference in a residential installation.
This equipment generates uses and can
radiate radio frequency energy and, if not
installed and used in accordance with the
instructions, may cause harmful interference
to radio communications. However, there is
no guarantee that interference will not occur
in a particular installation. If this equipment
does cause harmful interference to radio or
television reception, which can be determined
by turning the equipment off and on, the user
is encouraged to try to correct the interference
by one or more of the following measures:
Reorient or relocate the receiving antenna.
Increase the separation between the
equipment and receiver.
Connect the equipment into an outlet on a
circuit different from that to which the receiver
is connected.
Consult the dealer or an experienced radio/
TV technician for help.
FCC Radiation Exposure Statement
This equipment complies with FCC radiation
exposure limits set forth for an uncontrolled
environment. This equipment should be
installed and operated with minimum distance
20cm between the radiator & your body
FCC

Continental Trading GmbH
Soderner Str. 9
65824 Schwalbach
Germany
Support & Download www.vdo.com
Table of contents
Other Continental Refrigerator Car Receiver manuals

Continental Refrigerator
Continental Refrigerator TR7422U-OR User manual

Continental Refrigerator
Continental Refrigerator CDD7418UB-OR User manual

Continental Refrigerator
Continental Refrigerator TRD312UB-WH User manual

Continental Refrigerator
Continental Refrigerator TR7411U-OR User manual

Continental Refrigerator
Continental Refrigerator CD7426U-OR User manual

Continental Refrigerator
Continental Refrigerator CD7416UB-OR User manual

Continental Refrigerator
Continental Refrigerator TR7412UB-OR User manual

Continental Refrigerator
Continental Refrigerator TR7423UB-OR User manual

Continental Refrigerator
Continental Refrigerator ACR313UBA-IVE User manual