IMPORTANT!Whencuttingtheopeningforthewallbox,DONOTcutthe
openingtoolarge.Beconservativeandcautiouslyenlargeitasneeded.
IMPORTANT!Encoupantl’ouverturepourlaboîtedemur,necoupez
pasl’ouverturetropgrande.Soyezconservateuretagrandissez-avec
précautionlacommenécessaire.
WICHTIG!WennSiedieönungfürdenWandkastenschneiden,
schneidenSieNICHTdiegroßeönungzu.SeienSiekonservativund
vergrößernSieesvorsichtig,wiegebraucht.
IMPORTANT!Beforeyoucancompletetheseinstructionsbelow,youmust
haveaControl45”or7”TouchScreenwallboxinstalledaccordingtothe
documentationprovidedinthewallboxkit.See“Accessories”fordetails.
IMPORTANT!Encoupantl’ouverturepourlaboîtedemur,necoupez
pasl’ouverturetropgrande.Soyezconservateuretagrandissez-avec
précautionlacommenécessaire.Voyezque<<Accessories>>.
WICHTIG!BevorSiedieseAnweisungendurchführenkönnen,müssen
SieeinControl47haben“derBerührungseingaben-Wandkasten,
derentsprechenddenUnterlagenangebrachtwird,dieinden
Wandkasteninstallationssatzbereitgestelltwerden.SehenSiedaß
“Accessories.”
Network Options
• Power Over Ethernet (PoE):TheEthernetnetworkconnectionisprovided
throughthePoEInjector.Noadditionalwiringisneeded.
• Standard Ethernet Connection:ConnecttheTouchScreentooneoftheRJ-
45LANportsonthegateway/routerusingtheRJ-45Ethernetcable.
• WiFi Connection:TheinternalWiFiantennawillcommunicatewiththeLAN’s
WAP.IftheLANhasaWAPsetup,noadditionalwiringisneeded.
Power Configurations
• AC Power.ACpowerisusedtopowertheTouchScreenwhenusingan
EthernetorWiFinetworkconnection.
• PoE.PoEisusedtopowertheTouchScreenwhenusinganEthernetorWiFi
networkconnection.
1 Preparetheplasticpowerboxforinstallationintothewallboxbyinserting
eithertheEthernetcableortheACpowercableintothepowerbox(see
Figures7and8).
AC Power Connection.ThestepsbelowrepresentatypicalU.S.installation.
ConnectwirestotheACpowersourcefortheTouchScreenaccording
toyournationalandlocalelectricalcodes.Yourinstallationmayrequire
alternativewiresandtheuseofaterminalblock.
• Threadthepowercablethroughthebottombackholeofthewallboxtothe
terminal(Figure7).Removethetabcoveringtheholerst.
• Usingtheorangewirenuts(shippedinthebox)connectthewhite-to-white
wireandtheblack-to-blackwire,andthencapeachonewithawirenut.Strip
thewireto1/4”ifnecessary.
• Capthegroundwirefromthewallifyouareusingaplasticwallbox.Attach
thegroundwiretothewallboxwhenusingametalwallbox.
Figure7.ACPowerConnection
• Alignandbendthewirescarefullytottheminsidethewallbox.
• Alignandcarefullyslidethepowerboxintothewallbox.
Power Over Ethernet (PoE) Connection.InstallaPoEInjector(sold
separately)orswitch,andthenconnectthePoEInjectortothepowerand
network.Connecttothepowerbox.Thestepsbelowdescribehowtoinstalla
Control4PoEInjector.
• ConnecttheControl4PoEInjectortoapowersource,forexample,anAC
outlet,usingthepowercord(providedwiththeunit).
• ConnectoneoftheRJ-45LANportsonthegateway/router/switchtothe
PoEInjector’sLANportusingtheRJ-45Ethernetcable.
• ConnectthePoEInjector’sPWRLAN-OUTporttotheRJ-45Ethernetcable
thatwillbeconnectedtotheTouchScreen.
• PulltheEthernetcablethroughthetopbackholeofthewallboxtothe
Ethernetconnectoronthetopbackofthepowerbox,andthenconnectit
(seeFigure8).
• Alignandcarefullyslidethepowerboxintothewallbox.UnlesstheTouch
Screenisinthepowerbox,itdoesn’tpullanypower.
Figure8.EthernetConnection
2 Securethepowerboxintothewallboxusingthescrewsprovided.Note:
Overtighteningpowerboxscrewscouldresultinapoorconnectionbetween
theTouchScreenandthepowerbox.
3 AlignandslidethebackoftheTouchScreenintothepowerbox.TheTouch
Screenismagneticandshouldsnaprightintoplace.
4 (Optional)TosecuretheTouchScreeninsidethepowerbox,removethetape
coveringthebottomsecuritypin(seeFigure9)beforeattachingtheTouch
Screentothepowerbox.
5 NotethepinholeonthebottomundersideoftheTouchScreen’sfaceplate.If
youeverneedtoremovetheTouchScreenfromthewall,dothefollowing:
• Locatethesmallpinholeonatab(rightside)underneaththeTouchScreen.
• Insertapaperclipintothehole(about1/4”).Withbothhands,lifttheTouch
Screenfromthebottomofthescreentowardyoutoremoveit(seeFigure9).
Figure9.TouchScreenPinandPinhole
6 Toprotectthescreen’sdisplay:Useoneofthescreen-saveroptionsavailable
fromtheMore>Settings>Screen Saverpage.
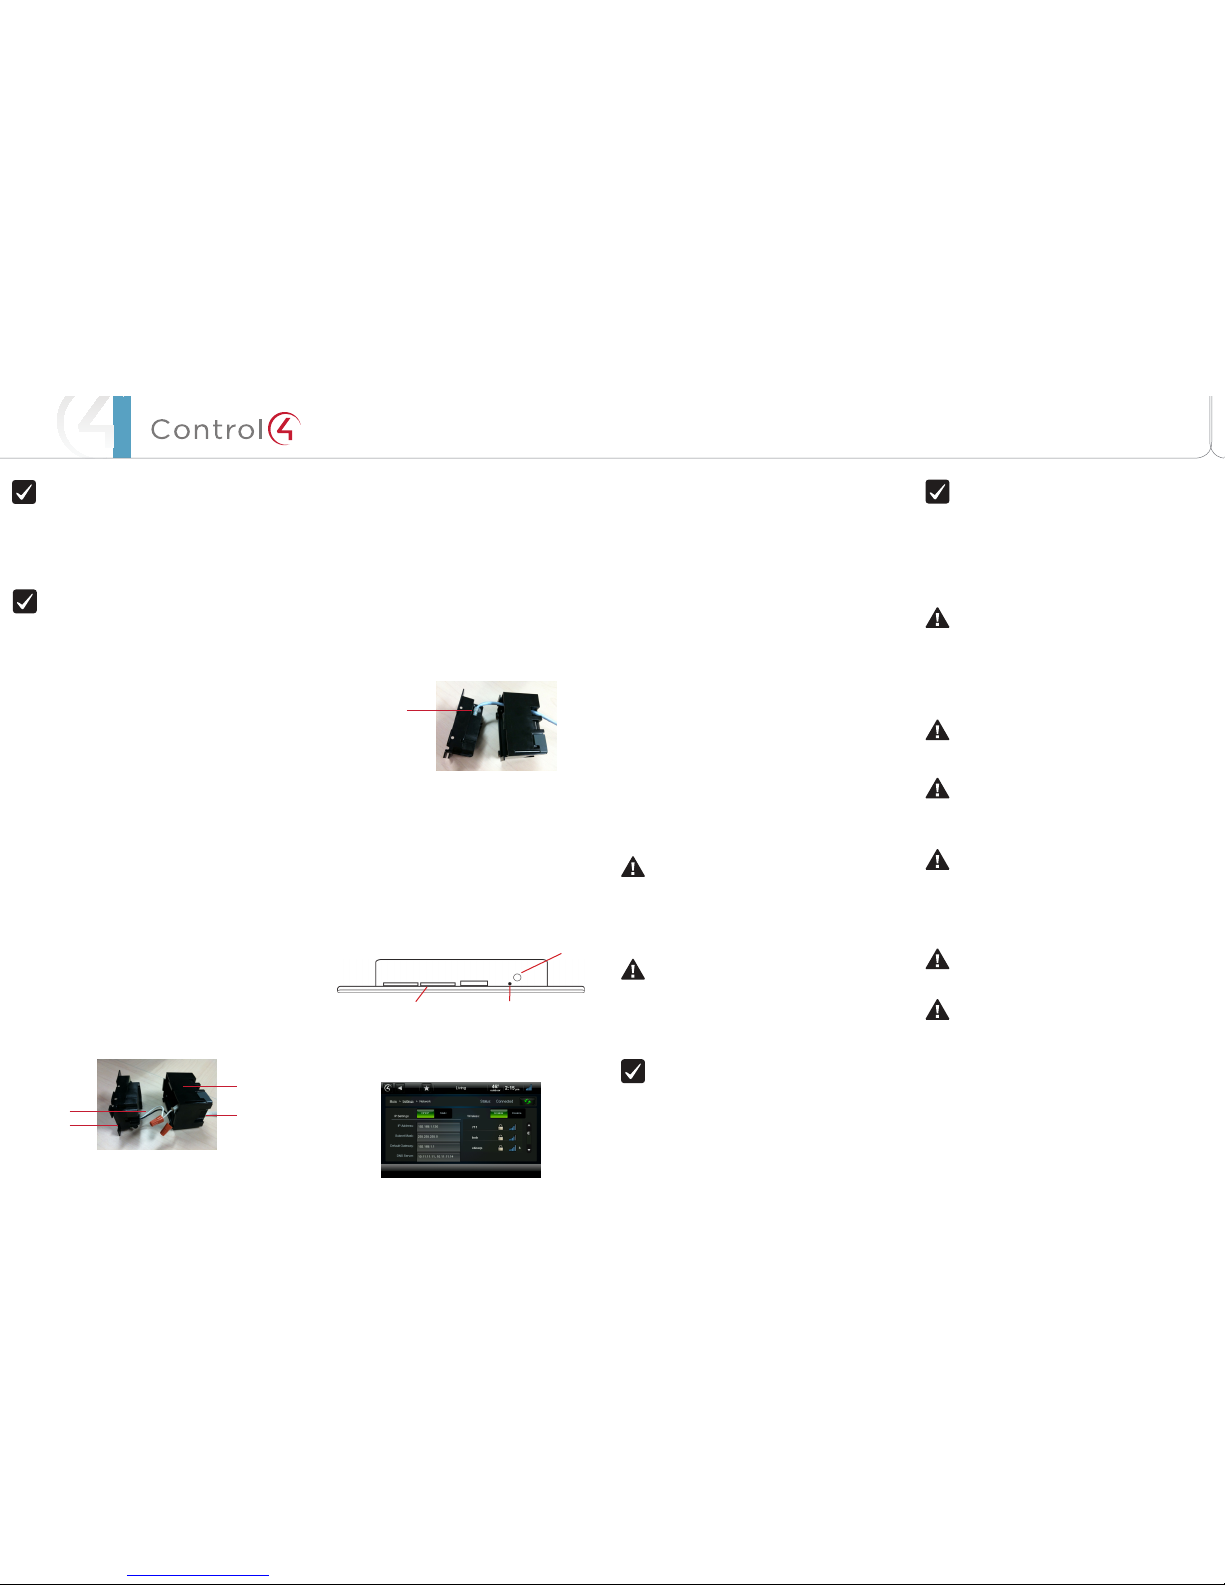
7 (WiFionly)ConnecttoaWAPontheTouchScreen(seeFigure10):
Figure10.WirelessConguration
• Afterinitialization,pressandholdthelargered4onthecenteroftheTouch
Screentoenterthecongurationscreen.
• PresstheNetworkbuttonontheTouchScreencongurationpage.The
networkcongurationscreendisplays.
• UnderWireless,selectEnable.Ifyoudon’tseethenetworkyouwant,select
Other.
• AtNetworkName,selecttoaddtheSSIDorwirelessnetworkwhenthe
keyboardappears.SelectDone.
• AtSecurity,selectNone,WEP 64,WEP 128,orW PA .AtPassword,typethe
passwordonthekeyboardthatappears.PressDone.
• SelectConnect.NoticethattheIPsettingschange.TheIPaddressissetto
DHCPbydefault.(Optional)IfyouneedtosetastaticIPaddressinstead,
completethefollowingsteps:
-OntheNetworkpage,pressStatic.
-Selecteachboxoneatatimeandtypetheaddress:IPAddress,Subnet
Mask,DefaultGateway,PreferredDNS,andAlternateDNS.Whenthe
keyboardappears,typetheaddress,andthenpressDone.
• PressOKtoreturntotheNetworkpage.YoucannowconnecttoaControl4
DirectorrunningonaControl4deviceonthenetwork.
• PressOK.
8 WhenyourTouchScreenisphysicallyinstalledandappearsonthehome
network,youcanaddandcongureittotheControl4Systemusingthe
ComposerProsoftware.SeetheComposer Pro User Guideforinformation
abouthowtoaddandidentifytheTouchScreentotheControl4System.
Restore to Factory Default
Pressandholdthered4 buttoninthetopleftcornerofthescreenuponstartup,
andfollowtheinstructionspresentedonthescreentoinitiatethefactoryrestore
processandtoresettheTouchScreentothefactorydefaultsettings.
Composer Driver Information
Chooseeitherthe5” Touch Screenor7” Touch Screen
driverinComposerandaddittoyourproject.Ifthedriverdoesn’tappear,right-
clickadriverandselecttheRestore Default Listmenuoptiontorefreshthelist.
SeetheComposer Pro User Guidefordetails.
WARNING!TheTouchScreenmustbeprotectedbyanexternalcircuit
breakerorafuseratedat6AmaximumwhenusedinEurope.
AVERTISSEMENT!Pourréduirelerisquedufeuoudechocélectrique,
n’exposezpascetappareilàlapluieouàl’humidité.
WARNUNG!DieBerührungseingabemußdurcheinenexternenCircuit
breakerodereineSicherunggeschütztwerden,dieamMaximum6A
veranschlagenwird,wennsieinEuropaverwendetwird.
WARNING!DonotplacetheTouchScreennearsourcesofheatorexpose
todirectsunlightforanextendedperiodoftime.
AVERTISSEMENT!Neplacezpasl’unitéprèsdessourcesdechaleurou
expositionpourdirigerlalumièredusoleilpendantunepériodeprolongée.
WARNUNG!SetzenSieMaßeinheitnichtnaheQuellenderHitzeoderdes
Exposés,umTageslichtwährendeinesausgedehntenZeitabschnittszu
verweisen.
IMPORTANT!Donotusepensorsharpobjectstonavigateormake
selectionsontheTouchScreen.Toselectanitemorscrollthroughalist,
useyourngertip.
IMPORTANT!N’employezpaslesstylosoulesobjetspointuspourdiriger
oupourfairedeschoixsurl’écran.Pourchoisirunarticleouunrouleau
paruneliste,employezvotreboutdudoigt.
WICHTIG!BenutzenSienichtFedernoderscharfeGegenstände,umoder
VorwählerenaufdemSchirmzubildenzusteuern.UmeinEinzelteiloder
eineRolledurcheineListevorzuwählen,benutzenSieIhreFingerspitze.
IMPORTANT!ImproperuseorinstallationcancauseLOSS/DAMAGEOF
PROPERTY.
IMPORTANT!L’utilisationoul’installationinexactepeutcauserLOSS/
DAMAGEDEPROPRIÉTÉ.
WICHTIG!UnsachgemäßerGebrauchoderInstallationkönnenLOSS/
DAMAGEDEREIGENSCHAFTverursachen.
IMPORTANT!Usingthisproductinamannerotherthanoutlinedinthis
documentvoidsyourwarranty.Further,Control4isNOTliableforany
damageincurredwiththemisuseofthisproduct.See“Warranty.”
IMPORTANT!Utilisantceproduitenquelquesorteautrequedécritdans
cedocumentvidevotregarantie.Deplus,Control4n’estpasresponsable
d’aucundommageencouruavecl’abusdeceproduit.Voyezque
«Warranty.»
WICHTIG!DasVerwendendiesesProduktesingewissemSinneanders
alsumrissenindiesemDokumenthebtIhreGarantieauf.Weiterist
Control4NICHTfürirgendeineBeschädigungverantwortlich,diemit
derFehlanwendungdiesesProduktesgenommenwird.SehenSie,daß
“Warranty.”
WARNING!Installinaccordancewithallnational,state,andlocalelectrical
CODES.
AVERTISSEMENT!Installezselontouslesnational,état,etcodes
électriqueslocaux.
WARNING!Thisproductgeneratesheat.Theroommusthaveadequate
VENTILATIONortheabilitytodissipateheateectively.
AVERTISSEMENT!Ceproduitproduitdelachaleur.Lasalledoitavoirà
VENTILATIONproportionnéeoulacapacitéd’absorberlachaleur
ecacement.
WARNING!Thisproductmustbegroundedinaccordancewiththe
NationalElectricalCode(NEC)requirements.
AVERTISSEMENT!Ceproduitdoitêtrefonduselonlesconditions
électriquesnationalesdecode(NEC).
WARNING!Usethisproductonlyindrylocations.
AVERTISSEMENT!Employezceproduitseulementdansdesendroitssecs.
CAUTION!Thisproductisforresidentialuseonly.
ATTENTION!Ceproduitestpouràl’usagerésidentieloucommercial
seulement.
MAGNETWARNING!Locatedwithintheplasticenclosuresofthis
productarestrong(rareearth)magnetsthatareusedtoattachtheface
platetotheelectricalbox.Ifsomeonehandlingorusingtheproducthas
apacemaker,debrillator,orsimilarelectronicdeviceusedforhealth
purposes,avoidcloseproximity(closerthan20inches)totheproduct
untilyouconsultyourphysician.Magneticeldscancausedamageto
magneticstoragemedia(forexample,creditcards,videotapes,computer
harddrives,etc).Keepallmagnetsatleast20inchesawayfromalltypes
ofmagneticmedia.Certainelectronicdevicesaresensitivetomagnetic
FIELDSandmaybedamagedpermanentlyortemporarilydisabled
ifexposedtoamagneticeldthatistoostrong.Consulttheowner’s
manualsofyourelectronicdevicesforfurtherinformation.
INGESTEDmagnetscancauseseriousinjuriesandmayresultindeath.If
magnetshavebeeningested(oryoususpecttheymighthavebeen),seek
competentmedicalattentionimmediately.
Ethernet
Connection
Speaker Insert paper clip here to
remove Touch Screen
Security pin
Black and White
Wires
Power Box
Wall Box
Power Cable