If there are two of the same air
conditioners installed, they cannot be
controlled separately. When you operate
either remote, it will turn on both air
conditioners if they are both within signal
range (6 metres).
Don’t let the remote control drop onto
hard surfaces or be subjected to sudden
shocks in any way. The warranty does not
cover misuse or accidental damage.
Don’t place the remote control in direct
sunlight, or near extremes of temperature.
This will affect the control’s temperature
reading.
Don’t allow the remote control to get wet.
Don’t place near strong electromagnetic
waves.
Don’t mix old and new batteries!
If the remote control will not be used for a
long time, remove the batteries to avoid
corrosion.
Care of your remote control
Preparation before operation
During Operation
Remove the battery cover and insert new
batteries
.
Remove the batteries and replace with new
ones. If this does not solve the problem
contact your nearest service centre for
advice.
(AAA), making sure the + and -
match the compartment markings (Fig 10)
If the remote control will not operate the air
conditioner, the batteries may need to be
replaced.
The air conditioner must be plugged in
and switched on for the remote control to
operate the air conditioner. To use, point at
the signal receiving window on the front
panel and press the remote button. The air
conditioner will “beep” when a signal has
been received. If there is no beep, press the
remote button again, ensuring it is within
range (6 metres) of the air conditioner.
Note!
!
NOTE:
WASTE BATTERIES SHOULD
BE DISPOSED OF CORRECTLY
REMOTE CONTROL
9
Signal
transmission point
Power ON / OFF
button
Fan speed
adjust button
Timer on / off
button
Mode buttons
(Cool-Dehumidify-Fan)
Timer on / adjust
button
Battery
compartment
Battery cover
10
ON/OFF
SPEED
TIMER
MODE
UP
DOWN
+
6CP12CS1 Portable Refrigerated Air Conditioner
Step 6:
Step 7:
Press the FAN SPEED button
on the control panel or remote control to
adjust the fan speed. Each press will cycle
the fan speed between high, medium and
low.
In Cooling mode, the fan will continue
to run even when the compressor has
cycled off.
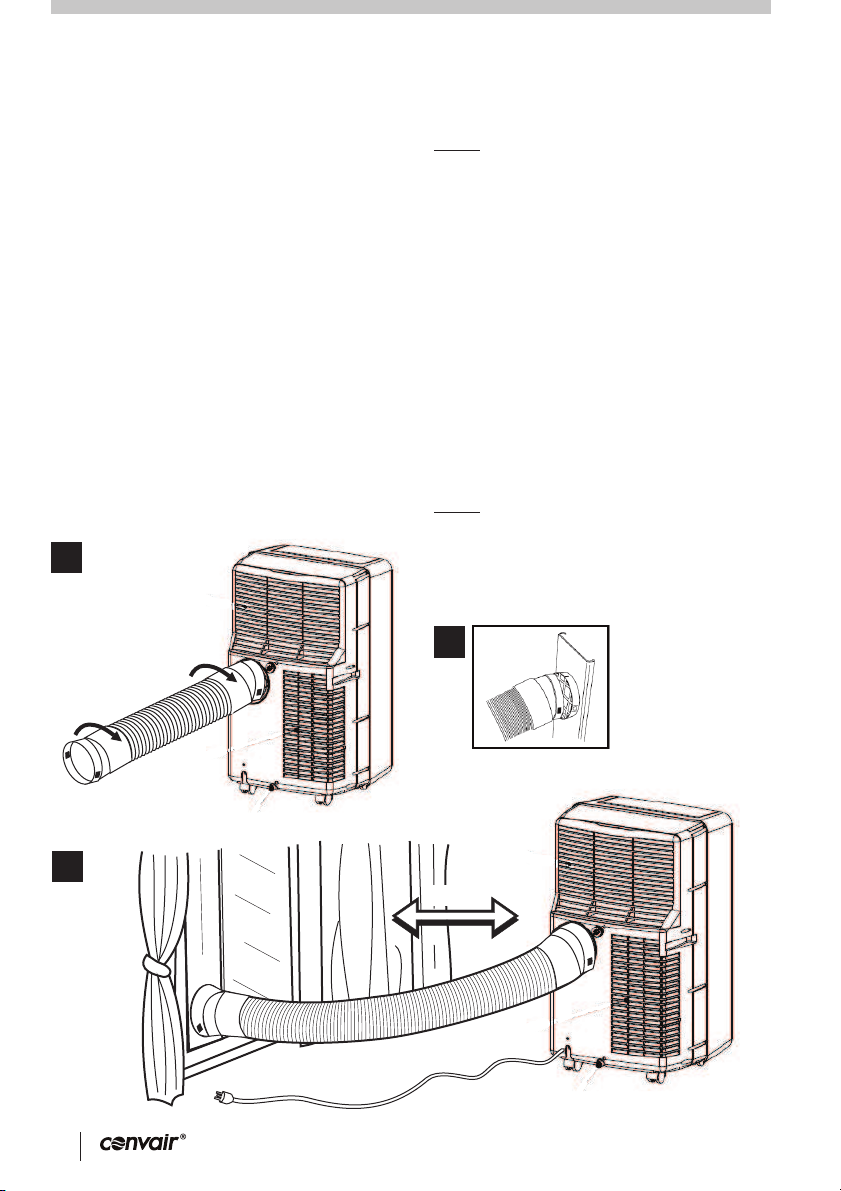
The air conditioner is fitted with
horizontal air direction vanes. Carefully
move the vanes to the desired position by
hand (Fig 12).
During cooling mode, water will
collect in the air conditioner’s tank. This
water is recirculated and some will be
exhausted out with the hot air, but will slowly
fill up the tank. This occurs more quickly in
humid conditions. If the tank should fill, the
‘water full’ indicator will be lit on the control
display and the unit will shut down. The
cooler cannot be restarted until the water
tank is drained. Refer to the Maintenance
section for draining the tank should this
occur.
Note!
Important!
Starting the air conditioner
Step 1: Ensure the cooler is plugged in
and switched on.
Step 2:
Step :
Step 4:
Cooling mode
Dehumidifying mode
Fan mode
Step 5:
!
Lift up the air outlet vent ready for
use.
3 Press the ON/OFF button
on the remote control or ON/OFF
button on the control panel to start the air
conditioner.
Press the MODE button on
the control panel or remote control to
select the desired operating mode (Fig 7,
8 &11):
- refrigerated
cooling
- for
extracting moisture from the air
- Fan only operation
(no cooling)
Press “ -” buttons on the
control panel or on the remote control to
select the desired operating ‘set’
temperature.
In Cooling mode, cooling will occur if the
set temperature is less than the room
temperature.
Do not set the cooling temperature
too low. This will consume more power.
24°C is the recommended set
temperature, with high fan speed.
Changing the set temperature will
have no effect in DEHUMIDIFYING or
FAN modes.
The display can toggle between °C
and °F by pressing both the “+” and “-”
buttons on the control panel together and
holding for 2 seconds.
+”or “
The set temperature range is 16°C-32°C
Tip
Note!
Note!
OPERATION
Step.4
Step.5
Step.3
Step.6
Step.8
11
12
ON/OFF
SPEED
TIMER
MODE
UP
DOWN
+
7
SEELEY INTERNATIONAL –OWNER’S MANUAL