Cook-air EP-3620 User manual

®
The revolutionary barbecue-grill!
Model EP-3620
Owner’s Manual
WWW.COOK-AIR.COM

2
Quick!
The COOK-AIR quickly reaches a very high cooking temperature
exceeding 400°C! Approximately 4-5 minutes after starting the
unit, you are ready to cook! When you are done cooking, the
COOK-AIR cools off just as quickly - simply let the fuel residue
burn (+/-15 minutes)!!
Simple!
No more messy charcoal or heavy gas tanks!
From now on, all you will need is some solid wood fuel and a
fire starter. It’s simple, clean, easy to store and to use! Solid
wood fuel is a very safe, available and renewable energy
source and therefore contributes to the conservation of our
resources.
Efficient!
Heat control is not a very common characteristic with barbecue
grills! However, the COOK-AIR has a variable speed fan that
allows you to control the temperature and cooking time required
for each food.
Furthermore, cleaning the unit is also very simple; you just have
to safely dispose of the small quantity of ashes remaining in the
combustion chamber.
Versatile!
In addition to exceptional performance, thanks to its intense
cooking heat, the COOK-AIR makes it possible to also smoke your
food. This is just one of the many simple techniques you will be
able to use with your COOK-AIR… Go ahead and experiment!
THE REVOLUTIONARY COOK-AIR BARBECUE GRILL
Before using the Cook-Air for the first time, read the instructions thoroughly.

3
SAFETY
Fig. 1-A
Fig. 1-B
Fig. 2
Keep out of reach of children and pets.
CAUTION: Never use alcohol, lighter fluid, or any other
liquid fuel to light or reactivate your COOK-AIR. Use a
ball of crumpled paper, paraffin-coated wood, or a fire
starter that complies with EN 1860-3.
Never use charcoal briquettes or chemically-treated
wood as fuel because it produces creosote and emits
toxic gases. Also, never use wood from coniferous
trees such as cedar, pine, fir, or others.
CAUTION: Never use your COOK-AIR indoors or in
enclosed areas.
Never move the COOK-AIR while it is in use or hot.
RECOMMENDED FUEL SOURCES:
- Hardwood (nut or fruit woods) chunks - about
fist-sized
- Hardwood lump charcoal
- Mojobricks compressed wood barbecue bricks
- The combustion chamber should never be filled more than 3/4
full.
- Always use the fan on low speed (level 1) for ignition (30-45 sec)
before increasing speed.
- To avoid fire hazards, always put the cooking grate properly
positioned before pressing the high speed control button (level 5).
- Always remove excess fat from food and drain marinated meat in
order to reduce excessive flare-ups.
- To handle your cooking grate safely, always insert the handle
(Fig. 1-A) in one of the 4 slots designed for this purpose (Fig. 1-B).
- To refuel while cooking, lift the cooking grate using the handle.
Always use tongs to add wood. Never attempt to remove or lift
the cooking grate without the supplied handle!
- If you use the lid for cooking, position the lid so as to allow the
air to circulate. If using the COOK-AIR on high (level 5), remove
the lid completely!

4
SAFETY
-When you are finished cooking, set the fan on medium (level
2-3) and allow the COOK-AIR to burn away 99% of the fuel in the
combustion chamber.
-After allowing the fuel to burn away, there will be very little
ash left. When it is cold, simply throw them away in a non-
flammable container.
-Always remove the batteries before storing the COOK-AIR for a
long period of time.
-Place the COOK-AIR on a horizontal, stable surface before use.
Do not leave the appliance unattended.
-Never touch the exterior of the grill or the cooking grate while
the COOK-AIR is in use.
Fig. 3-A
Fig. 3-B Fig. 3-C
ALWAYS BE EXTREMELY CAREFUL WHEN USING AN
APPLIANCE THAT PRODUCES EXTREME HEAT
-Always make sure that the vinyl cover is properly placed and
that the cord is securely fastened (Fig. 3-A) below the handle
ring (Fig. 3-B) before transporting the unit (Fig. 3-C).
WARRANTY & SPECIFICATIONS
Grill Dimensions: 381 x 381 x 432 mm
Weight: approx. 9.5 kg
Cooking Surface Diameter: 355mm
Material: Stainless Steel, Steel, and Plastics
Voltage: 12V DC
WARRANTY
The COOK-AIR has a 2-year warranty from date of purchase against manufacturing defects, given that it was used according to
instructions of use. For proof of warranty, please retain your sales receipt with indicated date of purchase.
Abrasion, rust, deformation or staining of parts exposed directly to flame (especially stainless steel parts) are normal wear after use
and are under no circumstance considered to be manufacturing defects.

5
CONTENTS AND ASSEMBLY
Contents:
How to attach the
handle to the lid.
Cook-Air Barbecue Grill (ill.1)
Cigarette lighter adapter (ill. 2)
AC adaptor (ill. 3)
Cleaning brush (ill. 4)
Vinyl cover (ill. 5)
Cooking grate handle (ill. 6)
Owner’s Manual (ill. 7)
Ill. 4
Ill. 5
Ill. 1
Ill. 3
Ill. 2
Step. 2
Step. 1
Ill. 6
Ill. 7
The COOK-AIR barbecue grill is fully
assembled. Using a screwdriver, firmly
attach the handle to the lid.

6
Batteries
The COOK-AIR uses eight (8) “D” alkaline batteries. To install
the batteries in your barbecue grill:
1. Remove the cover and cooking grate, turn the unit upside
down and set down on a flat level surface.
2. Remove the cover from the battery compartment.
3. Insert the batteries, carefully placing them according to the
polarity indicated.
4. Check that the batteries are correctly installed by pressing
the control button (ON); the fan motor should start.
5. Replace the cover on the battery compartment.
Once the batteries are installed, the COOK-AIR becomes totally
portable. The batteries last up to 20 hours on high speed and
even more on low. You are now ready to go camping or go to the
park!
Battery protection switch
The COOK-AIR EP3620 model is equipped
with an ON/OFF switch that protects and
keeps the charge of your batteries when
the grill is stored. Always set the switch
to the OFF position when finishing the
use of your grill.
Cigarette lighter adapter
The COOK-AIR 12-volt cigarette lighter adapter is very versatile.
Plug it into your car, camper, trailer, boat or into any other 12-
volt energy source. Using this adapter will allow you to enjoy
your COOK-AIR anywhere without using your batteries.
AC adapter
The AC adapter extends battery life and allows you to use the
barbecue grill anywhere you have access to electricity. For safe
use, always follow the following recommendations. To install:
Plug the adapter cord into the intended socket (fig. 5-A and
5-B) then plug the other end into an approved electrical source.
The grill can now operate normally.
(ON) button: starts the fan.
(OFF) button: stops the fan.
Arrows: sets the power level of the fan to the
desired level. The lowest level is (1) and the highest
is (5). The stronger the fan level, the hotter the cooking
surface.
Fig. 5-A
Fig. 6
Fig. 5-B
GRILL POWER SUPPLY
CONTROL PANEL
There are three ways to supply your COOK-AIR with the 12 volts DC energy source it requires:
1. “D” alkaline batteries 3. AC adapter2. Automobile cigarette lighter adapter
Fig. 4

7
STARTING YOUR COOK-AIR
Follow these instructions when starting your barbecue grill.
Place the appliance on a flat, level surface at a convenient
cooking height.
1. Remove the cover and insert
the handle in one of the 4
slots on the cooking grate (Fig. 7),
then remove the cooking grate
to access the combustion
chamber.
2. Place a fire starter (Fig. 8) at
the bottom of the combustion
chamber. Paraffin-coated wood
or any type of chemical-free fire
starter may be used.
Never, under any circumstances,
use lighter fluid, kerosene or any
other flammable liquid to start the
COOK-AIR!
3. Ignite the COOK-AIR fire starter
(Fig. 9).
4. Once the fire started is ignited,
use tongs to place one or more
pieces of dry wood on the fire
starter. Using the control button,
set the fan on low (level 1).
5. Put the cooking grate back into place.
6. Wait 30 to 45 seconds and then, using the control button, set
the fan on high (level 5). Leave the lid off.
7. If necessary repeat the first steps to achieve full ignition.
8. About 4-5 minutes after ignition and depending on the
ambient temperature, your COOK-AIR should have reached its
cooking temperature. Select the heat output required for the
food you are cooking by varying the fan speed using the
control button and by adding wood as needed.
Wood fuel
It is recommended to use only dry hardwood species as fuel.
Green or wet wood can produce smoke and reduce heat levels,
some softwood can spark excessively.
If you wish, you can also prepare your own wood. To do so,
you will need very dry hardwood species, such as maple, oak,
beech, apple or cherry. Each variety of hardwood will give
food a unique flavour. Hardwood chunks should be no thicker
than 5x5cm and no longer than 7.5cm. Branches up to 5 cm in
diameter can also be used if they are cut in lengths no longer than
7.5 cm.
You can also use hardwood lump charcoal or compressed wood
barbecue bricks. Do not use softwoods such as pine and cedar.
Never, under any circumstance, use charcoal briquettes with
your COOK-AIR grill!
For best efficiency, the wood should be piled in the combustion
chamber in a similar way as a campfire, but never more than 3/4
full.
Fig.7
Fig. 8
Fig. 9
Fig. 10
When operating the COOK-AIR for the first time,
light the appliance at least 10-20 minutes prior to
use in order to burn off any residue.

8
Cooking
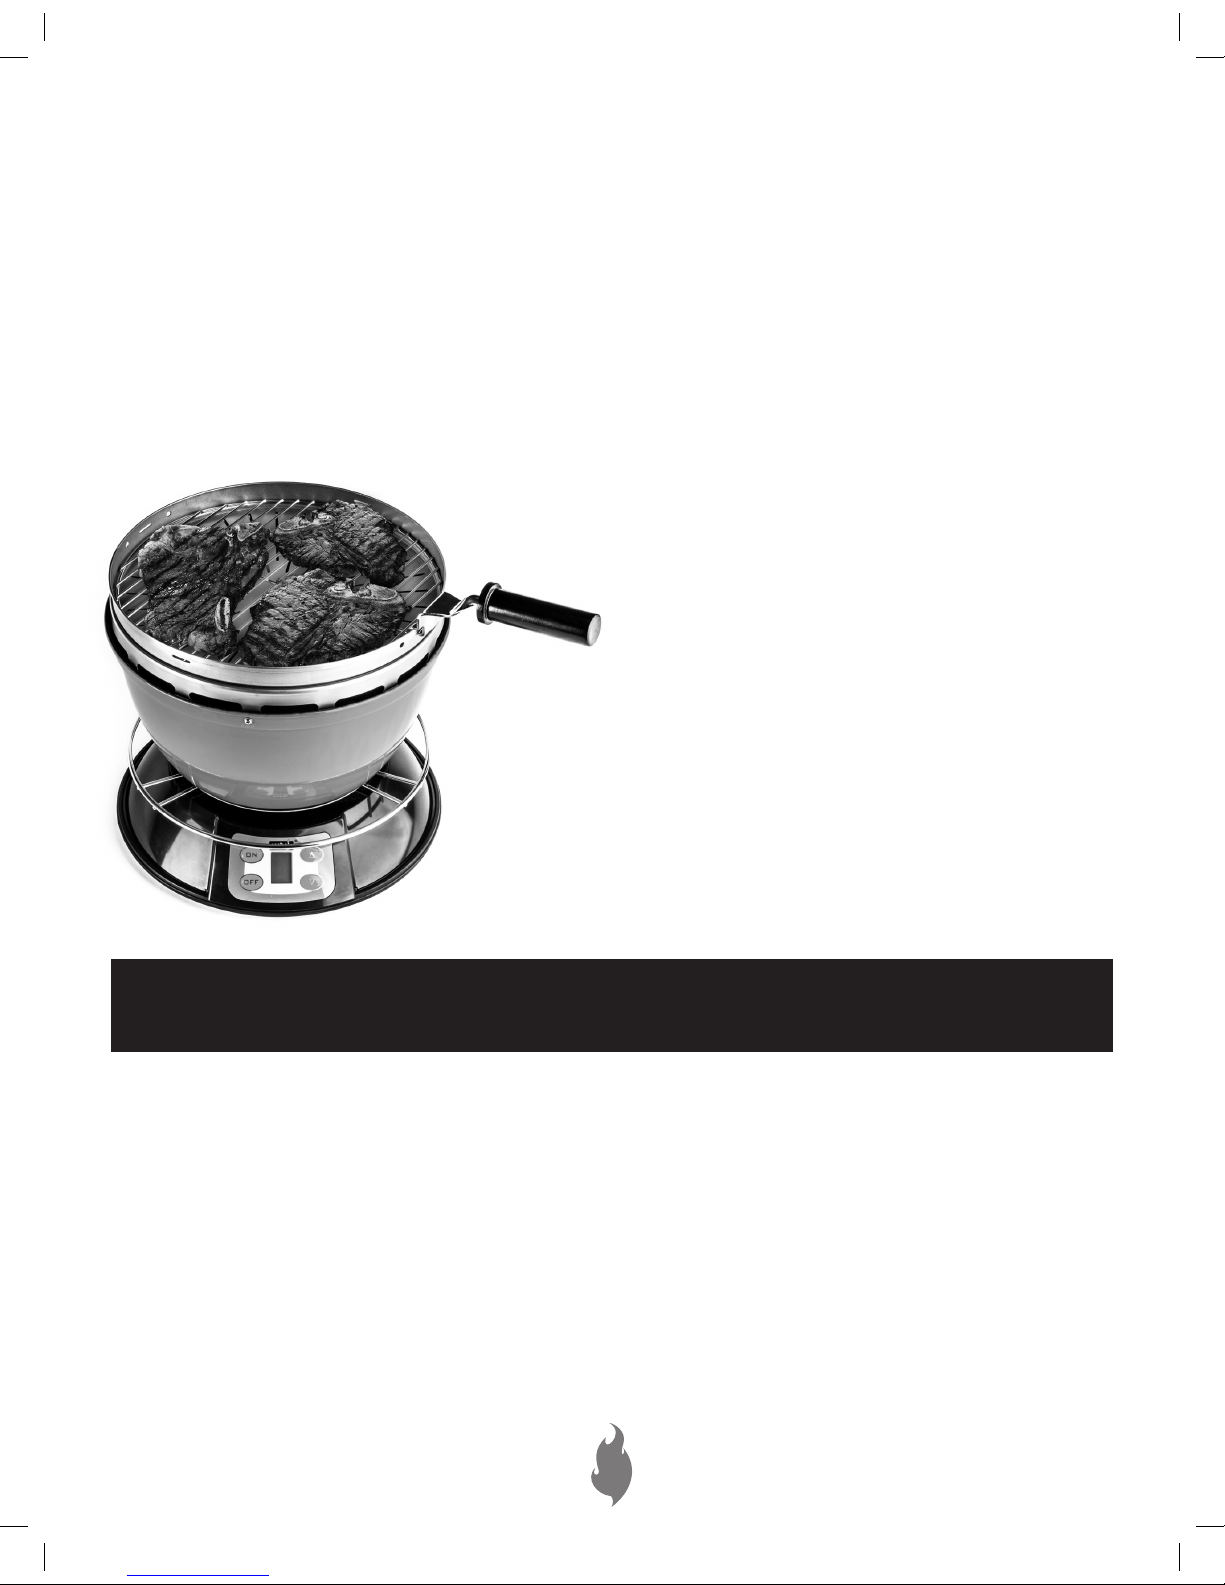
The COOK-AIR is capable of reaching very high temperatures
in record time. You must become familiar with the fan control to
master the intensity of the cooking heat.
CAUTION: Always remove excess fat from food and drain mari-
nated meat in order to reduce excessive flare-ups and smoke.
Contrary to other types of barbecue grills on the market, which
cannot reach the high temperatures required to sear meat
(400C +), the COOK-AIR allows you to sear your meat and seal in
its natural juices. For meat which is 2.5-3cm thick, you
just have to sear it on high for 1 1/2 minute on each side. For
meat 2cm thick, one minute on each side will suffice.
Once the meat is seared, given the very high temperature rea-
ched by the COOK-AIR, it is advisable to frequently turn the
meat (every 60 seconds) until the desired doneness is reached.
To enjoy a new cooking experience, just before your food is
cooked, reduce the fan speed to level 1 and place the lid on
the grill. When fully ignited, the wood fuel produces a smo-
ked wood aroma that is absorbed by the food. Every variety of
wood fuel has its own characteristics and, consequently, pro-
duces a unique flavour and incomparable taste.
To add wood fuel
If you must add wood fuel while cooking, turn the fan control
button to minimum speed (level 1).
Always use the supplied handle to lift the cooking grate.
NEVER PUT THE HOT COOKING GRATE DOWN ON ANOTHER
SURFACE, IT COULD DAMAGE IT!
Add wood to the combustion chamber using tongs. Replace the
cooking grate and reset the fan to the required speed to resume
cooking.
The lid should not be tightly closed except to smoke food. The
fan must be set on minimum speed (level 1) during this process.
Maintenance
Very little maintenance is required to enjoy years of grilling on
the COOK-AIR. To clean the combustion chamber, first wait until
the unit is cold, then:
1. Set the fan on low (level 1). Once the cooking grate is re-
moved, loosen ash residues in the combustion chamber using the
supplied brush in a circular motion.
2. Remove the ashes safely and make sure that there is no re-
sidue left in the chamber. Make sure that the burner holes inside
the combustion chamber are clear of debris. If needed, clean the
holes with an ordinary paperclip.
Storage
Before storing your COOK-AIR, clean the combustion chamber as
indicated. Clean the cooking grate with regular household cleaner
and wipe all stainless steel surfaces with a damp cloth. Make
sure that the unit is in the OFF position to avoid draining the
batteries. For seasonal storing, remove the batteries from the
appliance.
COOK-AIR HINTS AND TIPS
Unit Care
- Carefully dry your barbecue when wet
- Use the vinyl cover when transporting your COOK-AIR and to
protect it in storage
- Store in a cool, dry location

9
COOK-AIR PARTS LIST
Model EP-3620
Top cover C-001 C-001A Cover handle
C-003B Cooking grate handle
C-002 Grate
C-003 Thermal pan
C-006 Inner casing cone
C-009 Inner casing tube
C-011 Removable Air chamber
C-012 Air tube
C-023 Touch switch board
C-022 Circuit board
C-032A Nut (3)
C-015C Rubber ring
C-004 Mid outer housing
Cooking grate
Combustion chamber C-010A
Bolt (3) C-032
Disc baffle C-014
Ring handle C-021
Base control housing C-015
Air pump C-018 Base
control cover
+battery casing C-015A
Battery door C-015B

®
WWW.COOK-AIR.COM
© 2015 BBQ EUROPE. All rights reserved. COOK-AIR and the COOK-AIR logo are trademarks of Cata Marketing , Inc.,
registered in the U.S., Canada and Europe.
Made in China for: BBQ EUROPE • Prague, Czech Republic
Other manuals for EP-3620
1
Table of contents
Other Cook-air Grill manuals