manuals.online logo
Brands
  1. Home
  2. •
  3. Brands
  4. •
  5. Cook's Companion
  6. •
  7. Griddle
  8. •
  9. Cook's Companion EASY FLIP PAN Guide

Cook's Companion EASY FLIP PAN Guide

1 Year Limited Warranty
EASY FLIP PAN™GRIDDLE PAN
EASY FLIP PAN CARE & USE

The Fusion® nonstick coating makes this pan easy toclean. While the pan is dishwasher
safe, hand washing with asoft dishcloth or sponge is recommended and will prolong the
cookware’s beauty. Do not use abrasive or harsh cleaners, as these may damage the finish.

Always preheat your cookware and uselow to medium heat when cooking food. This helps
preserve the nutrients in food and the nonstick surface. Preheating requires oil, water or
food to be in the pan. Heating without food, water or oil may cause damage to the pan or
ceramic coating.

Never use metal utensils on any ceramic coating surface. It is recommended thatyou use
tools made of nylon, plastic,wood, silicone ormelamine.

Do not scratch the surface or cut directly on your cookware.

Always use extreme caution when handling hot cookware and keep out of reach of children
at all times.

Do not let handles extend over a hot burner. Doing so may causethe handle to become hot
or cause damage. Always use oven mitts, towel or potholders when handling.

The Easy Flip Pan™is compatible with induction, ceramic, electric (including glass cook tops),
radiant coil and gas stovetops.

Do not use your Easy Flip Pan™ in a conventional or microwave oven.

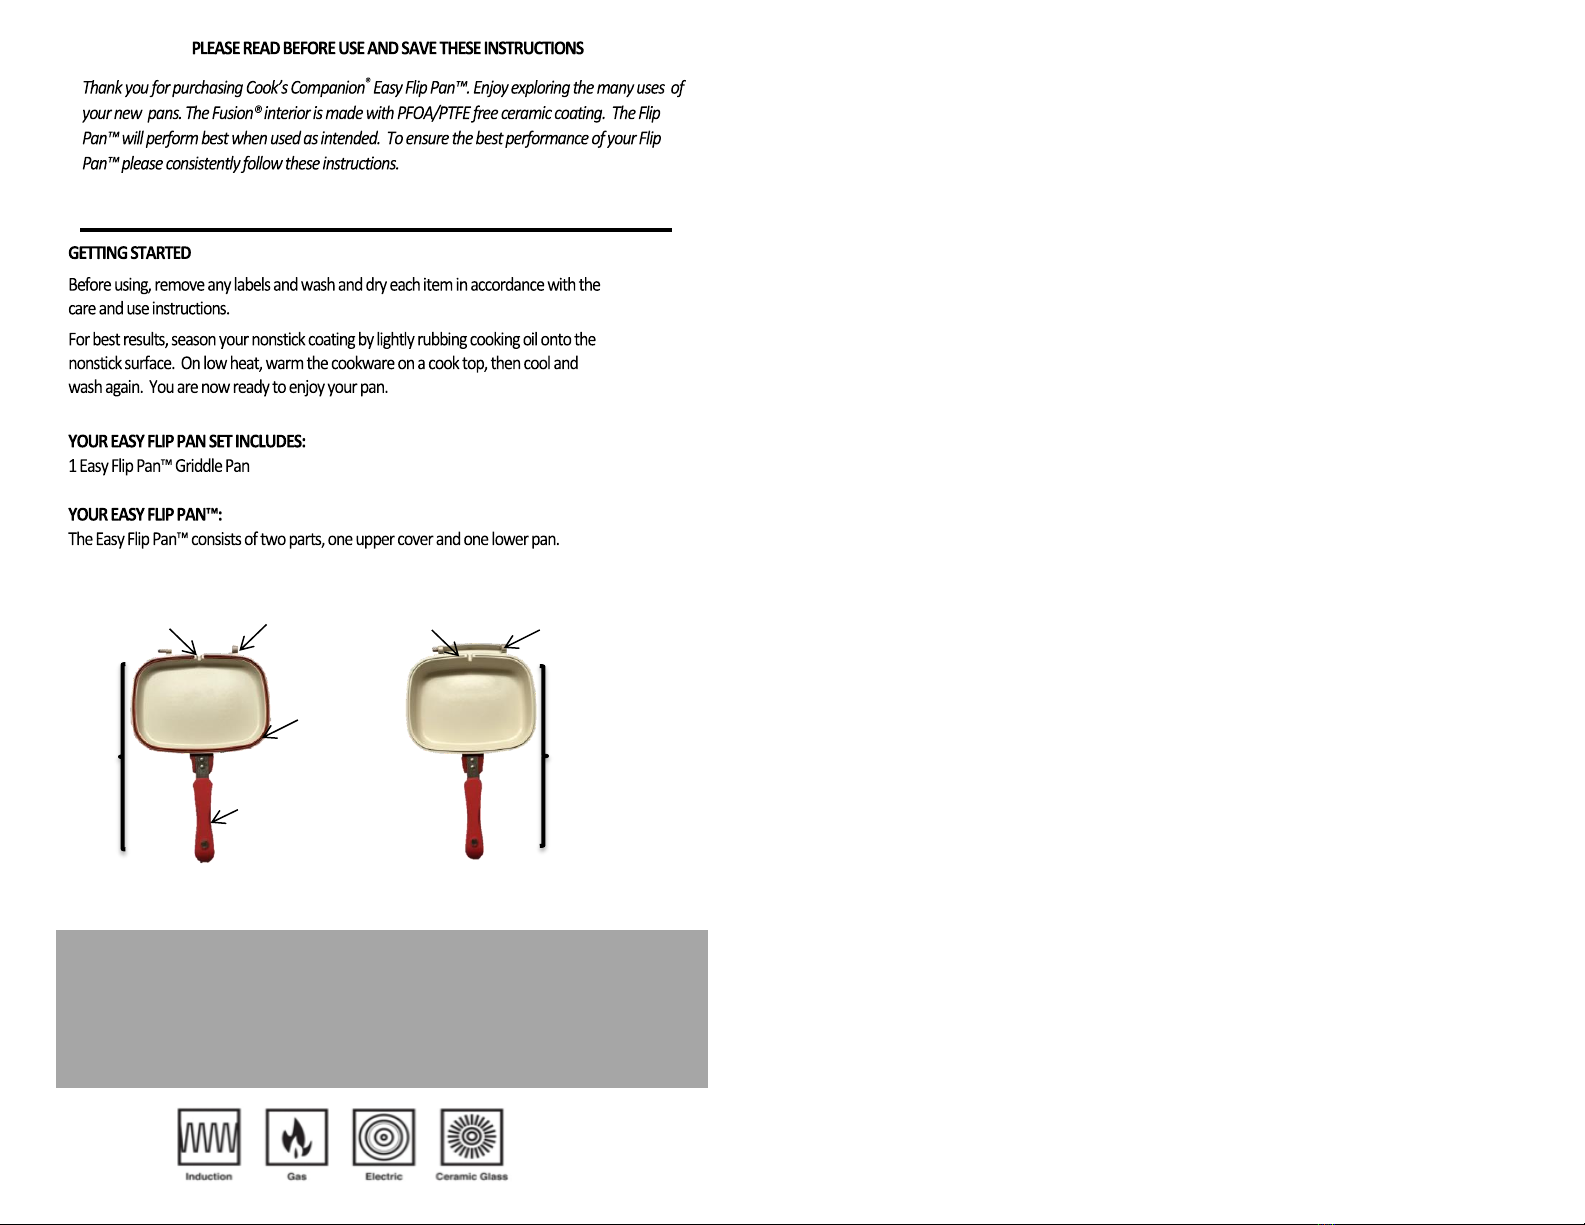
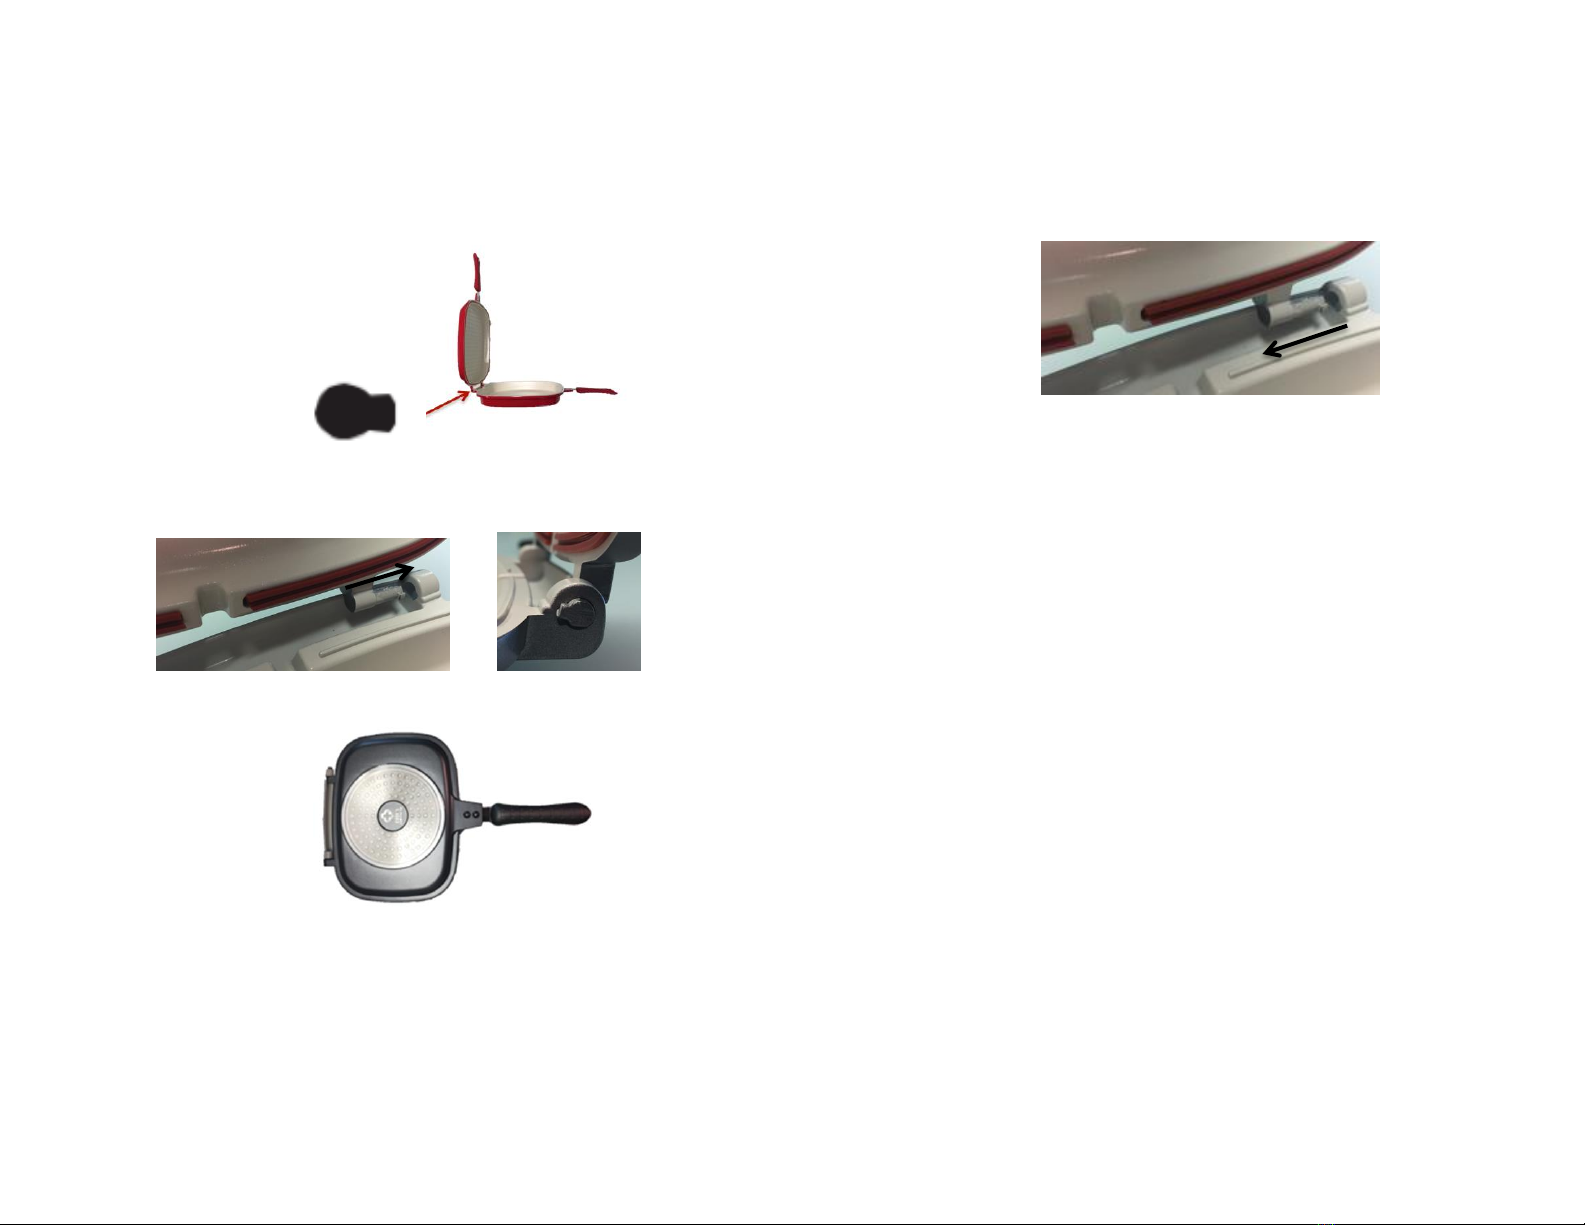
The Easy Flip Pan™ consists of 2 individual pans that are interchangeable with each other by
disconnecting and connecting the pans by a hinge. There is one upper pan (cover) and one
lower pan included.

The pans connect by a hinge that opens to a 90° angle. Do not force pastthe 90° angle as
this could cause damage to the pan. Please follow the directions on the next page of how to
assemble and disassemble your Easy Flip Pan™ before attempting to do so.

To close the pan, bring handles together until the magnets connect.

To flip the pan, first make sure the contents are safefor flipping andcarefully check to see if
any liquid has accumulated in the liquid catch trap. If any liquid exists,simply wipe away the
liquid with a towel and proceed to flip the pan.

Allow your cookware to cool before submerging into water.

If the red silicone gasket stretches or loosens it is recommended to cut off any excess and
reinsert. An additional silicone gasket is supplied for your convenience. If needed, remove
the old gasket, insert the replacement silicone gasket into the groove by applying light
pressure and trim away any excess gasket.

Your Easy Flip Pan™ consists of an upper griddlepan and a lower griddle pan. The lower pan
is the deeper pan and contains a liquid catch trap and smooth surface. The liquid catch trap
on the lower pan is opposite the handle and located between the hinges. The liquid catch
trap allows excess steam and liquid to get trapped here. The upper pan is the shallower
pan, and is called the cover when used with the lower pan. See the description on the first
page for reference.

The upper andlower pans can be separated for cooking, cleaning or using the glass lid (not
included). Pleasesee the below instructions for separating pans.
WARNINGS:
•
Do not use in a microwave.
•
Follow all Care & Useinstructions before using your pan.
•
Do not flip pan when it contains fluids, grease, oils, water, and other liquids as these contents
can leak from the liquid catch trap
•
Never attempt to remove or assemble the cover while the panis hot.
KEY HOLE
LIQUID
CATCH TRAP
LOWER/
BASE PAN
KEY HINGE
HANDLE
UPPER
PAN/COVER
STEAM VENT
GASKET
HOW TO ASSEMBLE YOUR EASY FLIP PAN™
•Place your Easy Flip lower pan on a flat surface, with the handle facing towards the
right.
•While holding the cover at a 90° angle, line up the hinges and gently slide the cover
to the right into the hinge slot on the lower pan. The key hinge on the cover will
line up with the keyhole on the lower pan.
•You will know the key hinge is inserted into the keyhole correctly when you can no
longer slide the cover to the right and are able to see the key hinge on the other
side of the keyhole.
•With the cover and key hinge fully attached to the lower pan and keyhole at a 90°
angle, you will be able to gently close the pan so that the magnets attach.
NOTE: If the cover is not fully to the right or inserted properly and you attempt to
close the pan, it could break the hinge and will void your warranty.
HOW TO REMOVE THE COVER OF YOUR EASY FLIP PAN™
• Place your Easy Flip Pan™ on a flat surface, closed, with the handle facing towards
the right.
•Open the cover fully to a 90° angle, line up the hinges and gently slide the cover
to the left out of the hinge slot on the lower pan.
•Once the cover is detached from the lower pan you can switch out the cover with
another Easy Flip cover or the Glass Lid (not included). Such as the Easy Flip Grill or
the Easy Flip Circle cover (not included).
NOTE: If the cover is not fully opened to a 90° angle and you attempt to detach
the pan, it could break the hinge and will void your warranty.
EASY FLIP PAN™RECIPES
Breakfast Bake
Prep Time: 5 Minutes
Cook Time: 15 Minutes
Ingredients
1 lb. Breakfast Sausage
¼ Bag Frozen Hash Browns (slightly thawed)
Salt & Pepper to taste
½ Tsp. Garlic Powder
½ Cup diced yellow onion
2 Cups Cheddar Cheese
6 Eggs (whisked)
1 ¼ cup milk
1 Tbsp. Butter
Directions
Brown the breakfast sausage in the lower griddle pan & drain the grease as
needed. Set aside. The upper griddle pan should be attached to the lower
griddle pan.
Add the butter to the lower griddle pan, on medium heat.
When the butter is melted, add in the hash browns and diced onion.
Continue to cook until the hash browns are golden brown.
Mix the eggs and milk together in a separate bowl. Add salt, pepper, 1 cup
of cheddar cheese, browned sausage & garlic powder.
Pour the egg and sausage mixture over the hash browns. Close the Flip
Pan™ cover and let cook for 6 minutes.
Flip Pan™!
Continue cooking the breakfast bake for 6 more minutes.
Flip Pan™!
Open the cover of your Flip Pan™ and sprinkle remaining cheese on top of
the breakfast bake. Continue cooking for 3 more minutes or until you have
achieved your desired doneness.
Parmesan & Spinach Gnocchi
Cook Time: 15-20 minutes
Ingredients
½ package of Gnocchi (or homemade!)
1 Clove Garlic (minced)
2 Tbsp. Butter
2 Cups Spinach
1 Cup Milk
2 Tbsp. Flour
1 Cup Parmesan Cheese
Salt & Pepper to taste
Directions
Cook Gnocchi according to package instructions in a separate pot or pan
and set aside.
In your lower griddle pan (with upper pan attached) melt butter and add in
the minced garlic. Cook for about 1 minute on medium.
Add flour and lightly whisk for about 2-3 minutes.
Slowly add in milk, whisking to avoid lumps.
Cook for 2-3 minutes.
Add Spinach and Salt & Pepper, close the cover, and let cook for 3 minutes
or until the Spinach is wilted.
Reduce the heat to low/ simmer on your stove and add in Gnocchi and the
Parmesan.
Close lid, turn off the heat, and let the gnocchi and sauce sit for about 2
minutes.
Open the cover and enjoy!

Popular Griddle manuals by other brands

Black Stone OMNIVORE 8010 owner's manual

Black Stone

Black Stone OMNIVORE 8010 owner's manual

Black Stone 2151EU owner's manual

Black Stone

Black Stone 2151EU owner's manual

Accu-Steam AT0H-3035 owner's manual

Accu-Steam

Accu-Steam AT0H-3035 owner's manual

Vollrath Cayenne XFTG2001LP installation instructions

Vollrath

Vollrath Cayenne XFTG2001LP installation instructions

Jenn-Air JEF3115GS Use and care guide

Jenn-Air

Jenn-Air JEF3115GS Use and care guide

Blaze BLZ-GRIDDLE-LP/NG Use & care guide

Blaze

Blaze BLZ-GRIDDLE-LP/NG Use & care guide

Lincat Silverlink 600 GS6 Installation, operating and servicing instruction

Lincat

Lincat Silverlink 600 GS6 Installation, operating and servicing instruction

BRIKA BMG-24 product manual

BRIKA

BRIKA BMG-24 product manual

Vulcan-Hart VCCG36 Installation & operation manual

Vulcan-Hart

Vulcan-Hart VCCG36 Installation & operation manual

Alice's Garden PORTHOS PH1004SB instructions

Alice's Garden

Alice's Garden PORTHOS PH1004SB instructions

Presto Tilt’nDrain 7045 instruction manual

Presto

Presto Tilt’nDrain 7045 instruction manual

Bosch HEZ9GR58UC use and care manual

Bosch

Bosch HEZ9GR58UC use and care manual

Vulcan-Hart Wolf VCRG36-T Installation & operation manual

Vulcan-Hart

Vulcan-Hart Wolf VCRG36-T Installation & operation manual

Black Stone OMNIVORE 2322 owner's manual

Black Stone

Black Stone OMNIVORE 2322 owner's manual

Lang 224Z installation, operation & maintenence

Lang

Lang 224Z installation, operation & maintenence

Cecilware EMIFGS-120 instruction manual

Cecilware

Cecilware EMIFGS-120 instruction manual

Cuisinart GR4CU manual

Cuisinart

Cuisinart GR4CU manual

Waring WGR240X Instruction book

Waring

Waring WGR240X Instruction book

manuals.online logo
manuals.online logoBrands
  • About & Mission
  • Contact us
  • Privacy Policy
  • Terms and Conditions

Copyright 2025 Manuals.Online. All Rights Reserved.