Copernicus LLS300 User manual

LLS300 - Version A - December 9, 2019 - Copernicus Educational Products Inc.
Please Recycle 1
Storage Room Organizer for Levelled Literacy Programs
Assembly Guide
LLS300 2019 Rev A
Check out our other products online at
www.copernicused.com
ŸThis product is meant to be assembled by an adult.
ŸIn its unassembled state, small parts present a hazard.
ŸTo be used under direct supervision of an adult.
WARNING
For assistance, please contact us:
1-800-267-8494
Email [email protected]
Have your packing slip ready for reference
LLS300
Assemble your Storage Room Organizer to suit your individual space!
OR
Assembly Option A:
Full Height Version
Steps 1A-7A
Starting on page 5
Assembly Option B:
Half Height Version
Steps 1B-7B
Starting on page 13

LLS300 - Version A - December 9, 2019 - Copernicus Educational Products Inc.
Table of Contents
Tips for Assembly................................................................................................3
Frequently Asked Questions...............................................................................3
Part Lists.............................................................................................................4
Assemble the Storage Room Organizer - Full....................................................5
Assemble the Storage Room Organizer - Half Height......................................13
To validate your five year frame & lifetime tub warranty, submit the ON-LINE form at
www.copernicused.com. Enter a draw to win a Copernicus Product for your
classroom at the same time!
Validate Your Warranty
5
Warranty
Year
Frame
Life
Warranty
Time
Tub
2
Storage Room Organizer for Levelled Literacy Programs
ŸThis product is meant to be assembled by an adult.
ŸIn its unassembled state, small parts present a hazard.
ŸTo be used under direct supervision of an adult.
WARNING
For assistance, please contact us:
1-800-267-8494
Email [email protected]
Have your packing slip ready for reference
LLS300
Assembly Guide
LLS300 2019 Rev A
Check out our other products online at
www.copernicused.com

LLS300 - Version A - December 9, 2019 - Copernicus Educational Products Inc.
For missing parts and other issues regarding the frame:
Please call Copernicus Customer Service, where we will be happy to help.
1-800-267-8494. Monday - Friday 8:00am - 4:30 pm EST.
Customer Service - FAQ’s
?
?
?
XXX
lThis symbol denotes a 2 Person Task. For safety, please ensure that there are two people
working on steps displaying this symbol.
lWatch for this symbol throughout the Assembly Instructions. Wherever you see it, pay close
attention. The symbol denotes a step needing extra attention to ensure it is done correctly.
lThe Star symbol highlights an advisory note
Tips for Assembly - Using this Manual
2 Person
Watch for These Helpful Symbols
Before You Begin
As You Assemble the Unit
lLayout and identify all of the included parts
lThe hardware has been packed according to size, separate them based on those sizes
lRead the assembly instructions over once to familiarize yourself with them
lPlease note that in its unassembled state, this product contains parts that can be a hazard
to small children; it should be assembled by an adult.
lFollow the steps in sequence
lBefore beginning each step, find the part(s) that you need for that step
lPay attention to the labeling on the parts, they are there to help direct you at certain stages
lThe title of each step states what you will be doing. Review the text and the pictures as you
build the unit.
After Assembly; Before Use
lRemove the plastic film from the Whiteboard before writing on it
lClean the Whiteboard surface well with soapy water and then rinse clean
“The beautiful thing about learning is that no one can take it away from you.” - B. B. King
3
LLS300 - Version A - December 9, 2019 - Copernicus Educational Products Inc.
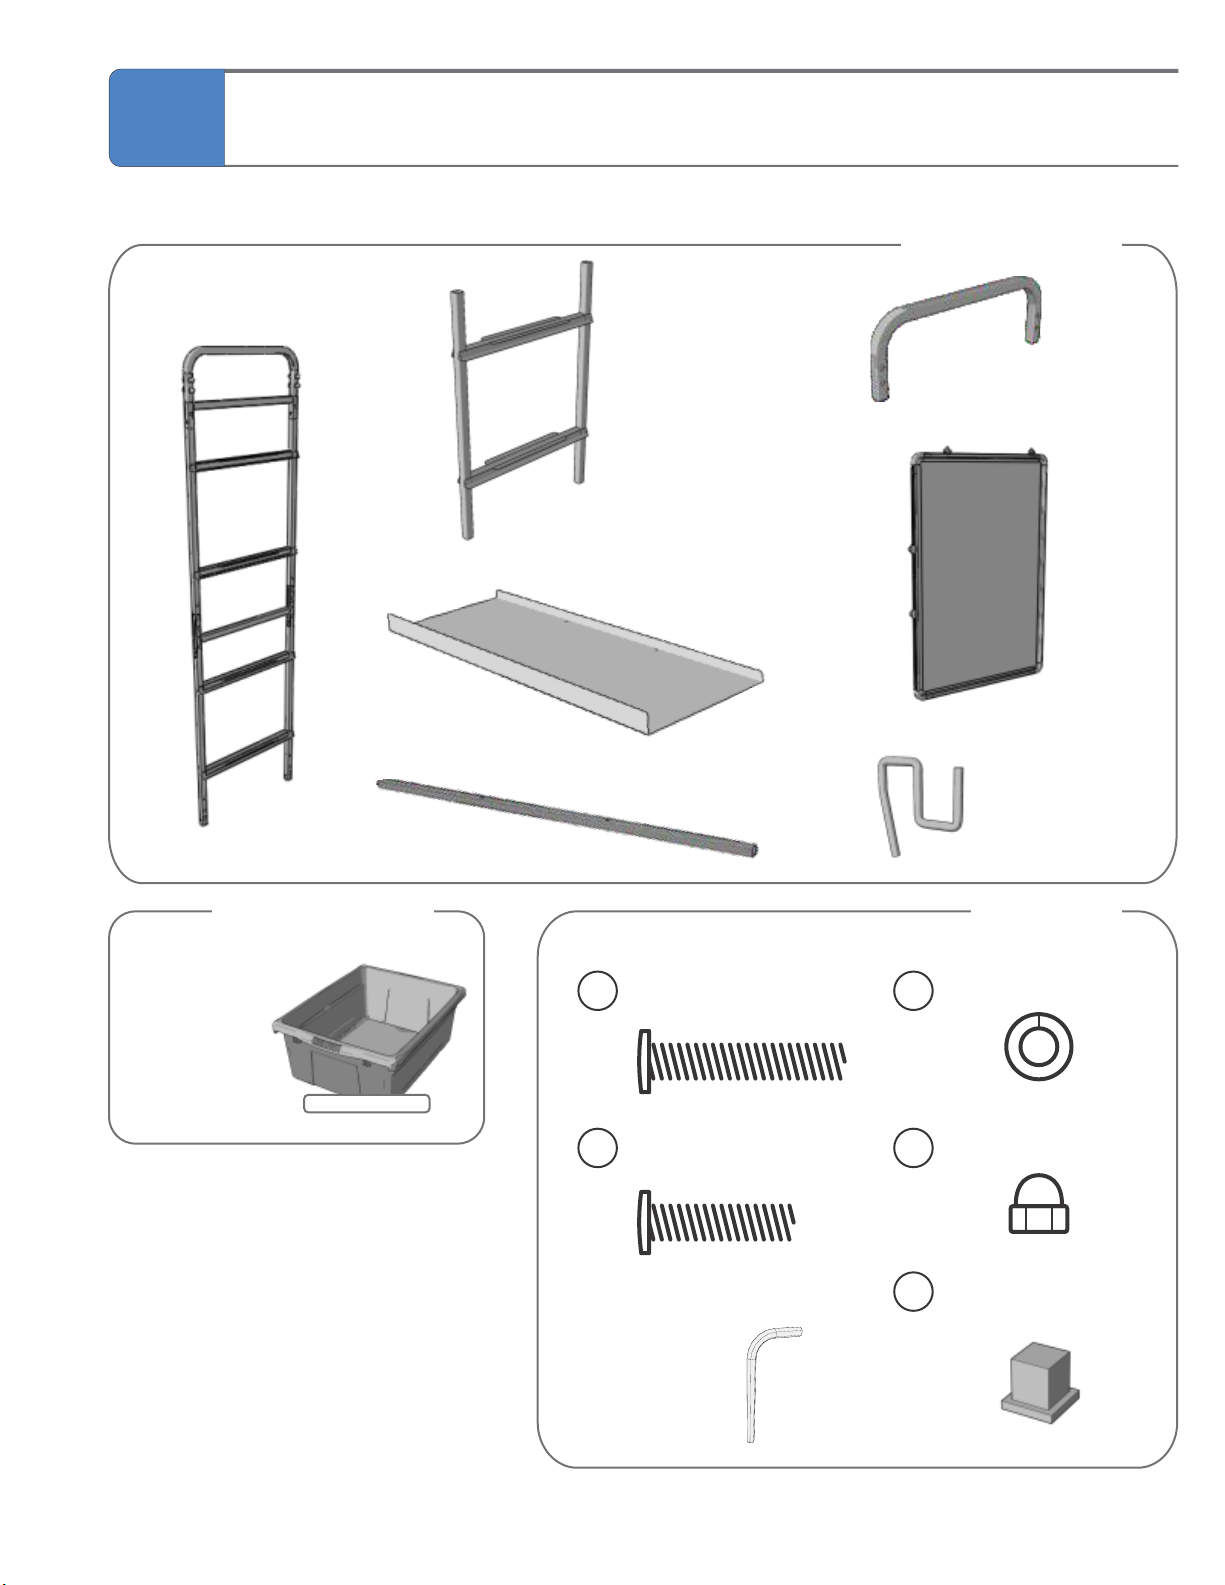
Contents - Box 1
Pre-Assembled
End Frame
2x
Before beginning, you should have:
Storage Room Organizer for Levelled Literacy Programs
Developed in Partnership with Fountas & Pinnell
Middle
Frame
4x
Stretcher
8x
Top
Shelf
1x
Contents - Box 2
Open
Tub
12x
Colours may vary
Side
Whiteboard
1x
Hardware
(Actual Size)
M6 x 35mm bolt
32x
AM6 lock washer
48x
D
Glide
8x
Not to Scale
F
Accessory
Hooks
2x
LLS300
Assembly Wrench
1x
Not To Scale
M6 acorn nut
16x
EM6 x 25mm bolt
16x
C
4
End Cap
2x
10 lbs Weight Limit

LLS300 - Version A - December 9, 2019 - Copernicus Educational Products Inc. 5
Storage Room Organizer for Levelled Literacy Programs
Developed in Partnership with Fountas & Pinnell
LLS300
!THIS FURNITURE MUST BE
SECURED TO THE WALL
Match the fastener to the wall material.
Do not open more than one drawer at a
time to prevent unit from toppling over.
Assembly Option A:
Full Height Version
Steps 1A-7A
Starting on page 5
LLS300 - Version A - December 9, 2019 - Copernicus Educational Products Inc.
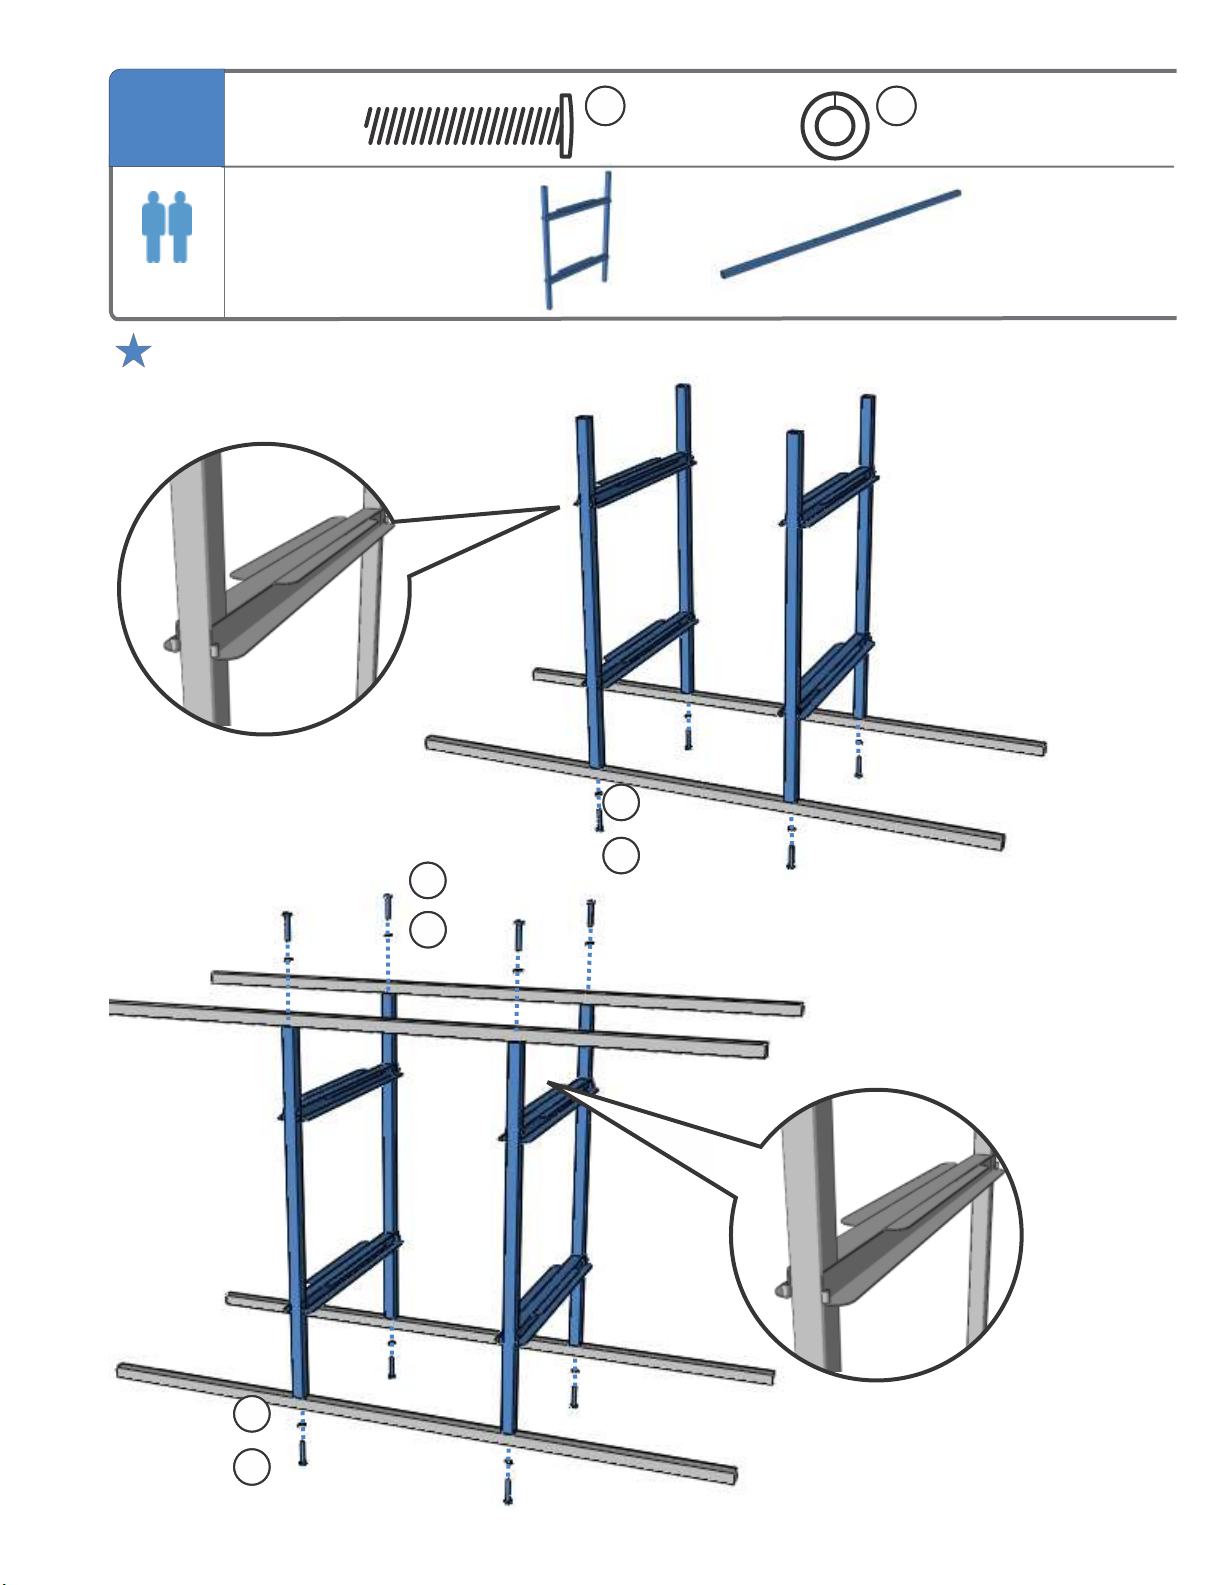
Build Middle Section
You will need: (not to scale)
ASSEMBLY OPTION A - FULL HEIGHT UNIT
1A Actual Size:
12x 12x
Middle Frame x 4
AA
Stretcher x 6
CD
AA
AA
D
D
2-Person Task
Note orientation of
channel when installing
middle frames.
Note orientation of
channel when installing
middle frames.
!
!
TIGHTEN FIRMLY
AA
D
x1
x1
6
(Upper Frame)
(Lower Frame)

LLS300 - Version A - December 9, 2019 - Copernicus Educational Products Inc.
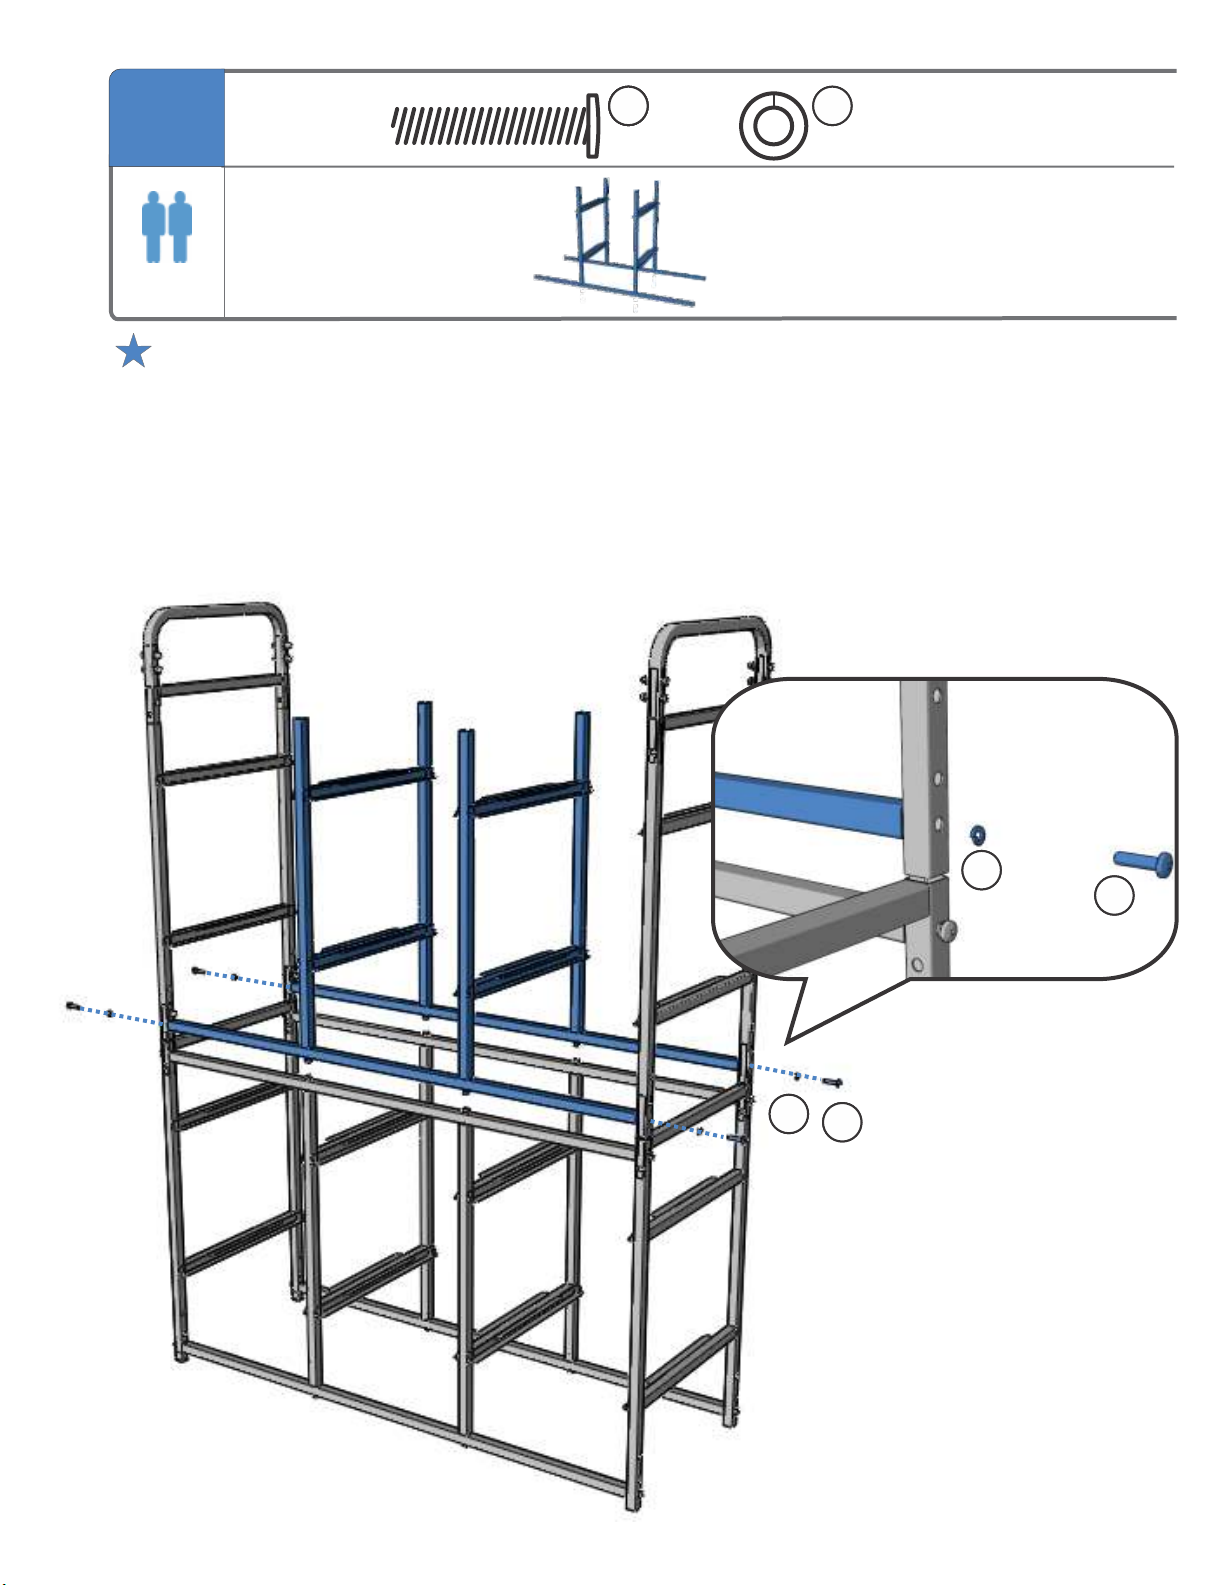
Build Bottom Half of Frame
You will need: (not to scale)
ASSEMBLY OPTION A - FULL HEIGHT UNIT
2A Actual Size:
8x 16x
AA
Pre-assembled End Frame x 2
CD
!Note orientation of channels
on end frames - they should
be facing inwards.
2-Person Task
7
Fit the lower middle frame built in the previous step
in between end frames.
CDE
Press Glide firmly
into the feet of the
unit. Use a rubber
mallet to tap in if
necessary.
Use lowest
hole to install
middle frame
stretchers
1
3
3
2
8x 8x
E
C
Glide x 4
AA
AA
AD
AD
LLS300 - Version A - December 9, 2019 - Copernicus Educational Products Inc.
Attach Upper Middle Frame to End Frames
You will need: (not to scale)
ASSEMBLY OPTION A - FULL HEIGHT UNIT
3A
Fit the upper frame built in the Step 1A in between both end frames.
4x
A
4x
CA D
2-Person Task
Use lowest
hole
to install
stretchers.
Actual Size:
AA
AA
AD
8
!
AA
AD
Upper Frame (Step 1A) x 1

LLS300 - Version A - December 9, 2019 - Copernicus Educational Products Inc.
Install Top Stretchers & Secure End Frames
You will need: (not to scale)
ASSEMBLY OPTION A - FULL HEIGHT UNIT
4A
4x
A
A
4x
E
Stretcher x 2
2-Person Task
4x
C
9
Actual Size:
C
D
8x
A
D
CE
E
E
E
AA
A
C
C
C
D
D
D
D
D
D
D

LLS300 - Version A - December 9, 2019 - Copernicus Educational Products Inc.
!THIS FURNITURE MUST BE
SECURED TO THE WALL
USE PROPER HARDWARE DEPENDING
ON WALL MATERIAL.
Do not open more than one drawer at a
time to prevent unit from toppling over.
This is the time to secure furniture to the wall
You will need: (not to scale)
ASSEMBLY OPTION A - FULL HEIGHT UNIT
5A Actual Size:
4x
A
4x
D
Top Shelf x 1
A
D
Install Top Shelf TIP - the higher edge is the
FRONT of the unit.
You can use lettering to label
the unit if desired (not included).
2
1
10
A
D
D
D
A
A
Table of contents
Other Copernicus Organizer manuals


