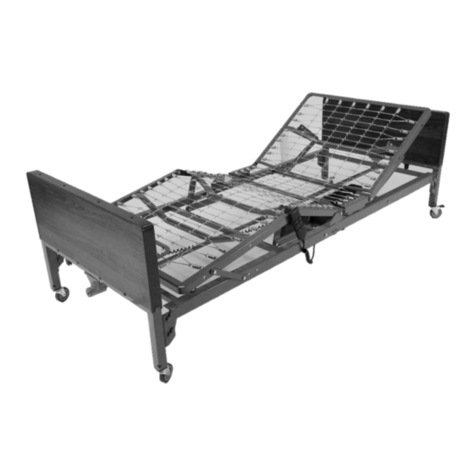
Costcare Bariatric B142C User manual

B142C
Full Electric Home Care Bed
Bariatric
User Manual
DEALERS: This manual MUST be given to the user of the bed.
USER: Before using this bed, read this manual and save for future reference.

1
Table of Contents
1.0 GENERAL WARNINGS .........................................................................................................................2
1.1 ASSEMBLING THE BED ....................................................................................................................................2
1.2 OPERATING THE BED......................................................................................................................................2
1.3 PERFORMING MAINTENANCE ..........................................................................................................................2
1.4 ELECTRICAL AND EARTHING .............................................................................................................................3
1.5 DISPOSAL.....................................................................................................................................................3
1.6 RADIO FREQUENCY INTERFERENCE....................................................................................................................3
2.0 EQUIPMENT ASSEMBLY......................................................................................................................4
2.1 UNPACKING THE BED .....................................................................................................................................4
2.2 ASSEMBLING THE BED ....................................................................................................................................5
3.0 EQUIPMENT OPERATION ...................................................................................................................9
3.1 USING THE HAND CONTROL PENDANT...............................................................................................................9
3.2 USING THE MANUAL HAND CRANK...................................................................................................................9
4.0 PREVENTATIVE MAINTENANCE ........................................................................................................10
5.0 TROUBLESHOOTING GUIDE..............................................................................................................11
6.0 LIMITED WARRANTY ........................................................................................................................12
APPENDIX –SERVICE RECORD........................................................................................................................13

2
1.0 GENERAL WARNINGS
1.1 Assembling the Bed
DO NOT overtighten the mounting hardware as this will damage the mounting
brackets.
DO NOT modify this equipment without authorization of the manufacturer. Doing so
will void the warranty.
DO NOT use accessories that are not designed or approved for use with the bed.
1.2 Operating the Bed
DO NOT operate your bed until it is fully assembled and checked.
DO NOT exceed maximum weight limitation of the bed. The maximum safe working
load (SWL) of the bed is 600 lbs. The maximum patient weight is 550 lbs.
ALWAYS make sure the power cable is clear of any moving parts of the bed before
switching on the power.
ALWAYS keep hands and fingers away from moving parts to avoid injury.
ONLY use appropriate mattresses and ALWAYS adjust the mattress retainer system
accordingly to ensure the mattress is fixed in place.
The mattress platform shall be kept in a flat position if the patient’s condition could
lead to patient entrapment.
ALWAYS keep the bed at the lowest position when the patient is unattended.
1.3 Performing Maintenance
ONLY qualified personnel should carry out the bed maintenance.
DO NOT attempt to open the pre-sealed actuator or obtain local service, for it will
VOID the warranty and might result in damage. Consult your dealer or manufacturer
for further information.
Inspect the casters every six months to check for tightness and wear.

3
Regular maintenance of bed and accessories is necessary to ensure proper operation.
DO NOT overtighten mounting hardware. This will damage mounting brackets.
1.4 Electrical and Earthing
EARTHING
DO NOT, under any circumstances, cut or remove the earthing prong from any plug.
Some devices are equipped with three-prong (earthing) plugs for protection against
possible shock hazards. Where a two-prong wall receptacle is encountered, it is the
personal responsibility and obligation of the customer to contact a qualified electrician
and have the two-prong receptacle replaced with a properly earthed three-prong wall
receptacle in accordance with the regional and national regulations. If you must use
an extension cable, use ONLY a three-wire extension cable having the same or higher
electrical rating as the device being connected.
DO NOT use if the power cable is cut, frayed or loosely connected to the device. Power
supply cable may be damaged by inappropriate handling, e.g. by kinking, shearing or
other mechanical damages. The POWER SUPPLY CABLE is only replaceable by SERVICE
PERSONNEL.
1.5 Disposal
This product has been supplied from an environmentally aware manufacturer.
This product may contain substances that could be harmful to the environment if
disposed of in places (landfills) that are not appropriate according to legislation.
Please be environmentally responsible and recycle this product through your recycling
facility at its end of life.
1.6 Radio Frequency Interference
Most electronic equipment is influenced by Radio Frequency Interference (RFI).
CAUTION should be exercised with regard to the use of portable communication
equipment in the area around such equipment. If RFI causes erratic behavior, switch
the power OFF IMMEDIATELY. DO NOT turn the Power Switch ON while transmission
is in progress.

4
2.0 EQUIPMENT ASSEMBLY
2.1 Unpacking the Bed
1. Unpack the components from the shipping cartons.
2. Upon unpacking your bed, the package should contain all of the following
components:
1 Instruction Manual
1 Foot board
1 Head board
1 Foot frame section
1 Head frame section
1 Hi-Lo motor (Pre-assembled)
1 Length adjustable drive shaft
1 Backrest motor (Pre-assembled)
1 Head drive shaft
1 Knee-break motor (Pre-assembled)
4 Locking castors
1 Hand pendant
3. Examine exterior of the bed components for nicks, dents, scratches or damages.
Foot Frame
with motors
Foot Board
Drive Shafts
4 Casters
Head Frame
Head Board
Hand Crank

5
2.2 Assembling the Bed
2.2.1 Connecting the Two Frames
1. Place both frames on its sides at approximately 90° to one another.
2. Hook the head frame mounting hooks to the foot frame mounting rivets.
3. Straighten the connected frames.
2.2.2 Installing the Head Drive Shaft
1. Align the one end of the head extension shaft with the drive tube on the motor
secure the extension shaft to the tube with cotter pin.
2. Connect the other end of the extension shaft with the pivot bracket on the head
deck.
3. After the head drive shaft is connected, slowly lay the frame on the floor. Make
sure the hooks remain engaged on the rivets at all times.
Head Frame
Foot Frame

6
2.2.3 Installing the Casters to the Head and Foot Boards
1. Insert the shaft of the caster into the caster socket of each bed leg. Ensure the
stem is fully inserted into the socket.
2. To prevent excess movement of the bed during assembly, lock the casters by
pushing down on the caster lock.
3. To unlock the casters, pull up on the caster lock.
2.2.4 Installing the Head and Foot Boards
1. Stand the headboard section as close to the head frame as possible. Ensure the
board and frame are paired correctly using the label on the boards.
2. Lift the head frame and hook the rivets onto the head board. Do not place your
hand between the frame and the head board when joining the two pieces
together.
3. Repeat the previous steps for foot board installation.
4. Insert a clevis pin through the hole between the two rivets at each corner to
securely lock the frame and bed ends together. Secure the pin with an R-clip.

7
2.2.5 Installing the Frame Support
1. Remove the zip ties holding the frame support bracket assembly.
2. Attach the center vertical support bracket to the bed using the nut and bolt
supplied. Place a washer between the support bracket and the bed.
3. Connect the 2 diagonal support brackets (one from the head deck and one from
the foot deck) to the center vertical support bracket using the nut, washers and
bolt supplied.
4. Repeat the procedure on the other side of the bed.

8
2.2.6 Installing the Hi/Low Motor
1. The Hi-Low motor is pre-installed on the bed. Make sure the slot on the Hi/Low
Motor engages the roll pin on the gearbox axle.
2.2.7 Installing the Center Drive Shaft
1. Extend the drive shaft until it locks on to the indicated hole on the outer tube.
2. Attach one end of the drive shaft to the heard board gearbox.
3. Attach the other end to the Hi/Low Motor under the foot deck.

9
3.0 EQUIPMENT OPERATION
3.1 Using the Hand Control Pendant
The UP arrow ( ) indicates raising the corresponding parts of
the bed.
The DOWN arrow ( ) indicates lowering the corresponding parts
of the bed.
3.2 Using the Manual Hand Crank
In the event of power outage or motor disfunction, use the hand crank to lower
raise/lower the bed.
Identify the section you wish to raise/lower, attach the hand crank to the exposed end
of the motor shaft under the foot section of the bed. Rotate clockwise or counter
clockwise to lower the bed/section.

10
4.0 PREVENTATIVE MAINTENANCE
A. Cleaning –It is recommended that the following cleaning procedures be conducted
between uses and at least once a year.
1.1. Unplug the power code of electric beds before performing maintenance.
1.2. Wipe down with disinfectant. Allow to dry completely.
CAUTION: Avoid spraying water directly into the electric components to avoid damage.
B. Mechanical Inspection and Maintenance:
2.1. Inspect all bed components for damage or excessive wear.
2.2. Inspect all mounting hardware for bending, damage or excessive wear.
2.3. Inspect all bolts and rivets to ensure that they are securely tightened and
functioning properly.
2.4. Inspect caster wheels to ensure they roll properly.
C. Electrical Inspection and Maintenance:
3.1. Inspect all electrical components for damage or excessive wear.
3.2. Check pendent, power code and motor cables for chafing, cuts or excessive wear.
3.3. Make sure all of plugs are fully attached and free of damage.
3.4. Check all functions working properly.
D. To Maximize Services Life –To ensure maximum life of your bed, follow all of warning
and cautions in the User Manual and maintain your bed with care –a thorough
inspection should be conducted as follow:
4.1. Run the bed frame to either the highest or lowest position once a day.
4.2. Observe bed operation and report any discrepancies or problems to service
personnel.
4.3. Check and tighten all tubes and mounting hardware monthly.
4.4. Check and tighten all electric wires and cables are properly connected monthly.
4.5. Lubricate pivot point, pins and bolts every 2 months.
WARNING: Possible Shock Hazard. All electric components to ONLY be replaced by service
personnel.

11
5.0 TROUBLESHOOTING GUIDE
SYMPTOMS
POSSIBLE FAULTS
POSSIBLE SOLUTIONS
Bed idle when hand pendant
buttons are pressed.
Adjustment may be at the
maximum or minimum
position
Power cord not connected or
damaged
Hand pendant or actuator
connectors are loose
Load is too heavy
Check if other buttons are
working.
Ensure the power cord is
properly connected to the
electrical socket and the bed.
Ensure tight connection of all
connectors to control box.
Ensure the load weight is
within the designated
capacity. Reduce the load.
Casters/Brakes noisy or stiff.
Debris or fluff in bearings
Clean or replace casters.
Noisy or dry sound from
pivots.
Needs lubrication.
Lubricate your bed.
Unusual noise from actuator.
Actuator is worn or damaged
or spindle is bent.
Replace the actuator. Contact
your supplier.
If problems persist following the above remedial procedures, please contact your dealer or
the manufacturer.

12
6.0 LIMITED WARRANTY
This Costcare product is warranted to be free of defects in material and workmanship
for one year of the original purchaser.
This device was built to exact standards and carefully inspected prior to shipment. This
Limited One Year Warranty from the date of original purchase is an expression of our
confidence in the material and workmanship of our products and our assurance to our
customers for years of dependable services.
In the event of a defect covered by this warranty, Costcare will, at Costcare's option,
repair or replace the device. The warranty provides only for replacement of defective
parts and does not cover shipping and labor charges. Costcare's sole obligation and
your exclusive remedy under this warranty are limited to such repair and/or
replacement.
This warranty does not cover device failure due to the user misuse, abuse, negligence,
or normal wear and tear. This warranty does not extend to non- durable components,
such as rubber accessories, casters and grips, which are subject to normal wear and
require periodic replacement.
This warranty shall not apply to serial numbered devices if the serial number has been
removed, or altered, or defaced, or to defect or damages caused by unauthorized
parts, attachments or repairs, negligence, operated by incorrect voltages, accident
and circumstance beyond Costcare's control, or improper operation, maintenance or
storage.
If you have a question regarding your Costcare device or this warranty, please contact
an authorized Costcare Dealer.
www.costcaremed.com
1-714-349-8331

13
APPENDIX –SERVICE RECORD
DATE
PERFORMED BY
CONDITION REPORT
Table of contents
Other Costcare Indoor Furnishing manuals
Popular Indoor Furnishing manuals by other brands

Regency
Regency LWMS3015 Assembly instructions

Furniture of America
Furniture of America CM7751C Assembly instructions

Safavieh Furniture
Safavieh Furniture Estella CNS5731 manual

PLACES OF STYLE
PLACES OF STYLE Ovalfuss Assembly instruction

Trasman
Trasman 1138 Bo1 Assembly manual

Costway
Costway JV10856 manual