Cox Business 3848 User manual

Cox Business Internet Gateway 3848
User Guide

©2020 by Cox Communications, Inc.
All rights reserved. No part of this document may be reproduced or transmitted in any form or by any means,
electronic, mechanical, photocopying, recording, or otherwise, without prior written permission of Cox
Communications.
0120

Table of Contents
i
Table of Contents
Overview of the 3848 Wireless Gateway ................................................................................ 1
Front Panel Description .........................................................................................................2
Back Panel.............................................................................................................................................................3
Top Panel Description............................................................................................................4
Installing the DOCSIS 3.0 3848 Gateway ................................................................................ 5
Install the Wireless Gateway..................................................................................................5
Connect Devices to the Wireless Gateway.........................................................................................................5
Connect the Wireless Gateway............................................................................................................................6
Operation of Front Panel Indicators ......................................................................................7
Initial Power On, Calibration, and Registration (AC Power applied) ...................................7
Normal Operations (AC Power Applied) ...............................................................................8
Special Conditions .................................................................................................................9
Web Access.............................................................................................................................10
Login......................................................................................................................................10
LAN Provisioning....................................................................................................................11
User Settings for LAN ..........................................................................................................11
DDNS Feature .......................................................................................................................13
WLAN Provisioning.................................................................................................................14
WiFi Protected Setup............................................................................................................14
User Provisioning for Basic Setup ........................................................................................15
WPS .......................................................................................................................................15
Radio Settings ......................................................................................................................16
Scan Button......................................................................................................................................................... 18
WiFi Disabled View .............................................................................................................................................18
Guest Network.........................................................................................................................19
User Provisioning for Guest Network .................................................................................19
Terms of Use.........................................................................................................................21
Advanced Wireless Settings / Provisioning..........................................................................22
User Provisioning for Advanced Wireless Settings ...........................................................22
WiFi - QoS Settings.................................................................................................................24
User Provisioning for QoS ...................................................................................................24

Table of Contents
ii
Wireless Security Settings .....................................................................................................25
User Provisioning for Wireless Security.............................................................................25
Wireless Security Modes......................................................................................................26
WAN Provisioning...................................................................................................................30
User Provisioning for WAN..................................................................................................30
Provisioning WAN IP through DHCP.................................................................................................................30
Provisioning with Static IP .................................................................................................................................32
MTU Size Feature ................................................................................................................................................33
Bridge Mode Provisioning......................................................................................................35
User Provisioning for Bridge Mode.....................................................................................35
Mixed Mode Provisioning .......................................................................................................36
Email Alert Provisioning.........................................................................................................37
User Provisioning for Email Alert........................................................................................37
Administration, Diagnostic, Maintenance Tools...................................................................39
Backup and Restore .............................................................................................................39
User Provisioning for Backup and Restore......................................................................................................39
Configure Gateway Settings in Cox Business MyAccount .............................................................................40
Defaulting to Factory Settings .............................................................................................44
User Provisioning ...............................................................................................................................................44
Restarting the Device ...........................................................................................................45
User Provisioning ...............................................................................................................................................45
Status Pages .........................................................................................................................45
Gateway Status ...................................................................................................................................................45
Internet Connection ............................................................................................................................................45
Local Network Status .........................................................................................................................................45
Wireless Status ...................................................................................................................................................45
DOCSIS WAN.......................................................................................................................................................45
Channel Selection...............................................................................................................................................45
Security....................................................................................................................................47
Firewall Basic Settings.........................................................................................................48
User Provisioning ...............................................................................................................................................48
VPN Passthrough Settings ..................................................................................................51
User Provisioning ...............................................................................................................................................51
VPN Tunnel Settings ............................................................................................................52

Table of Contents
iii
User Provisioning ...............................................................................................................................................52
Network Control and Advanced Security ..............................................................................57
User Provisioning Advanced Security ................................................................................57
IP Filtering ...........................................................................................................................................................57
MAC Filtering.......................................................................................................................................................57
Managed Devices................................................................................................................................................58
Port Filtering........................................................................................................................................................59
NAT Features ........................................................................................................................59
Port Range Forwarding ......................................................................................................................................59
Port Forwarding Example...................................................................................................................................60
Port Range Triggering ........................................................................................................................................62
DMZ Hosting Feature..........................................................................................................................................63
Network/Parental Control .......................................................................................................64
Basic Rules ...........................................................................................................................64
Parental Control Functions..................................................................................................65
Parental Control Log ..........................................................................................................................................66
Status Pages .........................................................................................................................66
Log Pages .............................................................................................................................66
Troubleshooting the DOCSIS 3.0 3848 Gateway...................................................................67
Frequently Asked Questions ...............................................................................................67
How Do I Configure TCP/IP Protocol?...............................................................................................................67
How Do I Renew the IP Address on My PC?.....................................................................................................69
Common Troubleshooting Issues .......................................................................................70
Tips for Improved Performance...........................................................................................71
Support....................................................................................................................................72
Remote Support: In Scope...................................................................................................72
Remote Support: Out of Scope............................................................................................72
Contact Us.............................................................................................................................72

Overview of the 3848 Wireless Gateway
Cox Business Internet Gateway 3848 User Guide 1
Overview of the 3848 Wireless Gateway
The Technicolor Model DPC3848VE DOCSIS 3.0 Wireless Gateway is a high-performance
Gateway that combines a cable modem, router, and wireless access point in a single device.
This guide provides instructions and recommendations for placing, installing, configuring,
operating, maintaining, and troubleshooting the 3848 Gateway.
The software’s Graphical User Interface (GUI) gives you access to settings that were configured
at the factory or by Cox Business for the most common installation configurations. After you
access the GUI, you can customize these settings for your business needs.
Important: If you are not familiar with the network configuration
procedures described in this guide, contact your IT professional before
you change any settings. Cox is not responsible for customer impacting
network or security issues.
Gateway equipment remains property of Cox and must be returned upon service termination to avoid additional charges. Coverage
area and signal strength vary and may be affected by building construction, topography, layout, and other factors. Maximum
simultaneous user limitations may apply for optimal performance. Speeds not guaranteed. “Cox” may not be used in customer SSID
naming convention. Services not available in all areas. Cox cannot guarantee your network’s security against all forms of
unauthorized network access. Other restrictions apply. For additional details, visit www.coxbusiness.com

Overview of the 3848 Wireless Gateway
Cox Business Internet Gateway 3848 User Guide 2
Front Panel Description
The front panel of your Gateway provides LED status indicators that indicate how well—and at
what state—your Gateway is operating.
Figure 1. Front Panel of DPC3848VE
POWER—ON: power is applied to the Gateway
DS—ON: the Gateway is receiving data from the cable network
US—ON: the Gateway is sending data to the cable network
ONLINE—ON: the Gateway is registered on the network and fully operational
WIFI 2.4G—ON: the wireless access point is operational. Blinking indicates that data is
being transferred over the wireless connection. OFF indicates that the wireless access
point is not enabled
WIFI 5G—ON: the wireless access point is operational. Blinking indicates that data is
being transferred over the wireless connection. OFF indicates that the wireless access
point is not enabled
WPS—OFF (normal condition): indicates that the wireless setup is not active. Blinking
indicates the user has activated wireless setup to add new WPS clients on the wireless
network

Overview of the 3848 Wireless Gateway
Cox Business Internet Gateway 3848 User Guide 3
Back Panel
The following illustration identifies the back panel components on the Gateway. Descriptions for
each component follow the illustration.
Figure 2. Back Panel of DPC3848VE
Important: Do not connect your PC to both the Ethernet and USB ports at the
same time. Your Gateway will not function properly if both the Ethernet and USB
ports are connected to your PC at the same time.
USB (Optional for some models)—Connects to selected devices. For models
that support USB, the default is one USB port.
ETHERNET—Four RJ-45 Ethernet ports connect to the Ethernet port on your
PC or your network.
RESET—A momentary pressing (1-2 seconds) of this button performs a
software reset the device. Pressing and holding the button for more than ten
seconds first causes a reset-to-factory-default of all settings and then performs a
software reset of the device.
Caution: The RESET
button is for maintenance purposes only. I
click it, you may lose any settings you have selected. We recomm
that you contact Cox Technical Support for assistance.

Overview of the 3848 Wireless Gateway
Cox Business Internet Gateway 3848 User Guide 4
WIFI ON/OFF—This button may be administratively disabled by Cox Business.
When this button is enabled, momentarily pressing this switch once for 1 to 2
seconds will turn off the 2.4G transmitter when both Wi-Fi transmitters are on.
Momentarily pressing it a second time turns off the 5G transmitter. Momentarily
pressing it a third time turns on both the 2.4G and 5G transmitters.
CABLE—F-connector links to an active cable signal from the Cox Technical
team.
DC IN—Connects the Gateway to the external power supply.
Top Panel Description
The WPS button on the top panel of the Gateway shows the status of the Wireless Protected
Setup (WPS) and Page features.
Figure 3. Top Panel of DPC3848VE
WIRELESS SETUP Button—Press this button to activate the Wireless Setup
feature. This feature allows users to add new Wireless Protected Setup (WPS)
compliant wireless clients to the network.
Installing the DOCSIS 3.0 3848 Gateway
Cox Business Internet Gateway 3848 User Guide 5
Installing the DOCSIS 3.0 3848 Gateway
This chapter describes how to properly install the Gateway and connect the Gateway to a
computer and other devices.
Install the Wireless Gateway
This section describes how to connect your Gateway to support the services that the Gateway
offers.
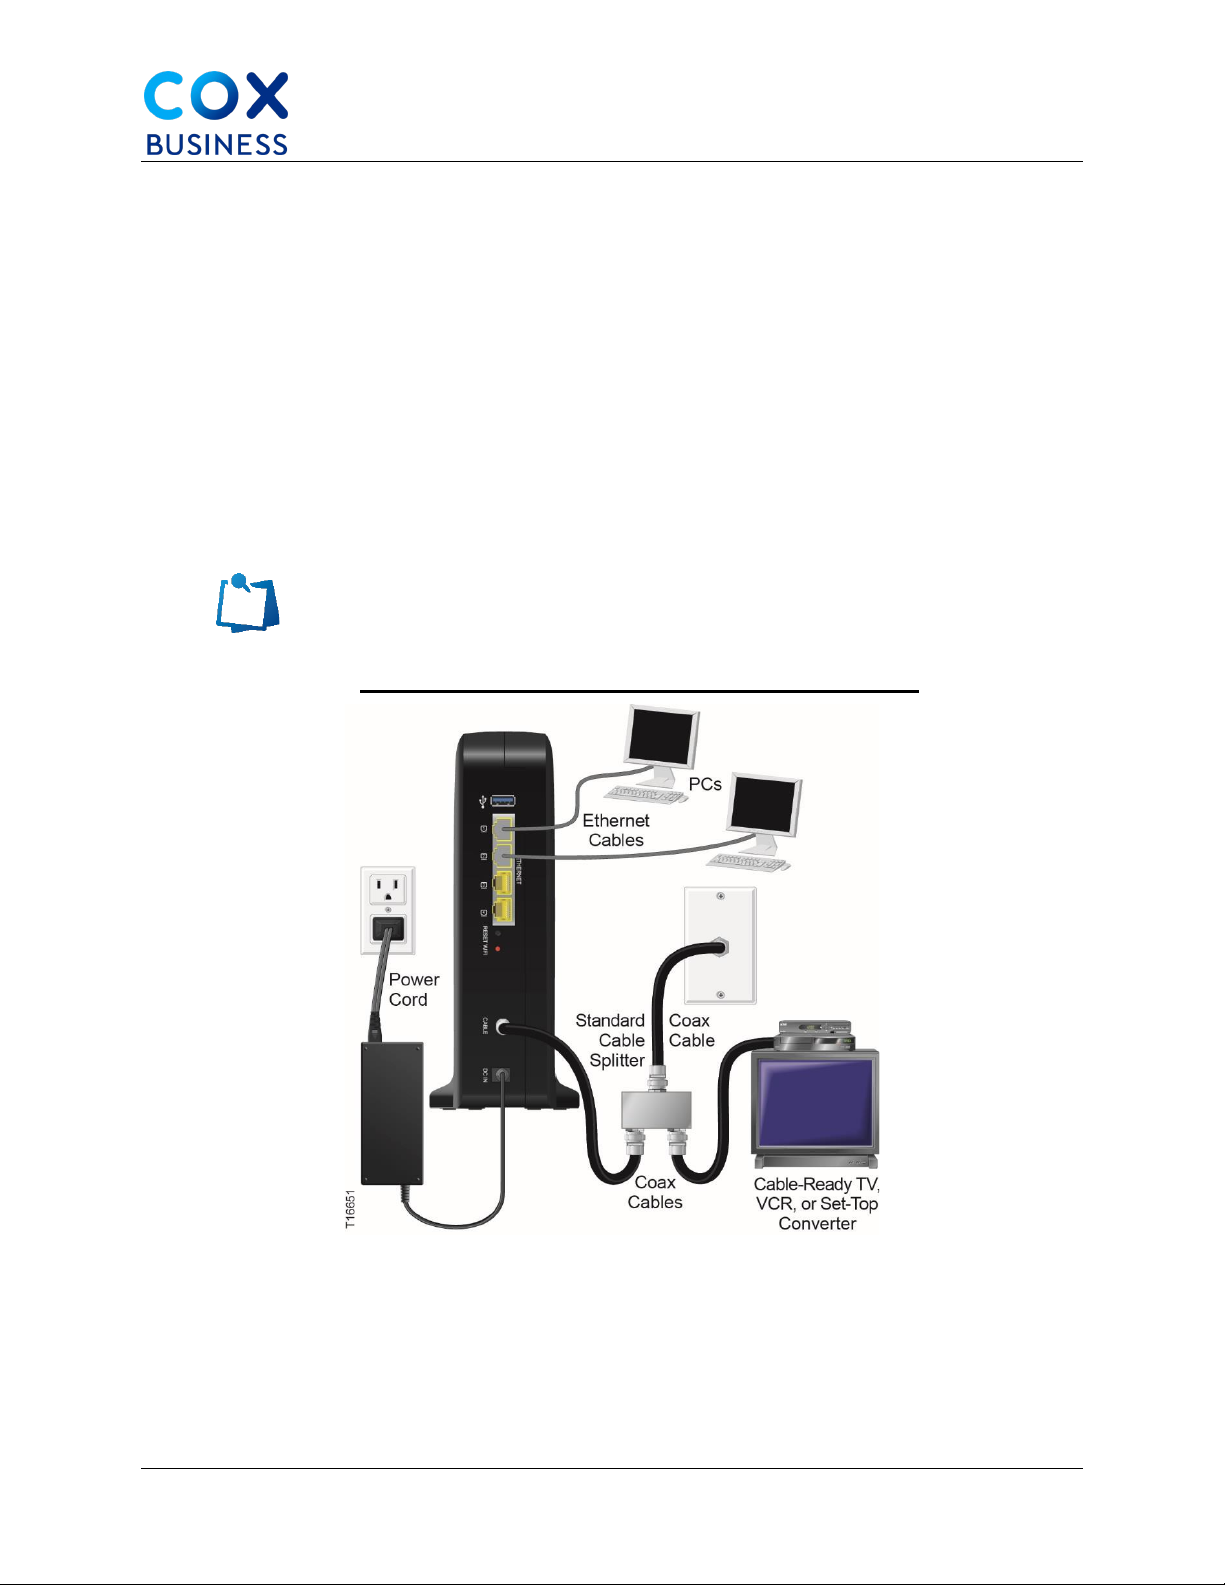
Connect Devices to the Wireless Gateway
The following illustration shows all of the possible connections that can be made to your
Gateway for various services. Although your model may not support all the services pictured,
you can determine which services your model supports by referring to the list.
Note: Professional installation may be available. Contact your local
service provider for further assistance. Device image varies according
to model.
Figure 4. Devices Connected to the Wireless Gateway (sample)

Installing the DOCSIS 3.0 3848 Gateway
Cox Business Internet Gateway 3848 User Guide 6
Connect the Wireless Gateway
The following installation procedure ensures proper setup and configuration for the Gateway.
Choose an appropriate and safe location to install the Gateway (close to a power
source, an active cable connection, your PC-if using high-speed Internet, and your
telephone lines-if using VoIP).
Caution: To avoid personal injury, follow the installation instructions in
the exact order shown. Wiring and connections must be properly
insulated to prevent electrical shock. Disconnect power from the
Gateway before attempting to connect to any device.
Power off your PC and other networking device; then, unplug them from the power
source.
Connect the active RF coaxial cable from the Cox Technical team to the coax
connector labeled CABLE on the back of the Gateway. (Note: To connect a TV,
DHCT, set-top, or VCR from the same cable connection, you will need to install a
cable signal splitter (not included). Always check with the Cox Technical team before
using a splitter as a splitter may degrade the signal.)
Connect your PC to the Gateway using one of the following methods:
•Ethernet Connection. Connect one end of an Ethernet cable to the Ethernet port on
your PC and connect the other end to the Ethernet port on the back of the Gateway.
•Wireless Connection. Make sure that your wireless device is powered up. You will
need to associate your wireless device with the Gateway once the Gateway is
operational. Follow the directions provided with your wireless device for associating
with a wireless access point. Make sure that either the 2.4G or the 5G indicator is
ON.
Locate the external power supply provided with your Gateway. Connect the barrel
connector end of the power cord into the DC power input on the back of the Gateway.
Then, plug the other end of the power supply cord into an AC outlet.
•The Gateway will perform an automatic search to locate and sign on to the
broadband data network. This process may take up to 2-5 minutes. The Gateway will
be ready for use when the Power, US/DS, and Online LEDs on the front panel of the
Gateway stop blinking and remain on continuously.
Plug in and power on your PC and other network devices. If one or more of these
devices uses wireless networking, the 2.4G or 5G LED on the Gateway should be on
or blinking.
At this point, the installation is complete, and you can use the Internet. (Note: If your
PC does not have Internet access, refer to How Do I Configure TCP/IP Protocol?.
Refer to the same section for Internet devices other than PCs.
Installing the DOCSIS 3.0 3848 Gateway
Cox Business Internet Gateway 3848 User Guide 7
Operation of Front Panel Indicators
This chapter describes the behavior of the front panel indicators when the Gateway is first
powered up, during normal operations, and in special conditions.
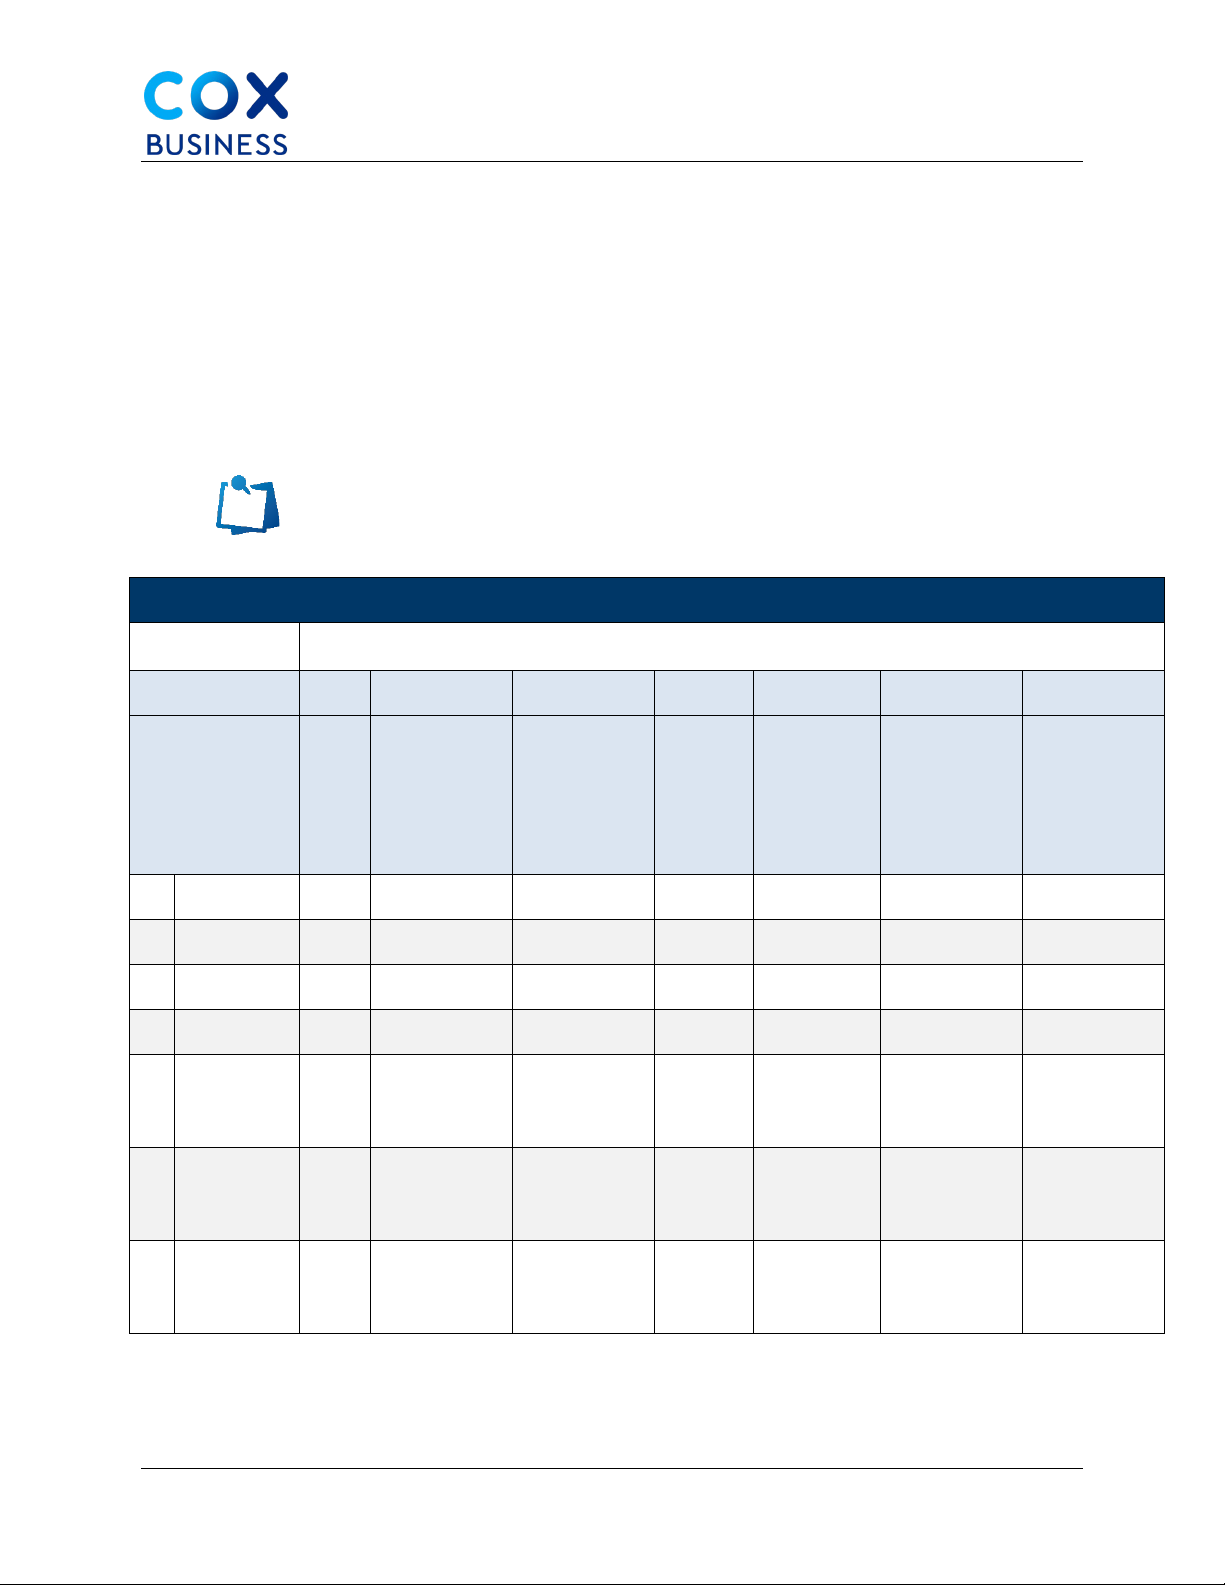
Initial Power On, Calibration, and Registration (AC Power applied)
The following chart illustrates the sequence of steps and the corresponding appearance of the
Gateway front panel LED status indicators during power up, calibration, and registration on the
network when AC power is applied to the Gateway. Use this chart to troubleshoot the power up,
calibration, and registration process of your Gateway.
Note: After the Gateway completes Step 7 (Data Network Registration
Complete), the Gateway proceeds immediately to Normal Operations.
Front Panel LED Status Indicators During Initial Power Up, Calibration, and Registration
Part 1, High Speed Data Registration
Step: 1 2 3 4 5 6 7
Front Panel
Indicator
Self-
Test
Downstream
Scan
Downstream
Signal Lock
Ranging
Requesting
IP Address
Request
High Speed
Data
Provisioning
File
Data
Network
Registration
Complete
1 POWER On On On On On On On
2 DS On Blinking On On On On On
3 US On Off Off Blinking On On On
4 ONLINE On Off Off Off Off Blinking On
6 2.4G On Blinking or
Fast Blinking
Blinking or
Fast Blinking
Blinking
or Fast
Blinking
Blinking or
Fast
Blinking
Blinking or
Fast Blinking
Blinking
7 5G On Blinking or
Fast Blinking
Blinking or
Fast Blinking
Blinking
or Fast
Blinking
Blinking or
Fast
Blinking
Blinking or
Fast Blinking
Blinking
8 WPS Off Off or
Blinking
Off or
Blinking
Off or
Blinking
Off or
Blinking
Off or
Blinking
Off

Installing the DOCSIS 3.0 3848 Gateway
Cox Business Internet Gateway 3848 User Guide 8
Normal Operations (AC Power Applied)
The data in the table below describes the appearance of the Gateway front panel LED status
indicators during normal operations when AC power is applied to the Gateway.
Front Panel LED Status Indicators During NORMAL Conditions
Front Panel Indicator Normal Operations
1 POWER On
2 DS On
3 US On
4 ONLINE On
6 WIFI 2.4G ▪Blinks - When the wireless access point is enabled and operational
▪Fast Blinks - When data is being transferred between the CPE and the
wireless Gateway
▪Off - When the wireless access point is disabled by the user
7 WIFI 5G ▪Blinks - When the wireless access point is enabled and operational
▪Fast Blinks - When data is being transferred between the CPE and the
wireless Gateway
▪Off - When the wireless access point is disabled by the user
8 WPS ▪Off - When wireless setup is not active
▪Blinks - When wireless setup is active to add new wireless clients on
the wireless network
Note: In addition to the status shown in the previous table, some
service providers use color-coded LEDs to indicate detailed channel
bonding and data link status. For additional information about color-
coded LEDs, contact Cox Technical Support.

Installing the DOCSIS 3.0 3848 Gateway
Cox Business Internet Gateway 3848 User Guide 9
Special Conditions
The data in the table below describes the appearance of the Gateway front panel LED status
indicators during special conditions when you have been denied network access.
Front Panel LED Status Indicators During SPECIAL CONDITIONS
Front Panel Indicator Network Access Denied
1 POWER On
2 DS Flashes in unison with the US indicator (twice per second)
3 US Flashes in unison with the DS indicator (twice per second)
4 ONLINE Off
6 WIFI 2.4G Slow Blinking (once per second)
7 WIFI 5G Slow Blinking (once per second)
8 WPS Slow Blinking (once per second)

Web Access
Cox Business Internet Gateway 3848 User Guide 10
Web Access
The default IP address of the Technicolor Gateway is 192.168.0.1. This URL should work when
your laptop is connected directly to the device. Be aware that the IP address may be different
from customer to customer.
Use the following steps to access the configuration web pages.
Obtain an IP address from the built-in DHCP server for the PC you are using to
connect the Technicolor Gateway.
Enter http://192.168.0.1 in your web browser address bar.
Login
Click the DOCSIS WAN tab and enter the User Name and Password. See Figure 5.
(Note: For a regular user, the default values are: <leave blank> (Username) and
<leave blank> (Password).
Figure 5. DOCSIS WAN screen

LAN Provisioning
Cox Business Internet Gateway 3848 User Guide 11
LAN Provisioning
User Settings for LAN
Click the Quick Setup tab to change your password and configure basic settings for the
Technicolor Gateway device. To verify connectivity, check the Status link.
The Wireless Network section in Figure 6 includes the minimum parameter settings to enable a
SSID.
Figure 6. Device Settings

LAN Provisioning
Cox Business Internet Gateway 3848 User Guide 12
Figure 7. Setup Tab / LAN Setup
Caution: Since the IP addresses are distributed (when the DHCP
server is enabled) to the CPEs connected to the Technicolor Gateway,
changes to the DHCP and LAN IP network settings will impact the
devices. This may require you to restart the DHCP service, restart or
re-provision the machine.
Click the Connected Devices Summary button to view a detailed table on the devices
that are connected behind the LAN interface. (Note: The modem may reboot when the
LAN IP address or Subnet mask is changed.)

LAN Provisioning
Cox Business Internet Gateway 3848 User Guide 13
DDNS Feature
Dynamic DNS (DDNS) allows a dynamic IP address to be aliased to a static, pre-defined host
name so that the host can be easily contacted by other hosts on the internet even if its IP
address changes. The Technicolor Gateway supports a dynamic DNS client compatible with the
Dynamic DNS service (http: //www.dyndns.com).
Since implementation of Dynamic DDNS the service has switched from a free service to a paid
service. A paid account is now required to use this feature.
Technicolor is evaluating other dynamic DNS options for future implementation.
Figure 8. Setup Tab / DDNS (User Settings)
Use the following steps to activate the DDNS client.
From the DynDNS website, create an account for the Dynamic DNS service.
Click the DDNS tab and enter a User Name and Password, as well as a Host Name
for your server.
Click the Save Settings button.
Enter the dynamic DNS domain to which your host will be assigned.
Enter the current IP address of the host. (Note: This is the WAN IP address that has
been assigned to your Technicolor Gateway during provisioning. It is located on the
Status tab / Gateway.)
Enter your account information on the Basic / DDNS webpage.
Enable the service by selecting www.DynDNS.oGateway from the DDNS Service
drop-down list, and click the Apply button.
Result: The DDNS client will notify the DDNS service whenever the WAN IP address
changes so that your chosen host name will be resolved properly by inquiring hosts.
The status of the service is shown at the bottom of the DDNS webpage.

WLAN Provisioning
Cox Business Internet Gateway 3848 User Guide 14
WLAN Provisioning
The Gateway serves as an 802.11 wireless access point (AP). When an 802.11 radio card is
installed, wireless configuration pages described below display in the Wireless tab.
This section contains configuration items required to get a wireless network up and running.
WiFi Protected Setup
WiFi Protected Setup (WPS) provides users a standardized way to set up a wireless local area
network (WLAN), enable security features, and add more devices to the network as your
business requires.
There are three ways to use WPS:
Push-Button Configuration (PBC) method
Press the WPSPBC buttons on the Gateway and client device simultaneously (within
60 seconds). The Technicolor Gateway provides two WPS PBC buttons.
HW button on the front panel and (2) SW button on the Gateway Web graphical user
interface . When you press the HW or SW PBC button, the WPS LED will flash
and start the WPS PBC operation. Then, press the SW PBC button in the client device
software (or a HW button in some devices). IMPORTANT: Push these buttons within
60 seconds of each other.
Personal Identification Number (PIN) method
Enter the client device’s PIN number here and click the Register button. If the WPS
LED on the front panel flashes, press the start button in the client device software. If
the client device software asks the Gateway SSID, enter the current SSID shown on
the Gateway Web GUI. If a wrong PIN number was input in the Gateway, the client
device will not be connected.

User Provisioning for Basic Setup
Cox Business Internet Gateway 3848 User Guide 15
User Provisioning for Basic Setup
WPS
Use this screen to control the gateway’s WiFi Protected Setup (WPS) feature.
Figure 9. Wireless link / WPS tab
Select the Enable or Disable radio button to activate or deactivate the WPS.
•WiFi Protected Setup Option 1: An administrator can push the WiFi Protected
Setup button on the Basic Wireless Settings screen or the button on the Gateway
hardware to allow a user to register a wireless client with the Gateway. The user
needs to push the WiFi Protected Setup software button on the client side at the
same time as the WiFi Protected Setup button is pushed on the Gateway. The
connection will be automatically established.
•WiFi Protected Setup Option 2: This is the most secure option for an administrator
to register a user's wireless client with the Gateway. The user needs to give the
administrator their WiFi Protected Setup PIN number, which is found in the client
WiFi Protected Setup utility. After entering the client's WiFi Protected Setup PIN
number, the administrator registers the user. The user can then connect to the
Gateway.
•WiFi Protected Setup Option 3: The Gateway WiFi Protected Setup PIN number is
on the label on the bottom panel. Using any WiFi Protected Setup client utility or
Microsoft Vista (or newer), the user needs to enter the Gateway WiFi Protected
Setup PIN number into the client device. This method is commonly referred to as the
External Registrar (ER) method. It also provides the Wireless Network (SSID) Name
and Security Mode. In case of Dual-Band Concurrent Products, a separate section to
view 5GHz parameters will be provided.
Table of contents
Other Cox Business Gateway manuals

Popular Gateway manuals by other brands

ADTRAN
ADTRAN 17600072F1S quick start guide

tilgin
tilgin HG2700 Series quick guide

Secure Computing
Secure Computing NETWORK INTERFACE CARDS Guide

ZyXEL Communications
ZyXEL Communications AMG1302-T11C user guide

Handlink Technologies
Handlink Technologies WG-500P M user manual

Lucent Technologies
Lucent Technologies PacketStar PSAX user guide


 user manual")


