CPG 351COHD3A User manual

www.cookingperformancegroup.com 1
User Manual
Electric Countertop
Convection Ovens
REVISED 04/2023
351COHD3A, 351COHT3A, 351COHD4M, 351COHT4M, 351COFT4M, 351COFD4M

. www.cookingperformancegroup.com
2
User Manual
Congratulations on your purchase of Cooking Performance Group commercial cooking equipment!
At Cooking Performance Group, we take pride in the design, innovation, and quality of our products.
To ensure optimal performance, we have outlined the following instructions and guidelines in this manual
carefully for your review. Cooking Performance Group declines any responsibility in the event users do
not follow the instructions or guidelines stated here.
Contents
Product Overview.........................................2
Safety Precautions ........................................3
Installation ...............................................5
General Operating Procedures .............................7
Manual Cooking ..........................................8
Cleaning Care .......................................... 11
Warning & Alarms ...................................... 12
Troubleshooting ........................................ 13
Stacking Instructions .................................... 14
5008969
Conforms to UL STD. 197
Conforms to CSA C22.2
Conforms to NSF/ANSI STD. 4
WARNING:
IMPROPER INSTALLATION, ADJUSTMENT, ALTERATION, SERVICE, OR MAINTENANCE CAN
CAUSE PROPERTY DAMAGE, INJURY, OR DEATH. READ THE INSTALLATION, OPERATING,
AND MAINTENANCE INSTRUCTIONS THOROUGHLY BEOFRE INSTALLING OR SERVICING THIS
EQUIPMENT.
5008969

www.cookingperformancegroup.com 3
User Manual
CAUTION:
Equipment is designed to provide safe and productive processing, cooking, and warming of food products as
long as the equipment is used in accordance with the instructions in this manual and is properly maintained.
Failure to comply with the following operation instructions could lead to potential hazards and/or unsafe
practice and could result in injury and damage to product and property. Owners of this equipment bear the
responsibility to make certain that this equipment is used properly and safely, and to strictly follow all the
instructions contained in this manual and the applicable requirements of applicable local, state, or federal law.
Do not store or use gasoline or other ammable vapors and liquids in the vicinity of this or any other
equipment. Improper installation, adjustment, alteration, service, or maintenance could lead to property
damage, injury, or death. Read the installation, operating, and maintenance instructions thoroughly before
installing or servicing CPG equipment. This manual must be retained for future reference. A factory authorized
agent must handle all maintenance and repair.
Owners should not permit anyone to touch this equipment unless they are over 18 years old, are adequately
trained and supervised, and have read and understood this manual. Repairs and conversions are to be made
solely by an authorized servicer. Owners should also ensure that no customers, visitors, or other unauthorized
personnel come in contact with this equipment. Please remember that the vender cannot anticipate every
circumstance or environment in which its equipment will be operated. It is the responsibility of the owner and
the operator to remain alert to any hazards posed by the function of this equipment. If you are ever uncertain
about a particular task or the proper method of operating this equipment, ask your supervisor.
This manual contains a number of precautions to follow to help promote safe use of this equipment.
Throughout the manual you will see additional warnings to help alert you to potential hazards.
Safety Precautions
Warnings affecting your personal safety are indicated by:
OR
WARNING
Warnings affecting your possible damage to the equipment and property are indicated by:
CAUTION
Please remember that this manual or the warning labels do not replace the need to be alert, to properly train
and supervise operators, and to use common sense when using this equipment.

. www.cookingperformancegroup.com
4
User Manual
NOTE: The serial plate is located on the back of the unit.
The serial plate provides important technical information that is essential in case of a request for
intervention for a maintenance or a repair of the equipment. Do not remove, damage, or modify it.
Serial Plate
IMMEDIATELY INSPECT FOR SHIPPING DAMAGE
All containers should be examined for damage before and during unloading. The freight carrier has
assumed responsibility for its safe transit and delivery. If equipment is received damaged, either apparent
or concealed, a claim must be made with the delivering carrier.
Apparent damage or loss must be noted on the freight bill at the time of delivery. It must then be signed
by the carrier representative (ie: driver). If this is not done, the carrier may refuse the claim. The carrier
can supply the necessary forms.
For concealed damage or loss if not apparent until after equipment is uncrated, a request for inspection
must be made to the carrier as soon as possible. Please conrm the time frame with the carrier as this
can vary. The carrier should arrange an inspection. Be certain to hold all contents and packaging material.
Installation and service should be performed by an authorized service agency. All CPG ranges should
also be installed under an approved hood. CPG Limited Warranty Does NOT cover equipment that fails
to follow these guidelines or has been altered, modied, or repaired by anyone other than an authorized
service agency. If you have questions concerning the installation, operation, maintenance, or service of
your equipment, visit CPG’s website at www CookingPerformanceGroup.com.
Make sure that the oor where you plan to locate the commercial range can support its weight along with
any accessories. Adequate clearance should be provided for proper operation and servicing. Level the
commercial range once you’ve uncrated it in your facility using the adjustable feet.
Proper ventilation is crucial to safe and optimum performance. Ensure that the oven is installed
underneath a ventilation hood according to all applicable local and national codes. Keep adequate
clearance for air openings into the combustion chamber.

www.cookingperformancegroup.com 5
User Manual
Installation
• These units are designed for commercial use and not for household use.
• Installation must conform to all applicable codes. Improper installation will void the
manufacturer’s warranty.
• Do not obstruct or reduce the air ow rate of the natural ventilation openings on the
oven or the vent located at the rear of the oven.
• Discontinue use if power cord or electrical wires are frayed or worn.
• This product conforms to UL-197 standards and is required to be installed under a
ventilation hood in accordance with all applicable codes.
Combustiable Clearance Requirements: 20" Sides, 28" Back
Non-Combustiable Clearance Requirements: 2" Sides, 2" Back
Installation Instructions
The place of installation must be indoors, well ventilated, and the ambient temperature must be at least
40 degrees Fahrenheit. The unit is required to have at least 2" of clearance on the sides and back from
non-combustible surfaces, or at least 20" and 28" of clearance on the sides and back, respectfully, from
combustible surfaces. Ensure that all four legs are installed correctly before the operation of this oven.
The unit is required to be installed on a non-combustible surface with 4" legs, or a combustible oor with
a stand. For full-size models, level unit by adjusting the (4) feet which have an adjustment of 1¾" for
accurate leveling.
This product conforms to UL-197 standards and requires it to be
under an exhaust hood. A vertical distance of not less than 48"
shall be provided between the top of the appliance and lters
or any other combustible material. Exhaust installation must
conform to applicable local codes.
Do not obstruct or reduce the air ow rate of the natural
ventilation openings on the oven or the vent located at the rear
of the oven. To ensure proper ventilation and clearance, the
provided spacer is required to be installed.
The spacer must be installed by screwing (2) self-threading
screws on the back of the unit immediately below the cooling
fan.
NOTE: For Oven Stacking Instructions, please see page 14.
WARNING: DO NOT OBSTRUCT THE VENT OR COOLING FAN LOCATED AT THE REAR OF
THE OVEN.

. www.cookingperformancegroup.com
6
User Manual
Electric Connection
• The power supply must comply with the rated voltage, frequency, and plug specic to the data plate.
• All installation types require a dedicated circuit protected by a fuse or circuit breaker. Do not use an
extension cord with plug and cord models.
• All electrical connections must be carried out by a qualied and authorized technician.
• This device should be safely and adequately grounded in accordance with local codes, or in the
absence of local codes, with the National Electrical code, ANSI/NFPA 70, Latest Edition to protect
the user from electrical shock. It requires a grounded system and a dedicated circuit, protected by a
fuse or circuit breaker of proper size and rating. Canadian installation must comply with the Canadian
Electrical Code, CSA C22.2, as applicable.
• To prevent any damages to property and/or people, unplug the appliance from the electrical
connection prior to carrying out any type of maintenance, installation, and/or cleaning operation.
Water Connection
ATTENTION: Using water that does not meet the requirements listed below may cause severe
damage to the heating elements, to the fans, and to the cooking chamber. Additionally, it may cause
considerable performance degradation.
A ¾” water connection is required for installation. The inlet water pressure has a requirement (min/max)
of 150-200 kPa or 22-29 psi. To reduce calcium/mineral build-up, a water ltration system
is recommended.
• Maximum acceptable water hardness = 60-90 ppm
• Minimum water PH = 7.5 PH
• Chlorides = less than 30 ppm
• Silica = less than 12 ppm (mg / L)
• Free chlorine = less than 0.1 ppm (mg / L)
• Total dissolved solids (tds) = 50-125 ppm
Before First Use
Remove all packing material and protective plastic from the surfaces of the unit. Ovens should be
cleaned before operation (see below). Make sure to clean the bafe, wire shelving, and support racks
before installing. The 240V full size and half size models feature (7) rack positions and the 120V half size
models feature (5) rack position. Make sure the tray support and shelves are correctly positioned inside
the cooking chamber and securely installed. Only load the rated number of trays per oven size. Do not
overload the chamber or it will affect cooking performance and results.
It is normal for an unpleasant smell to be noticeable the rst time the oven is used. This is caused by
burning off residue from the manufacturing process. Set the oven to 450 degrees Fahrenheit until the
smell dissipates, for about 30 minutes.

www.cookingperformancegroup.com 7
User Manual
General Operating Procedures
NOTE: This convection oven is not a replacement for a Combi Oven.
NOTE: For all models, the bi-directional fans reverse direction of rotation every two minutes.
NOTE: All models feature a micro safety switch which shuts off the oven when the door is open.
Exterior surfaces on unit will get hot during use and at the end of the cooking process. Use caution
when touching these areas. Do not touch any surfaces labeled CAUTION HOT while the product is
in use.
For timed use, the timer does control the baking operation of the oven. Start by rotating the
‘Temperature’ control clockwise to the desired temperature. Then rotate the 120-minute ‘Timer’ control
clockwise to set the desired time. The ‘Power On’ indicator light should now illuminate. When the timer
reaches ‘0’ minutes, the buzzer will sound and the heating will stop. To ensure the oven is ‘Off’ at the end
of service, rotate the ‘Temperature’ and ‘Timer’ controls to the ‘0’ position.
For continuous use and without interruption, rst rotate the ‘Timer’ control counterclockwise to the
‘ ’ symbol to turn the timer ‘Off‘. Then rotate the ‘Temperature‘ control clockwise to the desired
temperature. The ‘Power On‘ indicator light should now illuminate. The oven will continue to run until you
turn it ‘Off‘ by rotating the ‘Temperature‘ and ‘Timer‘ controls to the ‘0‘ position.
Steam can be added to the chamber at any point by pressing and holding the steam button.
THERMOSTATIC MODELS
DIGITAL MODELS
ON/OFF:
Press once to turn 'On' the
oven. Press and hold to
turn 'Off' the oven.
START/STOP:
Use this button to start or stop a manual
or programmable cooking cycle.
TEMPERATURE:
When the oven is cycling ‘On’ and heating, the LED will light
up. The actual temperature of the chamber will appear on the
display. If you want to display the set temperature, please
press this button.
SELECTING BUTTONS:
Plus or minus selecting buttons.
TIMER:
The adjustable time range is
999 minutes. Timer will be
displayed as a countdown
timer.
STEAM/HUMIDITY:
This button allows you to add steam during manual or programmable
cooking modes. The adjustable humidity range is: OFF – 20% - 40% -
60% - 80% - 100%. The LED will illuminate when steam is being added
to the chamber. Note: This unit is not a substitute for a Combi oven.
PHASE
These LEDs inform
you about which
phase is operating at
the time.
COOKING
CYCLE
For programmable
mode, this button
allows you to cycle
through the (3)
different cooking
phases when
creating a program.

. www.cookingperformancegroup.com
8
User Manual
Manual Cooking
For manual timed use, the timer does control the baking operation of the oven. Turn ‘On’ the oven by
pressing the ‘On/Off’ button. Manual cooking mode is the default and ‘MAN’ will appear on the display.
To set the temperature press the ‘ ’ button and then select your desired set temperature using the ‘+’ or
‘-‘ buttons. Pressing the ‘ ’ button again, or waiting 5-seconds, will conrm set temperature. Similarly, to
set the 999-minute timer press the ‘ ’ button and then set timer using the ‘+’ or ‘-‘ buttons. Then press
the ‘ ’ button again to conrm set timer. To start the cooking cycle, press the ‘Start/Stop’ button to start
the cooking cycle. The unit will now pre-heat (see below). When the timer reaches 0 minutes, ‘END’ will
ash on the display and the unit will ‘beep’ for 40-seconds at the end of the cooking cycle and the oven
will stop heating.
For manual continuous use and without interruption, turn ‘On’ the oven by pressing the ‘On/Off’ button.
Manual cooking mode is the default and ‘MAN’ will appear on the display. Press the ‘ ’ button and use
the ‘-‘ button to go below the minimum timer value and select “- -“. To set the temperature press the
‘ ’ button and then select your desired set temperature using the ‘+’ or ‘-‘ buttons. Pressing the ‘ ’ button
again, or waiting 5-seconds, will conrm set temperature. The timer will be displayed as a countdown.
The oven will continue to run until you turn it ‘Off‘ by pressing and holding ‘On/Off’ button or ‘Start/Stop’
at any point to stop cooking program.
Note: At any point during the cooking process, you can change the temperature and time. Manual steam
can be added to the chamber at any point by pressing and holding the steam button.
Note: The actual temperature of the chamber will appear on the display. If you want to display the set
temperature, please press the ‘ ’ button.
NOTE: When using the steam functions, if the Oven Temperature is BELOW 212°F (100°C ), water
may pool in oven as temperature will be too low to create steam.
Pre-Heating
All digital models feature an automatic pre-heat setting, where ‘PRE’ will appear on the display and
the oven will heat the chamber to a temperature of 20% higher than the set one. This is necessary to
compensate for heat loss that occurs when opening the door to load product. The oven will ‘beep’ and
ash when product is ready to be loaded. The unit will not stop ‘beeping’ or ‘ashing’ until you open the
door and load product. Once you close the door, your cooking cycle will begin automatically.
In programmable mode, you can create and set 99 programs with 3 stage cooking. In each stage, you can
set temperature, time, and humidity. Please refer to the supporting videos on the program page for added
visualization of recipe and program creation.
NOTE: For further instruction on programmable cooking, please view the online product page for a
'How-to' video.

www.cookingperformancegroup.com 9
User Manual
To create a new cooking program:
Press the button
COOKBOOK and
“P01” will appear
on the display
Then act on the
PLUS and MINUS
buttons
Press the button
COOKBOOK
to confirm
Now the oven is positioned on the rst phase (LED lit on N.1) and you can set the time, temperature, and
steam in the various stages as follows:
Press the button
TEMPERATURE
Then act on the
PLUS and MINUS
buttons
Press the button
TEMPERATURE to
confirm
Set the temperature value:
Press the button
TIME
Then act on the
PLUS and MINUS
buttons
Press the button
TIME to confirm

. www.cookingperformancegroup.com
10
User Manual
Cleaning Care
• DO NOT use abrasive or ammable cleaning uids.
• DO NOT hose down, immerse, or pressure wash any part of the oven.
• NEVER use a scrubber pad, steel wool or abrasive material, or cleaners containing chlorine, iodine,
ammonia, or bromine chemicals, as these will deteriorate the stainless steel and shorten the life of the unit.
• NEVER use steel wool pads to clean oven, as small bers may be left behind in cooking chamber.
• ALWAYS turn off the oven and allow time to cool prior to cleaning and/or maintenance.
Set the timer value:
Press the button
HUMIDITY
Then act on the
PLUS and MINUS
buttons
Press the button
HUMIDITY to
confirm or wait 5
seconds and the new
value will be stored
Set the steam/humidity value:
Select the cooking phase button to go to the second phase
(in the case of the cooking process with several phases) and
you will see the second LED on
C
To save a program with 3 steps, after setting them, press and hold the COOKBOOK button until the LED
ashes. If you only have 1 or 2 steps, enter ‘0’ for the time in the unused steps and save.
- When the program is stored, you can press START/STOP to activate the cooking process.
If needed, you can skip a phase in your recipe during the cooking cycle by pressing and holding the
‘Cooking Cycle’ button to continue to the next step. Note: The timer will reset to the next step's set time.
Return to manual cooking mode by turning the oven ‘Off’ and ‘On’.

www.cookingperformancegroup.com 11
User Manual
Internal Cleaning
Allow the oven to cool completely. To use the ‘cool down’ program for digital models, see below:
• Press ‘ ’ and using the MINUS button, go below the minimum temperature value and select “C00".
• Press ‘Start’ and the temperature will start to ash in the display, and then you will see the temperature
start to decrease.
• To expediate the cooling process, open the door of the oven.
Once the unit is cool, remove stainless steel bafe, wire shelves, and support racks. These parts are
dishwasher safe. Clean any buildup of grease from the oven interior using a mild detergent, a hot water
solution, and a soft bristle brush. We recommend Noble Chemical Sunbright for daily cleaning, and Noble
Chemical Knockout, or Blast, for deep clean or carbon build up. Dry the oven thoroughly with a soft, dry cloth.
Then reinstall steel bafe, wire shelves, and support racks.
External Cleaning
Clean any buildup of grease on the exterior of the oven using a mild detergent, a hot water solution, and
a soft bristle brush. We recommend Noble Chemical Sunbright for daily cleaning. We recommend using
Noble Chemical Excel to polish external stainless steel surfaces, as well as Noble Chemical Kleer View to
clean the door glass.
NOTE:
everything back in its original location.
Door Cleaning
Strictly adhere to the following procedure in order to avoid electrocution or
injury: To clean the inner glass of the door, start a rapid cooling cycle of the oven
chamber (for digital models) or wait until the ambient temperature is reached (for
mechanical models).
• This procedure should be performed with the door ajar (inclined about 30°).
• Remove the two external screws “A” as shown in the gure, unscrewing
counterclockwise.
• Pull out the sheet metal prole “B” carefully.
• Remove the inner glass very gently.
• Place the glass on a suitable surface, such as a soft cloth.
• Clean the surface using a soft cloth just moistened with a neutral product, specic for glass,
following the instructions of the manufacturer of the detergent
. www.cookingperformancegroup.com
12
User Manual
Warning and Alarms
All alarms are indicated by a buzzer. The buzzer can be silenced by pressing a key.
• ERR = CHAMBER PROBE ALARM
This is triggered if the chamber probe fails. Everything is deactivated except for the light. The cycle in
progress is interrupted. Once the alarm is silenced, press the ON/OFF button for 1 second to reset the
alarm (the control panel is set to OFF).
• "ALL" = MOTOR ALARM
This is triggered if the motor overheats. Everything is deactivated except for the light. The cycle in
progress is interrupted. Once the alarm is silenced, press the ON/OFF button for 1 second to reset the
alarm (the control panel is set to OFF).
• "H-t" = CONTROL BOARD TEMPERATURE ALARM
This is triggered if the control board overheats. The cycle in progress is interrupted. Once the alarm is
silenced, press the ON/OFF button for 1 second to reset the alarm (the control panel is set to OFF).
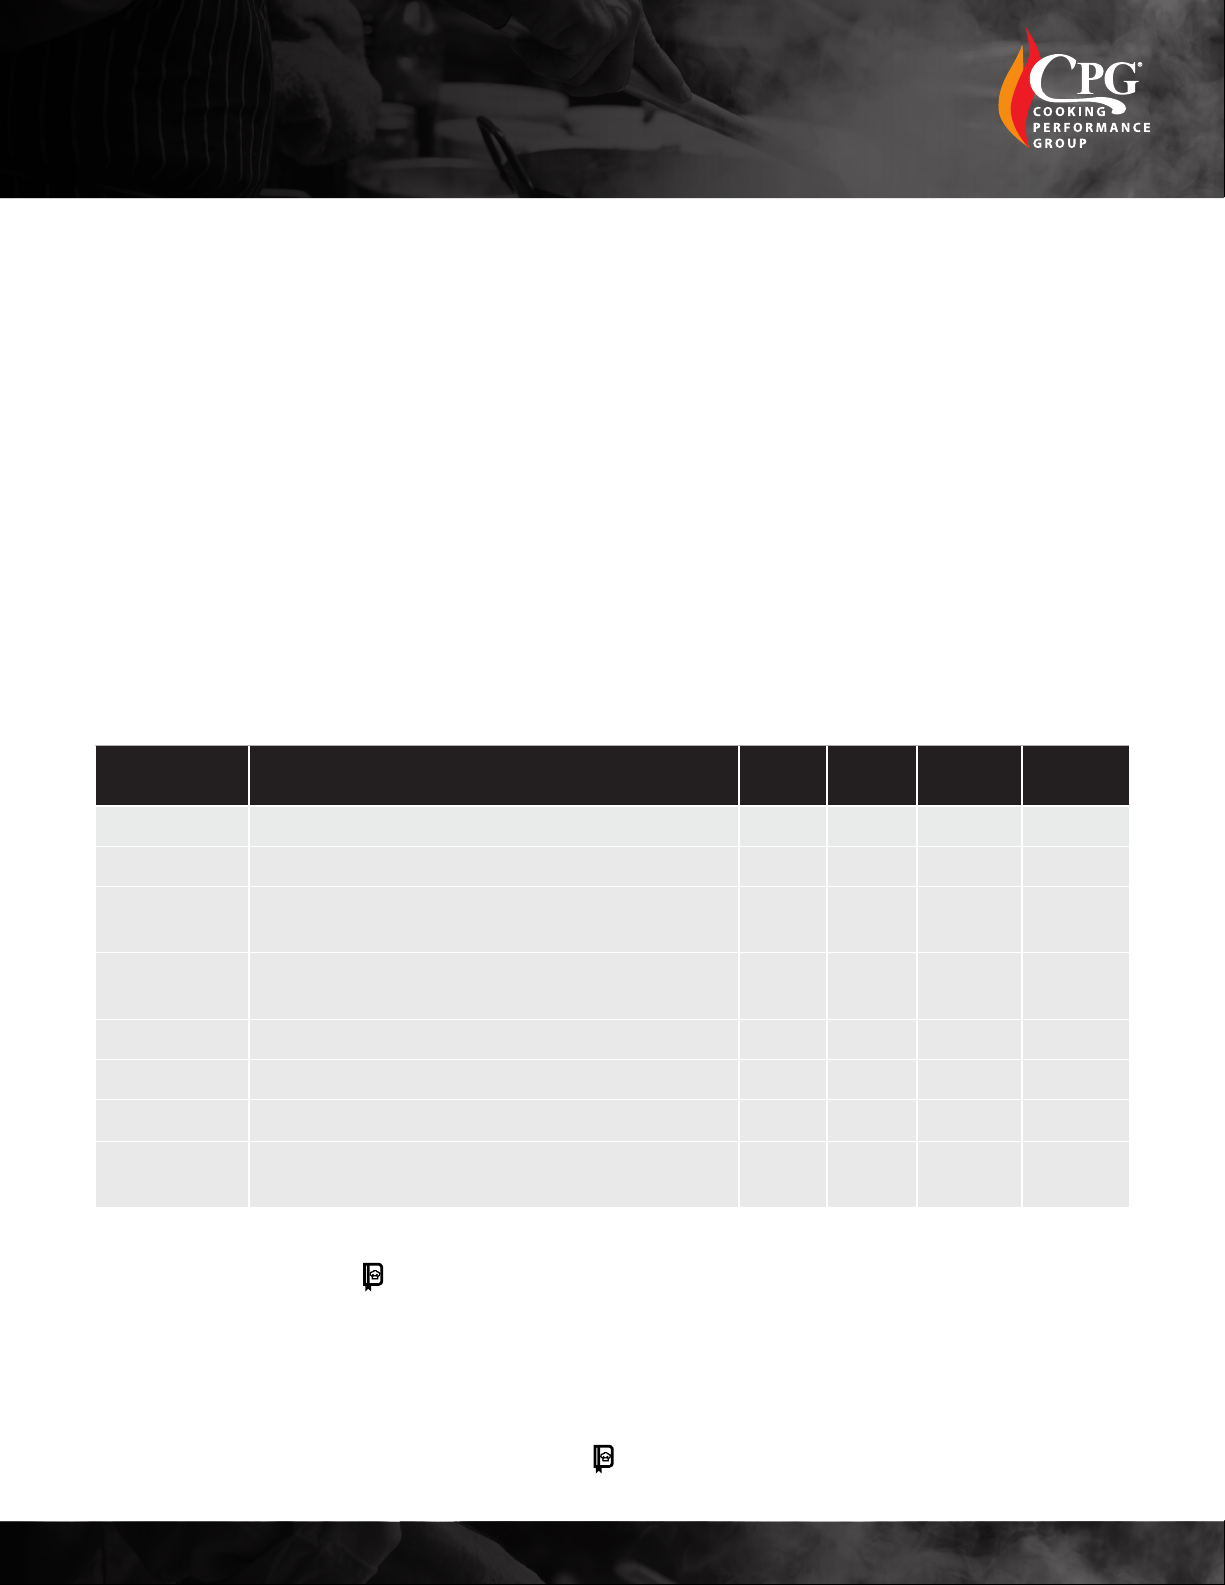
Operator and Factory Parameters Table
Parameter Description Default
Value Limits Unit Level
P01 Temperature unit: 0=C, 1=F 0 0-1 Flag Operator
P03 Min. cooking temperature setpoint 30 30-200 C/F Factory
P06 Preheating superheating
(% value of the set above the cooking setpoint) 20 0-100 % Operator
P15 Light Mode: 0= timed on button pressure, 1= always
ON during cooking, 2= Always ON 2 0-2 Flag Operator
P16 Light activation time 45 0-120 Seconds Operator
P17 Enable Preheating 1 0-1 Flag Operator
P40 Default Setpoint for Cooling 50 30-70 C/F Operator
P52 Time of inactivity to switch to standy mode
(function disabled with 0) 10 0-60 Minutes Factory
Access the parameter menu with the oven set to "OFF", indicated by the top display of the
appliance. Press down the ‘ ’ key until the upper display shows "PAS" and the lower display shows "0",
ashing. Press the ‘+’ key to set the value shown on the lower display to "30". Conrm by pressing
START/STOP. The upper display will show the name of the parameter, whereas the lower one will show
the value of that parameter. Scroll through the list of editable parameters using the ‘+’ and ‘-’ buttons.
Once the parameter to be edited has been found, press the START/STOP button: the value shown on the
lower display will start to ash, and then press ‘+’ and ‘-’ buttons to change the value. Once the desired
value has been set, according to the table below, press START/STOP to conrm the change. When the
desired parameters have been changed, press the ‘ ’ key to set the appliance back to "OFF".

www.cookingperformancegroup.com 13
User Manual
Troubleshooting
PROBLEM CAUSE RESOLUTION
In START mode
the oven does not
turn on
Door open Make sure the door is closed
The micro-switch does not signal that
the door is closed
Contact a specialist technician for repairs (Cus-
tomer Service)
Oven light off
Loose lamp Insert the lamp correctly into the lamp holder
Blown lamp Replace the lamp
(refer to ordinary maintenance)
The oven does not
cook uniformly
The fans no longer
execute inversion
Contact a specialist technician for repairs (Cus-
tomer Service)
One of the fans has stopped
One of the heating elements
is broken.
The oven is
completely off
No power supply Restore the power supply
Incorrect connection to the mains power
supply Check connection to the main power supply
Safety thermostat triggered Contact a specialist technician for repairs
(Customer Service)
The water is input
into the steam
pipes
Water inlet closed Open Water inlet
Incorrect connection to the main water
supply Check connection to the mains water supply
Water inlet lters obstructed by dirt. Clean the lters
Water leaks out
from the washer
when the doors is
closed
Dirty washer Clean the washer with a damp cloth
Damaged washer Contact a specialist technician for repairs
(Customer Service)
Door closing mechanism problem
The fan stops
during
operation
Motor safety thermostat
triggered
Switch the oven off and wait for the motor's
thermal protection to restore automatically. If the
problem persists, contact a specialist technician
for repairs (Customer Service)
Motor condenser breakage Contact a specialist technician for repairs (Cus-
tomer Service)
NOTICE: The above examples are provided for your reference. Provided a failure occurs, stop using the oven and
consult an authorized service agency. All maintenance should be done after the power supply is shut off.

. www.cookingperformancegroup.com
14
User Manual
Stacking Kit Instructions
1. Screw the front prole with provided screws.
2. Screw the rear plates with provided screws.
65
65
65
3. Place the oven on top.
Fig. 1 Fig. 2
1
2
2
4. Place the bracket on the back of the oven
on top.
Fig. 3
5. Connect the pipe and use the bracket provided.
Fig. 4
This manual suits for next models
5
Table of contents
Other CPG Convection Oven manuals


Popular Convection Oven manuals by other brands

Cosori
Cosori CO125-TO Quick reference guide

GE
GE Profile J2S968 SERIES owner's manual

Kleenmaid
Kleenmaid SMC4530 Instructions for use and warranty details

STARFRIT
STARFRIT 024615 Instructions for use and care

Vulcan-Hart
Vulcan-Hart SG4D Specifications

Lang
Lang 2F11-CLS-S Installation, operation, maintenance, & troubleshooting


