Crafstman CMCSTSB970 User manual

final page size: 8.5 x 5.5 in CRAFTSMANfinal page size: 8.5 x 5.5 in CRAFTSMAN
60V Max* Attachment Capable String Trimmer
Taille-bordure compatible avec accessoires 60 V max*
Podadora de Cuerda para Accesorios 60V Máx*
CMCSTSB970
INSTRUCTION MANUAL | GUIDE D’UTILISATION | MANUAL DE INSTRUCTIONES
IF YOU HAVE QUESTIONS OR COMMENTS, CONTACT US.
POUR TOUTE QUESTION OU TOUT COMMENTAIRE, NOUS CONTACTER.
SI TIENE DUDAS O COMENTARIOS, CONTÁCTENOS.
1–888–331–4569 WWW.CRAFTSMAN.COM

English (original instructions) 1
Français (traduction de la notice d’instructions originale) 13
Español (traducido de las instrucciones originales) 27

1
ENGLISH
English (original instructions)
Definitions: Safety Alert Symbols and Words
This instruction manual uses the following safety alert symbols and words to alert you to hazardous situations and your risk
of personal injury or property damage.
DANGER:Indicates an imminently hazardous situation which, if not avoided, will result in death or
seriousinjury.
WARNING:Indicates a potentially hazardous situation which, if not avoided, could result in death or
seriousinjury.
CAUTION:Indicates a potentially hazardous situation which, if not avoided, may result in minor or
moderateinjury.
(Used without word) Indicates a safety related message.
NOTICE:Indicates a practice not related to personal injury which, if not avoided, may result in
propertydamage.
WARNING:Read all safety warnings
and all instructions. Failure to follow the warnings
and instructions may result in electric shock, fire and/or
seriousinjury.
WARNING:To reduce the risk of injury, read
the instructionmanual.
If you have any questions or comments about this or any
product, call CRAFTSMAN toll free at: 1-888-331-4569.
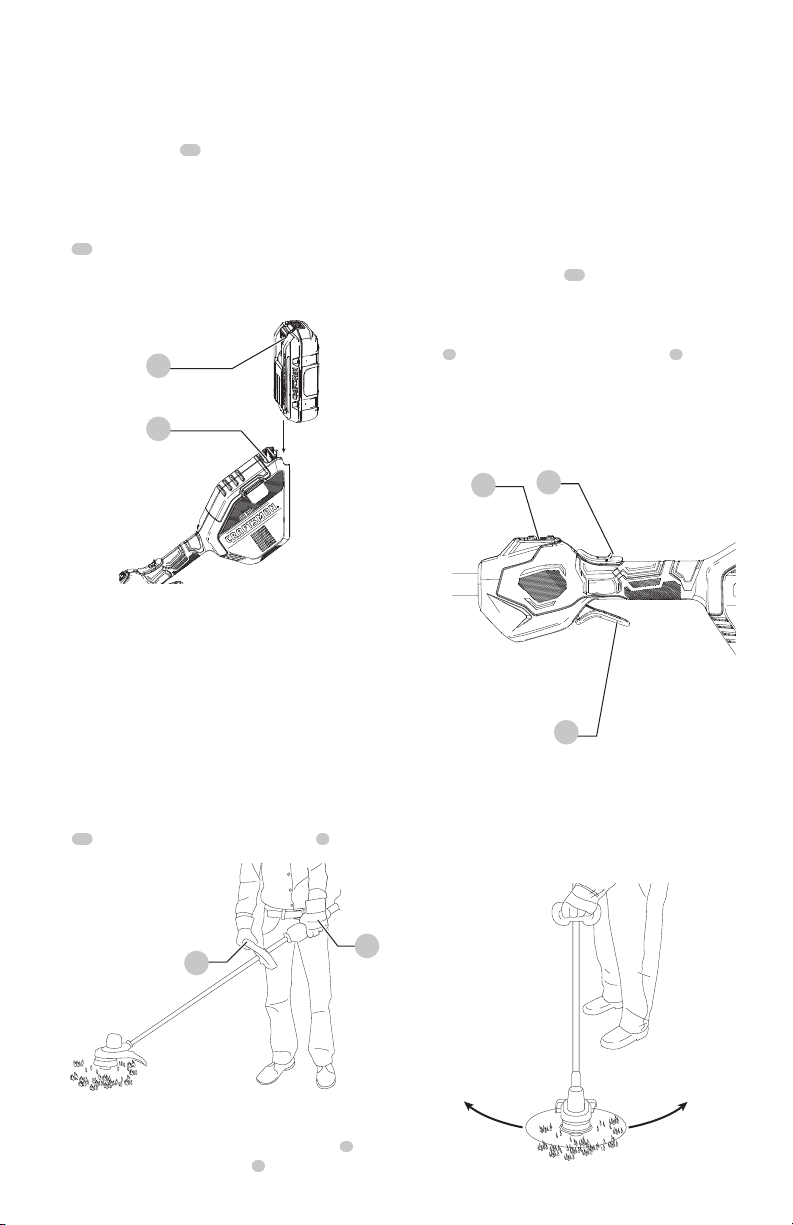
1 Variable speed trigger
2 Lock-off button
3 Speed control switch
4 Auxiliary handle
5 Motor housing
6 Lower trimmer
attachment
7 Upper trimmer pole
8 Guard
9 Spool housing
10 Battery housing
11 Battery
12 Battery release button
13 Main handle
14 Clamp
Fig. A 614 4 7 3 2
1
10 12
11
5
13
9 8

ENGLISH
2
Additional Safety Warnings
WARNING:This product is not an edger
and is not intended to be used for edging.
WARNING:To reduce the risk of
rebound (ricochet) injury, work going away from
any nearby solid object such as wall, steps, large
stone, tree,etc.
• GUARD – Do not use this appliance without
guardattached.
• DRESS PROPERLY – Do not wear loose clothing or
jewelry. They can be caught in moving parts. Gloves and
substantial rubber soled footwear are recommended
when working outdoors. Don’t operate the appliance
when barefoot or wearing open sandals. Wear heavy long
pants to protect your legs. Wear protective hair covering to
contain longhair.
• KEEP FACE, HANDS AND FEET CLEAR OF ROTATING
NYLON LINE AT ALL TIMES. The rotating line performs a
cutting function use care when trimming around screens
and desirableplantings.
• KEEP ALL BYSTANDERS AWAY – at a safe distance from
work area, especially children. MAKE SURE that other
persons and pets are at least 100' (30 m)away.
• USE GREAT CARE when working close to solid objects
and where necessary, do trimming byhand.
• DAMAGE TO UNIT – If you strike or become entangled
with a foreign object, stop appliance immediately, check
for damage and have any damage repaired before further
operation is attempted. Do not operate with a broken hub
orspool.
• DO NOT OPERATE portable electric appliances in
gaseous or explosive atmospheres. Motors in these
appliances normally spark, and the sparks might
ignitefumes.
• STAY ALERT – Do not operate this unit when you are tired,
ill, or under the influence of alcohol, drugs, ormedication.
• DO NOT immerse appliance in water or squirt it with
ahose.
• DO NOT allow any liquid to get inside it. If appliance does
get wet, allow to dry for a minimum of 48hours.
• DO NOT clean with a pressurewasher.
be carefully checked to determine that it will operate
properly and perform its intended function. Check for
alignment of moving parts, binding of moving parts,
breakage of parts, mounting, and any other condition
that may affect its operation. A guard or other part that
is damaged should be properly repaired or replaced by an
authorized service center unless indicated elsewhere in
thismanual.
SAVE THESE INSTRUCTIONS
IMPORTANT SAFETY INSTRUCTIONS
SAVE THESE INSTRUCTIONS
WARNING:To reduce risk of injury:
• Before any use, be sure everyone using this unit
reads and understands all safety instructions and
other information contained in this manual.
• Save these instructions and reviewfrequently.
WARNING:When using electric
gardening appliances, basic safety precautions should
always be followed to reduce risk of fire, electric shock,
and personal injury, including thefollowing.
1 . Avoid Dangerous Environment – Don’t use appliances
in damp or wetlocations.
2 . Don’t Use InRain.
3 . Keep Children Away – All visitors should be kept at a
distance from workarea.
4 . Dress Properly – Do not wear loose clothing or jewelry.
They can be caught in moving parts. Use of rubber gloves
and substantial footwear is recommended when working
outdoors. Wear protective hair covering to contain
longhair.
5 . Use Safety Glasses – Always use face or dust mask if
operation isdusty.
6 . Use Right Appliance – Do not use appliance for any job
except that for which it isintended.
7 . AVOID ACCIDENTALLY STARTING – Don’t carry with
finger on trigger when battery is installed.
8 . Don’t grasp the exposed cutting blades or cutting
edges when picking up or holding the appliance.
9 . Don’t Force Appliance – It will do the job better and
with less likelihood of a risk of injury at the rate for which
it wasdesigned.
10 . Don’t Overreach – Keep proper footing and balance at
alltimes.
11 . Stay Alert – Watch what you are doing. Use common
sense. Do not operate appliance when you aretired.
12 . Disconnect Appliance – Remove the battery when not
in use, before servicing, when changing accessories such
as blades, and thelike.
13 . Store Idle Appliances Indoors – When not in use,
appliances should be stored indoors in dry, and high or
locked-up place – out of reach ofchildren.
14 . Maintain Appliance With Care – Keep cutting edge
sharp and clean for best performance and to reduce
the risk of injury. Follow instructions for lubricating and
changing accessories. Inspect appliance power source
periodically, and if damaged, have it repaired by an
authorized service facility. Keep handles dry, clean, and
free from oil andgrease.
15 . Check Damaged Parts – Before further use of the
appliance, a guard or other part that is damaged should
60V Max* Attachment Capable String Trimmer
CMCSTSB970

3
ENGLISH
READ ALL INSTRUCTIONS
Important Safety Instructions for All
Battery Packs
WARNING:Read all safety warnings,
instructions, and cautionary markings for the
battery pack, charger and product. Failure to
follow the warnings and instructions may result
in electric shock, fire and/or serious injury.
• Do not charge or use the battery pack in explosive
atmospheres, such as in the presence of flammable
liquids, gases or dust. Inserting or removing the battery
pack from the charger may ignite the dust orfumes.
• When battery pack is not in use, keep it away from
other metal objects, like paper clips, coins, keys,
nails, screws, or other small metal objects, that can
make a connection from one terminal to another.
Shorting the battery terminals together may cause burns
or a fire.
• NEVER force the battery pack into the charger. DO
NOT modify the battery pack in any way to fit into
a non-compatible charger as battery pack may
rupture causing serious personal injury. Consult
BATTERIES AND CHARGERS
The battery pack is not fully charged out of the carton.
Before using the battery pack and charger, read the
safety instructions below and then follow charging
proceduresoutlined. When ordering replacement battery
packs, be sure to include the catalog number andvoltage.
The label on your tool may include the following symbols. The
symbols and their definitions are asfollows:
V.........................volts
Hz .......................hertz
min.....................minutes
or DC......direct current
......................Class I Construction
(grounded)
…/min.............. per minute
BPM.................... beats per minute
IPM..................... impacts per minute
RPM.................... revolutions per
minute
sfpm ...................surface feet per
minute
SPM.................... strokes per minute
OPM.................... oscillations per
minute
A.........................amperes
W........................watts
or AC........... alternating current
or AC/DC.... alternating or
direct current
......................Class II
Construction
(double insulated)
no.......................no load speed
n.........................rated speed
......................earthing terminal
..................... safety alert symbol
..................... visible radiation
..................... avoid staring at
light
..................... wear respiratory
protection
..................... wear eye
protection
..................... wear hearing
protection
..................... read all
documentation
IPXX....................IP symbol
• DO NOT store the appliance on or adjacent to fertilizers
orchemicals.
• DO NOT charge appliance in rain, or in wet locations.
Additional Safety Information
WARNING:Never modify the power
tool or any part of it. Damage or personal injury
couldresult.
WARNING:ALWAYS use safety glasses.
Everyday eyeglasses are NOT safety glasses. Also use
face or dust mask if operation is dusty. ALWAYS WEAR
CERTIFIED SAFETYEQUIPMENT:
• ANSI Z87.1 eye protection (CAN/CSA Z94.3),
• ANSI S12.6 (S3.19) hearing protection,
• NIOSH/OSHA/MSHA respiratoryprotection.
WARNING:Some dust contains
chemicals known to State of California to cause
cancer, birth defects or other reproductive harm. Some
examples of these chemicals are:
• compounds in fertilizers,
• compounds in insecticides, herbicides
andpesticides,
• arsenic and chromium from chemically
treatedlumber.
To reduce your exposure to these chemicals,
wear approved safety equipment such as dust
masks that are specially designed to filter out
microscopicparticles.
WARNING:Use of this tool can generate
and/or disperse dust, which may cause serious
and permanent respiratory or other injury. Always
use NIOSH/OSHA approved respiratory protection
appropriate for the dust exposure. Direct particles
away from face andbody.
WARNING:Always wear proper
personal hearing protection that conforms
to ANSI S12.6 (S3.19) during use. Under some
conditions and duration of use, noise from this
product may contribute to hearingloss.
CAUTION:When not in use, place tool
on its side on a stable surface where it will not
cause a tripping or falling hazard. Some tools with
a large battery pack will stand upright but may be
easily knocked over.
• Air vents often cover moving parts and should be
avoided. Loose clothes, jewelry or long hair can be caught
in movingparts.

ENGLISH
4
the chart at the end of this manual for compatibility of
batteries andchargers.
• Charge the battery packs only in CRAFTSMAN chargers.
• DO NOT splash or immerse in water or otherliquids.
• Do not store or use the tool and battery pack in
locations where the temperature may reach or
exceed 104°F (40°C) (such as outside sheds or metal
buildings in summer). For best life store battery packs in
a cool, drylocation.
NOTE: Do not store the battery packs in a tool with
the trigger switch locked on. Never tape the trigger
switch in the ONposition.
• Do not expose battery pack or tool/appliance to
fire or excessive temperature. Exposure to fire or
temperature above 265 °F (130 °C) may cause explosion.
• Do not incinerate the battery pack even if it is
severely damaged or is completely worn out. The
battery pack can explode in a fire. Toxic fumes and
materials are created when lithium-ion battery packs
areburned.
• If battery contents come into contact with the skin,
immediately wash area with mild soap and water. If
battery liquid gets into the eye, rinse water over the open
eye for 15 minutes or until irritation ceases. If medical
attention is needed, the battery electrolyte is composed of
a mixture of liquid organic carbonates and lithiumsalts.
• Contents of opened battery cells may cause
respiratory irritation. Provide fresh air. If symptoms
persist, seek medicalattention.
WARNING:Burn hazard. Battery liquid
may be flammable if exposed to spark orflame.
WARNING:Fire hazard. Never attempt
to open the battery pack for any reason. If the battery
pack case is cracked or damaged, do not insert into
the charger. Do not crush, drop or damage the battery
pack. Do not use a battery pack or charger that has
received a sharp blow, been dropped, run over or
damaged in any way (e.g., pierced with a nail, hit
with a hammer, stepped on). Damaged battery packs
should be returned to the service center forrecycling.
Storage Recommendations
1. The best storage place is one that is cool and dry, away
from direct sunlight and excess heat or cold.
2. For long storage, it is recommended to store a fully
charged battery pack in a cool dry place out of the
charger for optimal results.
NOTE: Battery packs should not be stored completely
depleted of charge.The battery pack will need to be
recharged before use.
Battery Pack Cleaning Instructions
Dirt and grease may be removed from the exterior of the
battery using a cloth or soft non-metallic brush. Do not use
water or any cleaningsolutions.
Fuel Gauge Battery Packs
CRAFTSMAN battery packs include a fuel gauge which
consists of three LED lights that indicate the level of charge
remaining in the batterypack.
The fuel gauge is an indication of approximate levels of
charge remaining in the battery pack according to the
followingindicators:
75–100% charged
51–74% charged
< 50% charged
Pack needs to be charged
To actuate the fuel gauge, press and hold the fuel gauge
button. A combination of the three LED lights will illuminate
designating the level of charge left. When the level of
charge in the battery is below the usable limit, the fuel
gauge will not illuminate and the battery will need to
berecharged.
NOTE: The fuel gauge is only an indication of the charge left
on the battery pack. It does not indicate tool functionality
and is subject to variation based on product components,
temperature and end-userapplication.
For more information regarding fuel gauge battery packs,
please contact CRAFTSMAN at 1-888-331-4569 or visit our
website www.craftsman.com
Transportation
WARNING:Fire hazard. Do not store
or carry the battery pack so that metal objects
can contact exposed battery terminals. For
example, do not place the battery pack in aprons,
pockets, tool boxes, product kit boxes, drawers, etc.,
with loose nails, screws, keys, etc. Transporting
batteries can possibly cause fires if the battery
terminals inadvertently come in contact with
conductive materials such as keys, coins,
hand tools and the like. The US Department of
Transportation Hazardous Material Regulations (HMR)
actually prohibit transporting batteries in commerce
or on airplanes in carry-on baggage UNLESS they
are properly protected from short circuits. So when
transporting individual battery packs, make sure that
the battery terminals are protected and well insulated
from materials that could contact them and cause a
short circuit. NOTE:Li-ion batteries should not be put
in checkedbaggage.

5
ENGLISH
of the cable, that is, 16 gauge has more capacity than
18gauge. An undersized cord will cause a drop in line
voltage resulting in loss of power and overheating. When
using more than one extension to make up the total
length, be sure each individual extension contains at
least the minimum wire size. The following table shows
the correct size to use depending on cord length and
nameplate ampere rating. If in doubt, use the next heavier
gauge. The lower the gauge number, the heavier thecord.
Minimum Gauge for Cord Sets
Volts Total Length of Cord in Feet
(meters)
120V 25 (7.6) 50 (15.2) 100 (30.5) 150 (45.7)
240V 50 (15.2) 100 (30.5) 200 (61.0) 300 (91.4)
Ampere Rating
American Wire Gauge
More
Than
Not
More
Than
0 6 18 16 16 14
610 18 16 14 12
10 12 16 16 14 12
12 16 14 12 Not Recommended
WARNING:If the plug or power cord is
damaged, it must be replaced by the manufacturer or
its representative or by an equally qualified person to
avoiddanger.
• Do not place any object on top of the charger or
place the charger on a soft surface that might block
the ventilation slots and result in excessive internal
heat. Place the charger in a position away from any heat
source. The charger is ventilated through slots in the top
and the bottom of thehousing.
• Do not operate the charger with a damaged cord
orplug–have them replaced immediately.
• Do not operate the charger if it has received a sharp
blow, been dropped or otherwise damaged in any
way. Take it to an authorized servicecenter.
• Do not disassemble the charger; take it to an
authorized service center when service or repair
is required. Incorrect reassembly may result in a risk of
electric shock, electrocution orfire.
• Disconnect the charger from the outlet before
attempting any cleaning. This will reduce the risk of
electric shock. Removing the battery pack will not reduce
thisrisk.
• NEVER attempt to connect 2 chargerstogether.
• The charger is designed to operate on standard
120V household electrical power. Do not attempt to
use it on any other voltage. This does not apply to the
vehicularcharger.
WARNING:Shock hazard. Do not allow
any liquid to get inside the charger. Electric shock
mayresult.
Important Safety Instructions for All
Battery Chargers
WARNING:Read all safety warnings,
instructions, and cautionary markings for the
battery pack, charger and product. Failure to
follow the warnings and instructions may result
in electric shock, fire and/or seriousinjury.
• DO NOT attempt to charge the battery pack with
any chargers other than a CRAFTSMAN charger.
CRAFTSMAN chargers and battery packs are specifically
designed to worktogether.
• These chargers are not intended for any uses other
than charging CRAFTSMAN rechargeable batteries.
Any other uses may result in risk of fire, electric shock
orelectrocution.
• Do not expose the charger to rain orsnow.
• Pull by the plug rather than the cord when
disconnecting the charger. This will reduce the risk of
damage to the electric plug andcord.
• Make sure that the cord is located so that it will not
be stepped on, tripped over or otherwise subjected
to damage orstress.
• Do not use an extension cord unless it is absolutely
necessary. Use of improper extension cord could result in
risk of fire, electric shock orelectrocution.
• When operating a charger outdoors, always provide
a dry location and use an extension cord suitable
for outdoor use. Use of a cord suitable for outdoor use
reduces the risk of electricshock.
• An extension cord must have adequate wire size
(AWG or American Wire Gauge) for safety. The smaller
the gauge number of the wire, the greater the capacity
The RBRC® Seal
The RBRC® (Rechargeable Battery
Recycling Corporation) Seal on the nickel
cadmium, nickel metal hydride or lithium-
ion batteries (or battery packs) indicates that the costs to
recycle these batteries (or battery packs) at the end of their
useful life have already been paid by CRAFTSMAN. In some
areas, it is illegal to place spent nickel cadmium, nickel metal
hydride or lithium-ion batteries in the trash or municipal
solid waste stream and the Call2Recycle® program provides
an environmentally consciousalternative.
Call 2 Recycle, Inc., in cooperation with CRAFTSMAN
and other battery users, has established the program in
the United States and Canada to facilitate the collection
of spent nickel cadmium, nickel metal hydride or
lithium-ion batteries. Help protect our environment and
conserve natural resources by returning the spent nickel
cadmium, nickel metal hydride or lithium-ion batteries
to an authorized CRAFTSMAN service center or to your
local retailer for recycling. You may also contact your local
recycling center for information on where to drop off the
spent battery. RBRC® is a registered trademark of Call 2
Recycle,Inc.

ENGLISH
6
Hot/Cold Pack Delay
When the charger detects a battery pack that is too hot
or too cold, it automatically starts a Hot/Cold Pack Delay,
suspending charging until the battery pack has reached an
appropriate temperature. The charger then automatically
switches to the pack charging mode. This feature ensures
maximum battery packlife.
A cold battery pack may charge at a slower rate than a
warm batterypack.
Important Charging Notes
1. Longest life and best performance can be obtained if
the battery pack is charged when the air temperature
is between 65°F – 75°F (18°C–24°C). DO NOT charge
when the battery pack is below +40°F (+4.5°C), or
above +104°F (+40°C). This is important and will
prevent serious damage to the batterypack.
2. The charger and battery pack may become warm to the
touch while charging. This is a normal condition, and
does not indicate a problem.To facilitate the cooling of
the battery pack after use, avoid placing the charger or
battery pack in a warm environment such as in a metal
shed or an uninsulatedtrailer.
3. If the battery pack does not charge properly:
a. Check operation of receptacle by plugging in a lamp
or other appliance;
b. Check to see if receptacle is connected to a light
switch which turns power off when you turn out
the lights;
c. Move the charger and battery pack to a location
where the surrounding air temperature is
approximately 65°F –75°F (18°C– 24°C);
d. If charging problems persist, take the tool, battery
pack and charger to your local servicecenter.
4. The battery pack should be recharged when it fails to
produce sufficient power on jobs which were easily
done previously. DO NOT CONTINUE to use under these
conditions. Follow the charging procedure. You may also
charge a partially used pack whenever you desire with
no adverse effect on the batterypack.
5. Foreign materials of a conductive nature such as, but
not limited to, grinding dust, metal chips, steel wool,
aluminum foil, or any buildup of metallic particles
should be kept away from charger cavities. Always
unplug the charger from the power supply when there
is no battery pack in the cavity. Unplug the charger
before attempting toclean.
6. Do not freeze or immerse the charger in water or any
otherliquid.
Charger Cleaning Instructions
WARNING:Shock hazard. Disconnect
the charger from the AC outlet before cleaning. Dirt
and grease may be removed from the exterior of the
charger using a cloth or soft non-metallic brush. Do
not use water or any cleaningsolutions.
WARNING:Burn hazard. Do not
submerge the battery pack in any liquid or allow any
liquid to enter the battery pack. Never attempt to open
the battery pack for any reason. If the plastic housing
of the battery pack breaks or cracks, return to a service
center for recycling.
CAUTION:Burn hazard. To reduce the
risk of injury, charge only CRAFTSMAN rechargeable
battery packs. Other types of batteries may
overheat and burst resulting in personal injury and
propertydamage.
CAUTION:Under certain conditions,
with the charger plugged into the power supply, the
charger can be shorted by foreign material. Foreign
materials of a conductive nature, such as, but not
limited to, grinding dust, metal chips, steel wool,
aluminum foil or any buildup of metallic particles
should be kept away from the charger cavities. Always
unplug the charger from the power supply when there
is no battery pack in the cavity. Unplug the charger
before attempting toclean.
Charging a Battery
NOTE: To ensure maximum performance and life of lithium-
ion battery packs, charge the battery pack fully before
firstuse.
1. Plug the charger into an appropriate outlet before
inserting batterypack.
2. Connect the charger and battery pack, making sure
the battery is fully seated. The (charging) light will blink
continuously indicating that the charging process
hasstarted.
3. The completion of charge will be indicated by the light
remaining ON continuously. The battery pack is fully
charged and may be removed and used at this time or
left in the charger.
NOTE: To remove the battery pack, some chargers require
the battery pack release button to bepressed.
Indicators
Charging
Fully Charged
Hot/Cold Pack Delay
A charger will not charge a faulty battery pack. The charger
refusing to light could indicate a problem with the charger.
NOTE: If the charger refuses to light, take the charger and
battery pack to be tested at an authorized servicecenter.
Leaving the Battery Pack In the Charger
The charger and battery pack can be left connected with
the charge indicator showing pack charged.

7
ENGLISH
Intended Use
WARNING: When the string trimmer
head is attached this is not an edger, and is not
intended for edging.
This string trimmer is designed for household
trimmingapplications.
DO NOT use under wet conditions or in presence of
flammable liquids orgases.
DO NOT let children come into contact with the tool.
Supervision is required when inexperienced operators use
thistool.
ASSEMBLY AND ADJUSTMENTS
WARNING:To reduce the risk of
serious personal injury, turn unit off and
remove the battery pack before making any
adjustments or removing/installing attachments
or accessories, when replacing line, or prior to
cleaning.An accidental start-up can causeinjury.
Assembling the Pole (Fig. A, B, E)
1. When installing the lower trimmer attachment 6 into
the upper trimmer pole 7 , align the latching button 15
with the main hole 34 as shown in Fig. B.
2. Lock the clamp 14 .
3. When properly assembled, the trimmer should look like
Fig. A. If it does not, do not use, disassemble and re-align
the lower trimmer attachment 6 so the latching button
15 engages the correct hole 34 .
4. Do not assemble so that the lower trimmer
attachment 6 head is upside down or sideways when
the trimmer is held according to Fig. E.
Fig.B
6
714
15
34
Powerhead
WARNING:To reduce risk of injury:
• Before any use, be sure everyone using this unit
reads and understands all manufacturer's safety
instructions and other information contained in
manufacturer's manual.
• Never apply power without an attachment being
properly mounted to the powerhead.
WARNING:To reduce the risk of
serious personal injury, turn unit off and
remove the battery pack before making any
adjustments or removing/installing attachments
or accessories, when replacing line, or prior to
cleaning.An accidental start-up can causeinjury.
Your string trimmer is designed such that the power head
can separate from the trimmer attachment by releasing
clamp 14 and gently pulling them apart by their shafts.
This should only be done with the power switch off and the
battery pack removed. Inside the shaft of the power head
is a mechanical coupling that will spin if the power head is
turned on. This coupling can cause severe injury if contacted
while the power head is operating .
The coupling is a universal type compatible with the
coupling used on many electric and gasoline powered
“split boom”products. Use only attachments recommended
by CRAFTSMAN. Other attachments may fit this product.
Use of attachments other than those recommended by
CRAFTSMAN may increase the risk of injury.
CAUTION:In no case should a snow
blower/thrower attachment be used.
Attaching the Auxiliary Handle (Fig. A, C)
1. Place the auxiliary handle 4 on top of the handle base
22so the upper trimmer pole 6 is between them.
2. Hold the auxiliary handle in place and slide the handle
bolts 23into the handle from the top, threading them
into the handlebase.
3. Tighten the handle bolts with the supplied hex wrench .
Ensure the handle is securelyattached.
4. Repeat for the other side of the auxiliaryhandle.
Fig.C 23 23
23 23
422
OPERATION
WARNING:To reduce the risk of
serious personal injury, turn unit off and
remove the battery pack before making any
adjustments or removing/installing attachments
or accessories, when replacing line, or prior to
cleaning.An accidental start-up can causeinjury.
Fig.B
ENGLISH
8
Proper Hand Position (Fig. E)
WARNING:To reduce the risk of serious
personal injury, ALWAYS use proper hand position
as shown.
WARNING:To reduce the risk of serious
personal injury, ALWAYS hold securely in anticipation of
a suddenreaction.
Proper hand position requires one hand on the main
handle13 and one hand on the auxiliary handle4.
Installing and Removing the Battery Pack
(Fig. D)
NOTE: For best results, make sure your battery pack is
fullycharged.
To install the battery pack 11 into the tool handle, align the
battery pack with the rails inside the tool’s handle and slide
it into the handle until the battery pack is firmly seated in
the tool and ensure that it does notdisengage.
To remove the battery pack from the tool, press the release
button 12 and firmly pull the battery pack out of the tool
handle. Insert it into the charger as described in the charger
section of thismanual
running, you may release the lock-off button. To turn the
appliance off, release the variable speed trigger switch.
WARNING:Never attempt to lock the
trigger in the onposition.
Speed Control Switch (Fig. A, F)
This string trimmer gives you the choice to operate at a
more efficient speed to extend the runtime for larger jobs, or
accelerate the trimmer speed for high-performancecutting.
To extend runtime, pull the speed control switch back
toward the battery housing 10 into the "LO" position. This
mode is best for larger projects that require more time
tocomplete.
To accelerate the trimmer, push the speed control
switch3 forward toward the auxillary handle 4 into the
"HI" position. This mode is best to cut through heavier
growth and for applications that need higherRPM.
NOTE: When in "HI" mode, runtime will be decreased as
compared to when trimmer is in "LO"mode.
Fig.F
32
1
Trimming (Fig. G, H)
With the trimmer on, angle it and swing side to side as
shown in Fig.G.
Maintain a minimum distance of 24" (610 mm) between the
guard and your feet as shown in Fig.H.
Fig.G
Fig.D
11
12
413
Fig. E
Switching Trimmer On and Off (Fig. A, F)
To turn the appliance on, squeeze the lock-off button 2 and
then the variable speed trigger switch 1 . Once the unit is

9
ENGLISH
Fig.H
Minimum
24" (610 mm)
WARNING: Keep the rotating string
roughly parallel with the ground (tilted no more
than 30°). This trimmer is not an edger. DO NOT
TILT the trimmer so that the string is spinning near
a right angle to the ground. Flying debris can cause
seriousinjury.
Bump Feed Trimmer Line Feed
Your trimmer uses 0.080" (2 mm) or 0.095" (2.4mm)
diameter line that is spiral-shaped with smooth round
edges. Cutting line will wear faster and require more feeding
if the cutting is done along sidewalks or other abrasive
surfaces or heavier weeds are beingcut.
As you use the trimmer, the string will get shorter due
to wear. Gently bump the trimmer on the ground while
running at normal speed and the line willfeed.
NOTE: Extending nylon line beyond the 15" (381mm)
swath will negatively affect performance, runtime, and the
life of the trimmer due to potential of damaging motor.
Doing so may void thewarranty.
Helpful Cutting Tips
• Use the tip of the string to do the cutting; do not force
string head into uncutgrass.
• Wire and picket fences cause extra string wear, even
breakage. Stone and brick walls, curbs, and wood may
wear stringrapidly.
• Do not allow spool cap 17 to drag on ground or
othersurfaces.
• In long growth, cut from the top down and do not
exceed 12" (305 mm)high.
• Keep trimmer tilted toward the area being cut; this is the
best cuttingarea.
• The trimmer cuts when passing the unit from the left to
right. This will avoid throwing debris at theoperator.
• Avoid trees and shrubs. Tree bark, wood moldings,
siding, and fence posts can easily be damaged by
thestring.
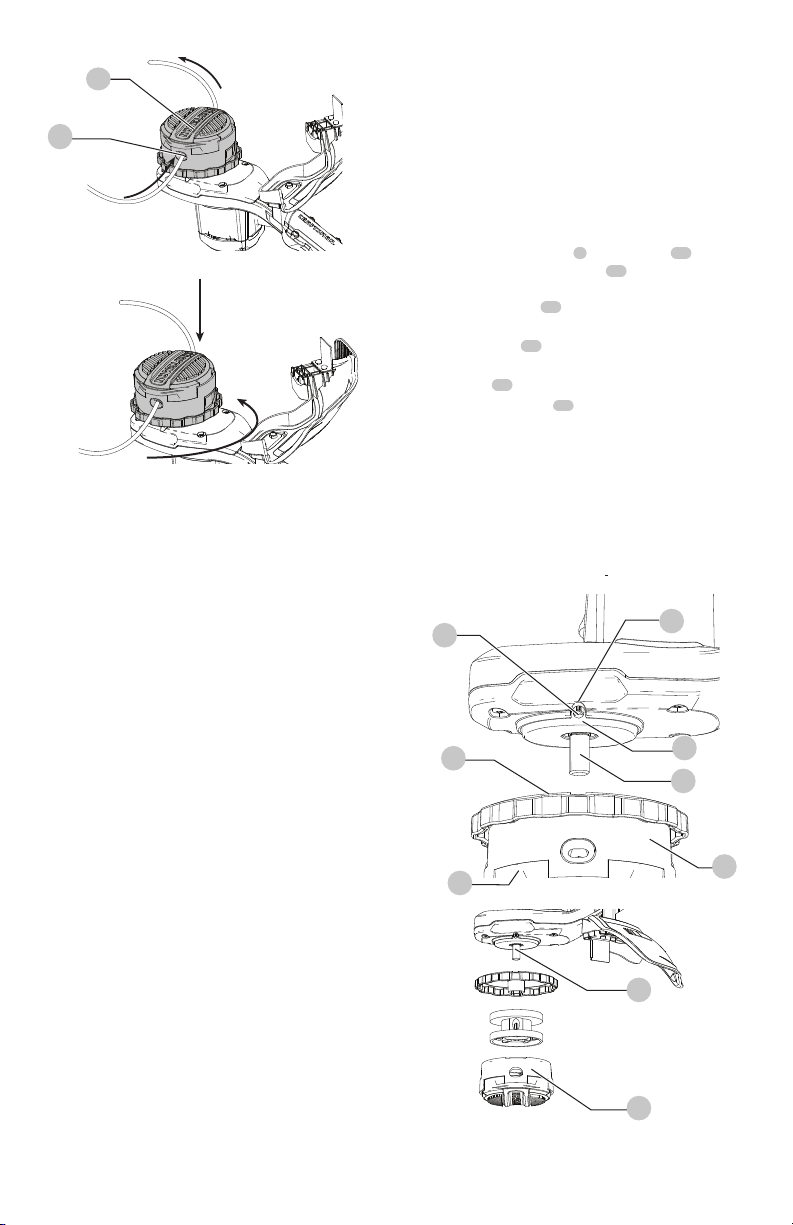
Reloading the Cutting Line (Fig. I–K)
WARNING:To reduce the risk of
serious personal injury, turn unit off and
remove the battery pack before making any
adjustments or removing/installing attachments
or accessories, when replacing line, or prior to
cleaning. An accidental start-up can causeinjury.
CAUTION:Use only CRAFTSMAN
replacement spools and line. Using any other
manufacturer's line can reduce performance, damage
the trimmer or cause personalinjury.
Your trimmer uses 0.080" (2 mm) or 0.095" (2.4mm)
diameter line that is spiral-shaped with smooth round
edges. Do not use other size lines. This can degrade
performance, cause damage to the unit or injury.
CAUTION:To avoid appliance damage, if
the cutting line protrudes beyond the trimming blade,
cut it off so that it just reaches theblade.
Use only CRAFTSMAN replacementline.
1. Removebattery.
2. Cut a max of 20' (6 m) length of of 0.080" (2mm) or
0.095" (2.4mm) trimmerline.
3. Align spool housing eyelets 18 with the arrow 19 on
the spool grip cover 20 as shown in Fig.I.
4. Thread one end of the trimmer line through an eyelet.
Guide the line through to the second eyelet and
continue to pull the line through until there are equal
lengths of string on each side of the spool housing as
shown in Fig.J.
5. Secure the spool cap 17 from moving with one hand.
Using your other hand, wind the string onto the spool
by rotating the spool grip cover counterclockwise as
shown in Fig.K. Continue winding until 6" (154mm) of
string remain on each side of the spool housing.
Fig.I
19
20
18
ENGLISH
10
Accessories
WARNING:Since accessories, other than
those offered by CRAFTSMAN,have not been tested
with this product, use of such accessories with this tool
could be hazardous. To reduce the risk of injury, only
CRAFTSMAN recommended accessories should be
used with thisproduct.
Recommended accessories for use with your tool are
available at extra cost from your local dealer or authorized
service center. If you need assistance in locating any
accessory, please contact CRAFTSMAN call 1-888-331-4569.
MAINTENANCE
WARNING:To reduce the risk of
serious personal injury, turn unit off and
remove the battery pack before making any
adjustments or removing/installing attachments
or accessories, when replacing line, or prior to
cleaning.An accidental start-up can causeinjury.
WARNING:Do not use any blades,
or any accessory or attachment other than those
recommended by CRAFTSMAN on this trimmer.
Serious injury or product damage mayresult.
When replacing the line, use .080" (2 mm) or 0.095"
(2.4mm) diameter line. Use CRAFTSMAN replacement line
Model No. CMZST080T5 or CMZST080TP. Other sizes may
degrade performance or cause damage to thetrimmer.
Replacing Spool Assembly (Fig.L, M)
1. Rotate the spool housing 9 until the hole24 in the
spindle plate aligns with notch 25 in the housing. Insert
a screwdriver through the notch and into the hole, to
prevent the spindle 26 fromturning.
2. Unscrew and remove the spool housing by turning the
spool grip cover 20 clockwise.
NOTE: Do not try to remove the spool housing by turning
the spool head 27.
3. Remove spindle plate 28 before installing a new
housing. Remove any dirt and grass from the motor
housing and spindleplate.
4. Install spindle plate onto the spindle, so the double D
shaped retaining nut on the spindle sits inside the base
of the spindleplate.
5. Align the spindle plate hole and notch, insert a
screwdriver back into the hole and thread the new spool
housing counterclockwise. Securely tighten the new
spool housing onto the spindle.
Fig.L
26
20
9
24 25
27
28
Fig.M
26
27
Fig.J
18
17
Fig.K
Replacement Accessories
WARNING:To reduce the risk
of serious personal injury, turn appliance
off and remove battery before making any
adjustments or removing/installing attachments
oraccessories.
WARNING:The use of any accessory
not recommended by CRAFTSMAN for use with this
appliance could behazardous.

11
ENGLISH
Recommended accessories for use with your tool
are available at extra cost from your local dealer or
authorized service center. If you need assistance in
locating any accessory, please contact CRAFTSMAN, call
1-888-331-4569. Use CRAFTSMAN replacement spool head
Model No. CMZST260H.
Attaching and Adjusting the Shoulder
Strap (Fig.N)
A shoulder strap is recommended for any tool with a total
weight exceeding 13.2 pounds (6 kg) (Total weight includes
the power head, attachment and battery) A shoulder
strap is available at an additional cost from CRAFTSMAN at
1-888-331-4569, part number N769443. Attach the strap to
the tool as shown in Figure N and adjust for proper balance
and support
1. Attach the strap mount.
2. Snap the shoulder strap latch
29
onto the strap
mount
16
located on the unit, just in front of the ON/
OFF trigger as shown in Fig. N. Adjust the strap so it
fits over yourshoulder and provides proper balance
and support.
Fig.N
29
16
Versatrack™ (Fig. Q)
WARNING:To reduce the risk of
serious personal injury, turn unit off and remove
the battery pack before making any adjustments
or removing/installing attachments or
accessories. An accidental start-up can causeinjury.
WARNING:
To reduce the risk of serious
personal injury, do not use a damaged Versatrack™
integral hang hook or Versatrack™ Trackwall. A damaged
Versatrack™ integral hang hook or Versatrack™ Trackwall
will not support the weight of the tool.
WARNING:To reduce the risk of serious
personal injury, DO NOT suspend tool overhead or
suspend objects from the integral hang hook. ONLY
suspend tool on the Versatrack™ Trackwall using the
integral hang hook.
WARNING:The Versatrack™ integral
hang hook is intended to mount the tool onto a
Versatrack™ Trackwall rail. Do not use the integral
hang hook to mount the tool to any other surface.
WARNING:The Versatrack™ integral
hang hook is not a belt hook.
WARNING:When hanging objects on a
Versatrack™ Trackwall rail, adequately space the tools
in order to not exceed 75 lb (35 kg) per linear foot.
WARNING:Before using the tool make
sure that the Versatrack™ integral hang hook is
returned to its original position.
NOTICE:Only use VersaTrack™hook with
CRAFTSMAN provided attachments.
IMPORTANT: Versatrack™ accessories mount compatible
tools securely to the Versatrack™ Trackwallsystem.
1. Turn tool off, remove the battery pack and
removeaccessories.
CAUTION:Any product with exposed
cutting teeth must have them covered securely if it is
to be on theVersatrack™ Trackwall.
Replacing Guard (Fig.O, P)
An extended coverage guard is available (sold separately)
for extra coverage if desired. Use CRAFTSMAN replacement
Part Number N712987.
WARNING:Never operate appliance
without guard firmly in place. Damage or personal
injury could result.
Remove current guard.
1. Remove the guard screw 31 shown in Fig.O.
2. Slide the guard 8 off.
Assembling the new guard 32 .
3. Slide the guard into place as shown in Fig.P.
4. Replace and securely tighten the guard screw 31.
Fig.O
31
8
Fig.P
31
32

ENGLISH
12
Register Online
Thank you for your purchase. Register your product nowfor:
• WARRANTY SERVICE: Registering your product will
help you obtain more efficient warranty service in case
there is a problem with yourproduct.
• CONFIRMATION OF OWNERSHIP: In case of
an insurance loss, such as fire, flood or theft, your
registration of ownership will serve as your proof
ofpurchase.
• FOR YOUR SAFETY: Registering your product will
allow us to contact you in the unlikely event a safety
notification is required under the Federal Consumer
SafetyAct.
• Register online at www.craftsman.com/registration
Cleaning
WARNING:Blow dirt and dust out
of all air vents with clean, dry air at least once a
week. To minimize the risk of eye injury, always
wear ANSI Z87.1 approved eye protection when
performingthisprocedure.
WARNING:Never use solvents or other
harsh chemicals for cleaning the non-metallic parts
of the tool. These chemicals may weaken the plastic
materials used in these parts. Use a cloth dampened
only with water and mild soap. Never let any liquid
get inside the tool; never immerse any part of the tool
into aliquid.
Four Year Limited Warranty
CRAFTSMAN will repair or replace, without charge, any
defects due to faulty materials or workmanship for four years
from the date of purchase. This warranty does not cover
part failure due to normal wear or tool abuse. For further
detail of warranty coverage and warranty repair information,
visit www.craftsman.com or call 1-888-331-4569. This
warranty does not apply to accessories or damage caused
where repairs have been made or attempted by others.
THIS LIMITED WARRANTY IS GIVEN IN LIEU OF ALL OTHERS,
INCLUDING THE IMPLIEDWARRANTY OF MERCHANTABILITY
AND FITNESS FOR A PARTICULAR PURPOSE, AND EXCLUDES
ALL INCIDENTAL OR CONSEQUENTIAL DAMAGES. Some
states do not allow limitations on how long an implied
warranty lasts or the exclusion or limitation of incidental
or consequential damages, so these limitations may not
apply to you. This warranty gives you specific legal rights
and you may have other rights which vary in certain states
orprovinces.
NOTE: Battery warranty voided if the battery pack is
tampered with in any way. CRAFTSMAN is not responsible
for any injury caused by tampering and may prosecute
warranty fraud to the fullest extent permitted bylaw.
90 DAY MONEY BACK GUARANTEE
If you are not completely satisfied with the performance of
your CRAFTSMAN Power Tool or Nailer for any reason, you
can return it within 90 days from the date of purchase with a
receipt for a full refund – no questionsasked.
LATIN AMERICA: This warranty does not apply to products
sold in Latin America. For products sold in Latin America,
see country specific warranty information contained in
the packaging, call the local company or see website for
warrantyinformation.
FREE WARNING LABEL REPLACEMENT: If your warning
labels become illegible or are missing, call 1-888-331-4569
for a freereplacement.
SAVE THESE INSTRUCTIONS
Repairs
The charger and battery pack are notserviceable. There are
no serviceable parts inside the charger or battery pack.
WARNING:To assure product SAFETY
and RELIABILITY, repairs, maintenance and adjustment
(including brush inspection and replacement, when
applicable) should be performed by a CRAFTSMAN
factory service center or a CRAFTSMAN authorized
service center. Always use identical replacementparts.
2. Flip or pull open the integral hang hook 33 . It clicks
when locked into position.
3. Mount the integral hang hook to the
Versatrack™Trackwall.
NOTE: Versatrack™ accessories for use with your tool are
available at extra cost from your local dealer or authorized
service center. If you need assistance in locating any
accessory, please contact CRAFTSMAN, call 1-888-331-4569.
Fig.Q
33

FRANÇAIS
13
Définitions: symboles et termes d'alarmessécurité
Ces guides d'utilisation utilisent les symboles et termes d'alarmes sécurité suivants pour vous prévenir de situations
dangereuses et de risques de dommages corporels ou matériels.
DANGER :indique une situation dangereuse imminente qui, si elle n’est pas évitée, entraînera la mort ou
des blessuresgraves.
AVERTISSEMENT : indique une situation potentiellement dangereuse qui, si elle n’est pas évitée,
pourrait entraîner la mort ou des blessuresgraves.
ATTENTION :indique une situation potentiellement dangereuse qui, si elle n’est pas évitée, pourrait
entraîner des blessures légères oumodérées.
(Si utilisé sans aucun terme) Indique un message propre à la sécurité.
AVIS :indique une pratique ne posant aucun risque de dommages corporels mais qui par contre, si rien n’est
fait pour l’éviter, pourrait poser des risques de dommages matériels.
Français (traduction de la notice d’instructions originale)
AVERTISSEMENT :lire
tous les avertissements de sécurité et
toutes les directives. Le non-respect des
avertissements et des directives pourrait se
solder par un choc électrique, un incendie et/
ou une blessuregrave.
AVERTISSEMENT :afin
de réduire le risque de blessures, lire le mode
d’emploi del’outil.
Pour toute question ou remarque au sujet de
cet outil ou de tout autre outil CRAFTSMAN
composez le
numéro sans frais : 1-888-331-4569.
1 Gâchette de vitesse variable
2 Bouton de verrouillage
3 Bouton de réglage de la
vitesse
4 Poignée auxiliaire
5 Boîtier du moteur
6 Accessoire du taille-bordure
inférieur
7 Tige du taille-bordure supérieure
8 Protecteur
9 Boîtier de la bobine
10 Boîtier de la pile
11 Pile
12 Bouton de libération de la pile
13 Poignée principale
14 Pince
Fig. A 614 4 7 3 2
1
10 12
11
5
13
9 8

FRANÇAIS
14
Avertissements de sécurité
supplémentaires
AVERTISSEMENT :ce produit
n’est pas une déligneuse et n’est pas conçu pour être
utilisé à des fins de délignage.
AVERTISSEMENT :pour réduire
le risque de blessures par ricochet, travaillezen
vous éloignant de tout objet solide tel un mur,
des marches, de grosses pierres, des arbres, etc.
• PROTECTEUR: ne pas utiliser cet outil sans avoir fixé
le protecteur.
• PORTEZ DES VÊTEMENTS APPROPRIÉS : ne pas
porter des vêtements amples ou des bijoux. Ils peuvent
se coincer dans les pièces qui se déplacent. Les gants et
les chaussures à semelles en caoutchouc solides sont
recommandés lorsque vous travaillez à l’extérieur. Ne pas
utiliser cet outil lorsque vous êtes pieds nus ou que vous
portez des sandales ouvertes. Portez des pantalons longs
pour protéger vos jambes. Portez une protection pour vos
cheveux afin de les retenir.
• GARDEZ VOTRE VISAGE, VOS MAINS ET VOS PIEDS
HORS DE PORTEZ DU FIL EN ROTATION EN TOUT
TEMPS. Le fil en rotation a une fonction de coupe : faites
attention lorsque vous coupez autour des moustiquaires et
des plantes désirables.
• GARDEZ TOUS LES PASSANTS ÉLOIGNÉS : à une
distance sécuritaire de la zone de travail, particulièrement
les enfants. ASSUREZ-VOUS que les autres personnes et les
animaux sont à une distance d’au moins 100 pi (30 m).
14. Entretenez soigneusement l’outil – gardez bords
coupants aiguisés et nettoyez pour une meilleure
performance et afin de réduire le risque de blessure. Pour
lubrifier l’outil et remplacer les accessoires, suivez les
directives du manuel. Inspectez régulièrement la source
d’alimentation et si elle est endommagée, faites-la réparer
dans un établissement de services autorisé. Gardez
vos mains sèches, propres et exemptes de graisse et
depoussière.
15. Vérifiez les pièces endommagées – avant toute
utilisation ultérieure de l’outil, un protecteur ou une autre
pièce qui est endommagé doit être soigneusement vérifié
afin de déterminer s’il fonctionnera correctement et s’il
effectuera la fonction prévue. Vérifiez l’alignement des
pièces qui se déplacent, les fixations des pièces qui se
déplacent, le bris des pièces, le montage et tout autre état
qui peut affecter son utilisation. Un protecteur ou une autre
pièce qui est endommagé doit être convenablement réparé
ou remplacé par un centre de services autorisé sauf si c’est
indiqué ailleurs dans ce manuel.
CONSERVEZ CES INSTRUCTIONS
CONSIGNES IMPORTANTES DE SÉCURITÉ
AVERTISSEMENT :afin de
réduire le risque de blessure :
• Avant toute utilisation, assurez-vous que toutes
les personnes qui utiliseront l’outil lisent et
comprennent toutes les consignes de sécurité
et les autres renseignements compris dans le
présent manuel.
• Conservez ces instructions et consultez-
lessouvent.
AVERTISSEMENT :lors de
l’utilisation d’outils de jardinage électriques, les
mesures de précaution de base devraient toujours
être prises pour réduire la possibilité d’incendie,
de choc électrique et de blessures, en suivant les
recommandations suivantes.
1 . Évitez les environnements dangereux – ne pas utiliser
des appareils dans des endroits humides ou mouillés.
2. Ne pas utiliser sous la pluie.
3. Gardez les enfants éloignés – tous les visiteurs devraient
être gardés à une distance sécuritaire de l’aire de travail.
4. Portez des vêtements appropriés – ne pas porter des
vêtements amples ou des bijoux. Ils peuvent se coincer
dans les pièces qui se déplacent. L’utilisation de gants en
caoutchouc et de très bonnes chaussures est recommandée
lors du travail extérieur. Portez une protection pour vos
cheveux afin de les retenir.
5. Utilisez des lunettes de sécurité – utilisez un
masque facial ou antipoussières s’il y a de la poussière
durantl’utilisation.
6. Utilisez le bon outil – ne pas utiliser cet outil pour toute
tâche autre que celles pour lesquelles il est conçu.
7. ÉVITER LES DÉMARRAGES ACCIDENTELS - Ne portez
pas votre doigt sur la gâchette lorsque la batterie est
installée.
8. Ne pas saisir les lames de coupe exposées ou
les bords coupants lorsque vous prenez ou
tenezl’appareil.
9. Ne pas forcer l’outil – le travail sera mieux fait et avec
moins de probabilité de risque à la vitesse pour laquelle il
a été conçu.
10. Ne pas s’étirer – maintenez vos pieds bien d’aplomb sur le
sol et un bon équilibre en tout temps.
11. Demeurez vigilant– regardez ce que vous faites. Faites
preuve de bon sens. Ne pas utiliser l’appareil lorsque vous
êtes fatigué.
12. Débranchez l’appareil – retirez le bloc-piles lorsque vous
ne l’utilisez pas, avant de réparer, lorsque vous changez les
accessoires comme les lames et autres.
13. Entreposez les outils arrêtés à l’intérieur – lorsqu’ils
ne sont pas utilisés, les outils doivent être entreposés à
l’intérieur dans un endroit sec et élevé ou verrouillé hors de
portée des enfants.
Taille-bordure compatible avec accessoires 60V max*
CMCSTSB970

FRANÇAIS
15
L’étiquette apposée sur votre outil peut inclure les symboles
suivants. Les symboles et leur définition sont indiqués ci-après:
V.........................volts
Hz .......................hertz
min.....................minutes
ou DC.....courant continu
......................fabrication classe I
(mis à la terre)
…/min.............. par minute
BPM.................... battements par
minute
IPM..................... impacts par minute
RPM.................... révolutions par
minute
sfpm (plpm).......pieds linéaires par
minute
SPM (FPM)......... fréquence par
minute
OPM.................... oscillations por
minuto
A.........................ampères
W........................watts
ou AC..........courant alternatif
ou AC/DC...courant alternatif
ou continu
......................fabrication classe II
(double isolation)
no.......................vitesse à vide
n.........................vitesse nominale
......................borne de terre
..................... symbole
d’avertissement
..................... radiation visible
..................... protection
respiratoire
..................... protection oculaire
..................... protection auditive
..................... lire toute la
documentation
IPXX....................symbole IP
Consigne de sécurité supplémentaire
AVERTISSEMENT :ne jamais
modifier l’outil électrique ni aucun de ses composants,
car il y a risques de dommages corporels oumatériels.
AVERTISSEMENT :porter
SYSTEMATIQUEMENT des lunettes de
protection. Les lunettes courantes NE sont PAS des
lunettes de protection. Utiliser aussi un masque
antipoussières si l'opération est poussiéreuse. PORTER
SYSTÉMATIQUEMENT UN ÉQUIPEMENT DE SÉCURITÉ
HOMOLOGUÉ:
• Protection oculaire ANSI Z87.1 (CAN/CSA Z94.3);
• Protection auditive ANSI S12.6 (S3.19);
• Protection des voies respiratoires
NIOSH/OSHA/MSHA.
AVERTISSEMENT :certaines
poussières contiennent des produits chimiques
reconnus dans l’État de la Californie pour causer le
cancer et des anomalies congénitales ou autres effets
nuisibles sur la reproduction. Certains exemples de ces
produits chimiques sont:
• des composants de fertilisants,
• des composants d’insecticides, d’herbicides et
depesticides,
• l’arsenic et le chrome provenant du bois de
construction traité chimiquement.
• FAITES TRÈS ATTENTION lorsque vous travaillez près
d’objets solides et au besoin, taillez à la main.
• ÉVITEZ LES DÉMARRAGES ACCIDENTELS – ne pas
transporter avec votre doigt sur la gâchette si la pile
estinstallée.
• DOMMAGES À L’OUTIL – si vous frappez ou si vous vous
emmêlé avec un objet étranger, arrêtez immédiatement
l’outil, retirez la pile, vérifiez les dommages et faites réparer
les dommages avant de tenter de le réutiliser. Ne pas
l’utiliser avec un moyeu ou une bobine brisé.
• NE PAS UTILISER les outils électriques portatifs dans une
atmosphère gazeuse ou explosive. Les moteurs de ces
outils produisent des étincelles et ces étincelles pourraient
enflammer les vapeurs.
• DEMEUREZ VIGILANT – ne pas utiliser cet outil lorsque
vous êtes fatigué, malade ou sous l’influence de l’alcool, de
drogues ou de médicaments.
• NE PAS immerger l’outil dans l’eau ou l’asperger avec
untuyau.
• NE PAS laisser pénétrer tout liquide à l’intérieur. Si l’outil
est mouillé, laissez-le sécher pendant au moins 48 heures.
• NE PAS nettoyer avec une laveuse à pression.
• NE PAS entreposer l’outil sur ou près de fertilisants ou de
produits chimiques.
Pour réduire votre exposition à ces produits chimiques,
portez un équipement de sécurité approuvé, comme
un masque antipoussière spécialement conçu pour
filtrer les particules microscopiques.
AVERTISSEMENT :cet outil peut
produire et/ou répandre de la poussière susceptible
de causer des dommages sérieux et permanents
au système respiratoire. Utiliser systématiquement
un appareil de protection des voies respiratoires
homologué par le NIOSH ou l’OSHA. Diriger les
particules dans le sens opposé au visage et aucorps..
AVERTISSEMENT :pendant
l’utilisation, porter systématiquement une
protection auditive individuelle adéquate
homologuée ANSI S12.6 (S3.19). Sous certaines
conditions et suivant la durée d’utilisation, le bruit
émanant de ce produit pourrait contribuer à une perte
de l’acuitéauditive.
ATTENTION :après utilisation,
ranger l’outil sur son côté, sur une surface stable,
là où il ne pourra ni faire trébucher ni faire chuter
quelqu’un. Certains outils équipés d’un large bloc-
piles peuvent tenir à la verticale sur celui-ci, mais
manquent alors destabilité.
• Prendre des précautions à proximité des évents,
car ils cachent des pièces mobiles. Vêtements amples,
bijoux ou cheveux longs risquent de rester coincés dans ces
piècesmobiles.

FRANÇAIS
16
car il pourrait exploser et causer un incendie. Pendant
l’incinération des blocs-piles au lithium-ion, des vapeurs et
matières toxiques sontdégagées.
• En cas de contact du liquide de la pile avec la peau,
rincer immédiatement au savon doux et à l’eau. En
cas de contact oculaire, rincer l’œil ouvert à l’eau claire
une quinzaine de minutes ou jusqu’à ce que l’irritation
cesse. Si des soins médicaux s’avéraient nécessaires, noter
que l’électrolyte de la pile est composé d’un mélange de
carbonates organiques liquides et de sels delithium.
• Le contenu des cellules d’une pile ouverte peut
causer une irritation respiratoire. En cas d’inhalation,
exposer l’individu à l’air libre. Si les symptômes persistent,
consulter unmédecin.
AVERTISSEMENT :risques de
brûlure. Le liquide de la pile peut s’enflammer s’il est
exposé à des étincelles ou à uneflamme.
AVERTISSEMENT :risques
d’incendie. Ne jamais tenter d’ouvrir le bloc-piles
pour quelque raison que ce soit. Si le boîtier du
bloc-piles est fissuré ou endommagé, ne pas l’insérer
dans un chargeur. Ne pas écraser, laisser tomber, ou
endommager les blocs-piles. Ne pas utiliser un bloc-
piles ou un chargeur qui a reçu un choc violent, ou si
l’appareil est tombé, a été écrasé ou endommagé de
quelque façon que ce soit (p. ex. percé par un clou,
frappé d’un coup de marteau, piétiné). Les blocs-piles
endommagés doivent être renvoyés à un centre de
réparation pour y êtrerecyclés.
Recommandations de stockage
1. Le lieu idéal de rangement est un lieu frais et sec,
à l’abri de toute lumière solaire directe et de toute
températureexcessive.
2. Pour un stockage prolongé, il est recommandé
d’entreposer le bloc-piles pleinement chargé dans
un lieu frais et sec, hors du chargeur pour optimiser
lesrésultats.
REMARQUE: les blocs-piles ne devraient pas être
entreposés complètement déchargés. Il sera nécessaire de
recharger le bloc-piles avantréutilisation.
Instructions d’entretien du blocs-pile
Éliminer toute saleté ou graisse de la surface externe
du blocs-pile à l’aide d’un chiffon ou d’une brosse
non métallique douce. N’utiliser ni eau ni aucun
nettoyantliquide.
Témoin de Charge du Bloc-Piles
Certains blocs-piles CRAFTSMAN possèdent un témoin de
charge qui consiste en trois voyants Del indiquant le niveau
de charge dubloc-piles.
Le témoin de charge indique approximativement le niveau
de charge restant dans le bloc-piles en fonction des
voyantssuivants:
Consignes importantes de sécurité
lesblocs-piles
AVERTISSEMENT :lisez toutes
les consignes de sécurité, les instructions et les
symboles d’avertissements du bloc-piles, du
chargeur et du produit. Tout manquement aux
avertissements et instructions pose des risques
de décharges électriques, d’incendie et/ou de
blessures graves.
• Ne pas recharger ou utiliser un bloc-piles en milieu
déflagrant, en présence, par exemple, de poussières,
gaz ou liquides inflammables. Le fait d’insérer ou
retirer un bloc-piles de son chargeur pourrait causer
l’inflammation de poussières ou d’émanations.
• Lorsque non utilisé, garder le bloc-piles éloigné de
petits objets métalliques comme des trombones
attache-feuilles, des pièces de monnaie, des clés, des
clous et vis ou autres pièces qui pourraient court-
circuiter les bornes. Un court-circuit pourrait causer des
brûlures ou unincendie.
• NE JAMAIS forcer l’insertion d’un bloc-piles dans un
chargeur. NE modifier un bloc-piles d’AUCUNE façon
pour le faire rentrer dans un chargeur incompatible,
car il pourrait se briser et causer des dommages
corporels graves. Consulter le tableau en dernière page
de ce manuel pour connaître les compatibilités entre
chargeurs et blocs-piles.
• Recharger les blocs-piles exclusivement dans des
chargeursCRAFTSMAN.
• NE PAS éclabousser le bloc-piles ou l’immerger dans l’eau
ou dans tout autreliquide.
• Ne pas entreposer ou utiliser l’appareil et le bloc-
piles en présence de températures ambiantes
pouvant excéder 40°C (104°F) (comme dans des
hangars ou des bâtiments métalliques l’été). Pour
préserver leur durée de vie, entreposer les blocs-piles dans
un endroit frais etsec.
REMARQUE: ne pas mettre un bloc-piles dans un
outil dont la gâchette est verrouillée en position de
marche. Ne jamais bloquer l’interrupteur en position
deMARCHE.
• Ne pas exposer le bloc-piles ou l’outil/l’appareil au
feu ou à une température excessive. L’exposition au
feu ou à une température au-dessus de 130° C (265° F)
pourrait entraîner uneexplosion.
• Ne pas incinérer le bloc-piles même s’il est
sévèrement endommagé ou complètement usagé,
LIRE TOUTES LES CONSIGNES
BLOCSPILES ET CHARGEURS
Le bloc-piles n’est pas totalement chargé d’usine. Avant
d’utiliser le bloc-piles et le chargeur, lire les consignes de
sécurité ci-après puis suivre la procédure de chargement
indiquée. Pour commander un bloc-piles de rechange,
s’assurer d’en inclure le numéro de catalogue et la tension.

FRANÇAIS
17
Directives de sécurité importantes
propres à tous les chargeurs de piles
AVERTISSEMENT :lisez toutes
les consignes de sécurité, les instructions et les
symboles d’avertissements du bloc-piles, du
chargeur et du produit. Tout manquement aux
avertissements et instructions pose des risques
de décharges électriques, d’incendie et/ou de
blessures graves.
• NE PAS tenter de recharger le bloc-piles avec tout
autre chargeur qu’une unité CRAFTSMAN. Le
chargeur CRAFTSMAN et son bloc-piles sont conçus
spécialement pour fonctionner conjointement.
• Ces chargeurs n’ont pas été conçus pour une
utilisation autre que recharger les blocs-piles
rechargeables CRAFTSMAN. Toute autre utilisation
comporte des risques d’incendie, de chocs électriques
oud’électrocution.
• Protéger le chargeur de la pluie ou de laneige.
• Tirer sur la fiche plutôt que sur le cordon
pour débrancher le chargeur. Cela permet de
réduire les risques d’endommager la fiche ou le
cordond’alimentation.
• S’assurer que le cordon est protégé de manière à
ce que personne ne marche ni ne trébuche dessus,
ou à ce qu’il ne soit ni endommagé ni soumis à
aucunetension.
• N’utiliser une rallonge qu’en cas de nécessité
absolue. L’utilisation d’une rallonge inadéquate
comporte des risques d’incendie, de chocs électriques
oud’électrocution.
• Pour utiliser un chargeur à l’extérieur, le placer
dans un endroit sec et utiliser une rallonge conçue
pour l’extérieur. L’utilisation d’une rallonge conçue pour
l’extérieur réduit les risques de chocsélectriques.
• Pour la sécurité de l’utilisateur, utiliser une rallonge
de calibre adéquat (AWG, American Wire Gauge
[calibrage américain normalisé des fils électriques]).
Dans certaines régions, la mise au rebut ou aux ordures
municipales des piles au nickel-cadmium, à l’hydrure
métallique de nickel ou au lithium-ion, est illégale; le
programme de l’Appel à RecyclerMD constitue donc une
solution pratique etécologique.
Appel à Recycler Canada, Inc., en collaboration avec
CRAFTSMAN et d’autres utilisateurs de piles, a mis sur
pied de programme aux États-Unis et au Canada pour
faciliter la collecte des piles au nickel-cadmium, à l’hydrure
métallique de nickel ou au lithium-ion usagées. Aidez-nous
à protéger l’environnement et à conserver nos ressources
naturelles en renvoyant les piles au nickel-cadmium, à
l’hydrure métallique de nickel ou au lithium-ion usagées
à un centre de réparation autorisé CRAFTSMAN ou chez
votre détaillant afin qu’elles y soient recyclées. On peut en
outre se renseigner auprès d’un centre de recyclage local
pour connaître d’autres sites lesacceptant. SRPRCMD est une
marque déposée de l’Appel à Recycler Canada,Inc.
Le sceau SRPRCMD
Le sceau SRPRCMD (Société de recyclage
des piles rechargeables du Canada)
apposé sur une pile au nickel-cadmium, à
hydrure métallique de nickel ou au lithium-ion (ou un bloc-
piles) indique que les coûts de recyclage de ces derniers
en fin d’utilisation ont déjà été réglés par CRAFTSMAN.
Chargé de 75 à 100%
Chargé de 51 à 74%
Chargé de < 50%
Le bloc-piles doit être rechargé
Pour activer le témoin de charge, maintenez appuyé le
bouton du témoin de charge. Une combinaison des trois
voyants Del s’allumera indiquant le niveau de charge.
Lorsque le niveau de charge du bloc-pile atteint la limite
minimale d’utilisation, le témoin de charge reste éteint et le
bloc-piles doit êtrerechargé.
REMARQUE: le témoin de charge ne fait qu’indiquer
le niveau de charge du bloc-piles. Il ne donne aucune
indication quant au fonctionnement de l’outil. Son
propre fonctionnement pourra aussi varier en fonction
des composants produit, de la température et de
l’applicationd’utilisation.
Pour plus d’informations quant au témoin de charge du
bloc-piles, veuillez appeler le CRAFTSMAN 1-888-331-4569
ou vous rendre sur notre site www.craftsman.com.
Transport
AVERTISSEMENT :risques
d’incendie. Au moment de ranger ou transporter
le bloc-piles, veiller à protéger ses bornes à
découvert de tout objet métallique. Par exemple,
éviter de placer le bloc-piles dans un tablier, une
poche, une boîte à outils ou un tiroir, etc. contenant
des objets tels que clous, vis, clés, etc. Le fait de
transporter des blocs-piles comporte des risques
d’incendie, car les bornes des piles pourraient
entrer, par inadvertance, en contact avec des
objets conducteurs, tels que: clés, pièces de
monnaie, outils ou autres. La réglementation sur les
produits dangereux (Hazardous Material Regulations)
du département américain des transports interdit, en
fait, le transport des blocs-piles dans les commerces
ou dans les avions dans les bagages de cabine, À
MOINS qu’ils ne soient correctement protégés de
tout court-circuit. Aussi lors du transport individuel
de blocs-piles, s’assurer que leurs bornes sont bien
protégées et isolées de tout matériau pouvant entrer
en contact avec elles et provoquer un court-circuit.
REMARQUE: il ne faut pas laisser de piles au li-ion
dans les bagagesenregistrés.

FRANÇAIS
18
AVERTISSEMENT :risques de
chocs électriques. Ne laisser aucun liquide pénétrer
dans le chargeur, des chocs électriques pourraient
enrésulter.
AVERTISSEMENT :risques de
brûlure. Ne submerger le bloc-piles dans aucun
liquide et le protéger de toute infiltration de liquide. Ne
jamais tenter d’ouvrir le bloc-piles pour quelque raison
que ce soit. Si le boîtier plastique du bloc-piles est brisé
ou fissuré, le retourner dans un centre de réparation
pour y être recyclé.
ATTENTION :risques de brûlure.
Pour réduire tout risque de dommages corporels,
ne recharger que des blocs-piles rechargeables
CRAFTSMAN out autre type de piles pourrait exploser
et causer des dommages corporels etmatériels.
ATTENTION :sous certaines
conditions, lorsque le chargeur est connecté au bloc
d’alimentation, des matériaux étrangers pourraient
court-circuiter le chargeur. Les corps étrangers
conducteurs tels que (mais pas limité à) poussières de
rectification, débris métalliques, laine d’acier, feuilles
d’aluminium, ou toute accumulation de particules
métalliques doivent être maintenus à distance des
orifices du chargeur. Débrancher systématiquement
le chargeur lorsque le bloc-piles n’y est pas inséré.
Débrancher systématiquement le chargeur avant
toutentretien.
Chargement du bloc-piles
REMARQUE: afin d’assurer la performance et la vie
maximales des blocs-piles au lithium-ion, chargez
complètement le bloc-pile avant la première utilisation.
1. Branchez le chargeur dans une prise appropriée avant
d’insérer le bloc-piles.
2. Branchez le chargeur et le bloc-piles en vous assurant
que le bloc-piles est bien mis en place. Le voyant rouge
(chargement) clignotera sans cesse indiquant que le
processus de chargement est commencé.
3. La fin de la recharge sera indiquée par le voyant qui
demeurera allumé de façon continue. Le bloc-piles est
complètement chargé et peut être retiré utilisé à ce
moment ou laissé dans le chargeur.
REMARQUE: pour retirer le bloc-piles, on doit appuyer sur
le bouton de libération du bloc-piles sur certains chargeurs
Indicateurs
Bloc-piles en Cours
de Chargement
Bloc-piles Chargé
Plus le calibre est petit, et plus sa capacité est grande. Un
calibre16, par exemple, a une capacité supérieure à un
calibre18. L’usage d’une rallonge de calibre insuffisant
causera une chute de tension qui entraînera perte de
puissance et surchauffe. Si plus d’une rallonge est utilisée
pour obtenir une certaine longueur, s’assurer que chaque
rallonge présente au moins le calibre de fil minimum. Le
tableau ci-dessous illustre les calibres à utiliser selon la
longueur de rallonge et l’intensité nominale indiquée sur
la plaque signalétique. En cas de doute, utiliser le calibre
suivant. Plus le calibre est petit, plus la rallonge peut
supporter decourant.
Calibre minimum pour les cordons d'alimentation
Volts Longueur totale du cordon
d'alimentation en mètre (pieds)
120V 7,6 (25) 15,2 (50) 30,5 (100) 45,7 (150)
240V 15,2 (50) 30,5 (100) 61,0 (200) 91,4 (300)
Ampères
AWG
Plus que Pas plus
que
0 6 18 16 16 14
610 18 16 14 12
10 12 16 16 14 12
12 16 14 12 Non recommandé
AVERTISSEMENT : si la fiche ou
le cordon d'alimentation est endommagé, il doit être
remplacé par le fabricant ou son représentant ou par
une personne non moins qualifiée pour éviter tout
danger.
• Ne poser aucun objet sur le chargeur. Ne pas mettre
le chargeur sur une surface molle qui pourrait en
bloquer la ventilation et provoquer une surchauffe
interne. Éloigner le chargeur de toute source de chaleur.
Le chargeur dispose d’orifices d’aération sur le dessus et le
dessous duboîtier.
• Ne pas le faire fonctionner avec un cordon
d’alimentation ou une ficheendommagée–les
remplacer immédiatement.
• Ne pas utiliser le chargeur s’il a reçu un coup, fait une
chute ou a été endommagé de quelque façon que ce
soit. Le ramener dans un centre de réparationagréé.
• Ne pas démonter le chargeur. Pour tout service
ou réparation, le rapporter dans un centre de
réparation agréé. Le fait de le réassembler de façon
incorrecte comporte des risques de chocs électriques,
d’électrocution et d’incendie.
• Débrancher le chargeur du secteur avant tout
entretien. Cela réduira tout risque de chocs
électriques. Le fait de retirer le bloc-piles ne réduira pas
cesrisques.
• NE JAMAIS tenter de connecter 2 chargeursensemble.
• Le chargeur a été conçu pour être alimenté en
courant électrique domestique standard de
120volts. Ne pas tenter de l’utiliser avec toute
autretension.
This manual suits for next models
2
Table of contents
Languages:
Other Crafstman Trimmer manuals


