Crane S002391 User manual

Air Resistance
Rower
For a full body cardio workout
YEAR WARRANTY
1
AFTER SALES SUPPORT
1800 465 070
MODEL: S002391 PRODUCT CODE: 14498 06/2020
W2
INSTRUCTION MANUAL
AU

AFTER SALES SUPPORT
1800 465 070
MODEL: S002391 PRODUCT CODE: 14498 06/2020
Introduction
Congratulations!
You have made an excellent choice with the purchase of this quality CRANE®product.
By doing so you now have the assurance and peace of mind which comes from purchasing a product
that has been manufactured to the highest standards of performance and safety, supported by the
high quality standards of ALDI.
We want you to be completely satisfied with your purchase so this CRANE®product is backed by a
comprehensive manufacturer’s 1 year warranty and an outstanding after sales service through our
dedicated Helpline.
We hope you will enjoy using your purchase for many years to come.
If you require technical support or in the unlikely event that your purchase is faulty please telephone
our Helpline for immediate assistance. Faulty product claims made within the 1 year warranty period
will be repaired or replaced free of charge provided that you have satisfactory proof of purchase (keep
your till receipt safe!). This does not affect your statutory rights. However, be aware that the warranty
will become null and void if the product is found to have been deliberately damaged, misused or
disassembled.
You can also register your product at https://www.aldi.com.au/en/about-aldi/product-registration/ to
keep up-to-date with important product information.

MODEL: S002391 PRODUCT CODE: 14498 06/2020
AFTER SALES SUPPORT
1800 465 070
3
Contents
2 Introduction
4 Getting Started
7 General Information and Safety Instructions
9 Hardware Identification Chart
10 Assembly Parts List
11 Assembly Instructions
19 Workout Area
20 How To Use The Rower
21 How To Use The Console Display
28 How To Store The Rower
29 Exercise Guidelines
30 Suggested Stretches
31 Technical Parts List
33 Exploded Diagram

AFTER SALES SUPPORT
1800 465 070
MODEL: S002391 PRODUCT CODE: 14498 06/2020
Getting Started
Before you begin to assemble the product, remove all the parts from the packaging and check that you
have every part from the parts list on page 8 & 9. If you are missing any parts please call our Service
Centre on 1800 465 070. Once you have checked all the parts, please read through the instructions
again carefully and then you are ready to get started. Ensure you assemble the Rowing Machine on a
level surface and check that all the hardware is fitted tightly before use.

MODEL: S002391 PRODUCT CODE: 14498 06/2020
AFTER SALES SUPPORT
1800 465 070
5
1
Air Resistance Rower
Warranty Details
The product is guaranteed to be free from defects in workmanship and parts for a period of
12 months from the date of purchase. Defects that occur within this warranty period, under
normal use and care, will be repaired, replaced or refunded at our discretion. The benefits
conferred by this warranty are in addition to all rights and remedies in respect of the
product that the consumer has under the Competition and Consumer Act 2010 and similar
state and territory laws.
Our goods come with guarantees that cannot be excluded under the Australian Consumer
Law. You are entitled to a replacement or refund for a major failure and for compensation for
any other reasonably foreseeable loss or damage. You are also entitled to have the goods
repaired or replaced if the goods fail to be of acceptable quality and the failure does not
amount to a major failure.

AFTER SALES SUPPORT
1800 465 070
MODEL: S002391 PRODUCT CODE: 14498 06/2020
1
Air Resistance Rower
Repair and Refurbished
Goods or Parts Notice
Unfortunately, from time to time, faulty products are manufactured which need to be
returned to the Supplier for repair.
Please be aware that rather than repairing goods, we may replace them with refurbished
goods of the same type or use refurbished parts in the repair process.
Please be assured, refurbished parts or replacements are only used where they meet
ALDI’s stringent quality specifications.
If at any time you feel your repair is being handled unsatisfactorily, you may escalate your
complaint. Please telephone us on 1800 465 070 or write to us at:
ACTION SPORTS EQUIPMENT PTY LTD.
48B Egerton Street
Silverwater NSW 2128 Australia
1800 465 070
Opening Hours - 9:00am - 4:30pm (Mon-Fri), 9:00am - 3:00pm (Sat)

MODEL: S002391 PRODUCT CODE: 14498 06/2020
AFTER SALES SUPPORT
1800 465 070
7
General Information and Safety Instructions
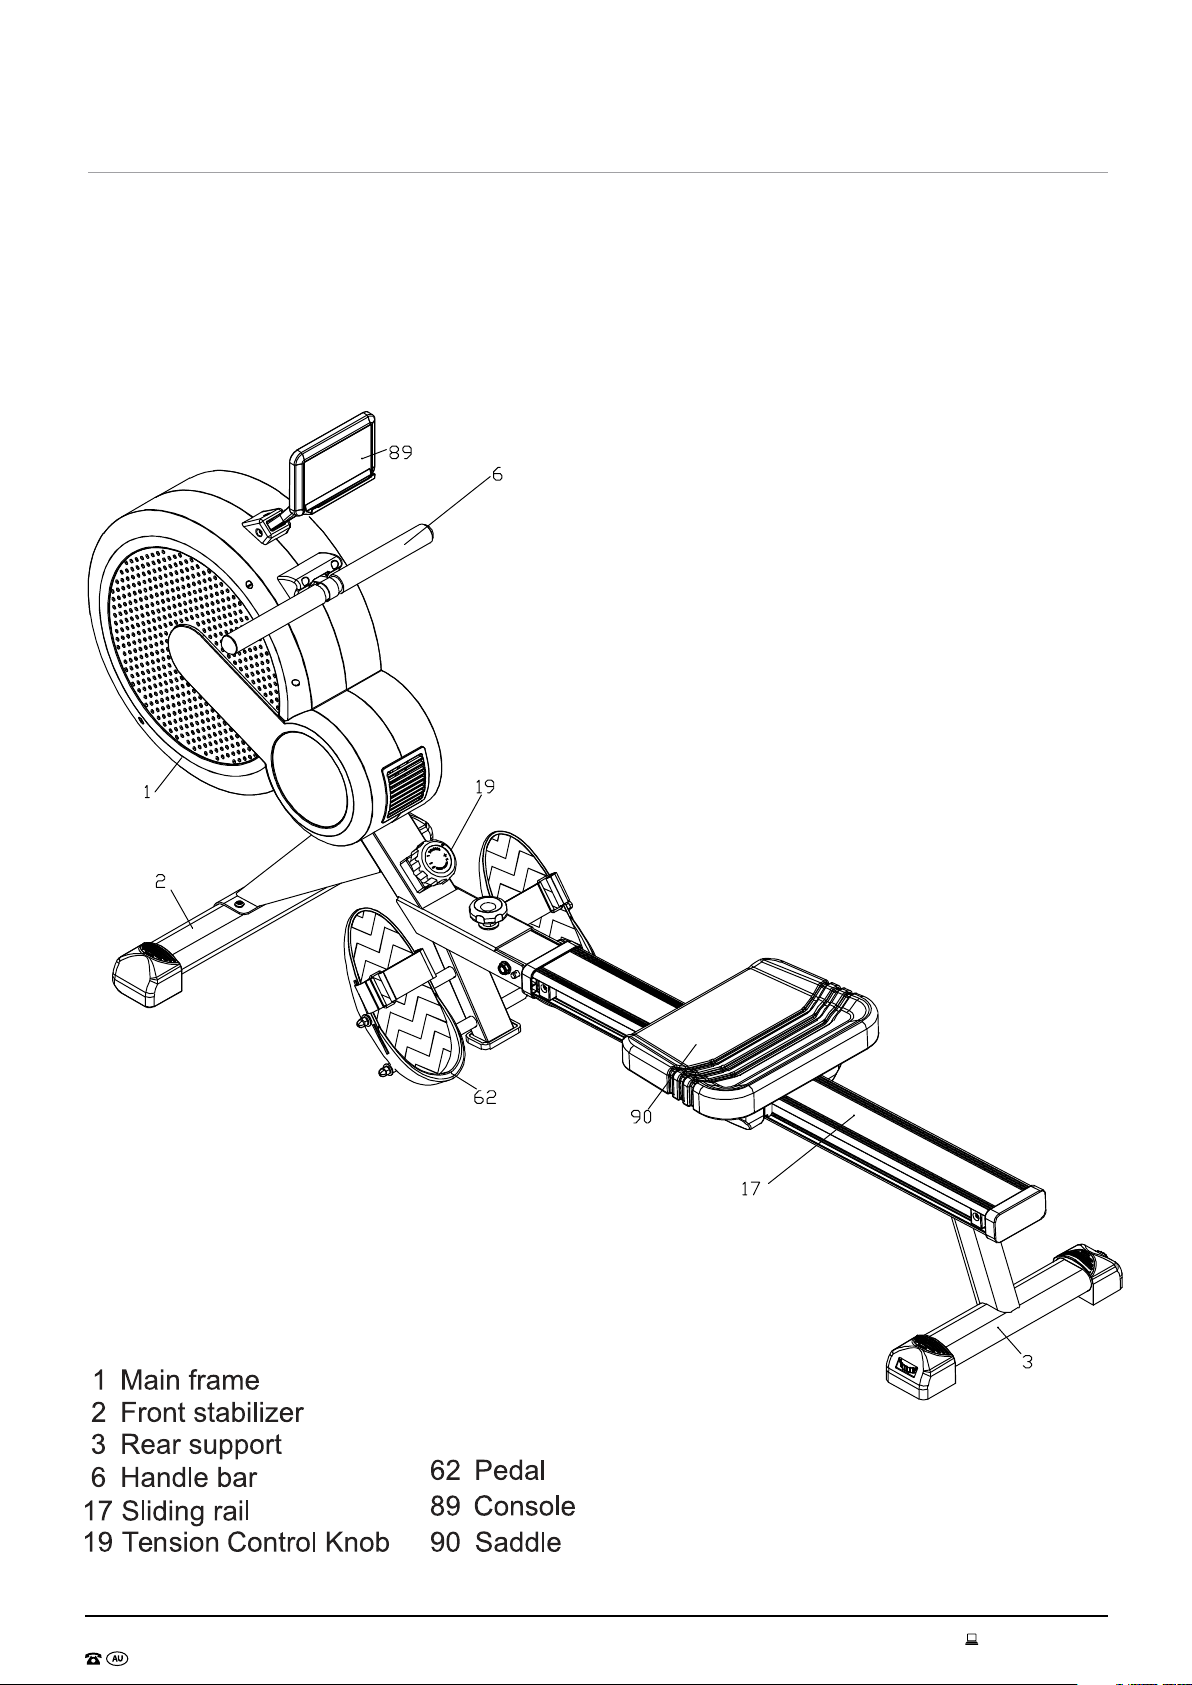
To reduce the risk of serious injury, read the entire manual before you assemble or operate this rowing
machine. In particular, please note the following safety precautions. Please keep this manual in a safe
place for future reference. Any defective components should be replaced or repaired immediately and
the rowing machine should not be used until the repair has occurred.
WARNING: It is strongly recommended that you consult your physician prior to beginning
an exercise program. If dizziness, nausea, chest pains, or any other abnormal symptoms are
experienced while using this rowing machine, stop the workout at once and consult a physician
immediately.
1. It is the responsibility of the owner to ensure that all users of this product are properly informed as
to how to use this product safely.
2. This product is intended for domestic use only. Do not use in any commercial, rental, or
institutional setting.
3. Use the equipment only for intended use, as described in this manual. Do not use attachments not
recommended by the manufacturer.
4. Keep this equipment indoors, away from moisture and dust. Do not put the equipment in a garage,
outbuilding, covered patio, or near water.
5. Your product is intended for use in clean dry conditions. You should avoid storage in excessively
cold or damp places as this may lead to corrosion and other related problems that are outside our
control.
6. Keep unsupervised children away from the equipment.
7. Disabled persons should not use the equipment without a qualified person or doctor in attendance.
8. Always wear appropriate workout clothing when exercising. Do not wear loose or baggy clothing, as
it may get caught in the equipment. Wear trainers to protect your feet while exercising.
9. Do not place any sharp objects around the equipment.
10. Keep hands away from all moving parts.
11. If any of the adjustment devices are left projecting, they could interfere with the user’s movement.
12. Before using the equipment to exercise, always perform stretching exercises to properly warm up.
13. Only one person at a time should use the equipment.
14. If the user experiences dizziness, nausea, chest pain, or other abnormal symptoms stop the
workout and seek immediate medical attention.
15. Injuries to health may result from incorrect or excessive training.
16. This product is suitable for a maximum user weight of: 120kg.
17. This product conforms to: ISO 20957-1 and ISO-20957-7 Class (H) - Home Use - Class (C).
18. Braking system is speed independent.
WARNING: Incorrect installation of batteries may cause battery leakage and corrosion, resulting in
damage to the computer.
WARNING: Do not mix old and new batteries, or batteries of different types.
WARNING: Do not dispose of batteries in a fire.
WARNING: Do not dispose of batteries with normal household waste, take to a local recycling centre.

AFTER SALES SUPPORT
1800 465 070
MODEL: S002391 PRODUCT CODE: 14498 06/2020
General Information and Safety Instructions (cont)
Safe Disposal Of Product And Packaging
Unpacking
Unpack the unit where it will be used. Place the Vibration Trainer carton on a level flat surface. When
unpacking the unit, remove any packaging materials from the interior. Keep the original packaging
carton and materials in a safe place. It will help prevent any damage if the product needs to be
transported in the future. Plastic wrapping can be a suffocation hazard, so please ensure all packaging
materials are kept safely away from children and babies.
Packaging Disposal
Government guidelines ask that we reduce the amount of waste material disposed of in land fill sites.
We therefore ask that you dispose of all packaging waste responsibly and recycle where possible.
End of Life Disposal
We hope you enjoy many years of use from your Vibration Trainer. However, a time will come when your
Vibration Trainer will come to the end of its useful life. You are responsible for the appropriate disposal
of your unit to a recognised public collection facility or council disposal service.
Technical Specifications
Assembled Dimensions: 2040 x 650 x 1020mm
Net Weight: 30 kg
Max.load: 120 kg
Version: 1.1
Date of issue: 27th March, 2020

MODEL: S002391 PRODUCT CODE: 14498 06/2020
AFTER SALES SUPPORT
1800 465 070
9
Hardware Identification Chart
Use the drawings below to identify the hardware needed for assembly. The number in parentheses
below each drawing is the part number.
NOTE: If a part is not in the hardware kit, check to see if it has been pre-assembled.
Step 2Step 1
Step 5 Step 4
Step 3
Step 6
(40) OD14*ID10.5* 1.5 T
hexagon screw - 2pcs (44) M8*20 screw - 4pcs (36) OD20*ID8.5* 1.5T
(30) OD22*ID13*2.0T
(36) OD20*ID8.5*1.5T
(100) Screw cover-1pc(31) OD32*ID13*2.0T
(83) saddle carrier
PP blocker-2pcs
(50) M3*10 self stapping
screw - 1pc
(43) M6*10 round cross
head screw - 1pc
(54) M4*16 self tapping
screw - 1pc
(47) M6*16 round cross
head screw - 2pcs
(86) wire plug-1pc
(46) M8 split washer
- 4pcs
(9) pedals gap tube- 2pcs
5MM allen wrench
6MM allen wrench
Multi-functional spanner
Spanner screw driver

AFTER SALES SUPPORT
1800 465 070
MODEL: S002391 PRODUCT CODE: 14498 06/2020
Part
Number Description Quantity
1
Frame
1
62
Pedal (L/R)
2
2
Front Stabiliser
1
3
Rear Support
1
Part
Number Description Quantity
90
Saddle
1
17
Sliding Rail
1
89
Console
1
Assembly Parts List
Components

MODEL: S002391 PRODUCT CODE: 14498 06/2020
AFTER SALES SUPPORT
1800 465 070
11
Assembly Instructions
Find a clean flat surface to unpack and assemble your rowing machine. Prior to beginning assembly,
ensure that you have all of the parts listed in the Assembly Parts List and Hardware Identification
Chart.
Assembly Warnings
• The product must be installed on a stable and level surface. To protect the floor or carpet from
damage, place a mat under the rower.
• Assemble the item as close to its final position (in the same room) as possible.
• Make sure you have enough space to layout the parts before starting.
• Keep children and animals away from the exercise area, small parts could pose a choking hazard if
swallowed.
• Dispose of all packaging carefully and responsibly.
• Check you have all the components and tools listed in the parts list, bearing in mind that, for ease of
assembly, some components are pre-assembled.
• The assembly of this equipment is best carried out by 2 people.
If you’re missing any parts, please contact our Service Centre on 1800 465 070 or email
service@actionspares.com.au to arrange for replacement parts to be sent to you.

AFTER SALES SUPPORT
1800 465 070
MODEL: S002391 PRODUCT CODE: 14498 06/2020
Assembly Instructions (cont)
Step 1
(40) OD14*ID10.5* 1.5 T
hexagon screw - 2pcs
6MM allen wrench
Attach the Front Stabilizer (2) to the Main Frame (1) with 2 x M10*50 screws (39), 2 x washers (40).
Tighten and lock firm with the 6mm allen wrench.
1

MODEL: S002391 PRODUCT CODE: 14498 06/2020
AFTER SALES SUPPORT
1800 465 070
13
Assembly Instructions (cont)
Step 2
(44) M8*20 screw - 4pcs (36) OD20*ID8.5* 1.5T
5MM allen wrench
Insert 2 x M8*20 screws (44) and 2 x washers (20) through the holes of the Rear Support (3). Lock
them up tight to the rear underneath of the Sliding rail (17) with the 5mm Allen wrench.

AFTER SALES SUPPORT
1800 465 070
MODEL: S002391 PRODUCT CODE: 14498 06/2020
Assembly Instructions (cont)
Step 3
(100) Screw cap - 1pc
(31) OD32*ID13*2.0T
6MM allen wrench
Multi-functional spanner
NOTE: The M12 nut (32) is pre-assembled on the Adjust knob (18). These parts are placed in a seperate
PE bag. Please make sure to identify them out of box before this step.
Remove all of the following parts pre-assembled. Pull pin (27), Nylon nut (28), Screw 1/2*100 (29), 2 x
washers (30).
Attach the Sliding rail (17) to the Main frame (1). Connect the Sensor wire(92) with console wire (98).
Align all the holes from both parts.
Insert the removed Screw 1/2*100 (29), 2 x washers (30), Nylon nut (28) the aligned holes as shown and
lock them tight. Put the Screw cap (100) on as shown.
Insert the Pull pin (27) through the aligned holes. Insert Ajust knob (18), M12 nut (32) and washer (31)
through the holes aligned and lock them tight.

MODEL: S002391 PRODUCT CODE: 14498 06/2020
AFTER SALES SUPPORT
1800 465 070
15
Assembly Instructions (cont)
Step 4
(42) M6*80 flat cross head bolt- 1pc
(83) saddle carrier
PP blocker-2pcs
(50) M3*10 self stapping
screw - 1pc
(43) M6*10 round cross
head screw - 1pc
Multi-functional spanner
NOTE: The Sliding rail end cap (77) is placed in a seperate PE bag. Please identify this part out of box
before this step.
Slide the Saddle (90) onto the Sliding rail (17), then insert the M6*80 flat cross head bolt(42) through 1 x
Saddle carrier PP blocker (83), the holes on the rear end of the rail, and the other blocker.
And finally lock the M6*10 round cross head screw (43) on the end of the bolt. Plug the Sliding rail end
cap (77) on the rear end of the rail and use M3*10 self tapping screw (50) to lock it tight.
.
Spanner screw driver

AFTER SALES SUPPORT
1800 465 070
MODEL: S002391 PRODUCT CODE: 14498 06/2020
Assembly Instructions (cont)
Step 5
(30) OD22*ID13*2.0T
flat washer - 2pcs
(36) OD20*ID8.5*1.5T
flat washer - 4pcs
(46) M8 split washer
- 4pcs
(9) pedals gap tube- 2pcs
Multi-functional spanner
Firstly please identify the two Pedal axles (8) mounted with M8 nut cap (37) out of box.
Insert first Pedal axle (8) through Pedals gap tube (9) and lower holes of the Main frame (1), lock both
ends with the washer(36), M8 split washer (46), M8 nut cap (37) till tight.
Insert the other pedal axle (8) through both washers (30), Pedals (62), and upper holes of the Main
frame (1) , lock both ends with with washer(36), M8 split washer (46), M8 nut cap (37) till tight.
Spanner screw driver

MODEL: S002391 PRODUCT CODE: 14498 06/2020
AFTER SALES SUPPORT
1800 465 070
17
Assembly Instructions (cont)
Step 6
(54) M4*16 self tapping
screw - 1pc
(47) M6*16 round cross
head screw - 2pcs
(86) wire plug-1pc
Route the Console wire (98) out of the Main frame (1) housing, through the Console post (4).
Pull the wire out of the post hole as shown in drawing. Attach the Wire plug (86) into the hole.
Insert Console post (4) into the Console post base (60).
Use M6*16 screw (47) to lock it from both sides.
Finally use M4*16 self tapping screw (54) to lock it.
Spanner screw driver

AFTER SALES SUPPORT
1800 465 070
MODEL: S002391 PRODUCT CODE: 14498 06/2020
Assembly Instructions (cont)
Step 7
Remove 4 x M5*10 flat screws (99) which are pre-assembled on the back of the console (89).
Connect the Console wire (98) out of the Console plate (5) with the wire out of back of console.
Use the removed screws to lock the console firm on the plate.
Spanner screw driver

MODEL: S002391 PRODUCT CODE: 14498 06/2020
AFTER SALES SUPPORT
1800 465 070
19
Workout Area
Free area and training area.
The free area should be no less than 0.6m greater than the training area in the directions from which
the equipment is accessed. The free area must also include the area for emergency dismount.Where
equipment is positioned adjacent to each other the value of the free area may be shared.

AFTER SALES SUPPORT
1800 465 070
MODEL: S002391 PRODUCT CODE: 14498 06/2020
How To Use The Rower
HOW TO MOVE THE ROWER
Stand behind the rower and lift the rear stabiliser until the rower will roll on the wheels. Then, carefully
move the rower to the desired location, and lower it to the floor.
HOW TO ROW ON THE ROWER
Sit on the seat, place your feet in the pedals, and adjust the straps to fit your feet. Hold the row bar
with an overhand grip.
Correct rowing form consists of three phases:
1. The first phase is the CATCH. Slide the seat forward until your knees are almost touching your
chest. Pull the row bar until your hands are above your feet.
2. The second phase is the DRIVE. Push backward with your legs. Lean back slightly at the hips (not
at the waist), keeping your back straight. As you straighten your legs, pull the row bar toward your
chest. Keep your elbows outward.
3. The third phase is the FINISH. Your legs should be nearly straight. Continue to pull the row bar until
your hands are even with your chest.
After the finish phase, extend your arms forward and pull the seat forward using your legs. Repeat this
sequence, moving through all three phases with a smooth, fluid motion. Remember to breathe normally
as you row; never hold your breath.
HOW TO ADJUST THE TENSION
Adjust the End caps (81) and the Rear support of the machine if the machine is unbalanced.
Turn the Tension control knob (19) clockwise to increase the resistance and vice-versa.
IMPORTANT: To avoid damaging the resistance control, stop turning it when turning becomes difficult.
19
81
This manual suits for next models
1
Table of contents