manuals.online logo
Brands
  1. Home
  2. •
  3. Brands
  4. •
  5. Crate
  6. •
  7. Music Pedal
  8. •
  9. Crate DXJFC User manual

Crate DXJFC User manual

To obtain optimum performance from your Footcontroller, please read this guide before its use.
www.crateamps.com
©2000 SLM Electronics, Inc. • A Division of St. Louis Music, Inc.
1 00 Ferguson Avenue • St. Louis, MO 63133
7-063-01
03/00
Specifications:
Communication MIDI, Midi channel 0 (default)
Presets 10
Selector Switches Five
Displa Indicator LEDs for preset displa
and tap tempo
Expression Pedal Passive volume control t pe,
50k – 1M ohm impedance
Power Requirements
Supplied via MIDI cable when used
with Crate DX amplifiers
Dimensions 2.25”H x 15”W x 4”D
Weight 2.7 lbs
• Specifications and information subject to change without notice •
Additional Technical Information:
The DXJFC communicates to the DX amplifier via MIDI (Musical Instrument
Digital Interface). Communication is on MIDI channel 0 b default, since the DX
amplifier operates in “omni/pol ” mode.
Presets are changed b standard MIDI program change messages. The MIDI
message value can range from 0 to 9.
The Tap function defaults to MIDI controller #80. Value decimal 127 (hex 7F)
is sent when the tap is pressed, zero is sent when it is released.
The expression pedal defaults to controller #11 using single b te controller val-
ues. Pedal assignments are communicated to the DX amplifier via a MIDI “s s-
tem exclusive” (aka s sex) message. The following chart shows the s sex mes-
sage format (in hexidecimal) after the S stem Exclusive status b te.
00, 01, 28 SLME s sex ID code 00, kk knob ID (2 b tes) “kk” = knob ID
04 SLME packet t pe 00, 01 action ID (2 b tes)
00 packet number (zero) cc checksum “cc” = calculated checksum
06 packet data b te count F7 end of s sex
00, 01 DXJFC product ID
About the DXJFC:
What it is and what it does:
The Crate DXJFC MIDI Footcontroller is a foot-operated “remote control” designed to work with our Crate DX
amplifier. Using the DXJFC, ou can:
• Access up to 10 factor or user-defined presets
• Change presets “on the fl ”
• Set the “tap tempo” for an effect
• Adjust selected amplifier controls (when used with an expression pedal)
The Front Panel/Side Jacks:
ASSIGN
PRESS BOTH SWITCHES
EXPRESSION INPUT MIDI OUTPUT
PRESS BOTH SWITCHES
BANK
REVERB
DEPTH
REVERB
LEVEL
1
2
4
3
11)) SSeelleeccttoorr bbuuttttoonnss::Use these buttons to:
A) Select the desired preset,
B) Set the tap tempo for the selected preset,
C) Assign an expression pedal to a DX ampli-
fier control knob (#1/6 and 2/7 pressed
simultaneousl ),
D) Change banks (#4/9 and 5/10 pressed
simultaneousl )
AA:: To select a preset, step on the numbered button
which corresponds to the desired preset.
BB:: To set the dela times or modulation speeds (tap
tempo) of the effects, step three times on the button
of the selected preset in time with the desired tempo.
(The DX amplifier manual lists specificall what the Tap
button controls for each of its effects.)
CC:: To assign an expression pedal to a control knob, see
“Assignment of a DX Control Knob” on page 3.
DD:: To change banks, see the section “Selecting a
Preset” on page 2.
22))BBaannkkBBIInnddiiccaattoorr::This LED illuminates when the “B”
bank (presets 6-10) is selected. See “Selecting a Preset”
on page 2
33)) MMIIDDIIOOuutt jjaacckk::Use this jack to connect the DXJFC
to our DX amplifier using a standard MIDI 5-wire inter-
connecting cable.
44)) EExxpprreessssiioonn IInnppuutt jjaacckk::Use this jack to connect the
optional expression pedal to the DXJFC for remote
control of a DX amplifier control knob.
-1-
CONNECTING THE DXJFC:Use a standard 5-wire MIDI interconnecting cable*to connect the DXJFC’s MIDI Out jack to the MIDI In
jack of our DX amplifier or other MIDI-controllable device.
If ou are using an expression pedal, use a standard instrument signal cable to connect the pedal’s output jack to the DXJFC’s
Expression Input jack.
NOTE: When using the DXJFC with the Crate DX amplifier, you MUST DEPRESS THE “CRATE FOOT CONTROLLER” SWITCH ON
THE BACK OF THE DX AMPLIFIER! The switch is located next to the amp’s MIDI Thru/Out jack. If you don’t, the DXJFC doesn’t
get its power and it won’t work. (To avoid damage when using any MIDI device other than a Crate footcontroller with a DX ampli-
fier, make sure this switch is set to the “STANDARD MIDI” position.)
SELECTING A PRESET:The DXJFC lets ou access the 10 presets in groups (or “banks”) of five – 1-5 (bank A) and 6-10 (bank B). To
access bank B, step on the “4/9” and “5/10” buttons simultaneousl . The Bank B indicator LED illuminates, and the buttons will access
the second number (for example, the “2/7” button will access preset 7 when the Bank B indicator is illuminated).
NOTE: There will be no preset displa LED illuminated until another preset is chosen after ou change banks.
Each Selector button has two numbers – which of those two numbers is the “active” number depends on the setting of the
bank. Remember: the presets work in banks of five. You have to get to the correct bank to access the preset within that bank. The
chart below will help clarif this:
TToo aacccceessssGGoo ttooSStteepp oonnTToo aacccceessssGGoo ttooSStteepp oonn
PPrreesseett::BBaannkk::SSeelleeccttoorr bbuuttttoonn::PPrreesseett::BBaannkk::SSeelleeccttoorr bbuuttttoonn::
01 A 11/6 06 B 1/66
02 “ 22/7 07 “ 2/77
03 “ 33/8 08 “ 3/88
04 “ 44/9 09 “ 4/99
05 “ 55/10 10 “ 5/1100
Using the DXJFC:
DEPRESS THIS
SWITCH!
(OPTIONAL
EXPRESSION PEDAL)
(SECOND DX
AMPLIFIER
OR OTHER
MIDI DEVICE)
ASSIGN
PRESS BOTH SWITCHES
EXPRESSION INPUT MIDI OUTPUT
PRESS BOTH SWITCHES
BANK
REVERB
DEPTH
REVERB
LEVEL
STANDARD
MIDI
CRATE
FOOT
CONTROLLER
STEREO
LINE
IN
MIDI
THRU/
OUT
MIDI IN/
FOOT
SWITCH
*NOTE: You must use a 5-wire MIDI cable
when connecting the DXJFC to the DX amplifier
or no power will be sent to the footcontroller!
-2-
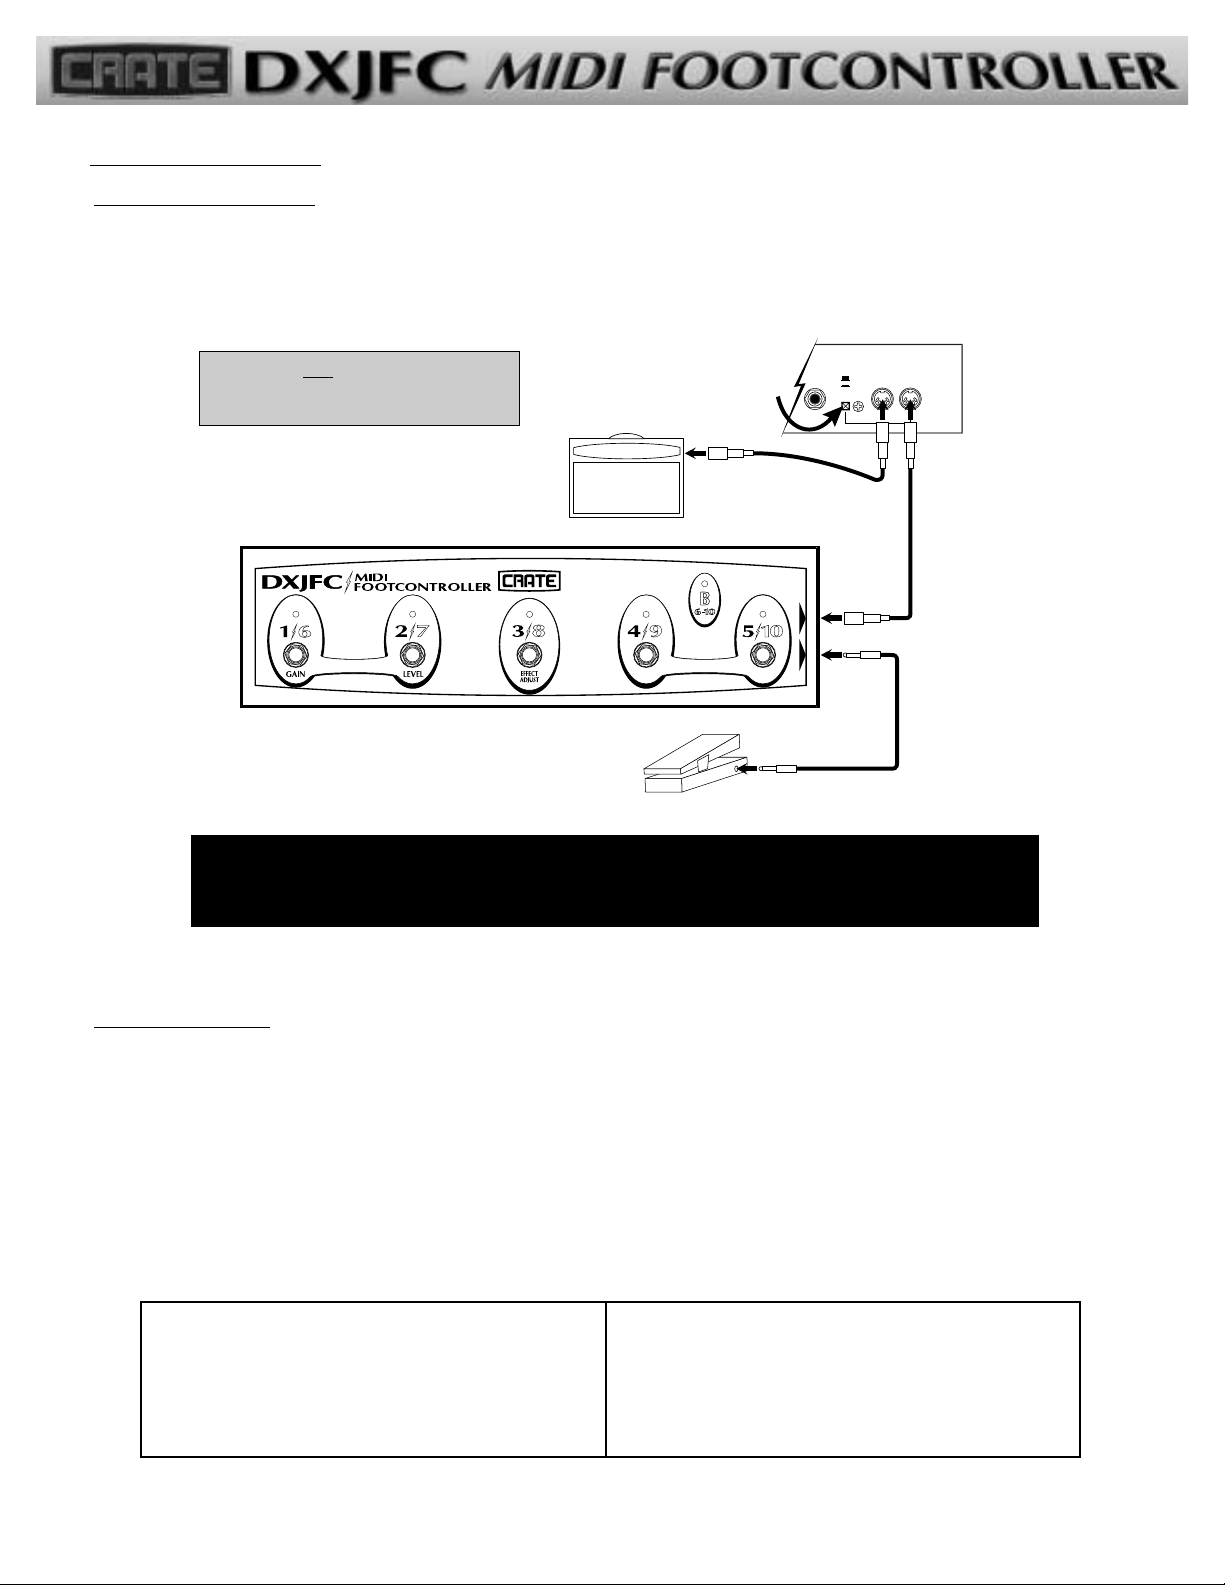
USING AN EXPRESSION PEDAL: B using an external pedal, ou can remotel adjust several of the controls (gain, level, effect adjust,
reverb level, and reverb depth) on the DX amplifier through the DXJFC.
Here are some things ou need to know about the expression pedal:
• The pedal must be a passive, unpowered t pe, such as the SLM OmniFex volume pedal VP-200, or the Dunlop
HighGain GCB-80 with a “blank” 1/4” plug (as explained later on).
• After connecting the pedal, it must be calibrated to the DXJFC – simpl adjust the pedal to its minimum output posi-
tion, then to its maximum output position. This tells the DXJFC what kind of pedal ou are using. If ou forget to cali-
brate the pedal, the DXJFC will do it for ou the first time ou use the pedal through its full range. The pedal’s effect on
the DX amplifier control knob ma change after calibration.
NOTE: If the pedal doesn’t seem to give ou full range of control after calibration, unplug the pedal from the DXJFC,
wait five seconds, plug the pedal back in, and adjust it to its minimum then maximum output positions.
• Some pedals ma require a “blank” 1/4” plug (just a plain plug, no wires) to be plugged into the input jack to activate
them – if our pedal doesn’t work with the DXJFC, tr using the pedal with such a plug in its input jack.
• If the expression pedal is unplugged from the DXJFC, the DXJFC will stop sending expression messages – the DX ampli-
fier will revert to the knob setting stored in its current preset.
ASSIGNMENT OF A DX CONTROL KNOB: The default assignment for the expression pedal is the effect adjust control. To assign a
different DX control knob to the expression pedal, follow these steps:
• Step on BOTH the “1/6” and “2/7” buttons simultaneousl (the “1/6” and “2/7” LEDs will flash rapidl to indicate the
footcontroller is in the “assign” mode.)
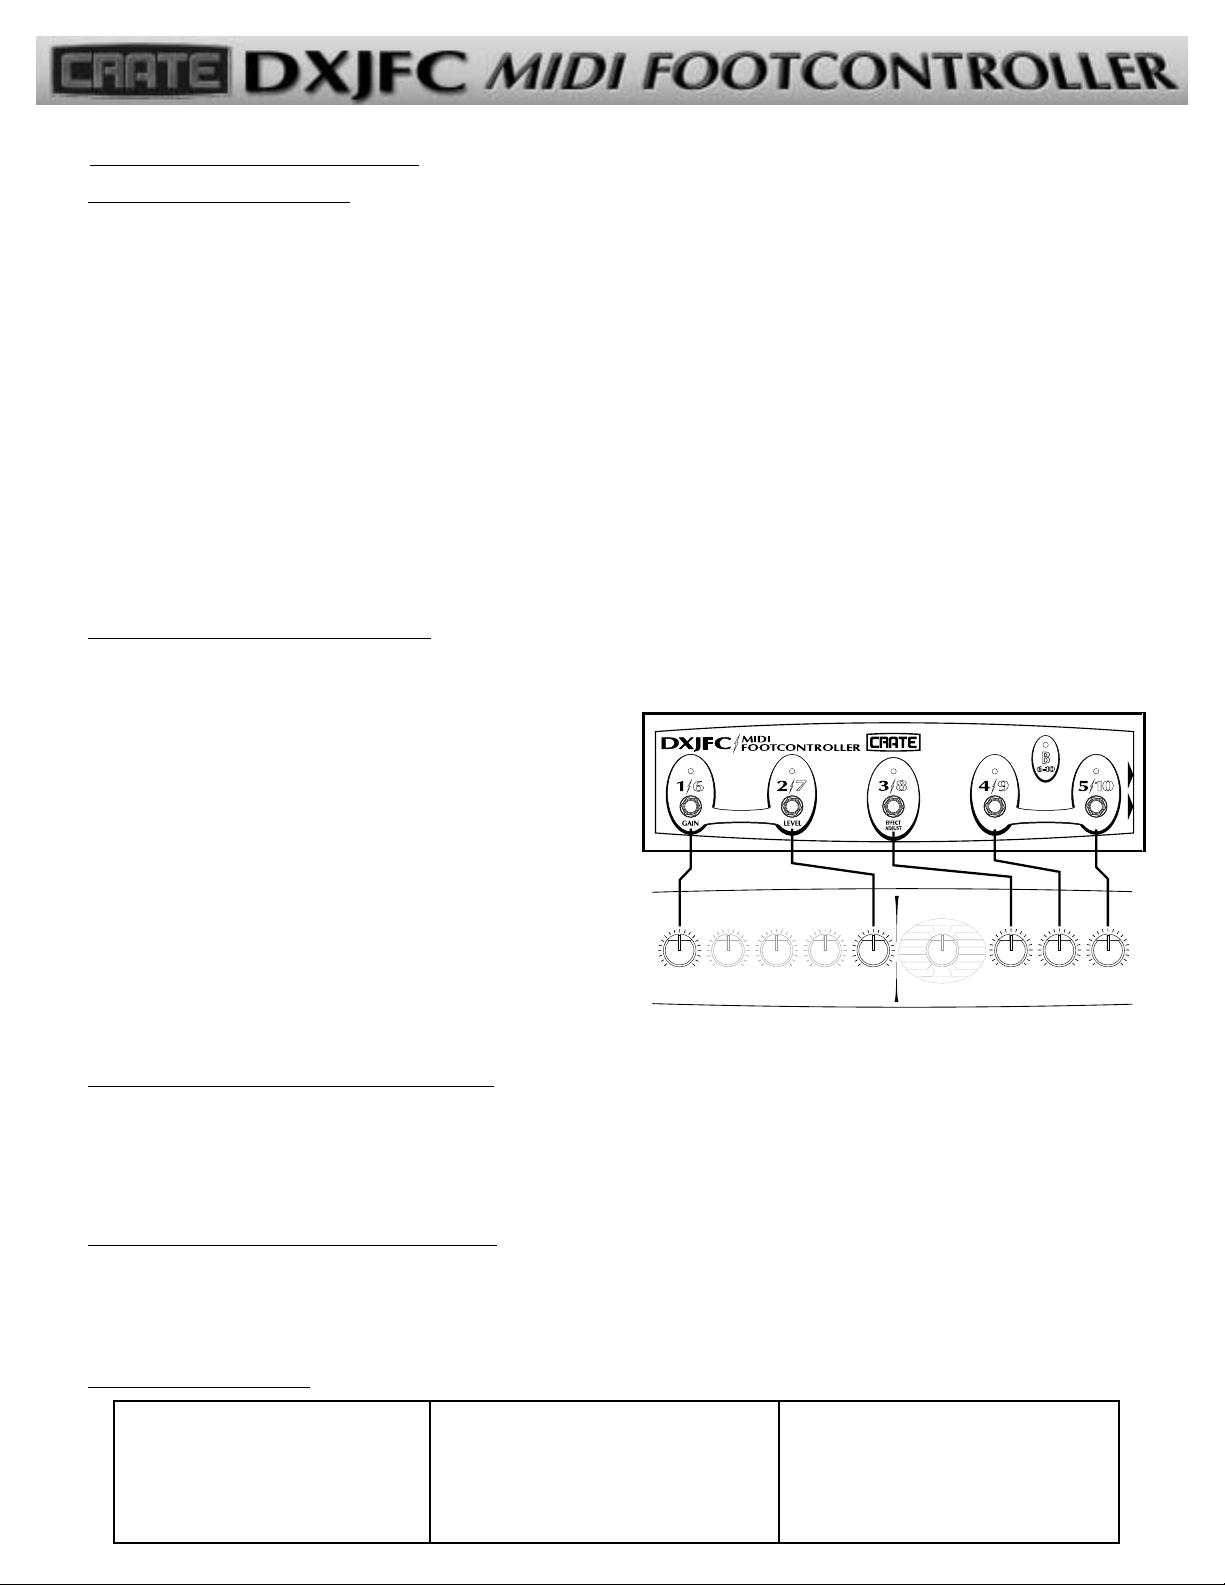
• Choose which DX control knob to assign to the pedal b
stepping on one of the selector buttons – the buttons are
labeled to correspond to the DX amplifier, as shown ––>
11//66= GGaaiinn44//99= RReevveerrbb LLeevveell
22//77= LLeevveell55//1100= RReevveerrbb DDeepptthh
33//88= EEffffeecctt AAddjjuusstt
• That’s it – the pedal is assigned – moving the pedal up and
down now acts the same as reaching over to the amplifier
and turning the assigned control (without actuall having to
reach over to the amp!)
(You can reassign the expression pedal at any time by repeating the above steps.)
STORING AN EXPRESSION PEDAL ASSIGNMENT: The DXJFC has no internal memor , so an assignments made must be stored in
the amplifier’s preset memor or the will be lost when the amplifier is turned off or when a different preset is selected. Follow the
instructions in our amplifier’s owners manual for saving/storing presets, and save the pedal assignment before turning off the power.
When ou store the preset, the DXJFC assignment is stored with that preset and will remain there until ou store the preset with a
different assignment or store it with no assignment (cleared).
CLEARING AN EXPRESSION PEDAL ASSIGNMENT:
• Step on BOTH “1/6” and “2/7” buttons simultaneousl
• Step on BOTH “1/6” and “2/7” buttons again – the expression pedal is no longer assigned to an of the DX controls
for the current preset
Troubleshooting:
Using the DXJFC con’t):
αΩαΩαΩαΩαΩαΩ
αΩαΩ
PRESET PARAMETERS EFFECTS
GAIN
BASS MID TREBLE
CHANNEL
LEVEL EFFECT
ADJUST REVERB
LEVEL REVERB
DEPTH
Touch Wah
Rotating Spkr
Cmp/Cho/Echo
Cmp/Vib/Echo
Cmp/Flg/Echo
Flange/Echo
Chor/Echo
Comp/Chorus
Comp/Echo Compressor
Tremolo
Chorus
Vibrato
Delay
Flanger
Echo
ASSIGN
PRESS BOTH SWITCHES
EXPRESSION INPUT MIDI OUTPUT
PRESS BOTH SWITCHES
BANK
REVERB
DEPTH
REVERB
LEVEL
Pedal doesn’t control setting
• Pedal plugged in?
• MIDI cable connected?
• “Blank” plug needed b pedal?
• Pedal assigned to correct control?
No lights on DXJFC
• Standard 5-wire MIDI cable used?
• MIDI cable connected?
• Power button depressed on DX amp?
• DX amp turned on?
Pedal control range inaccurate
• Pedal calibrated? (unplug pedal, wait five
seconds, plug back in – adjust pedal to its
minimum then maximum output positions)
• Pedal impedance too low? (compatible
impedance: 50k ohms to 1M ohm ) -3-

Popular Music Pedal manuals by other brands

Behringer MIDI FOOT CONTROLLER FCB1010 user manual

Behringer

Behringer MIDI FOOT CONTROLLER FCB1010 user manual

nux JTC Pro NDL-5 owner's manual

nux

nux JTC Pro NDL-5 owner's manual

BYOC 27V Boost instructions

BYOC

BYOC 27V Boost instructions

ORANGE The Amp Detonator user manual

ORANGE

ORANGE The Amp Detonator user manual

thomann Harley Benton AC TrueTone user manual

thomann

thomann Harley Benton AC TrueTone user manual

Stanley Effects blue nebula user manual

Stanley Effects

Stanley Effects blue nebula user manual

BJF Electronics BLUE BERRY owner's manual

BJF Electronics

BJF Electronics BLUE BERRY owner's manual

Source Audio Ultrawave user guide

Source Audio

Source Audio Ultrawave user guide

L.R. Baggs ALIGN SERIES user guide

L.R. Baggs

L.R. Baggs ALIGN SERIES user guide

Darkglass microtubes B7K ULTRA user manual

Darkglass

Darkglass microtubes B7K ULTRA user manual

Fender TREAD-LIGHT VOL/EXP PEDAL manual

Fender

Fender TREAD-LIGHT VOL/EXP PEDAL manual

GOAT BLUE Series STEREO CHORUS manual

GOAT

GOAT BLUE Series STEREO CHORUS manual

DOD LOOKING GLASS OVERDRIVE quick start guide

DOD

DOD LOOKING GLASS OVERDRIVE quick start guide

mxr m288 Bass Octave Deluxe manual

mxr

mxr m288 Bass Octave Deluxe manual

Mooer BEM BoX owner's manual

Mooer

Mooer BEM BoX owner's manual

Echo Collective Signal Return user guide

Echo Collective

Echo Collective Signal Return user guide

Behringer VINTAGE DISTORTION VD1 quick start guide

Behringer

Behringer VINTAGE DISTORTION VD1 quick start guide

MORLEY PWA-IIES manual

MORLEY

MORLEY PWA-IIES manual

manuals.online logo
manuals.online logoBrands
  • About & Mission
  • Contact us
  • Privacy Policy
  • Terms and Conditions

Copyright 2025 Manuals.Online. All Rights Reserved.