Creasol SENDER User manual
Made in EU
Creasol Sender
Multi-frequency
remote control duplicator.
Powered externally or through
pushbutton or vehicle horn.
Creasol Sender
Simple installation schemes inside.
Supported
frequencies:
*: not permitted
inside EU
433.92, 868.3, 31 *,
288*, 300*, 303*, 306*,
310*, 318*, 330*, 390*,
403. *,418* MHz
Power (selectable): 10μW, 100μW, 1mW,
10mW
Power supply: ÷36Vdc or 7÷27Vac
Power supply in
high-beam mode:
12÷36Vdc or 12÷27Vac
Max current while
transmitting:
4÷30mA
depending by TX code
and voltage (higher
voltage→lower current)
Operating
temperature:
-20°C ÷ +70°C
Dimensions: 29x29x11mm
Weight: 9g
ENG ISH
Introduction: this device can be used to transmit, when powered by a pushbutton
switch, a factory-programmed code, or a code copied from an existing remote control:
rolling codes are not managed. It can be powered by a wide range of voltage, is
compact and fully configurable through button Prog.
Two modes of operation are available (see Fig.2, parameter 9):
basic mode: only 1 code is managed, and device starts transmitting as soon as it's
powered by pressing the pushbutton switch;
car mode: up to 4 codes are managed, and can be selected pressing the pushbutton
switch from 2 to times, as shown in the Fig.1; in this way the device does not
transmit anything if a single pulse is issued, preventing unwanted transmissions.
Installation: please refer to Fig.1: connect the 2 wires marked as Supply, through a
switch, to the power supply ÷36Vdc or 7÷27Vac; don't care about polarity.
Alternatively, connect the two wires to a 12 or 24V actuator activated through a
pushbutton, like a vehicle horn.
Leave the antenna wire unconnected, and place it stretched-out and away from metal
parts. If the device is used at 868 MHz, it's better to cut the antenna at 8cm.
Configuration: this device is supplied factory-programmed to work at 433.92 MHz,
in basic mode, to transmit 16 frames with 1mW ouput power. To modify this
configuration:
1.if Ch is specified in Fig.2, press quickly the button Prog a number of times
corresponding to the selected channel (1 to 4): led goes ON;
2.push Prog a number of times corresponding to the parameter that should be
modified : led will flash to notify the current value of that parameter;
3.press again the button Prog for the number of times corresponding to the desired
value: led will fash a number of times corresponding to the new value.
If programming fails, a long flash will be emitted. If modification is not needed, just
wait second to exit.
Learning a remote control: press the Prog button a number of times corresponding
to the selected channel (1 to 4); led goes ON. Press Prog twice to enable learning
mode: then press a button on the source remote control within 10s to learn it. Led
flashes twice if a fixed code is copied, 4 times if a rolling code is copied: in the latter
case, be aware that it may not work if the receiver checks the rolling part of the code.
Instead of copying an existing remote control, it's possible to program a new random
code pressing Prog for 1-4 times (channel selection), then for 10 times, and finally for
3 times. Pressing Prog 4 times instead of 3 do a complete factory reset.
Security, safety and disposal: installation should be done by a qualified technician, in
a well insulated enclosure, protected by dust, high humidity, steam and contact with
other circuits and metallic parts. All responsibility, for any damage caused by not
complying with the instructions in this manual, is declined. Paper (instructions),
plastic (blister and enclosure), battery and electronic board should be disposed of
properly.
Warranty: complies with statutory requirements, and covers only defects, within the
product itself, in material and manufacture. Your local stockist should be contacted in
connection with any warranty-related matters. Your warranty entitlements only apply
to the country in which the device was purchased.
CE Declaration of Conformity: Creasol hereby declares that the device Sender meets
the essential requirements of the European Directive 1999/ /EC (R&TTE). Applied
standards: EN300220, EN301489, EN609 0, EN62479.
Declaration of Conformity can be optained from http://www.ce.creasol.it
Parameter Value (default value underlined)
Ch 5=set the
frequency
= 433.92, 3=868.3, 4=31 *, 5=288*, 6=300*, 7=303*, 8=306*,
9=310*, 10=318*, 11=330*, 1 =390*, 13=403. *, 14=418* MHz
Ch 6=TX length 1=transmission disabled, =hold-to-run (max 20s), 3=2 codes,
4=4 codes, 5=8 codes, 6 =16 codes, 7=32, 8=64, 9=128 codes
Ch 7=extra blank
between codes
1 =extra blank time disabled, =random short blank, 3=random
medium blank, 4=random long blank (used to avoid collisions)
Ch 8=TX power 1=10μW, =100μW, 3 =1mW, 4=10mW
9=opeation mode 1=basic mode: 1 channel transmitter/duplicator,
=car mode: 4 channels transmitter/duplicator
Ch 10=init. code 3=initialize a new random code for the selected channel,
4=factory reset: device totally reprogrammed Fig.
ITA IANO
Introduzione: il dispositivo può essere utilizzato per trasmettere, quando alimentato
attraverso un pulsante, un codice preimpostato, oppure un codice copiato da un
radiocomando esistente: non sono gestiti i codici rolling. Ampio range di tensione di
alimentazione, compatto e completamente configurabile attraverso il pulsante Prog.
Due modalità operative sono disponibili (vedi Fig.2, parametro 9):
basic mode: gestisce un solo canale, e la trasmissione inizia appena viene alimentato il
dispositivo premendo il pulsante esterno;
car mode: gestisce fino a 4 canali, selezionabili premendo il pulsante esterno da 2 a
volte, come mostrato in Fig.1; in questo modo non viene trasmesso nulla qualora il
pulsante esterno venga premuto una sola volta, prevenendo quindi trasmissioni
indesiderate.
Installazione: vedere Fig.1: collegare i due fili Supply, attraverso un pulsante, ad una
sorgente di alimentazione ÷36Vdc o 7÷27Vac; non serve rispettare alcuna polarità. In
alternativa collegare i due fili ad un attuatore a 12 o 24V, attivabile attraverso pulsante,
come il claxon, luci, ...
Lasciare il filo antenna scollegato e disporlo, dritto e disteso, lontano da parti
metalliche. Tagliare il filo a 8cm nel caso si utilizzi la frequenza 868MHz.
Configurazione: il dispositivo viene fornito programmato per funzionare a 433.92
MHz, in basic mode, e trasmettere 16 frame con 1mW di pontenza. Per modificare
questa configurazione:
1.se in Fig.2 è specificato Ch, premere Prog un numero di volte corrispondente al
canale (da 1 a 4): il led si accende fisso;
2.premere Prog un numero di volte corrispondente al parametro da modificare: il led
emetterà un numero di lampeggi corrispondente al valore corrente del parametro;
3.premere ancora Prog un numero di volte corrispondente con il valore desiderato: il
led mostrerà il nuovo valore impostato.
Se la programmazione fallisce, verrà emsso un lampeggio lungo. Se non si intende
modificare i parametri, basta attendere secondi affinché la procedura termini.
Copiare un radiocomando: premere il pulsante Prog un numero di volte
corrispondente al canale da copiare (da 1 a 4); il led rimarrà acceso fisso. Premere
Prog due volte per abilitare l'apprendimento: poi premere il tasto sul radiocomando
sorgente entro 10s per apprenderlo. Il led lampeggia 2 volte nel caso di radiocomandi
copiabili, 4 volte nel caso di rolling code: in tal caso attenzione che il dispositivo
potrebbe non funzionare se l'automazione controlla la parte variabile del codice
rolling. Anziché copiare un codice esistene, è possibile programmare un nuovo codice
casuale premendo Prog un numero di volte corrispondente al canale, poi premere Prog
per 10 volte ed infine premerlo 3 volte. Premendo Prog 4 volte anziché 3 verrà
ripristinata la configurazione di fabbrica.
Sicurezza e smaltimento: l'installazione va fatta da un tecnico qualificato, in una
scatola isolata protetta da polvere, umidità, vapore e contatto con altri circuiti
metallici. Si declina ogni responsabilità per danni causati dall'inosservanza di quanto
riportato nel manuale. Carta (istruzioni), plastica (contenitore e blister) ed il circuito
elettronico vanno smaltiti correttamente.
Garanzia: è conforme ai termini di legge e copre solo i difetti del prodotto.
Dichiarazione di Conformità CE: Creasol dichiara che il dispositivo Sender soddisfa
i requisiti essenziali della Direttiva Europea 1999/ /EC (R&TTE). Norme applicate:
EN300220, EN301489, EN609 0, EN62479.
La dichiarazione di conformità è scaricabile da http://www.ce.creasol.it
EN
IT
Creasol
only creative solutions
http://www.creasol.it
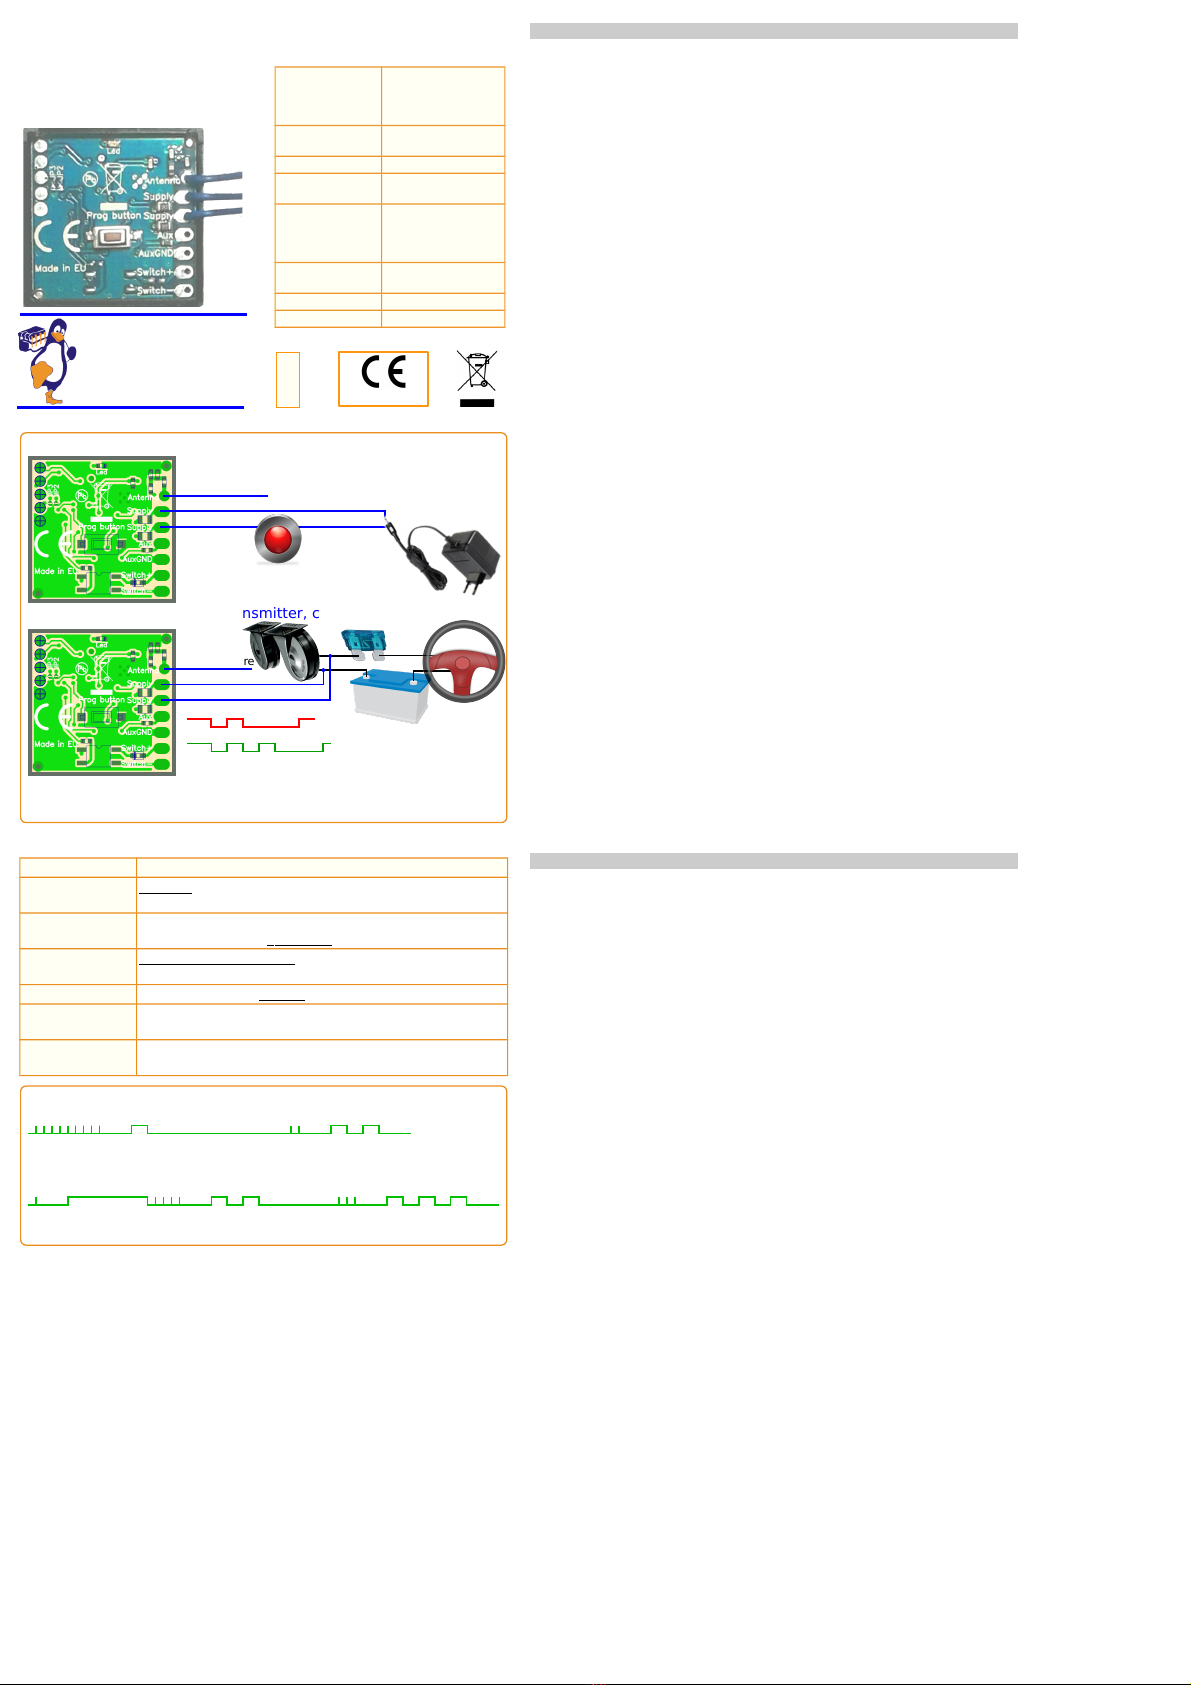
Antenna wire
Example 1: 1 channel transmitter connected to a switch
Antenna wire should be 17cm long for 433MHz 8cm long for 868 MHz
Supply wires should be connected to 5÷36Vdc or 7÷27Vac. Polarity is not important.
Pushbutton
switch:
when pressed
device is powered and starts transmitting
Low power dissipation due to the switching power supply
Example 2: 1÷4 channels transmitter connected to the car horn
Antenna wire
Max current consumption:
30mA @5Vdc 8mA@36Vdc
Push release push and hold horn to transmit code #1
to open the barrier or gate
Push twice then push and hold
to transmit code #2 to open
the garage door for example
↓ ↓↓ ↓↓↓↓
↓↓↓↓↓
In some countries it's possibile to connect the transmitter to high-beam headlamps
Horn/claxon
Fig.1
Configuration Examples
Select car mode (Par.9=2): up to 4 channels transmitter selected by 2÷5 pulses
Fig.3
↓↓↓↓↓↓↓↓↓ ↓↓ Prog button
Green led status
Push 9 times (P9)
Led flashes 1 time (cur. value)
Push 2 times to select car mode
New value
Change frequency on channel 1 to 868.3 MHz (Ch1 Par.5=3)
↓ ↓↓↓↓↓ ↓↓↓
Channel=1 Parameter=5 Value=3
New valueCurrent value
Led on waiting
for parameter
Made in EU
Parameter Value (default value underlined)
Ch 5=set the
frequency
= 433.92, 3=868.3, 4=31 *, 5=288*, 6=300*, 7=303*, 8=306*,
9=310*, 10=318*, 11=330*, 1 =390*, 13=403. *, 14=418* MHz
Ch 6=TX length 1=transmission disabled, =hold-to-run (max 20s), 3=2 codes,
4=4 codes, 5=8 codes, 6 =16 codes, 7=32, 8=64, 9=128 codes
Ch 7=extra blank
between codes
1 =extra blank time disabled, =random short blank, 3=random
medium blank, 4=random long blank (used to avoid collisions)
Ch 8=TX power 1=10μW, =100μW, 3 =1mW, 4=10mW
9=opeation mode 1=basic mode: 1 channel transmitter/duplicator,
=car mode: 4 channels transmitter/duplicator
Ch 10=init. code 3=initialize a new random code for the selected channel,
4=factory reset: device totally reprogrammed Fig.
ITA IANO
Introduzione: il dispositivo può essere utilizzato per trasmettere, quando alimentato
attraverso un pulsante, un codice preimpostato, oppure un codice copiato da un
radiocomando esistente: non sono gestiti i codici rolling. Ampio range di tensione di
alimentazione, compatto e completamente configurabile attraverso il pulsante Prog.
Due modalità operative sono disponibili (vedi Fig.2, parametro 9):
basic mode: gestisce un solo canale, e la trasmissione inizia appena viene alimentato il
dispositivo premendo il pulsante esterno;
car mode: gestisce fino a 4 canali, selezionabili premendo il pulsante esterno da 2 a
volte, come mostrato in Fig.1; in questo modo non viene trasmesso nulla qualora il
pulsante esterno venga premuto una sola volta, prevenendo quindi trasmissioni
indesiderate.
Installazione: vedere Fig.1: collegare i due fili Supply, attraverso un pulsante, ad una
sorgente di alimentazione ÷36Vdc o 7÷27Vac; non serve rispettare alcuna polarità. In
alternativa collegare i due fili ad un attuatore a 12 o 24V, attivabile attraverso pulsante,
come il claxon, luci, ...
Lasciare il filo antenna scollegato e disporlo, dritto e disteso, lontano da parti
metalliche. Tagliare il filo a 8cm nel caso si utilizzi la frequenza 868MHz.
Configurazione: il dispositivo viene fornito programmato per funzionare a 433.92
MHz, in basic mode, e trasmettere 16 frame con 1mW di pontenza. Per modificare
questa configurazione:
1.se in Fig.2 è specificato Ch, premere Prog un numero di volte corrispondente al
canale (da 1 a 4): il led si accende fisso;
2.premere Prog un numero di volte corrispondente al parametro da modificare: il led
emetterà un numero di lampeggi corrispondente al valore corrente del parametro;
3.premere ancora Prog un numero di volte corrispondente con il valore desiderato: il
led mostrerà il nuovo valore impostato.
Se la programmazione fallisce, verrà emsso un lampeggio lungo. Se non si intende
modificare i parametri, basta attendere secondi affinché la procedura termini.
Copiare un radiocomando: premere il pulsante Prog un numero di volte
corrispondente al canale da copiare (da 1 a 4); il led rimarrà acceso fisso. Premere
Prog due volte per abilitare l'apprendimento: poi premere il tasto sul radiocomando
sorgente entro 10s per apprenderlo. Il led lampeggia 2 volte nel caso di radiocomandi
copiabili, 4 volte nel caso di rolling code: in tal caso attenzione che il dispositivo
potrebbe non funzionare se l'automazione controlla la parte variabile del codice
rolling. Anziché copiare un codice esistene, è possibile programmare un nuovo codice
casuale premendo Prog un numero di volte corrispondente al canale, poi premere Prog
per 10 volte ed infine premerlo 3 volte. Premendo Prog 4 volte anziché 3 verrà
ripristinata la configurazione di fabbrica.
Sicurezza e smaltimento: l'installazione va fatta da un tecnico qualificato, in una
scatola isolata protetta da polvere, umidità, vapore e contatto con altri circuiti
metallici. Si declina ogni responsabilità per danni causati dall'inosservanza di quanto
riportato nel manuale. Carta (istruzioni), plastica (contenitore e blister) ed il circuito
elettronico vanno smaltiti correttamente.
Garanzia: è conforme ai termini di legge e copre solo i difetti del prodotto.
Dichiarazione di Conformità CE: Creasol dichiara che il dispositivo Sender soddisfa
i requisiti essenziali della Direttiva Europea 1999/ /EC (R&TTE). Norme applicate:
EN300220, EN301489, EN609 0, EN62479.
La dichiarazione di conformità è scaricabile da http://www.ce.creasol.it
Creasol Sender
Multi-frequency
remote control duplicator.
Powered externally through
pushbutton or vehicle horn
Creasol Sender
Simple installation schemes inside.
Supported
frequencies:
*: not permitted
inside EU
433.92, 868.3, 31 *,
288*, 300*, 303*, 306*,
310*, 318*, 330*, 390*,
403. *,418* MHz
Power (selectable): 10μW, 100μW, 1mW,
10mW
Power supply: ÷36Vdc or 7÷27Vac
Power supply in
high-beam mode:
12÷36Vdc or 12÷27Vac
Max current while
transmitting:
4÷30mA
depending by TX code
and voltage (higher
voltage→lower current)
Operating
temperature:
-20°C ÷ +70°C
Dimensions: 29x29x11mm
Weight: 9g
ENG ISH
Introduction: this device can be used to transmit, when powered by a pushbutton
switch, a factory-programmed code, or a code copied from an existing remote control:
rolling codes are not managed. It can be powered by a wide range of voltage, is
compact and fully configurable through button Prog.
Two modes of operation are available (see Fig.2, parameter 9):
basic mode: only 1 code is managed, and device starts transmitting as soon as it's
powered by pressing the pushbutton switch;
car mode: up to 4 codes are managed, and can be selected pressing the pushbutton
switch from 2 to times, as shown in the Fig.1; in this way the device does not
transmit anything if a single pulse is issued, preventing unwanted transmissions.
Installation: please refer to Fig.1: connect the 2 wires marked as Supply, through a
switch, to the power supply ÷36Vdc or 7÷27Vac; don't care about polarity.
Alternatively, connect the two wires to a 12 or 24V actuator activated through a
pushbutton, like a vehicle horn.
Leave the antenna wire unconnected, and place it stretched-out and away from metal
parts. If the device is used at 868 MHz, it's better to cut the antenna at 8cm.
Configuration: this device is supplied factory-programmed to work at 433.92 MHz,
in basic mode, to transmit 16 frames with 1mW ouput power. To modify this
configuration:
1.if Ch is specified in Fig.2, press quickly the button Prog a number of times
corresponding to the selected channel (1 to 4): led goes ON;
2.push Prog a number of times corresponding to the parameter that should be
modified : led will flash to notify the current value of that parameter;
3.press again the button Prog for the number of times corresponding to the desired
value: led will fash a number of times corresponding to the new value.
If programming fails, a long flash will be emitted. If modification is not needed, just
wait second to exit.
Learning a remote control: press the Prog button a number of times corresponding to
the selected channel (1 to 4); led goes ON. Press Prog twice to enable learning mode:
then press a button on the source remote control within 10s to learn it. Led flashes
twice if a fixed code is copied, 4 times if a rolling code is copied: in the latter case, be
aware that it may not work if the receiver checks the rolling part of the code.
Instead of copying an existing remote control, it's possible to program a new random
code pressing Prog for 1-4 times (channel selection), then for 10 times, and finally for
3 times. Pressing Prog 4 times instead of 3 do a complete factory reset.
Security, safety and disposal: installation should be done by a qualified technician, in
a well insulated enclosure, protected by dust, high humidity, steam and contact with
other circuits and metallic parts. All responsibility, for any damage caused by not
complying with the instructions in this manual, is declined. Paper (instructions),
plastic (blister and enclosure), battery and electronic board should be disposed of
properly.
Warranty: complies with statutory requirements, and covers only defects, within the
product itself, in material and manufacture. Your local stockist should be contacted in
connection with any warranty-related matters. Your warranty entitlements only apply
to the country in which the device was purchased.
CE Declaration of Conformity: Creasol hereby declares that the device Sender meets
the essential requirements of the European Directive 1999/ /EC (R&TTE). Applied
standards: EN300220, EN301489, EN609 0, EN62479.
Declaration of Conformity can be optained from http://www.ce.creasol.it
C r e a s o l
only creative solutions
http://www.creasol.it EN
IT
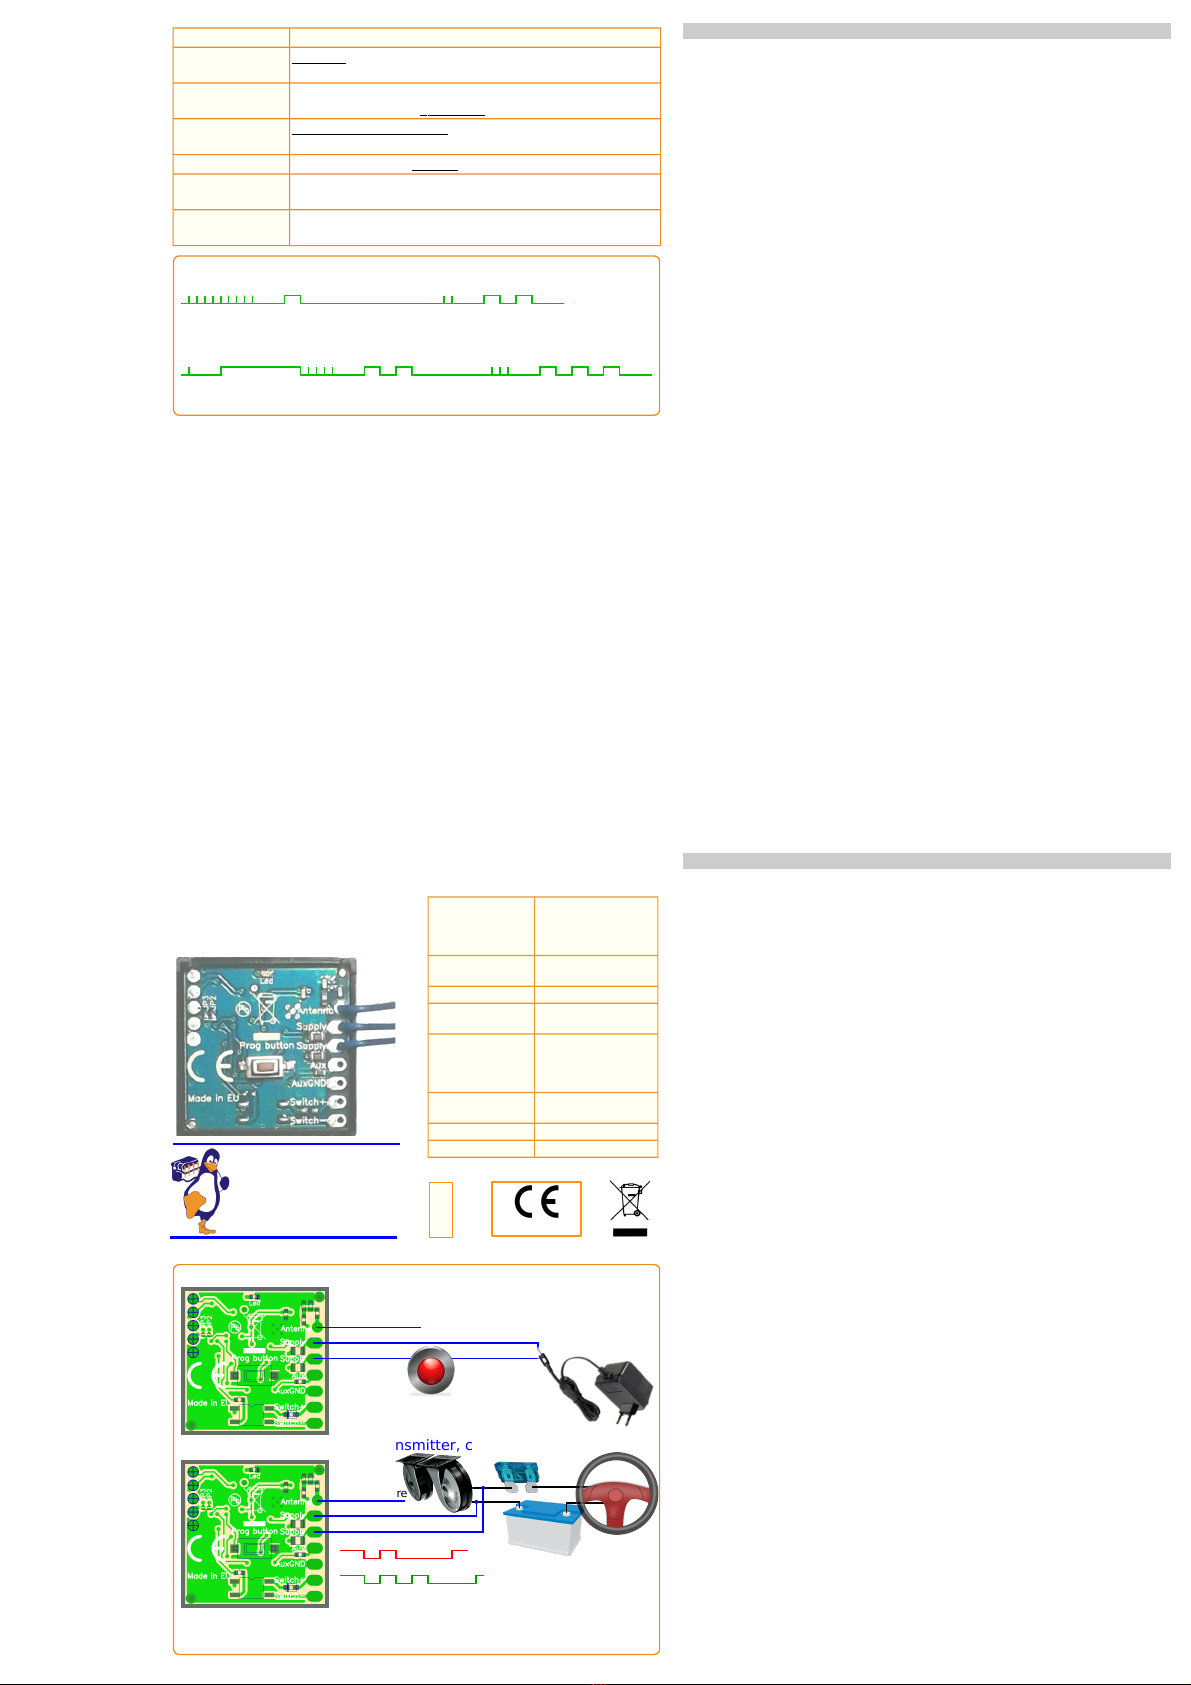
Antenna wire
Example 1: 1 channel transmitter connected to a switch
Antenna wire should be 17cm long for 433MHz 8cm long for 868 MHz
Supply wires should be connected to 5÷36Vdc or 7÷27Vac. Polarity is not important.
Pushbutton
switch:
when pressed
device is powered and starts transmitting
Low power dissipation due to the switching power supply
Example 2: 1÷4 channels transmitter connected to the car horn
Antenna wire
Max current consumption:
30mA @5Vdc 8mA@36Vdc
Push release push and hold horn to transmit code #1
to open the barrier or gate
Push twice then push and hold
to transmit code #2 to open
the garage door for example
↓ ↓↓ ↓↓↓↓
↓↓↓↓↓
In some countries it's possibile to connect the transmitter to high-beam headlamps
Horn/claxon
Fig.1
Configuration Examples
Select car mode (Par.9=2): up to 4 channels transmitter selected by 2÷5 pulses
Fig.3
↓↓↓↓↓↓↓↓↓ ↓↓ Prog button
Green led status
Push 9 times (P9)
Led flashes 1 time (cur. value)
Push 2 times to select car mode
New value
Change frequency on channel 1 to 868.3 MHz (Ch1 Par.5=3)
↓ ↓↓↓↓↓ ↓↓↓
Channel=1 Parameter=5 Value=3
New valueCurrent value
Led on waiting
for parameter
Other Creasol Disc Duplicator manuals

Popular Disc Duplicator manuals by other brands


Addonics Technologies
Addonics Technologies DGBRC3 user guide

Aleratec
Aleratec 1:3 Copy Cruiser BLU HLX quick start guide

Primera
Primera Disc Publisher II user manual

Recordex
Recordex Messenger operating instructions

Rimage
Rimage 3410 user guide

MicroBoards Technology
MicroBoards Technology CX-1 Publisher Quick reference guide


