Create HUMIZEN PRO User manual

HUMIDIFIER
HUMIDIFICADOR
USER MANUAL
HUMIZEN
PRO


4
ENGLISH
Security instructions 6
Characteristics 7
Working principle 7
Relative humidity 7
Water filter 7
Aroma box 7
Parts list 8
Display 8
Control panel 8
Features 8
Operation instructions 9
Remote control 10
Replacing the remote control battery 10
Troubleshooting 11
Maintenance 13
ESPAÑOL
Instrucciones de seguridad 14
Características 15
Funcionamiento 15
Humedad relativa 15
Filtro de agua 15
Recipiente para el aroma 15
Listado de partes 16
Pantalla 16
Panel de control 16
Propiedades 16
Instrucciones de uso 17
Mando a distancia 18
Remplazar la pila del mando a distancia 18
Resolución de problemas 19
Mantenimiento 21
PORTUGUÊS
Instruções de segurança 22
Caracteristicas 23
Operação 23
Umidade relativa 23
Filtro de água 23
Recipiente de perfume 23
Lista de peças 24
Ecrã 24
Painel de controle 24
Propriedades 24
Instruções de uso 25
Controle remoto 26
Substitua a bateria do controle remoto 26
Resolução de problemas 27
Manutenção 29
FRANÇAIS
Consignes de sécurité 30
Caractéristiques 31
Fonctionnement 31
Humidité relative 31
Filtre à eau 31
Récipient de parfum 31
Liste de pièces 32
Écran 32
Panneau de commande 32
Propriétés 32
Mode d’emploi 33
Télécommande 34
Remplacez la pile de la télécommande 34
Résolution des problèmes 35
Entretien 37
INDEX
HUMIZEN
PRO

5
ITALIANO
Istruzioni di sicurezza 38
Lineamenti 39
Operazione 39
Umidità relativa 39
Filtro per l’acqua 39
Contenitore di profumo 39
Elenco delle parti 40
Schermo 40
Pannello di controllo 40
Proprietà 40
Istruzioni per l’uso 41
Télécommande 42
Sostituire la batteria del telecomando 42
Risoluzione del problema 43
Manutenzione 45
DEUTSCH
Sicherheitshinweise 46
Eigenschaften 48
Bedienung 47
Relative Luftfeuchtigkeit 47
Wasserfilter 47
Duftbehälter 48
Teileliste 48
Bildschirm 48
Bedienfeld 48
Eigenschaften 47
Gebrauchsanweisung 49
Fernbedienung 50
Ersetzen Sie die Batterie der Fernbedienung 50
Problemlösung 51
Wartung 53
NEDERLANDS
Veiligheidsinstructies 54
Kenmerken 55
Functioneren 55
RH 55
Water Filter 55
Aroma houder 55
Onderdelen lijst 56
Scherm 56
Controlepaneel 56
Eigendommen 56
Gebruiksaanwijzing 57
Afstandsbediening 58
Vervang de batterij van de afstandsbediening 58
Probleem oplossing 59
Onderhoud 61
POLSKI
Środki bezpieczeństwa 62
Cechy 63
Działanie 63
Wilgotność względna 63
Filtr wody 63
Pojemnik na aromat 63
Lista części 64
Ekran 64
Panel sterowania 64
Właściwości 64
Instrukcja obsługi 65
Pilot zdalnego sterowania 66
Wymiana baterii pilota zdalnego sterowania 66
Rozwiązanie problemu 67
Konserwacja 69
INDEX
HUMIZEN
PRO

6ENGLISH
Thank you for choosing our humidier. Before using the appliance, and to ensure the best
use, carefully read these instructions.
The safety precautions enclosed herein reduce the risk of death, injury and electrical shock
when correctly adhered to. Keep the manual in a safe place for future reference, along with
the completed warranty card, purchase receipt and package. If applicable, pass these in-
structions on to the next owner of the appliance. Always follow basic safety precautions and
accident-prevention measures when using an electrical appliance. We assume no liability for
customer failing to comply with these requirements.
SECURITY INSTRUCTIONS
When using any electrical appliance, basic safety precautions should always be observed.
• Please follow all the safety precautions listed below for safety and to reduce the risk of
injury or electrical shock.
• This humidier can be used by children aged from 8 years and above and persons with re-
duced physical, sensory or mental capabilities or lack of experience and knowledge if they
have been given supervision or instruction concerning use of the humidier in a safe way
and understand the hazards involved. Children shall not play with the humidier. Cleaning
and user maintenance shall not be made by children without supervision.
• Before using this humidier ensure that the voltage of your electricity supply is the same
as that indicated on the rating plate of the humidier.
• Always place the humidier on a hard, at and level surface. Avoid exposure to direct sun-
light and always keep it away from walls and heat sources such as stoves, radiators, etc.
The humidier may not work correctly if it is not placed on a level surface.
• Do not insert or remove the electric plug on the humidier with wet hands.
• If the mains cable is damaged it must be replaced by the manufacturer, its service agent,
or similarly qualied person in order to avoid a hazard.
• To reduce the risk of electric shock, do not remove screws. The humidier does not contain
any user-serviceable parts. Please leave all maintenance work to qualied personnel.
• Fill the tank with fresh, distilled or demineralized water. Do not drop any other liquid into
the water tank. Do not run the humidier when there is no water in the tank.
• Do not shake the humidier as this might cause the water spill over into the base of hu-
midier.
• Never touch the water or any component while the humidier is in operation.
• If there is an unusual smell when it is being used as described in this manual, switch the
humidier off, unplug it and have it examined by your dealer.
• Do not pour hot water into the tank, i.e. at a temperature over 40°C.
• Unplug the humidier before cleaning it or removing the tank.
• Do not immerse the humidier or the mains cable or plug in water or other liquids.
• Never scrape the transducer with a hard tool. The humidier must be cleaned regularly. To
do this, refer to the cleaning instructions in this manual.
• If you spill any liquid into the humidier, it can cause serious damage. Switch it off at the
mains immediately. Withdraw the mains plug and consult your dealer.
• Disconnect the humidier from the power supply when not in use and before cleaning.
• Ensure that the mains cable does not touch any hot surface and that it does not overhang
a table edge.
• Never use this humidier in a room where aerosol products (sprays) are used or in a room
where oxygen is being administered.
• Do not put items of clothing or towels on top of the humidier. If the nozzle is obstructed,
this may cause the humidier to malfunction.
ENGLISH

7
ENGLISH
CHARACTERISTICS
WORKING PRINCIPLE
WATER FILTER
AROMA BOX
RELATIVE HUMIDITY
The ultrasonic humidier uses the ultrasonic high-frequency oscillator to break up water
into tiny water particles with the diameter of about 1-5 um. The ventilation system blows
out this water into the dry air where they evaporate to give the required humidity. The clear-
ly visible smooth and even fog can be seen out of the humidier.
Ceramic balls can soften the hard water.
A ceramic lter can eliminate the strange smell in the water.
1. Press out the aroma box from the base.
2. Use water-soluble aroma oil and drop on to the sponge.
3. Put the aroma box back into the humidier, the aroma function will remain on when the
humidier is running.
4. To stop the aroma function or when storing the humidier, clean the sponge in the aroma
box.
5. Only drop aroma oil into aroma cotton. Do not drop any liquid except clean water into the
water tank.
1. The percentage of water mist in a given space with a given air temperature is named as
relative humidity, usually marked as % RH, i.e. 45% RH. The air contains water mist more
or less. The proportion of water mist to the air varies according to different air tempera-
tures. The higher the temperature, the more water mist inhaled in the air.
2. In winter, the cold air outside enters the room and becomes warmer by the higher tem-
perature in the room. As a result, the relative humidity decreases. If you want to keep the
healthy environmental humidity, we need to increase the mist volume in the air. The humid-
ier can do that for us.
3. Relative humidity in different environments suitable for people:
Bedroom, living room: 45-65% RH
Patient’s room: 40-55% RH
Room with computer, experiment equipment: 45-60% RH
Room with a piano: 40-60% RH
Museum, exhibition hall, and library: 40-50% RH
• When moving the humidier, lift it by the base and not by the water tank.
• Do not use the humidier if the air in the room is already sufciently humid.
• The ideal relative humidity level for human comfort is in fact between 45% and 65%. Ex-
cess humidity shows up in the form of condensation on cold surfaces or cold walls in the
room. To measure the room’s humidity correctly, use a hygrometer available in most spe-
cialist shops and hypermarkets.
• The humidier is designed for indoor and domestic use only.

8ENGLISH
PARTS LIST
FEATURES
1. Top cover
2. Handle
3. Nozzle
4. Water tank
5. Control panel
6. Host
7. Sensor
8. Power cord
1
2
3
5
4
67
8
DISPLAY CONTROL PANEL
• Highly efcient in humidication with large output.
• Low energy consumption, save 85-90 percent of electricity than normal stream humidier.
• Long lifetime.
• Automatic control of humidity level, lack-of-water security protection.
• Base with aroma cotton, to wet it with aromatic oil.

9
ENGLISH
OPERATION INSTRUCTIONS
• First operation: Put the humidier in the room temperature for half an hour before running.
• It is recommended to use the humidier under a temperature of 20°C, relative humidity
less than 80% RH.
• Use clear water not over 40°C.
• Check the water tank, make sure it is clear.
1. Put the humidier on a at surface.
2. Remove the top cover, ll water into the water tank, and then put back the top cover.
Or take out the water tank for lling water, afterwards put the water tank back on the
main base.
3. Check if the rated voltage meets the input voltage, and plug into the socket. Then the
display will light up and the buzzer will ring for once. 1 second later, the display turns off,
only red symbol POWER showing and the humidier is in standby state.
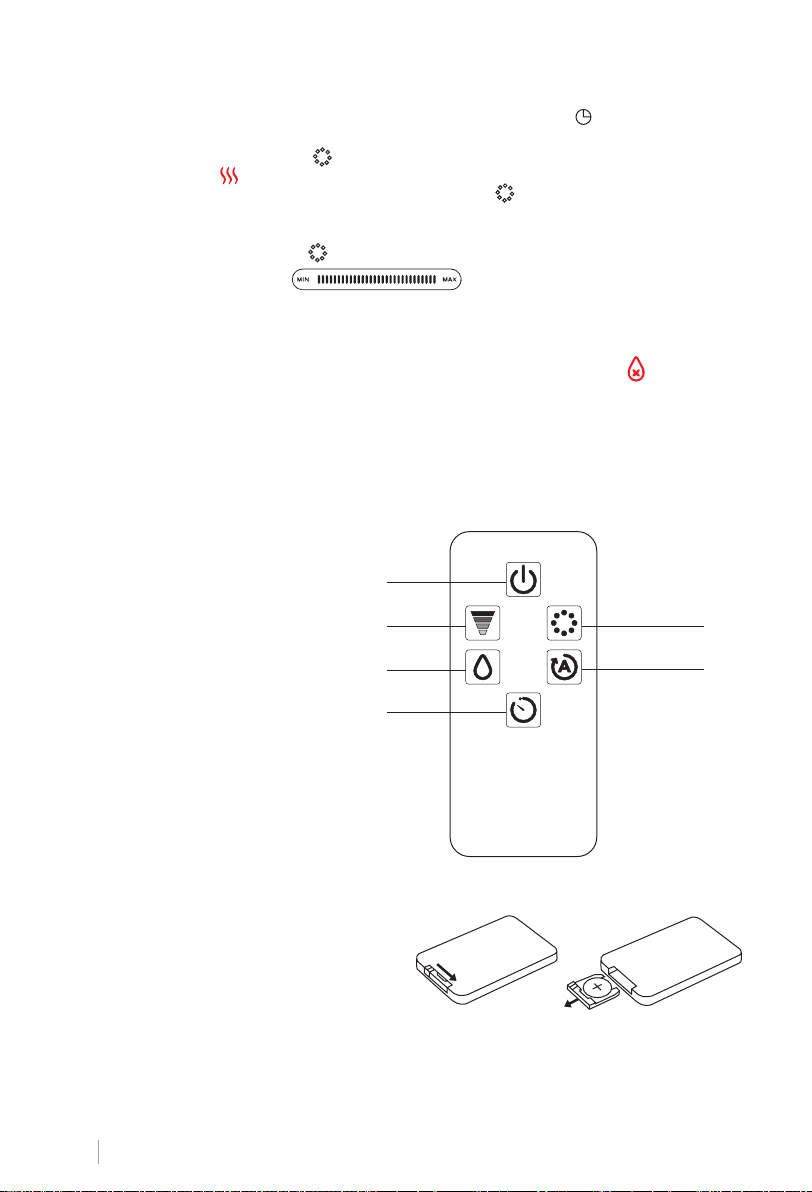
4. Touch the symbol POWER , display background and water tank indicator light will
light up meanwhile. Humidier will begin to work in AUTO mode, with display show-
ing AUTO symbol and current humidity. 10 seconds later, the display shows current
temperature, and then changes into humidity. Temperature and humidity showing will
switch once in every minute.
• Humidier will decide running humidity based on current temperature as below table.
5. Constant Humidity: Touch the symbol HUMIDITY , you may select the humidity range
from 30% RH to 75%. Touch once, it will increase by 5% RH for each time. When it
reaches 75%, touch again, it will show “--” and humidier will run back to AUTO mode.
6. After setting the expected humidity, humidier will keep the memory and conrm by
ashing in 3 seconds. Once the display switches to show current humidity, it means
setting is nished, “%” on display will ash slowly.
• When setting humidity is 1% RH ~ 9% RH higher than current humidity, mist output
speed will run by the lowest (the rst) speed.
• When setting humidity is 10% RH ~ 15% RH higher than current humidity, mist output
speed will run by the middle (the third) speed.
• When setting humidity is 15% RH higher than current humidity, mist output speed will
run by the highest (the fth) speed.
• When current humidity is higher than setting humidity, humidier will turn into sleep
state. Once current humidity is 3% RH lower than setting humidity, humidier will re-
work in previous working mode till water shortage.
Mist output speed is adjustable under constant humidity function.
7. Night Mode: Long press symbol HUMIDITY for 2 seconds to shut down water tank
indicator light and display, only red ON/OFF symbol is showing. Press any symbol to
wake up the light and display.
8. Timer: There are 12 timer setting: 1,2,3,4,5,6,7,8,9,10,11,12 hours. Touch the symbol TIM-
ER , the LED display will show the timer setting from 01-12 in sequence, for example
“1H”. Once nished setting excepted timer, without operation for 3 seconds, the timer
stop ashing means that the timer setting is successful.
Temperature of the air,
degrees Celsius ≤19 20 21 22 23 24 25 26 27 28 29 30 31 32 33 34 35 36 ≥37
Humidity (%) 65 60 58 57 55 53 50 48 45 43 40 38 36 35 34 32 31 30 25

10 ENGLISH
• The timer shows the rest operation time every minute and decreases by 1 hour, i.e., if the
timer is set at 12 hours, LED display shows 11 after 1 hour.
• There is a shortcut for timer setting. Long press the symbol TIMER 2 seconds to can-
cel timer setting.
9. Disinfect: Symbol DISINFECT , rst touch to start heating function, display shows
symbol HEATING . Warm mist will come out after 10~15 minutes. Second touch to
start plasma function, display shows symbol PLASMA , plasma generator works as
well. Third touch to shut down heating function. Fourth touch to shut down plasma func-
tion.
• Long press symbol DISINFECT to turn on/off water tank indicator light.
10.Mist Output Speed: Touch to enter manual mode, sliding from
MIN to MAX to select desired mist output speed. Sliding from left to right, speed will
increase from 1 to 5, with display showing from 1 to 5 accordingly.
11. Auto Shut-Off: Once the water in the tank is not enough to keep the humidier contin-
ue working, the humidier will automatically stop working and will warn with 3 beeps
(no sound under NIGHT mode). Display will show water shortage symbol only. Rell
water tank, humidier will restart after 5 seconds. Otherwise, humidier will automat-
ically power off after 5 minutes.
REMOTE CONTROL
REPLACING THE REMOTE CONTROL BATTERY
When rst using the remote control, the plastic tab should be removed from the battery
compartment.
1. Remove the battery compartment by
pinching the tab and pulling the compart-
ment out as below picture.
2. Remove the old battery.
3. Replace with a new battery. Make sure that
the polarities match.
4. Replace the battery compartment.
1. On / Off
2. Speed
3. Humidity
4. Timer
5. Plasma
6. Auto
1
2
3
4
5
6

11
ENGLISH
TROUBLESHOOTING
PROBLEM POSSIBLE CAUSE SUGGESTED SOLUTION
Power lamp is off when
switched on.
Humidier is not plugged in. Plug the humidifier into a powered
electrical socket.
Power cord is damaged. Immediately stop using and contact
Customer Support.
Humidier is defective or malfunc-
tioning.
Power lamp is on when
switched on, but no mist
comes out.
Humidier is not turned on. Press the power button to turn it on.
The target humidity is reached. Increase the target humidity or change
mode.
Water shortage indicator
is on.
No water in the tank. Refill the water tank and wait at least
1 minute.
Water level is low.
The water level required has not yet
reached the vaporization compart-
ment.
Wait at least 1 minute.
The water tank isn’t well positioned. Check the positioning of tank on the
base.
The humidifier isn’t on a flat sur-
face. Check the positioning of the humidifier.
Humidifier produces an
unusual smell.
Humidifier is new. Take out water tank, open cover, let it
stay 12 hours in cool position.
Dirty water or water sitting too long. Clean water tank, fill with clear water.
Residual smell from diffusing aro-
ma oil on the aroma cotton.
Remove the aroma cotton, rinse it un-
der clean water and allow it to dry.
Humidifier makes a loud
or unusual sound.
Resonant in water tank when water
is too low. Fill water into water tank.
Humidifier is on an unstable sur-
face.
Move the humidifier to a stable flat
surface.
Water tank is positioned incorrectly.
Turn off and unplug the humidifier,
then align the water tank cover with its
respective opening in the inner cham-
ber.
Humidifier is malfunctioning. Immediately stop using and contact
Customer Support.
The humidification
capacity is too low.
There is natural or artificial air re-
placement in the room which inter-
fere the increase of %RH.
Check if doors and windows are closed.
Check if there is no air conditioning
working in the room.
The air inlet grids and nozzle could
be blocked.
Remove any blocking items from the
grids and the nozzle.
Too much scale in the water tank. Clean transducer.
The humidity selected rate is too
low.
Increase mist output speed.
Increase humidity setting rate.
Water is too dirty or water kept too
long in the tank.
Clean water tank, change to fresh
clear water.

12 ENGLISH
PROBLEM POSSIBLE CAUSE SUGGESTED SOLUTION
The ambient humidity is
too high.
Humidifier is working in CONTINU-
OUS MODE. Change the mode.
The humidity target is too high. Select a lower %RH target.
Room is not well-ventilated.
Open a window to ensure proper air
flow for your humidifier, or move the
humidifier to a more well-ventilated
room.
Excess water tank has spilled while
filling the water tank or replacing
the water tank back onto the base.
Wipe off excess water from the top
and bottom of the base before replac-
ing the water tank.
There is condensation in
the room. The room temperature is too low. Heat the room up.
The mist suddenly stops
coming out.
Programmed timer period has run
out. Turn humidifier on.
The water shortage indicator is on. Refill water tank.
The target humidity level is reached.
Incorrect humidity level
is being displayed.
Room is larger than the effective
range of the humidifier.
Move the humidifier to a room which is
with suitable room size.
Moisture has built up inside of the
humidity sensor.
Turn off the humidifier and allow the
humidity sensor to completely air dry
before resuming use.
The nozzle is facing the direction of
the humidity sensor.
Turn the nozzle so that it is facing away
from the humidity sensor.
Humidity sensor is broken or defec-
tive. Contact Customer Support.
Control panel does not
work.
Hands are too wet when operating
control panel.
Keep hands dry while operating the
control panel.
Humidifier has malfunctioned. Contact Customer Support.
White dust appears
around the humidifier.
Water being used has a high mineral
content.
Use distilled water with the humidifier.
If distilled water is not available, use
purified or filtered water. Remember to
clean water tank at least once a week.
Humidifier was not properlycleaned
after last use. Clean humidifier.
Mist is coming out from
the base.
Water tank is not positioned cor-
rectly.
Turn off and unplug the humidifier,
then align the water tank cover with its
respective opening in the inner cham-
ber.
Mist fog coming out
from around the nozzle.
There are apertures between the
nozzle and water tank.
Reposition the cover and check if the
nozzle is well plugged in the cover.
The warm mist function
does not produce warm
mist.
The humidifier is in warm-up phase. Wait a few minutes till the end of the
phase.
The mist is too fine to feel the
warmth. Increase the speed level.
The room temperature is too cold
and the mist may cool down too
quickly.
Increase the speed level and heat the
room up.

13
ENGLISH
PROBLEM POSSIBLE CAUSE SUGGESTED SOLUTION
Remote control does not
work.
Remote control is out of range from
the humidifier.
Use the remote control within 5 m of
the humidifier.
The plastic tab blocks the battery. Remove the plastic tab from the bat-
tery compartment.
Battery needs to be changed. Replace the battery.
The following is not considered faulty operation:
1. If your water is very hard (containing abnormally high levels of minerals) the humidier
may produce white dust. This is not a malfunction. The solution would be to clean the
lter more often or use softer water.
2. If you stand very close to the humidier, you will hear the gurgling sound of water. This is
normal.
3. The humidier operates very quietly but it is not completely silent. Noise levels less than
35 dB (A) is considered normal.
MAINTENANCE
• In case the water is hard, which means water contains too much calcium and magnesium,
it can cause a “white powder” problem and leave heavy scales on the surface of the water
tank, transducer and inner surface of the water tank. Scales on the surface of transducer
will let the humidier work improperly.
• We recommend:
1. Use cold boiled water or distilled water.
2. Clean the transducer, water tank and basin humidier every week.
3. Change the water in water tank more often to keep it fresh.
4. Make sure to pour out water from the water tank and dry the water tank before you store it
unused for a long time.
5. Clean the whole humidier and make sure that all parts of the humidier are dried com-
pletely if it is supposed to be left unused for a long time.
• How to clean the transducer:
1. Clean with clean water or citric acid if there is scale in it.
2. Brush off the scale from the surface.
3. Rinse the transducer with clean water.
• How to clean the water tank:
1. Clean the water tank with a soft cloth or use citric acid if there is scale in it.
2. If the scale is covering the security switch, drop citric acid for 2-5 min on the scale and
clean it out with a brush.
3. Rinse the water tank with clean water.
• How to clean ceramic lter:
1. Clean and activate the ceramic ball lter after using 1000L water regularly. Depending
on water quality. If the ceramic ball is dirty, it needs to be cleaned more frequently.
2. It can be dipped in vinegar about 5 minutes. Then rinse it cleanly with clean water.
3. Then put the lter under the sun for 4~6 hours.
In compliance with Directives: 2012/19/EU and 2015/863/EU on the restriction of the use of dangerous substances
in electric and electronic equipment as well as their waste disposal. The symbol with the crossed dustbin shown on
the package indicates that the product at the end of its service life shall be collected as separate waste. Therefore,
any products that have reached the end of their useful life must be given to waste disposal centres specialising
in separate collection of waste electrical and electronic equipment, or given back to the retailer at the time of
purchasing new similar equipment, on a one for one basis. The adequate separate collection for the subsequent
start-up of the equipment sent to be recycled, treated and disposed of in an environmentally compatible way con-
tributes to preventing possible negative effects on the environment and health and optimises the recycling and
reuse of components making up the apparatus. Abusive disposal of the product by the user involves application of
the administrative sanctions according to the laws.

14 ESPAÑOL
ESPAÑOL
Gracias por elegir nuestro humidicador. Antes de usar el aparato, y para garantizar el mejor
uso, lea atentamente estas instrucciones.
Las precauciones de seguridad incluidas en este documento reducen el riesgo de muerte,
lesiones y descargas eléctricas si se cumplen correctamente. Guarde el manual en un lugar
seguro para referencia futura, junto con la tarjeta de garantía completa, el recibo de compra
y el paquete. Si corresponde, pase estas instrucciones al próximo propietario del electro-
doméstico. Siga siempre las precauciones de seguridad básicas y las medidas de prevención
de accidentes cuando utilice un aparato eléctrico. No asumimos ninguna responsabilidad
por el incumplimiento del cliente de estos requisitos.
INSTRUCCIONES DE SEGURIDAD
• Al usar cualquier aparato eléctrico, siempre se deben observar precauciones básicas de
seguridad.
• Siga todas las precauciones de seguridad que se enumeran a continuación para mayor se-
guridad y para reducir el riesgo de lesiones o descargas eléctricas.
• Este humidicador puede ser utilizado por niños a partir de 8 años y personas con capaci-
dades físicas, sensoriales o mentales reducidas o falta de experiencia y conocimiento si se
les ha dado supervisión o instrucciones sobre el uso del humidicador de manera segura
y entienden los peligros. involucrado. Los niños no deben jugar con el humidicador. La
limpieza y el mantenimiento del usuario no deben ser realizados por niños sin supervisión.
• Antes de usar este humidicador, asegúrese de que el voltaje de su suministro de electrici-
dad sea el mismo que el indicado en la placa de características del humidicador.
• Coloque siempre el humidicador sobre una supercie dura, plana y nivelada. Evite la ex-
posición a la luz solar directa y manténgalo siempre alejado de paredes y fuentes de calor,
como estufas, radiadores, etc. El humidicador puede no funcionar correctamente si no se
coloca en una supercie nivelada.
• No inserte ni retire el enchufe eléctrico del humidicador con las manos mojadas.
• Si el cable de alimentación está dañado, debe ser reemplazado por el fabricante, su agente
de servicio o una persona cualicada de manera similar para evitar riesgos.
• Para reducir el riesgo de descarga eléctrica, no quite los tornillos. El humidicador no con-
tiene piezas reparables por el usuario. Deje todo el trabajo de mantenimiento a personal
cualicado.
• Llene el depósito con agua fresca, destilada o desmineralizada. No utilice ningún otro líqui-
do en el depósito de agua. No haga funcionar el humidicador cuando no haya agua en el
depósito.
• No agite el humidicador, ya que podría derramarse agua en la base del humidicador.
• Nunca toque el agua o los componentes mientras el humidicador está en funcionamiento.
• Si hay un olor inusual cuando se usa como se describe en este manual, apague el humidi-
cador, desenchúfelo y haga que lo revise su distribuidor.
• No vierta agua caliente en el depósito, es decir, a una temperatura superior a 40 °C.
• Desenchufe el humidicador antes de limpiarlo o quitar el depósito.
• No sumerja el humidicador ni el cable de alimentación o el enchufe en agua u otros líquidos.
• Nunca raspe el transductor con una herramienta dura. El humidicador debe limpiarse reg-
ularmente. Para hacer esto, consulte las instrucciones de limpieza en este manual.
• Si derrama cualquier líquido en el humidicador, puede causar daños graves. Apáguelo de
la red eléctrica de inmediato. Retire el enchufe de la red y consulte a su distribuidor.
• Desconecte el humidicador de la fuente de alimentación cuando no esté en uso y antes
de limpiarlo.
• El cable de alimentación no debe tocar ninguna supercie caliente y no sobresalir del bor-
de de una mesa.

15
ESPAÑOL
CARACTERÍSTICAS
FUNCIONAMIENTO
FILTRO DE AGUA
RECIPIENTE PARA EL AROMA
HUMEDAD RELATIVA
El humidicador ultrasónico utiliza un oscilador ultrasónico de alta frecuencia para dividir
el agua en pequeñas partículas con un diámetro de aproximadamente 1-5 um. El sistema
de ventilación expulsa el agua al aire seco donde se evapora para proporcionar la humedad
requerida. La bruma suave es claramente visible fuera del humidicador.
Las bolas de cerámica pueden ablandar el agua dura.
Un ltro de cerámica puede eliminar el olor extraño en el agua.
1. Presione el recipiente de aromas desde la base.
2. Use aceite aromático soluble en agua y colóquelo sobre la esponja.
3. Vuelva a colocar el recipiente para el aroma en el humidicador, la función de aroma
permanecerá activada cuando el humidicador esté funcionando.
4. Para detener la función de aroma o al almacenar el humidicador, limpie la esponja del
recipiente para el aroma.
5. Solo coloque aceite aromático en el algodón. No añada ningún líquido, excepto agua
limpia, en el depósito de agua.
El porcentaje de vapor de agua en un espacio dado con una temperatura del aire dada se
denomina humedad relativa, generalmente marcada como % HR, es decir, 45% HR. El aire
contiene agua evaporada en mayor o menor cantidad. La proporción de vapor de agua en el
aire varía según las diferentes temperaturas del aire. Cuanto mayor es la temperatura, más
vapor de agua se inhala en el aire.
En invierno, el aire frío del exterior entra a la habitación y se calienta por la temperatura más
alta de la habitación. Como resultado, la humedad relativa disminuye. Si desea mantener
una humedad ambiental saludable, necesitamos aumentar el volumen de vapor en el aire. El
humidicador puede hacer eso por nosotros.
Niveles de humedad relativa en diferentes situaciones:
Habitación, sala de estar: 45-65% RH
Habitaicón de pacientes: 40-55% RH
Sala de ordenadores o equipamiento de laboratorio: 45-60% RH
Sala con piano u otros instrumentos: 40-60% RH
Museos, salas de exposiciones y bibliotecas: 40-50% RH
• Nunca use este humidicador en una habitación donde se utilicen productos en aerosol o
en una habitación donde se esté administrando oxígeno.
• No coloque prendas de vestir o toallas encima del humidicador. Si la boquilla está obstru-
ida, esto puede causar un mal funcionamiento del humidicador.
• Al mover el humidicador, levántelo por la base y no por el depósito de agua.
• No use el humidicador si el aire en la habitación ya está sucientemente húmedo.
• El nivel ideal de humedad relativa para la comodidad humana es, de hecho, entre 45% y
65%. El exceso de humedad aparece en forma de condensación en supercies frías o pare-
des frías en la habitación. Para medir la humedad de la habitación correctamente, use un
higrómetro disponible en la mayoría de las tiendas especializadas e hipermercados.
• El humidicador está diseñado solo para uso doméstico.

16 ESPAÑOL
LISTADO DE PARTES
PROPIEDADES
1. Cubierta superior
2. Asa
3. Boquilla
4. Depósito de agua
5. Panel de control
6. Cuerpo principal
7. Sensor
8. Cable de alimentación
1
2
3
5
4
67
8
PANTALLA PANEL DE CONTROL
• Alta eciencia en humidicación con gran rendimiento.
• Bajo consumo de energía, ahorre un 85-90 por ciento de electricidad más que con un
humidicador de corriente normal.
• Larga vida útil.
• Control automático del nivel de humedad, protección de seguridad por falta de agua.
• Base con algodón para aromas, para humedecer con aceite aromático.

17
ESPAÑOL
INSTRUCCIONES DE USO
• Primer uso: Coloque el humidicador a temperatura ambiente durante media hora an-
tes de utilizarlo.
• Se recomienda utilizar el humidicador a una temperatura de 20 °C, humedad relativa
inferior al 80% HR.
• Use agua limpia que no supere los 40 °C.
• Verique el depósito de agua, asegúrese de que esté limpio.
1. Coloque el humidicador sobre una supercie plana.
2. Retire la cubierta superior, llene el depósito de agua y luego vuelva a colocar la cubi-
erta superior. O saque el depósito de agua para llenarlo, luego vuelva a colocarlo en
la base principal.
3. Compruebe si el voltaje nominal cumple con el voltaje de entrada y conéctelo a la
toma. Luego la pantalla se iluminará y sonará un pitido. Un segundo después, la pan-
talla se apagará, solo se mostrará el símbolo rojo ENCENIDDO y el humidicador
entrará en estado de espera.
4. Toque el símbolo de ENCENDIDO , el fondo de la pantalla y la luz indicadora del depósi-
to de agua se encenderán mientras tanto. El humidicador comenzará a funcionar en
modo AUTO, con una pantalla que muestra el símbolo AUTO y la humedad actual. 10
segundos después, la pantalla muestra la temperatura actual y luego cambia a hume-
dad. La visualización de la temperatura y la humedad cambiará una vez cada minuto.
• El humidicador decidirá la humedad de funcionamiento en función de la temperatura
actual como se muestra en la tabla a continuación.
5.Humedad constante: toque el símbolo HUMEDAD , puede seleccionar el rango de
humedad de 30% HR a 75%. Toque una vez, aumentará en un 5% de HR por cada
toque. Cuando alcance el 75%, toque nuevamente, mostrará “-” y el humidicador
volverá al modo AUTO.
6. Después de congurar la humedad deseada, el humidicador mantendrá la memoria y
conrmará parpadeando 3 segundos. Una vez que la pantalla cambia para mostrar la
humedad actual, signica que la conguración ha nalizado, “%” en la pantalla par-
padeará lentamente.
• Cuando el ajuste de humedad es entre 1% RH ~ 9% RH más alto que la humedad ac-
tual, la velocidad de salida de vapor de agua se ejecutará en la velocidad más baja (la
primera).
• Cuando la humedad de ajuste es entre 10% HR ~ 15% HR más alta que la humedad actual,
la velocidad de salida de vapor de agua funcionará a la velocidad media (la tercera).
• Cuando la humedad de conguración es más de 15% HR que la humedad actual, la
velocidad de salida de vapor de agua utilizará la velocidad más alta (la quinta).
• Cuando la humedad actual es mayor que la conguración de humedad, el humidica-
dor entrará en estado de suspensión. Una vez que la humedad actual es 3% HR más
baja que la humedad establecida, el humidicador volverá a funcionar en el modo de
trabajo anterior hasta que haya escasez de agua.
La velocidad de salida del vapor de agua es ajustable bajo la función de humedad constante.
7. Modo nocturno: Mantenga presionado el símbolo HUMEDAD durante 2 segundos
para apagar la luz indicadora y la pantalla del depósito de agua, solo se muestra el
símbolo rojo de ENCENDIDO / APAGADO. Presione cualquier símbolo para activar la
luz y la pantalla.
8.Temporizador: Hay 12 ajustes de temporizador: 1, 2, 3, 4, 5, 6, 7, 8, 9, 10, 11, 12 horas.
Toque el símbolo TEMPORIZADOR , la pantalla LED mostrará la conguración del
Temperatura del aire,
grados centígrados ≤19 20 21 22 23 24 25 26 27 28 29 30 31 32 33 34 35 36 ≥37
Humedad (%) 65 60 58 57 55 53 50 48 45 43 40 38 36 35 34 32 31 30 25

18 ESPAÑOL
temporizador desde 01-12 en secuencia, por ejemplo, “1H”. Una vez que termine de
congurar el temporizador, espere 3 segundos. Cuando el temporizador deja de par-
padear signica que la conguración del temporizador se ha conrmado.
• El temporizador muestra el tiempo restante hasta apagarse y empieza la cuenta atrás
de hora en hora, es decir, si el temporizador se congura en 12 horas, la pantalla LED
muestra un 11 después de 1 hora.
• Hay un atajo para la conguración del temporizador. Mantenga presionado el símbolo
TEMPORIZADOR 2 segundos para cancelar la conguración del temporizador.
9.Desinfectar: Símbolo DESINFECCIÓN . Pulse el botón para iniciar la función de
calentamiento, la pantalla muestra el símbolo CALEFACCIÓN . El vapor de agua cal-
iente saldrá después de 10 ~ 15 minutos. Pulse el botón una segunda vez para iniciar la
función de desinfecicón, la pantalla muestra el símbolo .
• Pulse prolongadamente el botón de DESINFECCIÓN para encender o apagar la luz indica-
dora del depósito de agua.
10.Velocidad de salida de vapor: Pulse para acceder al modo
manual, deslice con el dedo de MIN a MAX para seleccionar la velocidad de salida de
vapor deseada. Deslizándose de izquierda a derecha, la velocidad aumentará de 1 a 5,
y la pantalla mostrará de 1 a 5 en consecuencia.
11. Apagado automático: una vez que el agua en el depósito no es suciente para que
el humidicador continúe funcionando, el humidicador dejará de funcionar au-
tomáticamente y advertirá con 3 pitidos (sin sonido en el modo NOCHE). La pantalla
mostrará solo el símbolo de escasez de agua . Rellene el depósito de agua y el
humidicador se reiniciará después de 5 segundos. De lo contrario, el humidicador
se apagará automáticamente tras 5 minutos.
MANDO A DISTANCIA
REMPLAZAR LA PILA DEL MANDO A DISTANCIA
Cuando utilice por primera vez el mando a distancia, la lengüeta de plástico debe retirarse
del compartimiento de la pila.
1. Retire el compartimento de la pila pellizcando
la pestaña y tirando del compartimento como se
muestra en la imagen de abajo.
2. Retire la pila vieja.
3. Reemplace con una pila nueva. Asegúrese de que
las polaridades coincidan.
4. Coloque de nuevo el compartimento de la pila.
1. Encendido / Apagado
2. Velocidad
3. Humedad
4. Temporizador
5. Desinfección
6. Auto
1
2
3
4
5
6

19
ESPAÑOL
RESOLUCIÓN DE PROBLEMAS
PROBLEMA CAUSA POSIBLE SOLUCIÓN
La luz de encendido
está apagada cuan-
do se enciende el hu-
midicador.
El humidicador no está enchufado. Conecte el humidificador a una toma de
corriente eléctrica.
El cable de alimentaicón está dañado. Deje de usarlo inmediatamente y pón-
gase en contacto con Atención al cliente.
El humidificador está defectuoso o no
funciona bien.
La luz de encendi-
do está encendida
cuando se enciende
el humidicador,
pero no sale bruma.
El humidicador no está encendido. Presione el botón de encendido para en-
cenderlo.
Se ha alcanzado el objetivo de hume-
dad.
Aumente el objetivo de humedad o cam-
bie de modo.
El indicador de
falta de agua está
encendido.
No hay agua en el depósito. Vuelva a llenar el depósito de agua y es-
pere al menos 1 minuto.
El nivel de agua es bajo.
El nivel de agua requerido aún no ha
alcanzado el compartimento de vapor-
ización.
Espere como mínimo un minuto.
El depósito de agua no está bien colo-
cado. Compruebe la posición del depósito.
El humidificador no está sobre una su-
perficie estable. Compruebe la posición del humidificador.
El humidificador
produce un olor
inusual.
El humidificador es nuevo.
Saque el depósito de agua, abra la
tapa, deje que permanezca 12 horas en
posición fría.
Agua sucia o agua estancada dema-
siado tiempo.
Limpie el tanque de agua, llénelo con
agua limpia.
Olor residual de la difusión del aceite
aromático sobreel algodón para aromas.
Retire el algodón para aromas, enjuágue-
lo con agua limpia y déjelo secar.
El humidificador
emite un sonido
fuerte o inusual.
Puede ocurrir cuando el nivel de agua
es demasiado bajo en el depósito de
agua.
Llene el depósito con agua.
El humidificador está en una superfi-
cie inestable.
Mueva el humidificador a una superficie
plana estable.
El depósito de agua está colocado in-
correctamente.
Apague y desenchufe el humidificador,
luego alinee la tapa del depósito de agua
con su respectiva abertura en la cámara
interior.
El humidificador no funciona cor-
rectamente.
Deje de usar inmediatamente y póngase
en contacto con Atención al cliente.
La capacidad de
humidificación es
demasiado baja.
Hay corriente de aire natural o artifi-
cial en la habitación que interfiere con
el aumento del % HR.
Verifique si las puertas y ventanas están
cerradas.
Compruebe si no hay aire acondicionado
funcionando en la habitación.
Las rejillas de entrada de aire y la bo-
quilla podrían estar bloqueadas.
Retire cualquier elemento de bloqueo de
las rejillas y la boquilla.
Hay demasiado residuo en el depósito. Limpie el transductor.
La tasa de humedad seleccionada es
demasiado baja.
Aumente la velocidad de salida de la
bruma.
Aumente la velocidad de ajuste de hu-
medad.
El agua está demasiado sucia o se
mantiene demasiado tiempo en el
depósito.
Limpie el depósito de agua y añada agua
limpia y fresca.

20 ESPAÑOL
PROBLEMA CAUSA POSIBLE SOLUCIÓN
La humedad ambi-
ental es demasiado
alta.
El humidificador está funcionando el
MODO CONTINUO. Cambie el modo.
El objetivo de humedad es demasiado
alto.
Seleccione un objetivo de %RH más
bajo.
La habitación no está ventilada de
manera adecuada.
Abra la ventana para asegurar un flujo
de aire adecuado para su humidificador,
o muévalo a otra habitación con mejor
ventilación.
Se ha derramado el depósito al lle-
narlo o al volver a colocarlo en la base.
Limpie el agua derramada de la parte
superior e inferior de la base antes de
reemplazar el depósito de agua.
Hay condensación
en la habitación.
La temperatura de la habitación es
demasiado baja. Caliente la habitación.
La bruma deja de
salir de manera
repentina.
El tiempo programado se ha acabado. Encienda el humidificador
El indicador de escasez de agua está
encendido. Rellene el depósito de agua.
Se alcanza el nivel de humedad objetivo.
Se muestra un nivel
de humedad incor-
recto.
La habitación es más grande que el
rango efectivo del humidificador.
Mueva el humidificador a una habitación
que tenga el tamaño adecuado.
Se ha acumulado humedad dentro del
sensor de humedad.
Apague el humidificador y permita que
el sensor de humedad se seque comple-
tamente al aire antes de reanudar el uso.
La boquilla está orientada en la direc-
ción del sensor de humedad.
Gire la boquilla para que quede lejos del
sensor de humedad.
El sensor de humedad está roto o de-
fectuoso.
Póngase en contacto con Atención al
cliente.
El panel de control
no funciona.
Tiene las manos demasiado húmedas
o mojadas.
Utilice el panel de control con las manos
secas.
El humidificador no ha funcionado
bien.
Póngase en contacto con Atención al
cliente.
Aparece polvo
blanco alrededor del
humidificador.
El agua utilizada tiene un alto conteni-
do mineral.
Use agua destilada con el humidificador.
Si no hay agua destilada disponible, use
agua purificada o filtrada. Recuerde lim-
piar el depósito de agua al menos una
vez a la semana.
El humidificador no se limpió cor-
rectamente después del último uso. Limpie el humidificador.
La bruma está sali-
endo de la base.
El depósito de agua no está colocado
correctamente.
Apague y desenchufe el humidificador, lue-
go alinee la tapa del depósito de agua con
su respectiva abertura en la cámara interior.
Sale bruma alrede-
dor de la boquilla.
Hay aberturas entre la boquilla y el
depósito de agua.
Vuelva a colocar la cubierta y verifique si la
boquilla está bien conectada en la cubierta.
La función de bruma
cálida no produce
bruma cálida.
El humidificador está en fase de
calentamiento.
Espere unos minutos hasta el final de la
fase.
La bruma es demasiado fina para sen-
tir el calor. Aumente la velocidad.
La temperatura ambiente es dema-
siado fría y la bruma puede enfriarse
demasiado rápido.
Aumente la velocidad y caliente la hab-
itación.
Table of contents
Languages:
Other Create Humidifier manuals