Creative Playthings Playtime PS10CLATL User manual

MODEL PS10CLATL
ASSEMBLY MANUAL
If you have problems or questions about your Creative Playthings Play Set,
DO NOT CALL THE RETAILER.
Contact Creative Playthings Customer Service at 1-800-833-4001 or
Please read the owner’s manual before assem-
bling your Play Set, it provides additional
information on the care and use of your Play
Set.
You must carefully read the entire instruction
manual before proceeding with the assembly
or use of your new Play Set.
Creative Playthings takes great care to design
its products with your child’s safety in mind.
However, only with careful supervision
and proper safety instructions, can you be
assured of safe play time on any product
designed for children.
By
This product is intended for single
family home/residential use only and
not intended for use in any public
setting. Placement in any public
setting constitutes a misuse of this
product.
All hardware on this set is specially coated
for corrosion resistance.
If non-Creative Playthings hardware is used,
it must be galvanized or stainless steel.
™

Assembly
© Copyright 2010, Creative Playthings. Printed in U.S.A.
MODEL PS10CLATL
19772-100 Rev B (02-10) Page 2
PLAY SET SAFETY
Observing the following statements & warnings reduces the likelihood of serious or fatal injury:
&KLOGUHQVKRXOGXVHHTXLSPHQWRQO\LQLWVLQWHQGHGPDQQHU
&KLOGUHQVKRXOGQRWZHDUORRVHRUVWULQJHGFORWKLQJZKLOHXVLQJSOD\JURXQGHTXLSPHQW
&KLOGUHQVKRXOGQRWSOD\RQHTXLSPHQWLQZHWZHDWKHUFRQGLWLRQVGXHWRSRWHQWLDOO\VOLSSHU\VXUIDFHV
&KLOGUHQVKRXOG127ZDONWRRFORVHO\LQIURQWRIEHKLQGRUEHWZHHQPRYLQJVZLQJVDQGWUDSH]HV
&KLOGUHQVKRXOG127VZLQJHPSW\VZLQJVHDWV
&KLOGUHQVKRXOG127MXPSRIIVZLQJVDQGRUWUDSH]HZKLOHWKH\DUHLQPRWLRQ
Children should NOT twist swing ropes because this will weaken and reduce the strength of the rope and rope clamps.
&KLOGUHQVKRXOGVLWLQWKHFHQWHURIWKHVZLQJVZLWKWKHLUIXOOZHLJKWRQWKHVHDWV
Hanging accessories MUST be removed prior to using overhead monkey bars.
Do not allow children under age 7 to use monkey bars unless supported by an adult.
&KLOGUHQVKRXOG127EHRQWKHWRSVXUIDFHRIWKHWRSODGGHU
2QVLWHDGXOWVXSHUYLVLRQLVUHTXLUHGDWDOOWLPHVIRUFKLOGUHQRIDOODJHV
8QWLODVVHPEO\LVFRPSOHWH'2127OHW\RXUFKLOGUHQXVHWKH3OD\6HW
1HYHUIDVWHQDQ\WKLQJQRWDSSURYHGE\&UHDWLYH3OD\WKLQJVWR\RXU3OD\6HW$FFHVVRULHVRULWHPVQRWDS-
proved by Creative Playthings include; Dog runs, clothes lines, electrical devices, or bird feeders etc.
6XVSHQGHGURSHVFKDLQVDQGFDEOHVPXVWEHVHFXUHGDWERWKHQGV
6XVSHQGHGURSHVFKDLQVDQGFDEOHVPXVWQRWEHFDSDEOHRIORRSLQJEDFNRQWKHPVHOYHV
'RQRWDOORZPRUHWKDQOEVRQ6LQJOHRFFXSDQF\VZLQJDFFHVVRULHVVXFKDVWKH6OLQJ6ZLQJDQG7UDSH]H
'R127DOORZPRUHWKDQOEVRQPXOWLSOHXVHVZLQJDFFHVVRULHVVXFKDVWKH%DFNWR%DFN3ODVWLF+RUVH
and Wooden Lawn Swing Glider.
'R127DOORZPRUHFKLOGUHQRQWKH3OD\6HWWKDQFDQVLPXOWDQHRXVO\XVHDOOWKHVZLQJVWDWLRQVDWRQHWLPH
&KLOGUHQVKRXOG1(9(5ZHDUELF\FOHKHOPHWVZKLOHSOD\LQJRQWKH3OD\6HW
Assembly Safety:
$GXOWDVVHPEO\UHTXLUHG
.HHSWKHZRUNDUHDFOHDQDQGFOHDURIREVWUXFWLRQV
&KLOGUHQVKRXOGVWD\RXWRIWKHZRUNDUHDXQWLOWKHVDIHSOD\DUHDLVFOHDUHGRIREVWDFOHVWKH3OD\6HWKDVEHHQ
completely assembled, all hardware has been tightened and checked, and all tools have been picked up.
.HHSFKLOGUHQRIIWKH3OD\6HWXQWLOLWKDVEHHQFRPSOHWHO\DVVHPEOHG
6RPHSDUWVRIWKHDVVHPEO\SURFHVVPD\UHTXLUHKHOSIURPDQRWKHUFRPSHWHQWDGXOW
'RQRWVWDQGRQWKHVWUXFWXUHXQWLOWKH3OD\6HWKDVEHHQFRPSOHWHO\DVVHPEOHGXVHDVWHSODGGHULI\RXFDQ
not reach high enough.
)ROORZWKHPDQXIDFWXUHUVVDIHW\UHFRPPHQGDWLRQVIRUWKHWRROVDQGHTXLSPHQW\RXXVH
$YRLGDVVHPEOLQJ\RXU3OD\6HWLQSRRUZHDWKHUFRQGLWLRQV
:HDUSURSHUFORWKLQJDQGVDIHW\HTXLSPHQWVDIHW\JODVVHVERRWVDQGJORYHVZKLOHDVVHPEOLQJ\RXU3OD\6HW
)256$)(7<6$.(3/($6(7$.(7,0(725($'$//,16758&7,216&203/(7(/<$1'
CAUTION YOUR CHILDREN APPROPRIATELY.

Assembly
MODEL PS10CLATL
19772-100 Rev B (02-10)
© Copyright 2010, Creative Playthings. Printed in U.S.A. Page 3
SAFE PLAY AREA
SELECTING THE CORRECT LOCATION FOR YOUR PLAY PRODUCT IS IMPORTANT FOR
<285&+,/'5(1ҋ66$)(7<$1'7+(352'8&7ҋ6/21*(9,7<
Play Set Dimensions:
7KH02'(/36&/$7/6ZLQJ6HWKDVJURXQGGLPHQVLRQVRI[
7KH02'(/36&/$7/6ZLQJ6HWUHTXLUHVDOHYHOJURXQGVXUIDFHRI[IRUD6DIH3OD\$UHD
$GGLWLRQDODFFHVVRULHVPD\LQFUHDVHWKHVL]HRIWKH6DIH3OD\$UHD
7KHPD[LPXPIDOOKHLJKWIRU\RXU02'(/36&/$7/LVDVPHDVXUHGIURPWKHWRSRIWKH7RS/DGGHU
Safe Play Area:
7KH6DIH3OD\$UHDUHIHUVWRD]RQHH[WHQGLQJPHWHUVEH\RQGWKH3OD\6HWRQDOOVLGHVLQFOXGLQJWKHVOLGH
and the space above the Play Set. Because children may deliberately jump from a moving swing, the Safe Play
$UHDPXVWEHH[WHQGHGWRPHWHUVLQIURQWRIDQGEHKLQGDVZLQJLQJ$FFHVVRU\
7KHJURXQGVXUIDFHPXVWEHOHYHO,QVWDOOLQJ\RXU3OD\6HWRQVORSLQJJURXQGFDQFDXVHLWWROHDQRU´UDFNµ
This leaning puts additional stress on all connections and joints and in time will cause those connections to
loosen and fail.
7KH6DIH3OD\$UHDPXVWEHIUHHRIDOOVWUXFWXUHVODQGVFDSLQJWUHHVDQGEUDQFKHV URFNVZLUHVDQGRWKHU
obstacles to safe play. Children can be seriously injured running, or swinging into these obstacles.
5HPRYHDOOWULSSLQJKD]DUGVIURPWKH6DIH3OD\$UHD7ULSSLQJKD]DUGVLQFOXGHURRWVVWXPSVURFNVODQGVFDS-
ing, sprinkler heads, railroad ties, plumbing and electrical connections.
'RQRWLQVWDOO\RXU3OD\6HWRYHUFRQFUHWHJUDYHODVSKDOWSDFNHGHDUWKRUDQ\RWKHUKDUGVXUIDFH7KHIROORZ-
ing is a list of recommended ground covers from the Consumer Product Safety Commission.
RECOMMENDED GROUND COVER
Suggested Material Uncompressed Depth
Double Shredded Bark Mulch 9"
Uniform Wood Chips 12"
Fine Gravel 12"
Fine Sand 12"
$Q\HGJLQJXVHGWRFRQWDLQWKHJURXQGFRYHUPXVWEHEH\RQGWKH6DIH3OD\$UHDLH/DQGVFDSH7LPEHUV
A FALL ONTO A HARD SURFACE COULD RESULT IN SERIOUS
INJURY.
Safe play area using
recommended ground cover.
Landscape Timbers 6' from
play structure.
6'
(2 M)
6'
(2 M)
14'
(4.27 M)
14'
(4.27 M)
Assembly
© Copyright 2010, Creative Playthings. Printed in U.S.A.
MODEL PS10CLATL
19772-100 Rev B (02-10) Page 4
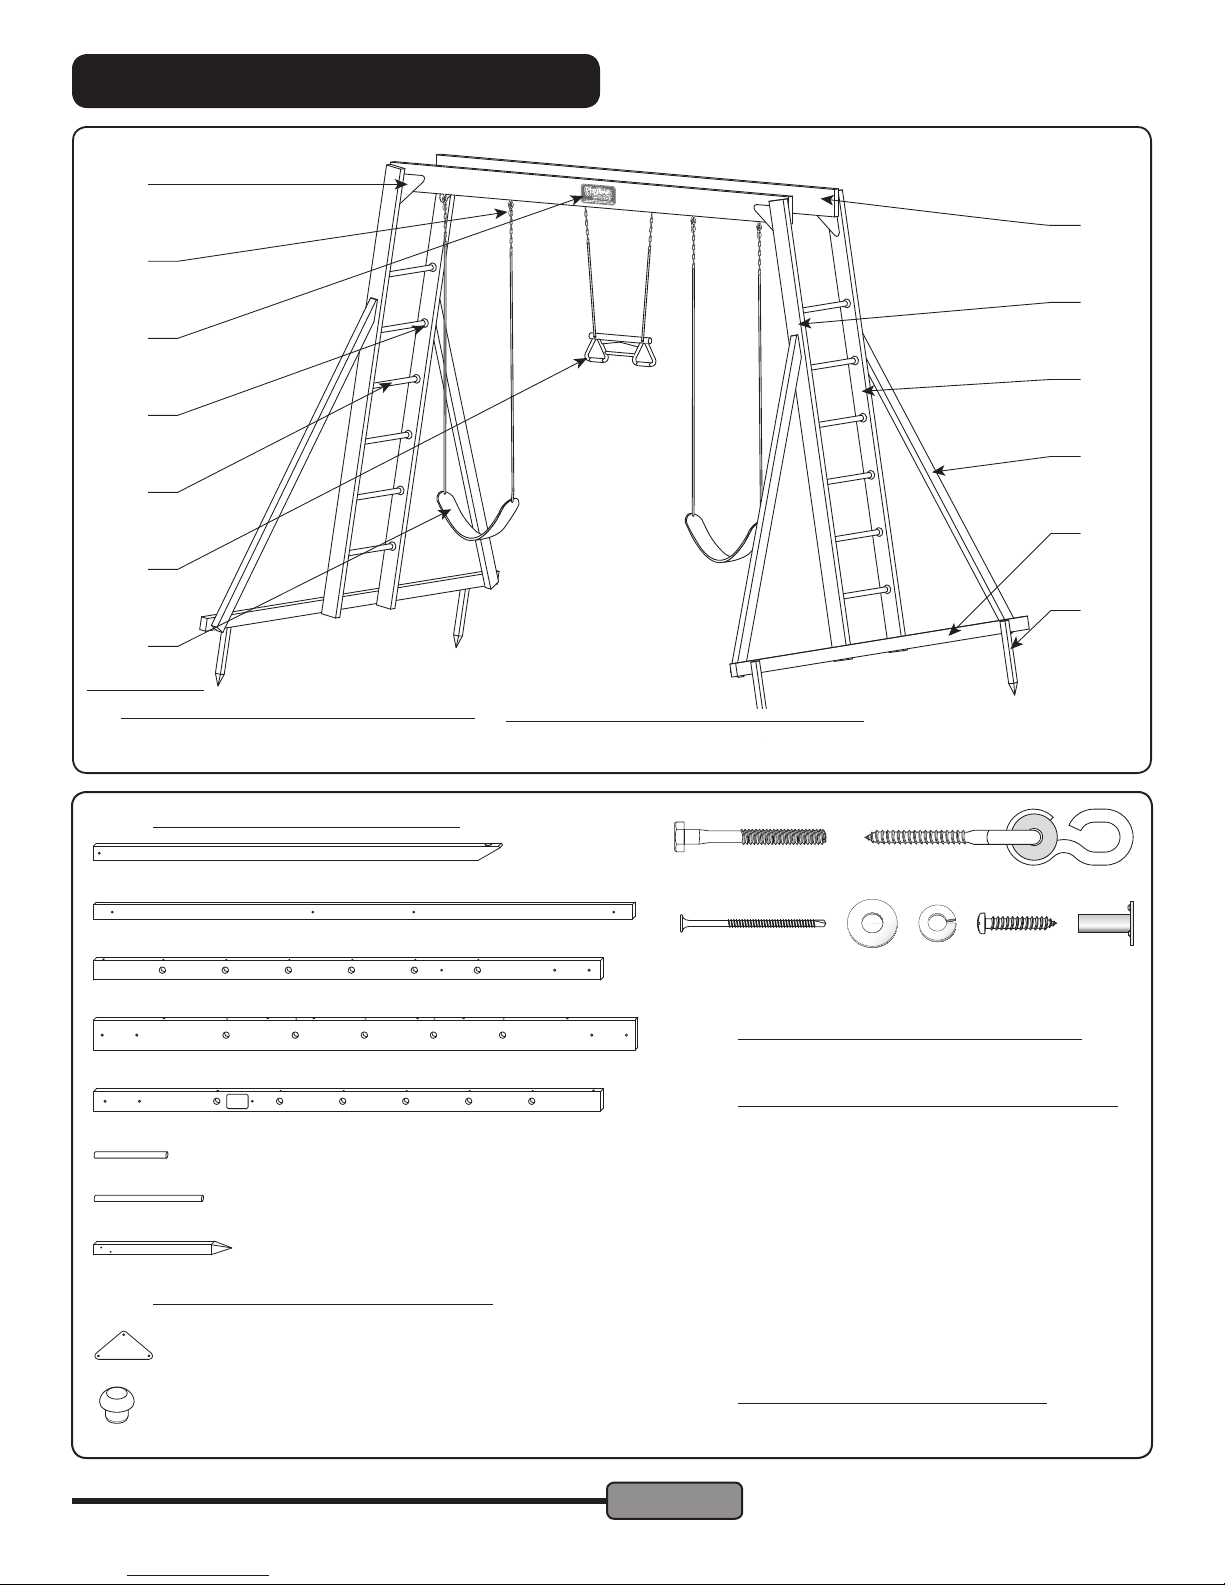
COMPONENTS
A
B
C
D
E
H
G
J
K
L
M
N
O
3OD\WLPH&ODVVLF7RS/DGGHU
A 4 31032-102 End Ladder Side Support 2 x 3 x 71"
B 2 31334-102 End Ladder Base 2 x 3 x 94"
C 2 33127-102 Right End Ladder Rail 2 x 4 x 88-1/2"
D 2 33128-102 Top Ladder Rail 2 x 6 x 94"
E 2 40516-102 Left End Ladder Rail 2 x 4 x 88-1/2"
F 5 14202-400 Steel Rung, Green 1" Dia x 15"
G 12 14203-400 Steel Rung, Green 1" Dia x 18"
H 4 36515-102 Ground Stake
$FFHVVRULHV&ODVVLF7RS/DGGHU
I 1 11051-2131 Assembly Block
J 4 14099-400 6" Triangle Brace
K 34 15154-400 Rung Collar, Green, 1" Dia x 7/8"
Weld Nut
Pan Head
Screw
NyGlide Swing Hanger
Lock
Washer
Flat
Washer
Self-Drilling Screw
Hex Bolt
1\*OLGH6ZLQJ+DQJHU3DFN
6 12002-206 Washer 5/16" Flat
L 6 17004-100 NyGlide Swing Hanger, Screw Type
+DUGZDUH%DJ&ODVVLF7RS/DGGHU
12 12002-205 Flat Washer 1/4"
12 12002-206 Flat Washer 5/16"
12 12017-205 Lock Washer 1/4"
12 12017-206 Lock Washer 5/16"
12 17001-104 Weld Nut 1/4"
12 17001-105 Weld Nut 5/16"
4 17003-1009 Hex Bolt 1/4 x 2-1/2"
4 17003-909 Hex Bolt 1/4 x 2-1/4"
4 17003-1809 Hex Bolt 1/4 x 4-1/2"
4 17003-1011 Hex Bolt 5/16 x 2-1/2"
8 17003-611 Hex Bolt 5/16 x 1-1/2"
18 17020-109 Screw #8 x 2-1/2"
10 17120-1402 Self-Drilling Screw #10 x 3-3/4"
24 17120-902 Self-Drilling Screw #10 x 2-1/2"
3OD\WLPH1DPH3ODWH%DJ
M 1 14208-100 Playtime Name Plate
4 17128-202 Stainless Pan Head Screw #6 x 1/2"
Swing Options:
6ZLQJ7UDS$FF3DFN5RSH
N 2 40009-400 Sling Swing, Green w/Rope
O 1 40381-100 Plastic Ring Trap. Combo, Yellow
OR
6ZLQJ7UDS$FF3DFN&KDLQ
2 40321-400 Sling Swing, Green w/Chain
1 40311-402 Ring Trapeze Assembly w/Chain

Assembly
MODEL PS10CLATL
19772-100 Rev B (02-10)
© Copyright 2010, Creative Playthings. Printed in U.S.A. 3DJH
MAINTENANCE INSTRUCTIONS
Re-staining Information: <RXU3OD\6HWLVVWDLQHGDWRXUIDFWRU\1RVWDLQLVQHHGHGDWLQLWLDODVVHPEO\
3LJPHQWHG H[WHULRU ZDWHU UHSHOOHQW VWDLQV DUH UHFRPPHQGHG DQG ZLOO SURYLGH DQ H[FHOOHQW EDUULHU DJDLQVW PRLVWXUH
ZLWKRXWKLGLQJWKHQDWXUDOZRRGJUDLQRUOHDYLQJDÀOPWKDWPD\ODWHUFUDFNRUSHHO
:HUHFRPPHQGWKDW\RXDSSO\VWDLQDFFRUGLQJWRWKHLQVWUXFWLRQVDQGSUHFDXWLRQVSURYLGHGE\WKHVWDLQPDQXIDFWXUHU
,WVKRXOGWDNHRQHRUPRUHTXDUWVWRFRYHU\RXUVHW
&RQWDFW\RXUORFDOGHDOHURUFDOO&UHDWLYH3OD\WKLQJVIRURXUVWDLQLQJSURGXFWV
'RQRWSDLQWRUYDUQLVKUXQJVRUVWHSV
$YRLGXVLQJÀQLVKHVWKDWFUHDWHVOLSSHU\VXUIDFHV
Maintenance:
:RRGHQ SOD\JURXQG HTXLSPHQW ZLOO ODVW IRU \HDUV ZLWK SURSHU PDLQWHQDQFH 0DLQWHQDQFH RI WKH 3OD\ 6HW ÀQLVK ZLOO
vary depending on weather climate.
$VDVDIHW\SUHFDXWLRQFKHFNDOOKDUGZDUHVXFKDVQXWVDQGEROWVIRUWLJKWQHVVWZLFHDPRQWKGXULQJXVHDQGDWWKH
EHJLQQLQJRIHDFKSOD\VHDVRQ7LJKWHQDVUHTXLUHGDQGVSHFLÀHGLQWKHVHLQVWUXFWLRQV'RQRWRYHUWLJKWHQ
&KHFNVWUXFWXUHWZLFHPRQWKO\GXULQJXVDJHIRUDQ\HYLGHQFHRIGHWHULRUDWLRQ,IXSRQLQVSHFWLRQKDUGZDUHKDVVKDUSHGJHV
rusted or structural pieces have signs of premature failure; replace them through Creative Playthings Customer Service.
2LODOOPHWDOOLFPRYLQJSDUWVPRQWKO\GXULQJWKHXVDJHVHDVRQ
7KHVZLQJVWUDSH]HWHQWURSHODGGHUVDQGDQ\RWKHUUHPRYDEOHSODVWLFDFFHVVRULHVVKRXOGEHUHPRYHGDQGWDNHQ
indoors when outside temperatures drop below 32° F (0° C).
:RRGZLOOH[SDQGDQGFRQWUDFWDVLWDGMXVWVWRWHPSHUDWXUHFKDQJHVDQGYDU\LQJPRLVWXUHFRQGLWLRQV&KHFNVRUFUDFNV
are a natural characteristic of all wood and will not affect the strength or durability of the wooden components.
7RPDLQWDLQWKHÀQLVKRI\RXUVHWDOLJKWVDQGLQJDQGDQDSSOLFDWLRQRIDQH[WHULRUVWDLQZLOOUHSDLUVFUDWFKHVDQGSUHYHQW
wood from aging prematurely.
7KHZRRGSDUWVRI\RXU3OD\6HWVKRXOGQHYHUEHGLVSRVHGRIE\EXUQLQJ
'LVSRVHRIDOOSDUWVVRDVQRWWRFUHDWHDKD]DUG
&KHFNDOOFRYHULQJVIRUEROWVDQGVKDUSHGJHVDQGUHSODFHZKHQUHTXLUHG
&KHFNVZLQJVHDWVFKDLQVURSHVDQGRWKHUPHDQVRIRIDWWDFKPHQWVIRUHYLGHQFHRIGHWHULRUDWLRQ5HSODFHWKURXJK
Creative Playthings Customer Service.
Tools & Materials Suggested for Assembly:
&ODZ+DPPHU
&DUSHQWHUҋV/HYHO
%R[:UHQFKRU6RFNHWV
'ULYHU'ULOO0HGLXP3KLOOLSV
/RFNLQJ3OLHUV
IW7DSH0HDVXUH
IW6WHS/DGGHU
%HHVZD[RU6RDS8VHGWROXEULFDWHVFUHZWKUHDGV
+H[%ROW:HOG1XW$VVHPEO\
Align the holes in the parts to be fas-
tened. Start preliminary tightening of
bolt into weld nut by hand. Tighten each
bolt with a wrench until the lock washer
is fully compressed between the head
RIWKHEROWDQGWKHÁDWZDVKHU
Correct Assembly:
Bolt has been screwed securely into
weld nut and the connection is tight.
Check connections periodically for
tightness during the life of the Play Set
. Do not over tighten.
Incorrect Assembly:
During assembly or maintenance the bolt
protrudes 1/8" past the weld nut. Call cus-
tomer service or replace the bolt at a local
hardware store. You may be overtighten-
ing or using the wrong size bolt. Failure
to replace this bolt with a shorter one
could result in serious injury.

Assembly
© Copyright 2010, Creative Playthings. Printed in U.S.A.
MODEL PS10CLATL
19772-100 Rev B (02-10) 3DJH
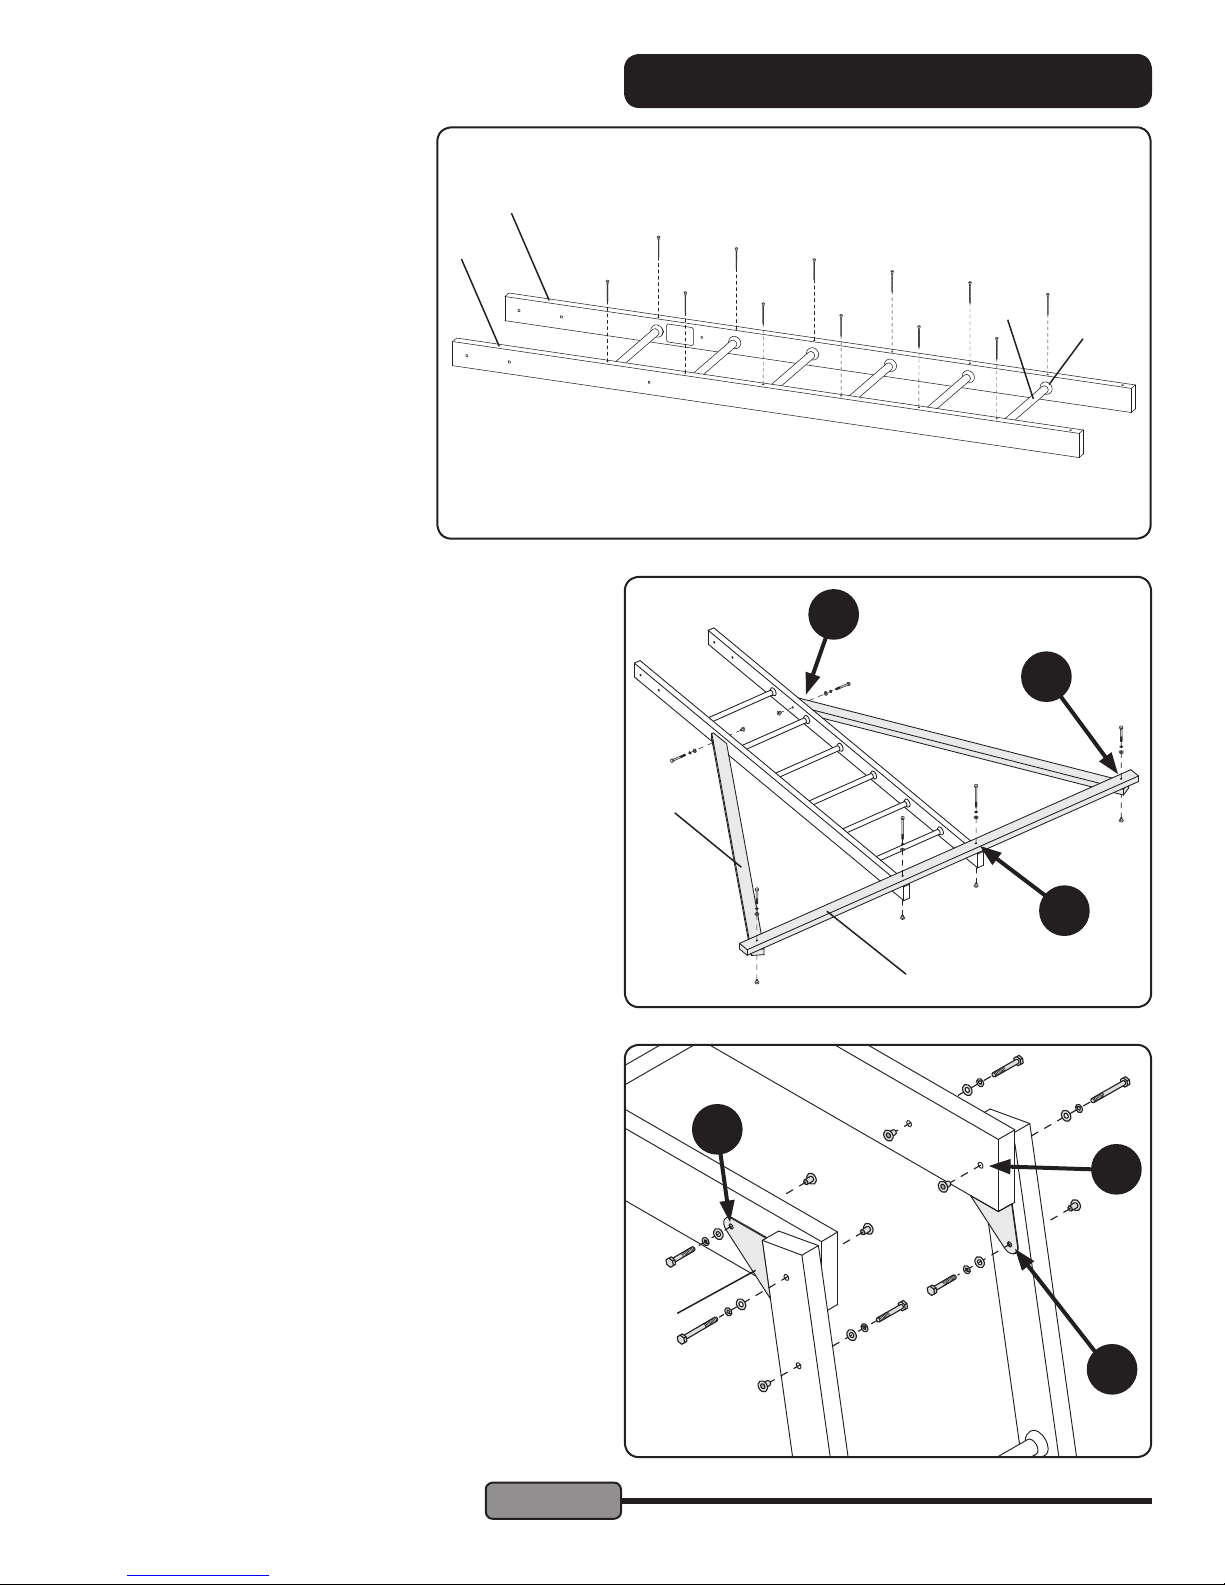
ASSEMBLY INSTRUCTIONS
STEP 2 – NyGlide Swing Connectors:
STEP 1 – Assemble Top Ladder:
Slide a Rung Collar (K) over each end of all 15" Rungs (F).
/D\RQH7RS/DGGHU5DLO'RQDVPRRWKÁDWVXUIDFHZLWKWKHKROHVIDFLQJDVVKRZQ3UHVVHDFK5XQJ$VVHPEO\LQ
place until the Rung Collar is tight against the Top Ladder Rail. Position the other Top Ladder Rail so the Rung Assemblies
ÀWLQWRWKHKROHV,IWKHÀWLVWRRWLJKWWRDVVHPEOHE\KDQGXVHDKDPPHUSDGGHGZLWKWKH$VVHPEO\%ORFN,WRIRUFHWKH
Top Ladder Rail onto the Rung Assembly.
Note: Before assembly make sure the Swing Hanger holes in the Top Ladder Rails are facing the same direction.
Use one #10 x 3-3/4" Self-drilling screw to secure each end of each Rung. Make sure that the collar of each Rung As-
sembly is tight against the Top Ladder
Rail before inserting the
screws into the holes
and fastening them
ZLWK D GULOO ÀWWHG
with a #2 Phillips
bit. When fasten-
LQJ SUHVV ÀUPO\
with your body
mass centered
over the drill.
ASSEMBLY INSTRUCTIONS
Note: A Hex Bolt Assembly consists of one Hex Bolt, one
Lock Washer, one Flat Washer and one Weld Nut.
Swing Hangers
F
K
I
Swing Hangers
Bottom View Swing Hangers
D
L
Install the Nyglide Swing Hangers (L), alternating in pairs, to
the front and back Top Ladder Rails as shown above.
Insert the screw end of a NyGlide Swing Hanger through a
ÁDWZDVKHUDQGLQWRRQHRIWKHKROHVLQWKH7RS/DGGHU
Use a screwdriver for leverage while turning the NyGlide into
the wood. The connector must be screwed into the wood ful-
O\ZLWKWKHEHQGRIWKHVKDIWUHVWLQJÀUPO\DJDLQVWWKH
ÁDWZDVKHU5HSHDWZLWKWKHRWKHU1\*OLGH6ZLQJ+DQJHUV
The swing motion must be perpendicular to the Ladder Rail.
&$87,21,I WKHVH LQVWDOODWLRQ LQVWUXFWLRQV DUH QRW H[-
plicitly followed, the NyGlide shaft will break or pull out
of the wood and injuries will result.
Assembly
MODEL PS10CLATL
19772-100 Rev B (02-10)
© Copyright 2010, Creative Playthings. Printed in U.S.A. Page 7
ASSEMBLY INSTRUCTIONS
STEP 3 – End Ladders:
Slide a Rung Collar (K) over each end
of all 18" Rungs (G).
Assemble one Right End Ladders Rail
(C) and one Left End Ladder Rail with
the Rung Assemblies in the same man-
ner as the Top Ladder. See illustration
at right for orientation of rails.
Use one #10 x 2-1/2" Self-drilling Screw
to secure each end of each Rung. Make
sure that the collar of each Rung As-
sembly is tight against the End Ladder
Rail before inserting the screws into the
KROHVDQGIDVWHQLQJWKHPZLWKDGULOOÀW-
ted with a #2 Phillips bit.
Repeat with the other End Ladder.
STEP 4 – Base Rail & Side Supports:
Flip the End Ladder so that the screws holding the Rungs
are face down.
Attach the End Ladder Base (B) to the outside of the End
Ladder as shown at point #1 using two 1/4" x 4-1/2" Hex Bolt
Assemblies.
Attach the Side Supports (A) to the End Ladder Base as
shown at point #2 using two 1/4" x 2-1/2" Hex Bolt Assem-
blies.
$OLJQ HDFK 6LGH 6XSSRUW VR WKDW WKH DQJOHG HQG ÀWV ÁXVK
with the side of an End Ladder Rail. Attach each Side Sup-
port as shown at point #3 using one 1/4" x 2-1/4" Hex Bolt
Assembly.
Repeat with the other End Ladder.
67(3²7RS/DGGHUWR(QG/DGGHUV
Attach one Triangle Brace (L) to the outside of each Top Lad-
der Rail at point #1 using one 5/16" x 1-1/2" Hex Bolt As-
sembly.
Align the Triangle Braces, Top Ladder and End Ladder Rails
at point #2 and attach using one 5/16" x 2-1/2" Hex Bolt As-
semblies.
Attach the Triangle Braces to the End Ladder Rails at point
#3 using 5/16" x 1-1/2" Hex Bolt Assemblies.
Repeat this procedure at the opposite end of the Top Ladder
with the other End Ladder Assembly.
Flip the End Ladder
before this step.
B
A
J
E
C
K
G
1
1
2
2
3
3
Assembly
© Copyright 2010, Creative Playthings. Printed in U.S.A.
MODEL PS10CLATL
19772-100 Rev B (02-10) Page 8
ASSEMBLY INSTRUCTIONS
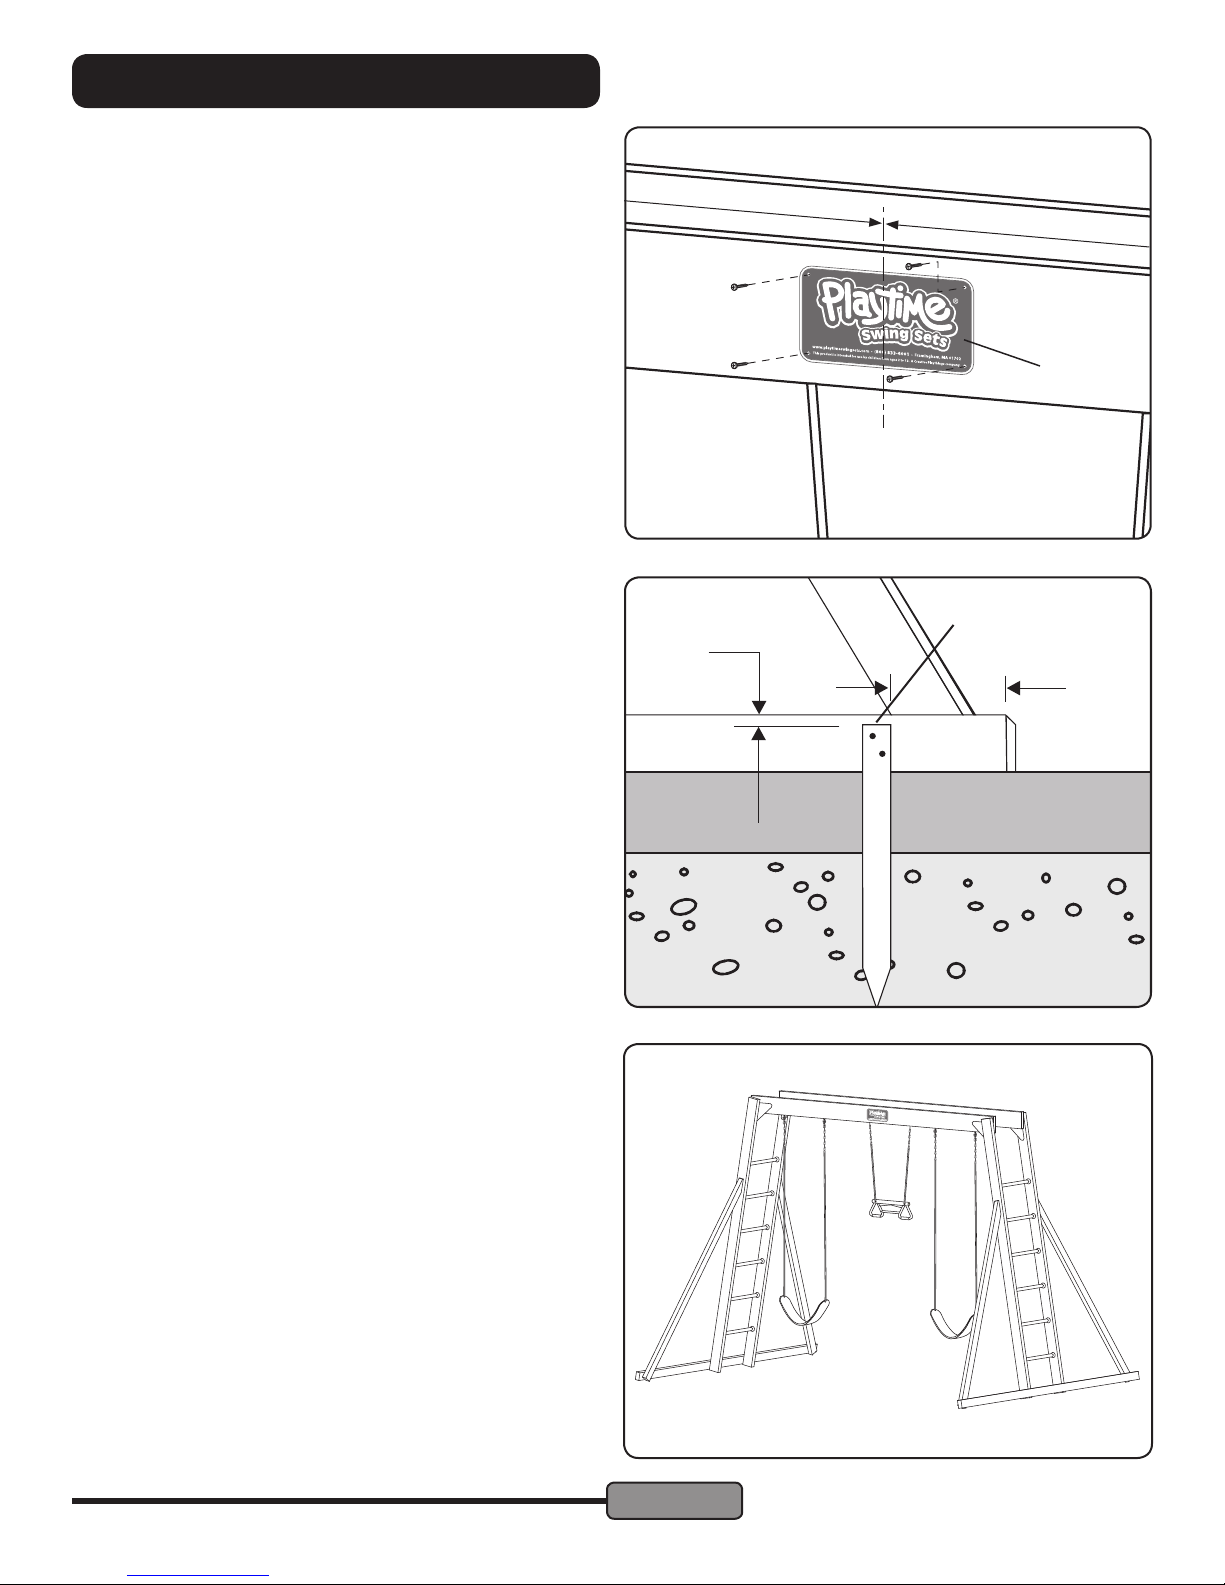
67(3²1DPH3ODWH
It is important to fasten the Playtime Name Plate (M) to the
7RS/DGGHU)HGHUDOODZUHTXLUHVWKDWWKHQDPHRIWKHPDQX-
IDFWXUHUEHSHUPDQHQWO\IDVWHQHGWRWKHJ\PIRULGHQWLÀFD-
tion in case of warranty claim.
Center the nameplate on the forward facing surface of the
Top Ladder. Use the included #6 x 1/2" pan head screws to
attach the name plate to the Top Ladder.
STEP 7 – Ground Stakes:
Hammer Ground Stakes (H) into the ground 6 to 9 inches
from each end of each End Ladder Base Rail (B). Secure
each stake with two #8 x 2-1/2" Screws through the pre-
drilled holes.
Note: Do NOT use concrete to set Ground Stakes. Pound a
metal spike or rod into the ground to start a hole in hard or
rocky ground.
STEP 8 – Hang Swings:
Hang the Swings and Trapeze in the positions shown. Fol-
low the safety warnings included.
86 VDIHW\ VWDQGDUGV UHTXLUH D PLQLPXP FOHDUDQFH RI
from the bottom of each Swing Accessory to the ground.
8.(8VDIHW\VWDQGDUGVUHTXLUHDPLQLPXPFOHDUDQFH
of 350mm (13-3/4") between the bottom of each Swing Ac-
cessory and the ground.
7KHKHLJKWRIHDFK6ZLQJ$FFHVVRU\LVDGMXVWHGE\XVLQJD
different link in the chain. Be sure to hang the Swings Ac-
FHVVRULHVZLWKJURXQGFOHDUDQFHJUHDWHUWKDQRUHTXDOWRWKH
safety standard for your region.
1/8"
6"-9"
H
M
Center Line
47" toend of Top Ladder Rail
47" to end ofTop Ladder Rail
Table of contents


