Crime Guard Crime Guard 328i4 User manual

COPYRIGHT 2004: OMEGA RESEARCH & DEVELOPMENT, INC.
OPERATION MANUAL
328i4
FRONT COVER
PRINTER’S NOTE:
production front cover
is to be printed with
different color artwork;
this is a
“place marker”
cover.
BACK COVER
PRINTER’S NOTE:
production back cover
is to be printed with
different color artwork;
this is a
“place marker”
cover.

Page 2
About Your New Crime Guard System ................................. 3-4
The Remote Transmitter, Status Light & Valet Switch
Using Your Crime Guard System........................................... 4
Remote Arming By Transmitter............................................... 4-6
Arming Bypass
Last Door Arming By Exiting The Car.................................. 6-7
System Armed and Activated ................................................. 7-8
Disarming The System ............................................................ 8-10
Safety Disarm, Activation Alert, Automatic Rearming
Disarming By Emergency Override ....................................... 10-11
Enhanced Remote Panic.......................................................... 11-12
Other Transmitter Operations ................................................. 12-13
Silent Arm/Disarm, Auxiliary Channel #2
Valet Mode ............................................................................... 14
Status Light............................................................................... 15
Optional Sensor ......................................................................... 16
Backup Battery......................................................................... 16-17
Vehicle Recovery..................................................................... 17-18
Transmitter Protection............................................................. 18
Programming Transmitters...................................................... 19
How To Program Features ...................................................... 19-21
Features Programming Checklist ........................................... 21
Programmable Features........................................................... 22-28
Optional Echo Transceiver ..................................................... 28-31
Limited Lifetime Warranty ..............................................BackCover
TABLE OF CONTENTS
Page 31
• While the Echo programming must be “scrolled” through, programming mode
can be exited at any point within the menu by simply not pressing any buttons for
12 seconds. The Echo chirps once when it exits programming mode.
• If the Echo is configured for “MUTE” operation (vibrates instead chirping), then
in programming it will not play the musical melodies. Instead, it vibrates when
the remote start Melody and Stop Melody are accessed for programming.
2) After 5 seconds the Echo chirps twice; release the “P” button; the
upper rear of the vehicle will flash; Vehicle Type may be chosen now.
3) Press and release the “:” button; each press of the button changes the
vehicle from Passenger Car, then to Pickup Truck, and then to Van/SUV. When
the desired type is flashing, press and release the “P” button; the Time’s
“Hours” will flash, and may be set now.
4) Press and release the “:” button to advance the hours, or press and
release the “ ” button to reverse the hours. When the Hours are correct
(please note “AM” or “PM”), press and release the “P” button. The
Time’s “Minutes” will flash, and may be set now.
5) Press and release the “:” button to advance the minutes or press and
release the “ ” button to reverse the minutes. When the minutes are cor-
rect press and release the “P” button. The Echo will play a musical
melody; this is the Start Melody which plays upon remote starting. One of five
melodies may be chosen now.
6) Press and release the “:” button. Each press of the button changes to the
next melody, note that the LCD screen displays “S” and a numeral, which is the
melody number. When the desired musical tone has been the last one played
press and release the “P” button.
7) The Echo will play another musical melody; this is the Stop Melody which
plays when remote start engine run period ends. There are five different melody
choices which can be made. Press and release the “:” button . Each press
of the button changes to the next melody, note that the LCD screen displays a
numeral, which is the melody number. When the desired musical tone has been
the last one played, you may
leave the Echo undisturbed for 12 seconds, until it chirps once
A- During this time Chirp or Mute can be chosen by pressing
the “:” button for 1 second.
B- Hold this button for 5 seconds to enter programming mode.
OR
1) Press and
hold the
“P” button
press and release the “P” button to scroll back through the features.
OR
...
...

Page 3
ABOUT YOUR NEW CRIME GUARD SYSTEM
CongratulationsonyourpurchaseofanewCrimeGuardsecuritysystem.
CrimeGuard systemscombinethebenefitsof easy-to-useconveniencewith
“no nonsense” protection of person and property. Please review this guide
to become familiar with your Crime Guard vehicle security system. Three
principal components are used to operate your system.
The Remote Control Transmitter operates your system. Two pre-
learnedremote controls,or“transmitters”,areincluded, andas manyasfour
transmitterscan operateyoursystem. Your CrimeGuardsystem canalsobe
operated by the optional Omega Echo 2-way controller, which emulates the
soundsthatyoursystemmakesandshowsvisualindicationsof itsoperation.
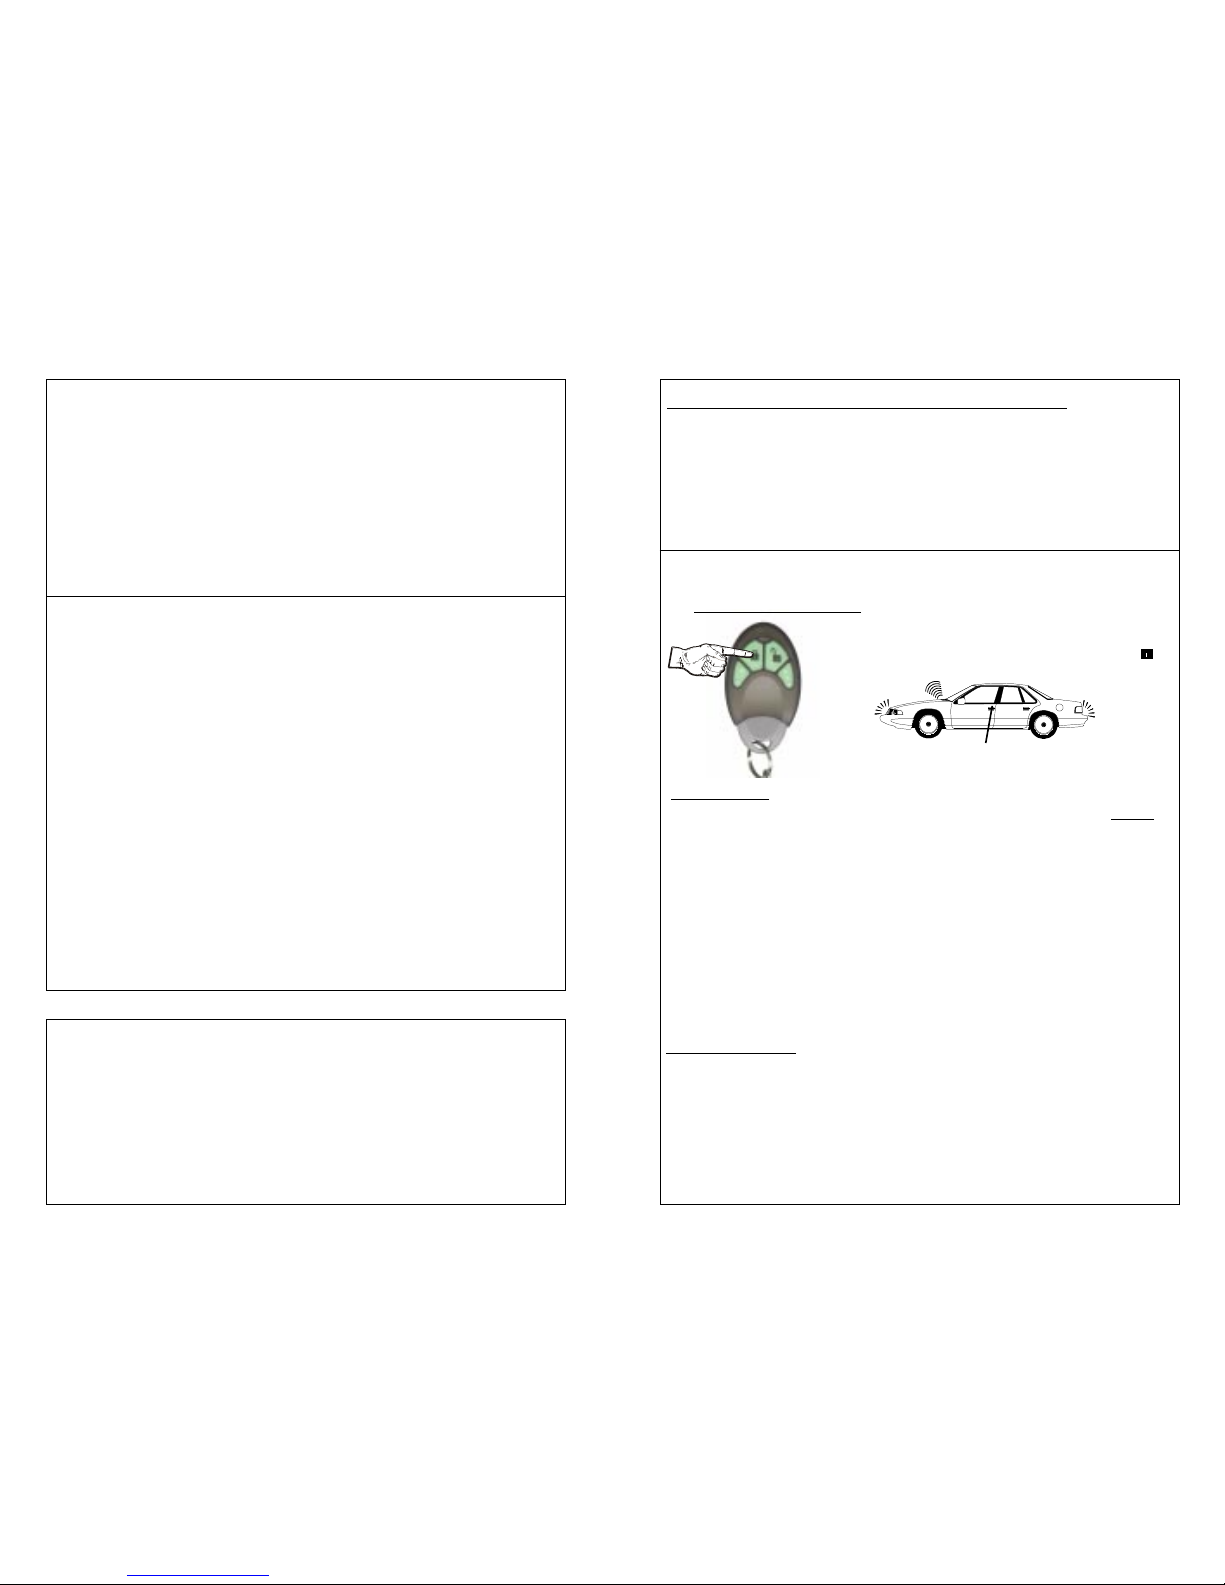
The transmitter has four buttons: A large upper left
button, marked with a “LOCK” icon; a large upper
right button, marked with an “UNLOCK” icon; a
small lower left button with 2 raised dots; and
small lower right button with 3 raised dots. The
transmitter also has a small green light inside, be-
tween the two large buttons, which illuminates
whenever a button is pressed and thus a signal is
being transmitted.
The transmitter uses a small “coin” type battery
for its power. The battery should last about one year,
but of course will vary depending on frequency of
transmitter use. The battery should be replaced when
the operating distance become noticeably less, or if the
greenindicatorlightdoesnotilluminatewhenabuttonispressed. Tochange
the battery, insert a small straight-blade screwdriver in the slot on the lower
right edge of the transmitter, and pry the case halves apart. Slide the old
batterydownwardtoremove,replaceitwithanewCR2032typebattery,and
then simply snap the transmitter case halves back together.
The Status Light shows the armed / disarmed / Valet Mode status of the
securitysystem atalltimes, andalso servesas avisualdeterrenttobreak-ins
and theft. The Status Light will also show the number of operating
transmitters every time the ignition key is turned on, and should the system
trigger, sounding an alarm and flashing the lights, it will indicate which
protected zone was violated.
Page 30
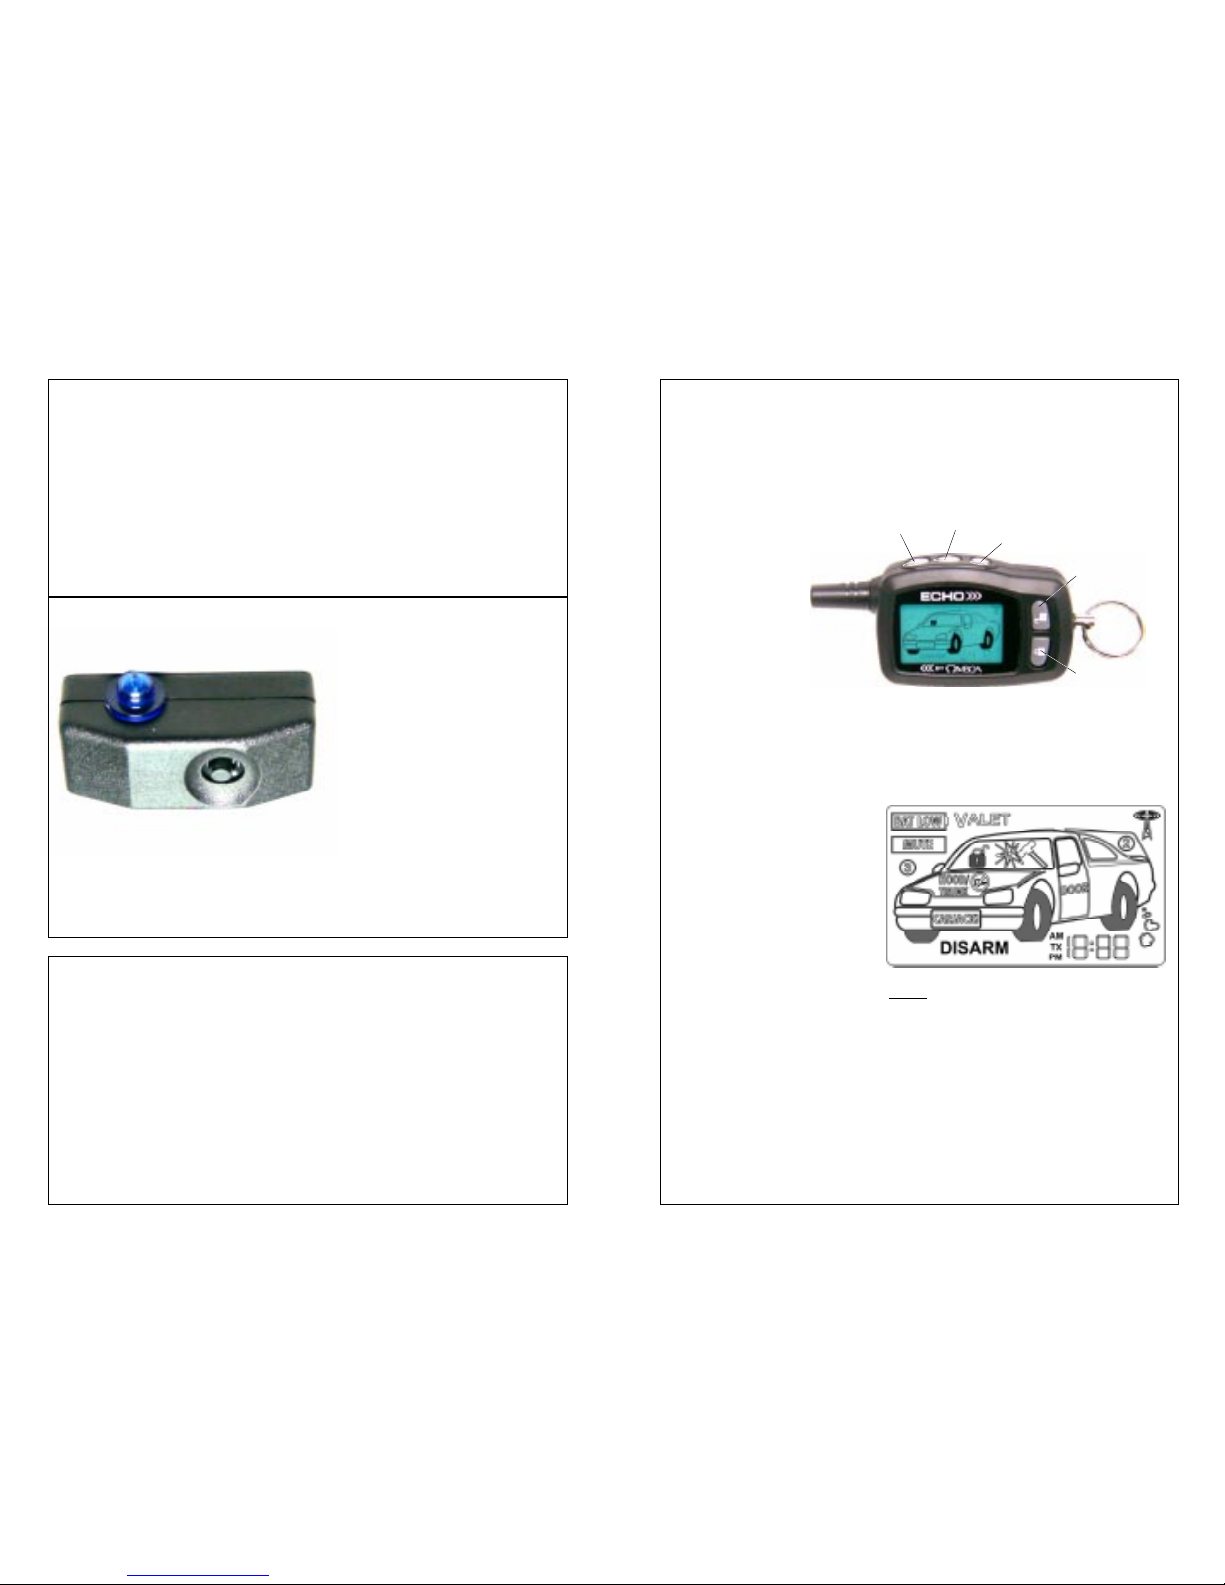
The optional Omega Echo transceiver has several user-programmable features:
✓Chirp or Mute The chirps may be turned off, and replaced with vibration.
✓Vehicle Type Choices are a passenger car, pickup truck, or van/SUV.
✓Time Adjust To set the Echo’s clock time.
✓Start Melody; and Stop Melody These are played with remote starting.
Programming these features is a sequential process- the controller is placed into
programming mode, then each programmable operation is accessed in turn, and either
changedasdesired,orleftasis,andthenthenextstepisaccessed. Programmingisdone
using the Echo unit’s three round side buttons:
Programming the Echo:
• The “CARJACK” icon within the vehicle’s front tag frame indicates that this
operation has been activated, which can be performed by any of three methods.
• On the vehicle’s windshield is a “hammer” and “impact” icon. When the shock
sensor detects light impact, causing the system to prewarn, the “impact” icon
alone will momentarily appear, accompanied by three chirps. If the sensor
detects a harder impact or breaking glass, activating the system, the full
hammer and impact icon appears, and the transceiver chips until any button is
pressed, and the icon remains flashing until the ignition switch is turned on.
• The “DOOR” icon will indicate that the system was activated via the door
detection circuit. The transceiver chirps until any button is pressed, and the
icon remains flashing until the ignition key is turned on.
• Ifthe Crime Guardsystem isconnected toanoptional remote startingmodule, the
“start” icon at the rear of the vehicle confirms remote starting. This icon is
accompaniedbyamusicalmelody,andstaysonwhileremotestartingisoperating;
during which the puffs will change to appearing sequentially.
• The “2” within a circle indicates use of the Auxiliary Channel #2, which is most
commonly used for a remote trunk release feature.
• The “transmitting tower” icon is an in-range indicator. It is present if the last
transmission from the transceiver was answered by a return signal from the
system. Should the transceiver be operated, and no return signal is received,
this icon will disappear.
• The various lines at the upper rear of the vehicle graphic represent a unique
Omega feature which allows the user to customize the vehicle type represented
by the display. Options are: passenger car, pickup truck, and sport utility/van.
• The system will only transmit a signal to the Echo transceiver if the Echo was
last used to operate the system (as in Arming or Disarming it). Example: if
the transmitter is used to Arm the system, the system will not transmit a signal
which will cause the Echo to chirp and change its icons.
• If multiple Echo transceivers are programmed to operate the system, the system
will send its signal to only one transceiver- the last one used.
• If the “MUTE” vibrating operation is selected, turning off the chirps, the remote
starting melodies are also replaced by vibration.

Page 29
• The locked or unlocked pad-
lock (windshield) reflects the
true locked or unlocked status
of the doors (certain pro-
grammable features can auto-
matically arm the system,
but not lock the doors). Arm-
ing with the transmitter/trans-
ceiver always locks the doors;
• The digital readout is a clock, with AM and PM indication. This readout also
shows how many transmitters/transceivers can operate the system.
• The “DISARM” will also show “ARM”; this indicates the Armed or Disarmed
status of the system. Neither icon is present when the system is in Valet Mode.
disarming with the transmitter/
transceiver will unlock the doors unless the system is activated and sounding.
• “VALET” indicates Valet Mode, replacing the “ARM” or “DISARM” icons. A
musical tone occurs when placing the system into Alarm Valet Mode.
• When “BAT LOW” appears the transceiver’s 1.5 volt AAA battery should be
replaced with a new battery.
• The transceiver’s chirps and musical tones may be turned off, which makes the
unit vibrate instead; “MUTE” indicates this state.
• The “3” within a circle appears when the Auxiliary Channel #3 is operated.
• “HOOD/TRUNK” indicates that this zone the vehicle is or has been violated.
If associated with the system being activated, the transceiver also emits chirps,
until any button is pressed. In this case, the icon remains flashing until the
ignition key is turned on.
“Lock/Arm”
Button
“Unlock/Disarm”
Button
“ ”
Button
“ ”
Button Programming
Button
Echo
Remote
2-Way
Transceiver
•••
••
The Echo has the same four operational buttons as the standard transmitter- the
“Lock/Arm”, the “Unlock/Disarm”, the “ ” Auxiliary Channel #2 button, and a “ ”
buttonforAuxiliaryChannel#3;thus,theuser-to-systemoperationisidenticaltothat
ofthestandardtransmitter. TheEchotransceiverhasafifthbutton,the“Programming”
button; pressing this button will illuminate the LCD screen.
•••
••
Echo Remote Transceiver
Icons: The LCD screen on the
remote transceiver has various
icons which indicate system
status. When the
remote transceiver is
used to operate the system, it
receives back a signal which
causes it to chirp (emulating the
siren)anddisplaytheappropriate
icons. Brief descriptions of the
icons are:
The Valet Switch has three main functions:
1- The Valet Switch can be used to turn off the security operation of the
system, including the Last Door Arming feature (if used). This is
“placing the system into Valet Mode”.
2- The Valet Switch can also be used, in conjunction with the vehicle’s
ignition key, to disarm the security system in the event the transmitter is
lostorbecomesinoperable. Thisis“performinganEmergencyOverride”.
3- TheValetSwitch isused in theprocedures forprogrammingoperational
features and also for programming transmitters to operate the system.
Your Crime Guard security system is designed to deter theft of both your
vehicle and its contents. Arming the system turns on the protection
operation, and locks the doors provided that an interface is installed. And
optionally,thevehicle’sstartercanbedisabled. Oncethesystem isArmed,
any intrusion attempt will Activate it, sounding the electronic “Psyren”
psychosirenandflashingthelightstoattractattention. Disarmingturnsoff
the protection, allowing access to, and normal use of, the vehicle.
Should your system become activated, the unique and patented Psyren
psycho siren actually produces the sounds of two normal sirens at once,
ensuring that it won’t be ignored like all of the other “common” car alarms.
Page 4
The Status Light and Valet Switch may be mounted in an included holder,
shown, or these items may be independently custom-mounted within the
vehicle. If the optional Echo 2-
way controller is used, the Status
Light and Valet Switch are within
a long-range receiver module,
typicallymountedtothewindshield
or other glass. The Status Light
maybeeitherblueorred; included
with your Crime Guard system is a blue
light (red is available optionally), and it’s red in the Echo receiver module.
Considering the flexible location choices for the Status Light and Valet
Switch, and the available options, please discuss with the installer your
preferences, or ensure that they show the location and operation of these
important system components.
Status
Light
Valet
Switch
USING YOUR CRIME GUARD SYSTEM

REMOTE ARMING BY TRANSMITTER
Page 5
There are two methods of Arming the security system:
1- The first method is to use the transmitter, by pressing and releasing its
UpperLeftButton. The systemmust not alreadybe armedorbe inValet
Mode, and the vehicle’s ignition key must be off.
2- The second method is Last Door Arming, which configures the system
to automatically arm every time you exit the vehicle. This method of
arming is programmable, and may be used or not used as desired.
To Arm the System: Press & Release the Upper Left
“Lock” Button ( )
THE PARKING LIGHTS
FLASH TWICE
TO CONFIRM
ARMING
THE SIREN CHIRPS TWICE
TO CONFIRM ARMING
THE DOORS WILL LOCK*
Upon Arming:
✓The siren will chirp twice (or four times if a zone is bypassed) unless
the silent arming procedure is followed.
✓The parking lights will flash twice (or four times if a zone is bypassed).
✓The doors will lock.*
✓The Status Light will begin to flash slowly.
Three seconds after arming, the security system becomes fully armed, and
will activate to an alarm condition should an intrusion attempt be detected.
* The Crime Guard system is capable of operating power doorlocks, if the
wiring connections are made, and in some cases an interface is needed.
Another option is adding a starter interrupt circuit to prevent the engine
from starting.
Arming Bypass:
When arming the system using the transmitter, if any protected zone or
sensor circuit is in a violated condition, the affected zone or circuit will be
automatically bypassed. This is “Arming Bypass”, which allows the sys-
tem to still arm and protect the other normal, non-violated zones. In the
case of a bypassed zone or circuit, should the violated condition return to
normal, 5 seconds after becoming normal the system restores protection to
the previously bypassed zone or circuit.
U
Page 28
Feature #21 Double Unlock Pulse (Factory Default Setting OFF)
Feature #22 Total Closure Lock Output (Default Setting OFF)
THE OPTIONAL
OMEGA ECHO TRANSCEIVER
An exiting upgrade option to your Crime Guard systemis a 2-way remote
“transceiver” controller, the Omega Echo. The remote transceiver, in addition to
operating your system, also receives signals from the system, and displays a variety
of system conditions on its LCD screen. Your system can be operated by as many
as four standard transmitters and/or Echo transceivers.
This feature, and the following feature, are not “user choice” type programmable
features. Both are available for certain installation-related issues pertaining to the
vehicle itself, and are provided for the installer’s use only. Some newer vehicles
require a double pulse output wiring connection to remotely unlock the doors and/
or to disarm a factory-equipped security system, which this feature provides.
When programming, to achieve the double pulse door unlock output, press the
transmitter’s Upper Left “Lock” Button; or press the Upper Right “Unlock” Button
to program the system for the single pulse unlock output operation.
Like the previous feature, this feature is installation-related to the vehicle itself, and
is provided for the installer’s use only. Should the vehicle have an existing “Total
Closure” feature, this programmable feature gives the installer the option of inter-
facing the Crime Guard system to operate this feature. Typically, on vehicles hav-
ing total closure, when locking the vehicle’s doors if the key in the door is held to
“lock” for a period of time the vehicle will close all windows and the sunroof, in
addition to locking the doors. Should your vehicle be equipped with this operation,
please inquire with the installer of your system to determine if it is capable of being
interfaced with the vehicle’s total closure operation.
Turning this feature on changes the system’s door lock output pulse from a .75
second pulse to be a 28 second duration output. When programming, press the
transmitter’s Upper Left "Lock" Button to turn on the 28 second door lock pulse; or
press the Upper Right "Unlock" Button for the standard .7 second pulse.
Note: When this feature is turned on, during the 28 second period after arming the
system, should either Upper Button be pressed, “Lock” or “Unlock”, only the
system’s lock output will be stopped. Pressing either button again will normally
operate the system, and at any time after the 28 second lock output period ends.

If the hood and trunk zone, or optional sensor circuit is bypassed when
the system is armed, instead of the normal arming confirmation the siren
will chirp four times and the parking lights will flash four times to alert you.
However, if a door zone is bypassed, the siren and light confirmation will
be the normal two chirps and flashes, as many vehicles are equipped with a
delayed interior light illumination. In these vehicles, the interior light delay
would typically cause the system to indicate a bypass if the system is armed
during the delay. In these cases, the arming indication is normal, and the
door zone is protected by the system five seconds after the interior light
turns off.
LAST DOOR ARMING BY EXITING THE CAR
Last Door Arming:
Last Door Arming is a programmable feature which configures the system
to arm itself without needing a command from the transmitter. This conve-
nient feature offers a high level of security and may entitle the vehicle owner
to an insurance discount since the user does not need to remember to arm
the system each time the vehicle is exited. The Last Door Arming feature
may be coupled, if desired, with the automatic locking of the vehicle’s doors
when the system arms itself.
Page 6
The Last Door Arming process:
✓When the vehicle’s ignition has been turned off, the system waits until a
door is opened. When the door is closed, or when the last door is closed
when more than one door is opened, the siren will chirp twice, the park-
ing lights will flash twice, and the Status Light will begin flashing
rapidly. The Last Door Arming countdown has begun.
✓Thirty seconds later the siren will again chirp twice, the parking lights
will again flash twice, the starter interrupt will engage, and the Status
Light will begin flashing slowly. If connected and programmed to do so,
the vehicle’s doors will also lock. Three seconds after these actions oc-
cur, the system is fully armed.
Notes:
•If a door is reopened during the thirty second period between the first
and second set of double chirps, the countdown will stop and reset. When
the reopened door is closed again, the 30 second countdown starts over
Page 27
The remaining transmitter operations are very similar- silent arm and disarming
is still operated by pressing and releasing twice the same button used for Auxiliary
Channel #2, and the sensor can still be bypassed, but pressing and releasing the
Auxiliary Channel #3 button after arming the system. Driver Door Priority
Unlocking is also available; for 5 seconds after disarming pressing the arm/disarm
button again will produce the system output necessary for all doors unlock, but after
the5secondperiodtheoperationrevertsbacktoarmingthesystemonthenextbutton
press. Remote Panic is also still operable, but it is not the “enhanced”, always
unlocking the doors.
When programming this feature, press the Upper Left “Lock” Button to config-
urethesystemas“1Button”arm/disarmoperation;orpresstheUpperright“Unlock”
Button for “2 Button” operation.
Extra,replacement,oroptionaltransmittersareavailablefromyourCrimeGuard
dealer, or visit www.caralarm.com on the Internet for ordering information
This feature operates regardless of the previous feature’s “Steady Siren” or “Pulsed
Horn” setting. All four transmitter buttons are used to program the four different
levels, as shown below with the system’s response also noted. While programming
this feature, the buttons can be repeatedly and sequentially pressed, thus making it
easy to choose the setting with the most desirable chirp volume.
Feature #20 1 Or 2 Button Arming / Disarming (Factory Default
Setting 2 Button Operation)
Part #
119-05B
or
119-05R
Part #
144-05B
or
144-05G
Pressing & releasing this button
alternates arming & disarming
Pressing & holding this button
operates Auxiliary Channel #2
Pressing & holding this button
operates Auxiliary Channel #3
Optional 3-button transmitterStandard 4-button transmitter
*
“:” button not used
:
*
This feature is used for special applications, and dramatically changes how the
transmitter operates the system. In the factory default setting of “2 Button”
operation, one transmitter button will arm the system only; and a second button will
disarm the system only. If this feature is changed to the “1 Button” setting, a single
transmitterbuttonwillalternate,or“toggle”,thearminganddisarmingofthesystem
with every press of the button. This booklet thoroughly and exclusively describes
the “2 Button” operation; the following illustration shows the basic “1 Button”
operations for the standard 4-button transmitter and for an optional 3-button
transmitter.

Feature #19 Confirmation Chirp Volume (Factory Default
Setting Medium High)
This feature allows the choice of four different volume levels of the system’s con-
firmation chirps.
Feature #17 Chirp Confirmation (Factory Default Setting On)
This feature removes the system’s 1 arming and 2 disarming confirmation chirps.
When this feature is used to remove these chirps, the system will still have 4 chirps
upon arming if a protected zone is violated, and still have 3 chirps upon disarming
if the system was previously activated. Using this feature to turn off the arm and
disarming chirps will also not affect the Prewarning operation, Unauthorized
Transmitter Alert, nor will it affect the chirps used in transmitter or features
programming.
When programming this feature, press the transmitter’s Upper Left “Lock”
Button to turn on the arm and disarming chirps, or press the Upper Right “Unlock”
Button to turn them off.
Feature #18 Steady Siren or Pulsed Horn Output
(Factory Default Setting Steady Siren)
It is possible to utilize the vehicle’s existing horn for the audible part of the system’s
operation. This feature changes the audible output of the system from the steady
output required by the electronic siren to a pulsed output which is suitable for oper-
ating the horn. When programming this feature, press the transmitter’s Upper Left
“Lock” Button to configure the output as pulsed; or press the Upper Right “Unlock”
Button to set the steady siren output.
Feature #16 Remote Activated Vehicle Recovery
(Factory Default Setting Off)
This form of Vehicle Recovery is initiated by a signal from the transmitter. The
Vehicle Recovery operation, and the three ways to initiate it are described on page
17. When programming this feature, press the transmitter’s Upper Left “Lock”
Button to turn it on, or press the Upper Right “Unlock” Button to turn it off.
Lower Right “ ” Button=
highest chirpvolume(50mS);
system responds with
4 chirps
Lower Left “ :” Button =
medium high chirp
volume (30mS); system
responds with 3 chirps
Upper Right "Unlock" Button =
mediumlowchirp volume(12mS);
system responds with 2 chirps
Upper Left "Lock" Button =
lowest chirp volume (8mS);
system responds with 1 chirp
:
:
Page 26
again at the beginning.
• Last Door Arming is separate from, and does not effect the operation of
arming by using the transmitter.
• All protected points must be closed or otherwise in a non-violated state
for the Last Door Arming sequence to start. Unlike active arming from
the transmitter, the system can not bypass an open or detected zone and
arm itself.
To temporarily prevent the system from arming itself:
• Place the system into Valet Mode using the Valet Switch.
• Leaveavehicledooropen. Althoughthisvariesdependingonthevehicle,
in some cases turning on the interior light will be detected by the system
as an open door.
• Although the system will not Last Door Arm while the ignition is on,
leaving the ignition key turned on without the engine running is not
recommended.
While the system is in the Armed state:
✓The Status Light will be flashing slowly to confirm that the system is
armed, and also serve as a visual deterrent.
✓Protected zones are being monitored for intrusion attempts.
• If an optional starter interrupt is installed, it will engage.
Should an activation into the alarm condition occur:
✓Thepolyrythmicchanging-toneelectronicpsychosirenwillloudlysound.
✓The parking lights will flash.
✓The doors will lock, regardless of their locked or unlocked status. This
feature is unique- if the system detects that a door is opened, it waits until
the door is closed before relocking it, denying the thief reentry.
Anactivatedalarmconditionhasadurationof30seconds(60isoptional)
unless the system is disarmed using the transmitter or by Emergency
Override using the Valet Switch. If all protected zones are secure at the end
of the alarm condition, the system will stop and rearm automatically, ready
todetectanother entryattempt. If aprotectedzone isstill violated atthe end
of the alarm condition, the system will reactivate for up to two additional
SYSTEM ARMED & ACTIVATED
Page 7

alarmcycles.Afterthethirdalarmcyclethesystemwill automaticallyrearm
and bypass the open zone until that zone returns to a non-violated state.
• Once the system resets after it has been activated, upon disarming the
audible and visual confirmation will change to indicate the activation.
This is the “Activation Alert”, which is explained on the next page.
There are two methods of Disarming the security system:
1- The first is to press and release the transmitter’s Upper Right “Unlock”
Button to disarm the system. This is the normal “daily use” method.
2- The second method is for emergencies, should the transmitter become
lost or inoperable. This is the “Emergency Override”, which uses the
ignition key and Valet Switch.
DISARMING THE SYSTEM
THE SIREN WILL CHIRP
ONCE TO CONFIRM
DISARMING THE PARKING LIGHTS
WILL ILLUMINATE
TO CONFIRM
DISARMING
THE DOORS WILL UNLOCK;
Either All or Drivers Only
Upon Disarming:
✓The siren will chirp once (or three times if an alarm activation occurred)
unlessthe silent disarming procedure is followed.
✓The parking lights will flash once and then illuminate for 30 seconds, or
until the ignition key is turned on.
✓The doors will unlock.
✓The Status Light will show one of these conditions:
-Off = System disarmed (Automatic Rearming feature not selected).
-Flashing rapidly = The Automatic Rearming feature is in progress.
-Flash /Pause = Indicates violated zone if system has been activated.
• If an optional starter interrupt is installed, it will disengage.
Page 8
To Disarm the System:
Press & Release the Upper Right
“Unlock” Button ( )
Page 25
Feature #11 Open Door Bypass Of Ignition Locking
(Factory Default Setting On)
Thisfeaturecancelstheautomaticlockingorunlockingofthevehicle’sdoors should
one of the doors is open when the ignition switch is turned on or off. When
programming, press the transmitter Upper Left “Lock” Button to turn on the “Open
Door Bypass”, or press the Upper Right “Unlock” Button to turn it off.
Feature #12 Doors Lock With Last Door Arming
(Factory Default Setting Off)
This feature adds the automatic locking of the doors to the Last Door Arming
operation. If this feature is added to feature #4, when the system becomes armed 30
secondsafter closingthe lastdoor the doorswillalso lock. This featurewill operate
onlyif feature#4is turned on. Whenprogramming, press thetransmitter Upper Left
“Lock” Button to turn on the automatic door locking, or press the Upper Right
“Unlock” Button to turn it off.
Feature #13 Doors Lock With Automatic Rearming
(Factory Default Setting Off)
This feature adds the automatic locking of the doors to the Automatic Rearming
operation. If this feature is added to feature #5, when the system rearms itself 90
seconds after being disarmed the doors will also lock. This feature will operate only
if feature #5 is turned on. When programming, press the transmitter Upper Left
“Lock” Button to turn on the automatic door locking, or press the Upper Right
“Unlock” Button to turn it off.
Feature #14 Ignition Activated Vehicle Recovery
(Factory Default Setting Off)
Feature #15 Door Activated Vehicle Recovery
(Factory Default Setting Off)
Feature #10
Not used on this model
This form of Vehicle Recovery is initiated by a door being opened. The Vehicle
Recoveryoperation, andthethree waystoinitiate itaredescribed onpage17. When
programming this feature, press the transmitter’s Upper Left “Lock” Button to turn
it on, or press the Upper Right “Unlock” Button to turn it off.
This form of Vehicle Recovery is initiated by the ignition key being turned on. The
Vehicle Recovery operation, and the three ways to initiate it are described on page
17. When programming this feature, press the transmitter’s Upper Left “Lock”
Button to turn it on, or press the Upper Right “Unlock” Button to turn it off.

Page 9
Safety Disarm Feature
:
Pressing and releasing the Upper Right Unlock Button while the system is
activated in the alarm condition will disarm the system, but the doors will
not unlock. This is the “Safety Disarm” feature, which allows the vehicle
toremainsecure, eventhoughan activatedsystemhas beendisarmed. Safety
Disarm will also cancel Automatic Rearming. This feature is also very
useful when the vehicle is exposed to environmental conditions, such as
storms, trains or heavy vehicles, which may cause false activations.
Safety Disarm is a temporary “one time” operation which occurs only
while the system is activated. To remotely unlock the doors after a Safety
Disarm,simplypressing andreleasethe UpperRight“Unlock” Buttonagain.
gain.
Activation Alert
:
Ifthesystemexperiencesanalarmconditionandresetsitself,upondisarming
the siren will chirp three times and the parking lights will flash three times
instead of the normal one chirp and one light flash. Additionally, the Status
Light will be flashing a “Zone Violation Code”; when the alarm condition
activation occurred, the Status Light changes from flashing slowly to
flashingtwotofourtimes betweenpausingtoindicatewhichprotectedzone
was violated (see page 15 for the Zone Violation codes).
•The Status Light will display the Zone Violation Code until the vehicle’s
ignition is turned on.
•The Status Light will display the Zone Violation Code in place of fast
flashes indicating Automatic Rearming.
•ShouldthesystemberearmedbeforetheignitionclearstheZoneViolation
Codememory, theStatusLightshowsthe normal“Armed”slowflashing.
•ThesystemcanstoreuptotwoconsecutiveZoneViolationCodes. Ifmore
than two activations occurred, the two most recent codes are displayed.
Automatic Rearming:
Automatic Rearming is a programmable feature which ensures that your
system is never inadvertently disarmed. It is possible to accidentally or
unknowingly operate the transmitter from a pocket or purse. You may not
even be aware of an accidental disarming due to the enhanced operating
distance offered by Crime Guard’s extended range transmitter.
How It Works:
Wheneverthesystemisdisarmedbythetransmitter,a90secondcountdown
starts, which is indicated by a rapidly flashing Status Light. During this 90
Page 24
case the system should also disarm. This feature configures the system to disarm
when Auxiliary Channel #2 is used, or to not disarm. When programming this
feature, pressing the transmitter’s Upper Left “Lock” Button will have the system
disarm when Auxiliary Channel #2 is used; programming by pressing the Upper
Right “Unlock” Button will have the system remaining armed whenever Auxiliary
Channel #2 is used.
Feature #8 Doors Lock When Ignition Is Turned On
(Factory Default Setting On)
This feature has the system automatically lock the vehicle’s doors every time the
ignition key is turned on. An exception would be if feature #11 is turned on (“Open
Door Bypass of Automatic Locking”), and a door is open when the ignition key is
turned on. When programming, press the transmitter Upper Left “Lock” Button to
turn on automatic locking; or press the Upper Right “Unlock” Button to turn it off.
Feature #9 Doors Unlock When Ignition Is Turned Off
(Factory Default Setting On)
Similartotheprevious feature, this feature automaticallyunlocksthevehicle’sdoors
every time the ignition key is turned off, with the same exception regarding a door
beingopenwhentheignitionisturnedoff,andfeature#11beingon. OnCrimeGuard
models with “Driver Door Priority Unlocking”, this feature may control all doors’
unlock operation, or only the driver’s door. If the later, the next feature controls the
ignition key unlocking of the remaining doors.
When programming, press the transmitter Upper Left “Lock” Button to turn on
Unlock #1 When Ignition turned Off”; or press the Upper Right “Unlock” Button to
turn it off.
Feature #7 Parking Light Illumination Upon Disarm
(Factory Default Setting On)
This feature affects the parking light operation when the system is disarmed. When
thisfeatureis turned on,the parkinglights flash once,and thenlight continuouslyfor
external illumination for 30 seconds unless the ignition key is turned on during that
time. If this feature is turned off, the parking lights flash once only, and do not
illuminate.
When programming, press the transmitter’s Upper Left “Lock” button turns on
theadded30 second illumination;pressing theUpper Right“Unlock” Buttonhas the
parking lights only flash once. This feature only affects the parking light operation,
and not the interior light operation which some Crime Guard models have.

second period, if no protected entry points are opened and the vehicle’s
ignitionisNOTturnedon,thesystemwillautomatically armitselfat theend
of the countdown. If desired, the system can also be programmed to
automatically relock the doors when this occurs.
Automatic Rearming Notes:
•Turning the vehicle’s ignition on cancels Automatic Rearming.
•Opening a door will suspend the 90 second countdown.
•All protected zones must remain non-violated during the 90 second
Automatic Rearming period. For example, if a vehicle door is opened
during the 90 second period, the countdown will stop. When the door is
closed, the system resets and starts a new 90 second countdown.
•The Automatic Rearming sequence is indicated by a fast flashing Status
Light,unlessthesystemhasbeenactivated,inwhichcaseaZoneViolation
code will flash instead (page 15). The ignition switch must be turned on
to erase a Zone Violation code.
•If the system is disarmed while it is activated (siren sounding and lights
flashing) Safety Disarm will cancel the Automatic Rearming for that
disarming operation only. The next time the system is armed, Automatic
Rearming will be initiated upon the subsequent disarming.
Emergency Override:
In the event that your transmitter is lost, damaged, or its batteries have
become exhausted, the Valet Switch and the vehicle’s ignition key may be
used to disarm the system. How the Valet Switch is used for this operation
may also be customized; this is the SecureCode feature, the operation of
which is described on page 22.
The following Emergency Override instructions reflect the SecureCode
entry of the Valet Switch as the “as received” default setting of “1 press”.
DISARMING BY EMERGENCY OVERRIDE
To Disarm the System without using a Transmitter:
Step 1With the system in the armed condition, enter the vehicle via the
driver's door (be aware that the system will activate to an alarm
condition when the door is opened).
Step 2Using the ignition key, turn the vehicle’s ignition on.
Step 3Within 5 seconds, enter the SecureCode by pressing and releasing
the Valet Switch once. The system will disarm.
Page 10
to chirp the total number entered Valet switch entry.
✓Important: Now let the system exit Programming Mode by allowing the 10
secondtimelimittoexpirewithoutanyfurtherprogrammingactivity. Donotexit
Programming Mode by turning on the ignition switch.
Feature #6 Auxiliary Channel #2 Also Disarms System
(Factory Default Setting On)
“AuxiliaryChannel#2”ismostcommonlyusedtoremotelyopenthetrunk, in which
Feature #5 Automatic Rearming (Factory Default Setting Off)
“Automatic Rearming”, described on page 9, prevents the system from becoming
accidentallydisarmed.Whenprogramming,pressthetransmitterUpperLeft“Lock”
Buttontoturnthisfeature on, or pressthe Upper Right “Unlock”Button to turn itoff.
Feature #4 Last Door Arming (Factory Default Setting Off)
“Last Door Arming” has the system automatically arm itself every time you exit the
vehicle (the complete operation is described on page 6). This feature turns that
operation on or off. When programming, press the transmitter Upper Left “Lock”
Button to turn on Last Door Arming; or press the Upper Right “Unlock” Button to
turn it off.
Feature #3 3 / 45 Second Arming Delay: (Factory Default Setting
3 Second)
When the system is armed, either by the transmitter or automatically, there is a brief
period of time in which a system activation cannot occur. This allows the system to
completelyprocessthearmingoperations,andthevehicletostabilize. Insomecases
more time is needed than the factory-set 3 seconds. This feature offers a longer 45
second delay.
Whenprogramming,pressthetransmitter’sUpperLeft“Lock”Buttonwillselect
the 3 second Arming Delay; pressing the Upper Right “Unlock” Button will
configure the 45 second setting.
Feature #2 30 or 60 Second Alarm Duration: (Factory Default
Setting 30 Seconds)
This feature allows the choice of a 30 or 60 second Alarm Duration, which is the
system triggering, or activating, sounding the siren, flashing the parking lights and
lockingthedoors. Whenprogramming,pressingthetransmitter’sUpperLeft“Lock”
Button will select the 60 second setting; pressing the Upper Right “Unlock” Button
will configure the 30 second setting.
Page 23

Page 22
To custom program a new SecureCode:
✓Follow Steps 1 to 4 on page 20; at Step 4 the Valet Switch will be pressed and
released once (the siren chirps once) to access “feature number one”.
✓Within 10 seconds slowly press and release the transmitter’s Upper Left “Lock”
Buttonthe numberoftimesequaltothedesiredSecureCodefor stage1,allowthe
system to respond to each transmitter button press with a siren chirp before
pressing the button again.
✓Afterenteringthefirststagebypressingthe transmitter Upper Left “Lock” Button
the desired number of times, and receiving a chirp for each press, wait for the
system, after the final button press, to chirp the siren again the total number of
times that the button was pressed.
✓Continue to configure stage 2 of the SecureCode by now pressing and releasing
the Upper Right “Unlock” Button the number of times desired for the stage 2.
Thisshouldbedoneintheexactsamefashionasthestage1entry-presstheUpper
Right “Unlock” button, wait for a single chirp before pressing the button again,
and then when final button press is done, wait after the single chirp for the siren
PROGRAMMABLE FEATURES
This section explains each of the programmable features in detail, notes the
factory default setting, and includes programming information as needed..
Feature #1 SecureCode Emergency Override (Factory Default
Setting 1 Press)
SecureCode is a unique patented feature which allows you to custom select the
number of Valet Switch presses in two stages, instead of a single “1 press”, which
would be required in order to perform an Emergency Override. If any of the three
anti-carjacking features are utilized, a customized SecureCode would also be
required to turn it off once it is fully activated.
How It Works:
When a customized SecureCode has been programmed, when performing an
Emergency Override two separate stages of valet switch presses are required. Each
of these stages may be from 1 to 9 Valet Switch presses. The system will not disarm
after the initial Valet Switch entry, but pause and chirp the siren before continuing
to sound. At this point the stage #2 entry must be made within 10 seconds. If both
stages’ entries are correct, the system will disarm shortly after the stage #2 entry.
After a failed attempt to achieve SecureCode, the ignition switch must be turned
off, then on again before another attempt is made. Should two failed SecureCode
attempts be made, the system will ignore any further presses of the Valet Switch for
two minutes. If this occurs, the system will reset to the armed state, then sound the
siren twice after 2 minutes to indicate that another attempt may be made to achieve
a SecureCode Emergency Override.
If the SecureCode entry of the Valet Switch is the “as received” default
setting of “1 press”, the system will disarm the moment the Valet Switch is
released from the single press. If a customized SecureCode has been
programmed, the system will disarm a few seconds after the correct entry.
If an incorrect entry is made, the system will not disarm. See page 22 for a
complete explanation of a customized SecureCode operation.
Valet Mode:
Whereas Emergency Override disarms an armed or sounding alarm, a
similarprocedureis theValet Mode,which basicallyturnsthe system“off”,
andpreventsit fromarming or performingany automaticarmingoperations
which may be programmed to occur. Valet Mode is explained on page 14.
Page 11
Upon Activating Panic:
✓The electronic siren will sound.
✓The vehicle’s exterior parking lights will flash.
✓*The vehicle’s doors will lock, or unlock, depending on the method
used to activate Remote Panic- the Upper Left “Lock” Button or the
Upper Right “Unlock” Button.
ENTER THE VEHICLE
AND USE YOUR KEY TO
TURN THE IGNITION ON WITHIN 5
SECONDS OF
TURNING THE
IGNITION ON,
ENTER THE
SECURECODE BY
PRESSING THE
VALET SWITCH
THE SYSTEM WILL DISARM
ENHANCED REMOTE PANIC
Hold 3
seconds
Hold 3
seconds
ORO
OR
R
OR
To Activate “Remote Panic”:
Press & Hold for 3 Seconds the Upper Left
“Lock” Button ( ) OR the Upper
Right “Unlock” Button ( )
U
THE SIREN SOUNDS THE PARKING LIGHTS
WILL FLASH
THE DOORS WILL
LOCK OR UNLOCK*

Page 21
•Repeat this Step 6 for each additional feature until all features
are programmed.
#1 SecureCode Programming 1 Press (n/a)
#2 30 / 60 Second Activated Alarm Cycle 30 Seconds (U)
#3 3 / 45 Second Arming Delay 3 Seconds (L)
#4 Last Door Arming OFF (U)
#5 Automatic Rearming OFF (U)
#6 Auxiliary Output #2 Also Disarms System ON (L)
#7 Parking Light Illumination Upon Disarm ON (L)
#8 Doors Lock At Ignition “On” ON (L)
#9 Doors Unlock At Ignition OFF ON (L)
#10 Not used on this model
#11 Open Door Bypass To Features 8, 9, 10 ON (L)
#12 Doors Lock With Last Door Arming OFF (U)
#13 Doors Lock With Automatic Rearming OFF (U)
#14 Ignition-Activated Vehicle Recovery OFF (U)
#15 Door-Activated Vehicle Recovery OFF (U)
#16 Transmitter-Activated Vehicle Recovery OFF (U)
#17 Chirp Confirmation ON (L)
#18 Steady Siren or Pulsed Horn Output Steady Siren (U)
#19 Soft or Loud Horn Confirmation Chirps “Medium Loud” (:)
#20 1 or 2 Button Arming / Disarming 2 Button (U)
#21 Double Unlock Pulse OFF (U)
#22 Total Closure Lock Output OFF (U)
Step 7 Turn the vehicles’s ignition on or allow 10 seconds to pass without
performing any programming actions.
•The siren will sound briefly and the Status Light will go out to
confirm that the system has exited Programing Mode.
# FEATURE DEFAULT
Thepagesfollowingexplaineachoftheprogrammablefeaturesindetail,
and below is a convenient feature programming checklist, which greatly
simplifies the feature programming process.
The Remote Panic feature is designed for situations in which the user feels
threatened and/or in need of attracting attention.
• Remote Panic allows you to activate the siren and flashing lights from
the transmitter, with the enhanced choice of having the doors lock, or
unlock when doing so.
• Remote Panic can be activated anytime, whether the vehicle’s ignition is
turned on or off, and has a 30 second duration (60 seconds is optional)
unless it is deactivated earlier by using the transmitter.
• At the end of the Remote Panic cycle the system will reset, enter the
armed state, and lock the doors (even if it was originally activated with
the Upper Right “Unlock” Button).
Page 12
OTHER TRANSMITTER OPERATIONS
The previous sections have described only the most basic everyday opera-
tions of your Crime Guard system. The transmitter is also capable of sev-
eral other optional functions.
The transmitter can also silently arm or disarm the system. Pressing the
Lower Left Button twice simply reverses, or “toggles” the armed or dis-
armed condition of the system, without the normal confirmation chirps.
An Auxiliary Channel #2 is available for optional uses (consider that
the transmitter operates on the first channel to arm and disarm the system).
Auxiliary Channel #2 is also capable of disarming the system, also unlock-
ing the doors; thus it is ideally suited for remote trunk release.
THE DOORS WILL LOCK IF
ARMING, UNLOCK IF DISARMING
To Silently Arm or Disarm the System:
THE PARKING LIGHTS
WILL FLASH ONCE IF
ARMING, TWICE IF
DISARMING
Silent Arming and Silent Disarming are both operated by double-pressing the same transmitter button.
Press
2 X THE SIREN
WILL NOT
CHIRP
Press & Release the Lower Left Button ( ) Twice
••

Page 20
To Change a Feature:
To Access Programing Mode and Change Features:
features. Once the system is in Programming Mode, a 10 second period
without programming activity will cause the system to automatically exit
Programming Mode. Features can be selected in any order as desired.
Step 4 Within 10 seconds, press and release the Valet Switch the same
number of times as the desired feature’s number.
•The siren will chirp and the Status Light will flash as many times
as the Valet Switch was pressed to indicate the feature number
which is now accessed.
To Access a Feature:
Step 3 Within 5 seconds, press and release the Valet Switch 5 times.
•The siren will chirp then sound briefly and the Status Light will
flash to confirm that the system is entering Programing Mode.
•Once in Programming Mode, if 10 seconds of no programming
activity occurs, the system will exit Programming Mode. Pro-
gramming activity is the pressing of the Valet Switch to select a
feature or pressing a transmitter button once a feature is selected.
Step 2 Turn the ignition off.
Step 1 Turn the vehicles’s ignition on.
Step 6 If there are more features to be programmed, within 10 seconds
of the previous action press and release the Valet Switch the
number of times as the next desired feature’s number.
•Again the siren will chirp and the Status Light will flash as many
times as the Valet Switch was pressed to indicate the new
feature number which is now accessed.
•Use the transmitter as described in Step 5 to change the newly
accessed feature as desired.
To Access and Change further Features:
Step 5 After accessing the desired feature, within 10 seconds press and
release either the transmitter’s Upper Left “Lock” Button or its
Upper Right “Unlock” Button.
•Pressing the Upper Left Button turns the feature ON; the siren
will chirp once and the Status Light will turn on.
•Pressing the Upper Right Button turns the feature OFF; the siren
will chirp twice and the Status Light will turn off.
• Auxiliary Channel #2 may be activated anytime, provided the vehicle’s
ignition is off. While the ignition is on, the Auxiliary Channel #2 can be
operated as long as a vehicle door is open; this prevents the output from
being accidentally activated while driving.
• If feature #6 is programmed to have the Auxiliary Channel #2 disarm the
system, the doors will unlock when it is activated; and there is an audible
and visual confirmation: 3 siren chirps and one light flash if the system
also disarms, and one chirp and light flash otherwise.
• When Auxiliary Channel #2 is operated, all of the doors will unlock,
even if the vehicle is configured with Driver Door Priority unlocking.
Page 13
• Silent arming and disarming from the transmitter is for the temporary
suspension only of the confirmation chirps- i.e. for that particular arming
or disarming operation. A programmable feature can turn the chirp con-
confirmation off permanently, should it be desired.
TYPICALLY USED FOR
OPTIONAL TRUNK
RELEASE
IF ARMED, THE SYSTEM
WILL DISARM, WITH
3 SIREN CHIRPS
AND 1 LIGHT
FLASH
IF THE SYSTEM IS NOT ARMED,
CONFIRMATION IS 1 SIREN CHIRP
AND 1 LIGHT FLASH
To Activate Auxiliary Channel #2:
Press & Hold the Lower Left Button ( )
for 3 Seconds
••
(Trunk Release)
Hold 3
seconds
THE DOORS WILL UNLOCK
The Lower Right Button ( )
is available for use with an
optional receiver unit
The “Extra” Transmitter Button:
•••
• The Lower Right “:” Button does not have
any specific function on the 328i4, therefore it is
available for use with an optional Omega uni-
versal receiver unit.
•••

VALET MODE
Valet Mode allows you to turn off all off the “alarm” operations of the
security system while retaining the remote convenience features such as
keylessentry,theAuxiliarychannel,andthesafetyfeature ofRemotePanic.
The system may only be placed into Valet Mode when it’s disarmed; if
armed, the system must disarmed via the transmitter or by Emergency
OverridebeforeitcanbeplacedintoValetMode. OncethesystemisinValet
Mode, it cannot become armed by any method- from the transmitter, Last
Door Arming, or Automatic Rearming.
• It is important to understand the difference between Valet mode and the
Emergency Override. Although both use the Valet Switch, Emergency
Override disarms an armed and activated system, and requires the
ignition key; whereas Valet Mode turns off the alarm operations of the
disarmed system, but without the need of the ignition key.
Valet Mode is designed for situations in which it is not convenient for the
security portion of the system to be operational. For example: During
extendedstopoversfor vehicleservicing,maintenance,valetparking, wash-
ing, etc.
To Enter Valet Mode:
Page 14
✓The siren will chirp twice, the parking lights will flash twice and the
Status Light will illuminate and stay on solid to confirm that the system is
in Valet Mode.
✓To remind the user that the system in Valet Mode, the siren will chirp
once every time the vehicle’s ignition key is turned off.
To Exit Valet Mode:
Press & Release the Valet Switch.
✓TheStatusLight willturnoff toconfirm the system’sexit from ValetMode.
With the system
disarmed,
Press & Hold the
Valet Switch
for 2 seconds.
Page 19
The Crime Guard system is capable of being operated by as many as four
transmitter. These can be any combination of standard Crime Guard
transmitter or, if your system is upgraded, the optional Omega Echo 2-way
transceiver controller. Regardless of which, the transmitter or transceiver
must be programmed to the system to operate it (excepting the original
transmitters, which were programmed at the factory). This programming
procedure is identical for a transmitter or an Echo transceiver:
Haveallofthetransmittersortransceiversathand(whenoneisprogrammed,
all existing codes are erased).
PROGRAMMING TRANSMITTERS
Only the Upper Left “Lock” Button is pressed in programming; when it is
learned all of the other buttons’ functions are automatically assigned. The
system will remove itself from the programming mode if 10 seconds expire
without its receiving a signal, if the ignition is turned “off”, or upon four
transmitters or transceivers being programmed into the system.
✓Programming a transmitter to the system will activate the Unauthorized
Transmitter Alert warning and the extended Status Indicator Light visual
display; for the next 48 hours the siren will sound a brief series of chirps
every time the vehicle’s ignition key is turned on.
Step 4 Repeat the previous step for each transmitter or transceiver which
is to operate the system.
Step 3 Within 10seconds pressandreleasetheUpperLeft“Lock” Button
(with the “locked padlock” icon). The siren will chirp once,
confirming that the system learned the transmitter.
Step 2 Within 5 secondsof turning onthe ignition, presstheValet Switch
5 times. The siren will chirp once, confirming that the system is
ready to learn a transmitter.
Step 1 Turn the vehicle’s ignition key “on”.
HOW TO PROGRAM FEATURES
Certainof theCrime Guardsystem operationsmaybeconfiguredastheuser
desires- “Programming Mode” allows you the ability to configure 21
operationalfeatures. The vehicleignitionkey andthe ValetSwitch areused
to enter the Programming Mode, and the transmitter is used to change

STATUS LIGHT
The Status Light visually indicates the operational condition of the system,
in addition to providing visual deterrence. As explained on pages 3 and 4,
the Status Light can be variously configured as to location and color, due to
the Crime Guard system’s flexibility of design. Specific operations are:
Page 15
Number of Authorized Transmitters:
Everytime thevehicle’signition keyisturned on,theStatusLightwill show
the number of transmitters which are capable of operating the system:
•1 to 4 Flashes indicates the number of authorized transmitters.
Thisdisplay,AutomaticTransmitterVerification,lastsfor10secondsunless
transmitters have been programmed to operate the system within the last 48
hours. Inthiscase, theindicatorchangestoUnauthorized TransmitterAlert,
extendingtheStatusLightdisplaytolastfor90seconds,andalsoaddsabrief
period of siren chirps when the ignition key is first turned on.
Zone Violation:
Onceitis armed,shouldthe systemtriggerand enter analarm condition, the
StatusLightwillchangefromflashingslowlytoflashinginacodedsequence
which indicates which protected zone caused the alarm condition.
•2 Flashes indicates that the system was triggered by the hood or trunk
being opened.
•3Flashesindicatesthatthesystemwastriggeredbyadoorbeingopened.
•4Flashesindicatesthat thesystemwastriggeredbythesensordetecting
a shock or impact above its threshold setting.
Oncea ZoneViolation codeisset,theStatus Lightwill continueto flashthis
code while the system is still armed, after it’s disarmed, and until the
vehicle’s ignition is turned on. The system’s Zone Violation memory can
storetwoconsecutivezoneviolations.Iftherehavebeenmultipleviolations,
the Status Light will replay the two most recent violations in the order in
which they occurred.
Security System Status:
Allofthese StatusLight indicatorsreferto thesystem’s “alarm” operations:
•Off indicatesthatthealarmisdisarmed,andalsonotintheprocessofLast
Door Arming or Automatic Rearming.
•On Constantly indicates that the system is in Valet Mode.
•Flashing Slow indicates that the alarm operation is fully armed.
•FlashingFastindicates thatLast DoorArming orAutomatic Rearming
is in progress.
Page 18
Your Crime Guard system offers the most comprehensive and advanced
securitysafeguards,especiallyinoneofthemostcriticalsystemcomponents,
the remote control transmitter.
As the transmitter sends a signal over the air to operate the system, it is
quite possible for a thief to record these coded signals, for later playback to
the system to operate it and thus defeat it. Crime Guard features Random
Code Encryption, rendering such “code grabbing” devices useless by
randomly changing each signal that the transmitter sends.
Another weakness found in all remote-controlled security and keyless
entry systems lies in their capability of being operated by more than one
transmitter. Crime Guard systems have unique patented operations which,
indailyuse,showthenumberoftransmitterscapableofoperatingit,andalso
have a special warning should transmitters have been recently programmed
to operate the system.
How It Works:
Automatic Transmitter Verification: Every time that the ignition key is
turned on, for 10 seconds the system’s Status Light shows the total number
transmitters which can operate the system by blinking the number between
pauses.
Unauthorized Transmitter Alert: Anytime the system has a transmitter
programmed,for48hoursthereafterthesirenwillemitabriefseriesofchirps
every time the vehicle’s ignition is turned on. This audible warning alerts
you that the system has had transmitter programming activity. The 10
second visual display of number of operating transmitters, described
previously, will extend to 90 seconds in length. The warning chirps
disappearafter48 hours,andthevisualdisplay returnstolasting10seconds.
Level #2: Vehicle Recovery activated an open door:
The Vehicle Recovery process is started by a door of the vehicle being
opened, but only if the ignition is on when the door is opened. This is
programmable feature #15.
Level #3: Vehicle Recovery activated using a remote control:
The Vehicle Recovery process is started by pressing and holding the
transmitter’s Small Lower Button for 3 seconds, but only if the vehicle’s
ignition is on. This is programmable feature #16.
TRANSMITTER PROTECTION

YourCrimeGuard securitysystem isdesigned sothatan optionalaccessory
sensormaybeeasilyadded. Althoughseveraltypesofsensorsareavailable,
the most commonly used sensor detects impact to the vehicle.
• A heavy impact will fully activate the alarm, sounding the siren, flashing
the lights and relocking the doors.
• If the sensor is a “dual zone” type, the system responds to a light impact
by“Prewarning”, whichis chirpingthe sirenthree timesand relockingall
of the doors.
• Should the Prewarning circuit be triggered five times within a single
armed period, the Prewarning circuit only will automatically shutdown
until the security system is disarmed, and then armed again.
OPTIONAL SENSOR CAPABILITY
THE SIREN WILL CHIRP TWICE
TO CONFIRM ARMING
THE SIREN THEN CHIRPS
ONCE TO CONFIRM
SENSOR BYPASS
THE DOORS WILL LOCK
UPON ARMING
THE PARKING LIGHTS
WILL FLASH TWICE
TO CONFIRM
ARMING
Page 16
Bypassing the Sensor: If an optional sensor is utilized, and should it be
desired,when thesecurity systemisarmedthesensorcanthenbeturned off.
BACKUP BATTERY
• When the optional sensor is bypassed; all of the system’s other protected
zones are still operational.
• Theoptionalsensor willremainoffuntilthe nexttimethesystemis armed
in the regular fashion..
This security system is equipped with a backup battery which will provide
an alternative power source to operate the Crime Guard system should the
vehicle's battery is disconnected.
To Bypass the Optional Sensor:
FIRST- Arm the System normally with the Upper Left
“Lock” Button ( ), THEN within 4 Seconds Press
& Release the Lower Left Button ( )
••
U
While operating on the backup battery, the system will not flash the
parking lights, nor the Status Light. The siren will continue to operate, all
protected entry zones will continue to be monitored, and if equipped, the
optionalStarterInterruptwilloperatewhilethesystemisarmed. Thebackup
battery should be replaced every 18 months, or any time the backup battery
hasoperatedthesystemonitsown. Thebackupbatteryisinsidethesystem’s
control module, so it is best replaced by a qualified installer.
Page 17
Your system is equipped with three separately programmable Vehicle
Recoveryprotectionfeatures,whichalsoprovideAnti-Carjackingprotection.
TheVehicleRecoveryoperationmaybeselectivelyactivatedbytheignition,
by an open door, or by the transmitter.
How It Works:
Once the Vehicle Recovery process has begun, the user has 53 seconds to
cancel the process by pressing the Valet Switch once. If Vehicle Recovery
isnotcancelled,53secondsafterbeingactivatedthe sirenwillbegintochirp
for 7 seconds to alert the user that the system is about to enter into an alarm
condition. The Valet Switch may still be pressed once during this period to
cancel the Vehicle Recovery process.
If the Vehicle Recovery process is not cancelled before the 60 second
countdown expires, the system will enter an alarm condition, sounding the
siren and flashing the parking lights. 30 seconds after this occurs, or should
the ignition be turned off in the meantime, the stater interrupt will engage.
Once the system enters the alarm condition, it will not respond to the
transmitter, nor will the system reset automatically after 60 seconds, and it
can only be disengaged by:
VEHICLE RECOVERY
Level #1: Vehicle Recovery activated by the vehicle’s ignition:
The Vehicle Recovery process is started every time the vehicle’s ignition is
turned on. This is programmable feature #14.
Step 3 Within 5 seconds, perform an Emergency Override using the
Valet Switch. If the SecureCode has been customized, the correct
number of Valet Switch presses must be made (page 22).
Step 2 Turning the ignition back on.
Step 1 Turning the vehicle’s ignition off.
Table of contents
Other Crime Guard Car Alarm manuals

Crime Guard
Crime Guard Crime Guard 533i4 User manual

Crime Guard
Crime Guard 328i3 User manual

Crime Guard
Crime Guard Crime Guard 650i5 User manual

Crime Guard
Crime Guard 533i 3 User manual

Crime Guard
Crime Guard 328i3 User manual

Crime Guard
Crime Guard Crime Guard 533i3 User manual

Crime Guard
Crime Guard 745i2 User manual

Crime Guard
Crime Guard 750i6 User manual

Crime Guard
Crime Guard 745i3 User manual

Crime Guard
Crime Guard 750i6 User manual