Crommelins CPV Series Administrator Guide
1
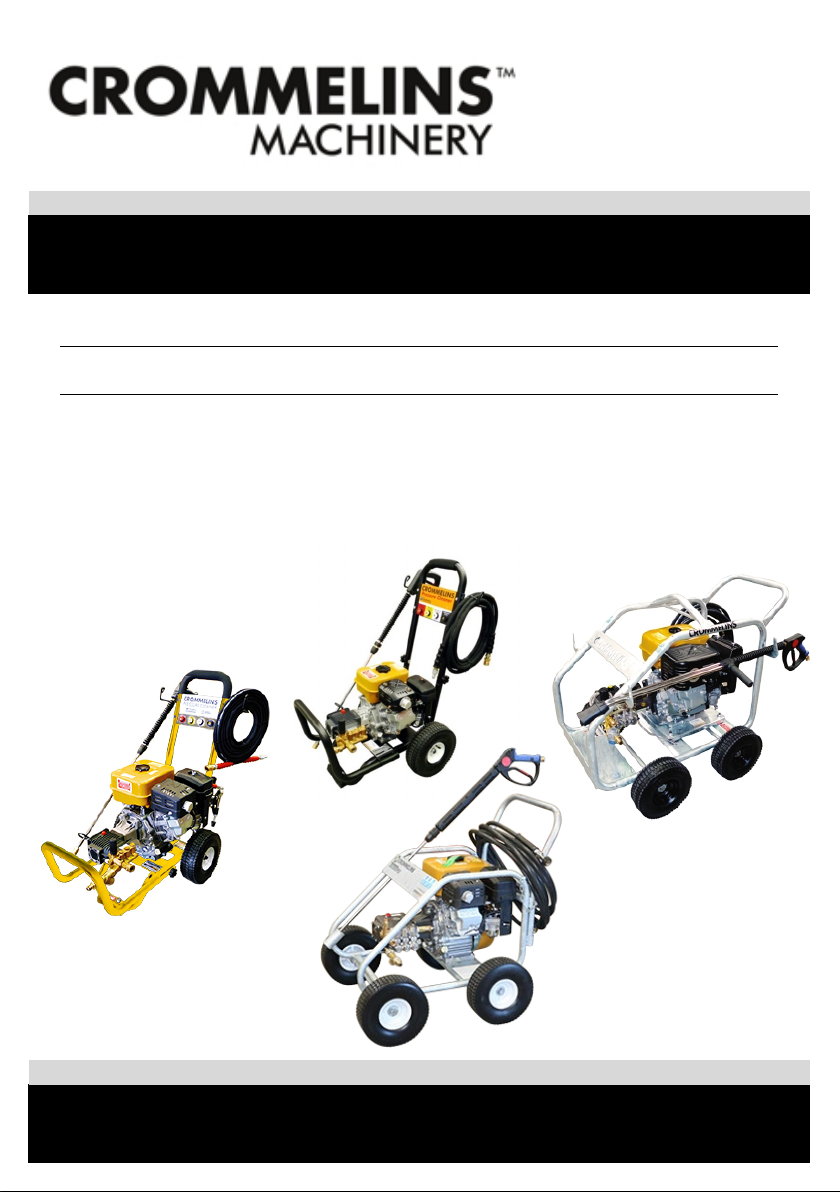
CROMMELINS™ PRESSURE CLEANERS
Thank you for your selection of a CROMMELINS™ Pressure Cleaner.
This Operation Manual explains its use, installation, checking and maintenance.
We highly recommend that you retain this manual for ready reference regarding
proper handling of the CROMMELINS™ Pressure Cleaner.
WA Metro 9350 5588
WA Regional 1800 655 588
East Coast 1300 650 659
sales@crommelins.com.au
OPERATION & INSTRUCTION MANUAL

2
Thank you very much for purchasing a CROMMELINS™ PRESSURE CLEANER.
This manual covers the operation and maintenance of the CROMMELINS™ PRESSURE
CLEANER.
Please take a moment to familiarise yourself with the proper operation and maintenance
procedures to maximise the safe and efficient use of this product.
Keep this owner’s manual at hand, so that you can refer to it at any time.
Due to constant efforts to improve our products, certain procedures and specifications
are subject to change without notice.
When ordering spare parts please have handy your products model number and serial
number. Record these numbers in the boxes below for future reference.
CONTENTS
Introduction & Contents ...................................................................................... 2
Safety Instructions ............................................................................................... 3-4
Engine & Pressure Pump Precaution .................................................................. 5
Pre-Operation Check List .................................................................................... 6
Operation Instructions ........................................................................................ 7-8
Shutdown Instructions / Checks & Maintenance................................................... 8-9
Specifications Charts .......................................................................................... 10-14
Trouble Shooting ................................................................................................. 15-17
Warranty (FAQ) ................................................................................................... 18
SERIAL NO.
MODEL NO.

3
SAFETY
This manual contains important information on how to use the CPV and CPC Series
Pressure Cleaners properly and safely. Please read through this manual before you
attempt to operate this product.
Ensure safe operation, this pressure cleaner is designed to give safe and dependable
service if operated according to the instructions.
WARNING! Fluids under high pressure from spray or leaks can penetrate the skin and
cause extremely serious injury, including death or the need for amputation. This product
must be used ONLY by personnel that have been instructed in the safe use of this
machine. Observe all warnings when you operate, maintain and repair the pressure
cleaner.
•Children and pets must keep away from the area of operation at all times.
•Always make a pre-operation inspection before starting the engine. (For more
information read engine operational manual)
•Must know how to stop the engine quickly and understand the operation of all
controls.
•Stop engine without fail before replenishing fuel tank. Never replenish fuel while the
engine is running or remains hot otherwise spilled or evaporated fuel is liable to catch
fire from the engine spark or muffler heat. Wipe off spilled fuel before starting engine.
•Mufflers and other hot parts are dangerous. Do not touch them with hands or any
other body parts.
•Do not place flammable objects near the unit.
•Be careful with the operating place and ventilation, avoid operating the machine in a
closed room, tunnel or other badly ventilated places, as its exhaust fumes contain
deadly poisonous carbon monoxide. If the machine is unavoidably operated in such a
place, discharge the exhaust fumes outside the room by a suitable means.
•Observe the following cautions when transporting. Close fuel tank cap securely and
close fuel tap tightly during transportation. Drain petrol or diesel from fuel tank before
transporting over a long distance or on rough roads.
To prevent injury wear the following protective items: Gloves, work boots, ear plugs,
safety glasses and any other protective items (hard hat, mask) required by job conditions.

4
SAFETY PRECAUTIONS
•NEVER point the spray gun at people, animals or plants.
•NEVER put your hand or fingers over the spray tip.
•NEVER try to stop or deflect leaks with your hand or body.
•NEVER purchase and use chemicals or detergents that are toxic,
flammable or high acidic/alkaline base, and always request a material safety data sheet
(MSDS) for the product you are purchasing.
•NEVER use a powder type detergent or chemical that is not manufactured for pressure
washer use, i.e. dish detergent, laundry soap.
•NEVER attempt any repairs or maintenance with the engine running or the pump and
gun primed.
•NEVER spray flammable liquids, toxic chemicals (such as insecticide or weed killer) as
personal injury or death could result from fire, explosion, or poisoning while damaging
the environment.
•NEVER leave the pressure cleaner unattended once you have started it. If you must
leave, follow complete shutdown instructions to prevent unauthorized and untrained
personnel from operating the machine.
•NEVER move the machine by pulling the hose.
•NEVER put any type of trigger lock onto the gun.
•ALWAYS face nozzle and wand to the ground when testing.
•NEVER exceed the pressure rating of the unit's recommended pressure.
•NEVER change quick couplers with the nozzle under pressure and without the gun safety
in the “ON” or “LOCK” position.
•NEVER run the machine without water, this will damage the pump and void warranty.
•The machine should be located as close as possible to the water supply.
•Locate the machine on a solid and level surface so that engine and pump crankcase oil
lubricate components properly. Avoid areas where water can build up in the working
area as possible injury can occur caused by the surface becoming slippery from water
build up.
•Locate the machine so the operator has easy access to the pressure cleaner and its
controls.
•To prevent excessive hose damage, locate the pressure cleaner so that the hose does
not cross traffic areas.
•Be sure that all system components and accessory items are original equipment, using
other accessories voids any warranty offered by the manufacturer.
•NEVER alter or modify the pressure cleaner as personal injury or death could result.

5
ENGINE PRECAUTIONS
WARNING! Read engine owners/operators manual before using or attempting to service
this machine.
•DO NOT fill fuel tank while engine is running. Allow engine to cool before refuelling.
•DO NOT operate the engine when an odour of fuel is present, or other explosive
conditions exist.
•IF FUEL IS SPILT, move the machine away from the area of the spill and avoid creating
any source of ignition until the fuel has been removed.
•DO NOT store, spill, or use fuel near an open flame or devices such as a stove, furnace,
water heater which utilize a pilot light, or devices which can create a spark.
•RE-FUEL OUTDOORS or in well ventilated area.
•DO NOT operate engine if the air cleaner or cover directly over the carburettor air
intake is removed.
•DO NOT choke the carburettor to stop the engine.
•DO NOT tamper with the governor springs, governor links or other parts which may
increase the governed engine speed.
•DO NOT tamper with the engine speed selected by the original equipment
manufacturer.
•CAUTION! DO NOT run at excessive speeds. Operating the engine at excessive speeds
increases the danger of personal injury.
•DO NOT touch hot mufflers, cylinders or fins, as contact may cause burns.
PRESSURE PUMP PRECAUTIONS
•NEVER allow the pump to run for more than a 3 minute period without opening the
gun. (This will cause pump damage due to excessive water temperature and void the
warranty)
•NEVER let the pump run when the machine is not connected to the water supply.
•NEVER run acid or hard caustics through the pump.
•ALWAYS use citrus based detergents.
•NEVER use hot water through the pump.
•Machine must be turned off and pressure released from pump and gun, before
checking for leaks, tighten connections if necessary.

6
PRE-OPERATION CHECK LIST
•Be sure you understand all the safety precautions and have been instructed in the
safe use of the machine.
•Wear face, feet and eye protection to prevent injury from spray and flying debris.
•Wear protective gloves, rubber boots, and other protective clothing as required.
•Understand all safety precautions and first aid for any detergent or chemical being
used.
•Check that all lines and hoses are not kinked, twisted or damaged. Replace any
damaged hose.
•Check that the machine is connected to a water supply and that the water supply is
on.
•Tighten all fluid connections securely.
•Replace red transit bungs with dipsticks supplied on pump head.
•Check that oil and fuel levels are at the correct levels before operating.
•Before starting machine, be sure pump is primed and air is purged from the system by
allowing water to flow through the pump.
SET-UP & USE
Follow these instructions for set-up and use of your high pressure cleaner.
1. Position the machine on a solid level surface with slopes for drainage to prevent
water build-up on the floor or surface. Position the machine so that the operator has
easy access to the pressure cleaner and its controls. Be sure ventilation WARNINGS
are observed.
2. Check and determine that the water supply source is capable of exceeding the output
in litres per minute of the pump. If you are drawing water from a clean static source,
rather than a pressure main, the pressure cleaner must be primed and placed as close
as possible to the water source. The intake hose used must be as large as possible.
When drawing water from a pressure source, you need a hose with 16mm or 5/8”
outside diameter.
3. Connect the high pressure hose to the pressure washer and tighten securely.
OPERATION INSTRUCTIONS
WARNING! High pressure spray, improperly used could damage the equipment you wish
to clean or the surrounding environment. Practice on scrap materials, gradually
increasing pressure applied to the object by adjusting the nozzle or moving the nozzle
closer to the object until it is cleaned without being damaged.
The manufacturer does not accept responsibility for damage caused by the consumer's
failure to adjust or operate the machine in accordance with the instruction provided in
the owner manual supplied with the machine.

7
OPERATION INSTRUCTIONS
Follow these instructions to operate the machine:
1. Use the pre-operation checklist to help avoid personal injury.
2. Set gun assembly to low pressure
a. CPV Series – Do not fit nozzle to lance
b. CPC Series – Twist gun assembly side handle anti-clockwise to low
pressure)
c. CPH Series – Allow water to flow through lance
3. Prime the pump and purge air from the system by squeezing the gun trigger before
starting the machine, with the unit attached to a pressure main. Let the water flow
from the wand until air is purged from system.
4. STARTING (PETROL UNITS)
STEP 1 – Open engine fuel cock.
STEP 2 – Set throttle lever to starting position.
STEP 3 – For cold engine starting, close carburettor choke lever.
STEP 4 – Set engine switch to “ON”.
STEP 5 – Pull recoil starter. (IMPORTANT: Do not pull recoil starter rope to the end as
it may cause damage. When the rope is pulled out, release the rope slowly. Do not let
the rope snap back)
STEP 6 – After engine starts, open the choke halfway and warm up the engine for 2-3
minutes with low speed position. The warm up procedure should particularly be
followed during cold weather.
STARTING (DIESEL UNITS)
STEP 1 – Set speed control to low speed. Larger engines press speed lever down till it
locks into place.
STEP 2– Pull recoil starter rope until resistance is felt.
STEP 3 – Bracing foot against frame, pull recoil starter rope with both hands.
STEP 4- If electric start, turn the key until engine starts. (IMPORTANT: Do not pull
recoil starter rope to the end as it may cause damage. When the rope is pulled out,
release the rope slowly. Do not let the rope snap back)
5. For high pressure spraying
a. CPV Series – Select desired spray pattern (0°,15°, 40° or BLACK detergent
nozzle). DO THIS ONLY WHEN THE TRIGGER IS NOT SQUEEZED AND THE
GUN SAFETY LOCK IS ON.
b. CPC Series – Twist gun assembly side handle clockwise to increase
pressure
6. The manufacturer has adjusted the pump pressure to its maximum operating
pressure. Simply adjust the pressure required for cleaning with a selected nozzle
from the quick connection nozzle set.

8
OPERATION INSTRUCTIONS cont...
7. You are now ready to start cleaning with your pressure cleaner. Hold the spray gun
firmly and squeeze the trigger. Always begin high pressure cleaning with the nozzle
at least 1 metre from the object being cleaned and gradually move the nozzle closer
to the object until it is cleaned.
8. To draw chemical/detergent, be sure the pick-up tube is installed into the
chemical/detergent container with the tube sub merged in the solution. Change
quick connection nozzle to the detergent nozzle and squeeze the gun trigger. The
detergent will be drawn up and out of the lance. When the object is covered replace
the detergent nozzle with a high pressure one.
9. Never allow the pump to run for more than a 3 minute period without opening the
gun. This will cause the pump damage due to excessive water temperature and void
the warranty. (A thermal relief valve has been added to the pump to reduce the
possibility of overheating. However, malfunction of this device does not constitute
pump warranty for damage caused by overheating.)
10. As you operate the machine, be sure the water inlet supply hose does not become
kinked.
11. The maximum engine RPM has been set by the manufacturer. Tampering with the
engine governor will void pump warranty.
12. Do not exceed the manufacturer's maximum pressure by increasing the unloader
adjustment. (This will void pump warranty.)
SHUTDOWN INSTRUCTIONS
1. Make sure the gun is closed.
2. SHUTDOWN – PETROL UNIT
STEP 1 – Move throttle lever to low speed position.
STEP 2 – Turn of the red stop switch.
STEP 3 – Close engine fuel cock.
EMERGENCY SHUTDOWN: Move throttle lever to OFF and press engine stop button.
SHUTDOWN – DIESEL UNIT
STEP 1 – Electric start models. Turn key to the off position.
STEP 2 – Move throttle lever to low speed position, then push red lever till the engine
stops
STEP 3 – Move the throttle lever to the stop position.

9
SHUTDOWN INSTRUCTIONS cont....
3. Turn off the water supply and remove the water supply hose from the pump. Pull the
gun trigger to release any built up pressure (make sure you do not spray people or
objects.)
4. Disconnect the pressure hose from the pump and gun and store on the hooks provided
on the trolley.
5. For safety and your liability protection, remove high pressure hose and store gun/wand
in a secure place with this manual to eliminate possibility of unauthorized and
untrained personnel from operating the machine.
CHECKS & MAINTENANCE
Daily Checks
Regular inspection of your pressure cleaner is the key to prolonging its life. Follow these
simple daily checks. This must be done with the engine OFF.
1. Check air filter for dirt and clean or replace as required. Refer to engine owner manual.
2. Check engine oil level. (Dipstick is attached to inside of oil cap.) Refer engine owner
manual.
3. Check engine fuel level.
4. Check high pressure hose for kinks, twists or damage. Replace any damaged hose.
5. Check that the pump oil level is within operation range on the pump dipstick. Model
CPV2700X17 has a sealed oil filled gearbox and must be refilled by service dealer.
6. Check that the water supply is adequate for your machine.
7. Check water inlet filter (situated behind the water inlet connector) remove with long
nose pliers and clean as necessary.
Preventative Maintenance
Change pump oil after first 50 hours of use or first season, then every 300 hours or as
needed. Units that have a reduction gearbox fitted use SAE90 pump oil, all other units are
required to use SAE30 universal pump oil and follow the below steps:
1. Un-thread the oil cap on the top of the pump.
2. Put a container under the pump then unscrew the drain plug on the bottom of the
pump;
3. After oil drains away completely, screw the drain plug into the drain hole again, make
sure the o-ring is with the plug.
4. Refill pump oil via the top hole of the pump until the oil level is to the top of the oil
dipstick level indicator.
5. Screw on the oil cap.
N.B. Dispose of used oils as per your local environmental disposal by laws.
10
CPV SERIES PETROL SPECIFICATION CHART
MODEL
CPV2700X21
CPV3200X27
CPV4000X40
Pressure PSI max
2700
3200
4000
Bar (max)
180
220
275
Water Flow (L/min max)
11.4L
14.0L
15.0L
Water Flow (L/hr max) 684L 840L 840L
Water Pump
Triplex
Triplex
Triplex
Fuel Type
Petrol
Petrol
Petrol
Engine Make
Robin
Robin
Robin
Engine
7.0hp EX21
9.0hp EX27
14.0hp EX40
Starting System
Recoil Start
Recoil Start
Recoil Start
Fuel Tank (L)
3.6L
6.1L
7.0L
Noise Level db@7m
68db
70db
72db
Lance & Spray Gun
Single Lance HD Gun
Single Lance HD Gun
Single Lance HD Gun
Nozzles
0° /15° /40°/ detergent
0° /15° /40°/ detergent
0° /15° /40°/ detergent
Hose Type & Length
10m HD Braided Hose
10m HD Braided Hose
10m HD Braided Hose
Detergent Tank (L)
Detergent Suction Pickup
Detergent Suction Pickup
Detergent Suction Pickup
Weight (kg)
43.0kg
48.0kg
67.0kg
Dimensions (LxWxH) mm
670 x 520 x 960mm
720 x 520 x 960mm
920 x 600 x 960mm
Folded Dimensions
670 x 520 x 480mm
720 x 520 x 530mm
Manufacturer’s Warranty
2 years
2 years
2 years
Engine Warranty
3 years
3 years
3 years
Pressure Pump Warranty
1 year
1 year
1 year
CPC SERIES PETROL SPECIFICATION CHART
MODEL
CPC2000SP
CPC3000SP
CPC4000SP
Pressure PSI max
2700
3200
4000
Bar (max)
180
220
275
Water Flow (L/min max)
11.4L
14.0L
15.0L
Water Flow (L/hr max)
684L
840L
840L
Water Pump
Triplex
Triplex
Triplex
Fuel Type
Petrol
Petrol
Petrol
Engine Make
Robin
Robin
Robin
Engine 7.0hp EX21 9.0hp EX27 14.0hp EX40
Starting System
Recoil Start
Recoil Start
Recoil Start
Fuel Tank (L)
3.6L
6.1L
7.0L
Noise Level db@7m
68db
70db
72db
Lance & Spray Gun
Single Lance HD Gun
Single Lance HD Gun
Single Lance HD Gun
Nozzles
0° /15° /40°/ detergent
0° /15° /40°/ detergent
0° /15° /40°/ detergent
Hose Type & Length
10m HD Braided Hose
10m HD Braided Hose
10m HD Braided Hose
Detergent Tank (L)
Detergent Suction Pickup
Detergent Suction Pickup
Detergent Suction Pickup
Weight (kg)
43.0kg
48.0kg
67.0kg
Dimensions (LxWxH) mm
670 x 520 x 960mm
720 x 520 x 960mm
920 x 600 x 960mm
Folded Dimensions
670 x 520 x 480mm
720 x 520 x 530mm
Manufacturer’s Warranty
2 years
2 years
2 years
Engine Warranty
3 years
3 years
3 years
Pressure Pump Warranty
1 year
1 year
1 year
11
CPC SERIES DIESEL SPECIFICATION CHART
MODEL CPC2000YDE CPC3000YDE
Pressure PSI max
2000
3000
Bar (max) 138 206
Water Flow (L/min max)
12L
15L
Water Flow (L/hr max)
720L
900L
Water Pump
Triplex
Triplex
Fuel Type
Diesel
Diesel
Engine Make
Yanmar
Yanmar
Engine
4.7hp L48
10.0hp L100
Starting System
Electric Start
Electric Start
Fuel Tank (L)
2.4L
4.7L
Noise Level db@7m
94db at 1m
97db at 1m
Lance & Spray Gun Twin Lance HD Gun Twin Lance HD Gun
Nozzles
Detergent Nozzle, Turbo
Optional
Detergent Nozzle, Turbo
Optional
Hose Type & Length
10m Braided HP Hose
10m Braided HP Hose
Detergent Tank (L) Detergent Suction Pickup Detergent Suction Pickup
Weight (kg) 76.0kg 115.0kg
Dimensions (LxWxH)mm
900x650x860
900x650x860
Manufacturer’s Warranty 2yrs 2yrs
Pressure Pump Warranty
1yr
1yr
MODEL CPH3000RP
Pressure PSI max
3000
Bar (max) 206
Water Flow (L/min max)
13L
Water Flow (L/hr max)
780L
Water Pump
Triplex
Fuel Type
Petrol
Engine Make
Robin
Engine
9.0hp EX27
Starting System
Recoil Start
Fuel Tank (L)
6.1L
Noise Level db@7m
70db
Lance & Spray Gun Single Lance HD Gun
Nozzles Permanent attached
Hose Type & Length
10m Braided HP Hose
Detergent Tank (L) N/A
Weight (kg) 59kg

12
TROUBLE SHOOTING GUIDE
PROBLEM
CAUSE
SOLUTION
Engine won’t start
Units with Oil Alert
System
1. Engine switch in OFF
position
2. Throttle lever on/off
switch in OFF position
3. No fuel in engine
4. Worn, fouled or dirty
spark plug
5. Pressure build up in
pump
1. Engine not level or
engine oil level too
low
1. Turn engine switch to ON
position
2. Turn throttle lever to ON
position
3. Fill fuel tank or turn on fuel
supply
4. Replace with factory
recommended spark plug
5. Squeeze trigger on spray
wand to release pressure in
hose line
1. Place engine on level surface
or fill crankcase with oil
(refer to engine
manufacturers instruction
manual)
Engine with low power
1. Throttle control lever
not set to full throttle
position
2. Partially clogged gun
nozzle
1. Set throttle control lever to
full position
2. Clean nozzle of any blockage
Engine runs well at no
load but ‘bogs’ down
under full load
1. Engine speed too low
1. Contact your pressure
cleaner dealer
Engine will not start:
or starts and runs
rough
1. Low oil level
2. Dirty air filter
3. Out of petrol
4. Stale petrol
5. Spark plug wire not
connected to spark
plug
1. Fill crankcase to proper level
2. Clean or replace air cleaner
3. Fill fuel tank
4. Drain fuel tank, fill with fresh
fuel
5. Connect wire to spark plug

13
TROUBLE SHOOTING GUIDE
PROBLEM
CAUSE
SOLUTION
Engine shuts down
during operation
1. Low fuel level
2. Low oil level
1. Fill fuel tank
2. Fill crankcase with oil to
proper level or level machine
Engine lacks power
1. Dirty air filter
1. Clean or replace air filter
Engine ‘hunts’ or
falters
1. Choke is opened too
long
2. Blocked spray nozzle
1. Move choke to halfway
position until engine runs
smoothly
2. Remove and clean nozzle tip
CPV SERIES
No low pressure
detergent delivery
1. High pressure nozzle
on wand
2. Syphon hose or hose
filter blocked
1. Fit black detergent nozzle
2. Clean or unblock hose and
filter
Unit does not reach
required pressure
1. Restricted or
insufficient water
supply, or pump
sucking air
2. Detergent nozzle
fitted to lance
3. Water leak in high
pressure fittings, hose
or gun
4. Pump has operated
more than 3 minutes
without pulling trigger
5. Thermal relief valve
stuck open
1. Check water supply and
supply hose, and inlet water
filter
2. Replace with high pressure
nozzle
3. Use Teflon tape or pipe
sealant to tighten hose
fitting, replace hose or gun
4. Pull trigger at least 30
seconds every 3 minutes
5. Return unit to your pressure
washer dealer

14
TROUBLE SHOOTING GUIDE
PROBLEM
CAUSE
SOLUTION
CPC SERIES
No low pressure
detergent delivery
1. Twin lance not set to
low pressure
2. Syphon hose or hose
filter blocked
3. Detergent won’t flow
on low pressure
1. Loosen off black side handle
to low pressure flow
2. Clean or unblock hose and
filter
3. Detergent to thick, dilute as
required so as to pick-up on
low pressure
Unit does not reach
required pressure
1. Restricted or
insufficient water
supply, or pump
sucking air
2. Detergent nozzle
fitted to lance
3. Water leak in high
pressure fittings, hose
or gun
4. Pump has operated
more than 3 minutes
without pulling trigger
5. Thermal relief valve
stuck open
6. Pressure regulator (if
fitted) has been
wound down
1. Check water supply and
supply hose, and inlet water
filter
2. Replace with high pressure
nozzle
3. Use Teflon tape or pipe
sealant to tighten hose
fitting, replace hose or gun
4. Pull trigger at least 30
seconds every 3 minutes
5. Return unit to your pressure
washer dealer
6. Wind pressure regulator
clockwise to increase
pressure
If problem continues, take your pressure cleaner to a dealer for servicing.

15
NOTE
Most detergent delivery problems can be prevented by:
1. Using citrus based detergents
2. Flushing the chemical/detergent system before storing
3. NEVER use powdered detergents that are not manufactured specifically for use in
pressure cleaners (ie dish detergent)
WARRANTY (FAQ) Frequently Asked Questions
Q. My Pressure cleaner won't start…
A. Are all engine controls set properly?
A. Do you have fuel in your machine?
A. Check that the engine oil level correct?
Q. How do I get the soap suction to work?
A. Replace the high pressure nozzle with the BLACK detergent nozzle..
Q I don't have any water pressure…
A. Do you have any kinks, leakage or blockage in hoses, fittings and nozzles?
A. Is the Black detergent nozzle attached to the end of the lance?
A. Have you let the unit run in bypass for longer than 3 minutes (pump running, gun
trigger not depressed)
A. Have you checked the nozzle for excessive wear?
A. Check nozzle for blockages
WARRANTY
Consult the CROMMELINS Machinery warranty leaflet (supplied with your new product)
for full details and a list of service dealers for this product, also available online at
www.crommelins.com.au.

This manual suits for next models
10
Table of contents
Other Crommelins Pressure Washer manuals


