Croquade MULTEX User manual

INSTRUCTIONS
MULTEX
©2013 Dalcq USA, Inc.
CROQUADE® Belgian Wafe Maker – MULTEX II WA 102US

2
MULTEX MULTEX
To protect against re, electrical shock, and injury to persons when using an electrical
appliance, important safety precautions must always be followed including the following:
1. Read all instructions before using the wafe maker.
2. Do not touch hot surfaces. Use handles or knobs.
3. To protect against re, electrical shock, and injury to persons, DO NOT IMMERSE CORD,
PLUG, OR UNIT in water or other liquids.
4. Close supervision is necessary when any appliance is used by or near children.
5. Unplug from outlet when not in use and before cleaning. Allow to completely cool before
putting on or taking off parts, and before cleaning the appliance.
6. Do not operate any appliance with a damaged cord or plug or after the appliance mal-
functions or has been damaged in any manner. Please contact our customer service center
using the information on page 5, so that you can return the appliance for examination,
repair or adjustment.
7. The use of accessory attachments not recommended by DALCQ USA, Inc. may result in re,
electrical shock, or injury to persons.
8. Do not use outdoors, or use for other than intended use.
9. Do not let power cord hang over edge of table or counter or touch hot surfaces.
10. Do not place on or near a hot gas or electric burner or in a heated oven.
11. Unplug the unit when nished baking wafes.
12. It is recommended that this appliance not be moved when it contains hot oil or other liquid.
13. Do not use appliance for other than intended use.
14. Always begin by plugging appliance into wall outlet. To turn off, remove the plug from the
wall outlet and allow to completely cool before touching.
15. The device is only intended for domestic use
16. WARNING: TO REDUCE THE RISK OF FIRE OR ELECTRIC SHOCK, REPAIR SHOULD BE DONE
ONLY BY AUTHORIZED PERSONNEL. NO USER SERVICEABLE PARTS ARE INSIDE.
This product has a polarized plug (i.e., one blade is wider than the other). To protect against re,
electrical shock, and injury to persons, the plug is intended to t into a polarized outlet only one
way. If the plug does not t fully into the outlet, reverse the plug. If it still does not t, contact a
qualied electrician. Do not modify the plug in any way.
A short-power supply cord is provided to reduce the risks resulting from becoming entangled in or
tripping over a longer cord. Extension cords may be used if care is properly exercised in their use.
If an extension cord is used, the marked electrical rating of the extension cord should be at least
as great as the electrical rating of the appliance. The extension cord should be arranged so that
it will not drape over the countertop or tabletop where it can be pulled on by children or tripped
over unintentionally.
Connect the power supply cord to a 120VAC outlet only.
SAVE THESE INSTRUCTIONS
THIS PRODUCT IS FOR HOUSEHOLD USE ONLY
IMPORTANT SAFEGUARDS PRECAUTIONS IMPORTANTESIMPORTANT CORD INSTRUCTIONS
3
MULTEX
1
2
2
6
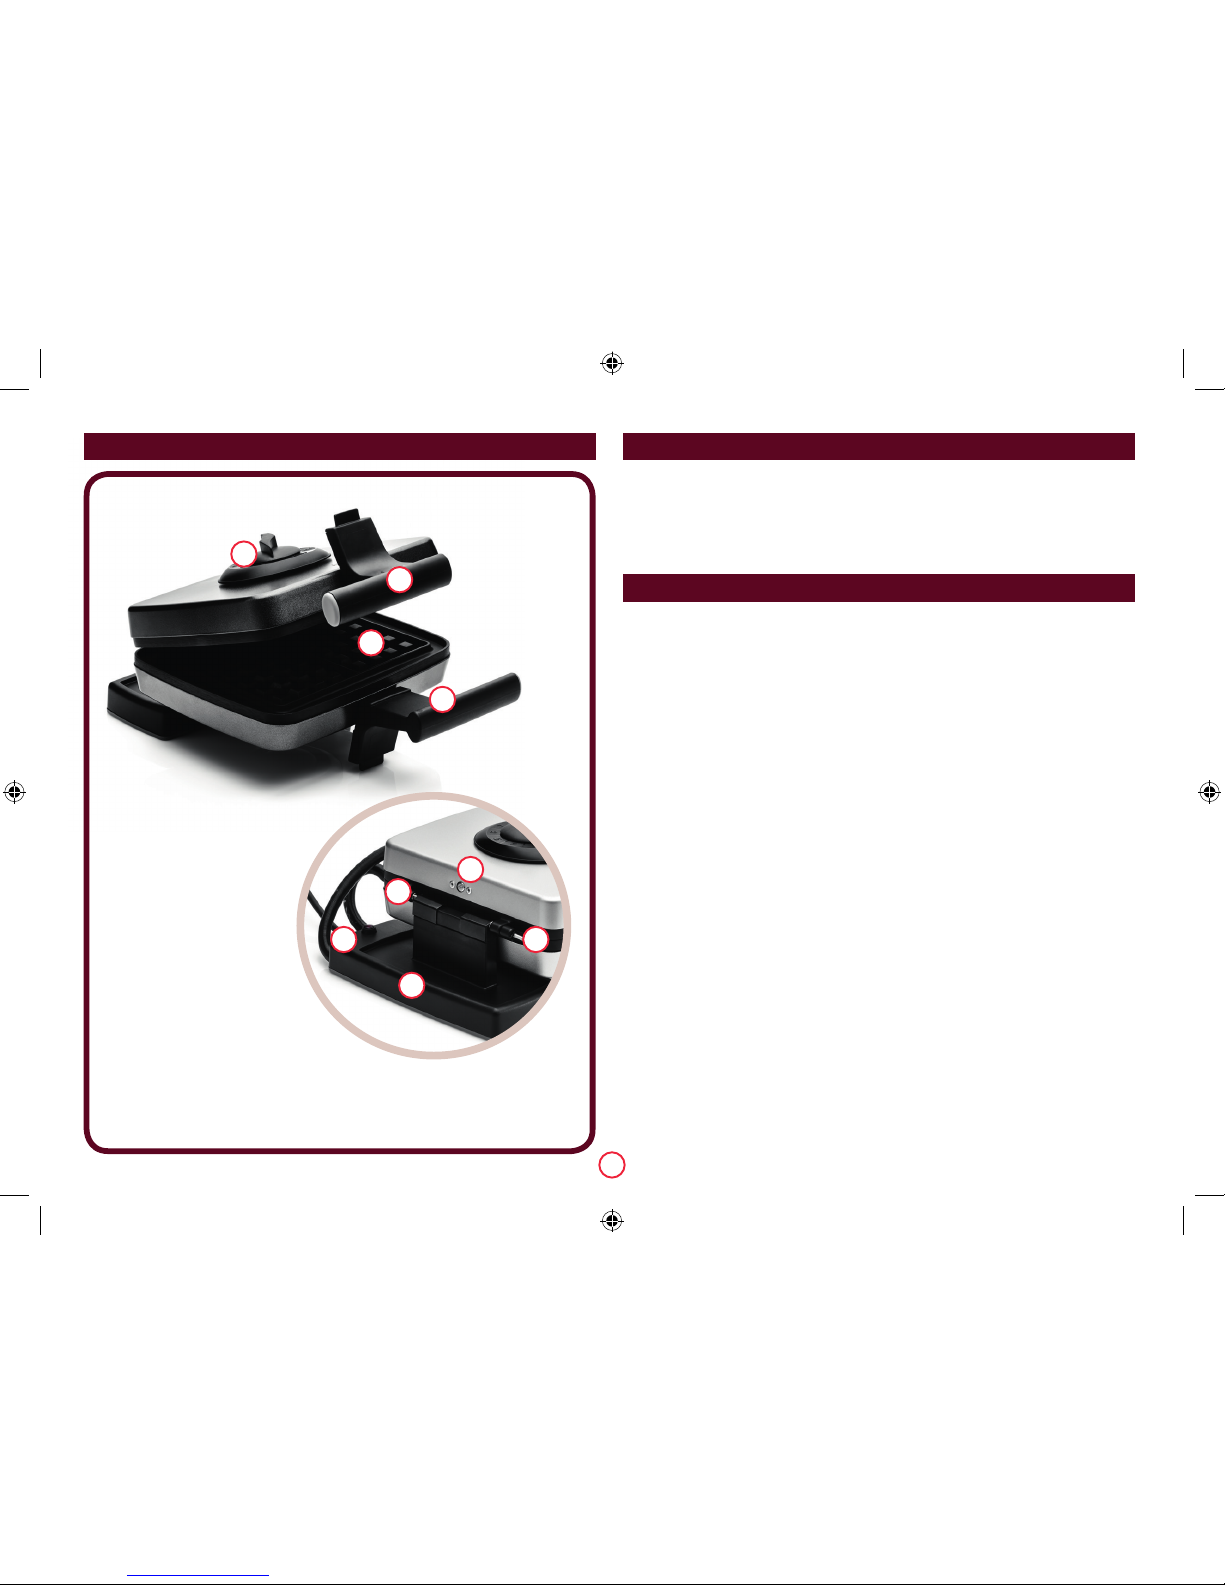
DESCRIPTION/PARTS (ADJUSTABLE THERMOSTAT) BEFORE THE FIRST USE
OPERATING INSTRUCTIONS
1. Interchangeable irons
2. Handles
3. Sliding channel
4. Screws for securing irons
5. Base
6. Knob for adjusting thermostat
7. Signal light
3
3
4
7
5
Remove all packaging from your CROQUADE wafe maker. Remove the irons and wash carefully
in hot water with a minimal amount of liquid or dish soap, and follow the instructions in
CHANGING THE IRONS, below. Return the irons to the wafe maker. Oil the irons using
a cooking brush or a cloth. This operation can be repeated each time that the irons have been
washed with soap.
1. Place the CROQUADE wafe maker in the closed position on a hard, at surface and plug
into a 120VAC outlet. Never place the wafe maker on a plastic table cloth or any other
material that is not heat resistant.
2. This CROQUADE wafe maker is equipped with a thermostat by which the temperature
can be varied and maintained at different cooking temperatures. The knob to adjust
the temperature is part #6 on the DESCRIPTION/PARTS above. The knob has 8
possible positions, with position #1 for the softest/lightest wafes and position #8 for the
crunchiest/darkest wafes. Turn the knob clockwise to the desired setting.
3. While the wafe maker is preheating, prepare wafe dough or batter.
4. When the light goes out, the wafe maker is preheated and ready for use.
5. Lift the lid of the wafe maker by grasping the upper handle and pushing back and up in
one motion.
6. Before the rst use after the unit has preheated, carefully use a brush or paper towel and
apply a light coating of cooking oil to the irons. Avoid using anything made of nylon or
synthetic bers that would melt when heated. Use less oil during your second use. No
oil should be necessary for subsequent uses. However, if you nd it difcult to remove a
wafe, be sure to apply a light coating of cooking oil during the following uses.
7. Using dough: Place a ball of dough (approx. 5cm_ to 8cm_ in size) in the center of each
of the two imprints of the lower iron. Close the CROQUADE wafe maker and, if necessary,
press the two handles together so that the irons are touching. The cover may lift slightly
due to steam pressure in the dough. This is normal.
8. Using batter: Use a ladle to pour a sufcient amount of wafe batter to cover the entire
baking surface of the lower iron. Close the CROQUADE wafe maker and turn it over by
pivoting it on its base. The batter will ow to the other iron/plate.
9. When nished, the color of the wafe should be brown. Light brown will make the wafes
chewy and dark brown will make it crusty.
10. To remove the wafes after baking, insert a two-pronged fork (or, if unavailable, a regular
fork) horizontally into the wafe. Remove the wafe from the wafe maker and place onto
a plate.
11. Unplug the wafe maker when baking is complete and allow it to cool completely in the
open position before cleaning or putting it away.
4
MULTEX MULTEX
Note: When using the CROQUADE wafe maker for the rst time, a slight odor or smoking may
occur. This is normal, and common to appliances with a nonstick surface.
CHANGING THE IRONS
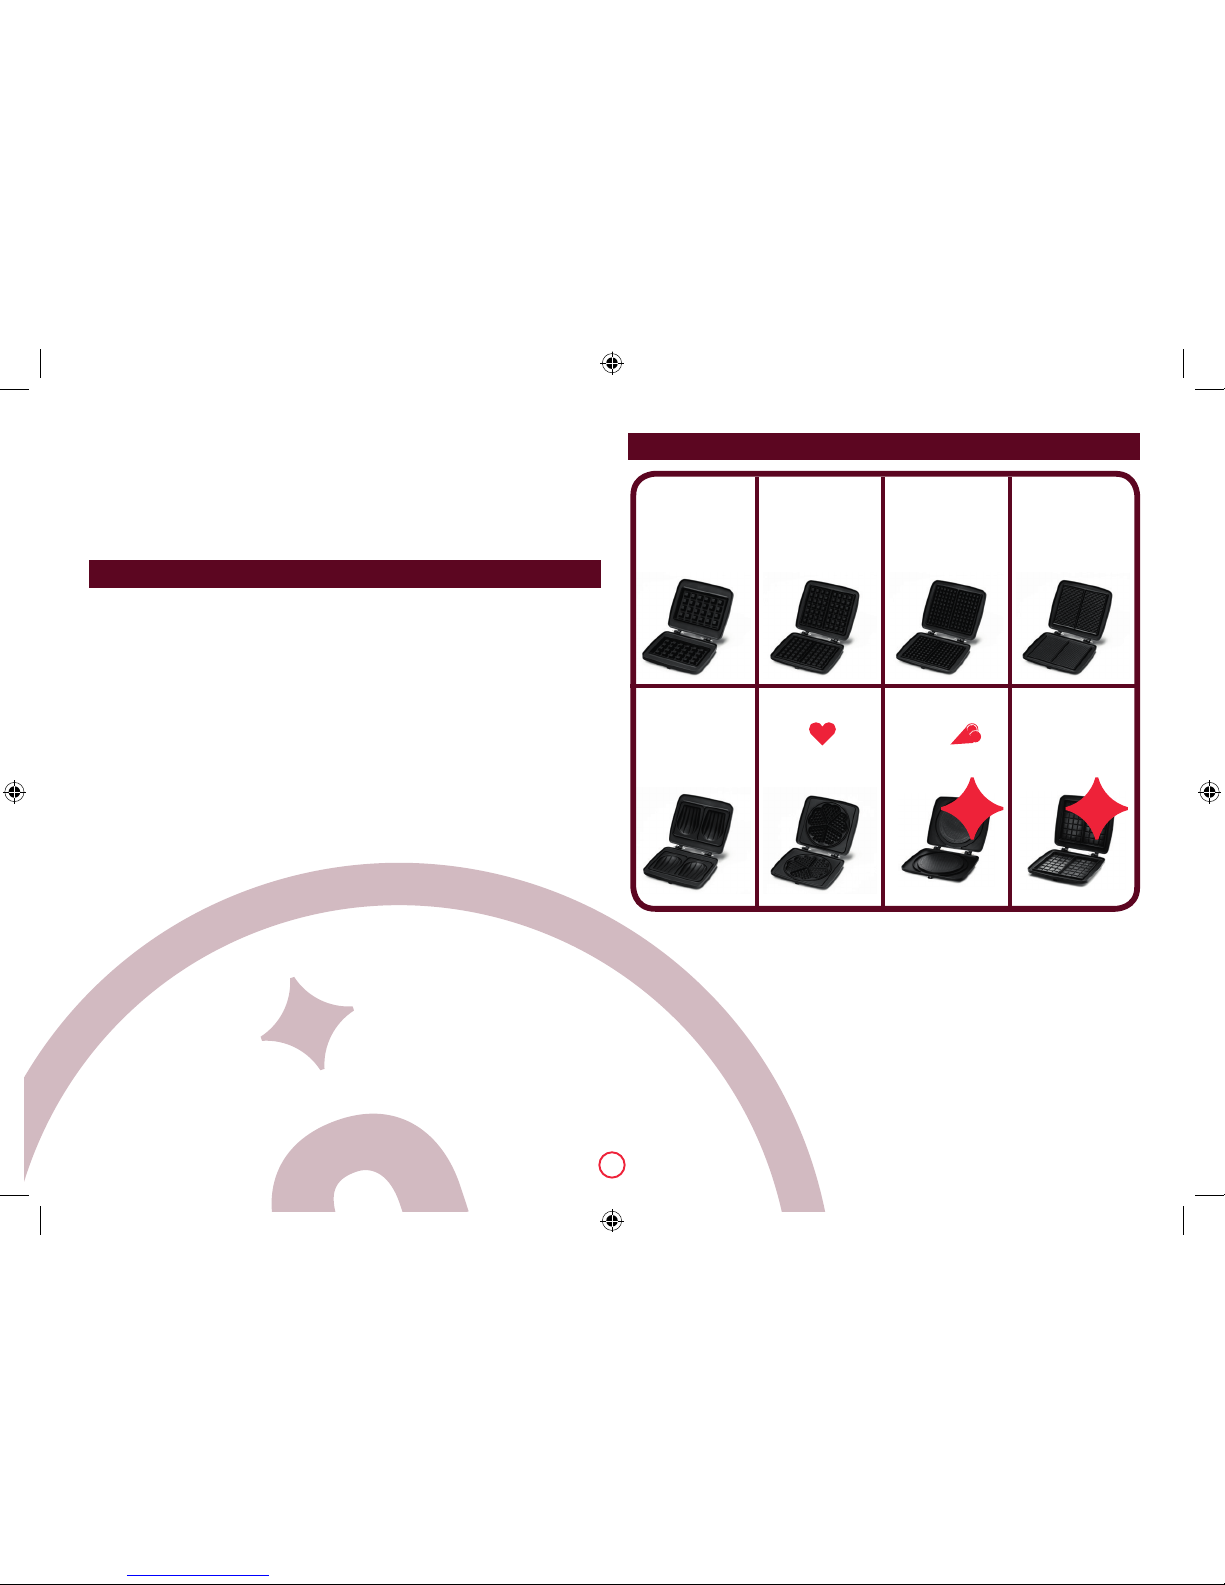
AVAILABLE IRONS
1. There are a variety of irons available for the wafe maker. A listing of some of the available
irons is below (AVAILABLE IRONS).
2. To change to a different iron, rst make sure the wafe maker is unplugged and the irons
are completely cool.
3. Slide the two interchangeable irons (part #1) towards the center to release the irons from
the base (part #5).
4. Unscrew the screws (part #4) securing the irons to the case and open the wafe maker. The
irons will detach from the case.
5. Choose a different set of irons. On the back of each iron is a bump/indentation with a hole.
Slide the lug located under the handle (part #2) into the hole. Close the wafe maker and
secure each of the irons with the screws removed in step 4.
6. Open and close the wafe maker several times to conrm everything is secure and in place.
Brussels wafes Home-made wafes Home-made wafes Thin Galettes
4x6 4x7 6x10 16x28
M001 M002 M003 M004
Toasted sandwich Heart Ice cream Cones Stuffed wafes
Croque Cone Fruits
M005 M006 M007 M008
NEWNEW

5
MULTEX
CLEANING AND CARE
HELPFUL HINTS
CONSUMER SERVICE INFORMATION
LIMITED 2 YEAR WARRANTY
Unplug the wafe maker and allow to completely cool before cleaning.
WARNING: DO NOT IMMERSE THE BASE OF THE WAFFLE MAKER INTO WATER OR ANY OTHER
LIQUID.
Wipe the outside of the wafe maker with a damp cloth. Do not use steel wool, scouring pads
or abrasive kitchen cleaners on the unit.
To wash the irons, rst remove the irons from the wafe maker by following the steps in
CHANGING THE IRONS, above. Wash the irons in hot water with a small amount of
household cleaner. Certain dishwasher soaps are too strong and may result in damage to
the anti-stick coating. If necessary, soak the irons for 30 minutes before wiping them with a
sponge. After the irons have been dried, return the irons to the wafe maker by following the
steps in CHANGING THE IRONS, above.
If the cord has been damaged, please contact DALCQ USA, Inc. to have it repaired or replaced.
If you should have any questions regarding the operation of this product or need parts, contact
us by any of the following methods:
- Mail at DALCQ USA Inc.
Canal Landing Court 32
Rehoboth
DE 19971
USA
When contacting us, please have available the model number and the series code for the
product. These numbers can be found under the foot of the wafe maker.
Please maintain this information:
Model Number:
Serial Code:
Date Purchased:
This warranty is only available to you, the individual consumer of the MULTEX II –
CROQUADE (the “Wafe Maker”) which was purchased at retail for personal, family or
household use. Except as otherwise required under applicable law, this warranty is not
available to retailers or other commercial purchasers or owners.
Dalcq USA, Inc. warrants that your Wafe Maker will be free from defects in materials and
workmanship under normal home use for 2 years from the date of original purchase. If
your Wafe Maker should prove to be defective within the warranty period, DALCQ USA, Inc.
will repair or replace it at its sole option. To obtain warranty service, please contact us at
[email protected]. You will then be instructed where to send your Wafe Maker. Please be
sure to include your return address, a description of the problem, and indicate the date the
Wafe Maker was purchased.
This warranty does not cover any damage caused by accident, misuse, shipment or other
than ordinary household use.
This warranty excludes all incidental or consequential damages. Some states do not allow
the exclusion or limitation of these damages, so they may not apply to you.
This warranty gives you specic legal rights, and you may have other rights which vary from
state to state.
- We recommend positions #6 to #8 on the thermostat for ideal wafes.
- If making wafe dough, mix and handle the ingredients at room temperature. Baker’s yeast will
result in a dough which doubles or triples in volume, so use a bowl that is sufciently large.
- Opening the wafe maker too soon while baking can result in difculty in removing the
wafe from the wafe maker.
- Use a wooden spatula instead of metallic utensils. Use of metallic utensils may result in
scratching or damage to the irons.

CONTACT AND INFORMATIONS
DALCQ USA Inc.
Canal Landing Court 32
Rehoboth
DE 19971
USA
ME_MultexUS-EN_1309
Table of contents


