Cross point XM3 MICROPROXS User manual

MANUAL
Remote Programmer XM3


Manual XM3 Remote Programmer: Version 4.1 3
Conditions
Transactions, deliveries et cetera will be according to the general terms of delivery as
deposited at the Chamber of Commerce at Meppel, The Netherlands. Registration
number is K.v.K. 04058425.

4 Manual XM3 Remote Programmer: Version 4.1
Table of contents
1Introduction....................................................................................... 8
1.1 Important Notice...................................................................... 8
1.2 Proximity ................................................................................. 8
1.3 XM3 Stand-alone features .................................................... 10
1.4 XM3 Single Door................................................................... 10
1.5 XM3 Tag types...................................................................... 11
2Remote Programmer section.......................................................... 12
2.1 The Remote Programmer ..................................................... 12
2.2 Operating the Remote Programmer...................................... 13
2.3 Operational level and Program number overview................. 14
2.4 XM3 LED Indicators.............................................................. 18
2.5 XM3 Sound Indicator............................................................. 18
2.6 XM3 Sleep modes................................................................. 19
2.7 Tag Level Overview .............................................................. 20
3Sleep mode .................................................................................... 21
3.1.1 - Show current XM3 level............................... 21
3.1.2 Set new level prior to entering Sleep mode............... 21
3.2 - Access..................................................................... 22
3.3 - Add tags by number................................................. 23
3.4 - (De)Activate Night time mode.................................. 24
3.5 - Add tags by presentation......................................... 25
3.6 - Void tags by presentation........................................ 26
3.7 - Set internal real time clock....................................... 27
3.8 - Add 24 hours tags (Special Users).......................... 28
3.9 - Add Night Time only tags......................................... 29
3.10 - Voiding tags by number........................................... 30
4User Options................................................................................... 31
4.1.1 Protect option ............................................................ 31
4.1.2 Read Indication option............................................... 31
4.1.3 - Display User options............................... 32
4.1.4 Set User options........................................................ 33
4.2 - Set Open Time-out............................................. 34
Manual XM3 Remote Programmer: Version 4.1 5
4.3 - Set Close Time-out ............................................35
4.4 - Program Night time Master tag ..........................36
4.5 - Program Add Master tag....................................37
4.6 - Program Void Master tag ...................................38
4.7 - Copy a Remote Programmer ............................. 39
4.8 - Program Overall Time-out.................................. 40
4.9 - Set PIN Keypad related codes...........................41
4.9.1 - Set PIN Code Change code........41
4.9.2 - Set PIN Access code...................42
4.9.3 - Set Alarm Code...........................42
4.10 - Set User level Access code ...............................44
5Installer Options.............................................................................. 45
5.1.1 Pivate option.............................................................. 45
5.1.2 Public option.............................................................. 46
5.1.3 Egress option.............................................................46
5.1.4 - Display Installer options.......................... 47
5.1.5 - Set Installer options.....................48
5.2 - Set Lock type .....................................................49
5.2.1 Set Lock type Normally Open.................................... 49
5.2.2 Set Lock type Normally Closed..................................49
5.2.3 Set Lock type Coded Signal ......................................50
5.3 - Set Installer level Access code...........................51
5.4 - Alarm options..................................................... 52
5.4.1 Alarm tone .................................................................52
5.4.2 Redirect Tamper alarm output................................... 52
5.4.3 Tamper alarm ............................................................52
5.4.4 Display Alarm options................................................53
5.4.5 - Set Alarm options........................54
5.5 - Set File System configuration ............................55
5.5.1 - Set File System configuration...... 56
- RS-485 Interface .........................................................57
5.5.2 Switch to RS-485 interface........................................57
5.6 - Set XM3 Address ...............................................58
6PIN Keypad.....................................................................................59
6.1 - Add a PIN Keypad..............................................59
6 Manual XM3 Remote Programmer: Version 4.1
6.2 - PIN Keypad options ........................................... 60
6.2.1 Alarm Notification mode ............................................ 60
6.2.2 Enable PIN code........................................................ 60
6.2.3 Use PIN Keypad as User Programmer...................... 60
6.2.4 PIN at night only........................................................ 60
6.2.5 Display PIN Keypad options...................................... 61
6.2.6 - Set Pin Keypad options............... 62
6.2.7 Defining a PIN code................................................... 63
6.2.8 Changing a PIN code ................................................ 64
7Event Logging................................................................................. 65
7.1 - Enable/Disable Event Logging........................... 65
7.2 Event Log Options................................................................. 66
7.2.1 Security...................................................................... 66
7.2.2 Configuration............................................................. 66
7.2.3 Status ........................................................................ 66
7.2.4 - Display Event Log options...................... 67
7.2.5 - Set Event Log Options ................ 68
7.3 - Erase Event Log ................................................ 69
8Anti-Pass back................................................................................ 70
8.1.1 - Set Anti-Pass back mode............ 70
8.2 - Set Anti-Pass back Time.............................. 71
8.3 - Re-enable Users................................................ 71
9Time Zones..................................................................................... 72
9.1 - Set Day-Night scheme....................................... 73
9.1.1 - Set Night-to-Day marker.............. 74
9.1.2 - Set Day-to-Night marker.............. 74
9.2 - Display Time zones Week scheme.................... 75
9.2.1 - Set Time zones Week scheme.... 76
10 Lock/Unlock.................................................................................... 77
10.1 - Set Lock/Unlock scheme.................................... 78
10.1.1 - Set Lock-to-Unlock marker.......... 79
10.1.2 - Set Unlock-to-Lock marker.......... 79
10.2 - Display Lock/Unlock Week scheme................... 80
10.2.1 - Set Lock/Unlock Week scheme... 81
10.3 - Add Unlock Master tag....................................... 82

Manual XM3 Remote Programmer: Version 4.1 7
11 Miscellaneous functions.................................................................. 83
11.1 - Show Operational level ......................................83
11.2 - Show Remote Programmer level ....................... 84
11.3 - XM3 Reset .........................................................85
11.4 - Erase memory....................................................86

8 Manual XM3 Remote Programmer: Version 4.1
1 Introduction
1.1 Important Notice
This manual is for use of authorized Cross Point OEM’s only. It is intended to
serve as an example user manual and as a guide to the functions of the
XM3. Authorized Cross Point OEM clients may freely copy and edit the text
and graphics contained in this document for including in their own
documentation.
This manual describes all available procedures for the XM3. For specific
markets, where the OEM client may not need all available options, it is
recommended that those parts of the text which deal with unneeded options
or operations be omitted, provided they are not made accessible to the end
user or installer.
References to the “user” should be interpreted as “the user of the OEM’s end
product”. Where reference is made to the XM3, the OEM should insert the
product name under which the end product is marketed. Other XM3 specific
names like I/O1, I/O2, I/O3 and I/O4 may be changed to the names or
numbers of the input and output ports used in the OEM’s end product.
In the interest of improvement, specifications of the XM3 may vary slightly
due to updates being made. Detailed specifications of updates will be made
available, to be incorporated in the OEM’s manuals when necessary.
This document is subject to changes without prior notice. Cross Point cannot
be held liable for the use of the provided information. In case of doubt please
contact your supplier.
1.2 Proximity
The XM3 applies proximity detection techniques to sense the presence of a
unique RFID tag, as authorization to allow automatic opening or unlocking of
a door, gate or other access.
Proximity detection has the advantage of not requiring physical contact
between ID reader and ID-carrier. The tag functions without use of a battery.
The ID Reader scans the ID-carrier by means of a Long Wave radio
frequency transmission. If within range, the tag is activated and powered by
this signal and in return transmits its specific ID number. This technique
ensures easy to use, highly reliable, vandal proof access control.
The standard tags are available as cards, conforming to the ISO standard, or
as small key tags which can be attached to key rings. The ISO card can
optionally be equipped with a magnetic strip for dual ID applications.

Manual XM3 Remote Programmer: Version 4.1 9
XM3 Stand-alone functionality:
This manual describes the full functionality of the Remote Programmer in
combination with anXM3 stand-alone reader. The XM3 On-line is described
in the XM3 Quick Guide.
The XM3 provides the basis for Stand-alone use. Although technologically
sophisticated, it is compact, quick and simple to use and flexible in
operation..
The tags used with the XM3 have a laser-engraved number on the outside.
Allowing up to billions of combinations, this ID number is unique for each tag.
When the XM3is installed, it first needs to be programmed. This is done at
installer level. The anti-tamper led at the front is then disabled and all specific
settings can be done. At user level the anti-tamper is active. The (end) user
can decide to ‘protect’ the installation against unauthorized access by
installer
All tags must have their ID numbers added to the XM3, meaning that they are
read and inserted into the internal memory of the XM3 before they can be
used. Once added, the tag number will be held in memory until it is voided
(erased).
Memory management of tag numbers may be performed by means of:
1. the XM3 Manage PC software (see the “XM3 Manage User Manual”
for further details).
2. so-called Masters (standard tags that have been “promoted” to
perform certain management functions).
3. by using a Remote Programmer (a separate self-contained
programming device with a built-in tag, capable of more advanced
management functions).
The internal memory of the XM3 can hold up to 5000 tag numbers in its most
simple configuration.
The maximum number of tag-ID’s that can be stored in the XM3’s memory is
dependent on the chosen file system configuration.
This total must include at least three Masters (typical one Program Master,
One Add Master and one Void Master) and possibly one or two Remote
Programmer(s) for advanced functions.
There is no maximum to the number of Masters and/or Remote
Programmers, other than the maximum capacity.

10 Manual XM3 Remote Programmer: Version 4.1
1.3 XM3 Stand-alone features
The XM3 Stand-alone has the following features:
•RS-485 Network Support
•Wiegand Interface
•Magstripe Interface
•Event Logging
•Keypad options (PIN code, Access code, Alarm code)
•User names (max 24 characters per name)
•Time Zones
•Unlock/Unlock
•Time based Anti pass back
•Support for remote programmers
•Support for master cards
1.4 XM3 Single Door
The XM3 can also be supplied as XM3 Single Door.
This XM3 Single Door contains most of the features mentioned above but
with the following limitations:
•Network address is fixed at 255
•No networking with multiple readers; one reader only
•Reads only 9-digit Cross Point card types
•No Event Logging
•No XM3 Manage Pro features
These limitations also affect some Remote Programmer functions. A remark
is placed in the function chapters for which these limitations apply.

Manual XM3 Remote Programmer: Version 4.1 11
1.5 XM3 Tag types
Table 1 shows the various tag types the XM3 can detect.
XM3 versions 13 digits 9 digits
EM only EM 4001 and EM 4102 Cross Point
EM + HID EM 4001 and EM 4102
HID Standard 26 bit (H10302)
HID Standard 34 bit (H10306)
HID Standard 37 bit (H10302/H10304)
HID Corporate 1000
Cross Point
EM + Mifare EM4001 and EM 4102
Mifare Standard
Cross Point
Table 1
Table 2 shows the various XM3 tag levels associated with the tag types.
Tag level Tag type
9 EM Marin H4201/H4001 (no facility code)
8 Mifare Standard (no facility code)
7 Undefined
6 Undefined
5 HID Standard 37 bit H10304
4 HID Standard 37 bit H10302
3 HID Corporate 1000 (no facility code)
2 HID Standard 34 bit H10306
1 HID Standard 26 bit H10302
0 Cross Point H4201
Table 2
12 Manual XM3 Remote Programmer: Version 4.1
2 Remote Programmer section
2.1 The Remote Programmer
A Remote Programmer allows a wider range of programming steps to be
performed on an XM3than Master tags do. The general technique for using
the Remote Programmer is similar to Program Masters, in that way too they
are recognized by the XM3when held within reading range of the XM3.
In fact, a Remote Programmer may be regarded as a Master that has a more
extensive repertoire and is equipped with a numeric keyboard.
When presented to the XM3, a unique code (also engraved as a number on
the outside) is transmitted, in a similar fashion as with normal tags or Master
tags. If the code is unknown to the XM3, the Remote Programmer is ignored.
This offers security against unauthorized attempts to obtain access or to
perform memory management operations. When a valid programmer is
presented to the XM3, it will switch itself to Program mode. All LEDs will turn
off, except for LED number 7, the ‘Program’ LED.
Figure 1 shows the remote Programmer.
Figure 1

Manual XM3 Remote Programmer: Version 4.1 13
2.2 Operating the Remote Programmer
The Remote Programmer is operated within reading range of the XM3, by
typing one or two digit numbers on the Remote Programmer keyboard, using
the Enter key for punctuation and the Backspace key for correcting
typing errors.
With option 10*4* on, LED 1 (yellow) is used to indicate that the Remote
Programmer is within reading range as is the case with a normal tag.
The Remote Programmer should be presented and held in a stable position,
where all LEDs on the XM3are visible, for example next to the reader.
While the XM3is in Program mode, it will sound a short beep at each
numeric key press. Pressing the Enter key will cause the XM3to execute the
chosen function, as determined by preceding numeric key presses, and to
display the resulting status with its LEDs.
In some cases where operation or programming caused an error, the system
can be bypassed, i.e. power off the system, hold the programmer (known or
unknown) in the field while powering on. The XM3 will go in Program mode.
Make sure that when doing this the cover of the XM3 has been removed.
A complete remote programming step is for example:
1. Activate Program Mode by placing and keeping the Remote
Programmer within reading range of the XM3.
2. Type the program numbers on the keyboard. Possible leading zero’s
can be omitted.
3. LED(s) light up to show the chosen function.
4. The chosen program is executed. A program may involve several
steps, each with key presses, LED readouts and/or presenting of
tags.
5. Once the Remote Programmer function is completed, the XM3
usually returns to normal operation.
If several different functions must be performed consecutively, the user can
leave the Remote Programmer within range and switch the XM3back to
Program mode by pressing the Enter or Backpsace key. Alternatively, the
Remote Programmer can be moved out of reading range and then back into
reading range to return to Program mode.

14 Manual XM3 Remote Programmer: Version 4.1
2.3 Operational level and Program number overview
For security reasons the XM3 has two operating modes:
1. Installer level
Full control over all program numbers (except a few user level
program numbers) allowing the installer to fully configure the XM3
during installation.
2. User level
Limited access to program numbers allowing the end-user to program
several user related settings after installation.
A Remote Programmer can be declared as either an Installer programmer or
a User programmer.
An Installer programmer has full control if the XM3 is in Installer mode and
limited control over User settings when the XM3 is in User mode.
A User programmer has full control over User related settings if the XM3 is in
User mode and has no control if the XM3 is in Installer mode.
Table 3 gives for every program number the actions that are allowed for each
type of remote programmer at each operational level. Refer to the table of
contents to find the page where the program numbers are explained in detail.
Program # Short description Installer
programmer
@
Installer
Level
Installer
programmer
@
User
Level
User
programmer
@
User
Level
Set User level
Sleep mode Yes Yes Yes
Set Installer level
Sleep mode Yes Yes No
Access Yes No Yes
Add tags by
number Yes No Yes
Toggle Night time
mode Yes Yes Yes
Manual XM3 Remote Programmer: Version 4.1 15
Add tags by
presentation Yes No Yes
Void tags by
presentation Yes Yes Yes
Set clock, date &
time Yes No Yes
Add special user
tags Yes No Yes
Add Night time only
tags Yes No Yes
Void tags by
number Yes Yes Yes
Set various User
options Yes Yes Yes
Set Open time Yes Yes Yes
Set Close time Yes Yes Yes
Add Night time
master Yes No Yes
Add Add Master Yes No Yes
Add Void Master Yes Yes Yes
Copy Remote
Programmer Yes Yes Yes
Set Inactivity time-
out Yes Yes Yes
Set PIN Keypad
related codes Yes No Yes
Set User level
Access code Yes No Yes
Set various Installer
options Yes No No

16 Manual XM3 Remote Programmer: Version 4.1
Set RS-485 poll
time Yes No No
Set Lock type Yes No No
Set Installer level
Access code Yes No No
Set various Tamper
related Installer
options
Yes No No
Set File System Yes No No
Switch to RS-485
mode Yes No No
Set XM3 address Yes No No
Add a Pin Keypad Yes No No
Set various Pin
Keypad options Yes No No
Set Event Log
mode Yes No No
Set Event Log
options Yes No No
Erase all event in
Event Log Yes No No
Set Anti-Passback
mode Yes No No
Set Anti-Passback
timer Yes No No
Set Time Zone
day/night markers Yes Yes Yes
Set Time Zone
week scheme Yes Yes Yes
Set Lock/Unlock
mode markers Yes Yes Yes

Manual XM3 Remote Programmer: Version 4.1 17
Set Lock/Unlock
week scheme Yes Yes Yes
Add Unlock master Yes No Yes
Re-enable users in
Anti-passback
mode
Yes Yes Yes
Switch Software
Configuration Yes Yes Yes
Show Operational
level Yes Yes Yes
Show Remote
Programmer level Yes Yes Yes
XM3 Reset Yes Yes Yes
Erase all tags from
level ‘nn’
downwards
Yes Yes Yes
Table 3
18 Manual XM3 Remote Programmer: Version 4.1
2.4 XM3 LED Indicators
The XM3 is provided with seven LEDs, which serve as status indicators.
Table 4 shows the LEDs and their function.
XM3 LEDs Function
LED 1 (yellow)
LED 2 (green)
LED 3 (red)
LED 4 (red)
LED 5 (red)
LED 6 (red)
LED 7 (red)
Read indicator
Access and Unlock mode
Closed mode
Night time mode
Add mode
Void mode
Program mode
Table 4
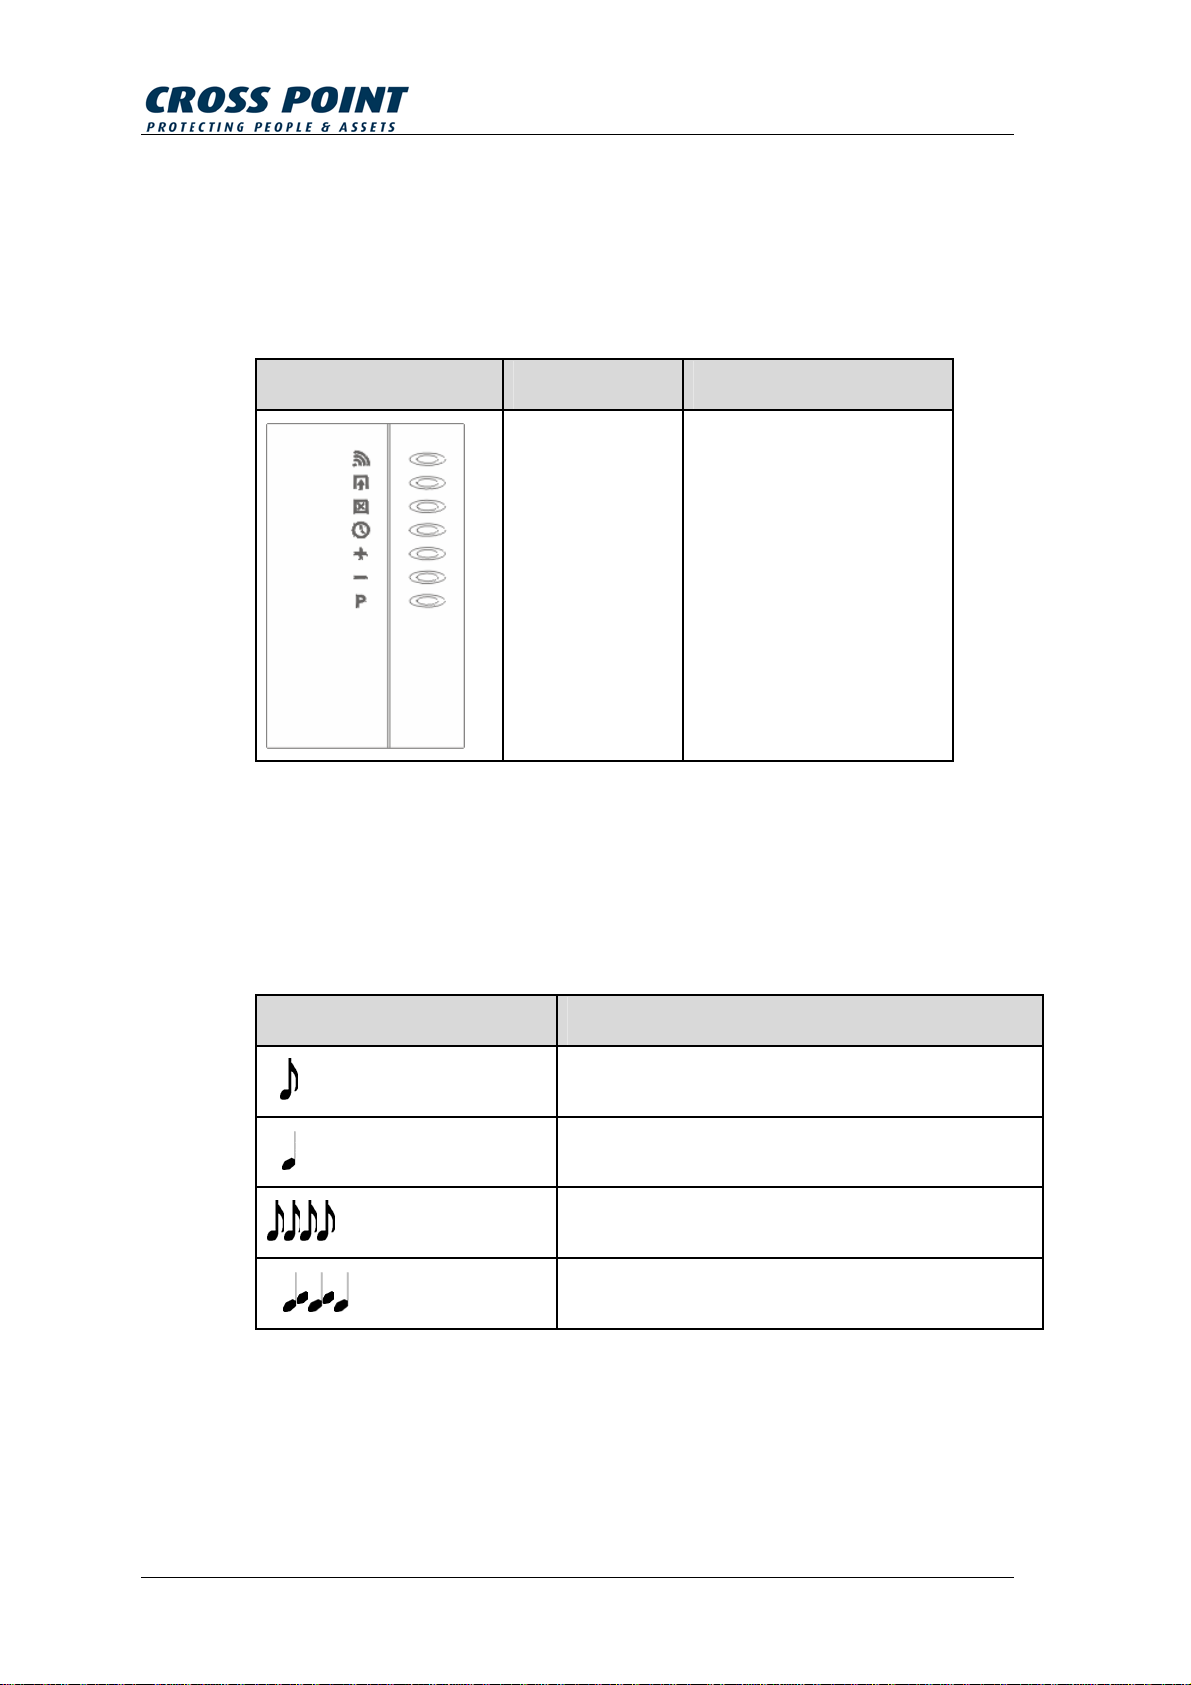
2.5 XM3 Sound Indicator
In addition to the LED display, the XM3 provides feedback by means of
sounds.
Table 5 shows an overview of the various sounds and their function.
Sound Function
Short beep A master tag or Remote Programmer is read
Long beep A tag is read
4 short beeps In case of error
Modulated In case of (tamper) alarm
Table 5

Manual XM3 Remote Programmer: Version 4.1 19
2.6 XM3 Sleep modes
As indicated before, the XM3 can be set to two different operational levels,
Installer level and User level.
The XM3 can also be set to sleep mode in these two levels (sometimes by
factory default. See Table 6 and Table 7 for instructions on how to wake the
XM3 up from the various sleep modes.
Installer level Sleep mode LEDs status
A Remote Programmer must be presented to wake the
XM3 up.
This Remote Programmer (if not yet known to the XM3)
will be declared a Installer Programmer.
After presenting the Remote Programmer the XM3 will
switch to Access mode.
Table 6
User level Sleep mode LEDs status
A Remote Programmer or tag must be presented to wake
the XM3 up.
The Remote Programmer (if not yet known to the XM3)
will be declared a User Programmer.
The tag (if not yet known to the XM3) will be declared as
a Program Master.
After presenting the Remote Programmer or the tag the
XM3 will switch to Access mode.
Table 7

20 Manual XM3 Remote Programmer: Version 4.1
2.7 Tag Level Overview
The XM3 distinguishes 12 different tag levels, with level 11 being the highest
and level 0 the lowest level.
Tag levels are used to assign specific functionality to a tag.
Table 8 shows the various tag levels.
Tag level Tag type
11 Installer Programmer
10 User Programmer, Program Master
9 Void Master
8 Add Master
7 Night time Master
6 PIN keypad
5 Lock/Unlock Master
4 Undefined
3 Undefined
2 Night time only tags
1 24 hours tags (special users)
0 Day time only tags (normal users)
Table 8
Other manuals for XM3 MICROPROXS
1
Table of contents
Popular Motherboard manuals by other brands

First International Computer
First International Computer XTB70 Schematics

V-tech
V-tech 202ca user manual

Global American Inc.
Global American Inc. 3307940 user manual

PEmicro
PEmicro Cyclone Series Developer's manual

Global American Inc.
Global American Inc. 3307810 user manual

Global American Inc.
Global American Inc. 3303788 user manual


