Crosstour P600 User manual

User Manual
Video Projector
P600


Thank you for purchasing product from Crosstour. Please read and follow this user manual
carefully and keep it in a safe place for future reference.
Crosstour consistently attaches great importance to product quality and high customer
satisfaction. We sincerely hope you can make a few suggestions during your use to help us
improve our products. Your precious suggestions will help us shape our business to perfectly fit
your standards. We'll soon introduce series of new products for our valued customers, please
share this with your friends.
Just let us know if you encounter any problem during your use. Our support team will provide
you our best solution without any delay. And all items purchased from Crosstour are covered by
1 year warranty.
You can find our contact information below:
support@crosstour.co
Look forward to bringing you more great products in the future.
Kind regards,
Crosstour Support Team
Contents
1
22
43
64
85
21
42
63
84
105

1
Important Safety Instructions
1. Read these Instructions.
2. Keep these Instructions.
3. Heed all Warnings.
4. Follow all instructions.
5. Do not use this apparatus near water.
6. Clean only with a dry cloth.
7. Do not block any ventilation openings. Install in accordance with the manufacturer’ s instruc-
tions.
8. Do not install near any heat sources such as radiators, heat registers, stoves, or other appa-
ratus (including amplifier) that product heat.
9. Protect the power cord from being walked on or pinched particularly at plugs or convenience
receptacles, and the point where they exit from the apparatus.
10. Only use attachments/accessories specified by the manufacturer.
11. Unplug this apparatus during lightning storms or when unused for long periods of time.
12. Refer all servicing to qualified service personnel. Servicing is required when the apparatus
has been damaged in any way, such as power-supply cord or plug is damaged, liquid has been
spilled or objects have fallen into the apparatus, the apparatus has been exposed to rain or
moisture, does not operate normally, or has been dropped.

2
Additional Warnings and Precautions
1. Do not look directly into the projector light.
2. Don’t touch the project lens
3. Objects filled with liquids, such as vases, shall not be placed on the apparatus.
4. Caution and marking information is located at the rear or bottom of the apparatus.
5. CAUTION: Use of controls or adjustments or performance of procedures other than those
specified may result in hazardous radiation exposure.
6. WARNING: Changes or modified to this unit not expressly approved by the party responsible
for compliance could void the user’s authority to operate the equipment.
7. WARNING: Use of this unit near fluorescent lighting may cause interference regarding use of
the remote. If the unit is displaying erratic behavior move away from any fluorescent lighting, as
it may be the cause.
8. WARNING: Shock hazard - Do Not Open.
9. WARNING: To reduce the risk of fire or electric shock, do not expose this apparatus to rain,
moisture, dripping, or splashing.

3
In The Box
Main unit
User Manual
User Manual
Video Projector
P600
Lens Cover
RECALL
7
PQRS
4
GHI
1/@ 2
ABC
5
JKL
8
TUV
3
DEF
6
MNO
9
WXYZ
FAV0
EXITMENU
SOURCE
OK
VOL- VOL+ FLIP
ZOOM
Remote
HDMI CableAV Cable
AC Power Adapter

4
Remove & Close the Lens Cover
Placing Your Projector
To Reduce Image Distortion
Distance Between The Projector And Screen
Placing Your Projector On Ceiling
Adjust The Vertical Location
Adjust The Focus and Keystone
Controls Of Remote
Install / Remove Battery Of Remote
Controls of Projector
Connecting AC Power Adapter
Main Operation
Connect HDMI Cable to Show The Image On Projector Screen
Connect AV Cable to Show The Image On Projector Screen
Connect VGA Cable to Show The Image On Projector Screen
Connect Audio Output ( Aux Out / Line Out / Earphones)
Install USB Device And Micro Sd Card “TF”
Using TF Card And USB Playback (Media Player)
Using Projector Menu 1.0
Using Projector Menu 2.0
Using Projector Menu 3.0
Using Projector Menu 4.0
Specifications
Table of Contents
5
5
6
7
7
8
8
9
9
10
11
11
12
12
13
15
15
16
17
18
19
20
21
5
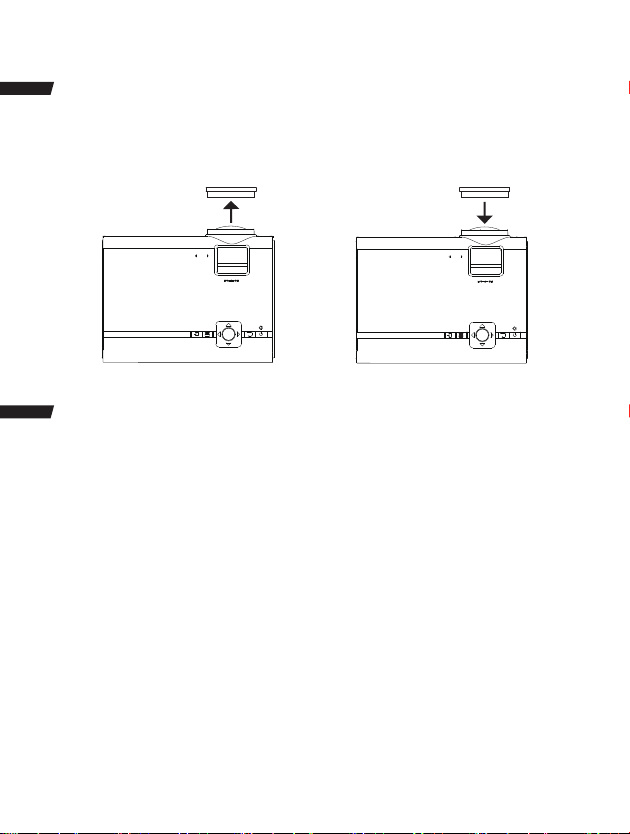
Remove & Close The Lens Cover
Remove the lens cover before using Close the lens cover when unit not using
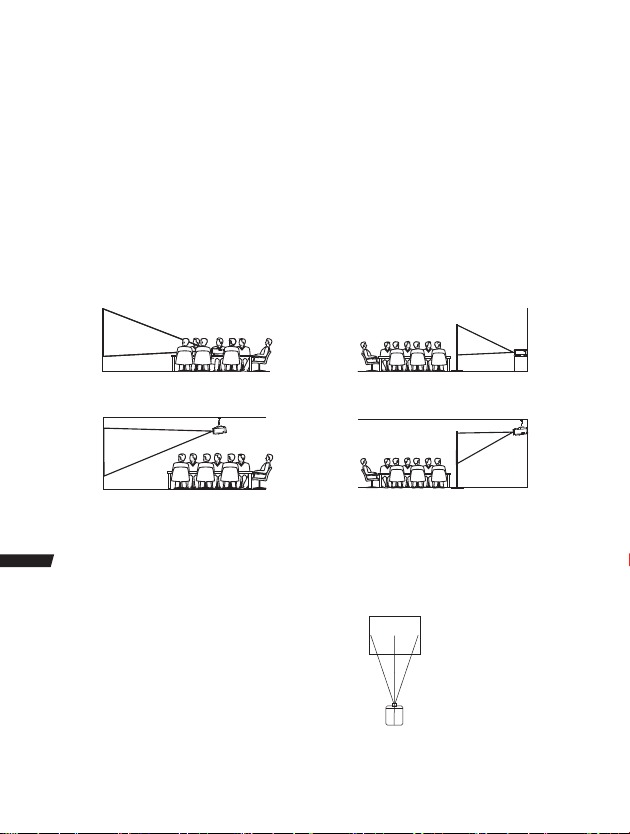
Placing Your Projector
Your projector can be installed in four different configurations ( see picture below):
Front Table:
Select this location with the projector placed near the floor in front of the screen. This is the most
common way to position the projector for quick setup and portability.
Front Ceiling:
Select this location with the projector suspended upside-down from the ceiling in front of the
screen.
NOTE: A projector mount is required to install the projector in a ceiling.
LENS COVER
REMOVE
KEYSTONE
FOCUS
OK
LENS COVER
CLOSE
KEYSTONE
FOCUS
OK
6
Rear Table:
Select this location with the projector placed near the floor behind the screen.
NOTE: That a special rear projection screen is required.
Rear Ceiling:
Select this location with the projector suspended upside-down from the ceiling behind the
screen.
NOTE:
A projector mount is required to install the projector in a ceiling.
A special rear projection screen is required.
Rear Table
Rear Ceiling
Front Table
Front Ceiling
To Reduce Image Distortion
It is recommended to move the projector
as close to center of screen.
Screen
Projector
Square/Rectangle

7
Distance Between The Projector And Screen
Measure the distance between the projector and where you want to position the screen. This is
the ojection distance.
72
"
60
"
50
"
45
"
37
"
THE CENTER
OF LENS
SCREEN
Placing Your Projector On Ceiling
1. When installing the projector in the ceiling, please purchase a projector mount recommended
by an installation professional and follow the instructions that come with the mount.
2. Before installing the projector in the ceiling, please check to make sure the ceiling structure
can support the weight of the projector and the mount. If in doubt, please ask the advice from an
installation professional.
NOTE: Projector mount and screw(s) not included
CEILING HANGER
FIXED HANGER HOLE
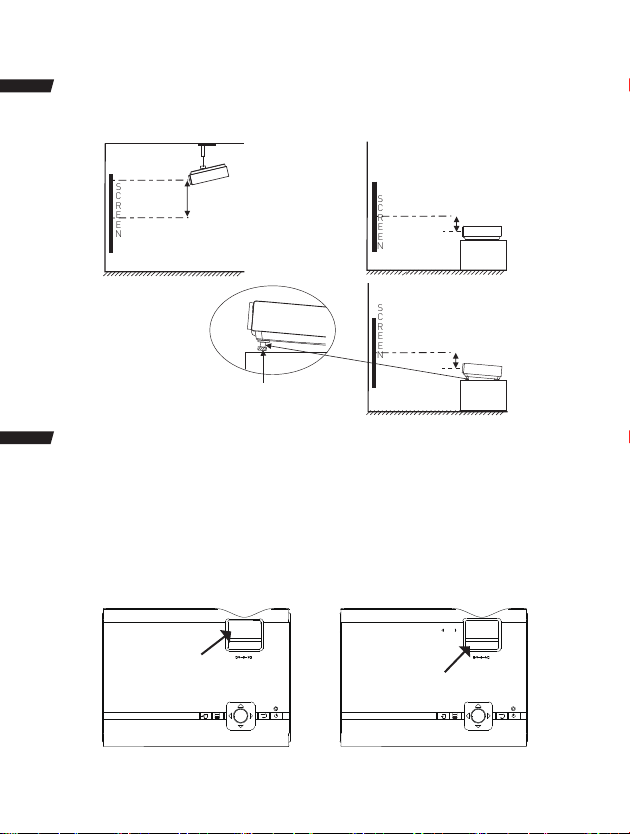
8
Adjust The Vertical Location
Follow below picture to adjust the vertical location.
SCREEN
PROJECTOR
VERTICAL
DIMENSION
SCREEN
PROJECTOR
VERTICAL
DIMENSION
SCREEN PROJECTOR
VERTICAL
DIMENSION
Adjust this knob(Angle adjustment knob)
to fine-tune display angle to higher.
Adjust The Focus And Keystone
Follow below picture to adjust the focus and trapezoidal screen.
1. Adjust the focus by turning the knob while observing the image pixels near the center of the
screen. Optimal focus is obtained when the pixels are clearly visible. Depending on the projected
screen size, the focus near the screen edges may be less sharp than the screen center.
2. Keystone image is created when the projector beam is projected to the screen in an angle.
Keystone correction will restore the distorted image to a rectangular or square shape.
Angle adjustment knob KEYSTONE
①
OK
Trapezoidal adjustment
knob
KEYSTONE
FOCUS
②
OK
9
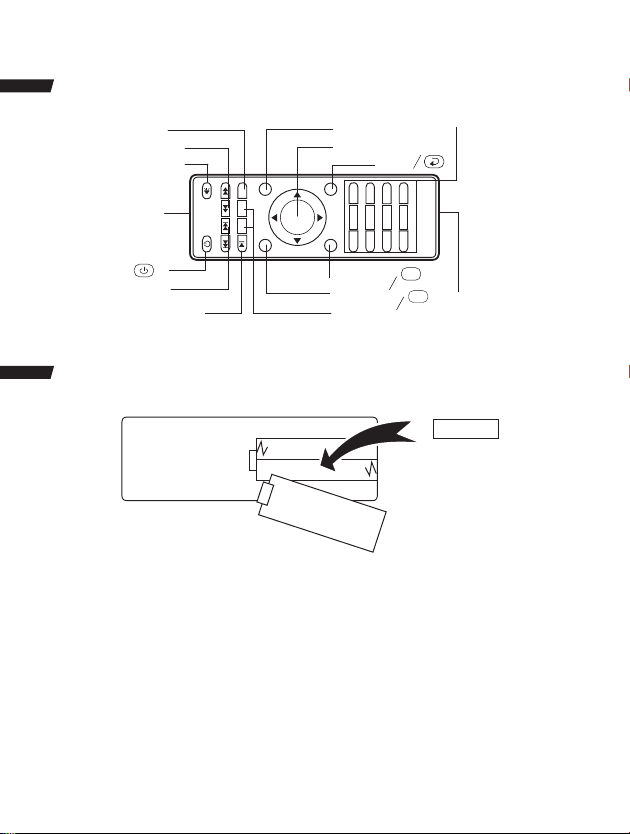
Controls Of Remote
Install / Remove Battery Of Remote
AAA / UM4
BATTERY DOOR
Remove the battery compartment cover on the back of your remote by carefully sliding to open.
The battery cover can then be lifted away. Fit the correct batteries (not included), referring to the
polarity markings. Finally, replace the cover.
NOTES:
• Batteries shall not be exposed to excessive heat such as sunshine, fire
• Be sure that the batteries are installed polarity correctly.
• Do not mix old and new batteries.
• Only same or equivalent type batteries as recommend are to be used.
• Do not dispose of batteries in fire, battery may explode or leak. Do not try to recharge a battery
PLAY/PAUSE
SKIP
IR
MUTE
SEARCH
FLIP ZOOM
NETVIGATOR
EXIT
OPTIONALBATTERY
COMPARTMENT
VOLUME
SOURCE
MENU
POWER/
RECALL
7
PQRS
4
GHI
1/@ 2
ABC
5
JKL
8
TUV
3
DEF
6
MNO
9
WXYZ
FAV0
EXITMENU
SOURCE
OK
VOL- VOL+ FLIP
ZOOM
M
S

10
Controls Of Projector
Power button
Return button
Netvigator buttons
Menu button
Source S button
TRAPEZOIDAL Adjustment Knob
FOCUS Adjustment Knob
LENS
EAR PHONE Jack
AV OUT Jack
M
①
②
③
④
⑤
⑥
⑦
⑧
⑨
⑩
TF Card Slot ( Micro SD Card )
HDMI Port 1
HDMI Port 2
USB Port
VGA Port
Power Indicator
IR Window ( Rear Side)
IR Window ( Front Side)
Angle Adjustment Knob
⑪
⑫
⑬
⑭
⑮
⑯
⑰
⑱
⑲
OK
⑱⑲
⑮⑰
VGA
⑨ ⑩ ⑪ ⑫ ⑬ ⑭
HDMI1 HDMI2
USB
AV
TF
① ② ③ ④ ⑤
⑥
⑦
⑧
⑯
KEYSTONE
FOCUS
OK
11
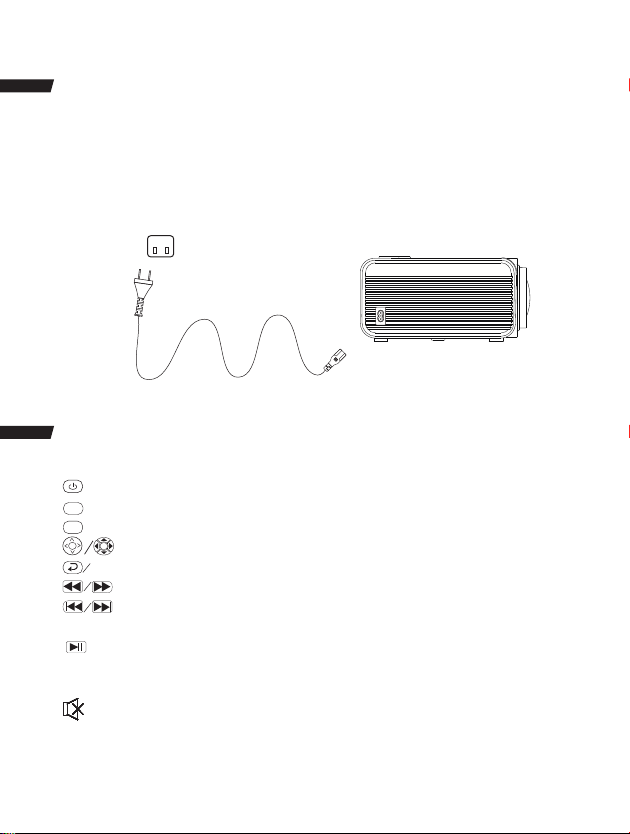
Connecting AC Power Adapter
Please refer to the following instructions to connect the AC adapter to the projector.
Step 1
Connect the DC plug to the DC IN terminal on the projector.
Step 2
Connect the AC adapter to an AC outlet.
Main Operation
- Press the button to turn on unit, press again to turn off.
-SOURCE - Press the button to select input source.
-MENU - Press the button to enter projector menu.
-Press the buttons to select screen item of projector menu.
EXIT - Press the button to exit the projector menu.
-Press the buttons to fast search forward and rewind on USB / TF.
-Press the buttons to search next or previous file on USB / TF.
VOL+ / VOL - Press the buttons to select correct sound.
- Press the button to play/pause the connected USB / TF card.
FLIP – Press the button to rotate / mirror projector screen
ZOOM - Press the button to select image scale.
-Press this button to mute the projector's audio sound. Press again to resume
audio.
S
M
OK
OK
①
②
12
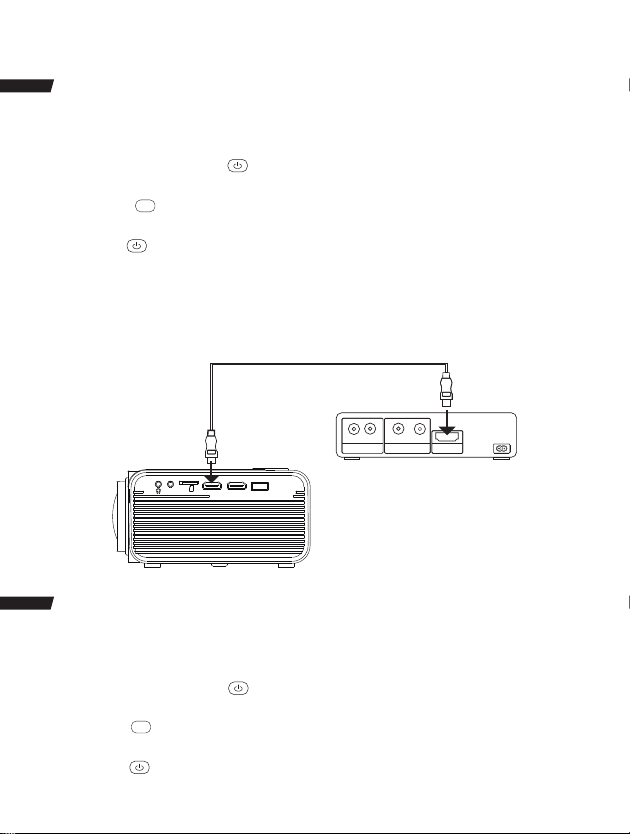
Connect HDMI Cable to Show The Image On Projector Screen
Follow the below picture to connect HDMI cable and device.
1. Turn off the unit before connecting HDMI cable.
2. After connecting, press the power button to turn on unit and power indicator will light
GREEN
3. Press the /SOURCE button to HDMI mode and the video of HDMI device will show on
projector screen.
4. Press the power button to turn off unit.
HDMI HD Signal Input : this interface can be input with HD player.
NOTE: In rare cases, if the projector’s speaker has no sound when playing a DVD movie in a player
connecting to the HDMI input, please check the player’s digital audio settings and make sure it is
set to “Auto” mode or “PCM”Mode.
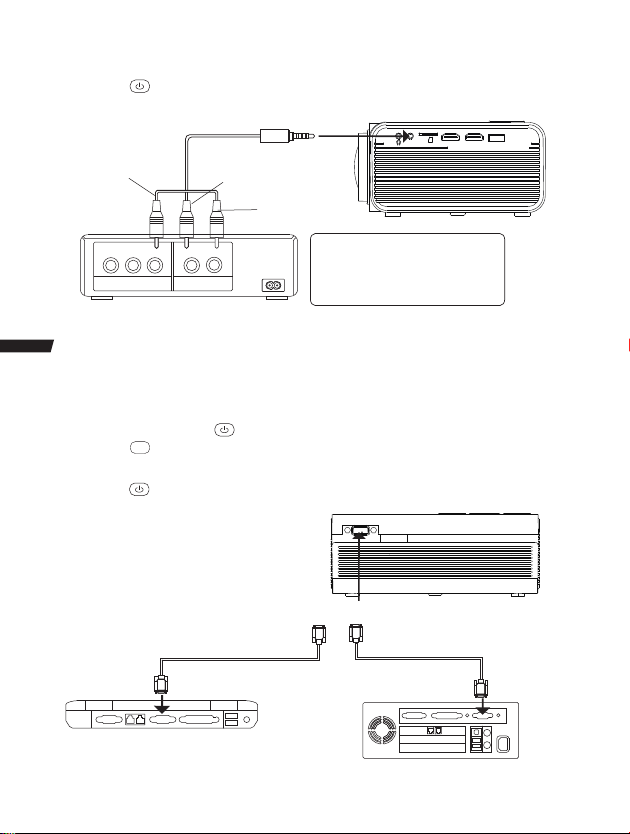
Connect AV Cable to Show The Image On Projector Screen
Follow below picture to connect AV cable and device.
1. Turn off the unit before connecting AV cable.
2. After connecting, press the power button to turn on unit and power indicator will light
GREEN
3. Press the / SOURCE button to AV mode and the video of AV device will show on projector
Screen.
4. Press the power button to turn off unit power.
S
S
Video Player
AUDIO OUT VIDEO OUT HDMI OUT
S-VIDEO
VIDEO
L R
HDMI1 HDMI2
USB
AV
TF
13
5. Press the button to turn off unit power.
Connect VGA Cable to Show The Image On Projector Screen
Follow below picture to connect VGA cable and device.
1. Turn off the unit before connecting VGA cable.
2. After connecting, press the power button to turn on unit and power indicator will light GREEN
3. Press the / SOURCE button to VGA mode and the video of VGA device will show on projector
screen.
4. Press the power button to turn off unit.
AUDIO OUTVIDEO OUT
L R
VIDEO CABLE LEFT CHANNEL
RIGHT CHANNEL
VIDEO PLAYER
VIDEO CABLE : YELLOW
AUDIO LEFT CHANNEL : WHITE
AUDIO RIGHT CHANNEL : RED
To VGA PORT
COMPUTER CABLE
NOTE BOOK DESK TOP
C OMPUTER CABLE
CABLE NOT INCLUDE
S
HDMI1 HDMI2
USB
AV
TF

14
Type Resolution Frequency Field Frequency
VGA
60
70
72
75
50
56
60
70
72
75
50
60
70
31.5
34.7
37.9
37.5
31.4
35.1
37.9
46.6
48.1
46.9
40.3
48.4
56.5
SVGA
640x480
800x600
1024x768XGA
PC
Please refer to the following table to adjust the output signal from computer
15
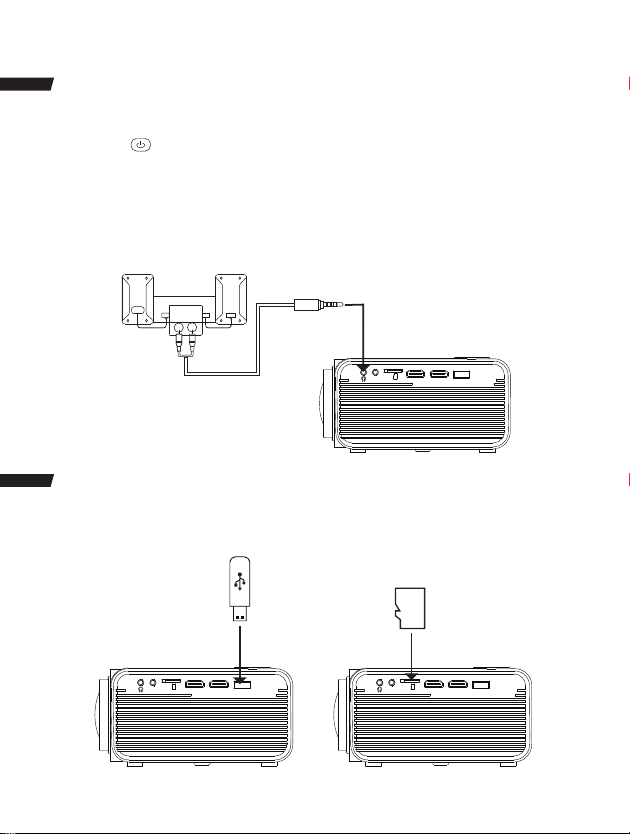
Connect Audio Output ( Aux Out / Line Out / Earphones)
Follow below picture to connect audio cable and device.
1. Press the power button to turn off power of your projector before connection.
2. Use audio cable to connect follow below figure.
3. After connecting and turning on both units, your projector sound passes through external
device now.
4. After using , turn off both units.
Install USB Device And Micro Sd Card “TF”
Follow below picture to install USB and TF card
Turn off the unit before install USB / TF card.
TF
Station Amplifier
AUDIO CABLE
AUDIO IN
L R
CABLE NOT INCLUDE
HDMI1 HDMI2
USB
AV
TF
HDMI1 HDMI2
USB
AV
TF HDMI1 HDMI2
USB
AV
TF
16
Using TF Card And USB Playback (Media Player)
Install USB / TF device:
1. Turn off the unit before install USB / TF card.
2. Install the USB device into USB port.
3. After connecting, press the power button to turn on unit and the power indicator light GREEN.
4. Press the / SOURCE button to enter and use button to search the MEDIAPLAYER mode.
5. After selection, use button to search the MUSIC / PHOTO / MOVIE icon and press the
button to enter. If necessary, use the button to select TF card or USB and press the button to
enter.
6. Use buttons to search the correct file and press the button to preview playback file and
press the button of unit or button of remote to start playback.
7. Press button to fast search forward and rewind.
8. Press button to search next or previous file.
9. During playback, press the button to pause and press again to restart.
NOTE: Remove USB / TF device, press the button to turn off power FIRST.
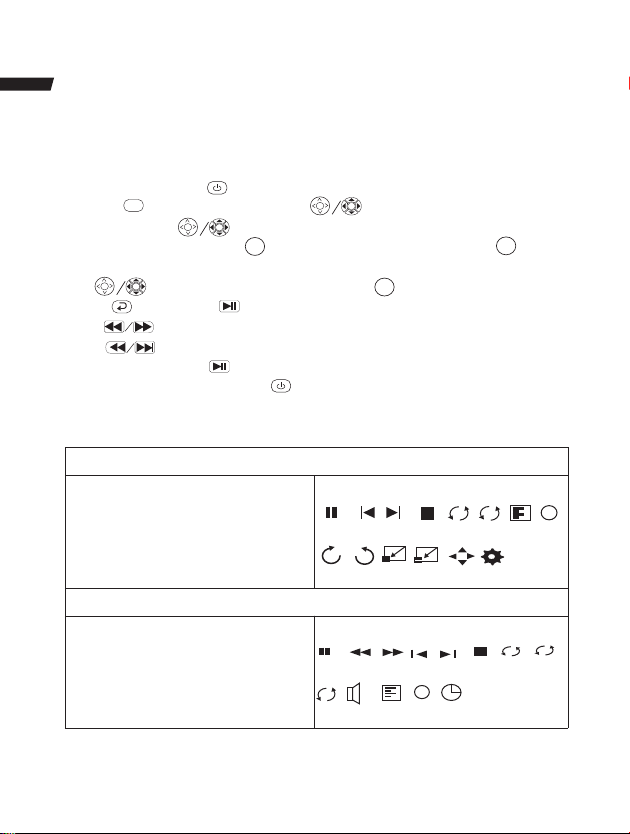
Sub-Menu on Photo screen
1. When photo playback, press the
button and more function screen show
on lower (figure 1).
2. Use the button to selecticon and press
the button to play special function.
Sub-Menu on Music screen
3. When music playback, press the
button and more function screen show
on lower (figure 2 ).
4. Use the button to select icon and press
the button to play special function.
Pause Prev. Next Stop Re... Ra... PL...
Rotate Rotate Zo... Zo... Sli...M
Figure 1
Ai
+
Info
Figure 2
A
AB
i
Pause FB FF Prev. Next Stop Re.... Set A
Ra... MUTE PL... Info Go..
OK
S
OK
OK
OK
OK
OK
OK
OK
OK
Other manuals for P600
1
Table of contents
Languages:
Other Crosstour Projector manuals


